This article is about how to build deck stair railings. In this project we show you how to choose the proper materials and tools for building deck stair railings, as without a good diy step by step guide it would be a complex task for any unexperienced home owner. Nevertheless, if you pay attention to all our tips and techniques that we use throughout the project, you will be able to get the job done in a professional manner.
Before building deck stair railings, you have to learn how to attach deck posts, otherwise you won’t be able to install the bottom rail, hand rail and balusters for your deck stairs. After you have built and installed the deck stairs, you have to attach the stair railings as to make it practical and give it a nice appearance. See all my Premium Plans in the Shop.
Made from this plan
In order to build stair railings, you need the following:
Materials
- 4×3 lumber – RAILS
- 2×3 lumber – X-SHAPED BALUSTERS
- 6-8” screws – WOOD SCREWS FOR RAILS
- 3” screws – WOOD SCREWS FOR BALUSTERS
- Primer, Stain
Tools
- Level, carpentry pencil, l-square, tape measure
- Rubber hammer, hammer, C-clamps
- Circular saw / jigsaw, miter saw
- Drill machinery and bits
- Electric screwdriver with torque control
Tips
- Read safety and disclaimer pages
- Select with great care the lumber, otherwise the railings would look bad
- Before fastening the posts, make sure they are plumb
- Pre-drill holes in the components, to prevent wood from splitting
Related
- Episode 1: Deck Plans
- Episode 2: Anchor Deck Posts
- Episode 3: Building Deck Railings
- Episode 4: Deck Stair Railings
Building deck stair bottom rail

Preparing to install deck stair railings
Before building and installing deck stair railings, we have to attach the deck posts on the deck surface. Consequently, according to the structure of your deck you can either anchor the posts on the floor using post anchors, or you can fasten them to the deck joists using lag screws.

Marking the top edge of the stair bottom rail
Next, we have to mark on the deck posts the line where we will install the bottom rail. However, we have to make sure the bottom rail of the deck stairs is aligned with the mail deck bottom rail.
Consequently, we have to use an l-square to mark on the deck post the top edge of the bottom rail. Pay attention to this operation if you want a neat look for your diy deck stair railings project.

Aligning the deck bottom rail
Next, we have to continue the mark on the next face of the deck post, as to be able to install properly the bottom rail. Use an l-square and a carpentry pencil, to be able to erase the mark after the installation of the stair railings.

Measuring the height of the bottom deck rail
After we have marked the guidance line, we have to measure the distance from the post anchor / floor surface, as to be able to transpose it to the other post of the deck stair railing.

Marking on deck post the top edge of the bottom rail
With the previous distance in mind, mark a line on the lower stair post in the same way you have done before. This line will also represent the top edge of the bottom rail. In this way, the deck stair railings will be symmetric and have a nice look.

Marking the cut lines on the bottom railing
Next, we have to position the 4×3 lumber over the two guidance lines we have drawn on the deck stair posts. Remember that the top of the lumber has to be aligned with the lines on each post.
After you have set the lumber in the proper position, you can either ask another person to mark the cut lines by using a pencil, or you can fix them firmly with two C-clamps and then mark them by yourself.

Cut lines on the bottom rail
In this image you can see the marks on the 3×4 lumber. The cut lines have to be parallel, so if you notice that something is wrong, you have to redo the previous step, in order to build the stair railings in a professional manner.
In order to make precision cuts, you have to use a miter saw. Although it is an expensive power tool, we recommend you to buy or rent one, as it is the right tool for this job. You could try cutting the bottom rail with a circular saw, but you will have to make, in most cases, two cuts, one on each side of the bottom rail.
For building the deck stair railings, we use common pressure treated lumber and we also recommend you to make the same choice, as it looks very good and it is very durable.

Fastening stair bottom rail with wood screws
Next, we have to fasten the bottom rail to the deck stair posts. In order to be able to do this, we have used a good drill machinery and a sharp drill bit. Therefore, we have to make pilot holes in the deck posts before installing the 6-8” wood screws.

Countersinking the heads of the screws
For a neat look we recommend you to countersink the head of the screws, using a countersink bit. Countersink bits are quite cheap, come in many forms and types, and make a significant difference when they are used properly.

Countersunk screw hole
After we have countersunk the heads of the wood screws, we obtained the result you can see in the image. Do not countersink too deep in the wooden post, just go 1/2” in the wood posts.

Installing bottom rail
Next, in order to finish installing the bottom rail, we have to fasten it to the deck posts with two wood screws. The screws have to be at least 6-8”, as to be able to fix the bottom rail firmly. In order to get the job done in a professional manner, you have to use two wood screws and an electric screwdriver with torque control.
Installing deck stair handrail

Drilling hole in deck post to fasten handrail
After we have finished installing the bottom rail, we have to continue the project by installing the handrail. Consequently, we have to cut another piece of 3×4 lumber, with the same dimensions as the bottom rail. In addition, we have to align the top of the deck stair handrail with the top of the platform handrail.

Fastening handrail with screws
The next step of our project is to drive in the wood screws, using the same electric screwdriver. In addition, we also countersunk the holes, as to mask the heads of the wood screws.

Building deck stair railing
After we have built and installed the deck stair railings, we got the result it can be seen in the image. You should be able to notice that the two railings are parallel one with other, and in addition have the same slope as the stairs.
After you have installed the bottom rail and the handrail, you should also use a level to check if the deck post are still plumb. There are cases in which, due to poor installation, after you fix the railings, the posts could be slightly moved from the right position.
Installing deck stair railings

Marking cut lines on deck stair balusters
After we have installed the deck stair railings, it is time to build and install the balusters. Consequently, you have to choose the design of your balusters before starting the project. In our case we have to build x-shaped balusters, as to fit with the rest of the house design, but you can adjust the designs, to fit your needs and tastes.

Cutting deck balusters with miter saw
Next we have to cut the balusters using a miter saw. In most of the cases, you can also cut the balusters with a regular circular saw or jig saw, but the most precise cut can be made with a miter saw.

Building deck stair balusters
Install the first deck stair railing using an electric screwdriver and 3” wood screws. At first, you should use the electric screwdriver at low speeds, and as the screw enters in the wood, you have to increase the speed.

Installing deck stair balusters
Installing railings at the bottom of the deck railing could prove to be a difficult task, as that place is inaccessible in most of the cases, due to the low angle. Consequently, the only way to fix the baluster is to drill a hole holding the drill machinery diagonally.

Building Deck railings
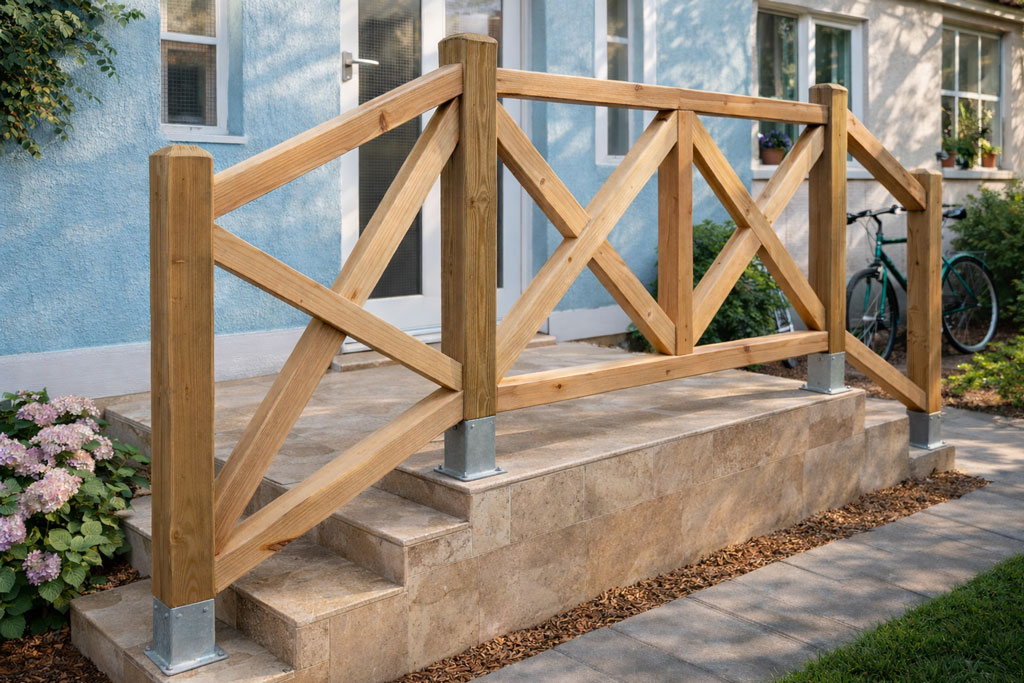
After we have finished installing the balusters, our deck stair railings look as you can see in the image. The X shaped balusters might not be up to all codes, so make sure you read your local one and make the needed adjustments. Check the full Concrete Deck Series.
Thank you for reading our project on how to build deck stair railings and we recommend you to check out the rest of our articles. Feel free to LIKE and SHARE our project, by using the social media widgets. SUBSCRIBE to be the first that gets our latest projects.