This article is about decking patterns. We show you many decking design ideas, as to build a deck close to the ideal one you have in mind. In this article we illustrate many decking patterns, starting with the most common up to several which are both complex and spectacular. Nevertheless, before deciding the decking pattern you will use, you must be awate of certain implication each type would generate: regarding the total cost, the complexity and the appearance.
First of all, you have to choose the decking boards dimensions and material. On the market, the decking boards come in many different dimensions starting with the 5/4 x 6 up to 2×4 and 2×6. In addition, you can also find 2×8 or even wider boards, but generally the wider the board the greater the possibility of cracking. Therefore, you should choose a conventional dimension, making sure that all boards are in perfect condition (do not use twisted or cracked boards).
Make sure you buy quality decking, which has been treated against excessive moisture or heat. Consequently, you could choose affordable Douglas fir or more expensive redwood or cedar decking (these are more resistant and have a better finish). Nevertheless, you should be aware that all wooden decking need regular maintenance (every 2-3 years), otherwise they will get a dull appearance. If you want to stay away from this drawbacks and you like a modern finish, the only option is to go for composite decking.
Although it looks amazing, a parquet decking or basket wave pattern require a more complex frame. Consequently, you need to install more joists, which will raise the total costs of your decking, but on the other hand will add personality and character to your yard.
Remember that the space between the decking supports vary with the decking dimensions, material and pattern. Consequently, if you install perpendicular 2×4 Douglas fir decking, the span should be 24”. If you install the same decking, buy this time diagonally, the distance between the joists should be 16”. In addition, 2×4 redwood or cedar should be supported by joists placed at 16”. Last but not least, the span between the frame joist should be 24”, you you install perpendicular 2×6 redwood or cedar. Nevertheless, check local requirement before starting the project, just to be sure.
Made from this plan
In order to use these decking patterns, you need the following:
Materials
- 2×4 or 2×6 decking
- Wooden deck screws
Tools
- Safety gloves, glasses
- Circular saw to cut the wooden boards
- Spirit level, carpentry pencil, corner square
- Drill machinery and wood drill bits, to make pilot holes
- Electric screwdriver to fasten screws
Tips
- Use chalk line to draw the cut line
- Drive the nails about 1” from each edge, as to avoid splitting the wood
- For a neat look, insert the nails or screws evenly
Time
- One weekend
My best tips on decking patters:
When building or updating a deck, the pattern of the decking boards can make a huge difference in both appearance and functionality. From simple designs to more intricate patterns, the right layout can enhance the look of your outdoor space and improve its durability. Here are my best tips for choosing and installing decking patterns.
1. Consider Your Deck’s Shape and Size
Before choosing a pattern, take the shape and size of your deck into account:
- Large decks: For bigger spaces, more intricate patterns like herringbone or diagonal layouts can add interest and break up the expanse of the surface.
- Small decks: In smaller spaces, simpler patterns such as parallel or single diagonal can make the area feel larger and more open.
- Irregularly shaped decks: If your deck has unique angles or features like a hot tub or built-in seating, a custom pattern can help frame these features.
Choose a pattern that complements the overall shape of your deck and enhances its visual appeal.
2. Parallel or Straight Patterns
The most common and easiest pattern to install is the parallel pattern:
- Horizontal layout: The decking boards are laid straight across the deck from side to side, creating a clean, classic look.
- Vertical layout: For a slight variation, you can install the boards vertically, running from the house outward. This can make a deck feel longer or taller.
- Cost-effective: Parallel layouts use fewer cuts and generate less waste, making them the most cost-efficient option.
This simple, straightforward design is perfect for DIYers or those who want a timeless look with minimal complexity.
3. Diagonal Decking
A diagonal pattern is a step up in both style and difficulty:
- 45-degree angle: The boards are installed diagonally across the deck, typically at a 45-degree angle to the house.
- Stability: This pattern not only looks great but also increases the structural stability of the deck by helping to distribute weight more evenly.
- Visual interest: Diagonal patterns can make a deck feel more dynamic and visually appealing, especially in large or open areas.
Keep in mind that diagonal decking may require more cuts and material, increasing both time and cost.
4. Herringbone or Chevron Pattern
For a more decorative touch, consider a herringbone or chevron pattern:
- Herringbone: In this design, the boards are laid in a zigzag pattern where the ends meet at a 90-degree angle. It creates a striking, symmetrical look.
- Chevron: Similar to herringbone, but the ends are cut at 45-degree angles to form a continuous “V” shape. It has a slightly more streamlined, modern appearance.
These patterns are perfect for adding a focal point to larger decks or framing specific areas like seating zones or fire pits. However, they require precise cuts and can generate more waste.
5. Picture Frame Pattern
The picture frame pattern adds a polished, finished look to any deck:
- Framing boards: In this design, a frame of boards surrounds the perimeter of the deck, enclosing the main deck boards inside. This is often done with a contrasting color or wood grain to highlight the border.
- Great for transitions: A picture frame can help define spaces and create a seamless transition between different sections of the deck, such as stairs or built-in seating areas.
- Protects the ends: It also protects the ends of the decking boards, reducing potential warping or splitting over time.
This pattern is ideal for adding a finished edge to your deck and can be combined with other designs like parallel or diagonal patterns.
6. Basketweave Pattern
A basketweave pattern creates a bold, geometric look using square sections:
- Alternating squares: In this design, boards are laid out in squares with alternating directions, creating a woven appearance. The pattern is more noticeable when using boards of different shades.
- Interesting texture: The alternating directions of the boards create texture and depth, making this pattern a great option for smaller, more intimate decks.
- Efficient use of materials: This pattern often uses shorter board lengths, which can help minimize waste.
The basketweave pattern is a bit more complex and time-consuming to install but offers a unique and visually interesting look.
7. Mixed Patterns
For those who want to get creative, mixing different patterns within the same deck can create a striking, custom look:
- Combination of patterns: Try using a parallel pattern in the main area of the deck and framing it with a picture frame border. You can also add a herringbone section in the center for a focal point.
- Define zones: Mixed patterns are ideal for defining different areas on a large deck, such as creating distinct spaces for dining, lounging, and entertaining.
When mixing patterns, be mindful of how they flow together to create a cohesive look.
8. Choose the Right Fasteners
No matter what pattern you choose, using the right fasteners is crucial for a clean, professional-looking deck:
- Hidden fasteners: For a seamless look, use hidden fasteners that are concealed beneath the boards, leaving no visible screws or nails on the surface.
- Face screws: If you prefer using face screws, make sure they’re stainless steel or coated for outdoor use to prevent rust. Be consistent with spacing for a neat appearance.
- Pre-drill: Always pre-drill your boards, especially with harder woods, to prevent splitting when inserting screws.
Fastener choice can affect the longevity and appearance of your deck, so choose carefully based on the material and pattern you’re working with.
9. Consider Maintenance
Some patterns may require more maintenance than others, especially when it comes to cleaning and refinishing:
- Simple patterns like parallel or diagonal layouts are easier to clean and refinish because of the uniformity.
- Complex patterns like herringbone or basketweave may have more edges and joints that require extra attention when sealing or refinishing.
Choose a pattern that aligns with your ability and willingness to maintain it over time.
Bonus Tip: Use Contrasting Colors for Visual Impact For added visual interest, consider using contrasting wood tones or stain colors for different sections of the deck. A darker color for the frame and a lighter shade for the interior can make the pattern stand out and give the deck a more custom, high-end look.
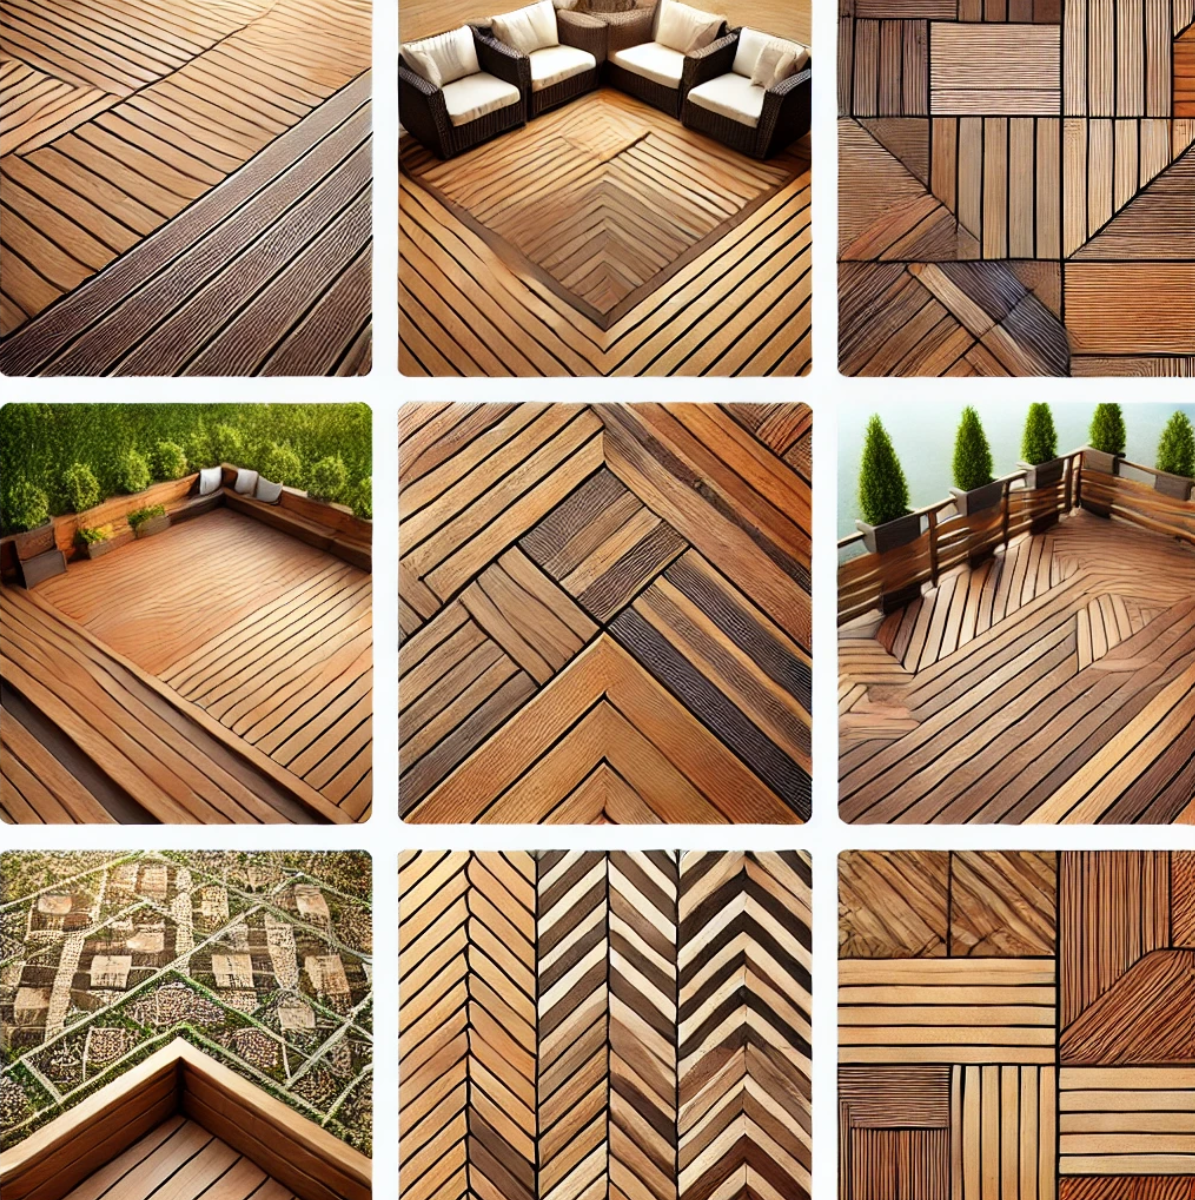
Decking patterns

Regular decking pattern
If you want to install the decking very quickly and to spend a relatively low amount of money, then you should definitively choose the regular decking pattern. Consequently, you have to fasten the decking boards perpendicular on the frame.
Make sure the joint of the boards are placed on a structural joist and use proper deck screws, as to get the job done in a professional manner.

Diagonal pattern
If your deck frame is not exactly square, or if you like to add a little emotion to your deck, but in the same time to keep costs at a decent amount, then you could use the diagonal pattern.
You can install the boards at 45º or if you have a rectangular deck, you can adjust the angle so that to match to your shape. shape. Installing decking diagonally requires to set the joist closer one to other.

Diamond decking pattern
A variation of the diagonal patter is represented by the diamond decking. As you can see in the image, a diamond pattern is usually a good choice when you have a deck with a regular shape. In addition, If you use this pattern on a large area, you will loose the great effect, so make sure you balance all these aspects before starting the project.
Using the diamond decking pattern implies a lot of accurate cuts, so you have to use a good circular saw and you must be attentive, to avoid mistakes.

Herringbone decking pattern
Another pattern you can use, is the so-called Herringbone pattern. Using this decking pattern also implies higher costs, as you need to double certain joists in the frame. Nevertheless, if you enjoy the design (and we can assure you it looks pretty spectacular) and you afford the extra-costs (due to raw materials but also to extra-labor), than it might fit your needs and tastes.
In order to make the cuts as accurately as possible, you have to use a good circular saw and a chalk line.

V-shaped decking pattern
The V-shaped pattern is a simplified model of the Herringbone. If want a unique design, but you consider the Herringbone pattern too superfluous or too expensive, you could choose this model.
Installing decking in a V-shaped pattern is not a complex job, provided you use the right tools and take proper measurements. In addition, you can choose the angle of the pattern, but we recommend you to use the common 45º, as it simplifies the work.

Basket wave pattern
Another variation of the Herringbone pattern is the basket wave pattern. This pattern can emphasize the unique character of your deck, but it definitely requires a lot of focus and preparation. In addition, the angle between two boards is restricted to 90º, which is not really bad, as you have to make fewer cuts.
Work with patience and make sure you leave a proper span between the structural joists.

Parquet pattern
Last but not least, another decking pattern you can use is the so-called parquet pattern. This pattern is the most exquisite one, but in the same time it requires the greatest amount of raw materials, therefore you must consider deeply the situation before taking a decision.
In addition, the little squares must be big enough to be noticeable but in the same time not too big, otherwise the beautiful pattern will be lost.
Deck edge design

Flush edge
Another design aspect one has to take into consideration when planning a deck is the edge details. Consequently, you have more options according to your needs and tastes. The first edge design is the flush, which means you have to cut the decking close to the deck frame. In order to hide the cut edge, you could install a wooden trim.

Overhang edge
Another option you have when installing the wooden decking is to let them overhang the frame. In this way, you will have a good water drainage, which means your deck will last longer. If you want to build a durable deck, this edge design is the best choice.
In addition, this edge design looks nice and it could help you emphasize certain traits of your deck. The overhang should be around 1” over the deck skirting.

Boxed-in edge
Another option you have when building the deck edge is to install a boxed-in edge. This is also a good choice if you like this design. The boxed-in edge design is less used, but is a good decision if you like the idea and design, although it might not drain water as efficiently as the overhang edge.
By following these tips, you’ll be able to choose and install a decking pattern that enhances both the beauty and functionality of your outdoor space. Whether you prefer a classic parallel pattern or a more intricate herringbone design, the right pattern can make your deck a standout feature of your home.
Thank you for reading our article about decking patterns, and we recommend you to check out the rest of our projects. Please LIKE and SHARE our projects with your friends, by using the social media widgets. SUBSCRIBE to be the first that gets our latest projects.
1 comment
Is it a good idea to build the deck with a bit of a grade, the way a concrete job would be done to allow for some help in rain runoff? Also, the parquet design – have you ever done this with different colors in the squares and how did it come out?