This step by step woodworking project is about building a gable carport roof plans. This is PART 2 of the single carport project, where I show you how to attach the roofing and how to take care of the finishing touches. Install hurricane ties if you live in an area with high winds. Attach the 5/8″ T1-11 siding panels to the front and back of the carports. My plans come with step by step instructions and you can easily adjust all the dimensions to suit your needs. See my other DIY projects HERE.
We recommend you to invest in the best materials you could afford. Therefore, you should buy weather-resistant lumber, such as pine or cedar. Always take accurate measurements before adjusting the size of the components at the proper size. Drill pilot holes trough the components before inserting the wood screws, to prevent the wood from splitting. See all my Premium Plans HERE.
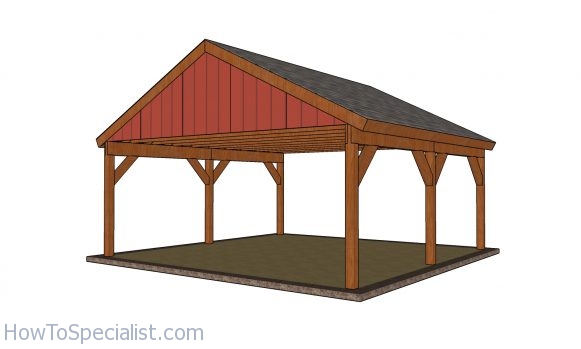
Made from this plan
2 Car Carport Plans – PART 2

Building a 2 car carport
Materials
- D – 11 pieces of 2×6 lumber – 20 ft BOTTOM CHORD
- E – 22 pieces of 2×6 lumber – 12 ft RAFTERS
- F – 22 pieces of 2×4 lumber – 32″ long WEB
- G – 22 pieces of 2×4 lumber – 67 5/8″ long WEB
- H – 12 pieces of 1/2″ plywood – 4’x8′, 6 pieces – 4’x4′ ROOF SHEETS
- I – 4 pieces of T1-11 siding – 4’x30 1/8″, 4 pieces – 4’x54 1/8″, 2 pieces – 66 1/8″ SIDING SHEETS
- J – 4 pieces of 1×8 lumber – 10 ft, 4 pieces – 10′ 5/8″, 4 pieces – 25 1/8″ TRIMS
Tools
- Safety gloves, glasses
- Miter saw, jigsaw
- Chalk line, tape measure, spirit level, carpentry pencil
- Drill machinery and drill bits
Time
- One Day
How to build a gable roof for a 2 car carport
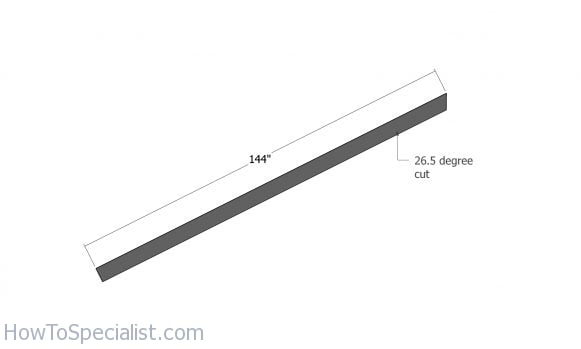
Rafters
Build the rafters for the carport from 2×6 lumber. Use a miter saw to make the 26.5 degree cuts to one end of the beams. For this project I recommend you engineered trusses, which come pre-assembled to the construction site, thus saving you time and money.
However, in this plan I also show you an example for a truss with a 6:12 pitch. Read the local codes to make sure it complies with your local requirements.
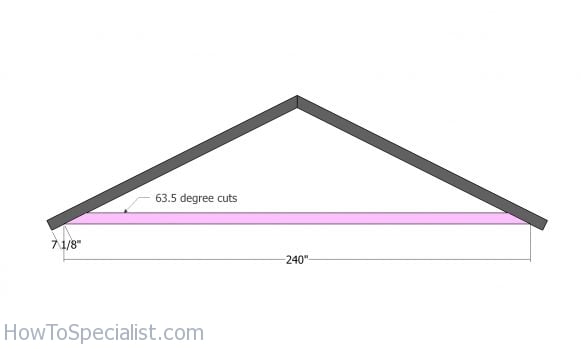
Bottom rafter
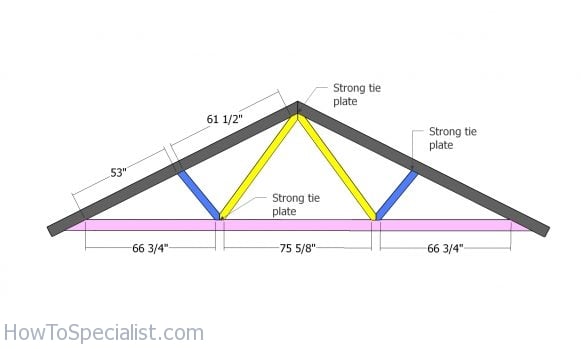
Next, build the bottom chord for the truss from 2×6 lumber. Make 63.5 degree cuts to both ends of the beam. Lay everything with attention on a level surface. Align the edges as shown in the diagram.
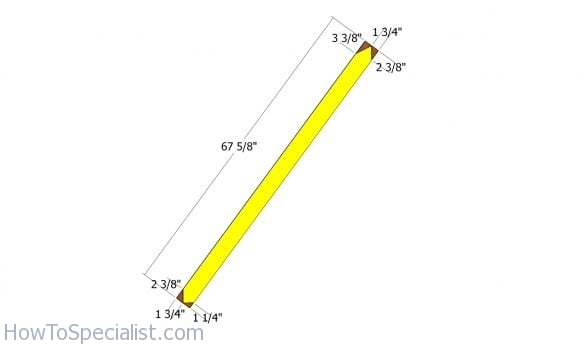
Second w support
Build the rest of the webs using the info from the diagram. Make the cuts with a saw, as shown in the diagram.
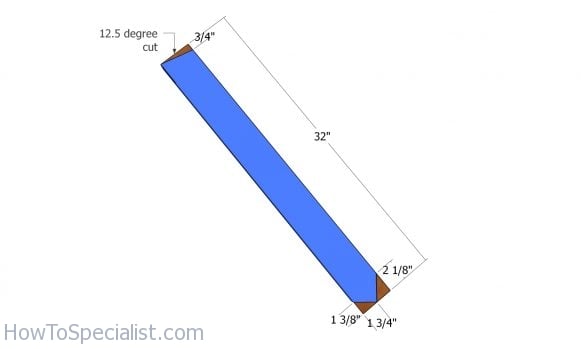
First support
Use 2×4 lumber for the webs. Mark the cut lines on the slats and then get the job done with a circular saw.
Fitting the W supports
Fit the webs to the trusses and align the edges with attention. Secure the components together by attaching strong tie plates over the joints. Insert 1 1/2″ structural nails to secure the plates into place. Fit the plates on both sides of the truss.
Fitting the trusses
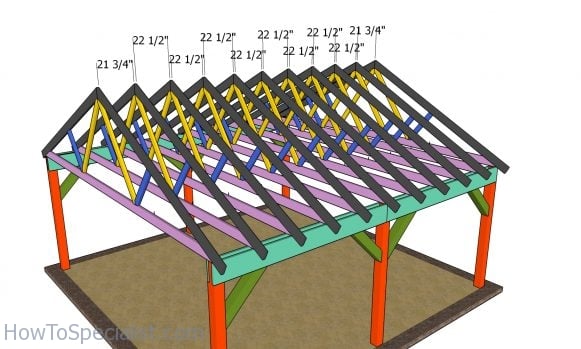
Fit the rafters to the top of the pavilion, using the information from the diagram. It is important to space the rafters properly (every 24″ on center), otherwise you won’t be able to attach the roofing sheets.
Use rafters ties to lock the rafters to the beams. Use 1 1/2″ structural screws for the rafter ties.
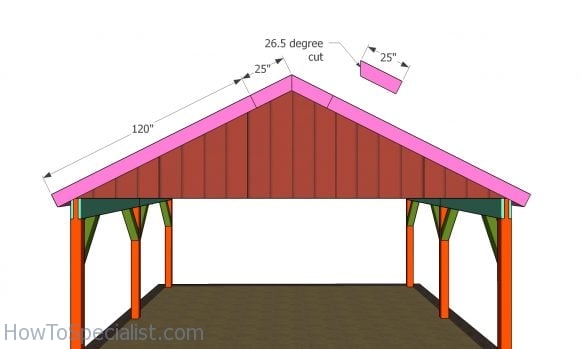
Gable end panels
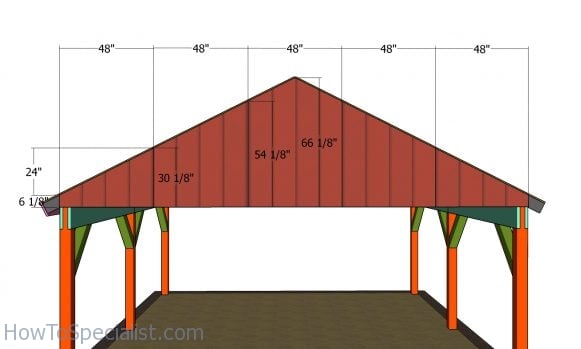
Use 5/8″ siding sheets for the gable ends. Cut the panels at the right dimensions and then lock them to the frame with 1 5/8″ screws. Leave no gaps between the panels for a professional result.
Fitting the roofing sheets
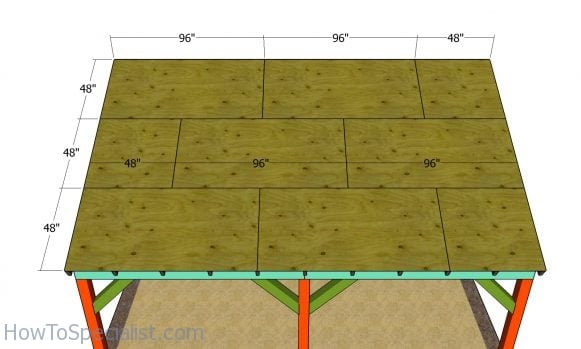
Use 1/2″ plywood for the roof of the pavilion. Cut the sheets at the right dimensions and then lay them to the top of the pavilion. Leave no gaps between the sheets and then insert 1 5/8″ screws, every 8″ along the rafters, so you can secure them into place tightly.
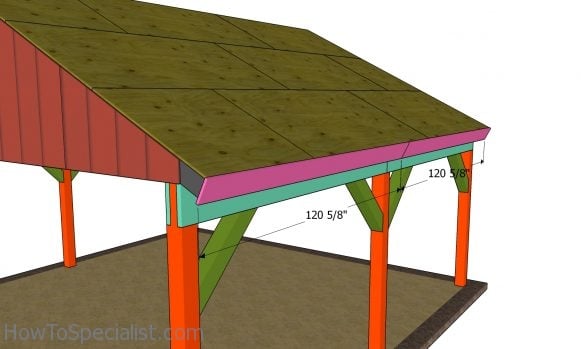
Side roof trims
Fit 1×8 trims to the sides of the pavilion. Align the edges with attention and insert 2″ nails to lock them into place tightly.
Fitting the front and back gable trims
Fit the 1×8 trims to the front and back of the pavilion. Lock them into place with 2″ nails.
You can build this carport under 2500$ if you do a proper cost management. I think this is not to bad considering the size of the constructions and the benefits it will bring in your home life. If you like my project, don’t forget to SHARE it on Facebook and Pinterest. Check out PART 1 of the project to learn how to lay out the posts and how to build the main frame of the construction.
Thank you for reading our project about free gable carport roof plans and I recommend you to check out the rest of the projects. Don’t forget to LIKE and SHARE our projects with your friends, by using the social media widgets. SUBSCRIBE to be the first that gets our latest projects.
<< Previous | Next >>
 |
 |
2 comments
I purchase the premium plans for the 2 car carport from Jack Sanders and I have not received any email with a link to the plans. My credit card show the transaction. The date was Saturday 12/28/24. I have checked in every location I can and do not find any communication from gumroad.
Hi. The plans were bought on 4th of January and they were sent to the email you entered, which is different from the one you used on this comment. The email with which you bought the plans ends with “@comcast.com”