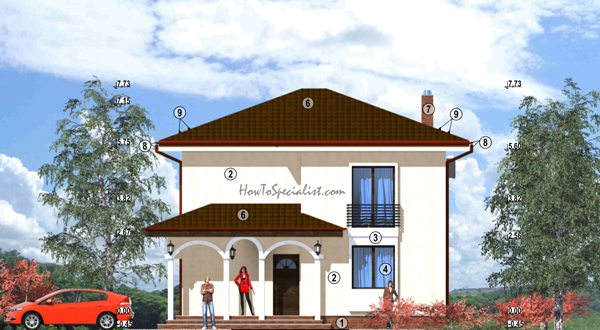
This article is about how to build a concrete and brick house. With Episode 1 I start a new series that will cover everything about the construction of my countryside house, including pouring the concrete foundation, building the brick walls, insulating the walls with rock wool and taking care of the interior finishes. My house features 1000 sq ft (100 sq m) per floor and it has 3 bedrooms, 2 bathrooms, one kitchen, one living room and 2 storage rooms.
This brick house is built to withstand 8.5 earthquakes on Richter scale and thus, it has strong structure made with re-bars and concrete. We used brick blocks for the interior and exterior walls. We used 8 tons of rebars for this house and close to 100 cubic meters of concrete for the whole constructions. In Episode 1, I will show you the story of the land, the plans for the house and how we poured the foundation. See all my Premium Plans HERE.
Made from this plan
Materials
- Gravel
- Premixed concrete
- Lumber – to build the forms
- Nails and screws
- Reinforcing bars – to build the reinforcing structure
- Welded mesh
- Reinforcement Spacers
- Film
- XPS Polystyrene
- Plumbing pipes
Tools
- Safety gloves, glasses
- Measuring tape, carpentry pencil, l-square, spirit level
- Concrete mixer – to mix the concrete
- Hammer and circular saw – to build the formwork
- Float – to finish the concrete
- Backhoe Digger
- Concrete Pump & mixer
- Angle grinder
- Stirrups bender
Time
- 2 weeks
Related
- Episode 1: Building the foundation
- Episode 2: Building the walls
- Episode 3: Building the roof
- Episode 4: Doing the installation and Windows
- Episode 5: Screeding the floors
- Episode 6: Installing the rock wool insulation
- Episode 7: Painting the house on the exterior
- Episode 8: Cementer render and wall plaster
- Episode 9: Installing natural stone
- Episode 10: Installing the septic Tank
- Episode 11: Building the walkarounds with pavers
- Episode 12: The kitchen
- Episode 13: The bathrooms
- Episode 14: The living Room
- Episode 15: The bedrooms
Brick Walls Construction – Video!
Building a brick house
Plan-drawing-for-brick-house
Every house starts with a plan, so our countryside house didn’t make an exception. As you can see we went after a Mediterranean design with a few local influences so it blends in easily. This isn’t a large house because I wanted to go for minimalism and pack everything I needed in a medium sized area. The house features two floors and an attic that will be used for storage purposes. This is a concrete and brick house with 3 bedrooms, 2 bathrooms, a large kitchen, a living room and two small rooms for storage. In addition, the house features a porch to the front with beautiful columns and arches.

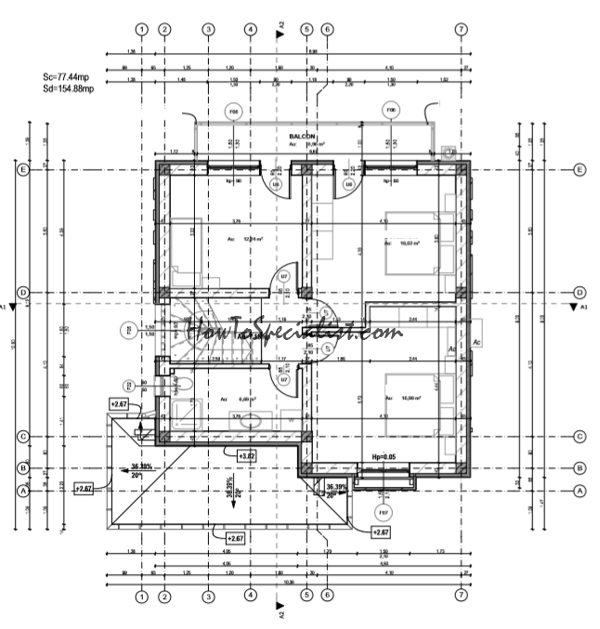
Plans 1st-floor
This is the plan for the ground floor. As you can see it features a living room, a kitchen, a bathroom a hallway, under stairs storage and another room for storage. We ended up making a few changes to the plans, so we moved the door to the storage room from the living room to the kitchen. The house has lots of windows, because I like to have plenty of light inside.
Second-floor-plans
The second floor features 3 bedrooms with one bathroom. I know you’ll probably think this isn’t enough, but it’s not the main residence, it’s just a weekend house. I will also have another series on a detached garage built on the property where I will set up my workshop.
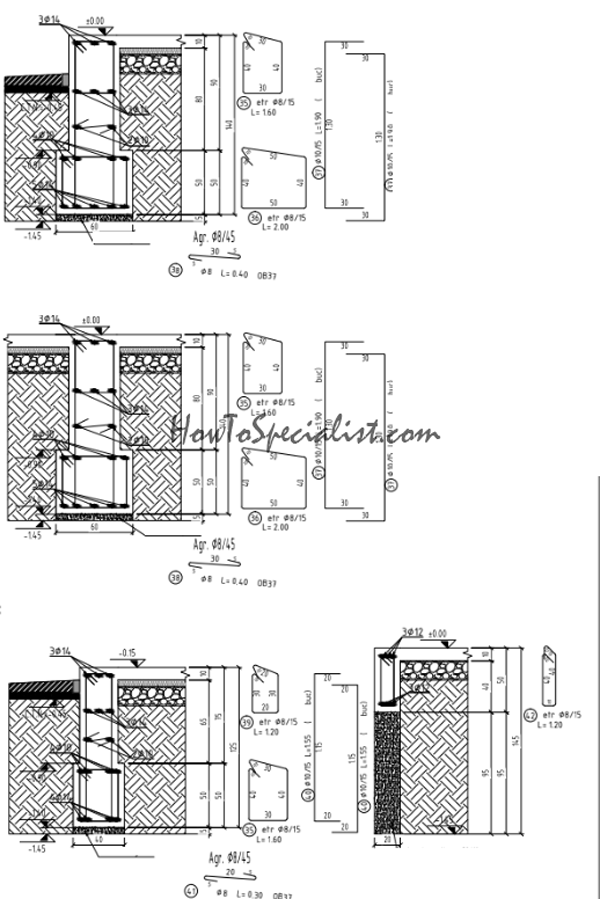
Foundation-detail
In this drawing you can see details on how to build the foundation for the house. It is pretty complex, but it is designed according to the local codes. We have a frost line, so the depth of the foundation is about 1 m (40 inches).

Section-view-of-brick-house
The sectional view on the house shows more details on the interior space and the materials that are going to be used.
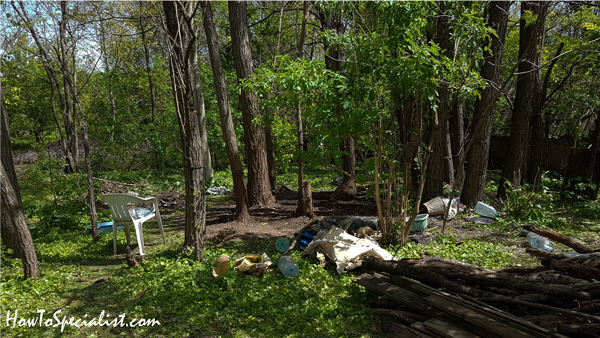
Land-with-tress-for-future-house
Getting back to the concrete and brick house project, it is time to show you the piece of land we’re going to build on. As you can see there was a lot of vegetation on the land which meant a lot of work and costs before starting the actual construction of the house. But I think everything was well worth it in the end, because it’s so serene: fresh air, a large forest near by and I have a lot of land at my disposal, for future projects.
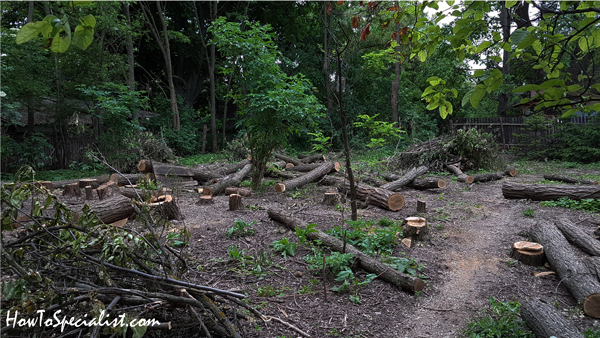
Cutting-the-trees-down-for-the-construction-site
First of all, we chopped down all the trees so we can level out the land and remove the vegetation layer. Meanwhile, we applied for the house permits and stayed in touch with our architect for a complete plan for the house. We also had a geo-technical report done, to help the engineers determine the right structure for the house.
I warn you will see a lot of rebars in this project, because we live in an area with significant seismic activity. That is why we decided to contact an architect and do a custom plan that both suited our needs and be up to the latest building codes. As a side info, the house is designed to withstand 8.5 earthquakes on Richter scale. Strongest earthquake ever recorded in my country was 7.8, so we have a comfortable margin.
Cleaning-the-land
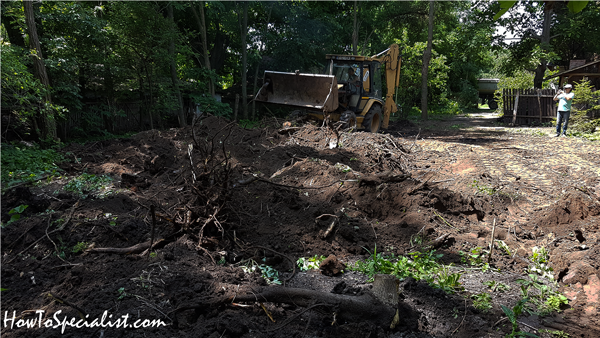
We rented a backhoe digger to take out all of the tree stumps. It took a few hours because these trees had really strong roots, but eventually the ground wall cleaned out. Ideally, I recommend you to perform this step a year before pouring the foundation for the house, to leave enough time for the ground to set. As you can see, we had to dig seriously to take out the stumps.
Leveling-the-ground-for-the-house
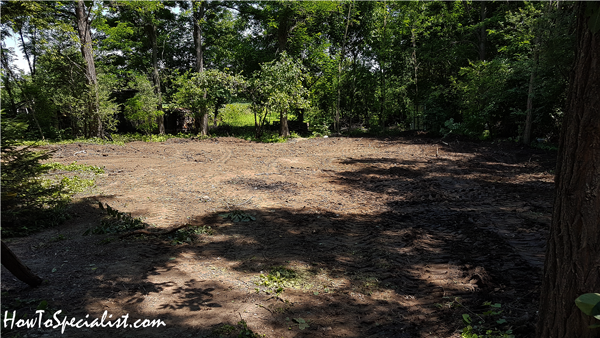
The backhoe digger was also of great help when it comes to leveling the ground. We used the front bucket for that. It went really smooth and we also used the weight of the CAT to press down the ground and give it back some structure. This was done in April.
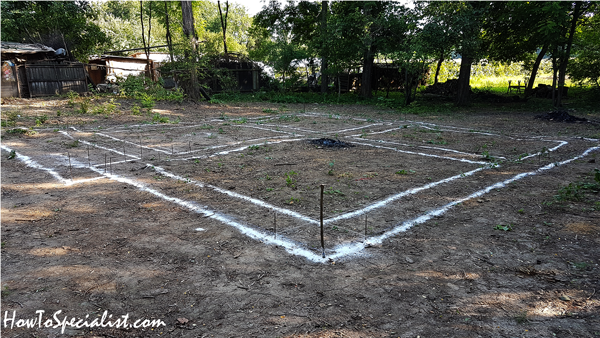
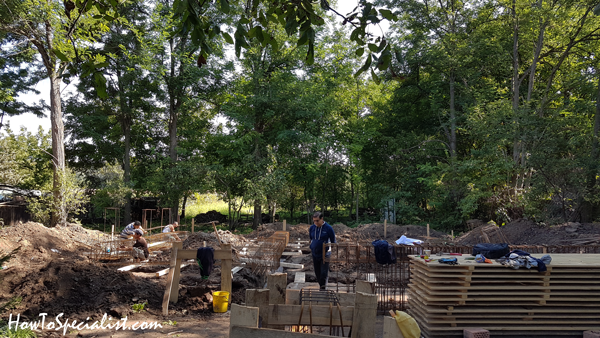
Tracing-the-foundation-trenches
We returned to the construction site in September to start the building process. We got delayed because of paperwork and despite serious frustration because we couldn’t keep up with the planned schedule, we got enough energy to make the house happen, from sketches to reality. It was hard to find the right team and after a few disappointments, we eventually sealed a deal with a great crew. I supervised the construction of the house day by day, because I wanted great quality and I made no compromises on the materials and solutions used.
We traced the foundation using string, rebars and slaked lime powder, to make the lines really visible. I recommend you to double check all the corners to make sure they are right angled. Also measure the diagonals because they will show if the tracing is off. Remember this step will influence directly the quality of your house and any mistake made now will translate to rooms with weird corner angles and so on, which in turn will make difficult finishing the walls.

Digging-out-the-foundation-for-the-house
Next, we rented the backhoe digger one more time and dig out the trenches. Make sure you use a bucket that is identical to the width of the trenches. I recommend you to hire an operator with experience because that will a difference. You need to have the walls of the trenches vertical and reduce the tearing down of the banks. If possible, you need to deposit some of the dirt inside the foundation, because you’ll need to fill those in anyway later on. You’ll see in a minute what I mean.

Batter-boards-for-house-foundation
Next, we used batter boards and string to make sure the axes for the foundation are properly aligned. Make some adjustments to the trenches manually, if needed.
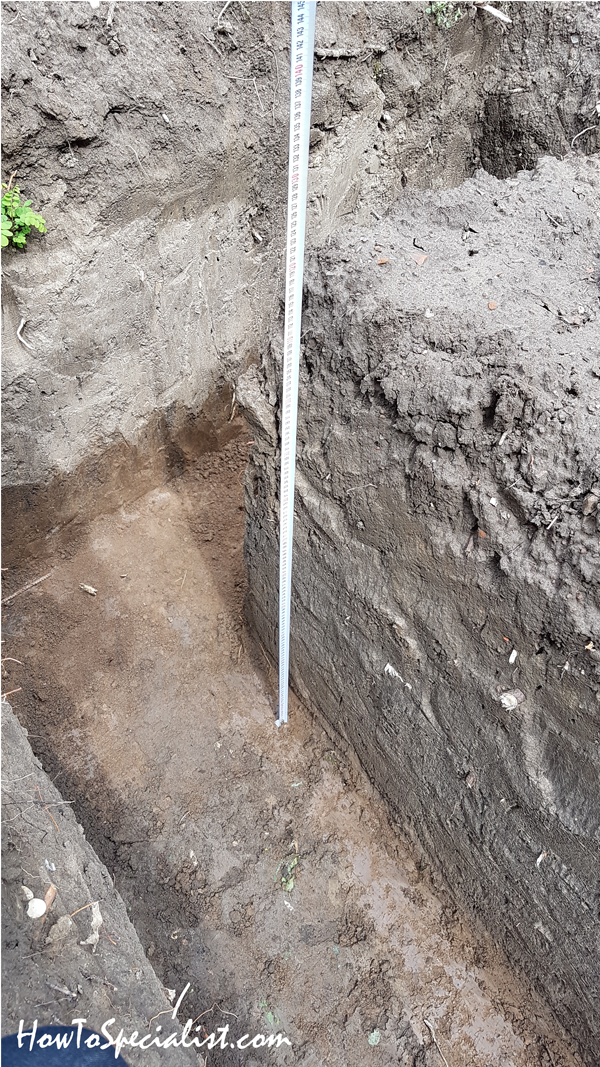
House-foundation-trench
The foundation trenches are pretty deep (1 meter or 40 inches), because the bottom needs to be under the front line.
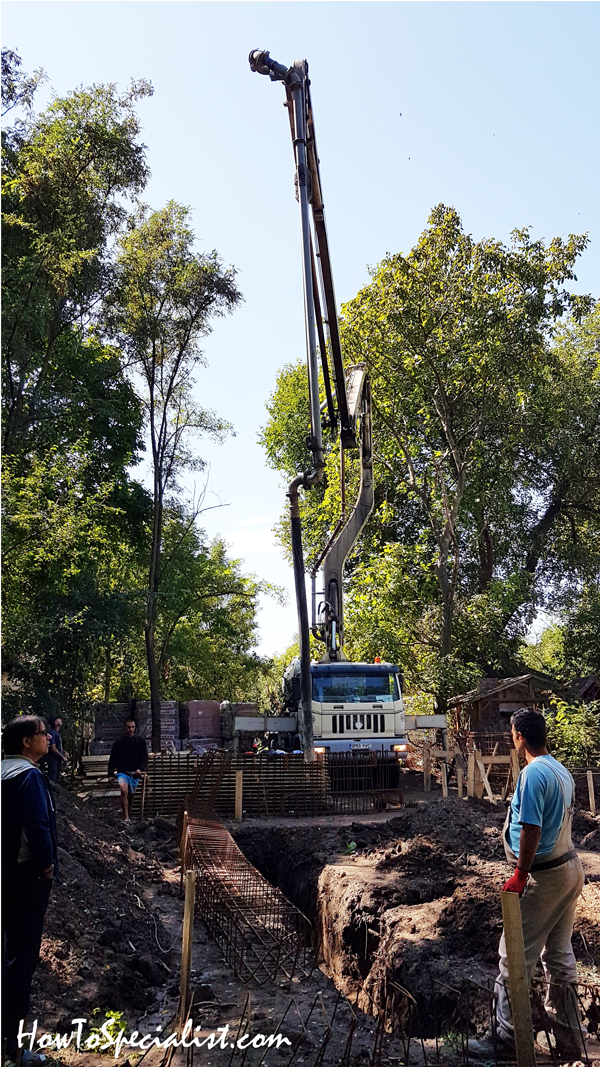
Concrete-pump-truck
Next step of the project is to pour a thin layer of concrete (about 4 inches or 10 cm) to the bottom of the trenches, so everything gets perfectly level, before laying the rebar beams. Therefore, we purchased mixed concrete that was delivered to the site with a truck that also had the pump attached to it.
Pouring-concrete-with-pump-truck
I really like heavy machinery, so this was the highlight of the day for me. I enjoyed seeing this big truck unfold its arms and pour the concrete through the big hose down the trenches. We called the truck The Elephant and I bet you agree that’s a pretty straight forward nick name :)

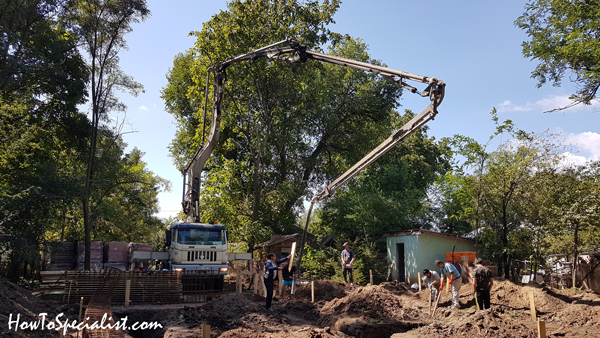
Pouring-concrete-for-foundation
We needed roughly 9 cubic meters of concrete for this step. The construction team made sure all the concrete goes inside the trenches and then used shovels to help it set level.
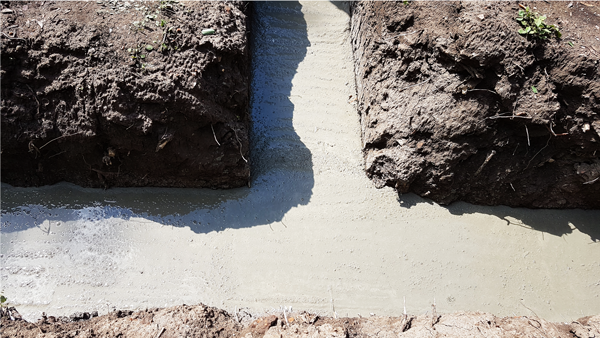
Concrete-leveling-layer
The concrete is all over the trenches and since it fluid, it will also level itself. The concrete needs a couple of days to set, so we can proceed further with laying the rebar beams.
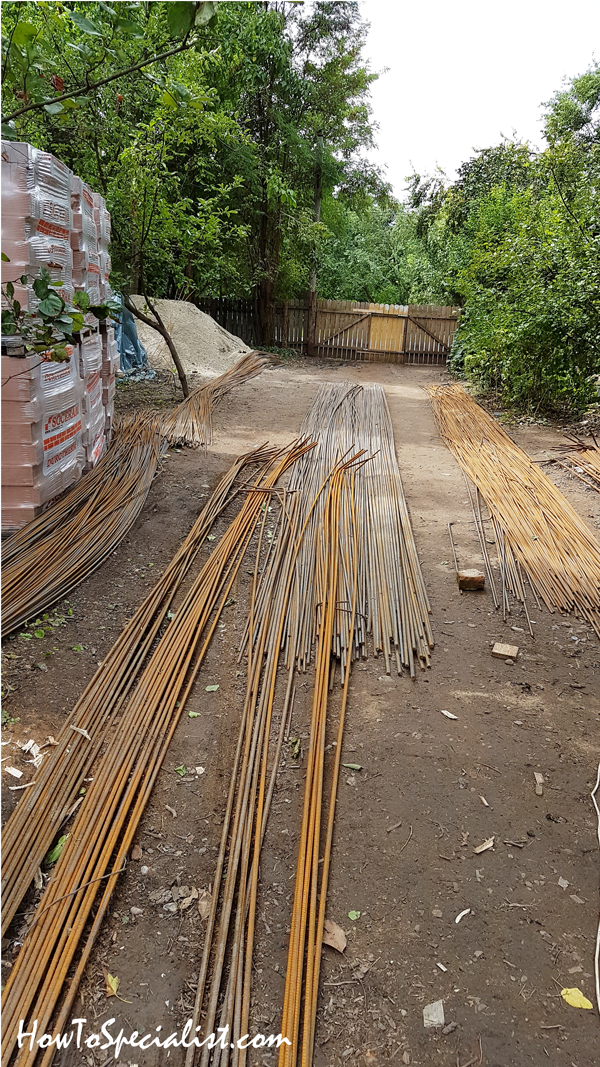
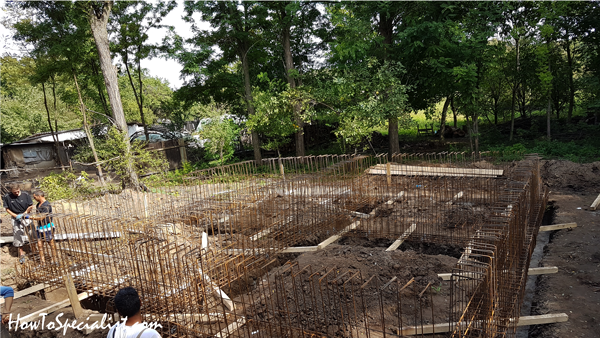
Rebars-for-brick-house
A lot of rebars were delivered to the construction site by the supplier.
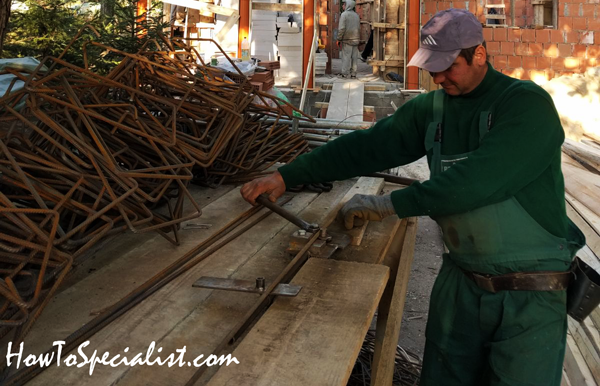
Stirrups
You need lots of stirrups for the foundation beams. You can get them pre-made from the supplier or you can just make them on site with a simple manual bending machine. One worker made all the stirrups needed for the foundation in a couple of days. The important thing is to follow the plans and drawings for the correct rebar thickness and dimensions.
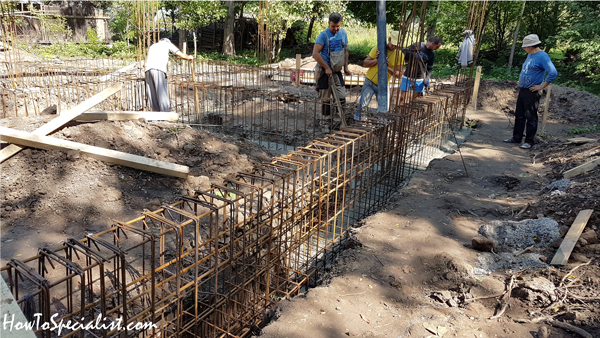
Rebar-beams-for-foundation
These are part of the rebar beams that will go into the foundation. All the rebars are tied to the bars with wire. The wire is need to hold everything together tightly and spaced properly.
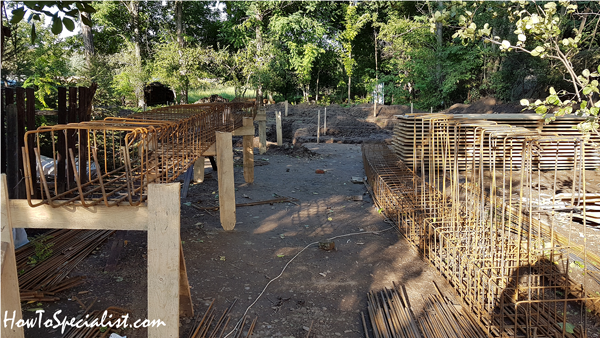
Assembling-the-rebar-beams
Next, it’s joining the beams together into a humongous mega beam. This might look crazy, but I already told you, lots of rebars for this brick house. The plans have been followed thoroughly and the supervising engineer came to inspect the structure and give his ok, before pouring the concrete.
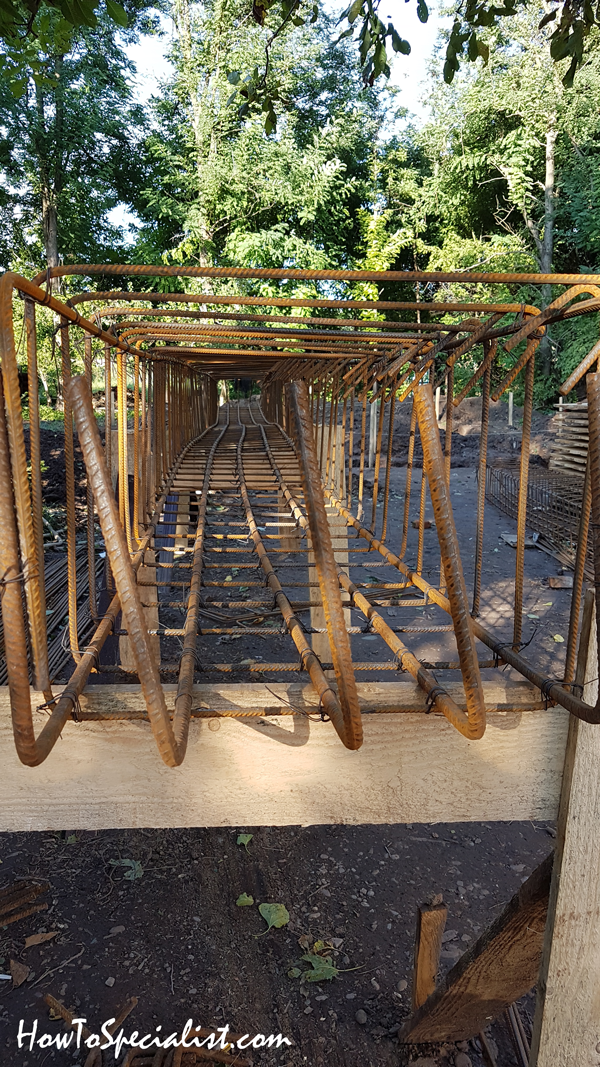
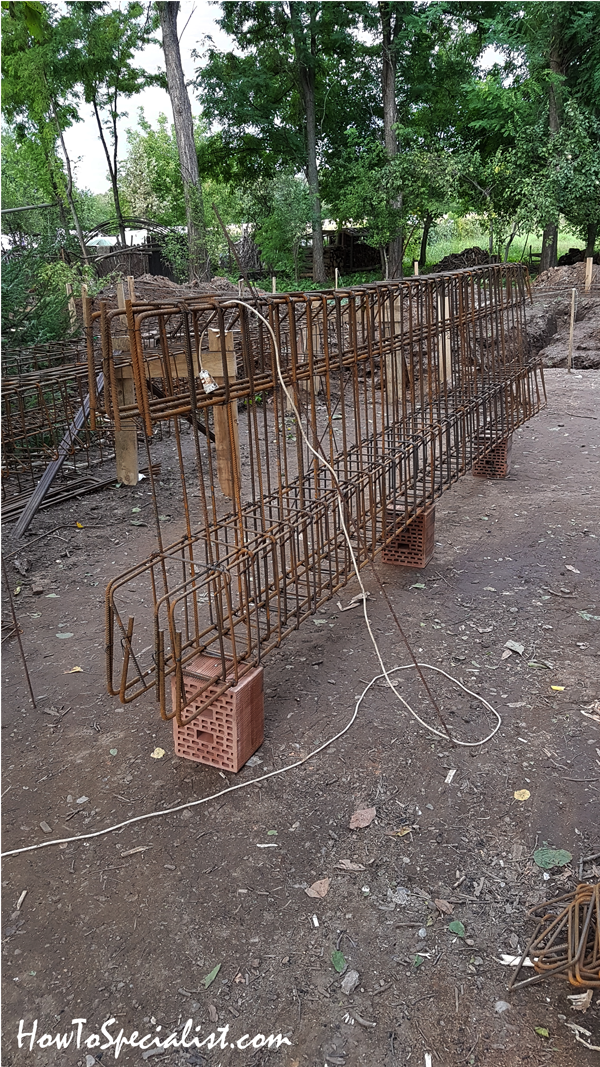
Rebar-beam
I say rebar beams look sexy. Don’t you agree?
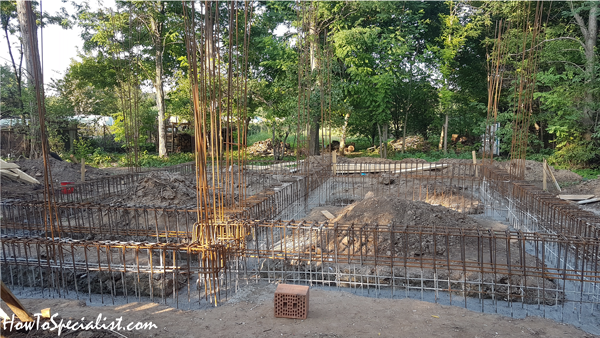
Rebar-beams-over-the-foundation-trenches
Assembling-the-rebar-structure-for-foundation
Next, the guys joined the beams together above the axes of the foundation. This is the only way to join everything together, otherwise it would be impossible to get the job done once you set them into the trenches. Luckily, we had a few big guys in the team so they didn’t have a problems lifting the mega-beams and laying them over the trenches. Real life gym session…
Rebar-beams-for-trenches
After all the beams are locked together we took the wooden posts under them out, one by one, and let the structure fall slowly into its place, over the concrete.
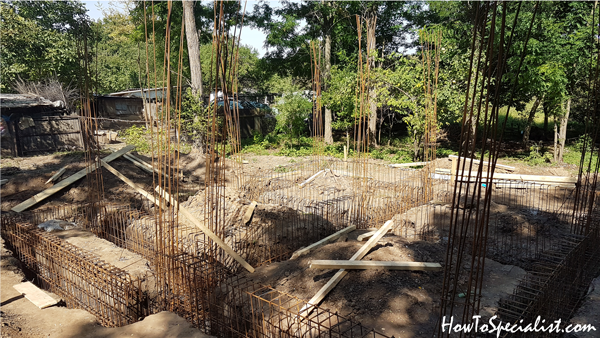
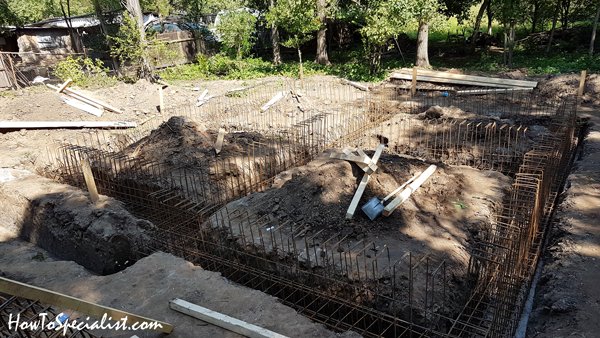
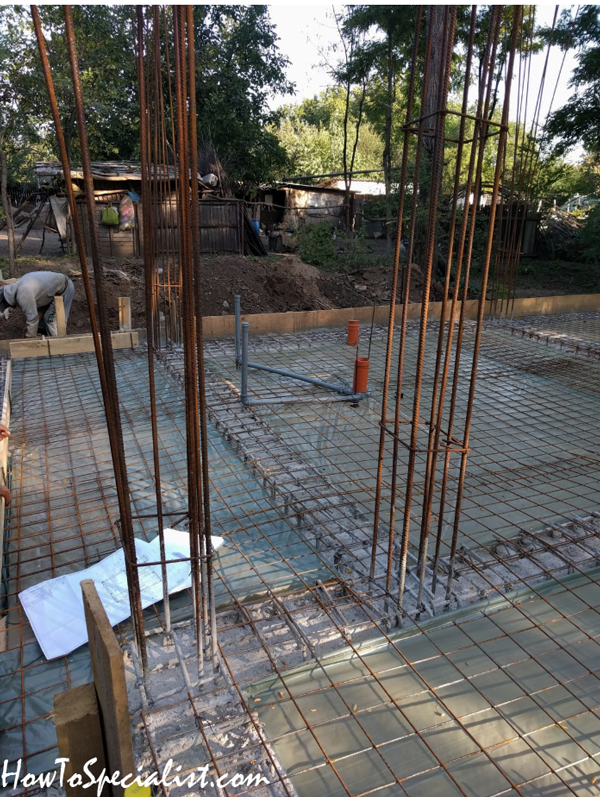
Installing-the-column-rebars
Next, time to set the rebars for the columns. This takes attention and lots of measurements, because the location of the columns will determine the size and shape of the rooms. It all comes down to following the plans and make no compromises. We got the ok from the engineer so it’s time for pouring more concrete.
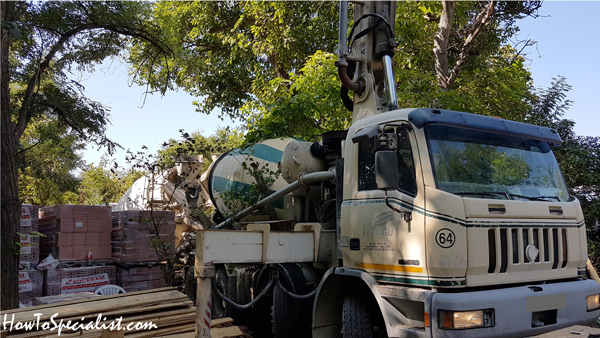
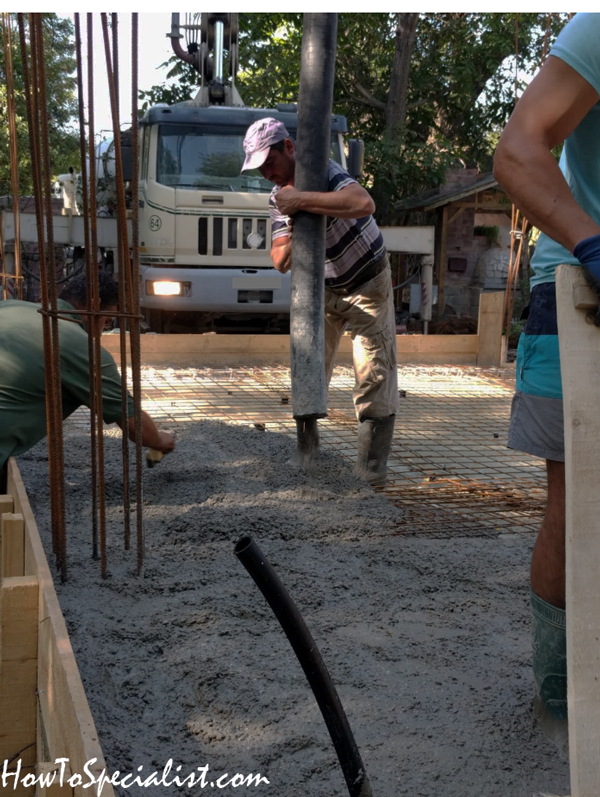
Concrete-pump-truck-with-mixer
The concrete truck is present again at duty. The pump makes the whole process a lot easier because the hose it’s radio controlled and with the push of a button it changes direction along the trenches.
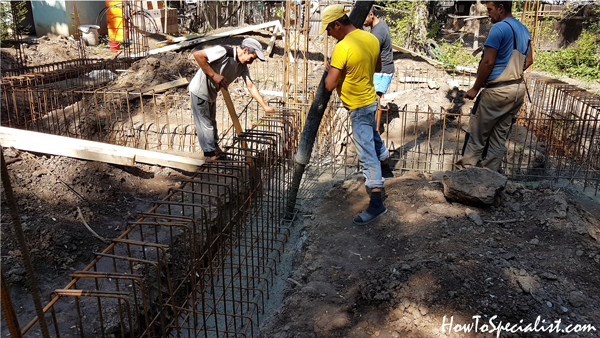
Pouring-concrete-into-foundation-trenches
However, the concrete comes with speed down the hose therefore you need a strong guy to hold it into place while it fills the trenches. Make sure you also use a concrete vibrator to help remove the air pockets.
Filling-the-foundation-trenches-with-concrete
Concrete-foundation-drying-out
After the trenches are filled with concrete, you need to let it set for a few days. Until then, we will be making the panels for the formwork.
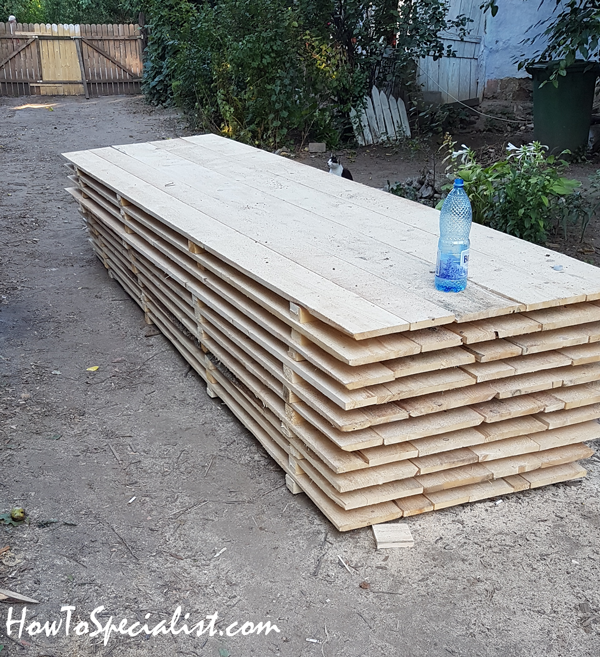
Formwork-panels
Panels made for the elevation formwork. Easy task… just a few boards and lots of nails.

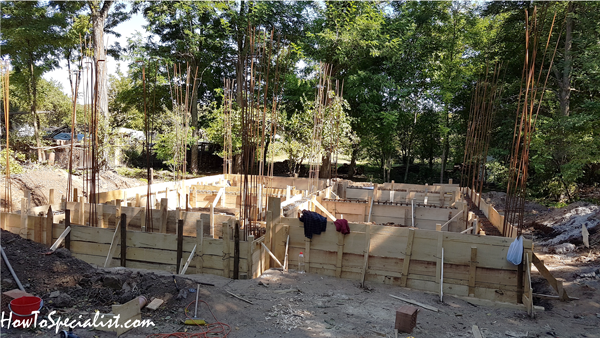
Formwork-for-house-foundation
The guys installed the panels around the foundation beams. They used a chainsaw to adjust the size of the panels and make them fit into place. As you can see the panels are vertical and backed up with braces. You need to check the distance between the panels and make sure it’s according to the plans. In our case, the elevation will be 12″ wide.
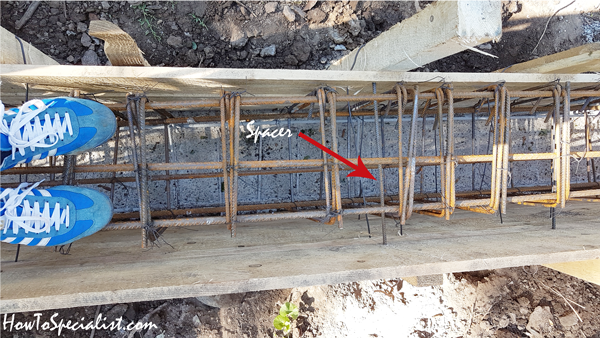
Wooden-foundation-form—detail
We used 12″ pieces of rebar and fit them between the two panels to keep the distance consistent. In addition, 4 mm wire was used to hold the panels together tightly, every 2 ft.
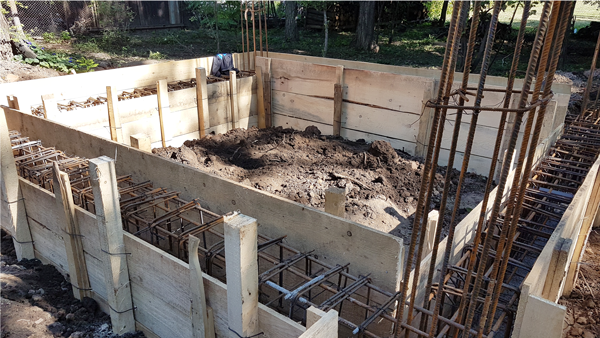
Foundation-formwork
The foundation formwork is ready for concrete. This will require a lot of concrete, about 20 cubic meters.
Wooden-form-for-foundation
Notice the diagonal braces that are placed against the formwork. The braces are used to support the formwork when the concrete will exert pressure from the inside towards to the outside. If you don’t have enough braces the foundation won’t end up straight and no need to tell you that’s not good.
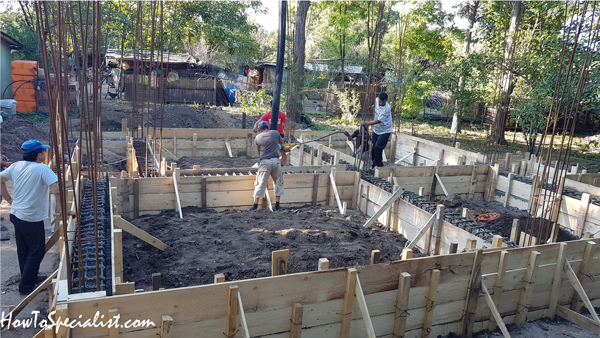
Pouring-concrete-into-foundation-elevation
The concrete was poured into the elevation using the pump truck mixer. Extra attention was needed because the concrete must go between the 12″ wide formwork. We didn’t fill the formwork to the top, because we will be pouring the floor slab and that needs to bond to the rebar beams, as well. Therefore, leave about 4″ uncovered with concrete. Leave the concrete to set for 2-3 days.
Filling-the-foundation-with-dirt
We removed the panels from the inside of the foundation and started to fill the partitions with dirt we previously dug out from the trenches. The backhoe digger was called again to speed up the process.
Foundation-filled-with-dirt
After filling everything with dirt, it’s time to compress it throughout. You can use a compacter or you can go traditionally and water the dirt in layers, as you fill the partition in. You can notice we didn’t go all the way up along the elevation, because we still need to add a 4″ layer of gravel as capillarity break.
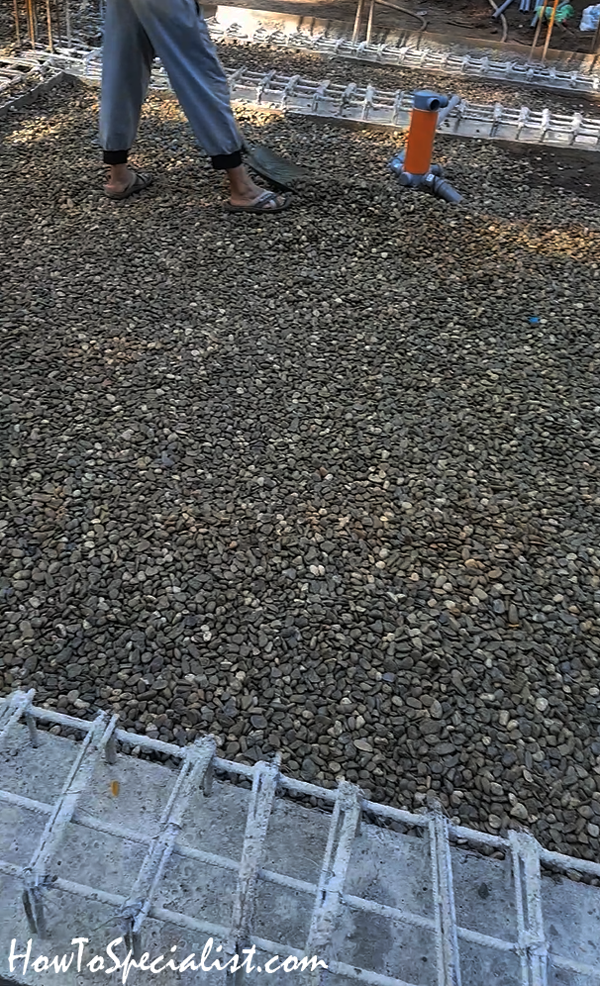
Filling-the-foundation-with-gravel
We covered the dirt with gravel and tried to even everything out. You can also see some pipes for drainage and water supply. We followed the plans and then covered everything with sand and then added gravel.
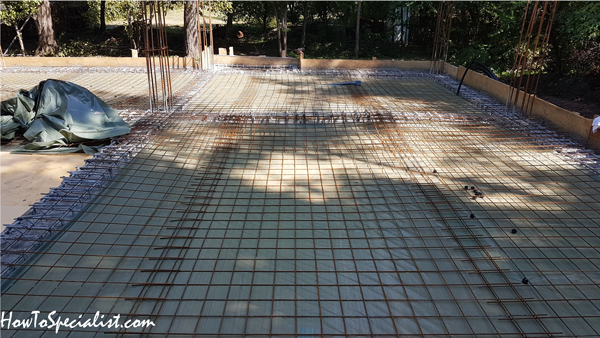
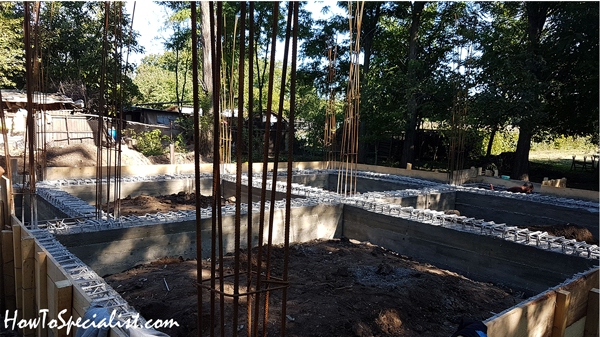
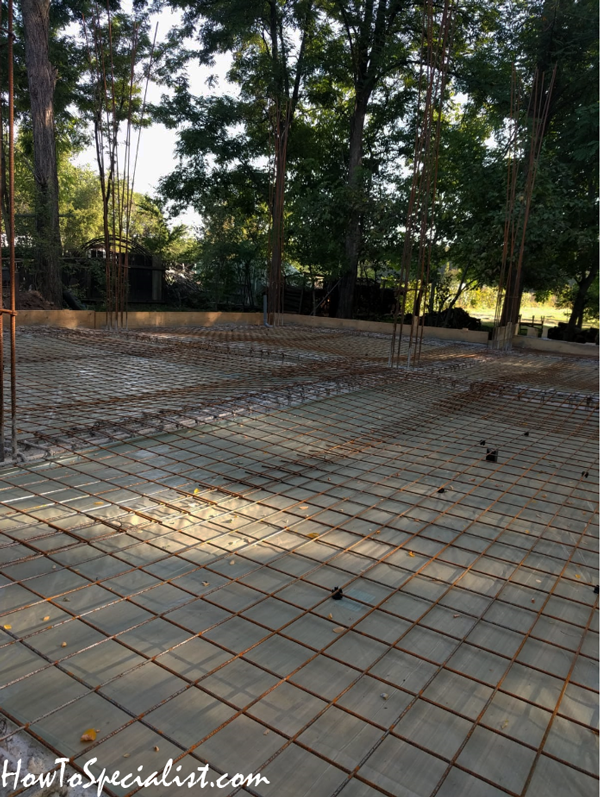
Reinforcing-the-foundation-slab
Next, we added 2″ XPS polystyrene sheets over the gravel and then polyethylene foil to keep them dry and locked together when we’ll be pouring the concrete slab. You should also notice the #6 welded wire that is installed. Its purpose is to reinforce the concrete slab. We set spacers under the wire to lift it 2″ from the surface.
Looking back, I would have went with 2 layers of XPS polystyrene, because the more you install the better the insulation you have. And you need insulation during the cold winter months, when a lot of head gets lost through the weak spots such as walls and flooring. We made up for that when installing the warm water underfloor heating system. Make sure you check out the rest of the episodes for details on that.

Pipe-for-water-drainage
Reinforcement-for-concrete-floor-slab
Rebars-for-concrete-slab
Pouring-concrete-to-house-floor-slab
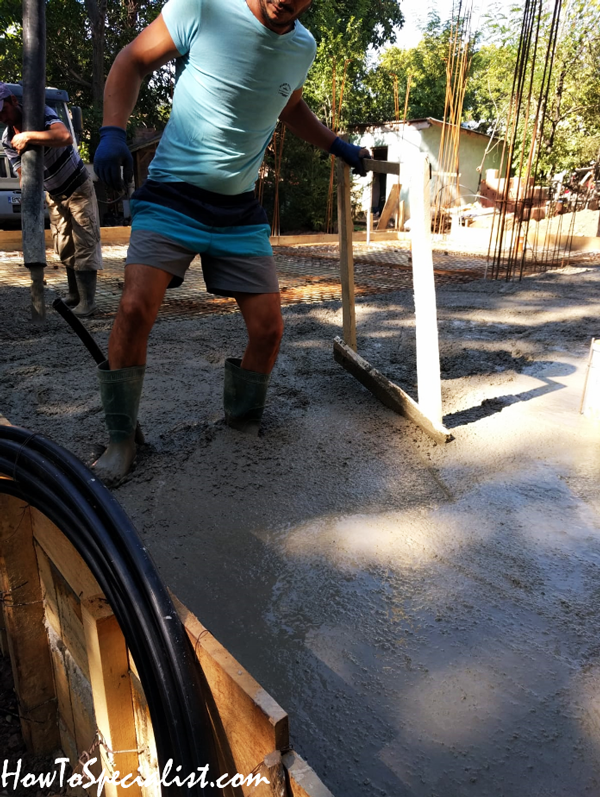
Concrete-slab-for-house
Concrete-house-slab-drying-out
Slab-floor-for-brick-house
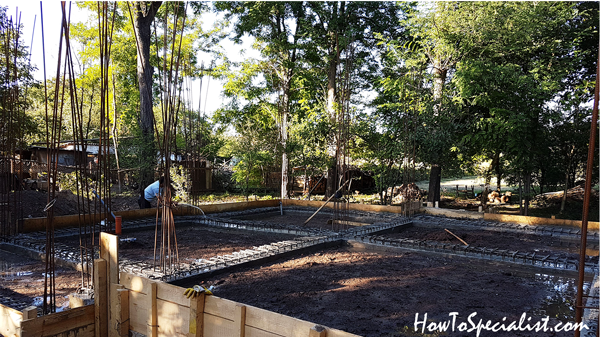
Next day we poured the 4″ concrete slab; 9 cubic meters of concrete right there. It is important to mark the level on the formwork so you can level the concrete and get a plane slab. We used a water level and nails every foot along the perimeter of the form. When the concrete got poured, the marks were of great help.
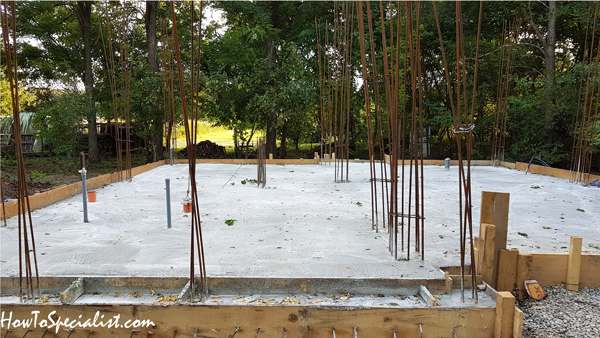
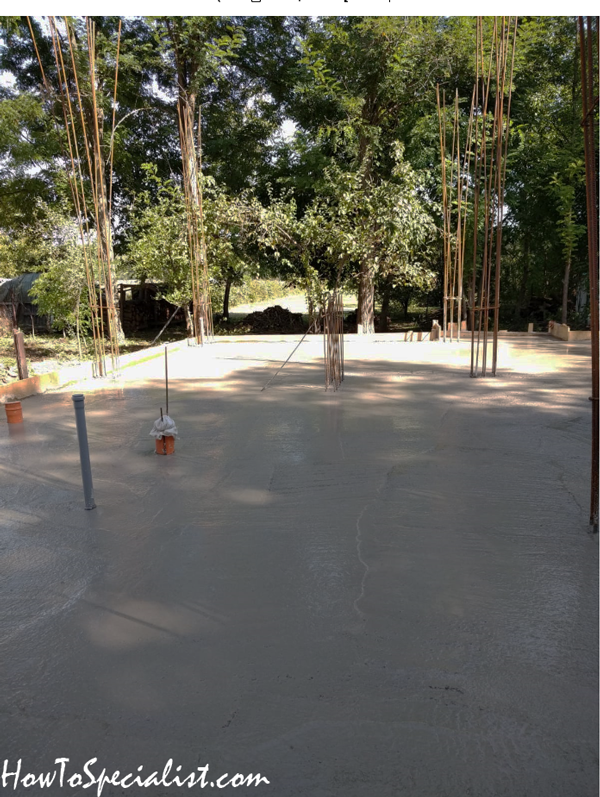
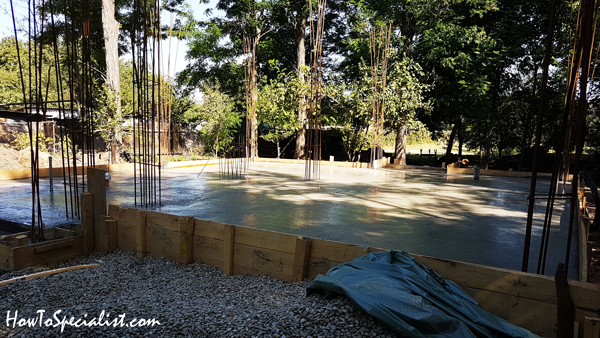
Foundation-slab-for-house
It is important to leave the concrete for at least 1 week before you start building the walls. This way, the concrete will have enough time to set and you can then add weight on the slab without having cracks. In addition, I recommend you to water the slab every day with a garden hose. Especially if it’s sunny, the concrete will drill out too quickly and that will lead to cracks into the slab. Make sure you take a look over the rest of the Concrete and Brick House Series to see our building adventure from bare ground to moving in. I promise you will have a lot of fun seeing the house coming together and maybe learn from out mistakes and problem solving.
Thank you for reading our article on how to build a brick house foundation and we recommend you to check out the other episodes of the series. Don’t forget to share our articles with your friends, by using the social media widgets.