This step by step woodworking project is about 10×16 greenhouse plans. If you want to build a medium-sized wood greenhouse for your backyard, we recommend you to take a look over this project. Before starting the construction, you need to find out the legal requirements regarding this type of constructions. Follow the building codes and hire a professional contractor if you don’t have the right skills to undertake the project on your own.
The location of the wood greenhouse should be set as to benefit from sunlight, most of the day. This aspect is essential for your future crops, as the plants need morning light to develop properly. Place the solar greenhouse far away from buildings or trees. If this is not possible, try to build it as to get the morning light from east. Before building the wood greenhouse, level the ground and excavate the soil if necessary.
If you want build a durable greenhouse, you should choose the materials with great care. Buy pressure treated lumber or cedar, making sure the studs and beams are perfectly straight. In addition, examine the studs and select the lumber without visible signs of damage. Use the right woodworking techniques, as to join the wood properly and a spirit level to plumb the walls before setting them into place. See all my Premium Plans in the Shop.
Made from this plan
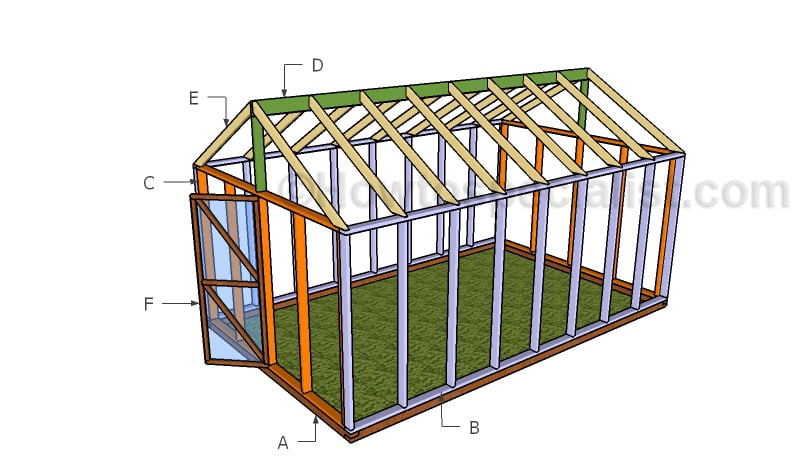
Building a large greenhouse
Materials
- A – 2 pieces of 4×4 lumber – 120″ long, 2 pieces – 192″ long BASE
- B – 2 pieces of 2×4 – 192″ long, 9 pieces – 72″ long 2xSIDE WALL
- C – 2 pieces of 2×4 – 113″ long, 5 pieces – 72″ long 2xFRONT WALL
- D – 2 pieces of 2×4 lumber – 28 3/4″ long, 1 piece of 2×6 lumber – 192″ long TOP RIDGE
- E – 18 pieces of 2×4 – 68 1/2″ long RAFTERS
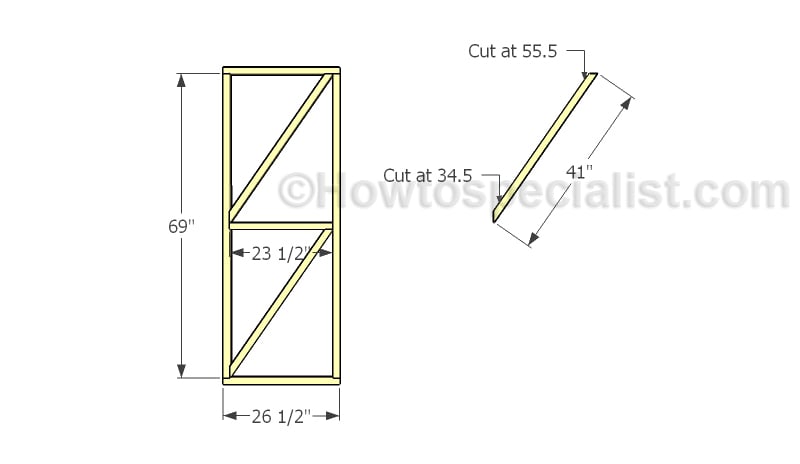
- F – 2 pieces of 2×2 lumber – 69″ long, 2 pieces – 26 1/2″ long, 1 piece – 23 1/2″ long, 2 pieces – 41″ long DOOR
- 2 pieces of 4×4 lumber – 16′
- 2 pieces of 4×4 lumber – 10′
- 4 pieces of 2×4 lumber – 16′
- 4 pieces of 2×4 lumber – 10′
- 46 pieces of 2×4 lumber – 8′
- 1 piece of 2×6 lumber – 16′
- 3 pieces of 2×2 lumber – 8′
- 500 pieces of 2 1/2″ screws
- film
- vent opener
- thermostat outlet
- hinges + latch
Tools
- Safety gloves, glasses
- Miter saw, jigsaw
- Chalk line, tape measure, spirit level, carpentry pencil
- Drill machinery and drill bits
Time
- One Week
Related
10×16 Greenhouse Plans
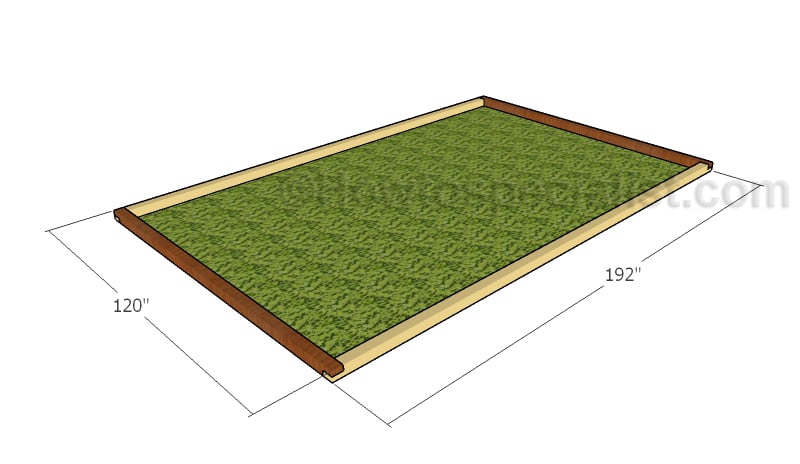
Building the base of the greenhouse
The first step of the project is to build the base for the greenhouse. Therefore, cut the components from 4×4 lumber. Make sure you choose a proper location for the greenhouse, so that it gets at least 8 hours of direct light every day. In addition, remove the vegetation layer before attaching the beams. Use 24″ long 2×4 stakes to anchor the base to the ground. Place the stakes every 36″ for proper support.
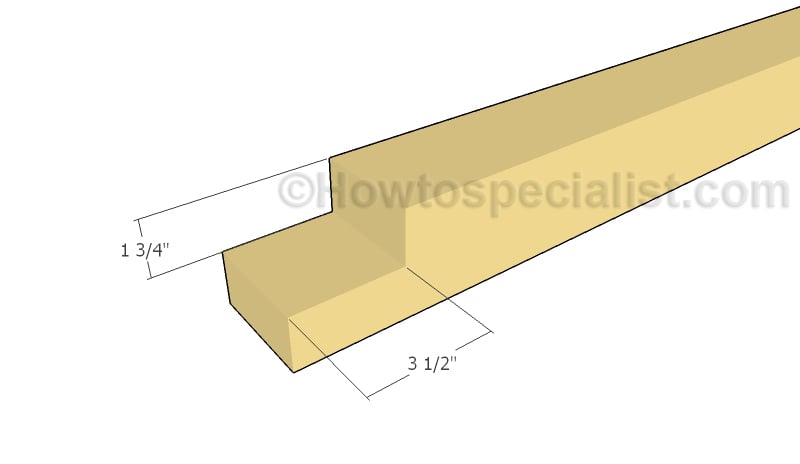
Cut the ends of the base beams
Make notches to both ends of the beams, as shown in the diagram. Mark the cut lines on the beams and get the job done with a circular saw. Make parallel cuts and remove the excess with a damp cloth. Smooth the recess with sandpaper. Use 3 1/2″ screws to lock the beams together. In addition, make sure the corners are right-angled.
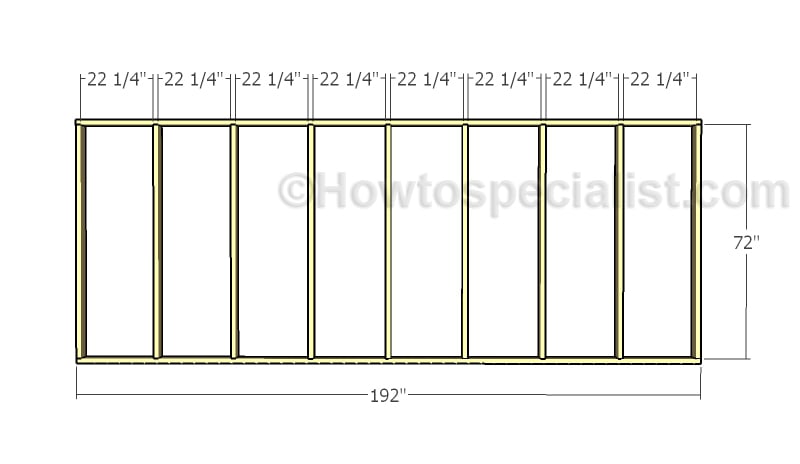
Building the side walls
Next, you need to assemble the sides walls for the greenhouse. Cut the components from 2×4 lumber. Drill pilot holes through the plates and insert 2 1/2″ screws into the studs. Make sure the corners are right-angled and align the edges with attention.
Building the front and back walls
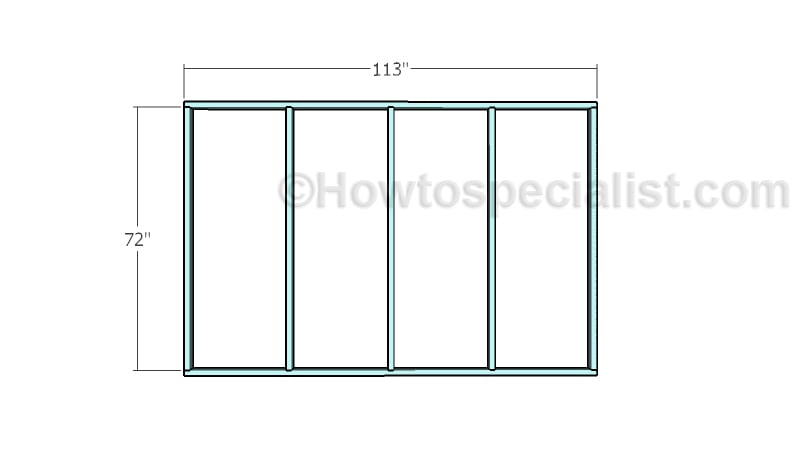
Build the front and back walls for the greenhouse. Drill pilot holes through the top and bottom plates and insert 2 1/2″ screws. Place the studs equally-spaced and make sure the corners are square.
Fitting the side walls
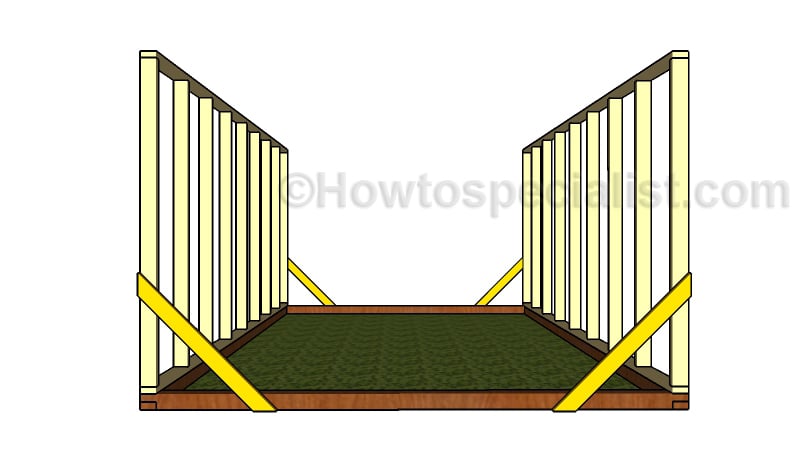
Fit the side walls to the base of the greenhouse. Use a spirit level to make sure the walls are perfectly plumb. Use 2×4 temporarily braces to lock the side walls into place, as shown in the diagram. Drill pilot holes through the bottom plates and insert 3 1/2″ screws into the base.
Assembling the greenhouse
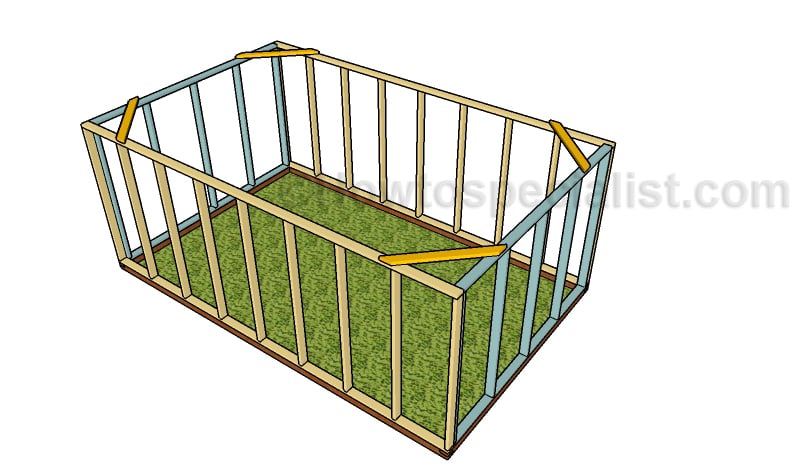
Next, fit the front and the back walls to the greenhouse. Make sure the walls are plumb and check if the corners are right-angled. Drill pilot holes and lock the adjacent studs together using 2 1/2″ screws.
Attaching the top ridge
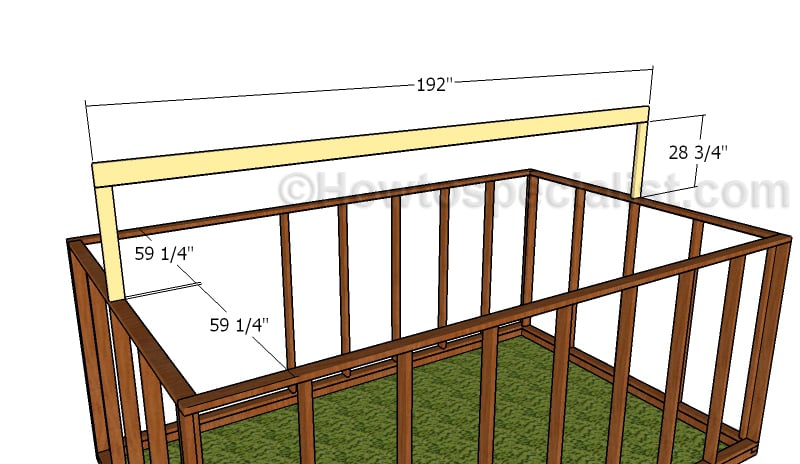
Next, you need to build the roof for the greenhouse. Build the supports from 2×4 lumber and the top ridge from 2×6 lumber. Center the supports to the top plates and lock them into place with 2 1/2″ screws and corner connectors. Make sure the supports are plumb. Attach the top ridge and lock it to the supports with screws and plate connectors.
Building the rafters
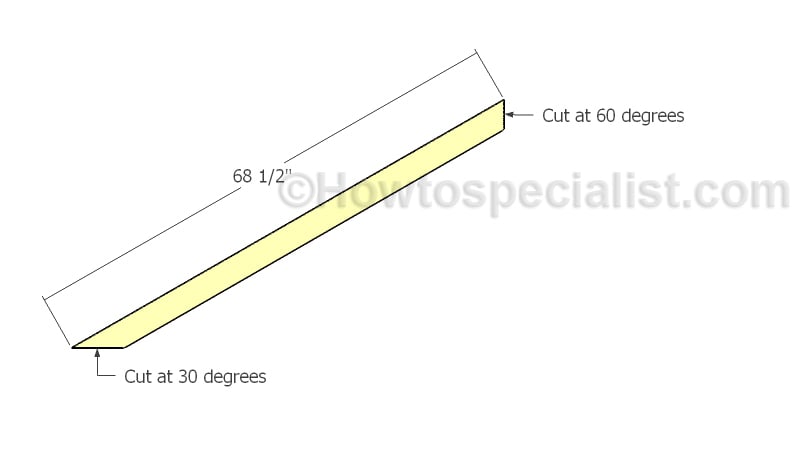
Build the rafters from 2×4 lumber. Cut one end of the rafters at 30 degrees and the opposite at 60 degrees.
Fitting the rafters
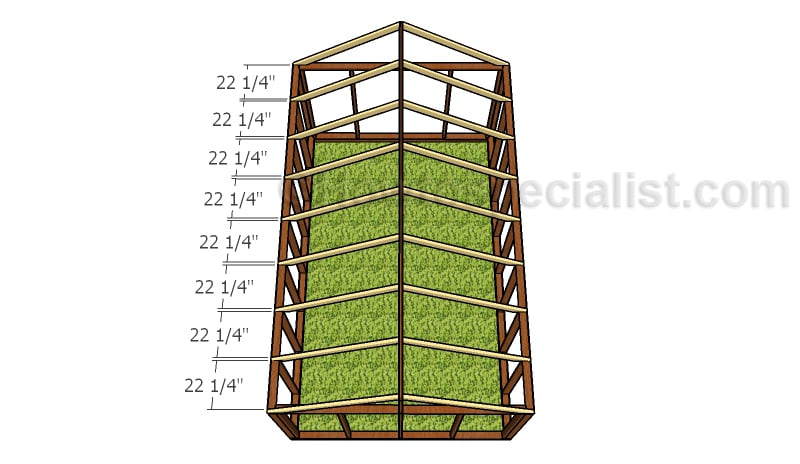
Attach the rafters to the top of the greenhouse, as shown in the diagram. Drill pilot holes and insert 2 1/2″ screws to lock the rafters to the ridge and to the top plates. Place the rafters equally-spaced for a professional result.
Building the door
Build the door for the greenhouse from 2×2 lumber. Cut the components at the right dimensions and align the edges with attention. Make sure the corners are square and drill pilot holes. Insert 2 1/2″ screws to lock the components together tightly.
Attaching the door
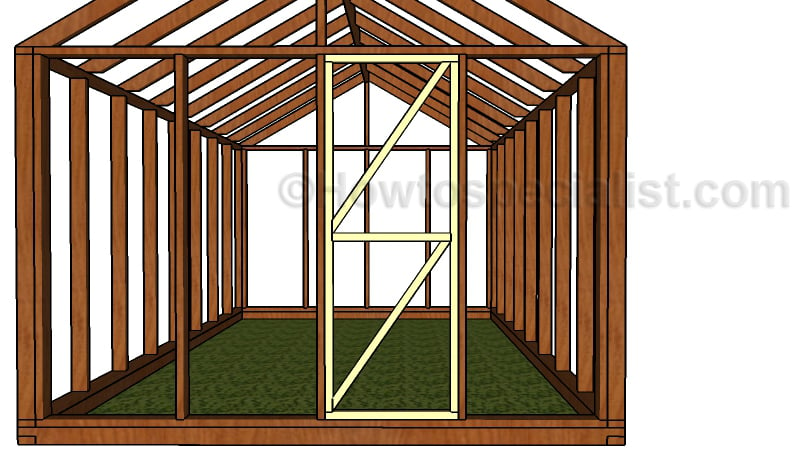
Fit the door to the opening. Use three hinges to lock the door to the frame of the greenhouse. In addition, we recommend you to install a latch to lock the door into place.

10×16 Greenhouse Plans
Check attentively the wood greenhouse before covering it with translucent polyethylene foil / sheets. Make sure there are no sharp edges or protrusions that could cut the foil.
Thank you for reading our project about 10×16 greenhouse plans and we recommend you to check out the rest of the projects. Don’t forget to LIKE and SHARE our projects with your friends, by using the social media widgets. SUBSCRIBE to be the first that gets our latest projects.

63 comments
Hi, just wondering about the true size of this greenhouse ? At the start of the article it says 12×16 and at the end it says 10×16. So is the material list for a 12×16 or 10×16 ?
Sorry for that. It is a 10×16 greenhouse.
10×16
Hi,
Was wondering if this structure is strong enough to place plastic panels instead of film?
Yes, you can easily use the plastic panels. The structure is sturdy.
Confused about the stakes anchoring the base, do they go on the inside or outside? Do they just prevent it from moving? How are they anchoring it?
The stakes go on the outside of the base. You secure them into the ground and then drive screws through them into the base. Their role is hold the greenhouse to the ground when strong winds hit your area.
What is the estimated cost to build this greenhouse? I am writing a grant for an elementary school. Thanks!
I don’t have an estimate, but my guess would be around 500 dollars.
I have never built anything this large before as I am not really a handy person, but I followed these plans last month and had great success! Thrilled with the outcome! Thank you!
Congratulations for the project. I would love to see your greenhouse. You can send pics here: http://howtospecialist.com/give-back/
Your article is vague on how to attach the plastic sheets once the frame is done. Do you have any more specific advice for your readers?
It depends on the product. Poly-carbonate sheets require screws. Greenhouse plastic requires 1×2 trims over the framing.
Hello. Do you have green house plans bigger? i try to start a farm project in my house I’d like something bigger.
No, I don’t have larger greenhouse plans.
I am currently following the the directions of this plan and have made considerable progress — I have attached the 4 walls and planning to start constructing the top soon. I am, however, confused about how to attach the 2×4 to the 2×6. In the article you said something about corner connectors, however I can find no such thing from Lowe’s or Home Depot. I am also unsure what you mean when you say plate connectors for the rafters.
Something like that: http://amzn.to/2FpGY3N You can assemble everything with screws, but these connectors will add more rigidity to the structure, especially if you live in an area with strong winds. Let me know how the greenhouse comes out!
Hey, me again. So I’ve completed the frame of the greenhouse, and have covered the front and back with poly carbonate panels I had left over from a previous failed attempt. I don’t have enough to do both side and want to cover it with film, but I’m having trouble finding a roll that will allow me to cover it with minimal seams and that will last for a while. Do you have any suggestions?
Have you looked on https://amzn.to/2uTNOK2 ?
Hello! I am getting more skilled with basic carpentry : )
I am excited about your plans for this greenhouse. Question–I have an SUV and at the most I can fit 10 feet of continuous lumber—12 feet with back window open….can I use 2 8′ x 8′ and brace them together to create the 16 foot green house as per your instructions?
Thanks…amateur but willing-to-learn carpentress
Eva
Yes, you can do that. But you need to make 2 separate wall frames and join them together.
Hi Jack
Your article is good. can you tell me how much , say tomatoes can be produced in this 10 x 16 feet green house at a time?
Also what amount termites in the soil? will they not eat up the timber soon?
Regards
Harold
I am a designer, not a gardener, therefore I cannot give you this kind of information. If anyone can give a competent insight on this, feel free to leave a comment to Harold.
I am interested in building this, and would like to see how much all the materials will cost. Where do you get your polyethylene foil / sheets?
I don’t have a cost estimate. You can find the greenhouse film at most home improvement stores.
Hi , Jack . your plans are good and I am building a 28 ft by 15 ft version.
Your estimate of 500 dollars looks about right.My larger version cost circa 1000 euros (1240 dollars) here in Ireland.Note I have an extra 12 ft in length and 5 feet in width so extra plastic and timber plus some extra strengthening.Oh and our cost of living is circa 20 % higher here.
I also added some cross braces and same length wise to facilitate hanging baskets etc and to support auto irrigation system.
Thanks for posting the plans.
That sounds awesome. Good luck and I’m looking forward to seeing your greenhouse!
I just wanted to add , that I plan to use Auto inner tubes , cut in strips to attach to the upper side of the rafters to reduce heat damage to the plastic , (not that we suffer from an abundance of sunshine here) and 2x 1/4 inch timber strips tacked to the outside using a heavy duty staple gun.
I should add that all the timber is pressure treated.
Regards.
Thank you for the feedback.
Am getting to build this. There are no metal angle noted to support or plates. Could you list these and 3 1/2 screws are not listed.
you have awesome instructions tried the 10 x16 plan but made it 4 feet shorter. Made it a 10×12.
Thank you. Looking forward to seeing it. You can send a few pics here: http://howtospecialist.com/give-back/
My husband made a couple changes to it, by adding some extra supports on the roof and putting windows in the back for ventilation. He put siding on the bottom for looks to match the shed we have.
I would love to see and feature your project on my blog. Please send a few pics here: http://howtospecialist.com/give-back/
What is the roof pitch? I live in snow country and need a 5:12 minimum.
It’s a 7/12 roof pitch
I live in Florida and want to do a slant roof with a one foot rise on one side for watering purposes. Is there a problem with this thinking?
Thanks for this. The area I live in has frequent high winds; do you think if I used the polycarbonate covering screwed to the frame the structure would be sturdy enough to keep the plastic on?
Yes, I think so, but it depends on how strong the winds really are.
I was planning on using old windows for my greenhouse. Would this frame work for attaching the windows for the walls? Or do you have a plan for using windows and glass door?
This will work perfectly with old windows. Just make sure you frame them between 2x4s on all sides.
Hi, would this frame be strong enough to support 3mm glass, in sides and roof?
Yes, but I would place the studs and rafters every 16″ on center instead of 24″ on center.
Can you tell me if the spacing between studs will specifically support screwing, with over lap, tuftex panels? According to the lowes description, they are 2.17 feet wide? Also, I’ve seen that when attaching these panels on walls, you attach in the valley vice the ridge like on roof applications. Not sure if this helps, just adding additional info. Thanks!
Yes, that should work because the rafters are every 2′ on center. I guess the extra 0.17 is for the overlap.
Thanks for the plans !! I have a lot of 2×6’s in various lengths left over from my house construction and am planning on using these for the greenhouse. I believe I can adjust the plans accordingly, but I would also appreciate your thoughts and advice in this regard.
Would there be a problem putting the door on the 16ft side? I also wonder about running the center beam the 12ft length and the rafter the 16ft length. Do you see any problems with that?
You can place the door on any side. I don’t understand the second question. This is a 10×16 greeenhouse, do you want to make it 12×16, or change the direction of the roof?
Hello,
really well thought! How would you do it if the door I need to enter some equipment, would be double, without the stud in the middle? How would you reinforce the roof? Do you think in the future there would be a 12×16 plan?
Thanks.
Hey. There already is a 12×16 plan: https://howtospecialist.com/garden/12×16-greenhouse-plans-free-pdf-download/ I wouldn’t center the door to the front wall, so I keep the middle post in place. So I would frame the double doors starting from the center stud towards the side of the greenhouse. Use 2×6 for the header and cripple studs, just as you do it in the case of a shed.
Hello, I constructing the walls at the moment and thinking about starting on the cuts for the roof. Any advice on cutting the 60 degree cut with the mitre say as it only goes to 45.
Maurice in Connemara Ireland
Would there be any compromise to the structural integrity if we increase the wall height to 7′?
No, it works
Don’t purchase PDF plans from this guy, it’s a scam. I paid the $4.99 for the “full” plans and was emailed an exact copy of what is provided here for free. I emailed to request a refund and, of course, was ghosted. I’ll be reporting this site as a scam.
The only scam here it’s you, Mister Veton Saliu, and you are a big liar, as well. I replied to your email within a few hours, explaining that everything is disclosed clearly on the website. You paid for the PDF version of the plans, and that was delivered to your email, so you can print or store them on your computer. In the FAQs section on the website it is explained clearly that the PDF plans are the ones on the blog. You cannot print or download the plans from the website, unless you buy the PDF file. So, Mister Veton Saliu, thank you for your very false claims and I wish you more happiness in your life.
Hi There, First of all thanks for the article! I have a slope in my backyard covered with gravel. I want to utilize that slope by building a greenhouse. I stumped across your article and was wondering if you have any ideas or information on how to build this green house on a slope? The slope falls about 5ft and its 12 ft in length. I can build a raised bed as a base but then i have to shop around for lot of dirt and soil. Is there any other way to build this house while keeping the slope as is as? Any feedback will be appreciated
Do you have any plans for something like 16×20
From the looks of it the 2×4 stakes you put in the ground could be made from from the 8′ scrap left over from the riser pieces of the walls. Is this what you did for this project? Or did you include making the stakes in the total count of 2x4s? Plan on making this in the following weeks getting prices.
Yes, you can make the leftovers.
You have thermostat outlet and vent opener listed but show this nowhere in the plans. Where does the vent go, how is it made, and hoe does thermostat go and work.?
hello, where does the vent go in your plans?
I have a 12×20 steel carport roof from when my carport blew over I’d like to turn into a greenhouse. I am thinking of getting 8 or 10 6″x6″x8ft pressure treated posts and using those as my supports for the roof. Then drilling holes in the tops of them and setting the downward facing steel pipes in the holes and securing it with a lag bolt all the way through. Is this a good idea and should I sink the poles into the ground like 2 ft and secure with concrete?
Could this be modified to use recycled windows instead of polyethylene sheets? Would it need a foundation to support it?