This step by step woodworking project is about how to build an octagon picnic table. Building an octagon table out of wood is a complex project, but the end result is breathtaking compared to the required investment. Gather all the tools needed for the project before starting the construction, otherwise the process will be time consuming. Don’t forget to take a look on the rest of the outdoor furniture projects, if you need more ideas.
There are a few things that you should know or that you should take into consideration before starting the actual assembly of the picnic table. First of all, we recommend you to adjust the size and the design of your table to your own needs and tastes. Therefore, if you need more legroom, you should make the seat supports slightly longer. In addition, you could also use 2×6 slats, if that suits your tastes.
On the other hand, it is essential to invest in the best quality materials you could afford, especially if the picnic table will be exposed to direct sunlight and rain. Choose between cedar, redwood or pine, as these materials provide the best ratio in terms of costs and benefits. In addition, always drill pilot holes before inserting the carriage bolts or screws, to prevent the wood from splitting. See all my Premium Plans in the Shop.
Made from this plan
Building an octagon picnic table

Building an octagon picnic table
Materials
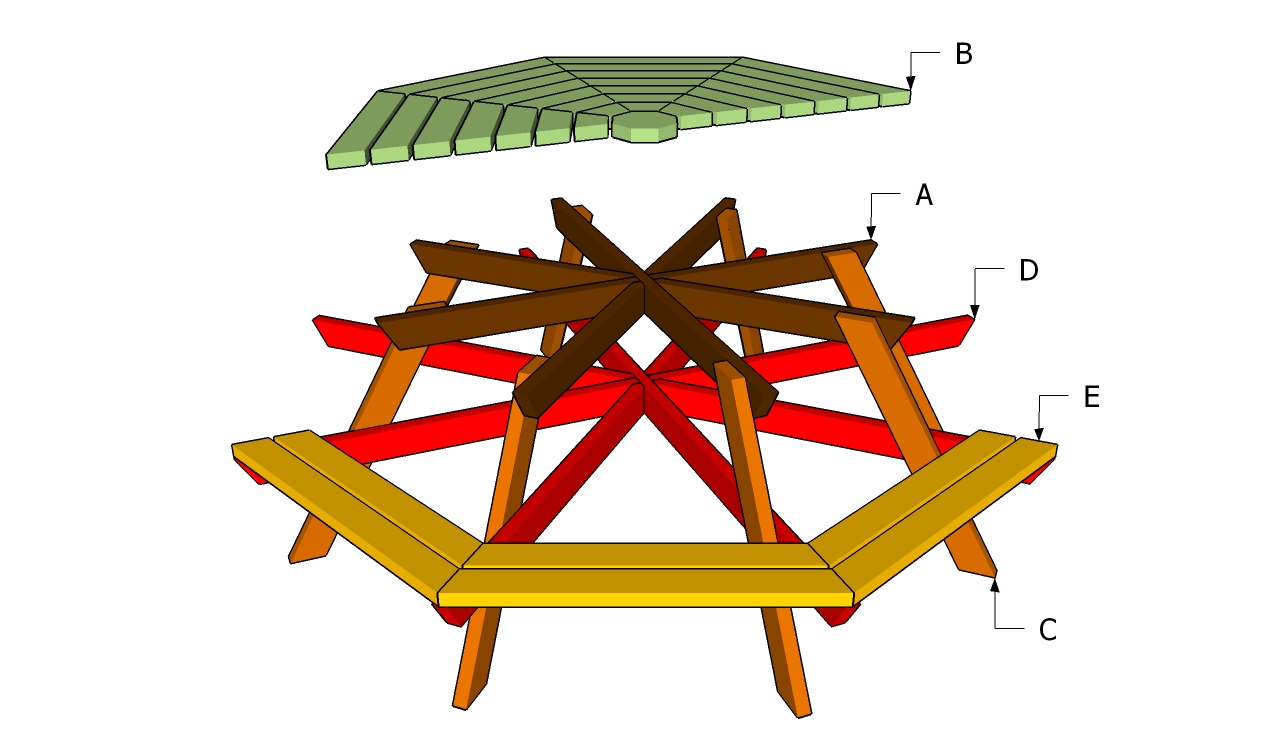
- A – 1 piece of 2×4 lumber – 72″ long, 2 pieces – 35 1/2″, 2 pieces – 35 1/4″ FRAME
- B – 8 pieces of 2×4 – 26″ long, 8 pieces – 22 3/4″, 8 pieces – 19 1/2″, 8 pieces – 16 1/4″, 8 pieces – 12 3/4″, 8 pieces – 9 1/2″, 8 pieces – 6 1/4″ long TABLETOP
- C – 8 pieces of 2×4 – 35″ long LEGS
- D – 1 piece of 2×4 lumber – 95″ long, 2 pieces – 46 1/2″, 2 pieces – 46 3/4″ BENCH SUPPORTS
- E – 8 pieces of 2×4 lumber – 36 1/4″ long, 6 pieces – 33 1/4″ long BENCHES
- 25 pieces of 2×4 lumber – 8 ft
- 2 1/2″ screws
- 1 1/4″ screws
- glue, stain
- wood filler
Tools
- Safety gloves, glasses
- Miter saw, jigsaw
- Chalk line, tape measure, spirit level, carpentry pencil
- Drill machinery and drill bits
Tips
- Use a good miter saw to make the angle cuts
- Drill pilot holes before inserting the screws
Time
- One Week
Related
How to build an octagon picnic table
The first step of the woodworking project is to build the frame of the tabletop. Therefore, you need to shape the frame using the pattern shown in the plans and by using 2×4 lumber. Use a good miter saw to cut the components as in the image, otherwise they won’t fit into place easily. In addition, cut the ends of the components at 60º, if you want to get a neat appearance.
The next step of the picnic table project is to attach the tabletop components. As you can notice in the image, you need to use 2×4 slats and to cut them at different sizes. Make sure you cut both ends of the slats at 67.5º, if you want to get professional joints. (set the miter at 22 5 degrees). Make sure you space the slats properly, by placing a 1/2″ piece of wood between them. Drill pilot holes and insert 2 1/2″ galvanized screws into the frame.
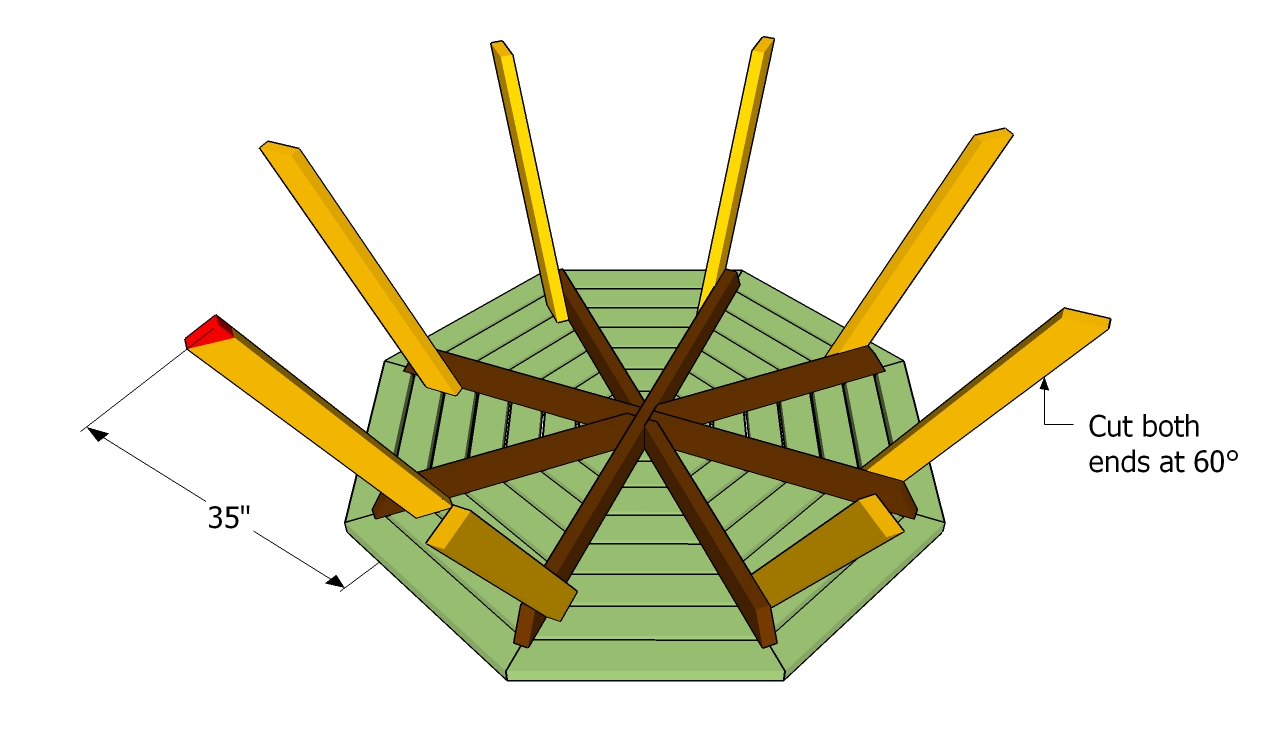
Afterwards, you need to build the eight legs of the octagon table using 2×4 lumber. Cut both ends of the legs at 60 degrees (set the miter at 30 degrees) before attaching them to the tabletop frame. Drill pilot holes both trough the legs and trough the frame and insert 3 1/2″ carriage bolts.
The next step of the project is to build the bench frame, in the same manner as shown above. Cut the 2×4 components at the right size and use a miter saw for the angle cuts. Drill pocket hole through the components and insert 2 1/2″ screws. In addition, we recommend you to add waterproof glue to joints, if you want to get a rigid structure.
You can see in this image a close up with the shape of the joint. As you can easily notice in the image, you need to make several angle cuts, so you need to tackle this part of the project with a lot of attention. If the frame is not rigid enough, then the whole structure won’t be stable.
After attaching the bench frame to the legs with carriage bolts (make sure it is perfectly horizontal), you need to fit the seat slats. In a similar manner to building the tabletop, we recommend you to cut both ends of the slats at 67.5º (set the miter at 22.5 degrees) and to secure them to the frame with galvanized screws. Smooth the exposed edges with a router or with sandpaper, if you want to get a professional result.
Lastly, we recommend you to take care of the final touches. Therefore, fill the holes and the gaps with wood filler and let it dry out for a few hours. Sand the wooden surfaces with medium-grit sandpaper along the wood grain.
Smart tip: Apply a few coats of stain or exterior paint to the components, in order to protect them from decay and water damage. Moreover, place the table on a concrete slab, if you want to protect the bottom of the posts from water damage.
Thank you for reading our project about how to build an octagon picnic table and we recommend you to check out the rest of the projects. Don’t forget to share our projects with your friends, by using the social media widgets.


