The holiday season is here, and there’s no better way to celebrate than by crafting something meaningful with your own hands. This DIY Christmas tree tray plan is not just a project, it’s a versatile piece that brings both functionality and festive cheer to your home. Whether you use it as a serving tray for holiday treats or a charming display shelf for your favorite ornaments, this project will fill your home with the warmth and creativity of the season. Gather your tools, embrace the spirit of Christmas, and let’s create a piece that’s sure to become a cherished part of your holiday traditions!
To make your Christmas tree tray project a success, precision and preparation are key. Start by carefully measuring and marking each cut to ensure all components fit together seamlessly, this will save time and frustration during assembly. Use a miter saw for crisp, accurate angles, but a hand saw can work just as well for smaller cuts. Always sand the edges thoroughly for a smooth finish, especially if you’ll use the tray for serving. Apply wood glue to strengthen joints before securing them with nails, and periodically check that everything is level and aligned as you work. Finally, choose a food-safe finish to protect the wood and give the tray a polished look, it’s the perfect touch to make your project both practical and festive!
We recommend you to invest in the best materials you could afford. Therefore, you should buy weather-resistant lumber, such as pine or cedar. Always take accurate measurements before adjusting the size of the components at the proper size. Drill pilot holes trough the components before inserting the wood screws, to prevent the wood from splitting.
Made from this plan
Pin it for Later!
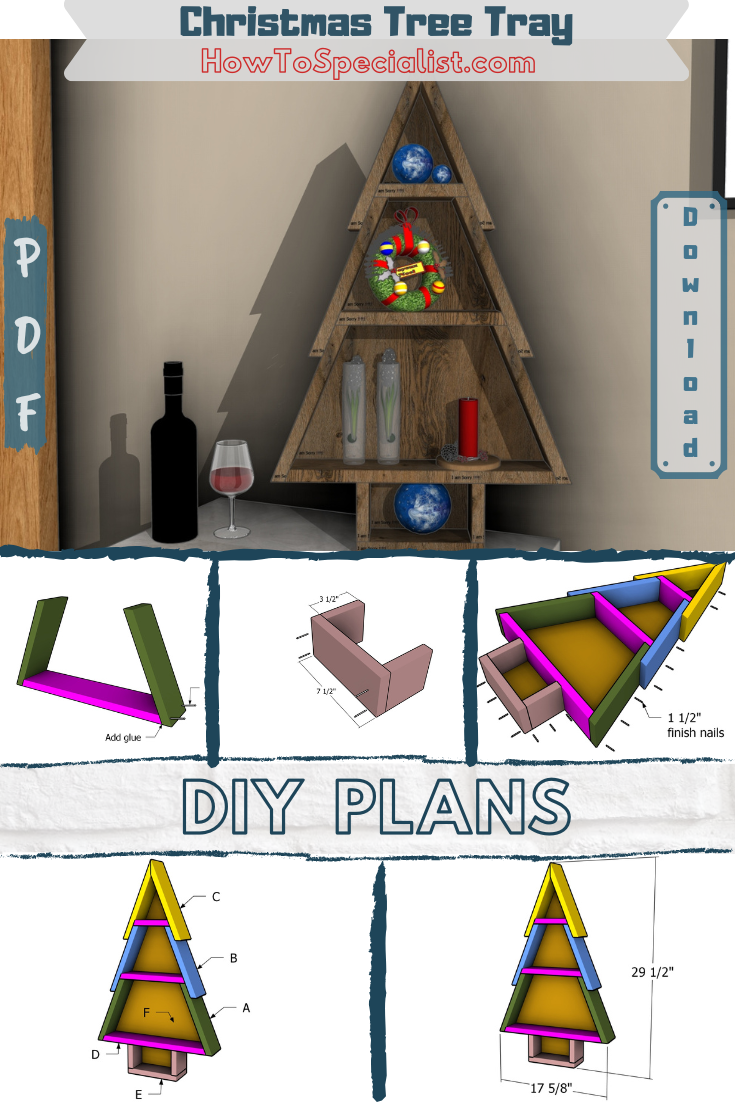
DIY Christmas Tree Tray / Shelves
Building a Christmas Tree Shelves
Materials
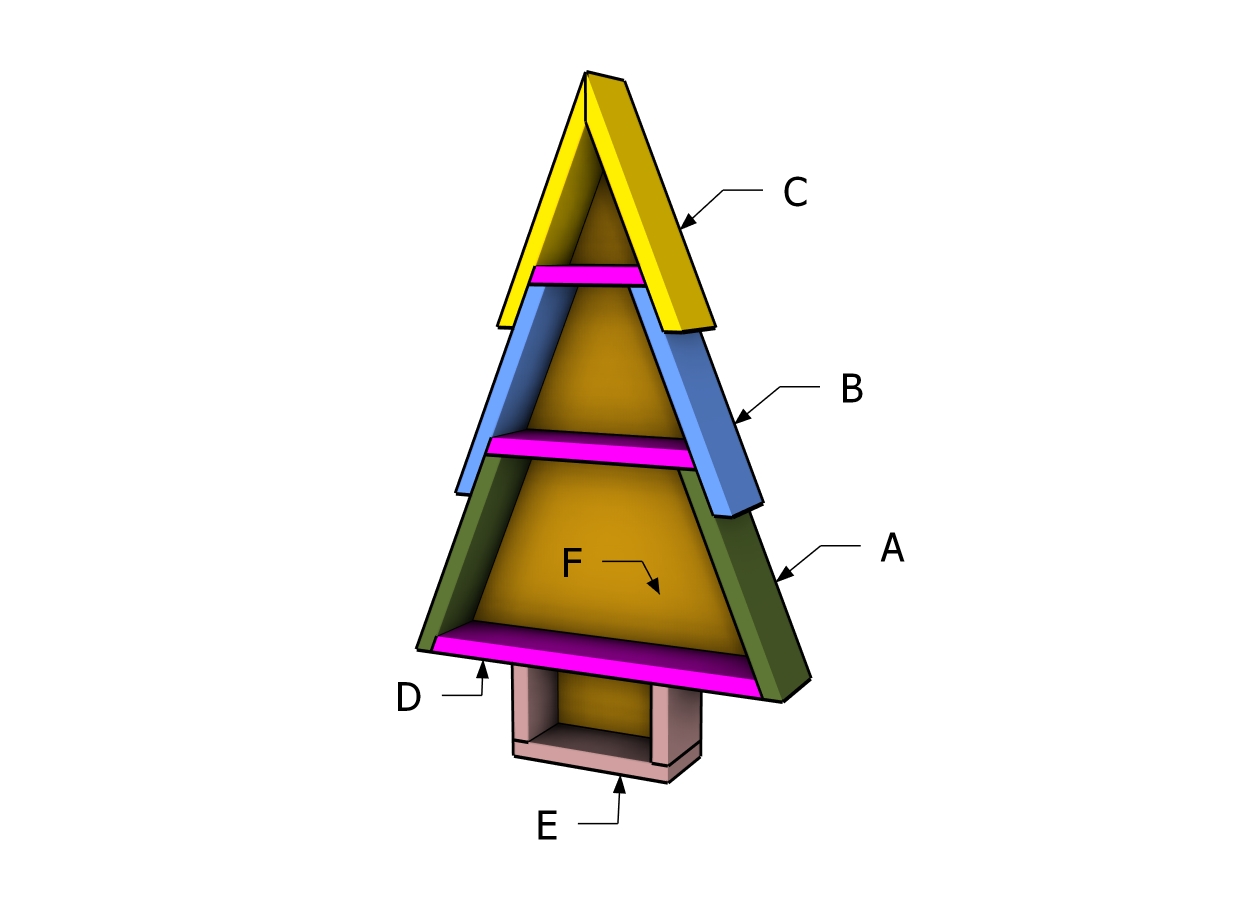
A – CROWN – 1×4 lumber 10 1/4″ – 2 pieces
B – CROWN – 1×4 lumber 10 1/4″ – 2 pieces
C – CROWN – 1×4 lumber 11 1/4″ – 2 pieces
D – SHELVES – 1×4 lumber 5 1/2″ – 1 piece
D – SHELVES – 1×4 lumber 10″ – 1 piece
D – SHELVES – 1×4 lumber 16″ – 1 piece
E – TRUNK – 1×4 lumber 3 1/2″ – 2 pieces
E – TRUNK – 1×4 lumber 7 1/2″ – 1 piece
F – BACK PANEL – 1/2″ plywood 3 1/2″x6″ – 1 piece
F – BACK PANEL – 1/2″ plywood 4 7/8″x5 7/8″ – 1 piece
F – BACK PANEL – 1/2″ plywood 9 3/8″x6 5/8″ – 1 piece
F – BACK PANEL – 1/2″ plywood 15 3/8″x8 1/2″ – 1 piece
- 1×4 lumber 10 ft – 1 piece
- 1/2″ plywood 2’x2′ – 1 piece
- 100 pieces of 1 1/2″ finish nails
- mineral oil / bee wax – 1 can
- Glue – 1 bottle
Tools
- Miter saw, Pocket hole jig
- Drill machinery, Drill bits, Jigsaw
- Safety gloves, Glasses
- Chalk line, tape measure, spirit level, carpentry pencil
Time
- One week
Related
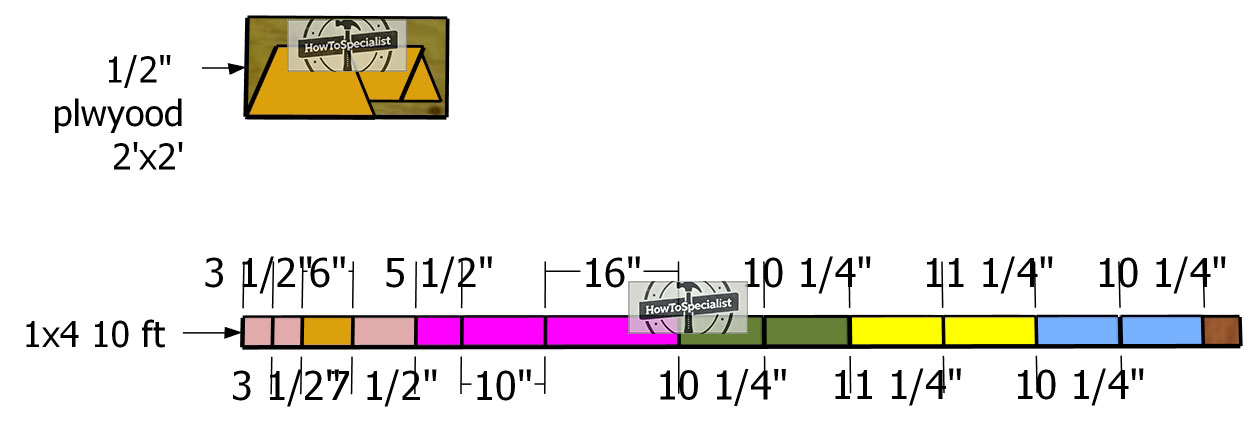
Cut layout diagram
Step 1: Building the tree crown
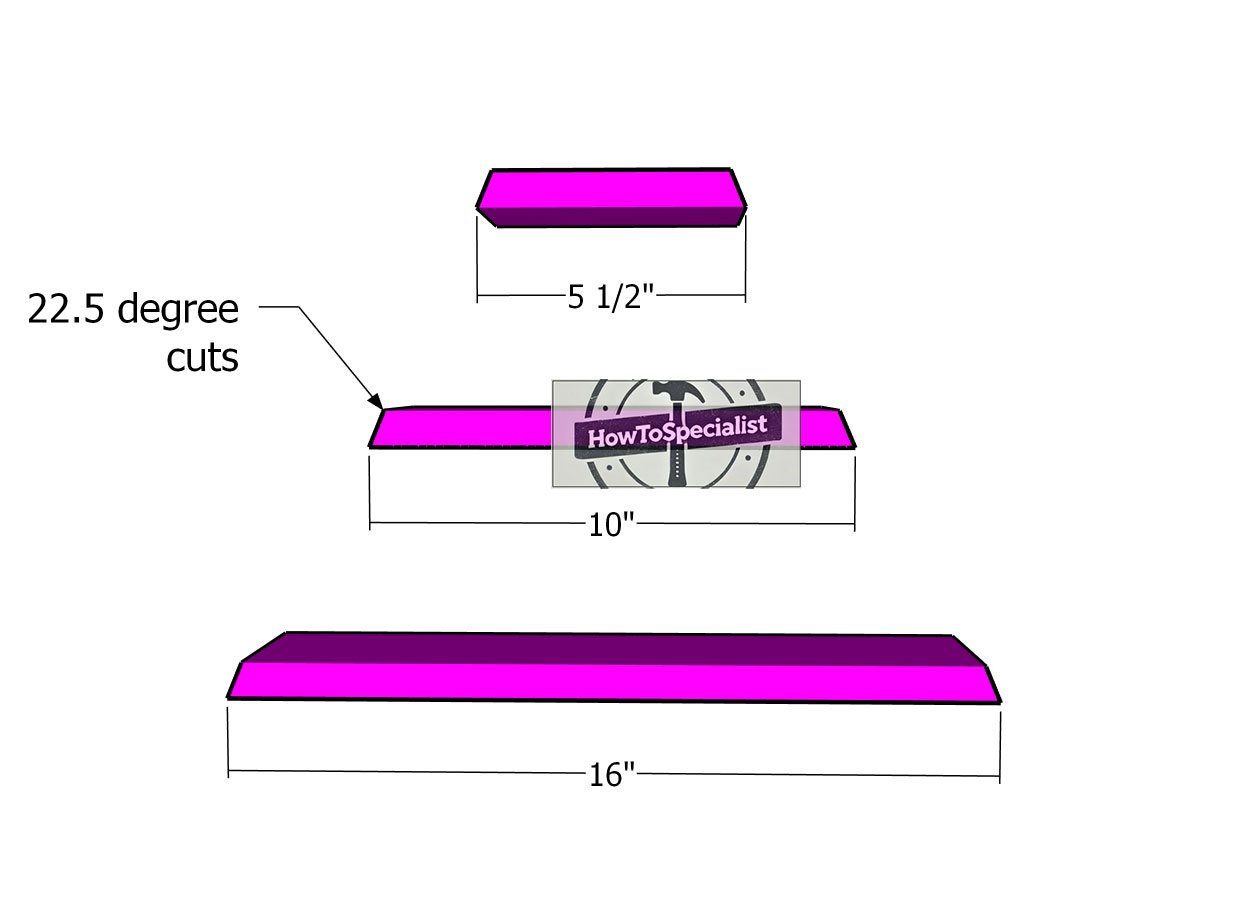
Shelves
The first step in creating your Christmas tree shelves is cutting the boards to size. We’ll be using 1×4 lumber for the tree crown, but feel free to swap in 1x3s or 1x2s based on your preferences. Since I designed this project to double as both a serving tray and a set of decorative shelves, I recommend sticking with 1x4s for added durability and visual balance.
Mark the angled cuts carefully on the boards to ensure precision. Then, cut the pieces to size using your preferred saw. A miter saw is ideal for speed and accuracy, but if you prefer a hands-on approach, a hand saw works just as well—this project is simple and manageable for either tool.
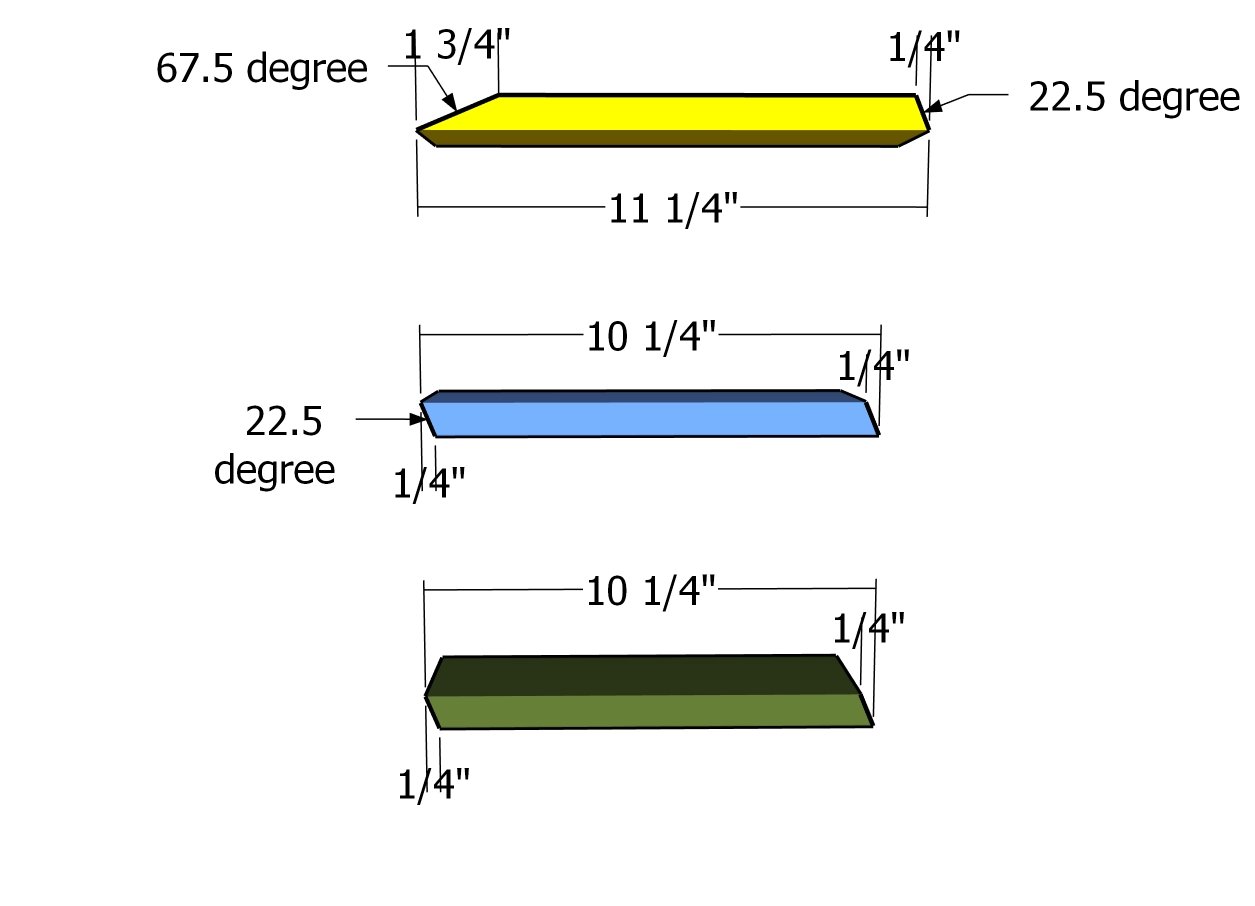
Crown slats
Next, cut the components for the tree crown. Accuracy is key here, so take your time marking the cut lines to ensure precise angles and measurements. Once everything is marked, make the cuts using your preferred saw. After cutting, smooth the edges with sandpaper to remove any splinters or rough spots, giving the pieces a clean, finished look and making them safer to handle.
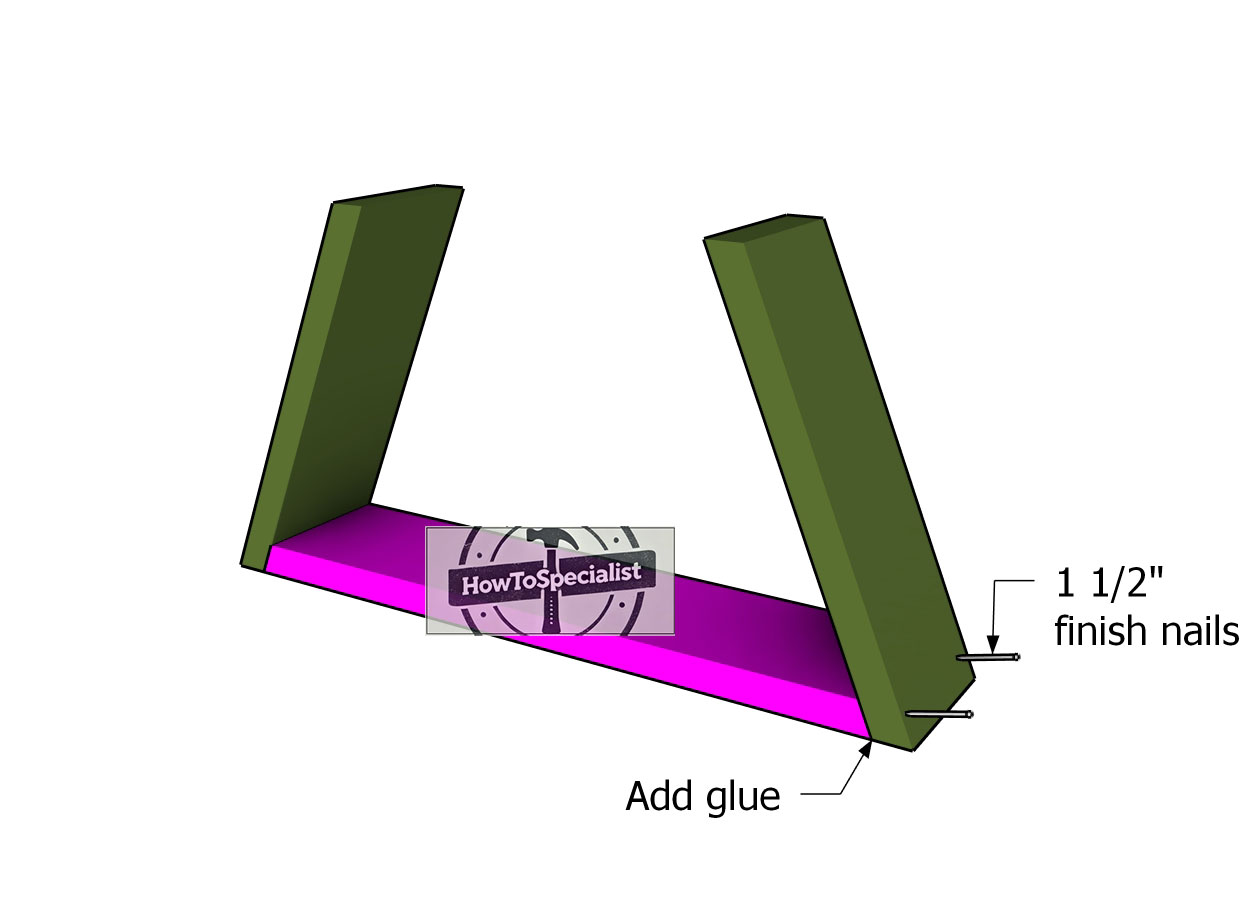
Attaching-the-base-slats
Once we have the main components cut, we need to assemble the tray. Start with the base of the tree. Attach the side slats to the base shelf and align the edges flush. Add glue to the joints and insert 1 1/2″ finish nails to secure the components together tightly. You can use a nail gun or a hammer.
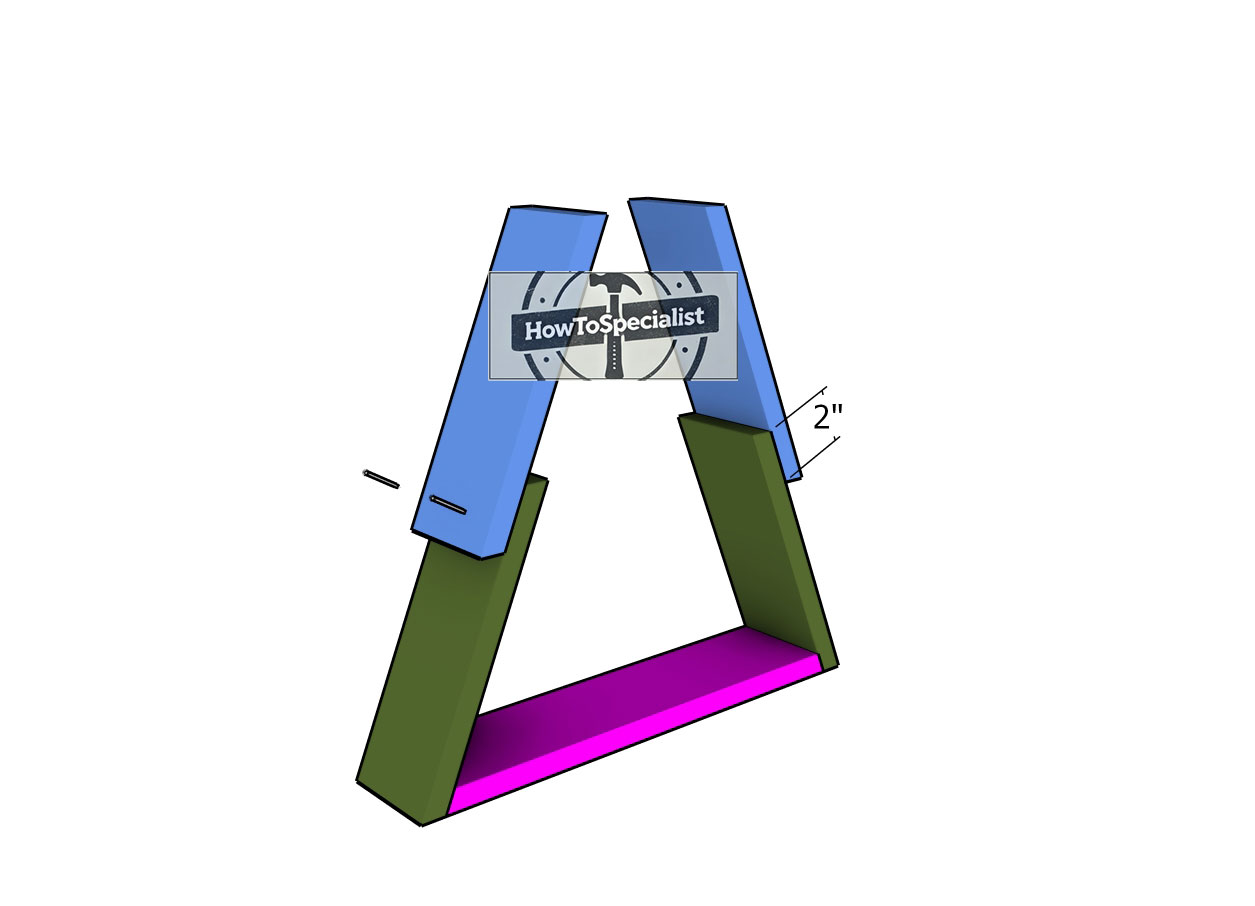
Middle-slats
Next, attach the second layer of slats to the tree tray. Ensure that the slats overlap by 2″, as shown in the diagram, to create the tiered tree effect. Align the pieces carefully before securing them. Use 1 1/2″ finish nails to attach the slats firmly to the base. Be sure to check the alignment regularly to keep the layers neat and symmetrical as you work.
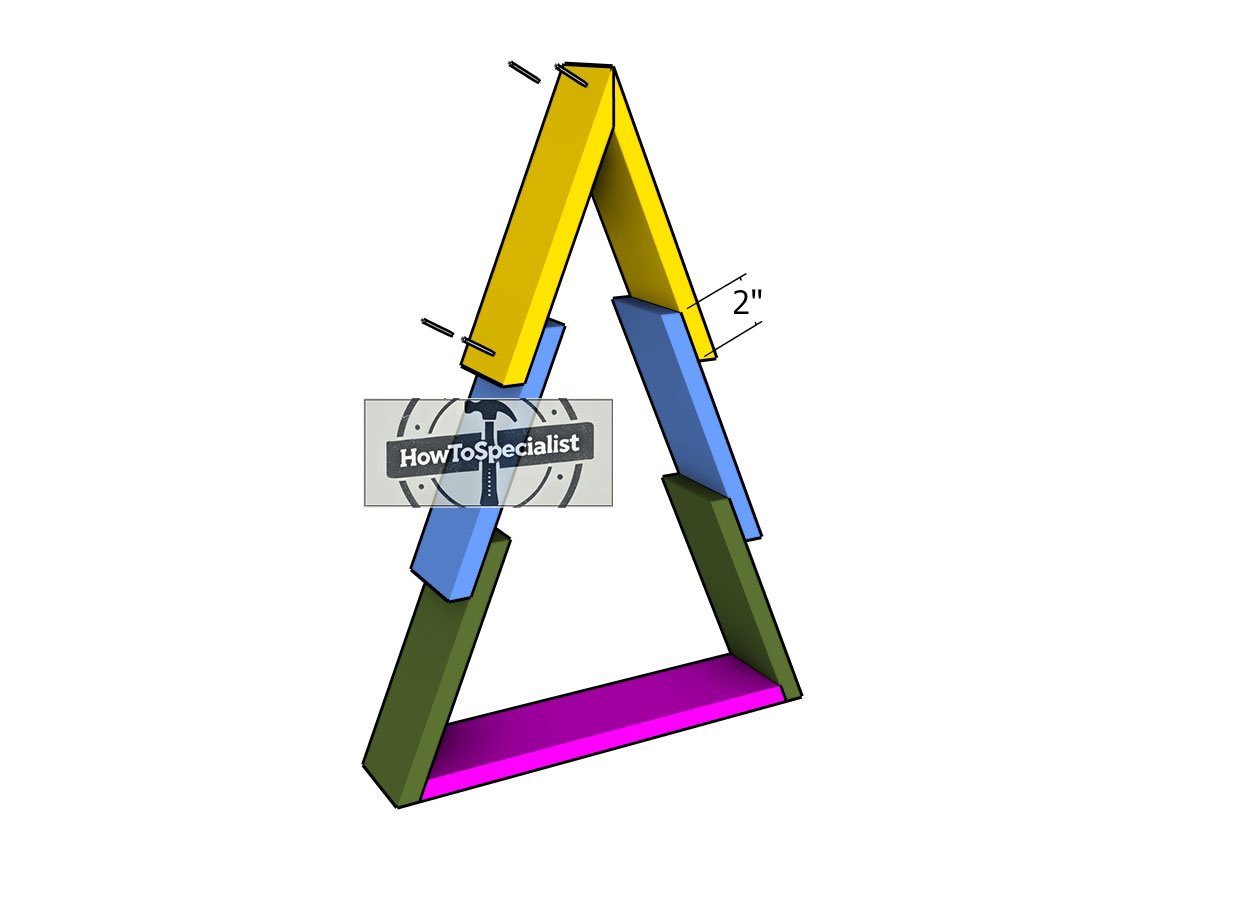
Fitting-the-top-slats
To complete the tree crown, attach the top slats. Align the edges carefully so they are flush for a clean, professional look. Secure the slats in place by inserting 1 1/2″ finish nails, ensuring a tight and sturdy fit. For added support and durability, apply wood glue to the joints before nailing. This extra step will help the tree crown withstand regular use and last for years to come.
Step 2: Building the tree trunk
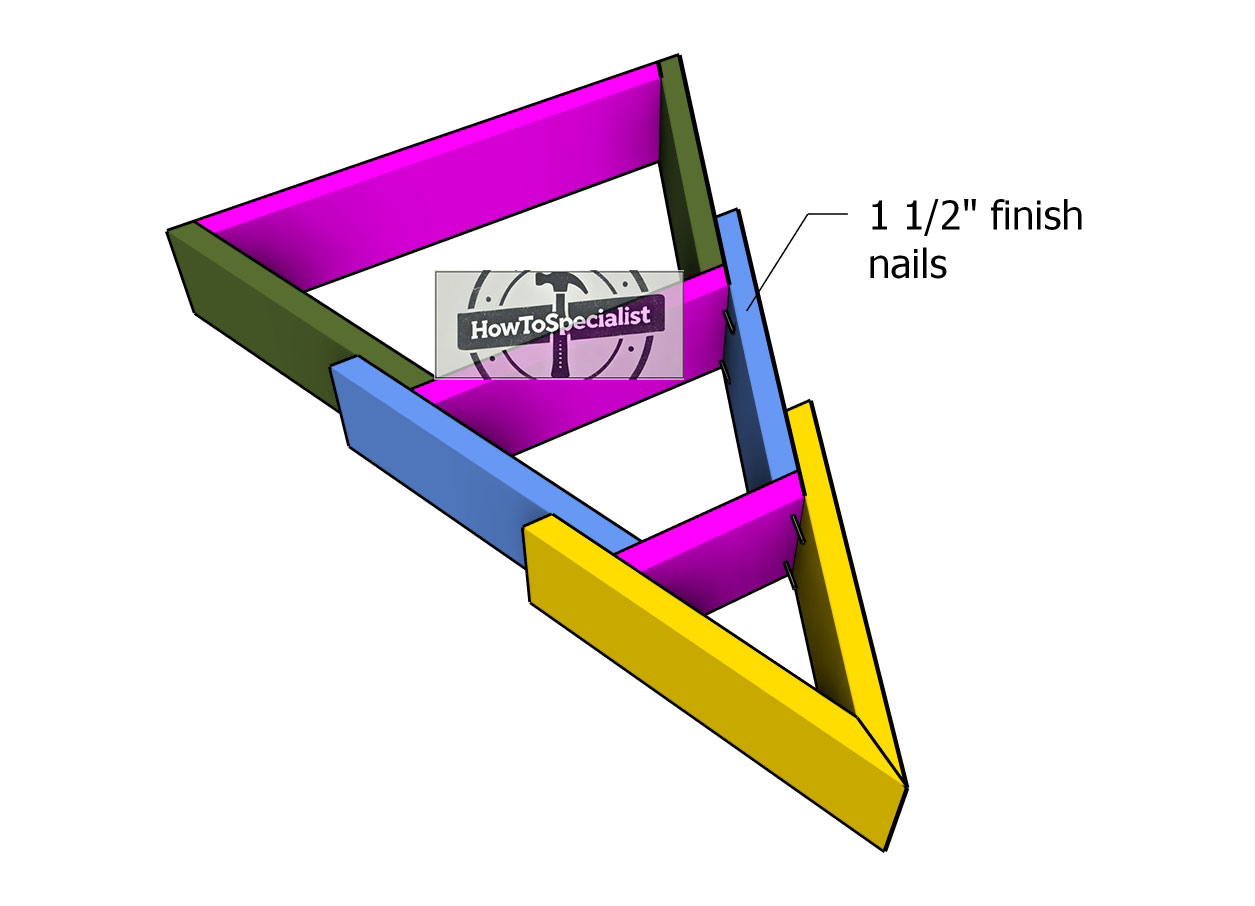
Fitting-the-shelves
With the tree crown assembled, it’s time to attach the shelves. Position each shelf carefully, ensuring they are level and evenly spaced for a balanced appearance. Use a nail gun to secure the shelves in place with 1 1/2″ finish nails. Check the alignment as you go to make sure everything stays straight and sturdy.
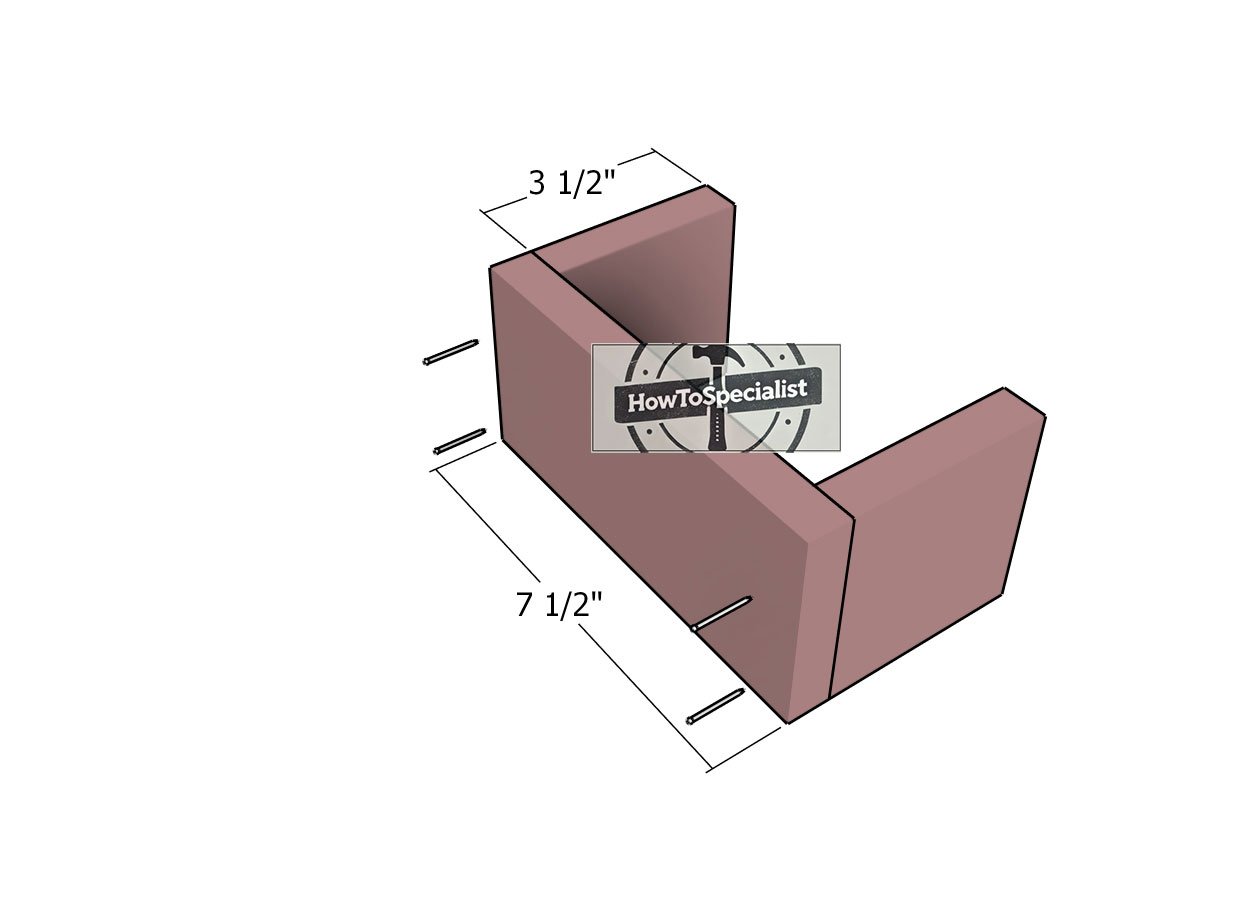
Building-the-base
Next, assemble the tree trunk tray. Cut the 1×4 boards to the specified sizes, as shown in the diagram. Lay the pieces on a level surface to ensure stability during assembly. Align the edges flush for a neat finish, then secure the boards together using wood glue and 1 1/2″ finish nails. Take your time to check the alignment before fastening to ensure the tray is square and sturdy.
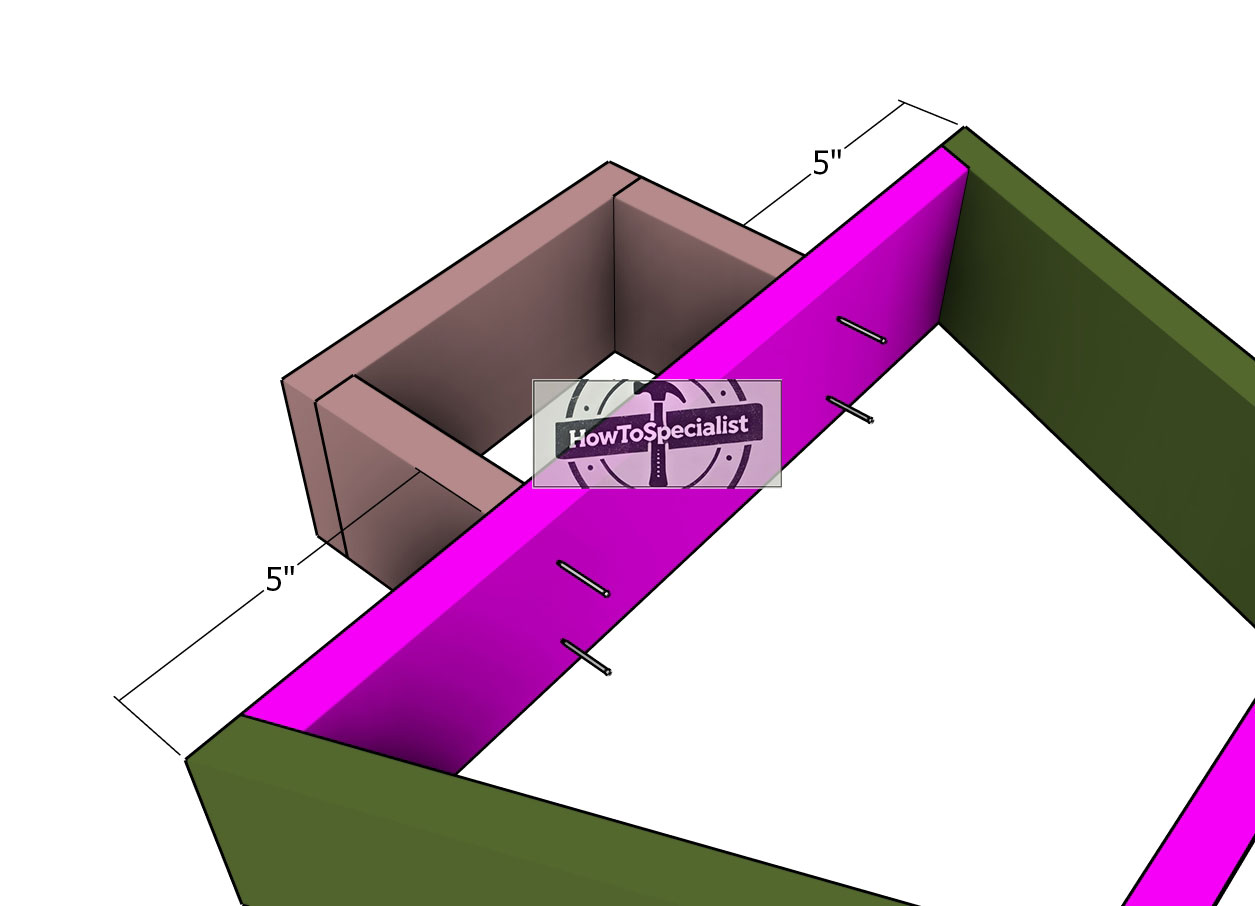
Attaching-the-base—tree-tray
Attach the trunk tray to the tree structure using 1 1/2″ finish nails. Carefully center the trunk tray in its designated position before securing it. Apply wood glue to the joints to strengthen the connection and ensure durability. As you fasten the components, check for gaps and press the pieces tightly together for a seamless fit and a polished appearance.
Step 3: Attaching the back panels
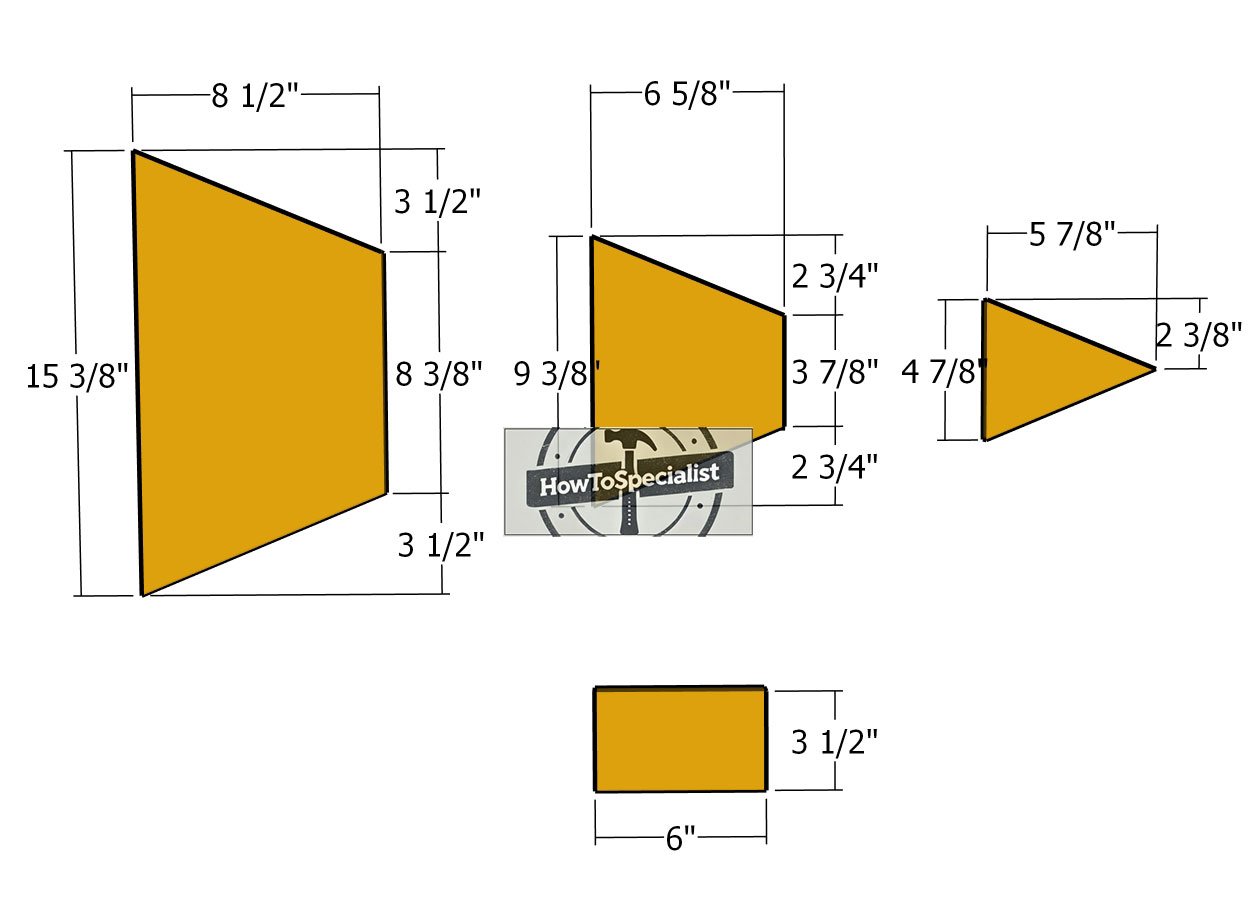
Back-panels
For the back of the Christmas tree tray, we’ll use 1/2″ plywood for a sturdy and clean finish. A 2’x2′ piece of plywood is perfect for this project. Measure and mark the dimensions as shown in the diagram, then cut all the required pieces for the back of the tray. Make sure your cuts are precise to ensure a snug and seamless fit during assembly.
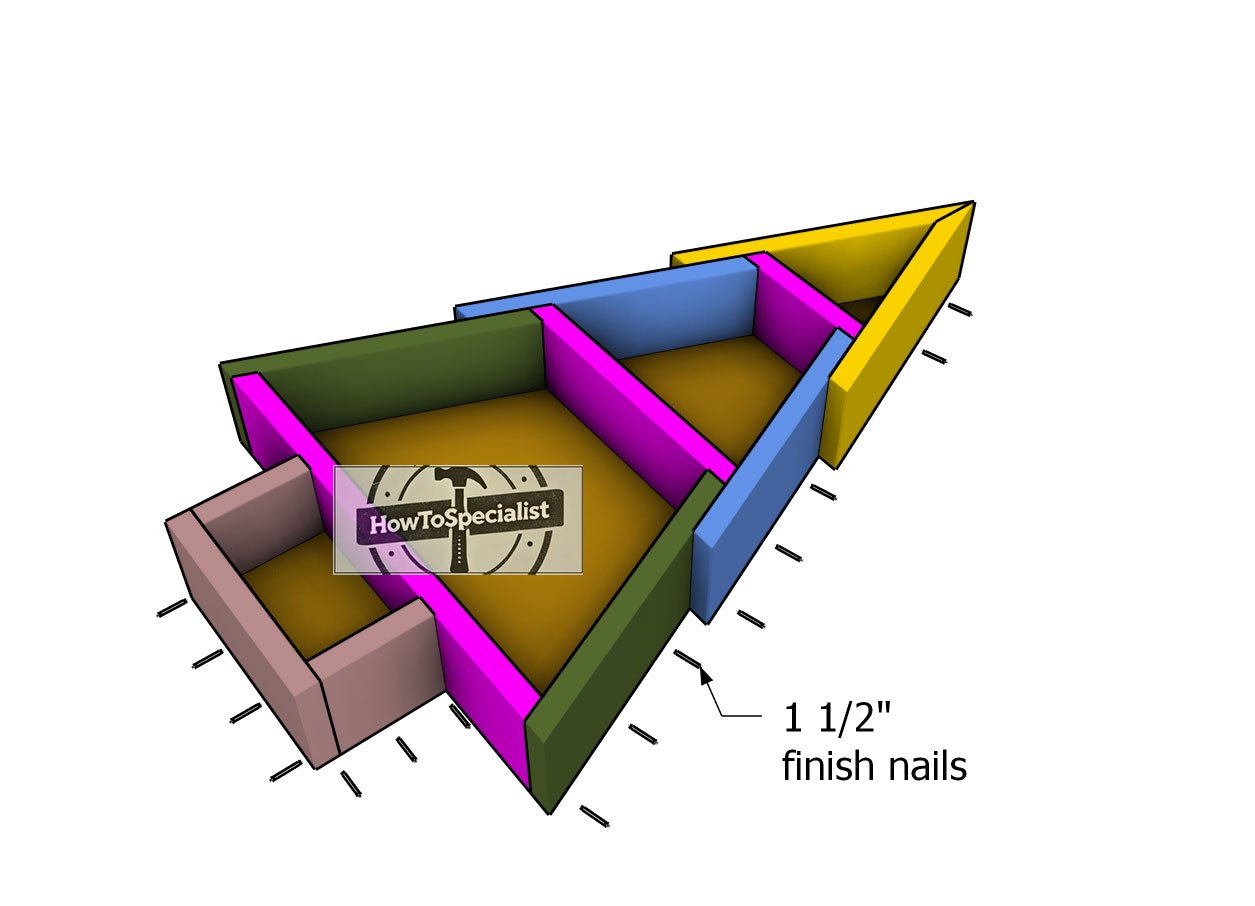
Fitting-the-back-panels
Place the tray on a level surface to ensure stability during assembly. Position the plywood panels for the back, aligning them carefully with the edges of the tray. Apply wood glue to the joints for added strength, then secure the panels in place using 1 1/2″ finish nails on both sides. Check that everything is flush and secure to achieve a clean and professional finish.
Step 4: Finishing touches
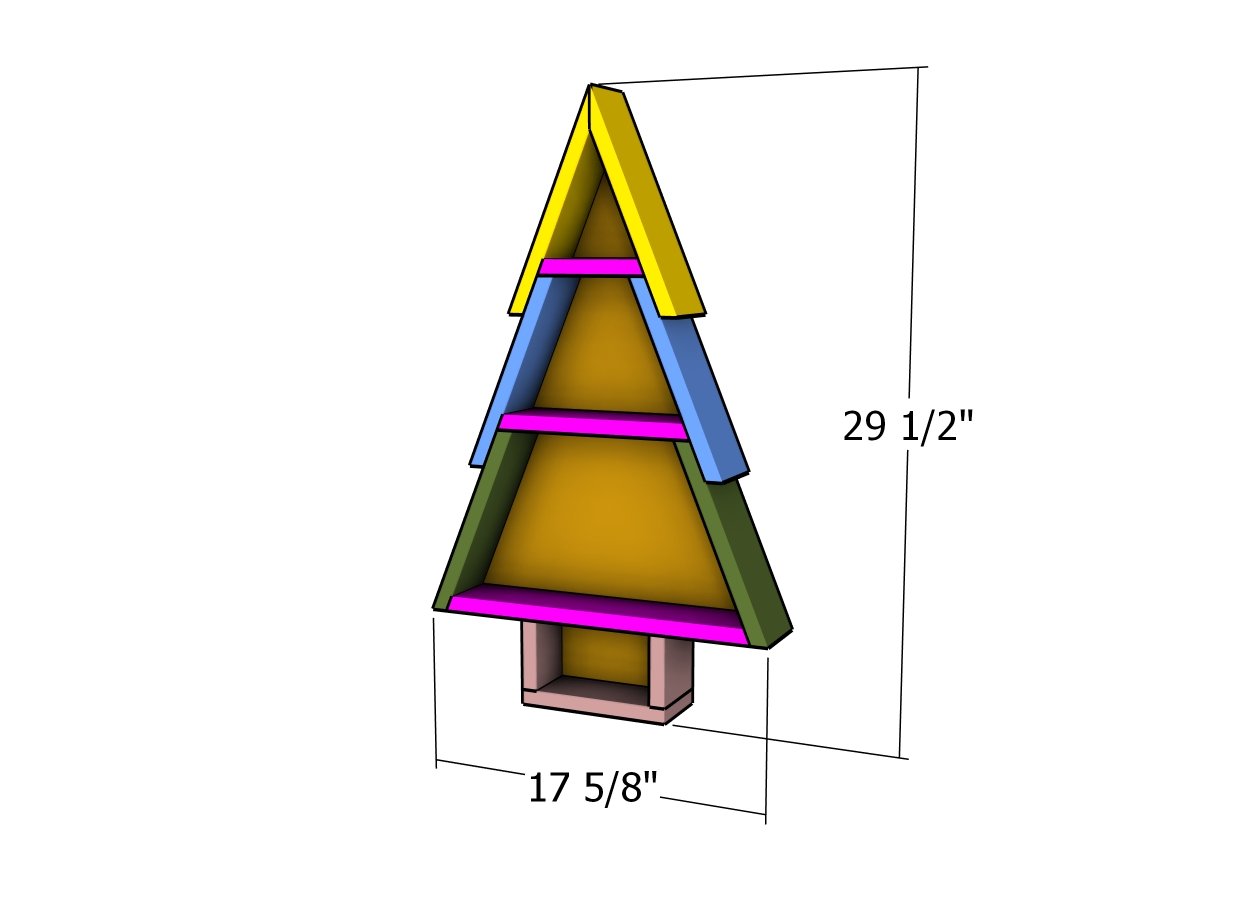
Wood Christmas tray – dimensions
With the Christmas tree tray fully assembled, it’s time to focus on the finishing touches. Start by filling any gaps or nail holes with wood putty, ensuring a smooth and seamless appearance. Once the putty has dried, sand the entire tray, paying special attention to the edges and corners, until the surface is smooth and free of rough spots.
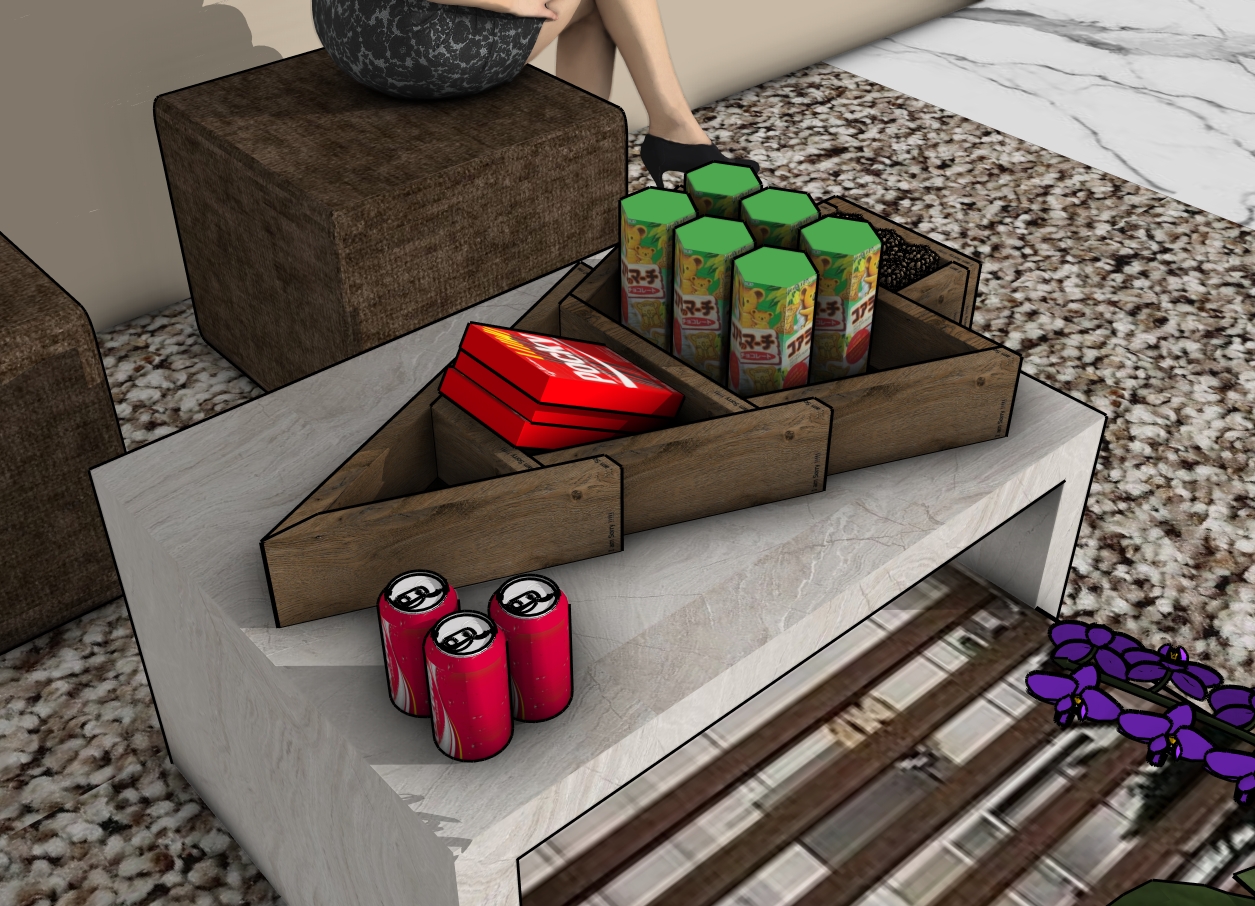
How to build a Christmas tree tray
Finally, apply a food-safe finish to protect the wood and make the tray suitable for serving. A mineral oil finish or a beeswax-based product works beautifully for this purpose. Let the finish cure as directed, and your Christmas tree tray will be ready to use and display!

Christmas tree tray plans
The Christmas tree tray combines versatility and charm, making it a perfect addition to your holiday decor. Use it as a functional serving tray during festive gatherings, offering a unique way to present treats, snacks, or drinks to guests.
Alternatively, transform it into a delightful shelf display, showcasing small ornaments, candles, or other seasonal decorations. Its dual purpose ensures it’s not only practical but also a beautiful centerpiece, adding warmth and holiday spirit to any space.
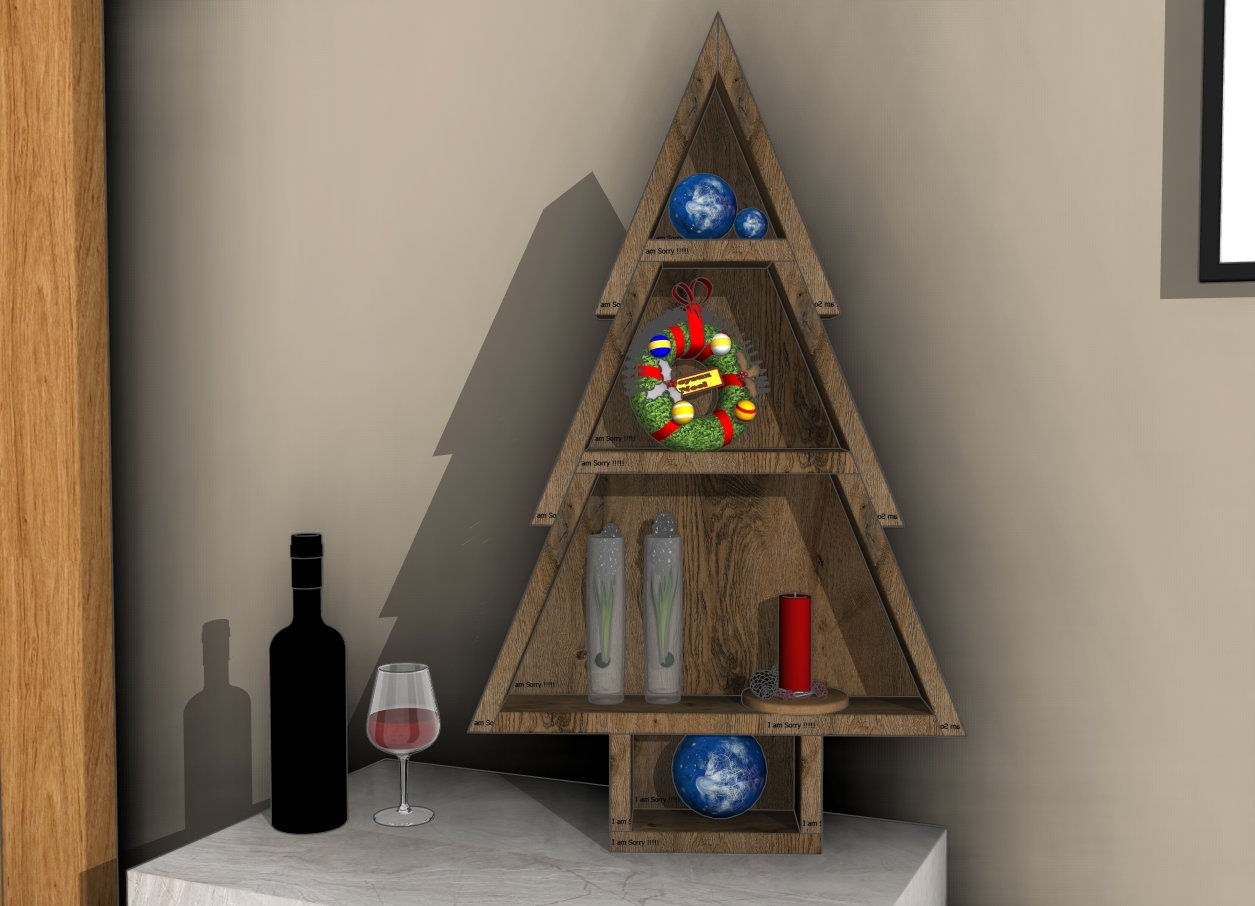
How to build Christmas tree shelves
As you place the final touches on your Christmas tree tray, let its presence in your home be a reminder of the true spirit of Christmas—a time to share, to give, and to cherish. Whether it carries treats for loved ones or cradles ornaments that tell stories of years gone by, this creation becomes more than just wood and nails—it’s a symbol of joy, love, and togetherness.
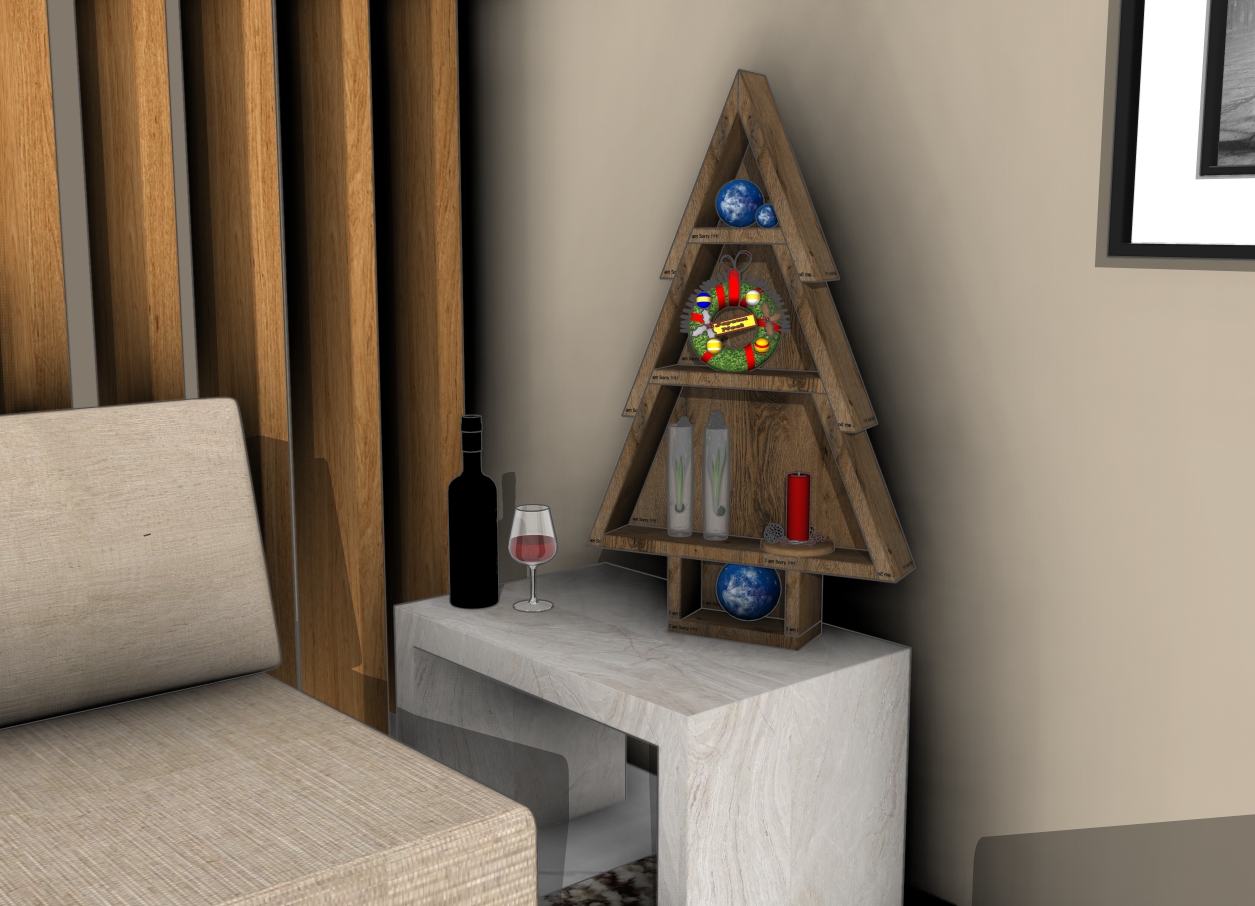
Wood Christmas tree shelves
May it inspire laughter around the table, warmth in the heart, and a spark of creativity in all who see it. This holiday season, let the Holy Spirit of Christmas shine brightly, not just in your decor, but in the love you share with those around you.
Thanks for checking out my DIY Christmas tree tray plans! Be sure to explore my other projects for more fantastic ideas. Don’t forget to hit the LIKE button and SHARE with your friends using the social media links below.

