This step by step woodworking project is about free 4×8 short lean to plans. I have designed this small shed for your garden so you can store tools and small equipment. This shed is built on a sturdy 2×4 framing and it features double front doors. The lean to roof is easy to build and it requires few materials. In most cases, you don’t need a building permit for this shed. See my other DIY projects HERE.
We recommend you to invest in the best materials you could afford. Therefore, you should buy weather-resistant lumber, such as pine or cedar. Always take accurate measurements before adjusting the size of the components at the proper size. Drill pilot holes trough the components before inserting the wood screws, to prevent the wood from splitting. See all my Premium Plans HERE.
Made from this plan
4×8 Short Lean to Shed – Free DIY Plans
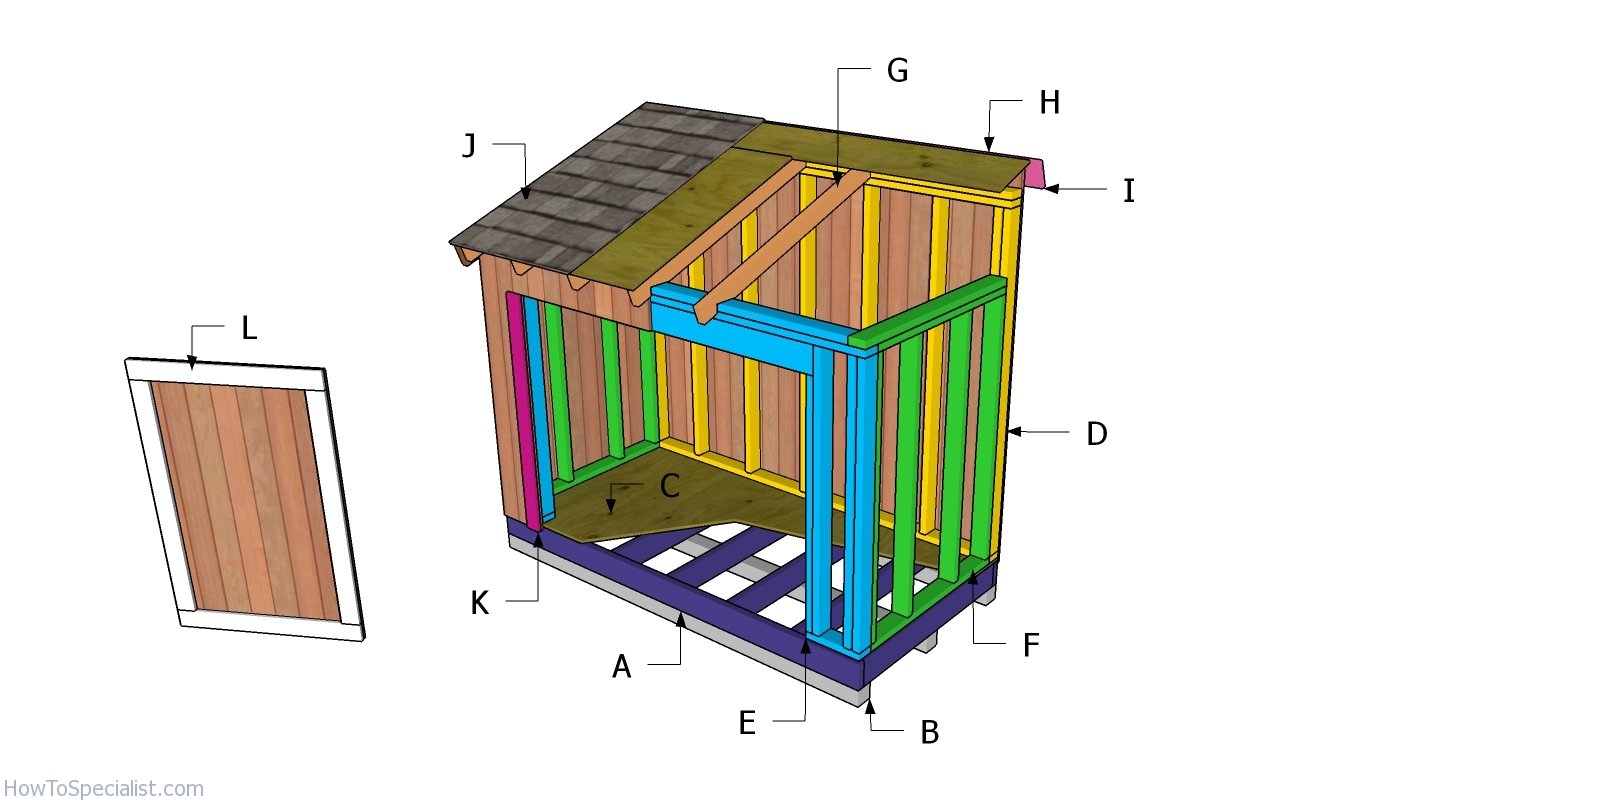
Building a 4×8 short shed
Materials
- A – 2 pieces of 2×6 lumber – 96″ long, 7 pieces – 45″ long FLOOR FRAME
- B – 3 pieces of 4×4 lumber – 96″ long SKIDS
- C – 1 piece of 3/4″ plywood – 4’x8′ long FLOOR
- D – 3 pieces of 2×4 lumber – 96″ long, 9 pieces – 71 1/2″ long BACK WALL
- E – 2 pieces of 2×4 lumber – 12″ long, 1 piece – 89″ long, 1 piece – 96″ long, 6 pieces – 55 1/2″ long, 2 pieces – 50″ long, 2 pieces of 2×6 lumber – 75″ long FRONT WALL
- F – 2 pieces of 2×4 lumber – 41″ long, 1 piece – 44 1/2″ long, 4 pieces – 55 1/2″ long 2xSIDE WALL
- G – 7 pieces of 2×4 lumber – 58 3/4″ long RAFTERS
- H – 1 piece of 1/2″ plywood – 4’x8′ long, 1 piece – 10 3/4″x96″ long ROOF
- I – 2 pieces of 2×6 lumber – 58 3/4″ long, 2 pieces of 1×6 lumber – 100 1/4″ long TRIMS
- J – 50 sq ft of tar paper, 50 sq ft of asphalt shingles ROOFING
- K – 2 pieces of 2×4 lumber – 53″ long, 1 piece – 79″ long JAMBS
- L – 2 pieces of 2×4 lumber – 46″ long, 1 piece – 36″ long, 1 piece of 5/8″ T1-11 siding – 36″x53″ long 2xDOOR
- 9 pieces of 2×6 lumber – 8 ft
- 3 pieces of 4×4 lumber – 8 ft
- 1 piece of 3/4″ plywood – 4’x8′
- 2 pieces of 1/2″ plywood – 4’x8′
- 24 pieces of 2×4 lumber – 8 ft
- 12 pieces of 2×4 lumber – 10 ft
- 2 pieces of 1×6 lumber – 10 ft
- 6 pieces of T1-11 siding – 4’x8′
- 50 sq ft of tar paper, 50 sq ft of asphalt shingles
- 1 5/8″ screws, 2 1/2″ screws, 3 1/2″ screws
- 8d nails
- shed hinges & latch
- rafter ties
- 1 1/2″ structural screws
- wood filler , wood glue, stain/paint
- shed anchors
Tools
- Safety gloves, glasses
- Miter saw, jigsaw
- Chalk line, tape measure, spirit level, carpentry pencil
- Drill machinery and drill bits
Building a 4×8 short shed – Free Plans
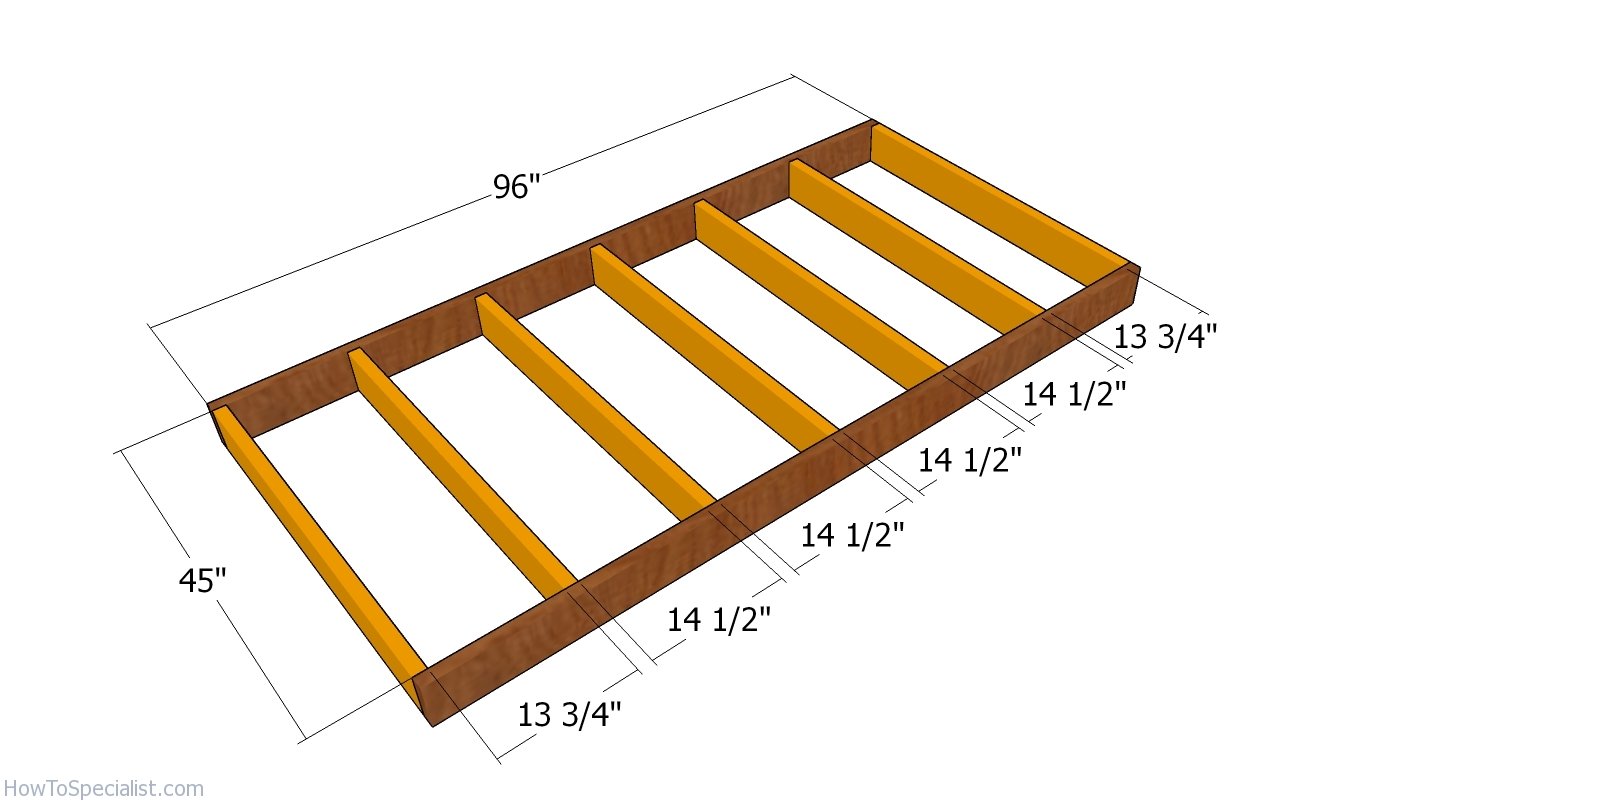
Floor frame – 4×8 shed
First, build the frame for the 4×8 lean to shed. Cut the joists from 2×6 lumber as shown in the diagram. Drill pilot holes through the rim joists and insert 3 1/2″ screws into the perpendicular components. Place the joists every 16″ on center. Make sure the corners are square and align the edges flush.
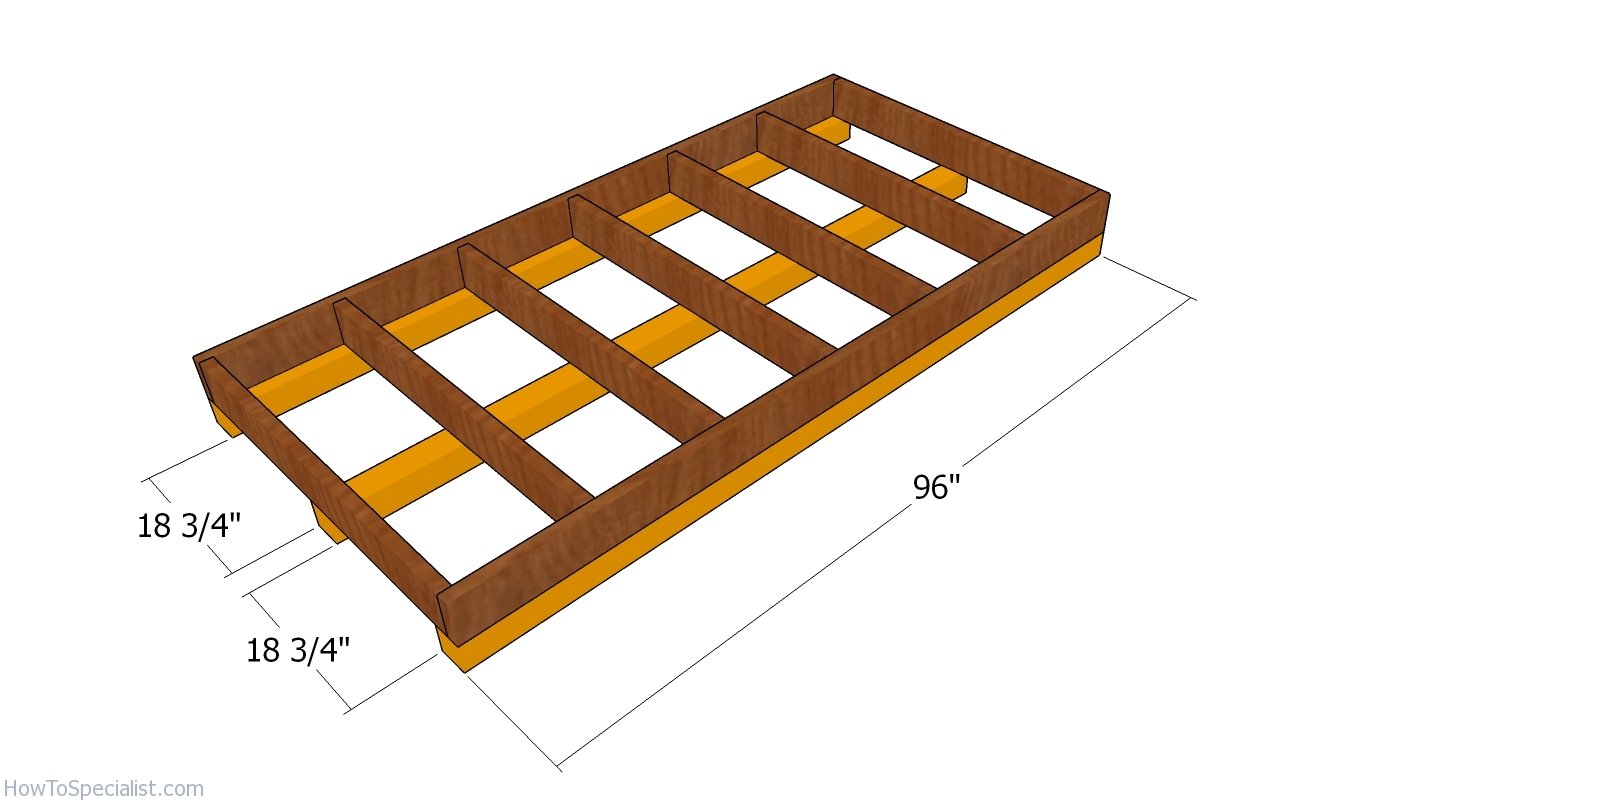
Fitting the skids – under floor frame
You can fit 4×4 skids under the floor frame to lift it from the ground. In this manner, you will protect the floor from moisture and thus make it more durable. Measure the diagonals and adjust the floor frame until they are equally. Lock the skids to the frame with rafter ties.
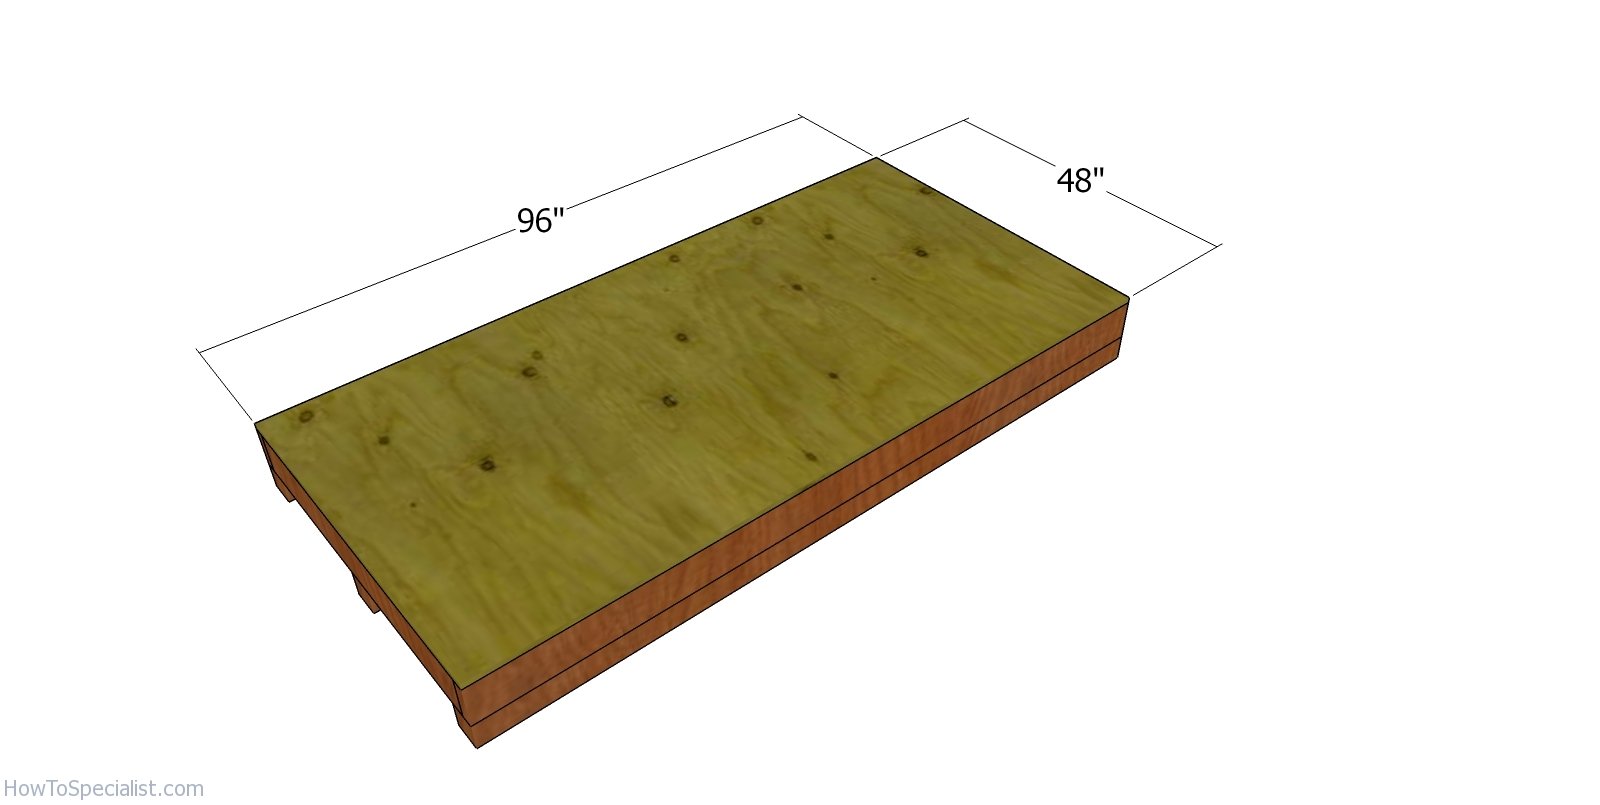
Floor sheet – 4×8 shed
Attach a piece of 3/4″ “plywood to the floor frame. Invest in pressure treated plywood. Align the edges flush, drill pilot holes and insert 1 5/8″ screws, every 8” along the framing.
Side wall frame
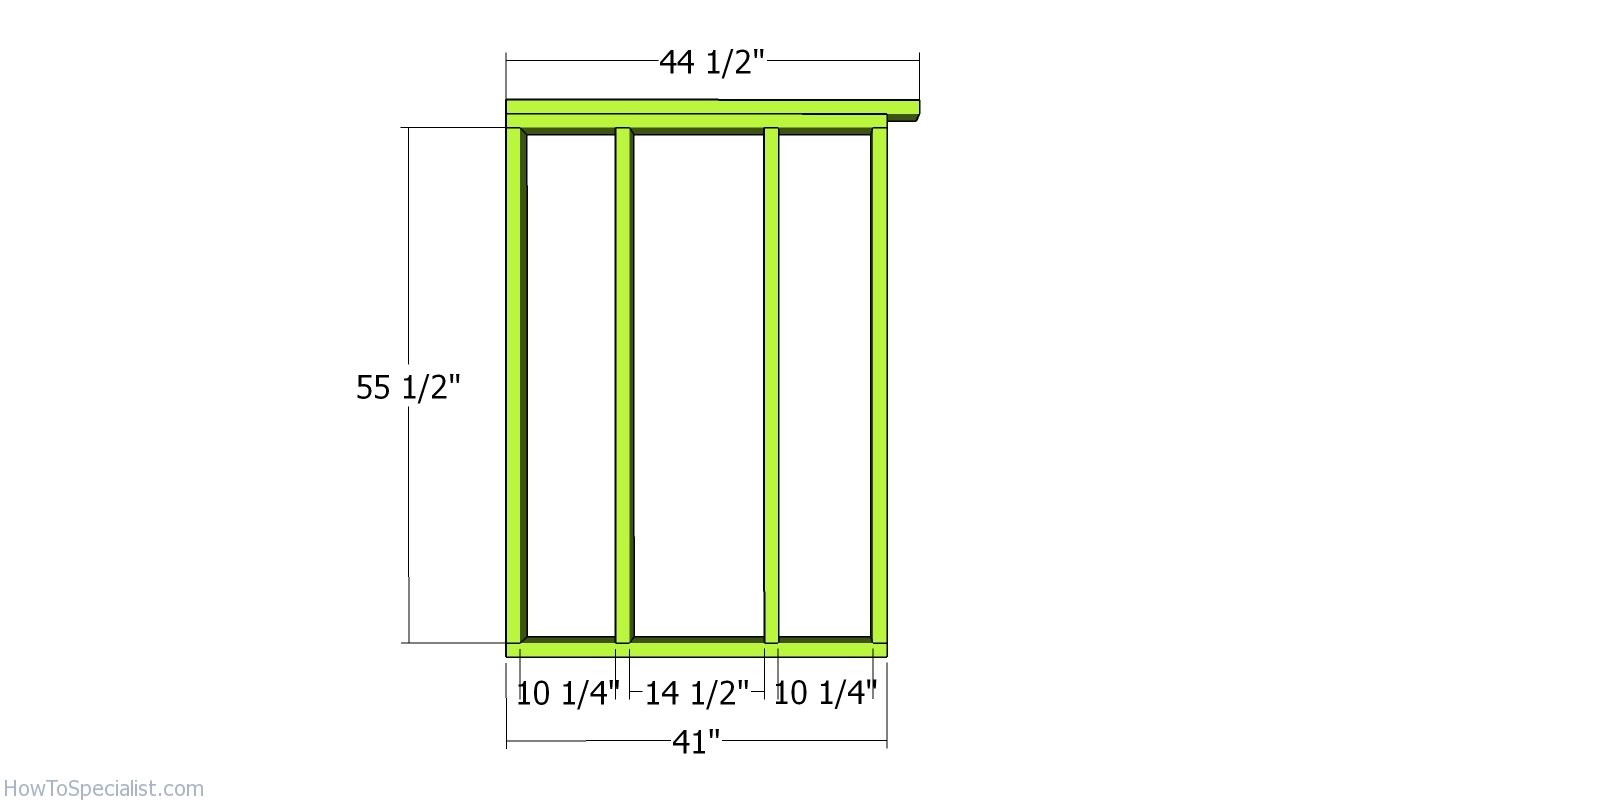
Build the side wall frames for the short shed. Cut the components from 2×4 lumber, as shown in the diagram. Drill pilot holes through the plates and insert 3 1/2″ screws into the studs. Place the studs every 16″ on center, as shown in the free shed plans. Notice the double top plates.
Front wall frame – short shed
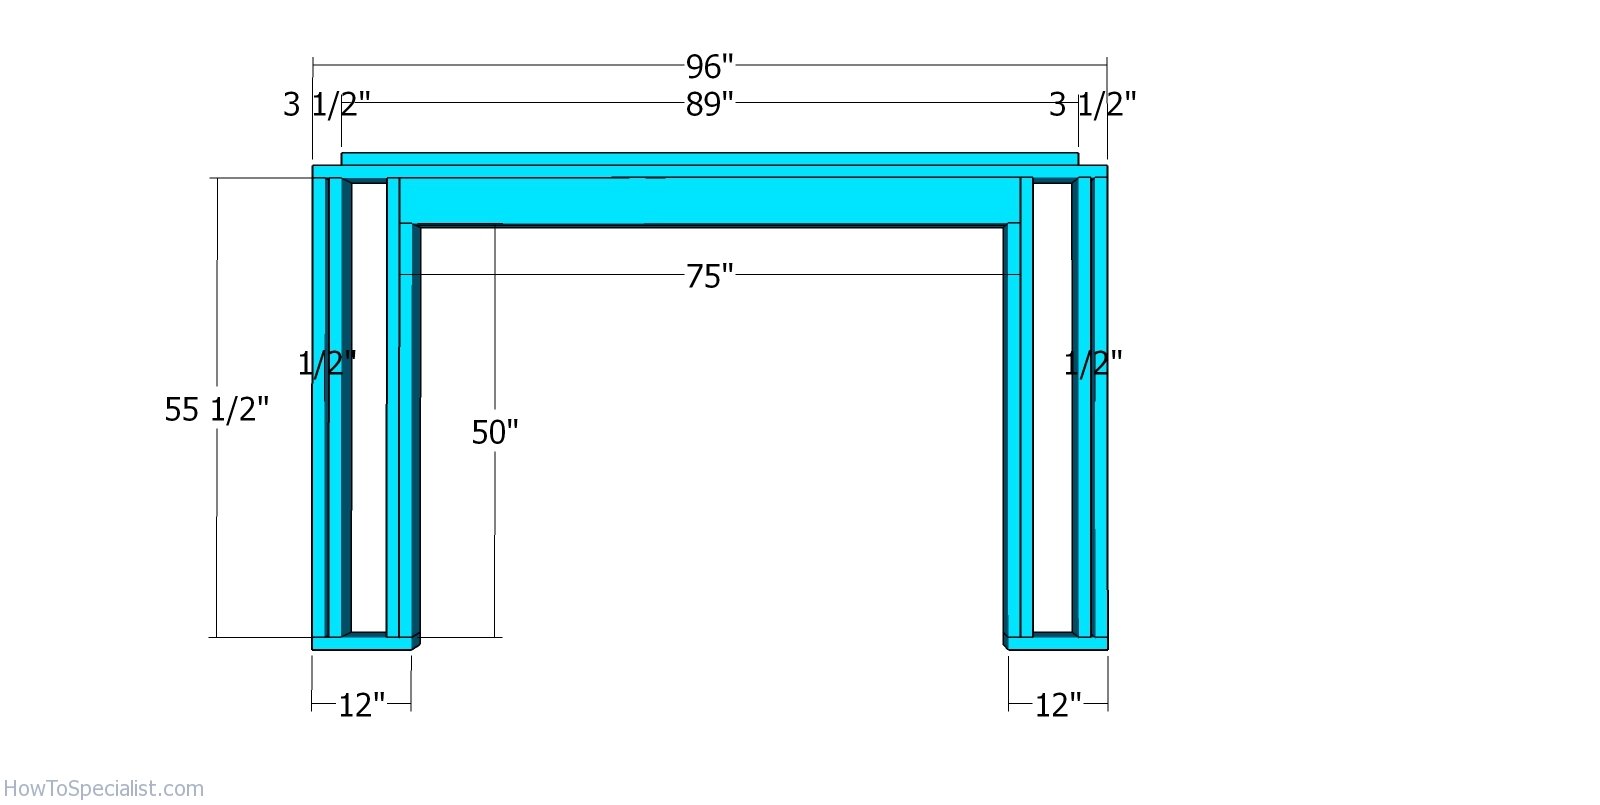
Continue the short shed project by assembling the front wall frame. Notice the double header built from 2x6s and 1/2″ plywood. Add glue to the joints and insert 2 1/2″ screws from both sides. Drill pilot holes through the plates and insert 3 1/2″ screws into the studs. Fit 1/2″ plywood pieces between the double studs. The opening is for double 6 ft doors.
Back wall frame
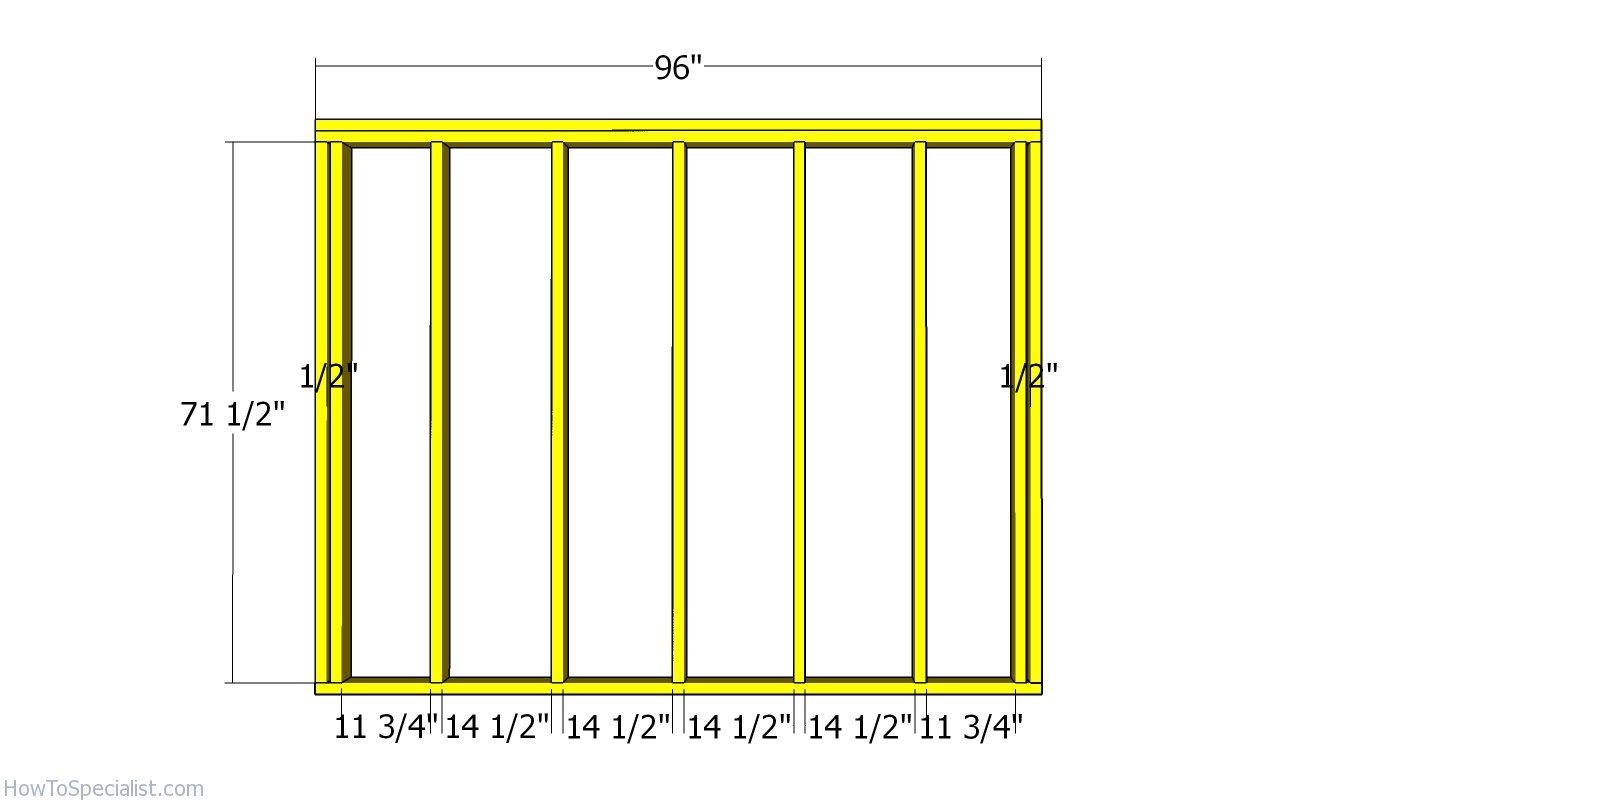
Build the back wall for the shed in the same manner described above.
Assembling the shed frame – 4×8 lean to
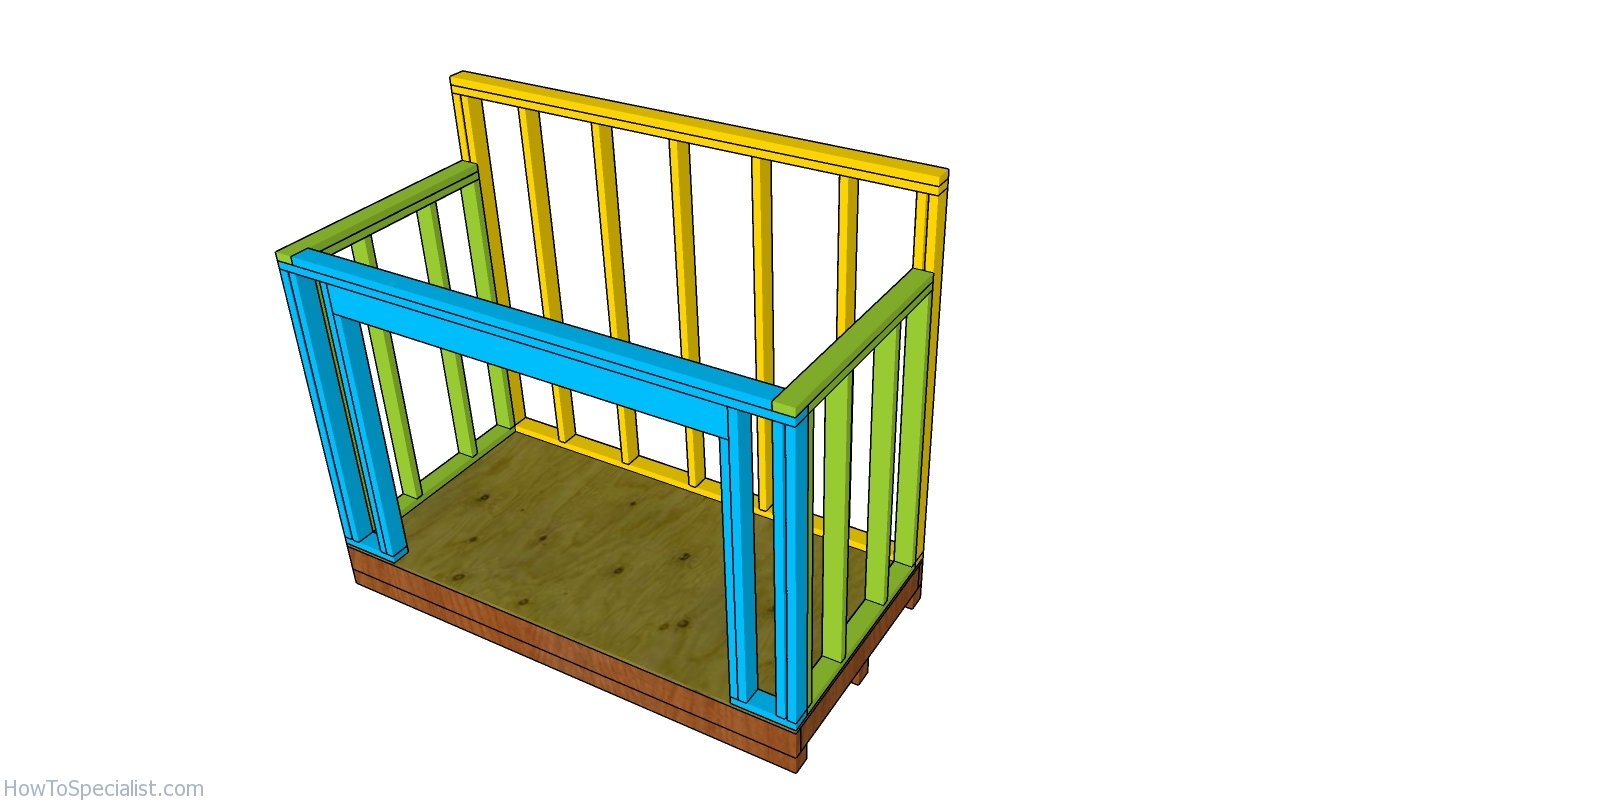
After assembling the wall frames, you need to lay them on the floor surface. Align the edges flush and plumb them with a spirit level. Drill pilot holes through the plates and insert 3 1/2″ screws into the floor frame. Moreover, you need to lock the adjacent walls together tightly with 3 1/2″ screws, after drilling pilot holes.
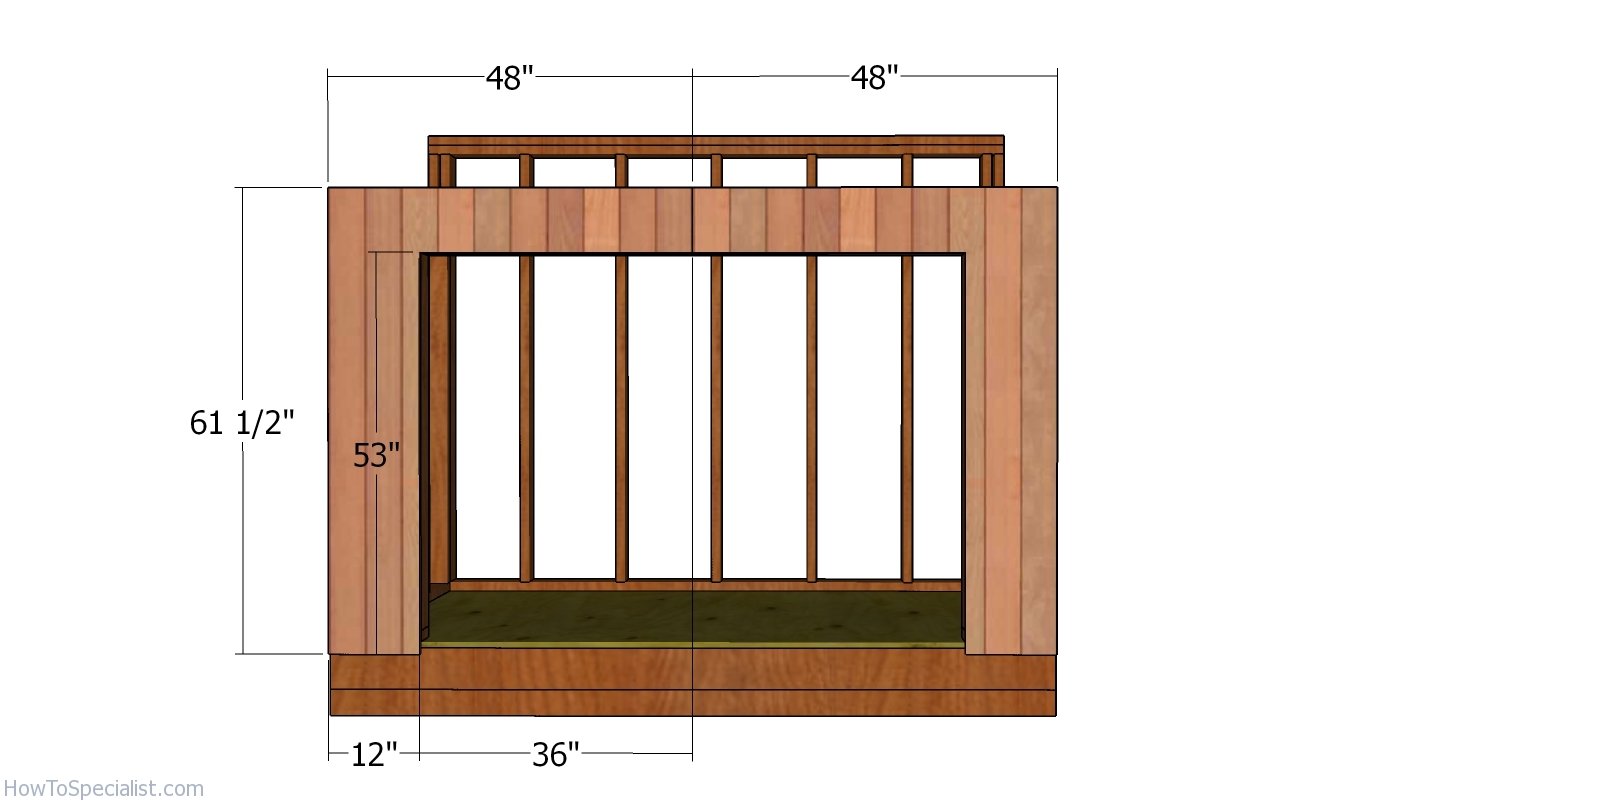
Front wall panels
Use 5/8″ T1-11 siding sheets for the exterior walls of the lean to shed. Attach the sheets to the front of the shed. Align the edges flush and use 8d nails to lock them to the wall framing, every 8″. Make the cuts around the door opening with a saw.
Building the lean to roof
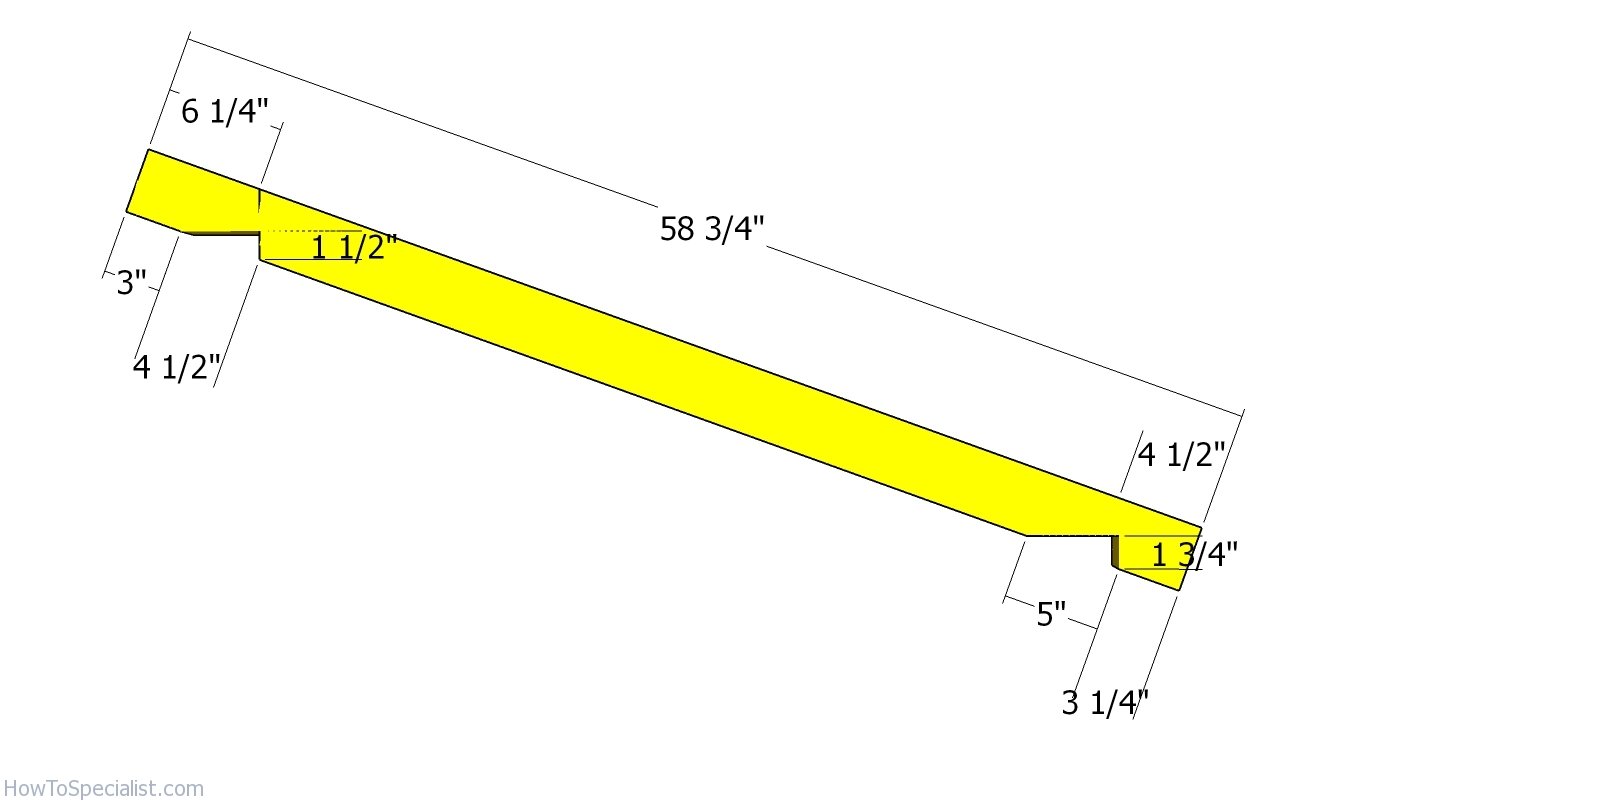
Rafters – lean to short shed
Use 2×4 lumber for the rafters. Mark the cut lines on the rafters and then get the job done with a circular saw.
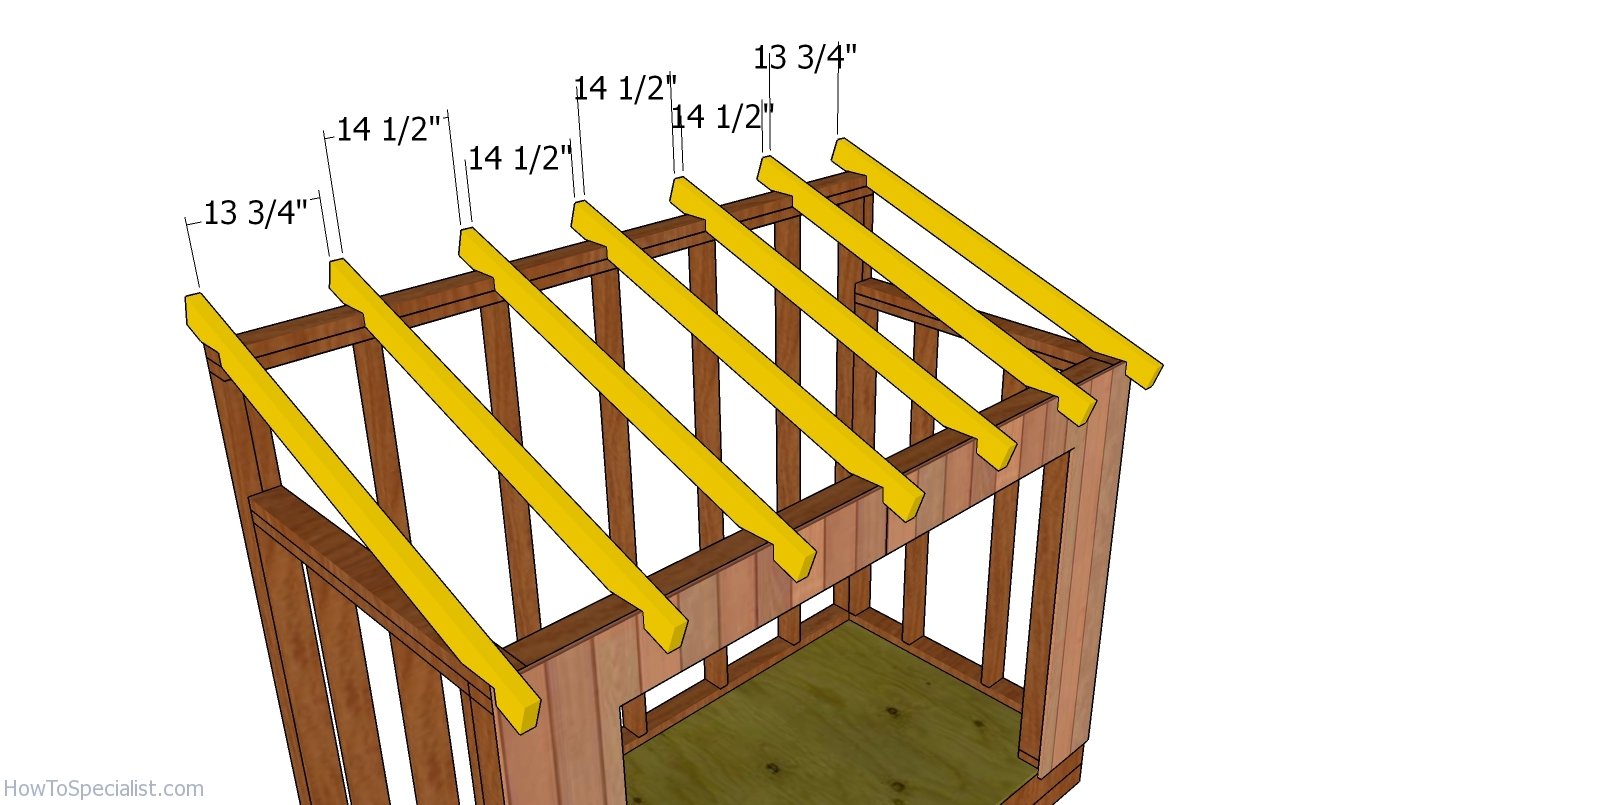
Fitting the rafters
Fit the rafters to the top of the shed, every 16″ on center. Use rafter ties to secure the rafters to the frame of the shed.
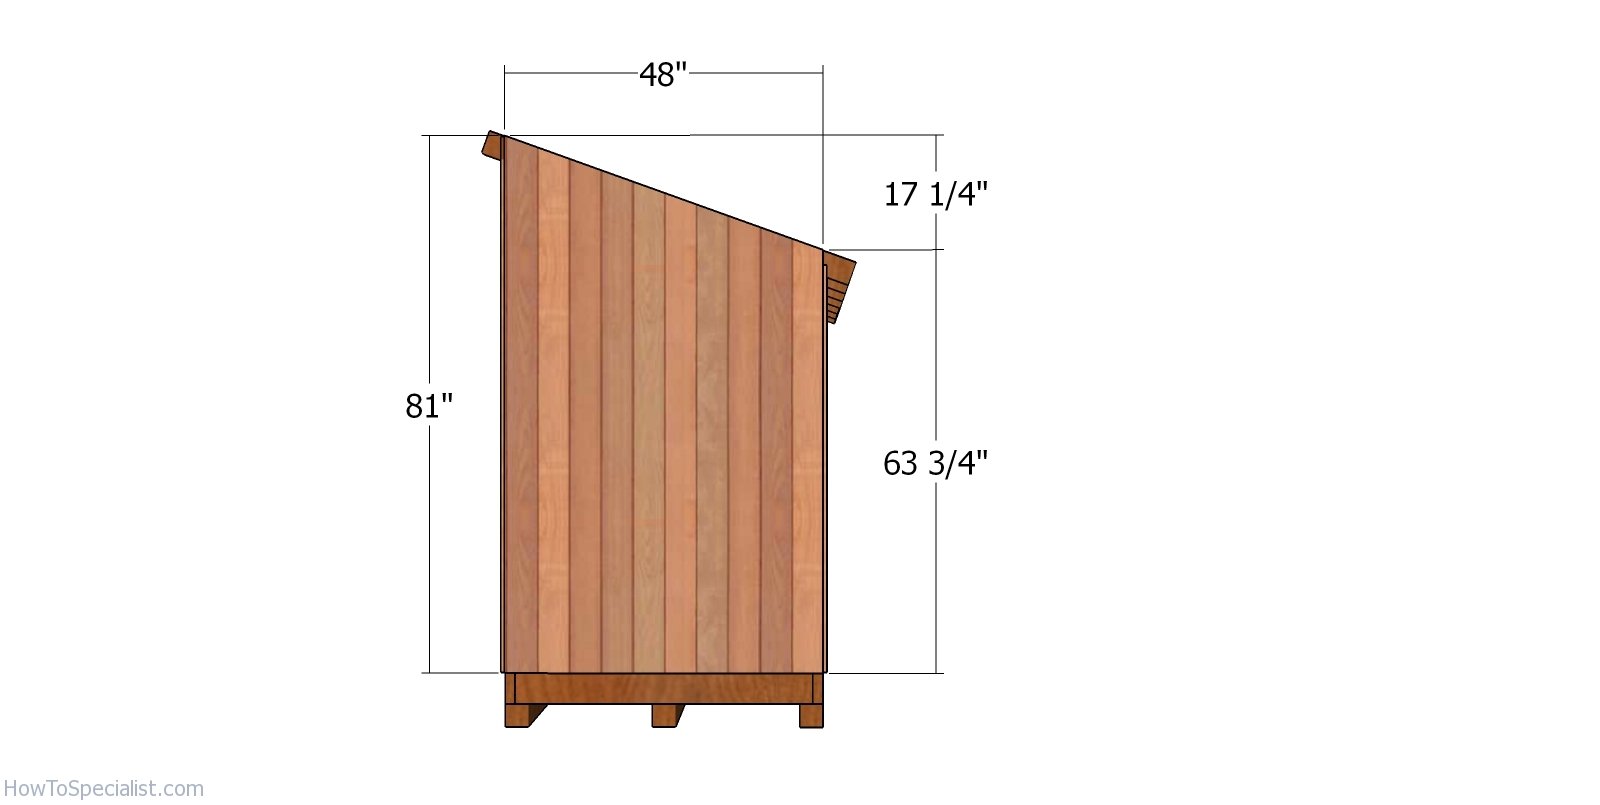
Side panels – short shed
Fit the T1-11 siding sheets to the sides of the lean to shed. Align the edges flush and insert 8d nails to lock the panel to the frame. Use a saw to make the cut around the rafters.
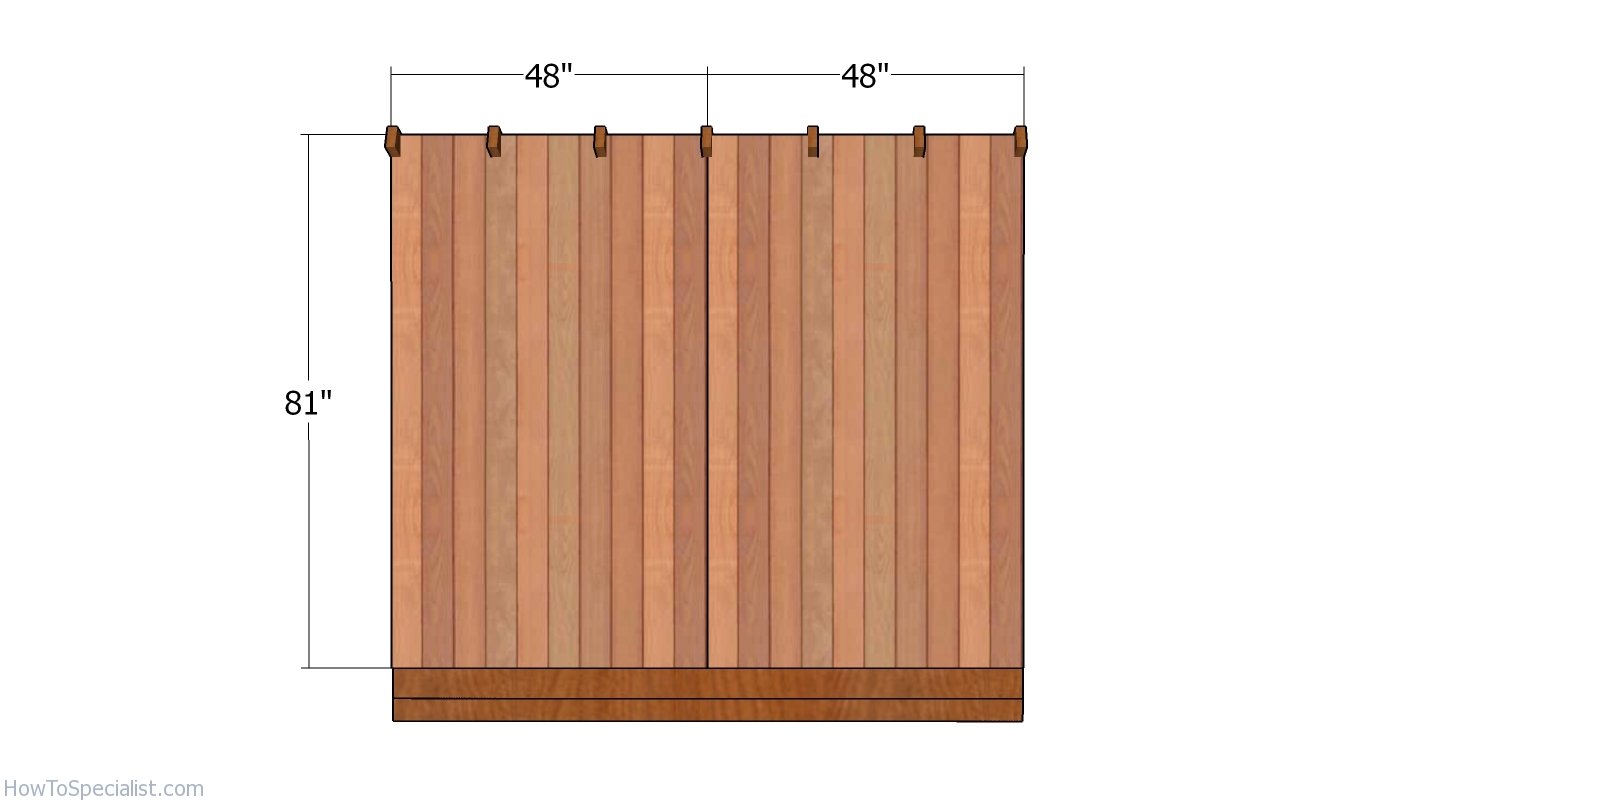
Back panels – 4×8 lean to shed
Fit the T1-11 siding sheets to the back of the short shed. Make the slots so you can slide the panel around the rafters.
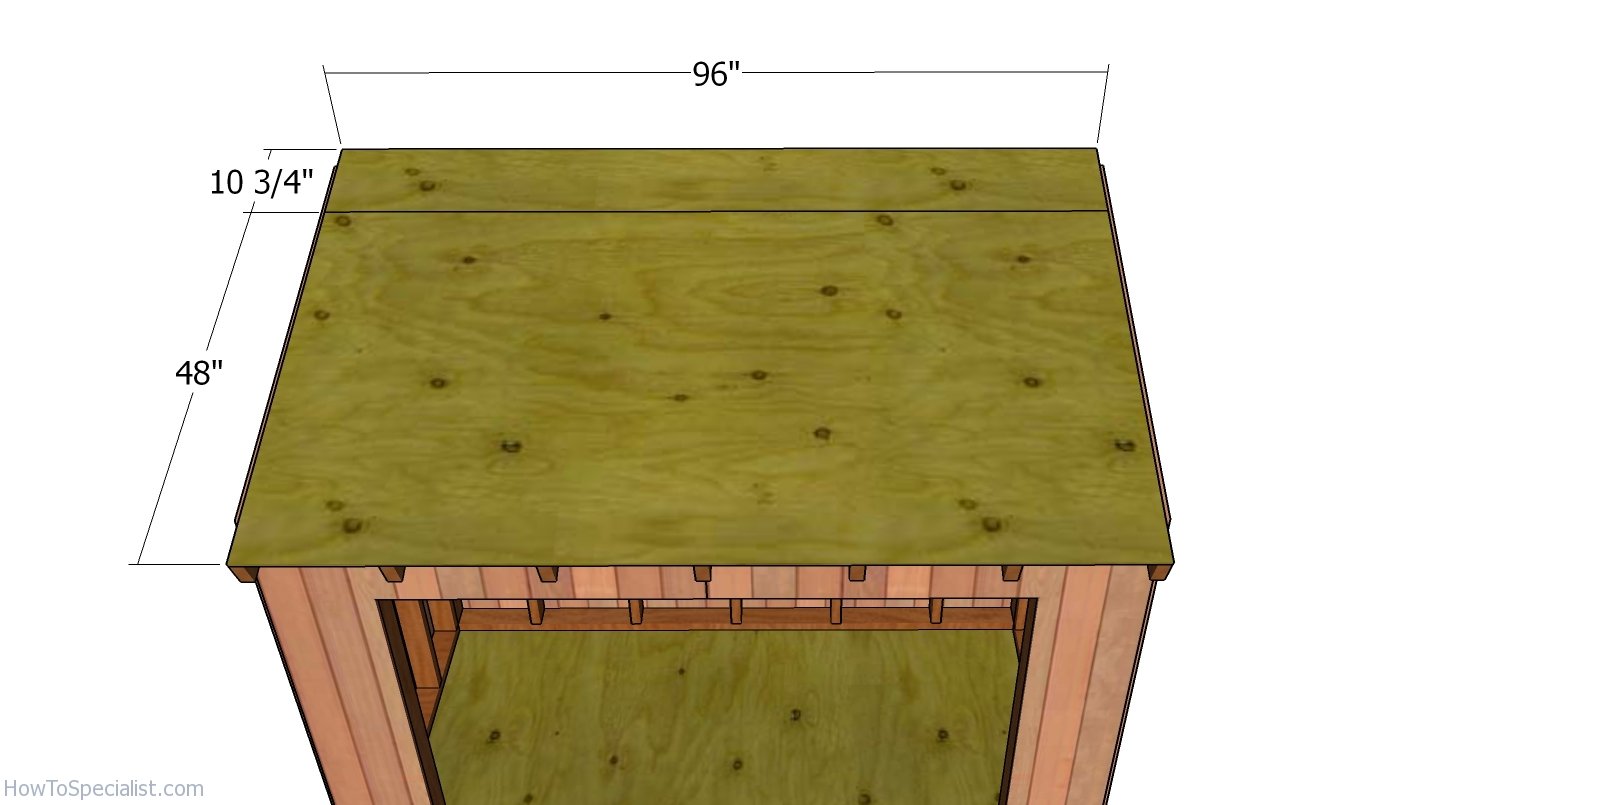
Roof sheets
Use 1/2″ plywood for the roof sheets. Fit the sheets to the top of the lean to shed and leave no gaps between them. Insert 1 5/8″ screws through the sheets into the rafters, every 8″.
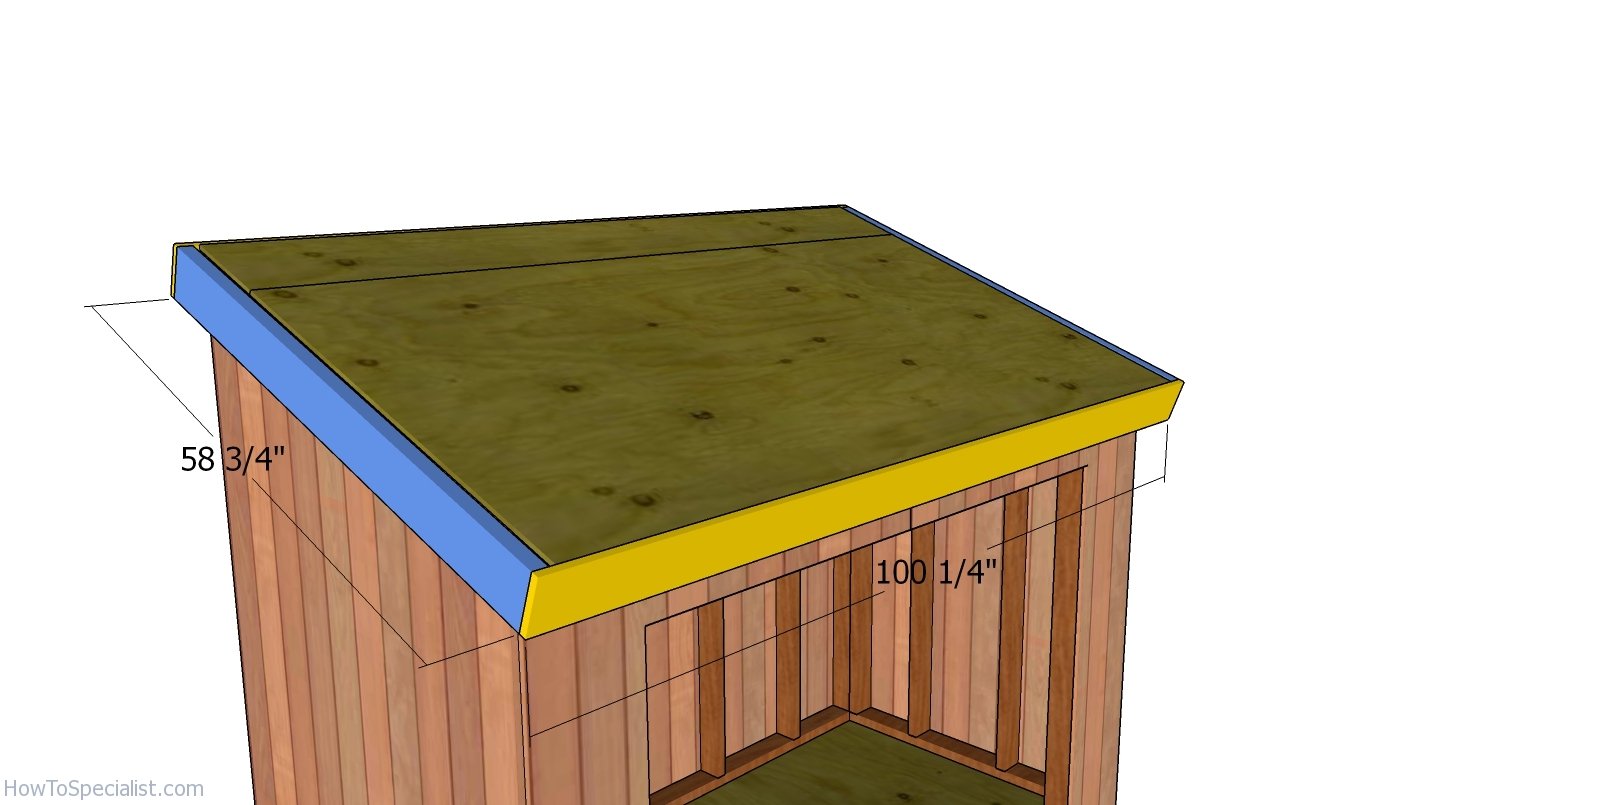
Fitting the roof trims – 4×8 shed
Use 2×6 lumber for the side trims and secure them to the frame of the shed with 3 1/2″ screws. Fit the 1×6 trims to the front and back of the shed. Use 8d nails.
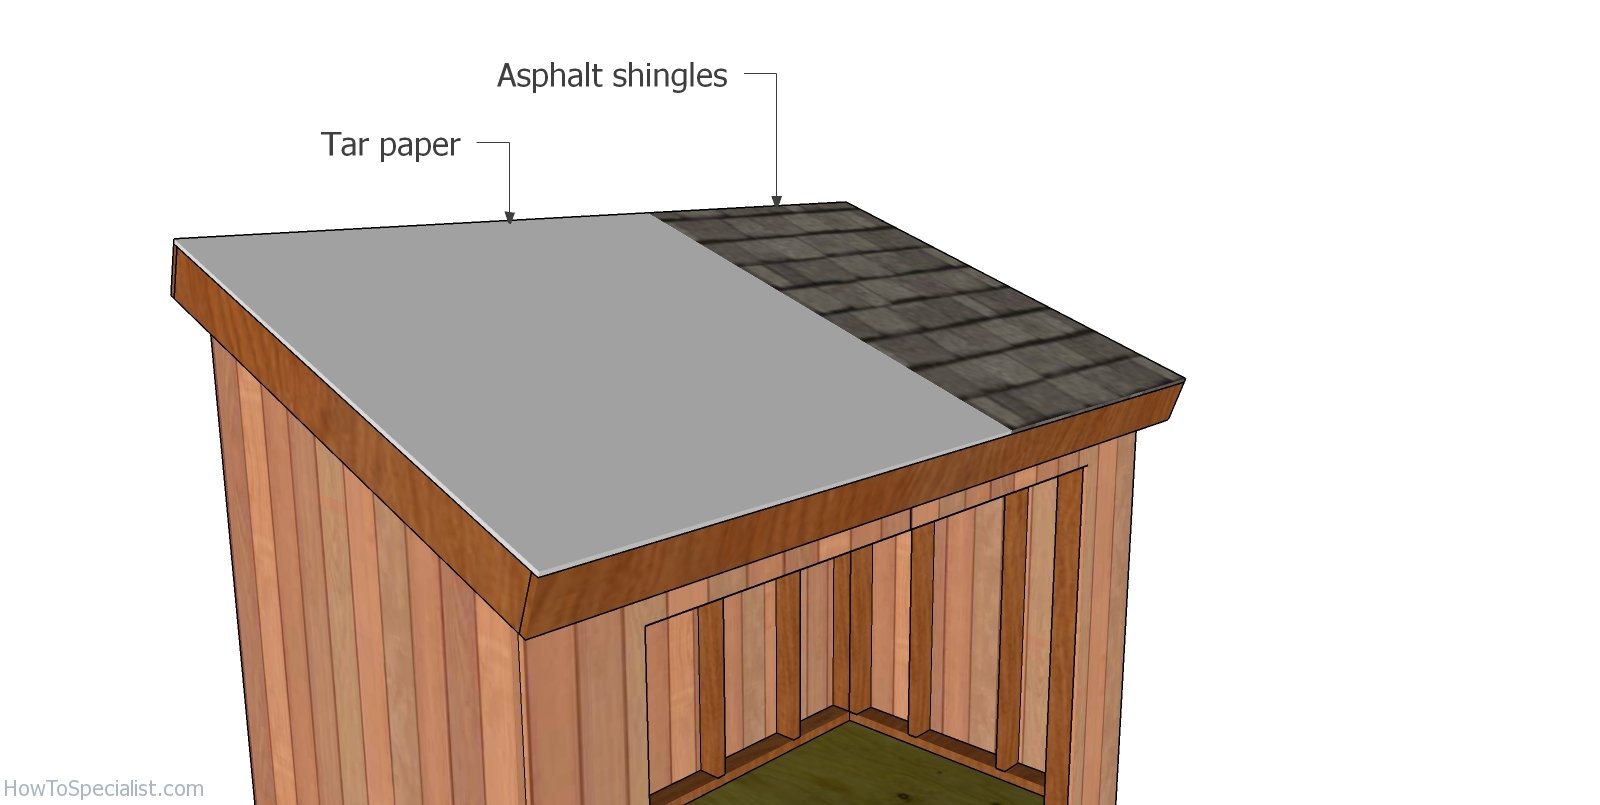
Fitting the roofing
You could fit asphalt shingles to protect the shed, as it is a straight forward solution. Therefore, install roofing felt over the roofing sheets, making sure the strips overlap at least 2″. Secure the tar paper to the plywood sheets with roofing staples. Fit the drip edges. Place a starting course at the bottom of the roof, before installing the asphalt shingles. Always read the manufacturing instructions before starting the installation, as there are several aspects that differ.
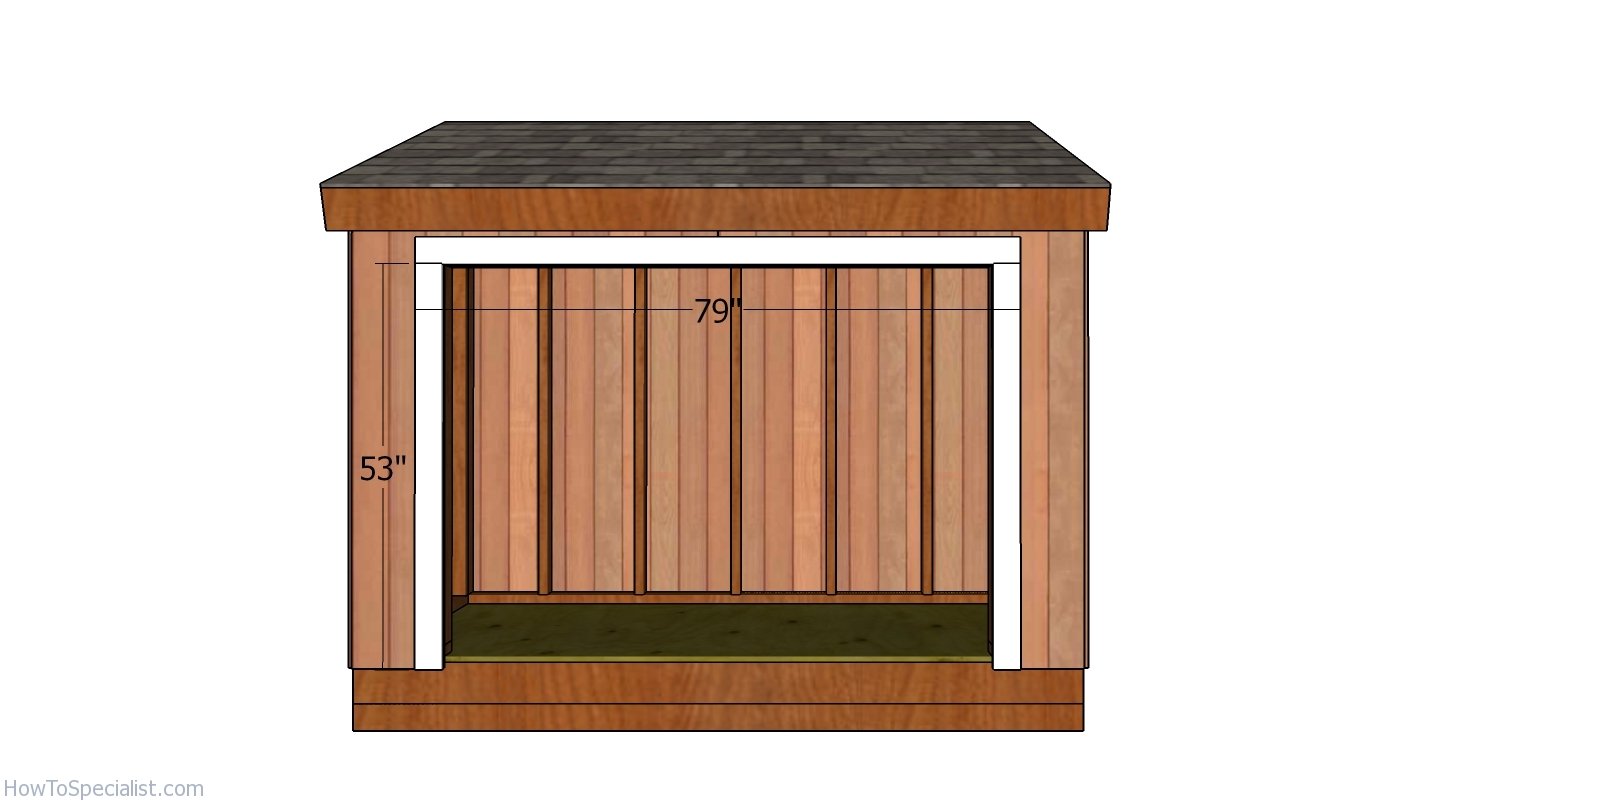
Jambs – 4×8 lean to shed
Use 2×4 lumber for the door jambs. Fit the jambs around the door opening and use 3 1/2″ screws to lock them into place tightly.
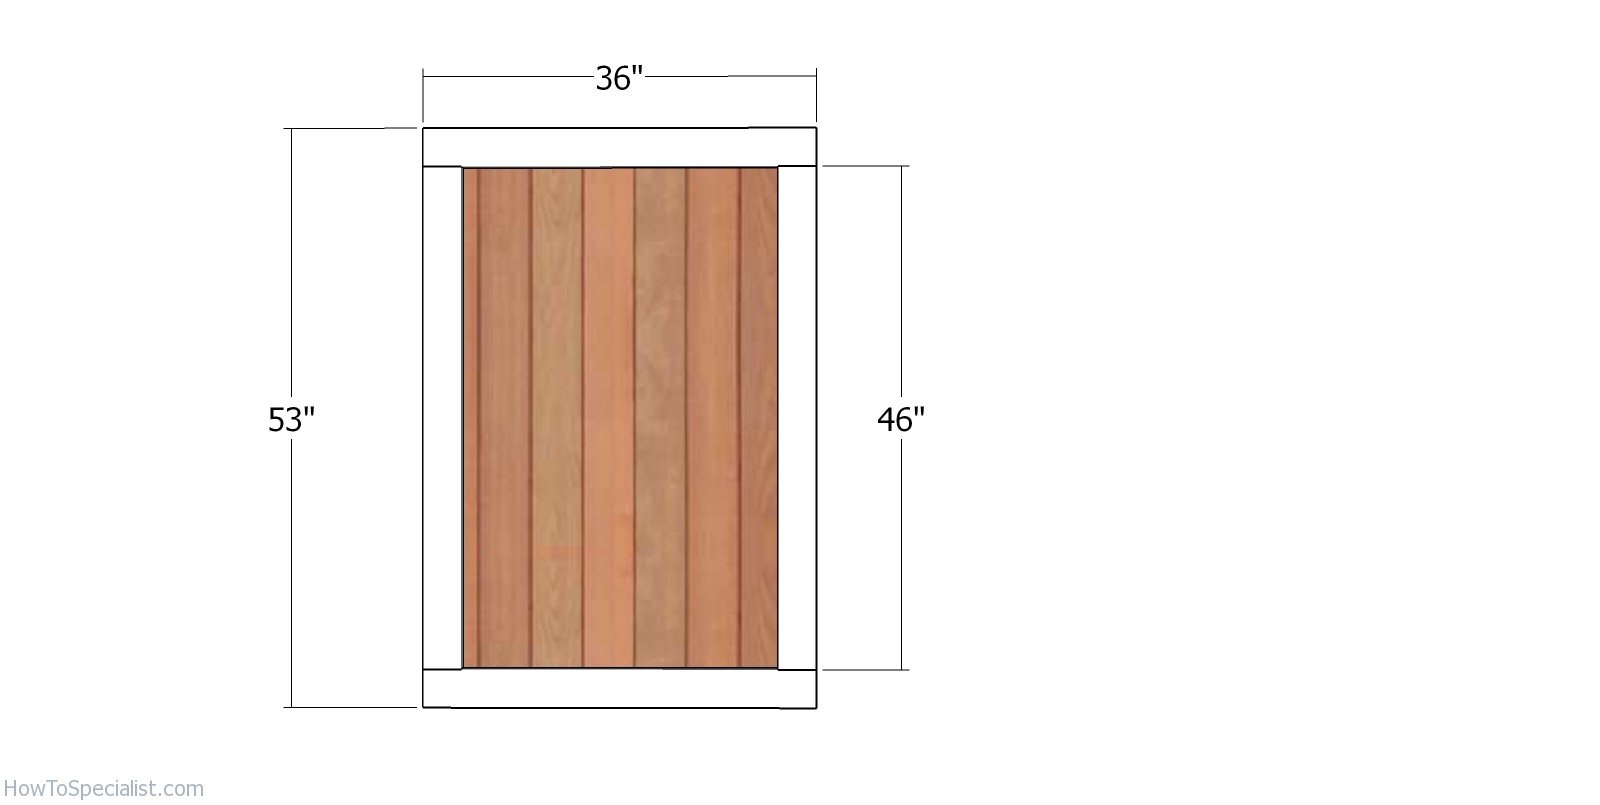
Double doors
Use 2×4 lumber for the door frame. Assemble the door frame with 2 1/2″ pocket screws and then attach the T1-11 siding panel with glue and 1 1/4″ nails.
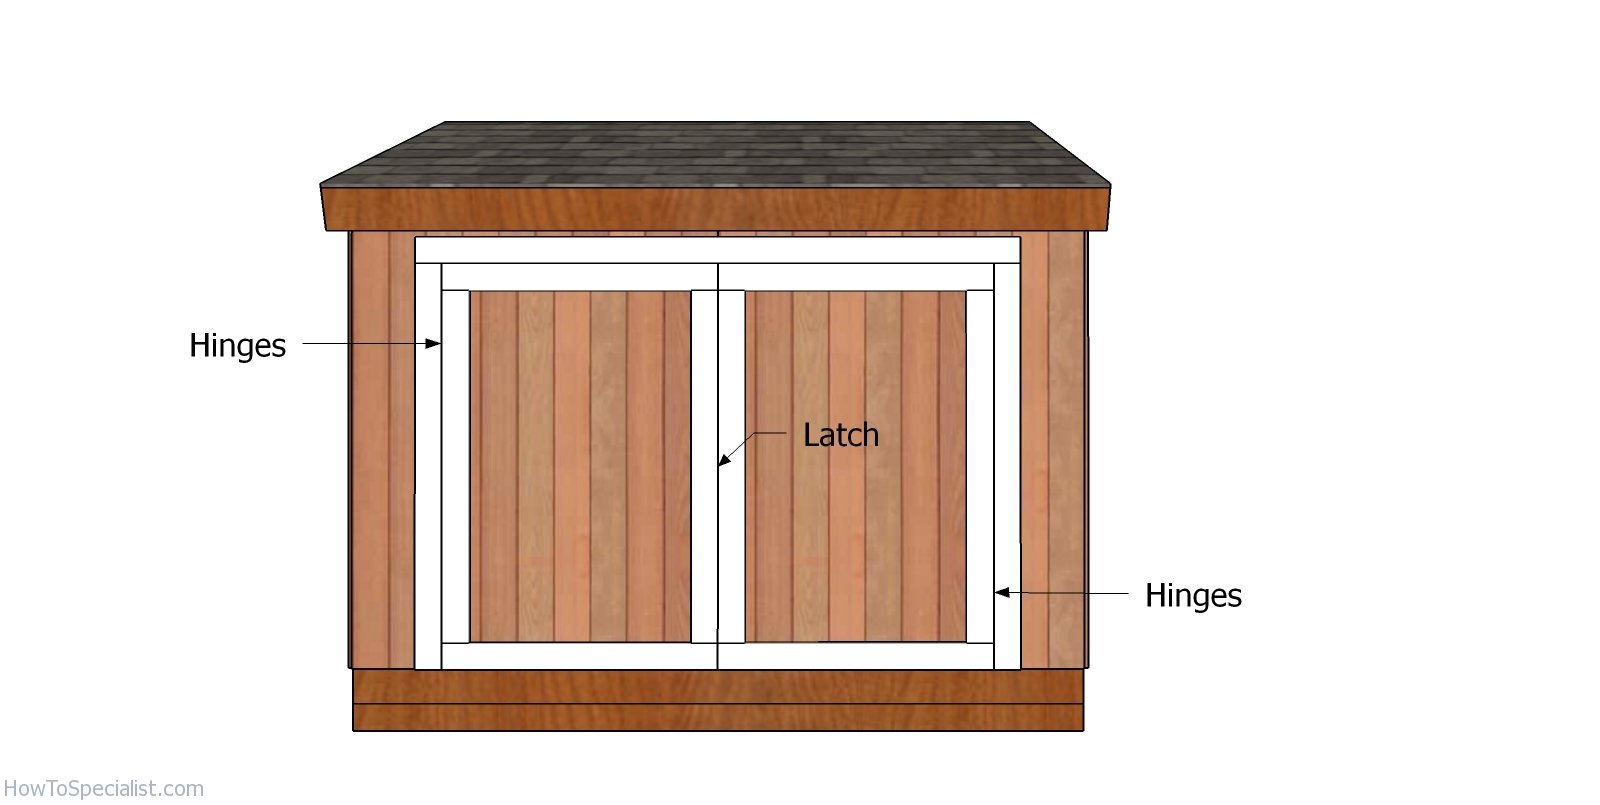
Fitting the double doors
Fit the double doors to the opening and align the edges flush. Use hinges to attach the door to the jambs. Install a latch.
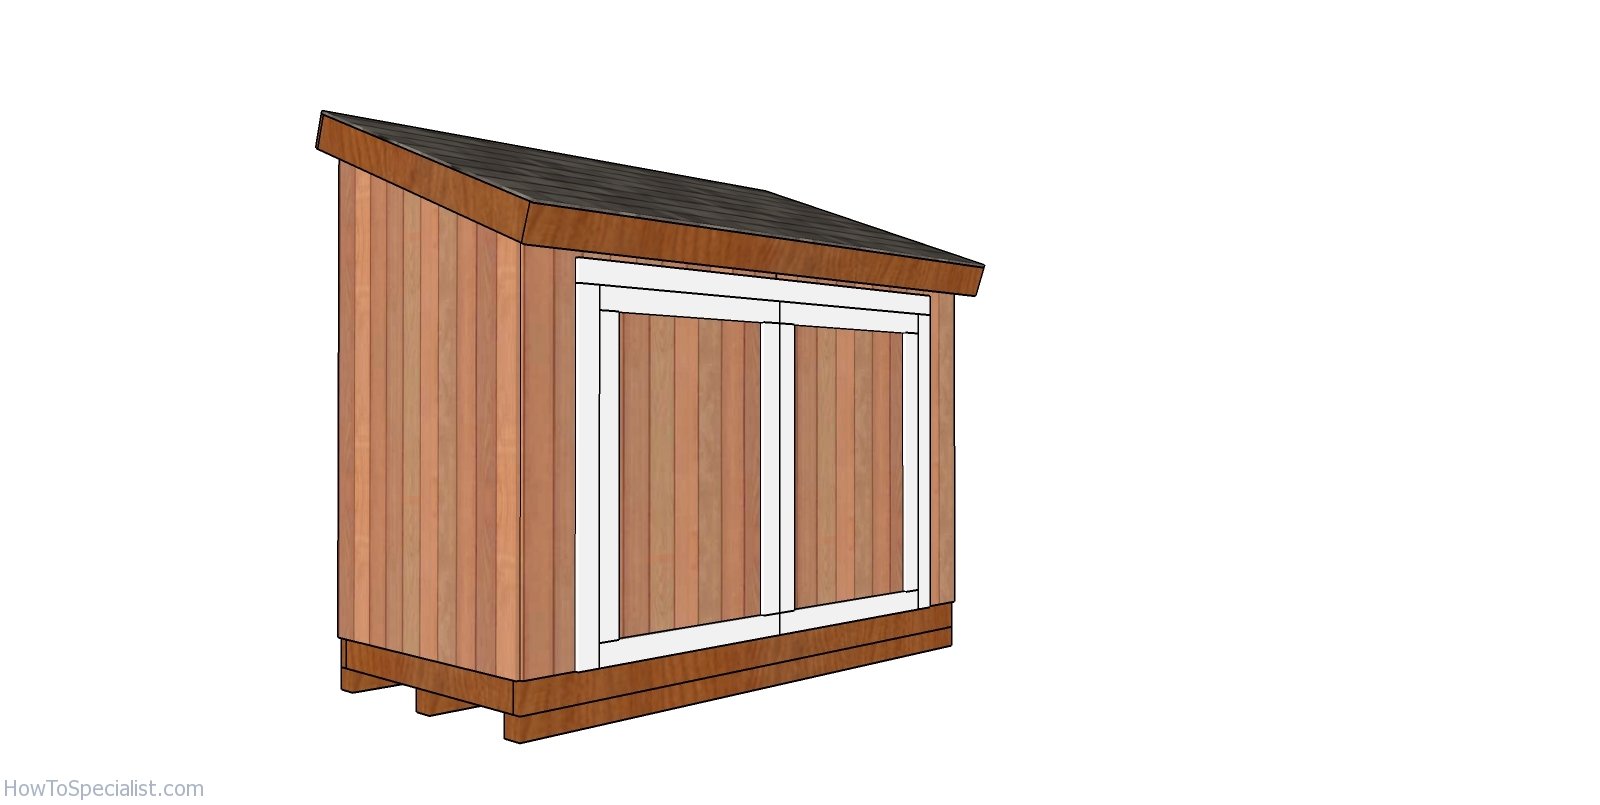
How to Build a 4×8 Short Lean to Shed
Last but not least, you need to take care of the finishing touches. Fill the holes with wood putty and smooth the surface with 120-220 grit sandpaper. Apply a few coats of paint over the exterior of the shed, to enhance the look of the shed and to protect the components from the elements.
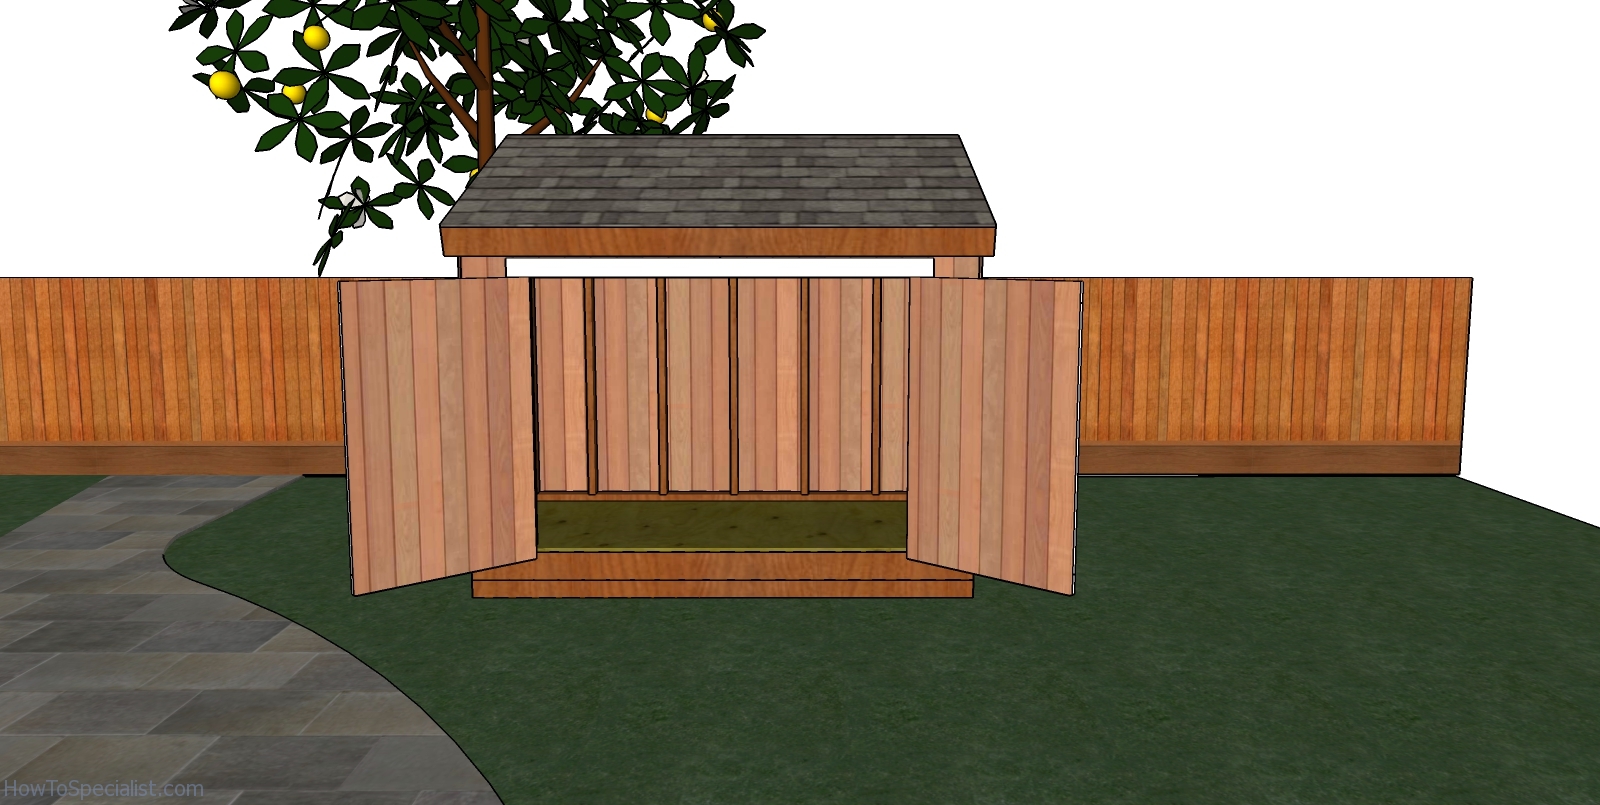
4×8 Short Lean to Shed – Inside view
This is the perfect shed for storing your lawn mower and other small items (fuel canister, shovels, etc.).
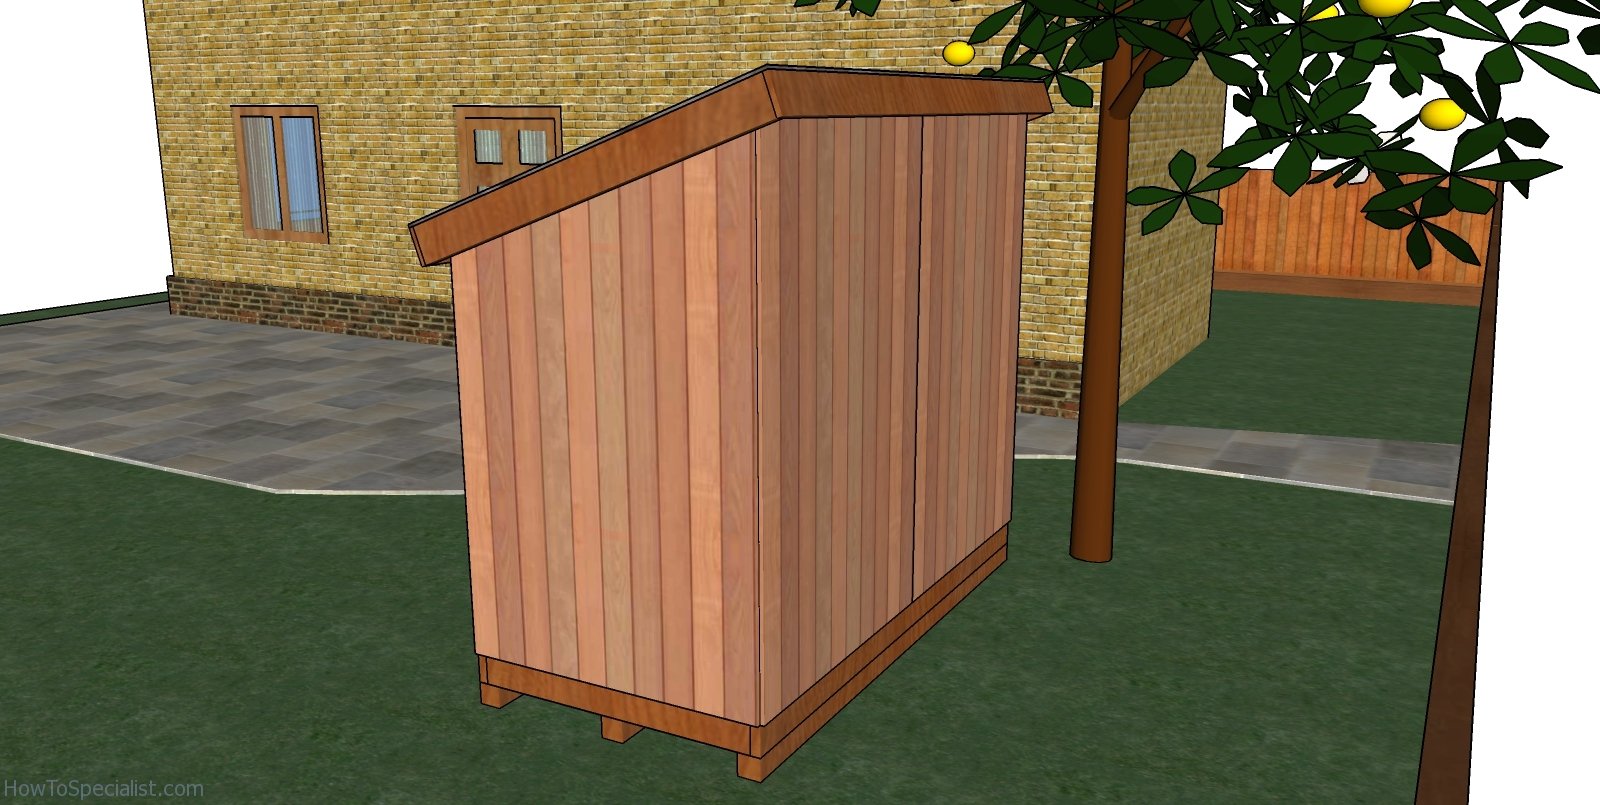
4×8 Short Lean to Shed Plans – back view
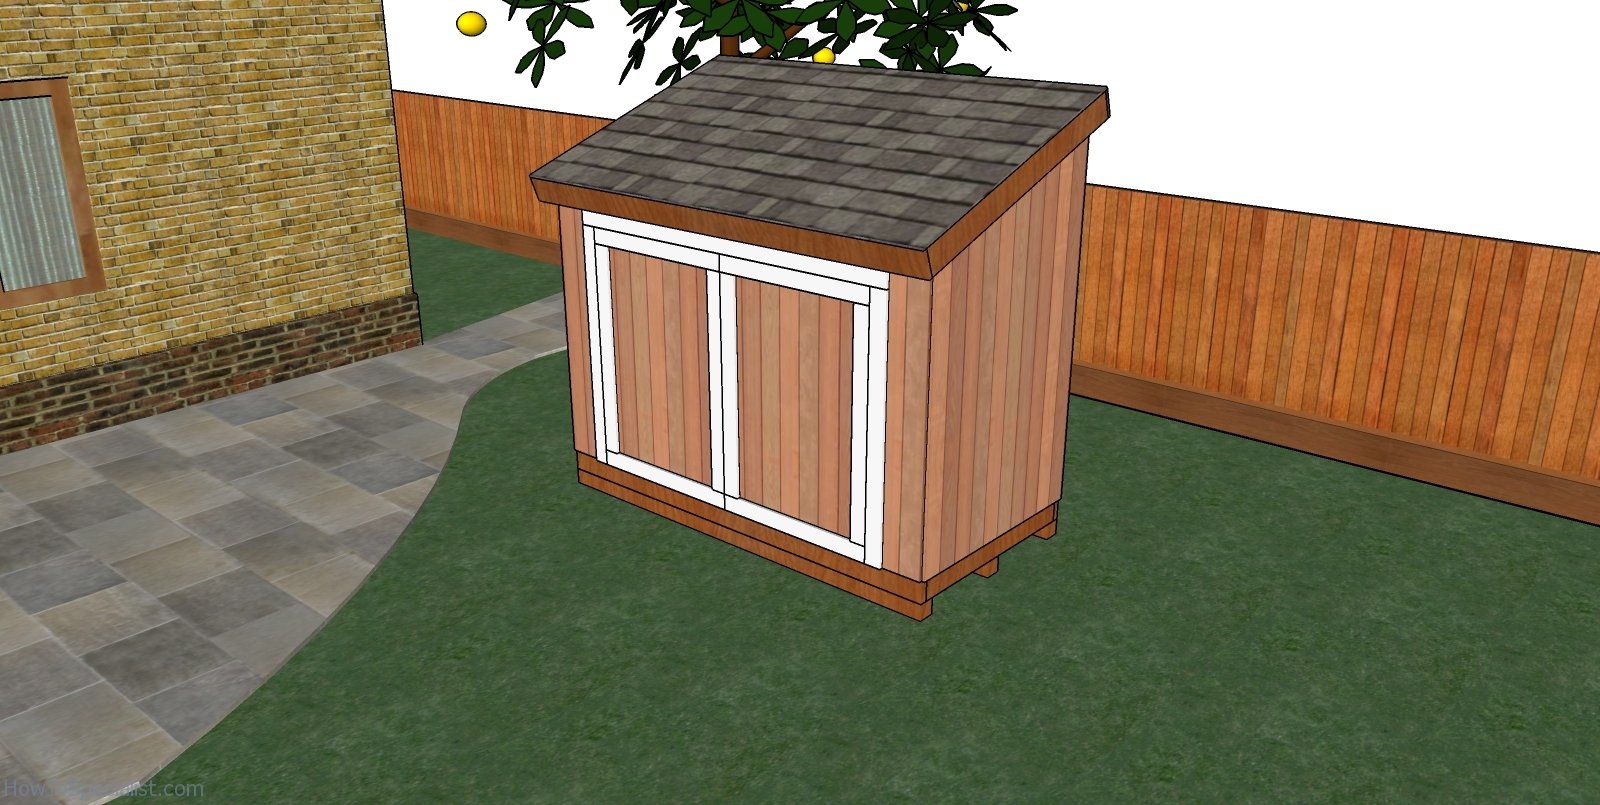
4×8 Short Lean to Shed
This shed is ideal for any backyard, if you want to store tools and small equipment, as a lawn mower. You can place this shed against the fence and thus, save a lot of space in your garden. You will have an easy access to the interior of the shed, using the double doors. See my other 4×8 shed plans, in that case a lot taller and with a saltbox roof.
Pin it for later!
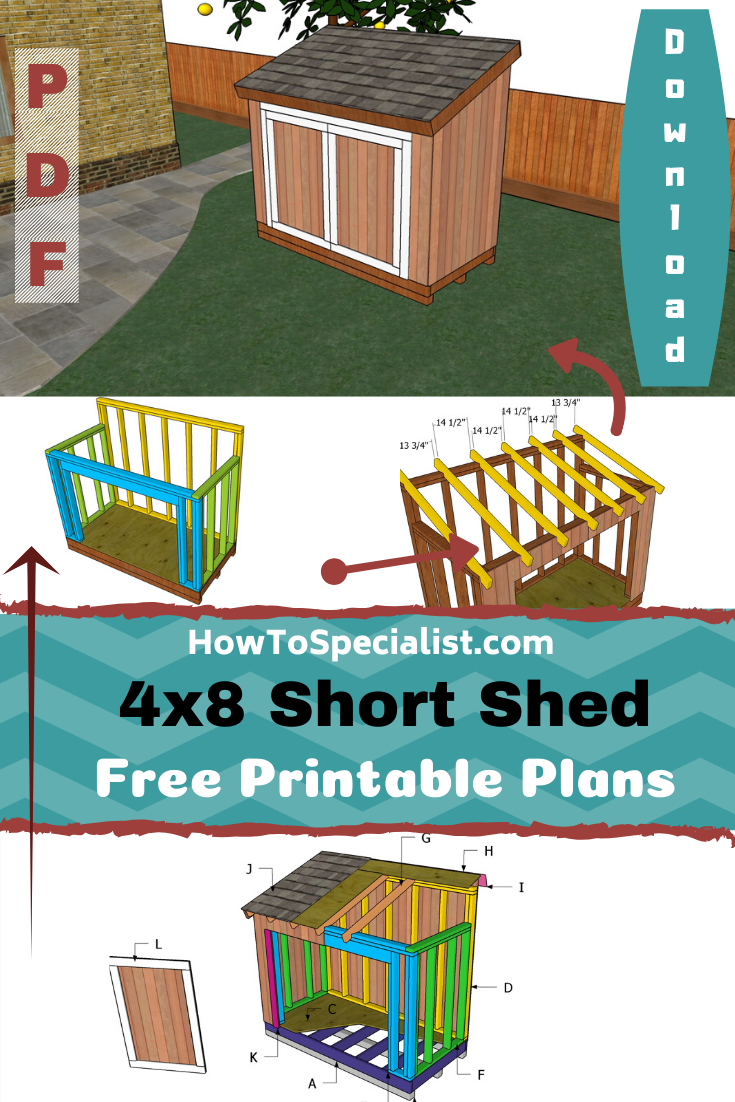
4×8 Short Shed Plans
Thank you for reading our project about free 4×8 short lean to shed plans and I recommend you to check out the rest of the projects. Don’t forget to LIKE and SHARE our projects with your friends, by using the social media widgets. SUBSCRIBE to be the first that gets our latest projects.


2 comments
These are great plans, easy to follow. Thank you for sharing!
You wouldn’t happen to offer plans for this same shed, a short 4×8″ lean-to shed but with a single door on one end instead of the double doors? I need to build my shed sandwiched between a block wall and a wall covered in stucco so I only have one wall that will need siding of some sort as the fence and house will provide the other three. I’m hoping to attach the frame directly to them. There is already a shed of sorts but the wood is rotted, there is no real floor, and the roof leaks so I want to replace it starting from scratch.
Thanks again for sharing your plans!
Thanks for leaving a free version online. I read the blog FAQs and I totally understand you have a free version online, and a paid version for the PDF file. Keep up the good work! Talking about work, I have to go to work so I have enough money for the premium version.