This step by step woodworking project is about how to build a cat house. If you have cats then you should probably build them a nice shelter to protect them from the cold weather and from precipitation. This cat house has a 2×2 frame and outdoor walls made from 1/2″ plywood. Add a few coats of paint or stain to the components, to protect them from decay.
This cat house can be easily converted to an insulated shelter, if you add insulation sheets to the walls. In this manner, your favorite pets can use the shelter even during the cold winter days. From our experience, we recommend you to invest in quality materials, otherwise the cat house won’t be durable and won’t have a beautiful appearance. Always align the components at both ends and drill pilot holes, to prevent the wood from splitting. See all my Premium Plans in the Shop.
Made from this plan
Outdoor Cat House Plans
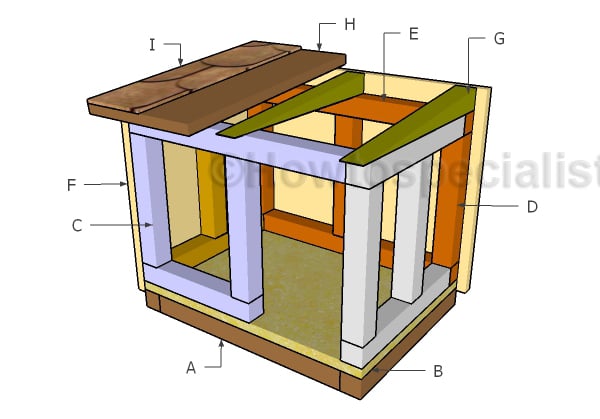
building-a-cat-house
Materials
- A – 2 pieces of 2×2 lumber – 14”, 3 pieces – 16″ long FLOOR FRAME
- B – 1 piece of 3/4″ plywood – 14″x19″ long FLOORING
- C – 1 piece of 2×2 lumber – 19”, 1 piece – 10 1/4″, 2 pieces – 10″ FRONT WALL
- D – 2 piece of 2×2 lumber – 12 1/2″, 2 pieces – 10″ SIDE WALL
- D – 2 piece of 2×2 lumber – 11″, 1 piece – 10″ SIDE WALL
- E – 2 pieces of 2×2 lumber – 19″, 3 pieces – 10″ BACK WALL
- 2 1/2″ screws
- 4 pieces of 2×2 lumber – 8′
- 3/4″ plywood – 24″x24″
Tools
- Safety gloves, glasses
- Miter saw, jigsaw
- Chalk line, tape measure, spirit level, carpentry pencil
- Drill machinery and drill bits
Tips
- Add trims to the cat house
- Secure the walls to the floor frame with galvanized screws
Time
- One Week
Related
How to build an outdoor cat house
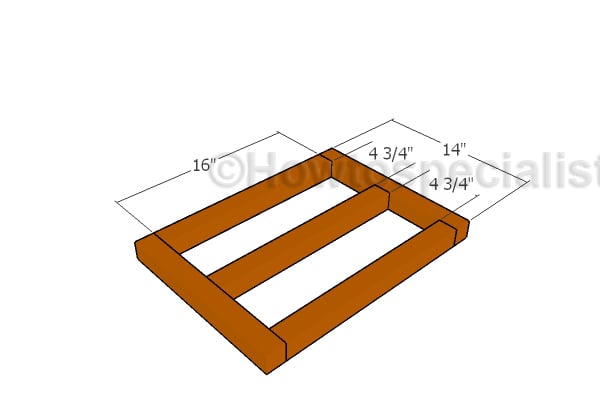
Floor-frame-plans
The first step of the outdoor cat house project is to build the floor frame from 2×2 lumber. Cut the components at the right components and then secure them together with 2 1/2″ screws. Align the edges flush and make sure the corners are square. Drill pilot holes through the 14″ long components and insert the screws into the perpendicular components.
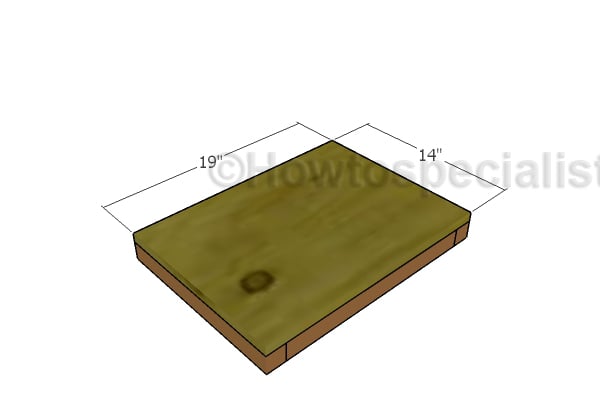
Attaching-the-floor
Attach a piece of 3/4″ plywood to the floor frame. Align the edges flush, drill pilot holes through the floor and insert 1 5/8″ screws into the joists.
Building the wall frames

Building-the-back-wall-frame
Assemble the back wall for the cat house from 2×2 lumber. Drill pilot holes through the plates and insert 2 1/2″ screws into the studs. Make sure the corners are square and align the edges flush, for a professional result.
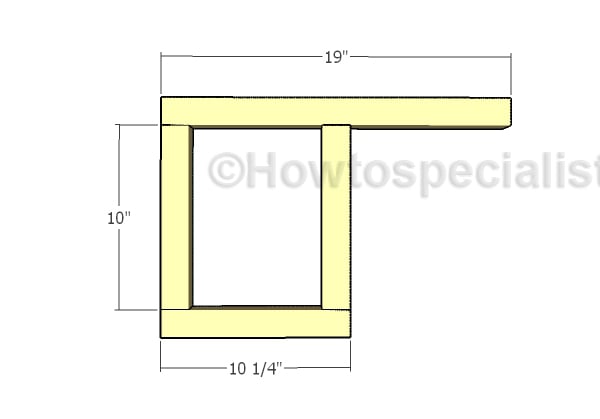
Front-wall-frame
Build the front wall from 2×2 lumber as well. Cut the components at the dimensions shown in the diagram. Drill pilot holes through plates and insert 2 1/2″ screws into the studs.
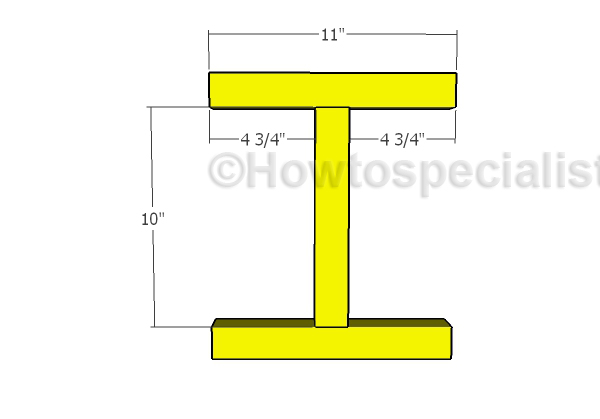
Side-wall-frame
Build the left side wall from 2×2 lumber. Use 2 1/2″ screws to assemble the walls tightly.
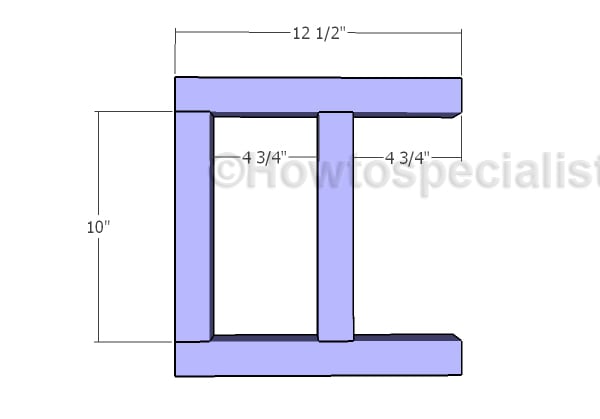
Side-wall-frame-2
Build the right wall frame from 2×2 lumber. Drill pilot holes and insert 2 1/2″ screws to assemble the frame together tightly.
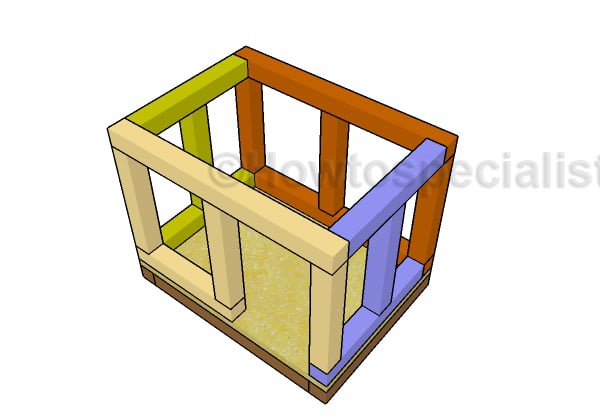
Assembling-the-frame-of-the-cat-house
Fit the wall frames to the floor of the cat house. Drill pilot holes through the bottom plates and insert 2 1/2″ screws into the floor. Make sure you align the edges flush, for a professional result.
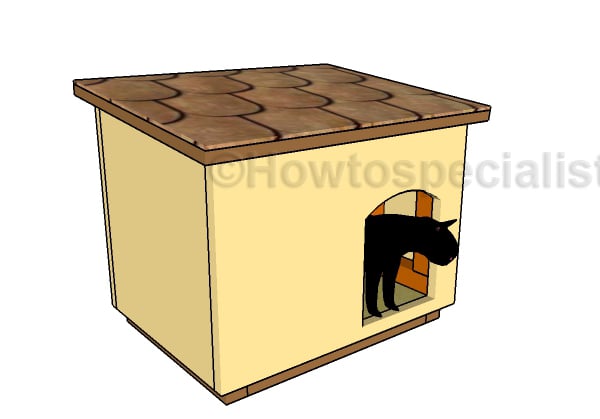
Outdoor-cat-house-plans-free
Last but not least, we recommend you to take care of the finishing touches. In order to get a professional result, fill the holes and the gaps with wood filler and let it dry out for a few hours. Check if there are protruding screws and fix the issue if necessary.
If you want to download the plans. just click on the GET PDF PLANS button bellow.
My best tips for building a cat house:
A cozy cat house can be the perfect retreat for your feline friend, whether they love spending time outdoors or you want to give them a special indoor hideaway. With a few materials and some creativity, you can create a comfortable, insulated space where your cat can relax. Here are my best tips to help you build the perfect cat house!
1. Choose Sturdy and Weatherproof Materials
Whether you’re building an outdoor or indoor cat house, start with durable materials. Plywood or cedar works well for the structure, as both are strong and moisture-resistant. For outdoor houses, consider using waterproof paint or sealant to protect the wood from rain and snow.
2. Size It Just Right
Cats love snug spaces! Make sure the house isn’t too big, as cats feel more secure in smaller, enclosed areas. A good rule of thumb is to leave enough room for your cat to stand, turn, and curl up. Smaller spaces also retain warmth better.
3. Elevate the House for Protection
If building an outdoor cat house, elevate it a few inches off the ground to protect from dampness, mud, and cold floors. Wooden legs or bricks can create a sturdy base, keeping your cat’s house dry and warm.
4. Insulate for Year-Round Comfort
For a cozy, all-weather cat house, insulation is key. Use foam board insulation, reflective bubble wrap, or straw to line the walls, floor, and roof. If you’re using foam boards, make sure they’re safely enclosed behind panels to prevent your cat from scratching or chewing on them.
5. Create a Cat-Sized Door
Keep the entrance small to prevent too much heat from escaping, but big enough for your cat to enter easily. If you’re building for outdoor use, consider adding a flap door made of soft vinyl or plastic strips to keep out the wind and rain while allowing easy access.
6. Add a Comfortable Floor
Cats love a soft, warm place to rest. Consider installing a removable cushion or pet-safe heated pad inside for extra comfort. If you’re in a colder climate, using straw bedding can also provide warmth, as it insulates well and is easy to replace.
7. Provide Ventilation
While you want the cat house to retain warmth, proper ventilation is necessary to prevent condensation and ensure fresh air circulates. Small vent holes near the top or sides of the house can provide airflow without creating a draft.
8. Place the House in a Safe Location
When positioning an outdoor cat house, choose a safe and sheltered spot. Ideally, place it somewhere out of direct wind, rain, or heavy foot traffic. If the house is for a feral or stray cat, consider placing it in a more secluded spot to help the cat feel secure.
9. Easy-to-Clean Design
Cats are naturally clean animals, and their house should be, too! Build the house with a removable roof or easy-access door so you can clean it out regularly. This will help keep it free from dirt, pests, and odors.
Bonus Tip: Personalize it! If you’re building an indoor cat house, make it match your decor by painting or decorating it to suit your style. Add your cat’s name, or even include a scratching post on one side for a multi-purpose design your cat will love.
Thank you for reading our project about how to build an outdoor cat house and we recommend you to check out the rest of the projects. Don’t forget to LIKE and SHARE our projects with your friends, by using the social media widgets.
<< Previous | Next >>


1 comment
Hi. I love this plan and would like to make this before the colder months move in. I have a question about making this exact plan with elevated legs. Reason being we also have about 10 raccoons that show up daily to steal the food we put out for the feral cat. Any suggestions would be most appreciated.