This article is about how to build an outdoor kitchen. In this DIY project, I will show you how to build a beautiful and rustic outdoor kitchen from scratch, in which you can enjoy both cooking your favorite food and having dinner with your family or friends. This project has an average difficulty, as you have to mix and pour concrete, build up walls of concrete blocks and to install flagstone. Nevertheless, if you read the full article and follow the instructions, you will be able to transform your dream outdoor kitchen into reality. This is Episode 1 of the series, so I recommend you to take a look over the rest of the parts about the Brick Pizza Oven Project.
The first problem is the location of the outdoor kitchen. In most of the cases, you have to build the outdoor kitchen under a big tree, as to benefit from its shade in hot summer days. However, you have to leave at least 5’/1.5 m from the tree trunk, to protect it from smoke and for fear that its roots may damage the construction over time. In addition, many people tend to choose the location of the outdoor kitchen near the house, as to have access to the refrigerator; we personally recommend you to construct the kitchen in your garden, as to enjoy the stillness of nature and the singing of the birds. In addition, leave enough space from your neighbors fences, windows as to escape their prying eyes.
Before starting the project, you have to draw clear and complete plans, from the very beginning. Generally speaking, it is in the human nature to assume things will go smoothly and you have enough time to adjust the project while you are working. On the contrary, it is better to start with a clear idea, with a drawn plan, which has to contain: the outdoor kitchen design, dimensions, materials and tools you need. Fortunately, our mission is to help you take the best decisions for your project, so pay attention to details.
Made from this plan
In order to build an outdoor kitchen, you need the following:
Materials
- Bricks – BRICKS
- Sand, gravel, cement – CONCRETE
- flagstone / soapstone – CLADDING
- Wooden boards – FORM
- Steel bars – REINFORCEMENT NET
Tools
- Safety gloves, safety glasses, Screwdriver, power mixer, drill machinery
- Utility knife, measuring tape, framing square, pencil, T-square
- Bucket, wheelbarrow, trowel
Tips
- Buy or rent a power mixer to save you from a hard work
- Pay attention to concrete recipes as they are essential for a proper job
Time
- One weekend
Related
- PART 1: Building the base of the pizza oven
- PART 2: Building an outdoor pizza oven
- PART 3: Insulating the brick pizza oven
- PART 4: Building an outdoor stove
- PART 5: Finishing the outdoor pizza oven
- PART 6: Building a shelter for the pizza oven
Outdoor kitchen building plans
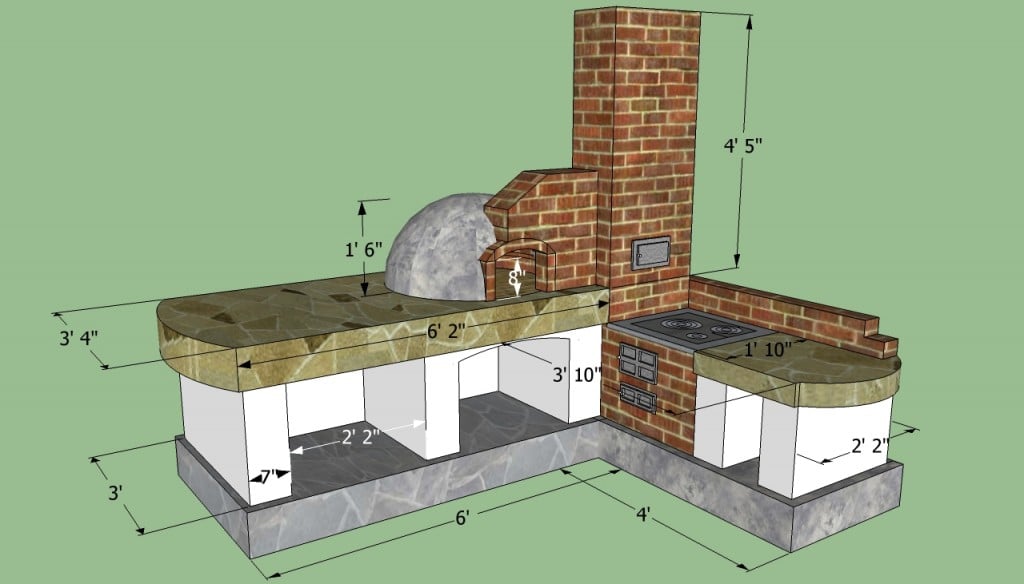
Outdoor kitchen building plans
The design of your outdoor kitchen has to fit the style of your house and garden, otherwise it won’t add any value to your home. Study attentively the details of your house: curved lines, materials used, colors and so on. I have used a 3D drawing software to transform my vision into a tangible model I could use as a reference. If you don’t wanna do that, make at least some sketches so you don’t build blind. Inn my care, I wanted a rustic outdoor kitchen with different material such as stone, concrete and bricks. Moreover, I really like outdoor cooking so I added a stove and a pizza oven to the project. My outdoor kitchen also features storage areas for wood so I can start a fire whenever I want.
Pouring the outdoor kitchen’s foundation
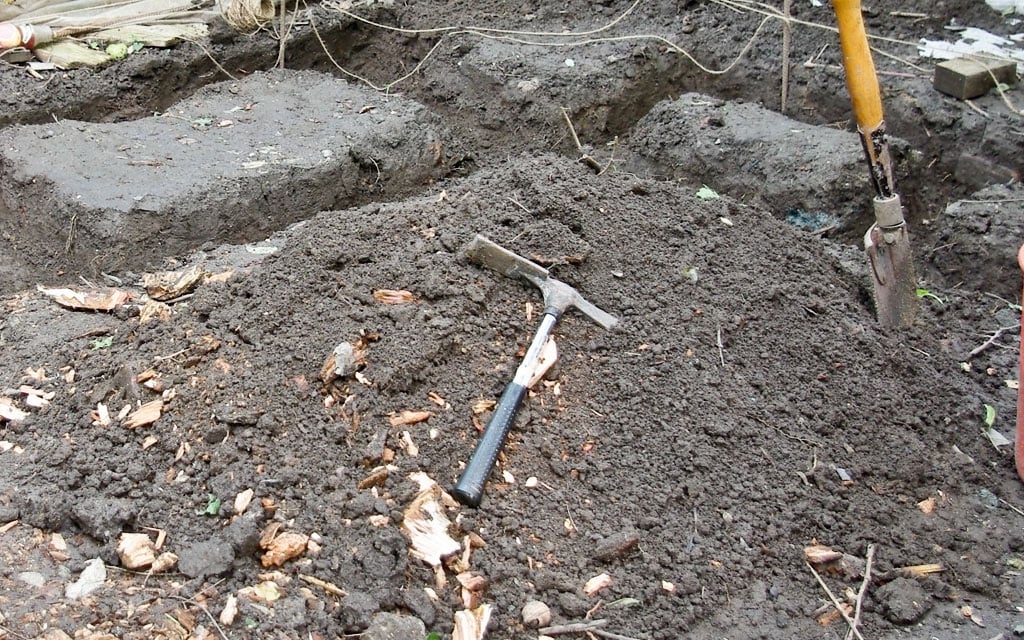
Digging foundation trenches
First, you have to build a sturdy foundation. Lay out the foundation, using batter boards and string, then dig the trenches. Dig around 15”/35 cm, by using a shovel. If you run into roots, you should chop them with your shovel or in the worst case you could use a handsaw.
Make sure the bottom of the trenches is firm and plane, by removing the soil with the shovel. Next pour 2”/5 cm of gravel into the bottom of the trenches and make sure it is level. In my case, I had “bad luck” as the only location possible for the kitchen was next to an old walnut tree. Therefore, there were lots of roots and even a stump from a dead tree. Luckily, I always have my axe sharp.
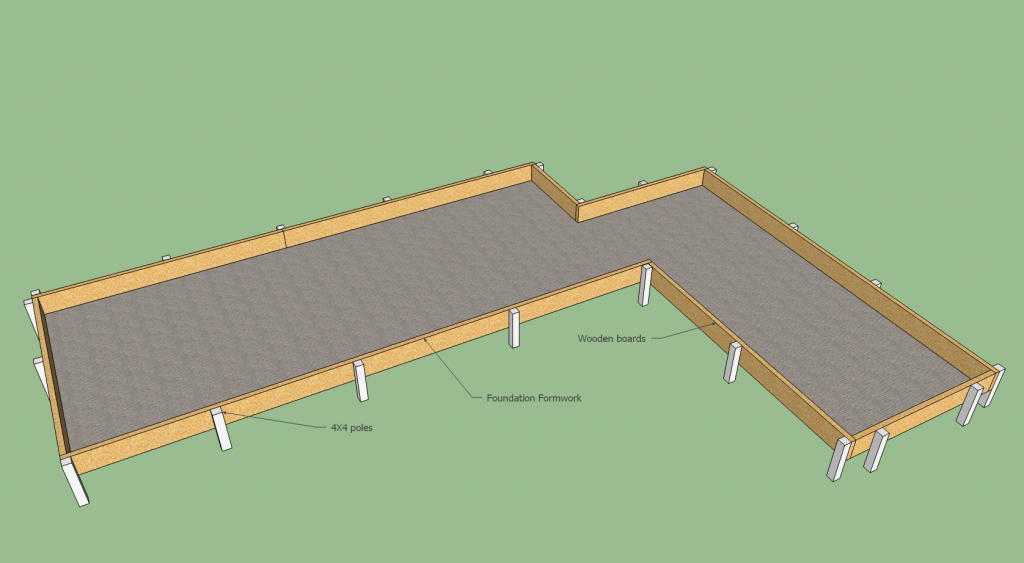
Foundation formwork for outdoor kitchen
Next, it’s time for the foundation formwork. Reinforce the concrete foundation with steel bars. The local inspector should tell you the exact number of bars and the layout you should use (if permits are required). These bars add strength to the foundation and prevent the concrete from cracking.
Next, build the form, from 8”/20 cm wide wooden boards. Make sure that all sides of the form are level, otherwise the foundation surface won’t be horizontal. Secure the form with stakes every 20”/50 cm, to make sure it resists the pressure of the concrete.
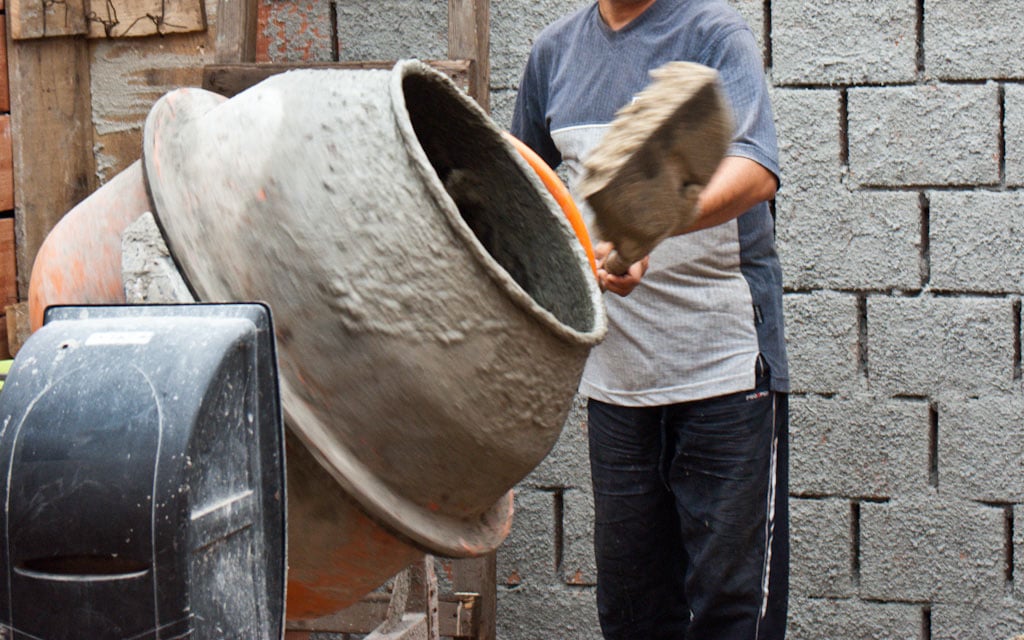
Mixing concrete with a power mixer
Next, prepare a small quantity of concrete and pour it into the form-work. We have used the following recipe for our foundation: 2 parts cement, 3 parts sand, 4 parts gravel and enough water to obtain concrete with cream consistency. Mix the compounds thoroughly in the power mixer, for several minutes and avoid inserting any residues in the mix.

Pouring concrete in the formwork
After we have mixed the concrete, we used a wheelbarrow to transport the concrete from the power mixer to the formwork. You should pour the concrete step by step, not all at once, as to distribute it evenly into the trenches. If the formwork slats are level you will have an easy job when pouring the foundation slab. Use a straight edge to pull out the excess concrete and distribute it evenly. You should also see my step by step tutorial on how to mix concrete.
Use a stick to remove the air pockets and to make sure the concrete is set up firmly. Protect the concrete from cats, dogs, leaves and dust. Hit the sides of the form with a hammer, to remove the air pockets. In case it rains, cover the concrete with foil.

Pouring concrete in the foundation formwork
Continue the process by preparing more concrete and pouring it into the form-works. Next, use a straight edge to level the concrete foundation, by pulling the tool over the sides of the formwork. In this manner, the cement paste will float at the top of concrete, creating a beautiful plane surface, which can be finished with a broom after it hardens, if you want to add texture.

Dried concrete foundation
After we have covered the whole surface of the foundation with concrete, we had to wait a couple of days until the cement has dried out. Hurrying things up is one of the biggest mistakes, as the foundation will suffer dramatic consequences on the long term.
Meanwhile, we have brought about 100 concrete bricks near the construction site. On the market there are many types of bricks, with different dimensions or shapes. There are all good, just make sure they are resistant and don’t break easily. These blocks don’t look very good but at the time there were the only thing we had access to. We’ll be covering them with render anyway.
Building the outdoor kitchen’s walls

Building outdoor kitchen with concrete bricks
In order to lay down the cement bricks, prepare a small quantity of mortar. You could either buy a prepared mix, or use a simple recipe: mix thoroughly 3 parts of cement with 5 parts of fine sand. Add water gradually until it gets the consistency of cream.
Start with one corner and then add a brick at the end of the row. Hook a string line at both ends, as to be at the top of the bricks. Next, continue the course, making sure there are all aligned. The gap between the bricks should be around 1/2”.

Building up outdoor kitchen’s walls
Continue building the first row on the whole perimeter of the outdoor kitchen. Use a spirit level to see if the wall is level and plumb. Do not continue adding bricks if they aren’t aligned, as you will make things worse. Work with patience and good judgement using protective plastic gloves, as the mortar might damage your skin.

Building brick walls for the outdoor kitchen
After we have finished the first row, we started the second layer of bricks. Notice that the pattern of the second row; it is essential to lay the brick in the stretcher bond, as to give the wall strength. In order to obtain this pattern you should start the second row with a half brick, instead of a regular one.
Use the spirit level to check if the walls are plumb, and rise up the string, in order to make sure the wall is straight.
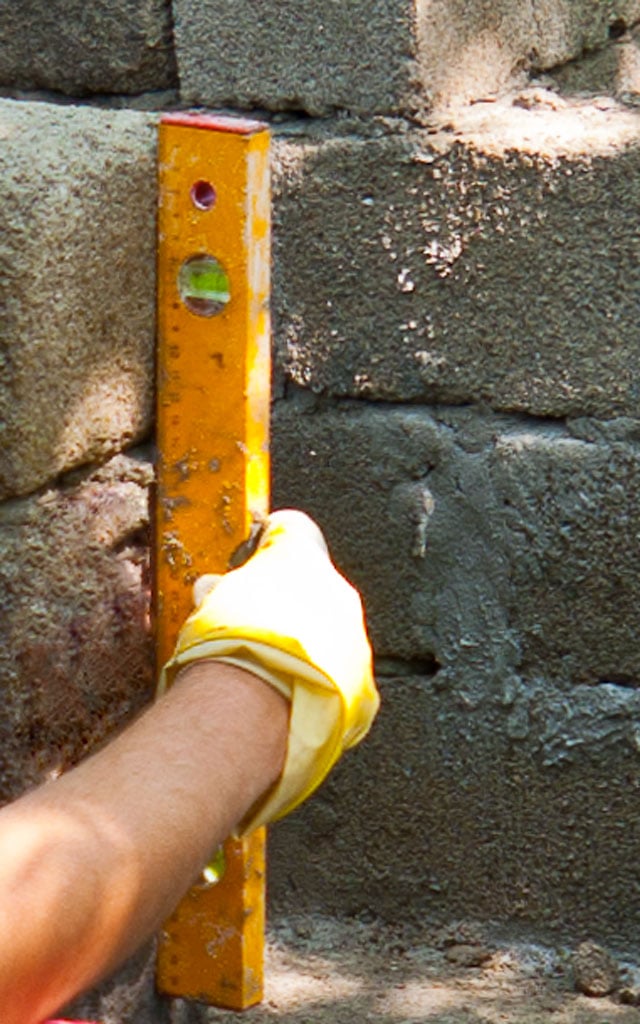
Verifying if the walls are plumb
Use the level to make sure the wall is level and plumb, otherwise you will find it very difficult and costly to repair the problem. Remove the brick if necessary and lay it again, correctly. If you have to break a brick, as to fit in a specific place, you should use a masonry hammer, in the following manner: measure the needed dimension of the brick, and then apply several firm hits all over the mark on the brick, until you get the piece you need.
If it happens to break it wrongly, don’t worry too much as it is also common to professionals. Clean up the tools and the power mixer, if you take a break or you have finished preparing concrete. After it hardens, it will be almost impossible to remove it from your tools.
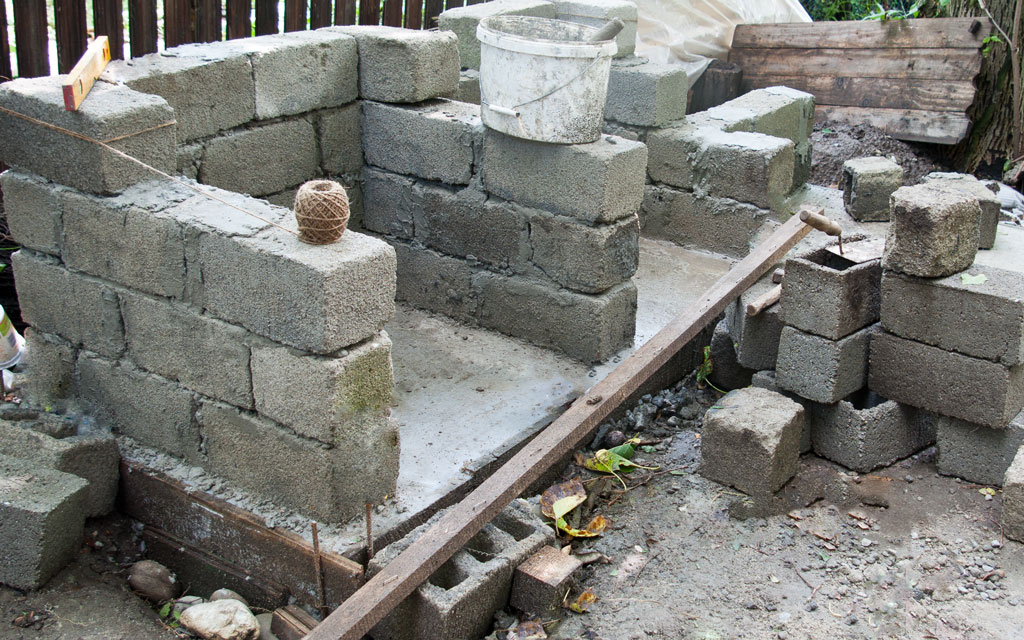
Building brick walls for the outdoor kitchen
You should add other courses of bricks, until you reach the right height for your needs and tastes. In our case, we decided that four courses of bricks are enough, but it all depends upon your needs and according to the size of the bricks.
Fill the space between the concrete blocks with mortar, using a trowel. Remove any excess material, using a trowel or a wire brush, as it will harden and it will be difficult to remove it from the bricks later on.
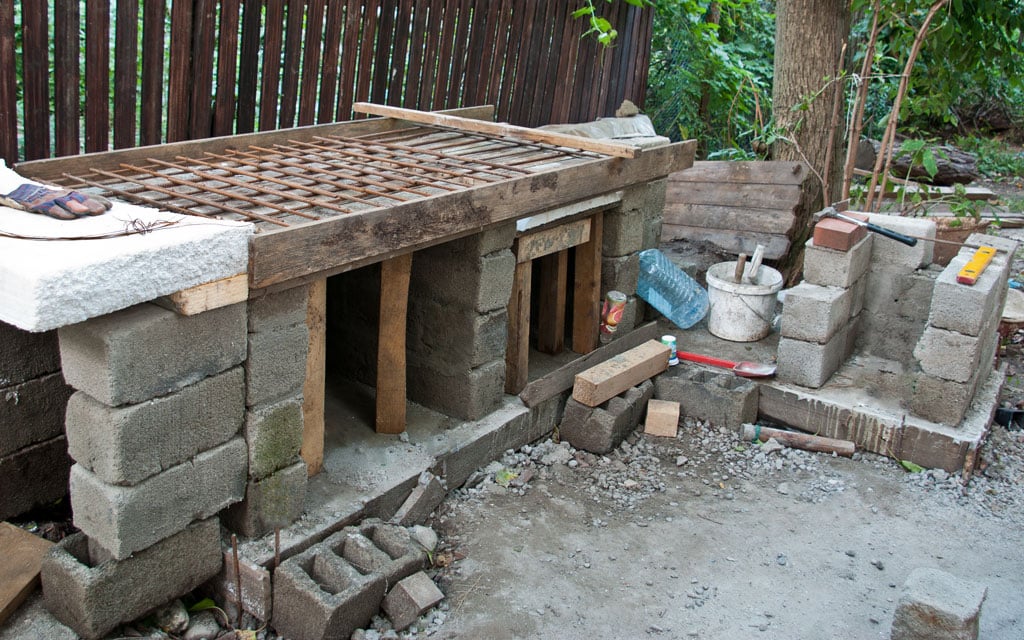
Creating the countertop
For our outdoor kitchen project, we have decided to make a concrete counter-top, and then to pave it with flagstone. Consequently, we have created a net of steel bars, as to make sure the countertop will support the weight. Connect the #8 rebars using galvanized wire and a pair of pliers.
Smart Tip: Use spacers to leave a clearance space of 1”/2.5 cm, between the form-work and the reinforcement net. Lock the wooden components together tightly, with 3” screws. We used slats for the horizontal formwork and 4×4 posts to support it. Concrete is quite heavy, so you need to build your formwork strong.

Installing flagstone on kitchen countertop
After you have poured the concrete over the re-bar network (mix 3 parts cement, 2 parts sand, 4 parts gravel and water), you should let it dry out for at least two days (48 – 72 hours), before continuing the project.
Next, we will install the flagstone counter-top using another concrete recipe: 3 parts cement, 3 parts fine sand, 2 parts gravel and enough water, as to get a compound with creamy consistency. Use a mallet to level the flagstone. Setting two slats on the front and to the back of the countertop is the way to go, because you’ll have a guideline and that will make setting the stone easy.

Outdoor brick kitchen
Last but not least, we have to plaster the walls, in order give a nice appearance to the outdoor kitchen. Consequently, use the following recipe for the mortar: mix thoroughly 3 parts cement, 5 parts fine sand and water, as get a compound with cream-like consistency. But more on that in the future episodes of the series.

How to build an outdoor pizza oven
After you have built the outdoor kitchen with cabinets, you could continue your project by making a wood fired pizza oven. As I have already said, you should decide from the very beginning if you want to add a brick dome and a cooking stove to your outdoor pizza oven, as to plan its dimensions proper.
Smart Tip: Work with good judgement, as the little details account for the final look of your outdoor kitchen. Cover the outdoor brick dome with an insulating layer.
My best tips on building a brick pizza oven:
There’s nothing quite like the taste of a pizza baked in a traditional brick oven! Building your own brick pizza oven might seem like a big task, but with careful planning and the right materials, you can create a beautiful, functional oven right in your backyard. Here are my best tips to help you get started.
1. Plan and Design Your Oven
- Choose the Right Location: Pick a spot in your yard that’s away from flammable materials, but still close enough to your outdoor kitchen or patio for convenience.
- Design: Decide between a barrel-vaulted or dome-shaped oven. Dome ovens are more traditional and retain heat well, while barrel-shaped ovens may be easier for beginners to build.
- Size Matters: Think about how many pizzas or loaves of bread you plan to bake at once. A typical oven interior is about 32 inches in diameter, which gives plenty of room for multiple pizzas.
- Check Local Building Codes: Ensure you meet any local regulations or codes, especially if you’re planning to use the oven frequently.
2. Gather High-Quality Materials
- Firebricks: These are essential for the interior of the oven, as they can withstand high temperatures and retain heat. You’ll use these for the oven floor and interior walls.
- Refractory Mortar: Regular mortar won’t stand up to the heat inside the oven, so make sure to get heat-resistant (refractory) mortar for building the dome or walls.
- Concrete Blocks and Bricks: You’ll need these for the base of the oven. They provide a sturdy foundation and support for the structure.
- Insulation: Proper insulation (like ceramic fiber or vermiculite) will help the oven retain heat, making it more efficient for cooking.
3. Build a Sturdy Base
- Lay the Foundation: Dig a hole about 6-8 inches deep where your oven will be located. Create a concrete slab foundation that will support the weight of the oven.
- Construct the Base: Use concrete blocks to build the base of the oven. Make sure it’s level and sturdy, as this will support the heavy firebricks and dome above.
- Create a Hearth: On top of the base, lay a reinforced concrete slab or use firebricks to create a solid hearth. This will be the cooking surface of the oven.
4. Lay the Oven Floor
- Firebrick Layout: Place firebricks in a herringbone or staggered pattern on top of the hearth. This pattern helps distribute heat more evenly across the floor.
- No Mortar for the Floor: Don’t use mortar between the firebricks on the floor, as the bricks need to expand and contract freely when heated. Fit them snugly together.
5. Build the Oven Walls and Dome
- Create a Template: Use sand or a temporary form (like a wooden mold) to shape the inside of the oven dome or barrel. This helps you lay the bricks in the correct shape.
- Lay the Firebricks: Start building the oven by laying firebricks around the template. Use refractory mortar between the bricks, but leave space for expansion between the dome and floor.
- Taper the Dome: As you work upward, taper the bricks inward to form the dome. This shape helps trap and circulate heat efficiently.
- Chimney Placement: Leave a space for the chimney at the front of the oven. The chimney should be positioned above the door to allow smoke to escape without losing too much heat.
6. Insulate and Protect the Oven
- Insulation Layer: Once the dome is built, cover it with a layer of insulation (like ceramic fiber blanket or vermiculite). This will help keep heat inside the oven, making it more efficient.
- Outer Shell: Build an outer shell around the insulation using regular bricks or concrete. This adds protection and can be styled to match your outdoor decor.
- Waterproofing: Apply a weather-resistant finish like stucco, tile, or stone to protect the oven from rain and other elements.
7. Construct the Oven Door
- Door Materials: Build a sturdy door using fire-resistant materials. The door should fit snugly in the opening, but allow for easy removal during cooking.
- Adjustable Ventilation: Consider adding a vent to the door to control airflow and regulate the oven’s temperature while cooking.
8. Curing and First Burn
- Slow Curing Process: Don’t rush into using your oven right away. The brick and mortar need time to cure. Start with small fires to gradually heat the oven, driving out moisture from the mortar.
- Increase Heat Slowly: Over several days, increase the size and duration of your fires. This will prevent cracks in the dome from sudden heat expansion.
- Test Cooking: Once your oven is fully cured, start with a test cooking session to check how well it holds heat and distributes temperature.
9. Cooking Tips for Your Brick Oven
- Preheat Properly: Allow the oven to heat up for at least an hour before cooking. You’ll know it’s ready when the inside walls turn white, indicating they’ve reached optimal cooking temperature.
- Use a Pizza Peel: A pizza peel is a must for safely transferring pizzas in and out of the oven. Choose one with a long handle to keep your hands away from the heat.
- Managing Heat: Use a small fire on one side of the oven to maintain consistent heat while cooking. You can push coals to the back or sides to keep the cooking area clear.
Thank you for reading our article about how to make an outdoor kitchen and we recommend you to check out the rest of our outdoor projects. Please share our articles with your friends, by using the social media widgets.
