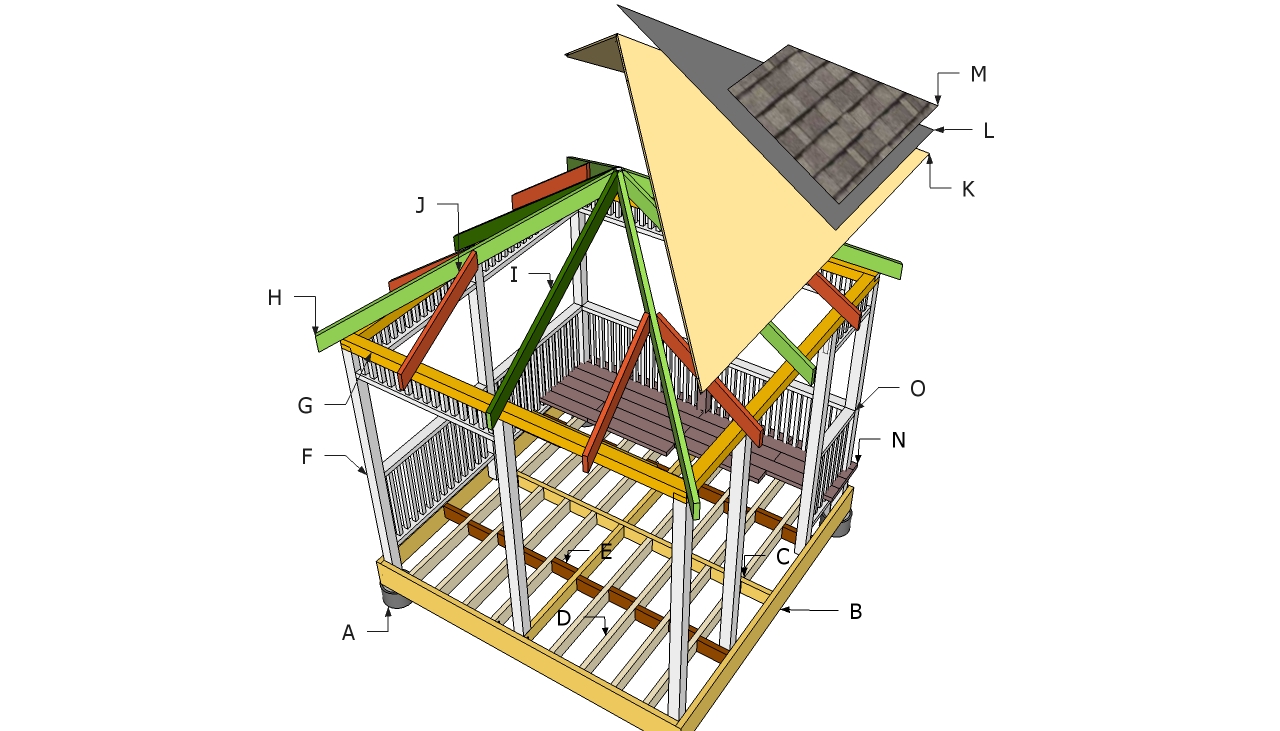
This article is about how to build a gazebo. Building a square gazebo is easy if you use the right plans, techniques and materials. If you have a large garden and you like to spend your time with your family and friends, a gazebo is perfect for your needs. Just imagine yourself in a beautiful and easy to build gazebo, while watching your kids playing on the grass. In addition, a gazebo is a great place to prepare the food and take dinner with you family. A square gazebo is also a wonderful place to read books during the hot summer days, as the roof will protected you against the sun rays.
You should plan and design the outdoor gazebo as to satisfy both your needs and tastes. Therefore, you should decide its dimensions and whether you want to add a bathtub, a deck or a barbeque, to make it suit your needs. The options are virtually unlimited, that is why we recommend you to take your time when planning its size and features. Nevertheless, you should remember that each extra-feature implies additional expenses, therefore you have to keep a balance between the benefits and costs.
Choosing the right design for your gazebo is a tough decision, as there are many potential alternatives: on one hand, you can build an eight-sided gazebo, a rectangular construction or a simple to build square gazebo. In this step by step article we will show you how to build your own gazebo in a couple of weekends, while keeping the costs under control. Building a gazebo is a straight forward procedure, provided you known several basic woodworking techniques.
Made from this plan
In order to build a gazebo, you need the following:
Materials
- A – 4 tube forms, 4 adjustable anchors CONCRETE FOOTINGS
- B – 2 pieces of 2×6 lumber, 120” long, 2 pieces of 2×6 lumber 123” long RIM JOISTS
- C – 1 piece of 2×6 lumber, 120” long MIDDLE JOIST
- D – 16 pieces of 2×6 lumber, 59 1/4” long JOISTS
- E – 18 pieces of 2×6 lumber, 14 1/2” long BLOCKING
- F – 9 pieces of 4×4 lumber 9′ long WOODEN POSTS
- G – 4 pieces of 4×4 lumber, 10′ long TOP RAIL
- H – 4 pieces of 2×4 lumber, 102” long, 64º cuts at both ends HIP RAFTERS
- I – 4 pieces of 2×4 lumber, 79” long, 55º cuts at both ends COMMON RAFTERS
- J – 8 pieces of 2×4 lumber,42” long JACK RAFTERS
- K – 400 sq ft of 1/2” tongue and groove plywood ROOFING SHEETS
- L – 400 sq ft of roofing felt ROOFING UNDERLAYMENT
- M – 400 sq ft of asphalt shingles, nails ASPHALT SHINGLES
- N – 100 sq ft of 2×4 decking boards FLOORING
- O – 2×4 bottom and top rails; 2×2 balusters 2 1/2′ long RAILINGS AND BALUSTERS
- cement, sand, gravel
- 2 1/2” lag screws – to secure the posts
- 4” screws – to secure the joists, the rails
- Corner brackets – to lock the joists into place
- 2 1/2” deck screws – to install the decking boards, the balusters, the roofing sheets
- 6” screws – to secure the rafters
- 1/2” roofing nails – to install the shingles
Tools
- Safety gloves, glasses
- Circular saw, miter saw
- Drill machinery and drill bits
- Hammer, spirit level, carpentry pencil, tape measure
- Ladder, posthole digger
- Power mixer
Tips
- Lay out the outline of the gazebo in a professional manner, using batter boards and string
- Plumb the posts using post level clips and braces (a level that reads in both directions simultaneously)
- Use adjustable post anchors to secure the 4×4 wooden posts
- Don’t use lumber that is likely to crack or twist
- Don’t over-tighten the screws
- Don’t leave more than 14 1/2” between the joists
Time
- Two weekends
My best tips for building a square gazebo with hip roof:
A square gazebo with a hip roof adds both style and function to your outdoor space, providing shade and a cozy place for gatherings. The hip roof, with its all-around slope, offers excellent stability and weather protection. Here are my best tips for building a sturdy and attractive square gazebo.
1. Plan Your Design and Size
Before starting, carefully plan the design to match your needs:
- Size: Common square gazebo sizes are 10×10 feet or 12×12 feet, but you can adjust the dimensions based on your available space and intended use.
- Roof slope: A hip roof has slopes on all four sides, meeting at a central point. Choose a pitch of at least 4:12 for good water runoff and a balanced aesthetic.
- Materials: Use pressure-treated wood for the frame or cedar for a more natural, weather-resistant look. You can also opt for vinyl or metal for lower maintenance.
Planning the design ensures the gazebo fits well into your backyard and meets your needs.
2. Prepare the Foundation
A solid foundation is essential for a stable gazebo:
- Concrete footings: Dig holes 18-24 inches deep for concrete footings under each corner post. This provides strong support and stability for the structure.
- Gravel or pavers: Alternatively, you can use gravel or pavers for a simpler foundation, ensuring the area is level and compacted to prevent shifting.
- Elevated wooden base: For a more formal look, you can build an elevated base using pressure-treated 2×6 lumber to create a platform for the gazebo.
A strong foundation prevents shifting and ensures the gazebo remains level.
3. Build the Frame
The frame is the backbone of the gazebo, supporting the roof and providing structure:
- Corner posts: Use 4×4 or 6×6 posts for the four corners, ensuring they are securely attached to the footings or base.
- Wall framing: Attach 2×4 beams between the posts to create the frame for the walls. Ensure everything is level and square.
- Roof framing: For the hip roof, cut four rafters to meet at a central ridge beam. Attach these to the top of the posts, and then add jack rafters to connect the center to the corners.
Ensure the frame is sturdy and level before moving on to the roof construction.
4. Construct the Hip Roof
The hip roof is the most important feature of this design, providing protection from the elements:
- Install roof rafters: Begin by installing the main rafters at the four corners, meeting at the top ridge. Attach smaller jack rafters between the corners and center for extra support.
- Add roof sheathing: Once the rafters are in place, cover them with plywood or OSB sheathing, ensuring the edges extend slightly beyond the walls for rain protection.
- Install roofing material: Use asphalt shingles, metal panels, or wood shingles to cover the roof. Ensure proper overlap for water resistance.
A well-constructed hip roof ensures excellent weather protection and stability in windy conditions.
5. Install Flooring and Railings
To complete the gazebo, add flooring and decorative railings:
- Flooring: Use pressure-treated decking boards or composite decking for the floor. Install the boards perpendicular to the joists, leaving small gaps for drainage.
- Railings: Add 2×2 balusters between the corner posts to create decorative railings. You can also install a lower rail for added safety and style.
Railings provide a finished look while enhancing safety, especially if the gazebo is elevated.
6. Add Finishing Touches
Once the structure is complete, focus on the finishing touches:
- Stain or paint: Apply a wood stain or exterior-grade paint to protect the wood from weathering and give it a polished appearance.
- Lighting: Install outdoor-rated lighting, such as lanterns, string lights, or solar-powered fixtures, to create ambiance for evening use.
- Screens or curtains: For added privacy or protection from insects, add screens or outdoor curtains.
Finishing touches help personalize your gazebo and make it more comfortable for relaxation and entertaining.
Bonus Tip: Add a Pergola Feature To make your square gazebo even more unique, consider adding a pergola extension on one side. This creates extra shade and a stylish transition area.
Building a square gazebo
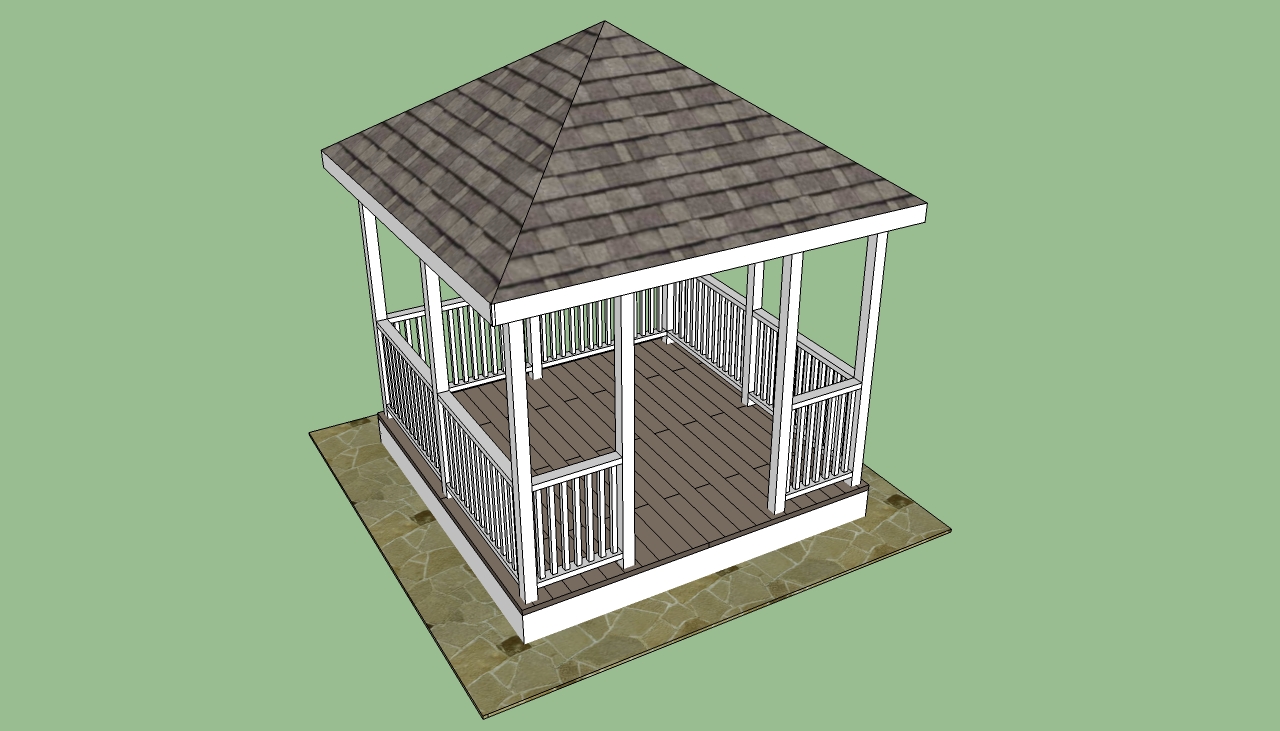
Building a square gazebo is a complex woodworking project, but any amateur can pull it trough, provided he uses the right plans, techniques and tools. As you can see in the image, you have to install several posts, build the flooring, attach the roof and install the railings. Although it might look very complicated at first, you have to use a step by step approach and work with great judgement and attention.
How to build a gazebo

Gazebo layout
The first step of the project is to lay out the gazebo, in a professional manner. Therefore, after you have selected a level area, you should mark the outline of the square gazebo, by using batter boards (made from 2×4 lumber) and string.
Anchoring the post into concrete
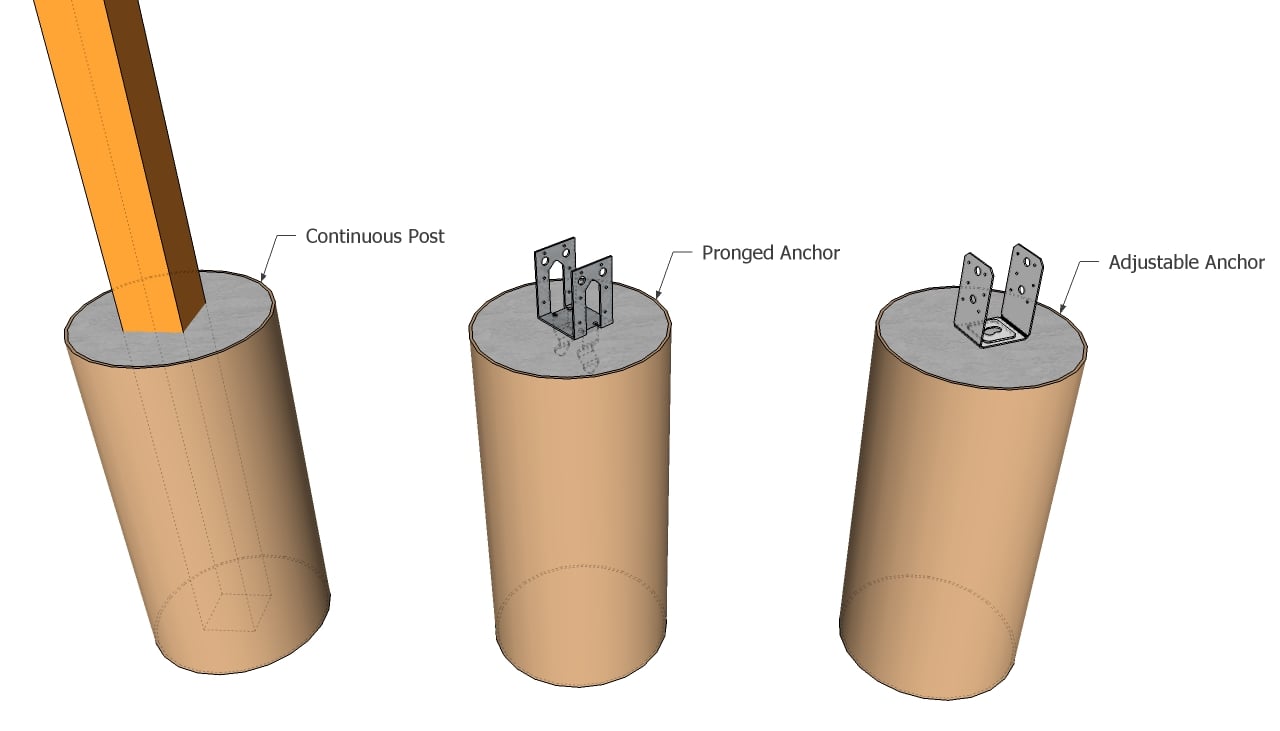
There are several techniques to secure the 4×4 wooden posts into place: locking them in concrete or using metal hardware. If you want to install the posts in concrete, you have to dig 2-3′ deep holes, compact a 2” layer of gravel and pour in 4” of concrete. Afterwards, place the post in the hole and plumb it with a spirit level.
Make sure you brace the wooden posts in two directions, after plumbing them, otherwise it might move from position.

Plumbing a gazebo post
Alternatively, you could place tube forms in the holes and fill them with concrete. After the concrete has hardened a little, you should install the adjustable anchors into place, making sure they are perfectly aligned one with another.

Installing gazebo post
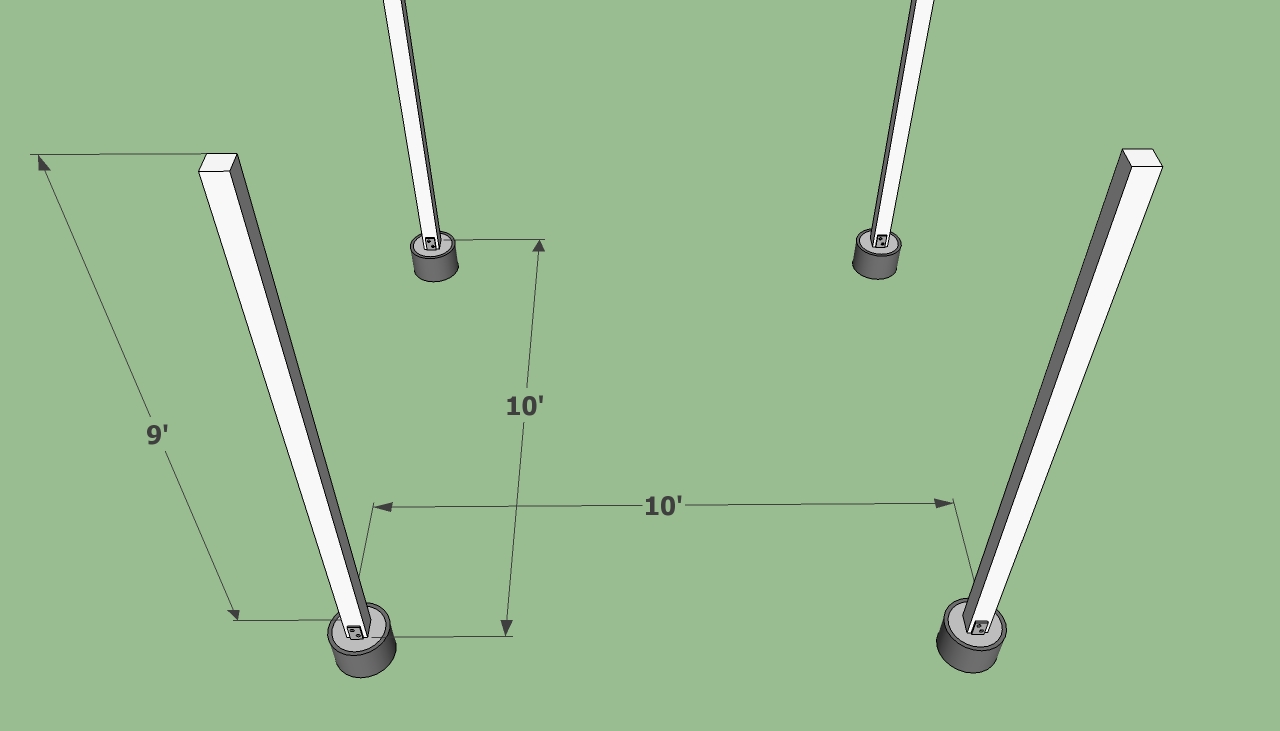
In order to anchor the four posts in a professional manner, you have to dig 3′ deep holes (12” in diameter), making sure the the holes are also 6” below the frost line.
Pour and compact a 3” layer of gravel and install a tube form in each hole (alternatively, you could build a form with 2×4 boards). Mix a small quantity of concrete, fill the form and install the adjustable post anchors.
Simple gazebo posts
Use a straight edge and a spirit level, to make sure the four footings are perfectly aligned and horizontal. Let the concrete dry out for at least 48 hours before installing the 4×4 posts.

Gazebo floor frame
Afterwards, use 2×6 wooden joists to build the frame of the gazebo floor, as in the image. It is essential to install the joists every 16” OC, as to support the weight of the decking and to create a rigid structure.

How to attach floor joists
In order to secure the joists to wooden frame, you have two broad options. On one hand, you can drive 4′-5′ screws trough the rims in the joists, or, you can use metal joist hangers.
We recommend you to support the joists with metal hangers, but you can get the job done by inserting screws trough the rim joists, as well (don’t forget to drill pilot holes, before driving in the screws).

How to build gazebo floor frame
Next, you have to install the rest of the 4×4 posts that will support the top plate and roof, as in the image. If you want to build a durable gazebo, we recommend you to secure the posts to the floor joists, using 6” nails.
How to build a gazebo decking
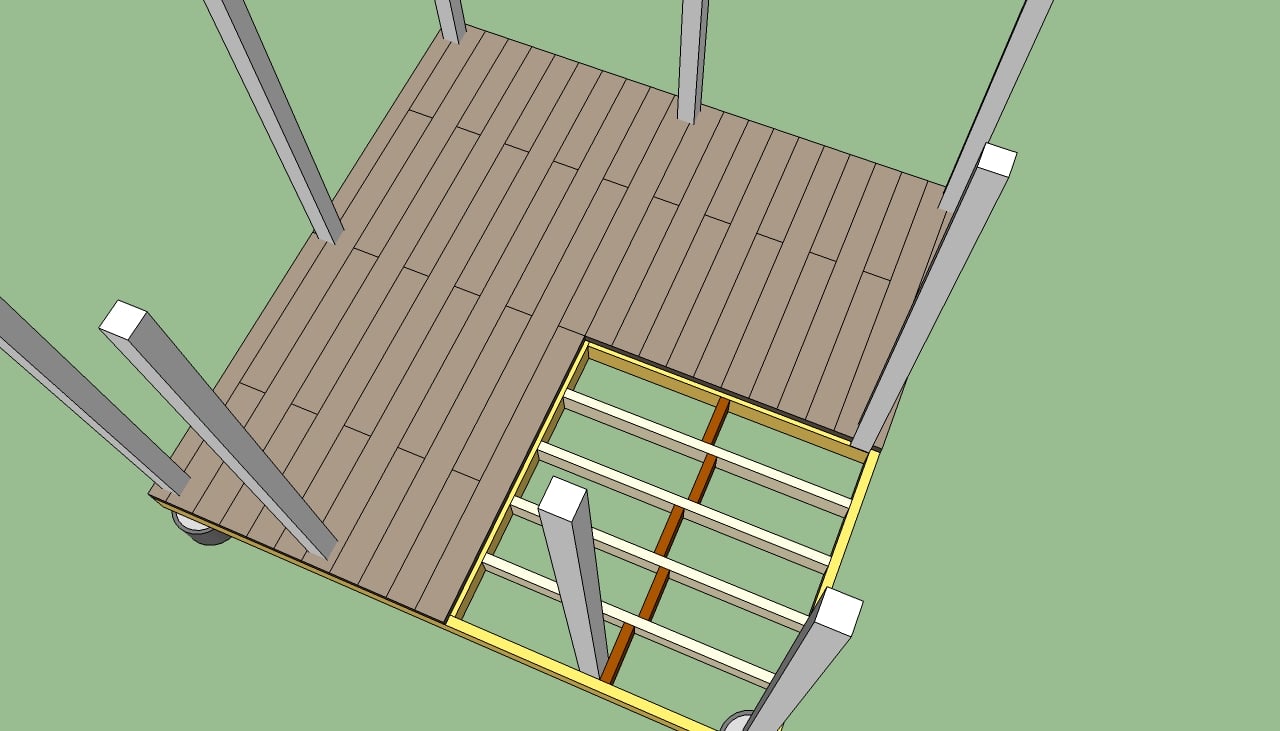
After you have built the frame of the floor and installed the 4×4 wooden posts, you have to fasten the 2×4 or 2×6 decking. We recommend you to buy decking boards designed for outside use, otherwsie the floor of the gazebo will be damaged by the moisture.

How to build gazebo floor
As you can see in the image, we recommend you to drill pilot holes before inserting the nails. If you use screws, you can drive them in the boards without pre-drilling, but you have to use appropriate decking screws.
How to build gazebo roof

How to build a gazebo
Building a gazebo roof can be done in several ways, but we will show you a technique that requires a small amount of materials and that will make the gazebo durable. The first step of the process is to install the top plates over the 4×4 wooden posts.
Use 4×4 beams and install them in a professional manner. Consider asking a friend to hold the beams into place, while you drive in the screws.

How to build gazebo top plate
In this image, you should notice the proper technique to join the top plates. Therefore, you have to cut their ends in an L-shape and join them together on top of the posts. After you join the top plates, you have to drill pilot holes and drive in several 6” screws.

How to build gazebo roof
Afterwards, install 2×4 rafters, to build the main frame of the roof. The procedure is straightforward, if you use the right techniques and tools. First, cut a 6×6 king post (4” high) and secure it into place by installing two opposite rafters, with 4” screws (toenail the rafters to the king post).

How to build a gazebo roof
Next, install the rest of the 2×4 intermediate rafters, as in the image. Work with great care and make sure the intermediate rafters are placed symmetrically. Secure them to the top plates and to the king post with several 4” screws, as in the image.
How to build gazebo roof
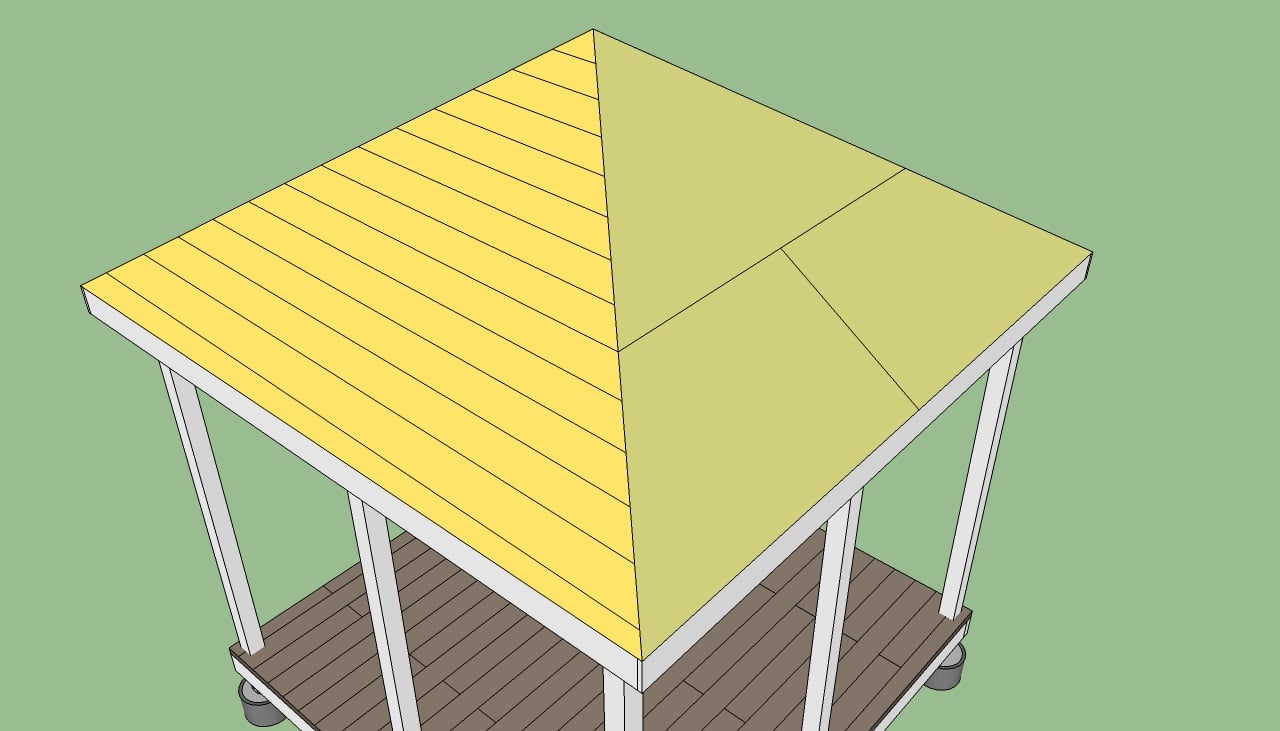
The roofing of your gazebo can be done in several ways: on one hand you can install 2×4 wooden boards, while on the other hand you can use large sheets of plywood and roofing paper. Irrespective of your choice, we recommend you to secure the wooden boards or the plywood sheets with appropriate screws, every 10” along the rafters.

How to build a gazebo roof plans
After you have installed the wooden boards or the plywood sheets, you have to cover the surface with roofing paper. Next, you should install asphalt shingles, wooden shingles or metal sheets.
From our experience, we can say that the costs are similar, therefore you have to choose the option that suits your needs and tastes. Work with great care and make sure the nails don’t go through the roofing (use 1/2” roofing nails).
How to build gazebo railings
How to build gazebo railings
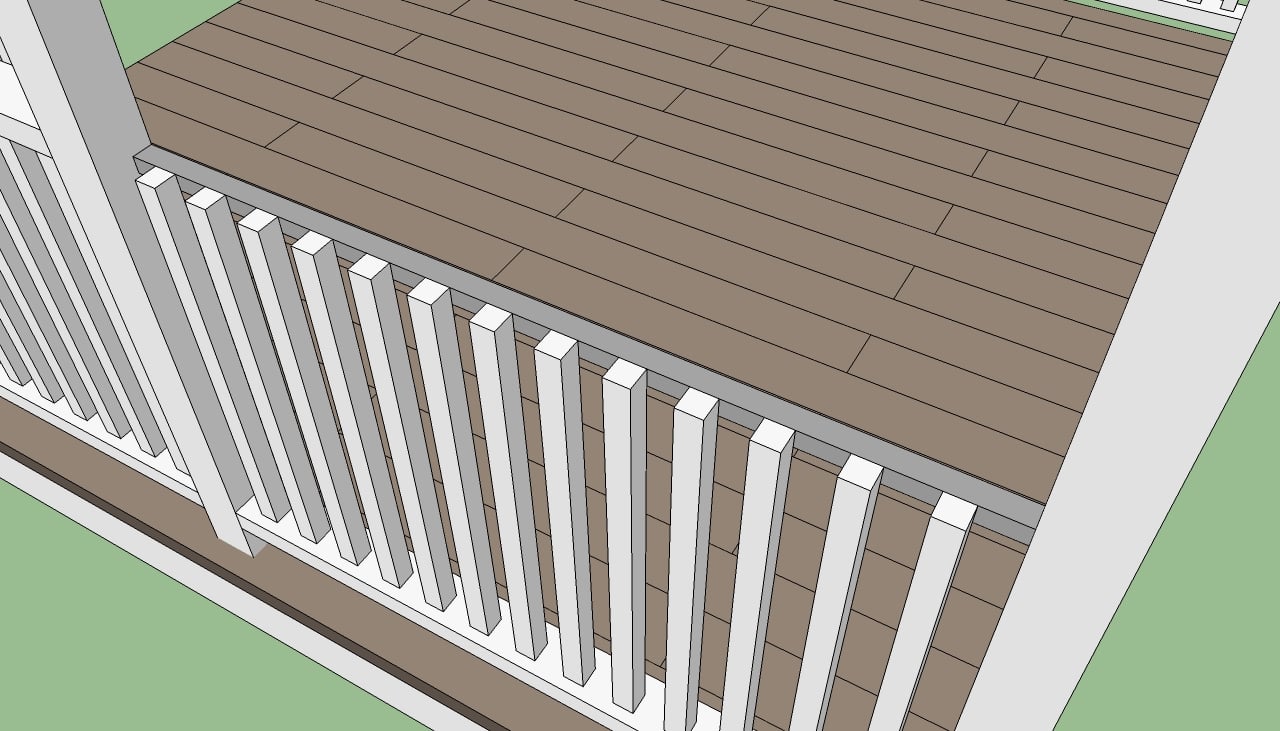
Building the balusters of the gazebo is an essential task of your project, therefore you have to tackle it with great care and attention. There are many design options to choose from, therefore you should choose the one that fits your tastes.
In our example, we have used 2×2 balusters, placed every 3”. The balusters should be 28-32” high, but you can adjust them according to your needs.
How to build gazebo railings
In order to build the balusters, you have to use proper techniques. The bottom and top railings should be secured with screws driven at angle, or locked with corner brackets.
How to build gazebo frieze
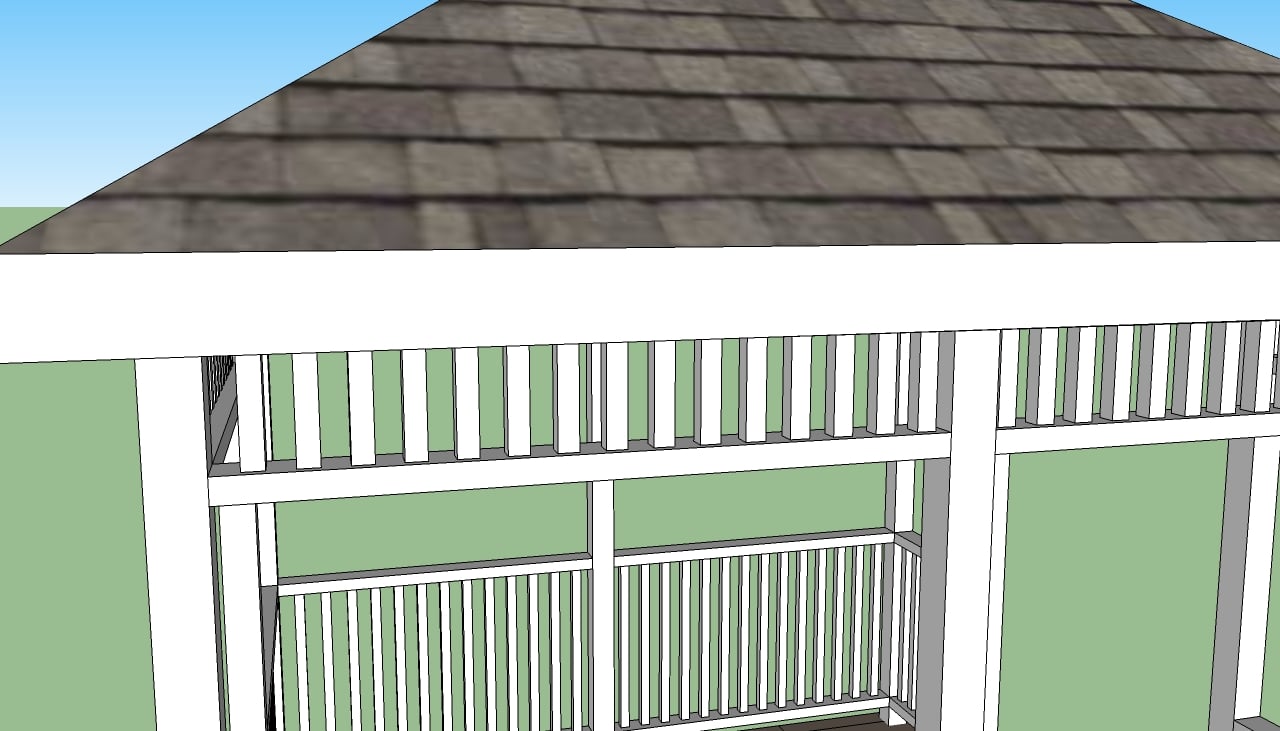
Use 2×4 boards to build the bottom and head rail of the frieze and 2×2 molding to build the balusters. In addition, make sure everything fits into place properly and has a neat look. In order to secure the balusters into place, drive nails through the bottom and top rail in the balusters.
You can also toenail them, but it would take longer an the look won’t be the same. The design of the frieze should match your house and garden.
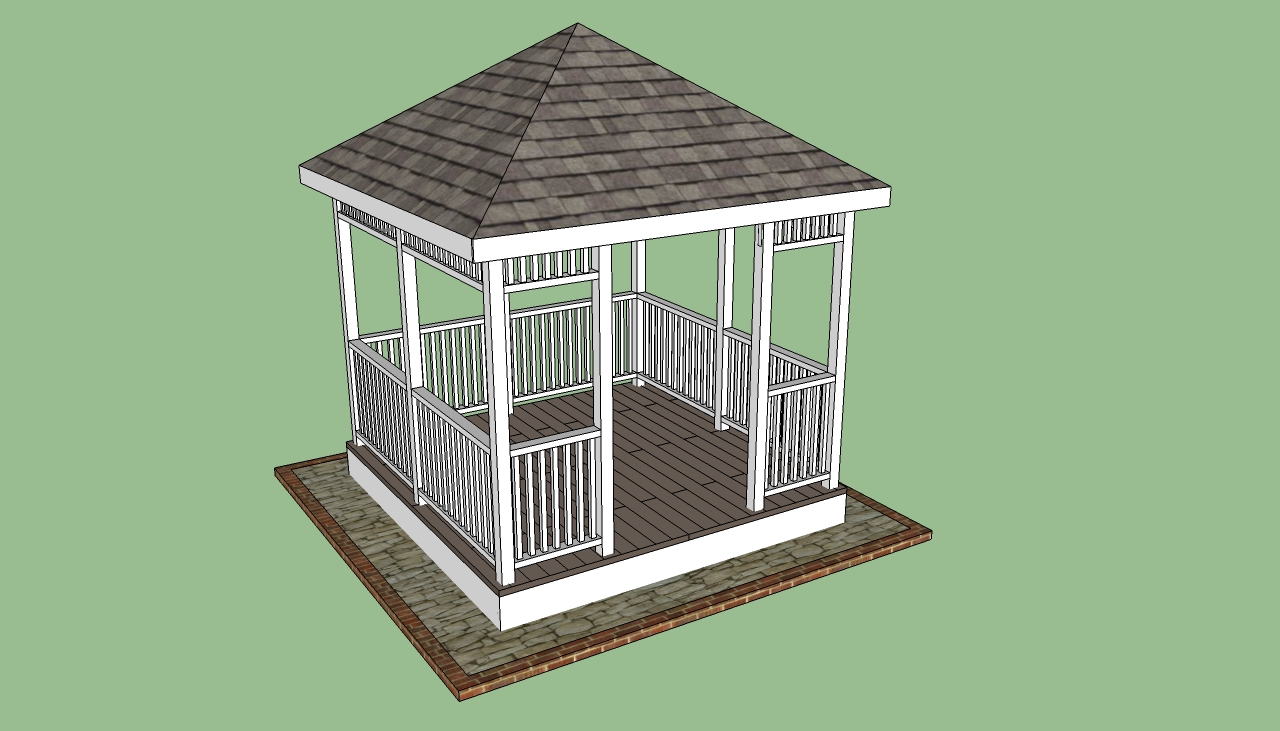
How to build a gazebo
Fill the cracks and holes with wood putty and leave it to harden. Sand the wooden surfaces of the square gazebo with medium-grit sandpaper and protect the construction against water damage, by applying several coats of varnish.
Building the perfect gazebo is a subjective matter, therefore we recommend you to choose its design and size from the very beginning, according to your needs and tastes.
By following these tips, you’ll be able to build a beautiful and durable square gazebo with a hip roof, perfect for enhancing your backyard. With careful planning and attention to detail, your gazebo will provide a cozy and functional outdoor space for years to come.
Thank you for reading our article about how to build a gazebo and we recommend you to check out the rest of our projects. Don’t forget to share our articles with your friends, by using the social media widgets.
EXPLORE MORE IDEAS:

