This step by step woodworking project is about free plans for a picnic table. I have designed this simple picnic table so that anyone can make one, even if you don’t have prior experience with woodworking. This is a simple design, but I am sure you will enjoy the look of the picnic table for many years in a row. Make sure you check out my top projects, for a healthy dose of building inspiration.
We recommend you to invest in the best materials you could afford. Therefore, you should buy quality lumber, such as pine, cedar or redwood. Always take accurate measurements before adjusting the size of the components at the proper size. Drill pilot holes trough the components before inserting the wood screws, to prevent the wood from splitting. See all my Premium Plans in the Shop.
Made from this plan

Picnic table building plans
Materials
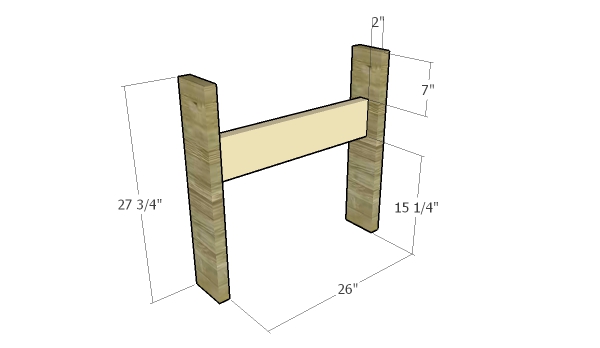
- A – 2 pieces of 2×6 lumber – 27 3/4″ long, 1 piece – 26″ long FRAME
- B – 4 pieces of 2×6 lumber – 15 1/4″ long, 2 pieces – 26″ long BENCHES
- C – 2 piece of 2×4 lumber – 60″ long RAILS
- D – 4 pieces of 1×6 lumber – 32″ long SEAT
- E – 2 pieces of 2×4 lumber – 27 1/2″ long, 5 pieces of 1×6 lumber – 32″ long TABLETOP
- 3 pieces of 2×6 lumber – 8′
- 3 pieces of 1×6 lumber – 8′
- 1 piece of 2×4 lumber – 10′
- 200 pieces of 2 1/2″ screws
- 200 pieces of 1 1/4″ screws
- wood glue
- stain, spar varnish
- wood filler
Tools
- Safety gloves, glasses
- Miter saw, jigsaw
- Chalk line, tape measure, spirit level, carpentry pencil
- Drill machinery and drill bits
Time
- One Day
Plans for picnic table

Building the benches
Build the frames for the bench from 2×6 lumber. Drill pilot holes through the legs and insert 2 1/2″ screws into the supports. Center the supports to the legs and make sure the corners are right angled. Add waterproof glue to the joints.

Building the table frame
Next, build the frame for the table. Drill pilot holes through the 2×6 legs and insert 2 1/2″ screws into the support. Make sure the corners are square and add glue to the joints.

Tabletop supports
Build the supports for the tabletop from 2×4 lumber. Make decorative cuts to both ends of the supports and smooth the edges with sandpaper. Drill pilot holes through the legs and insert 2 1/2″ screws into the supports. Add waterproof glue to the joints.

Building the tabletop
Attach 1×6 slats to the stop of the table. Align the edges until they are flush, drill pilot holes and insert 1 1/4″ screws to secure them to the supports. Leave no gaps between the components for a professional result.

Assembling the 2 person picnic table
Fit the 2×4 rails to the benches and to the table. Make both ends of the rails in a decorative manner. Drill pilot holes through the legs and insert 2 1/2″ screws into the rails. Make sure the corners are square and plumb the legs with a spirit level.

Fitting the bench slats
Attach 1×6 slats to the bench frames. Align the edges, drill pilot holes at both ends and insert 1 1/4″ screws into the rails. Countersink the head of the screws so they are at the same level with the slats.

Two person picnic table plans
Fill the holes with wood putty and let it dry out for several hours. Smooth the surface with 120-220 sandpaper before applying the coats of stain. Seal everything with spar varnish, so you protect the table from the elements.

Plans for a picnic table
Thank you for reading our project about free plans for picnic table and we recommend you to check out the rest of the projects. Don’t forget to LIKE and SHARE our projects with your friends, by using the social media widgets. SUBSCRIBE to be the first that gets our latest projects.


