Are you tired of clutter taking over your workspace? Dreaming of a solution that combines functionality, durability, and a touch of DIY pride? Look no further! In this project, we’re going to guide you step-by-step with free plans to build a versatile storage workbench and tower unit, the perfect setup to organize your tools, totes, and supplies all in one place.
This isn’t just another DIY project; it’s a game-changer for anyone who loves an organized workshop. By the end, you’ll have a sturdy, custom-fit solution tailored to your exact needs—and the satisfaction of knowing you built it yourself.
Follow along, and I’ll show you every detail, from assembling the frames to adding the finishing touches. Trust us, by the time you secure that last screw and apply the final coat of paint, you’ll wonder how you ever managed without it. Ready to roll up your sleeves?
We recommend you to invest in the best materials you could afford. Therefore, you should buy weather-resistant lumber, such as pine or cedar. Always take accurate measurements before adjusting the size of the components at the proper size. Drill pilot holes trough the components before inserting the wood screws, to prevent the wood from splitting. My plans come with a full cut / shopping list and they are PDF Download and Print friendly. See all my Premium Plans HERE.
Made from this plan
Pin it for Later!
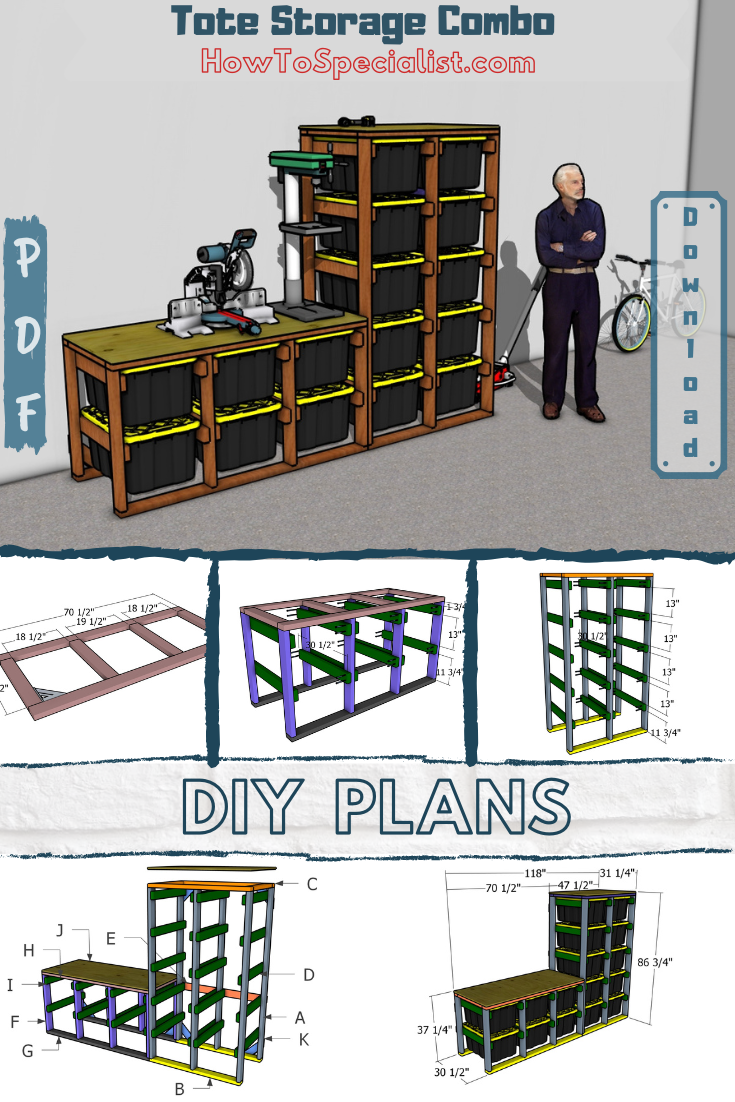
Tote Storage Rack – Free DIY Plans
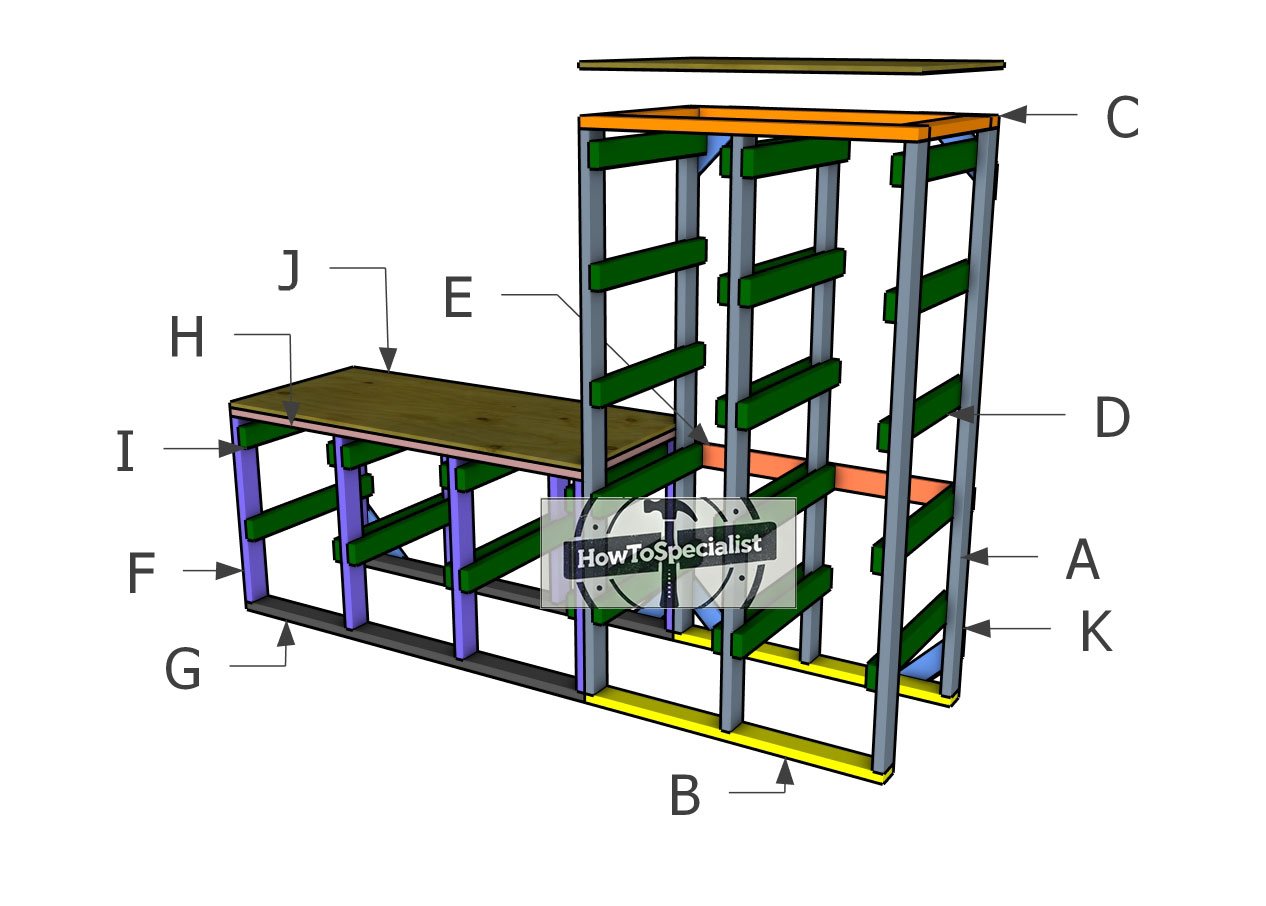
Building-a-tote-storage-unit
Materials
A – UPRIGHTS – 2×4 lumber 83″ – 6 pieces
B – SKIDS – 2×4 lumber 47 1/2″ – 2 pieces
C – TOP FRAME – 2×4 lumber 48 1/2″ – 2 pieces
C – TOP FRAME – 2×4 lumber 23 1/2″ – 3 pieces
D – CLEATS – 2×4 lumber 30 1/2″ – 20 pieces
E – BACK SUPPORT – 1×4 lumber 47 1/2″ – 1 piece
F – UPRIGHTS – 2×4 lumber 33 1/2″ – 8 pieces
G – SKIDS – 2×4 lumber 70 1/2″ – 2 pieces
H – TOP FRAME – 2×4 lumber 70 1/2″ – 2 pieces
H – TOP FRAME – 2×4 lumber 23 1/2″ – 4 pieces
I – CLEATS – 2×4 lumber 30 1/2″ – 12 pieces
J – TABLETOP – 3/4″ plywood 31 1/4″x70 1/2″ – 1 piece
J – TOP SHELF – 3/4″ plywood 31 1/4″x47 1/2″ – 1 piece
K – BRACES – 1×4 lumber 16″ – 8 pieces
- 2×4 lumber 8 ft – 15 pieces
- 2×4 lumber 10 ft – 5 pieces
- 1×4 lumber 8 ft – 2 pieces
- 27 gallon storage tote – 16 pieces
- 3/4″ plywood – 4’x8′
- 3/4″ plywood – 4’x4′
- 1 5/8″ screws – 100 pieces
- 2 1/2″ screws – 200 pieces
- 3 1/2″ screws – 50 pieces
- stain / paint – 1 can
- Glue – 1 piece
- Wood putty – 1 can
Tools
- Miter saw, Pocket hole jig
- Drill machinery, Drill bits, Jigsaw
- Safety gloves, Glasses
- Chalk line, tape measure, spirit level, carpentry pencil
Time
- One week
Related
Step 1: Building the storage workbench
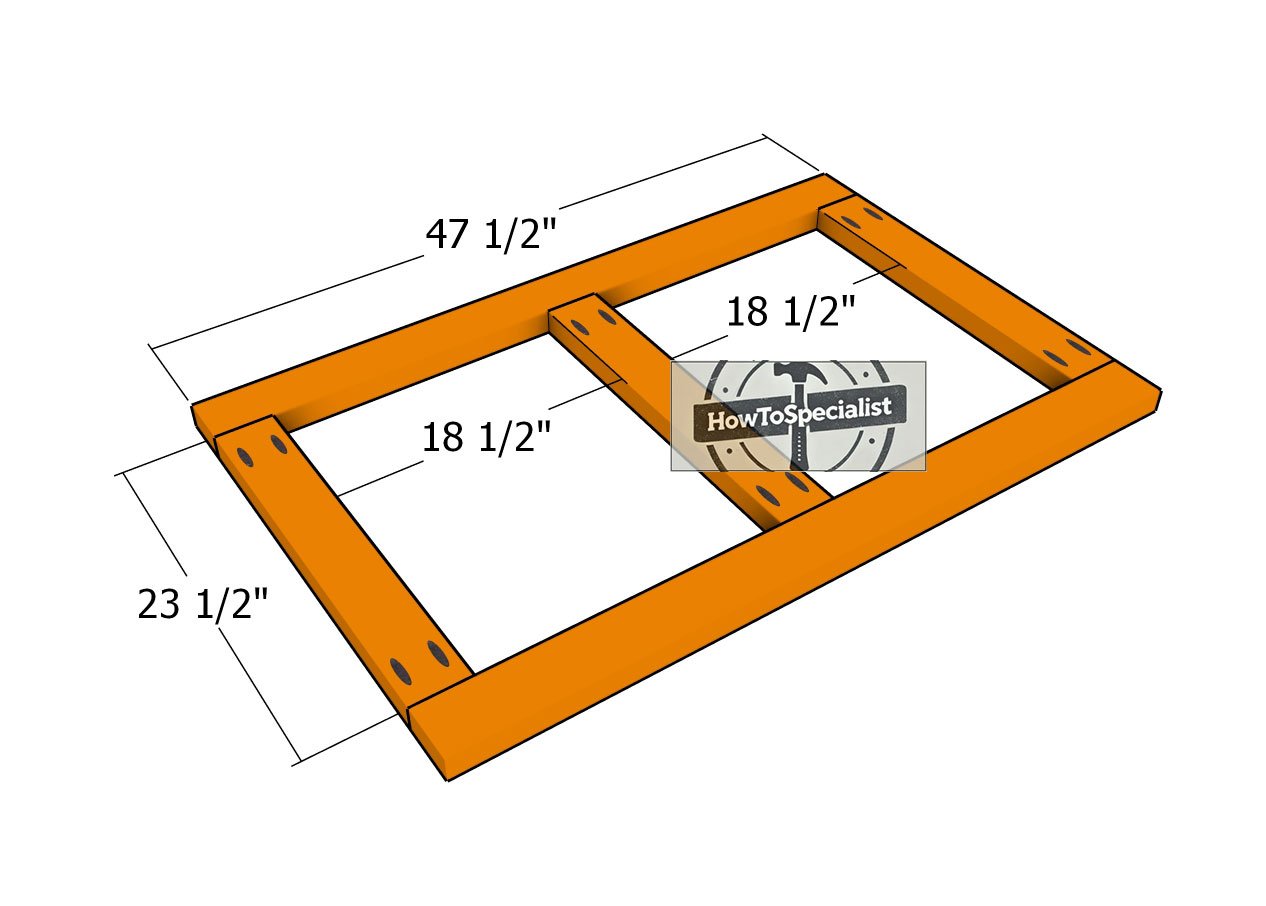
Tower top frame
Start this project by assembling the top frame for the tower unit. Cut the components from 2×4 lumber, precision is key here! Drill pocket holes at both ends of the 23 1/2″ pieces using your pocket hole jig. Lay everything out on a flat, level surface and align the edges flush like a pro.
Double-check that the corners are square with a speed square—this is your golden ticket to a solid build. Once everything lines up, secure the frame with 2 1/2″ screws. You’ll feel the satisfaction of a strong, clean frame coming together!
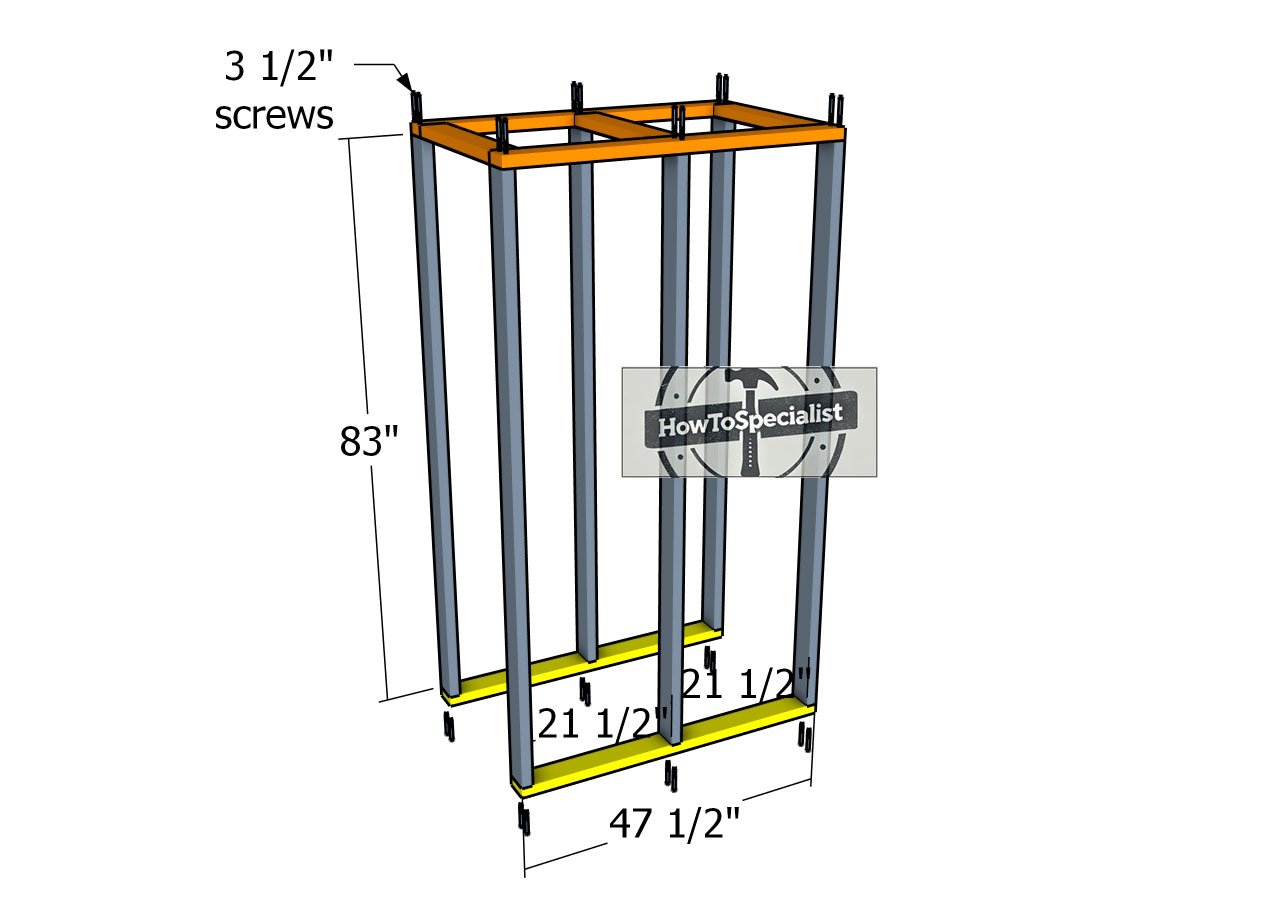
Assembling-the-tower-unit
Now it’s time to bring the frame of the tower storage unit to life! Start by drilling pilot holes through the top and bottom frames, then secure them to the uprights with 3 1/2″ screws. Use 2 screws per joint for rock-solid connections, no shortcuts here!
Don’t forget to check that those corners are perfectly square with your speed square. Here’s the pro move: adjust the spacing between the uprights to fit your storage totes like a glove.
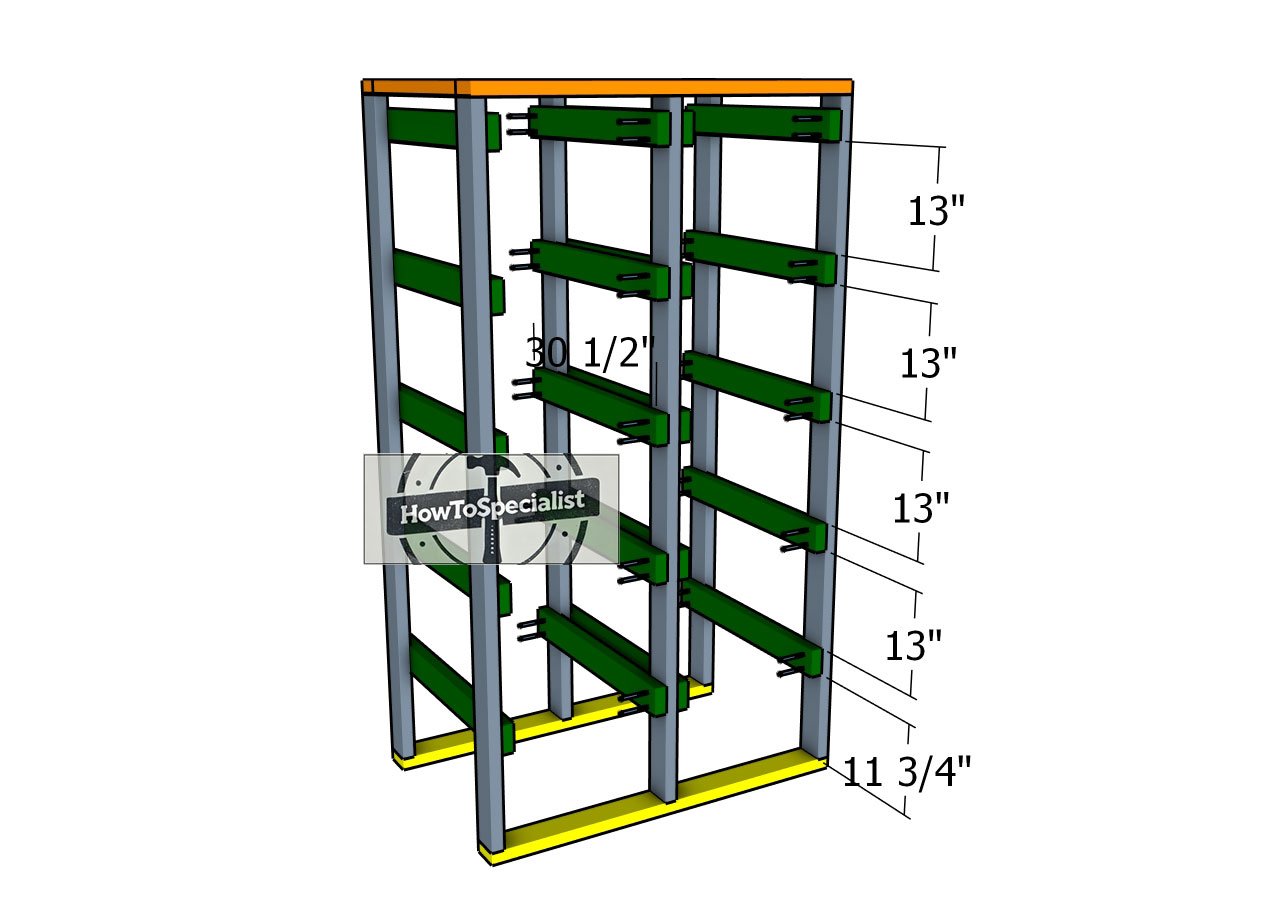
Cleats—tower-unit
Next up, it’s time to fit the 2×4 cleats to the tower unit. Align each cleat flush with the uprights at the front and back of the storage unit for a clean, professional look. To keep everything consistent, use spacers between the cleats to ensure even gaps.
Drill pilot holes through the cleats, then secure them to the uprights using 2 1/2″ screws. Be sure to use two screws per joint for maximum stability.
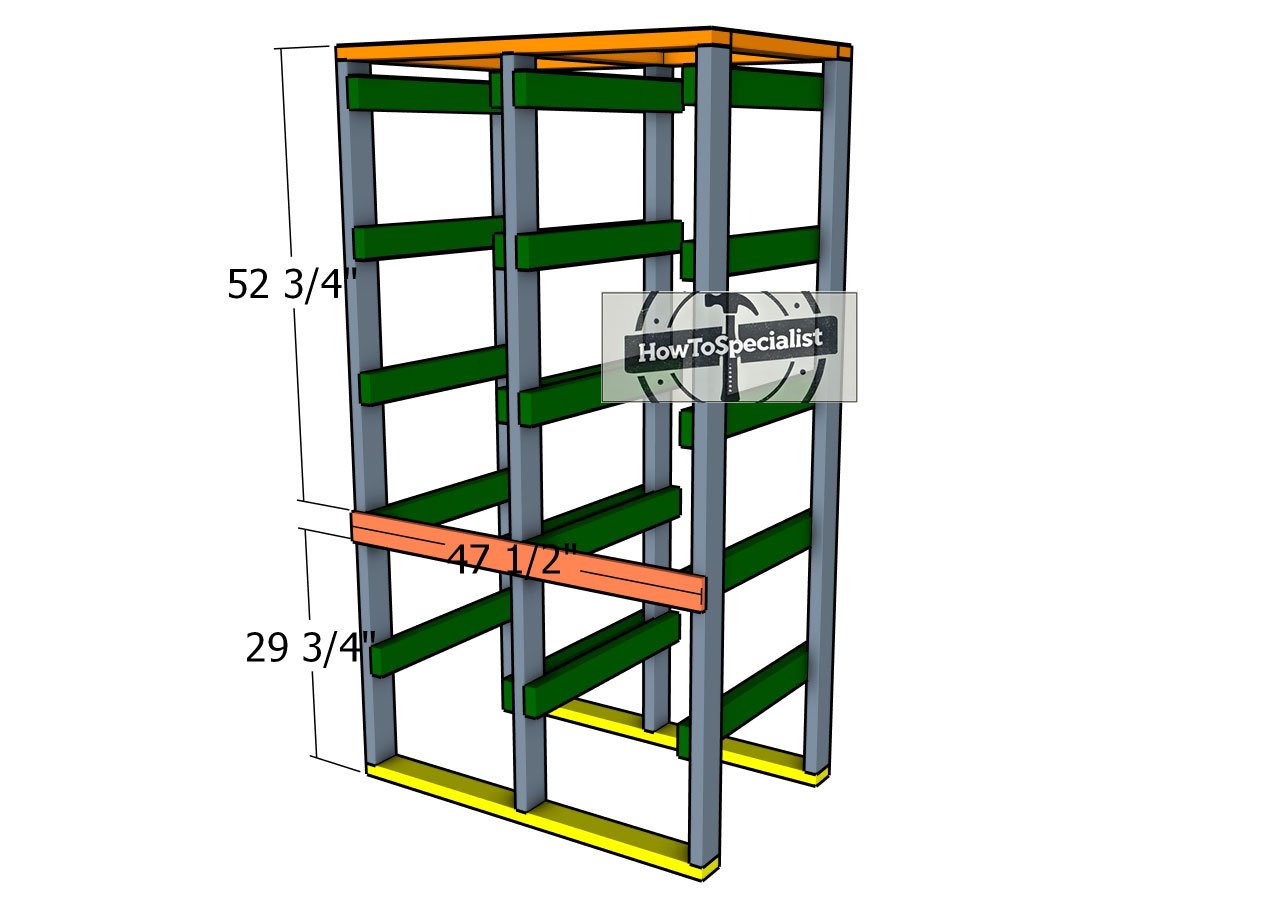
Back-support
Now, let’s add a 1×4 support to the back of the storage unit for extra rigidity. Start by making sure the posts are perfectly plumb—grab your level to double-check. Confirm the corners are square, because a solid frame depends on precise angles. Drill pilot holes into the 1×4 to prevent splitting, then secure it to the uprights with 2 1/2″ screws.
Step 2: Building the storage tower
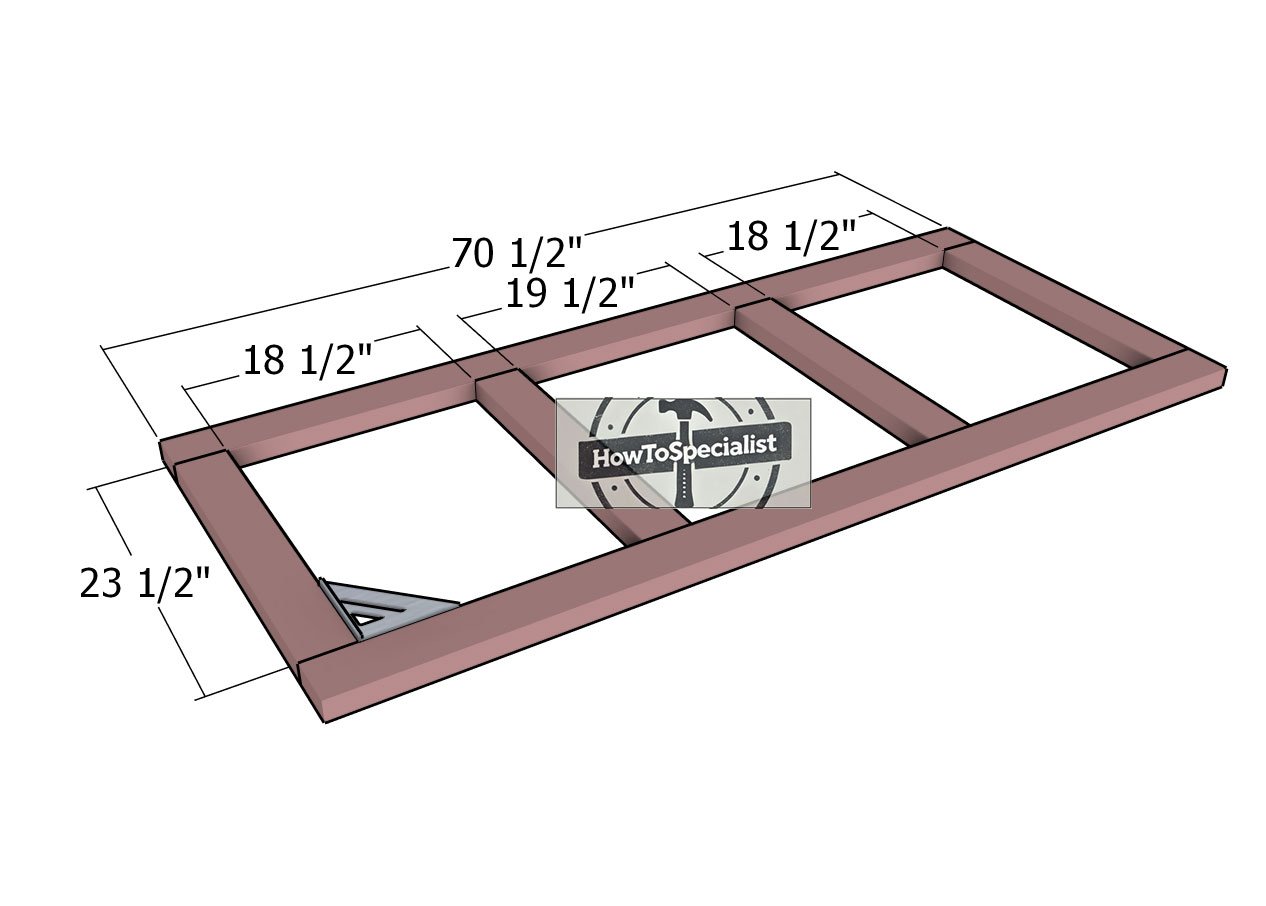
Assembling-the-workbench-frame
Next, let’s tackle the top frame for the workbench. Grab your 23 1/2″ components and drill pocket holes at both ends—this step ensures strong, hidden joints. Secure these pieces to the end boards using 2 1/2″ screws. Don’t rush here! Use a speed square to make sure the corners are perfectly right-angled.
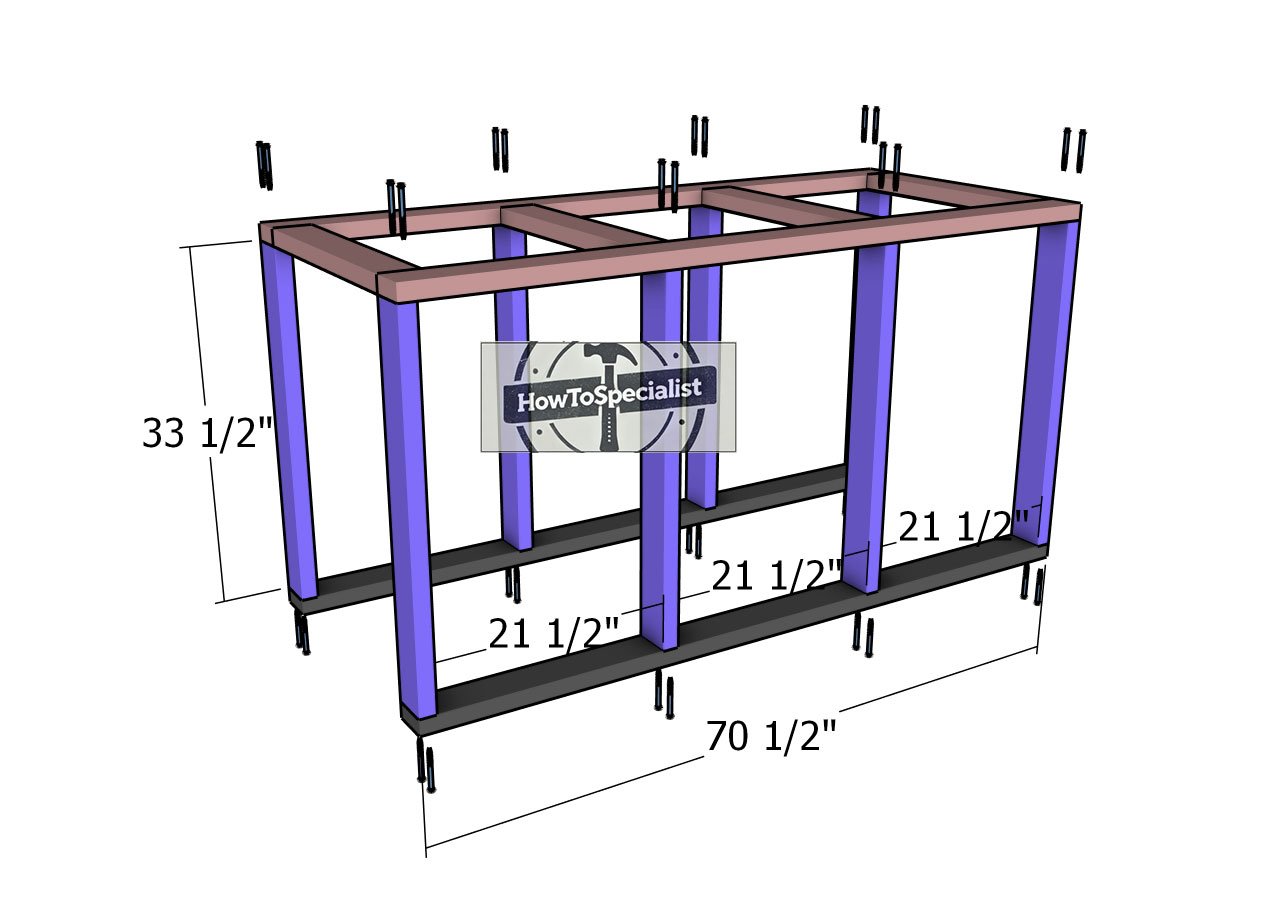
Workbench-unit-frame diy
Time to assemble the frame of the workbench! Start by attaching the uprights to the top frame and the base skids. Drill pilot holes through the skids and the top frame to prevent splitting, then secure the uprights with 3 1/2″ screws. Make sure everything is aligned properly and square as you go—precision here means a sturdy, wobble-free workbench that’s ready for action!
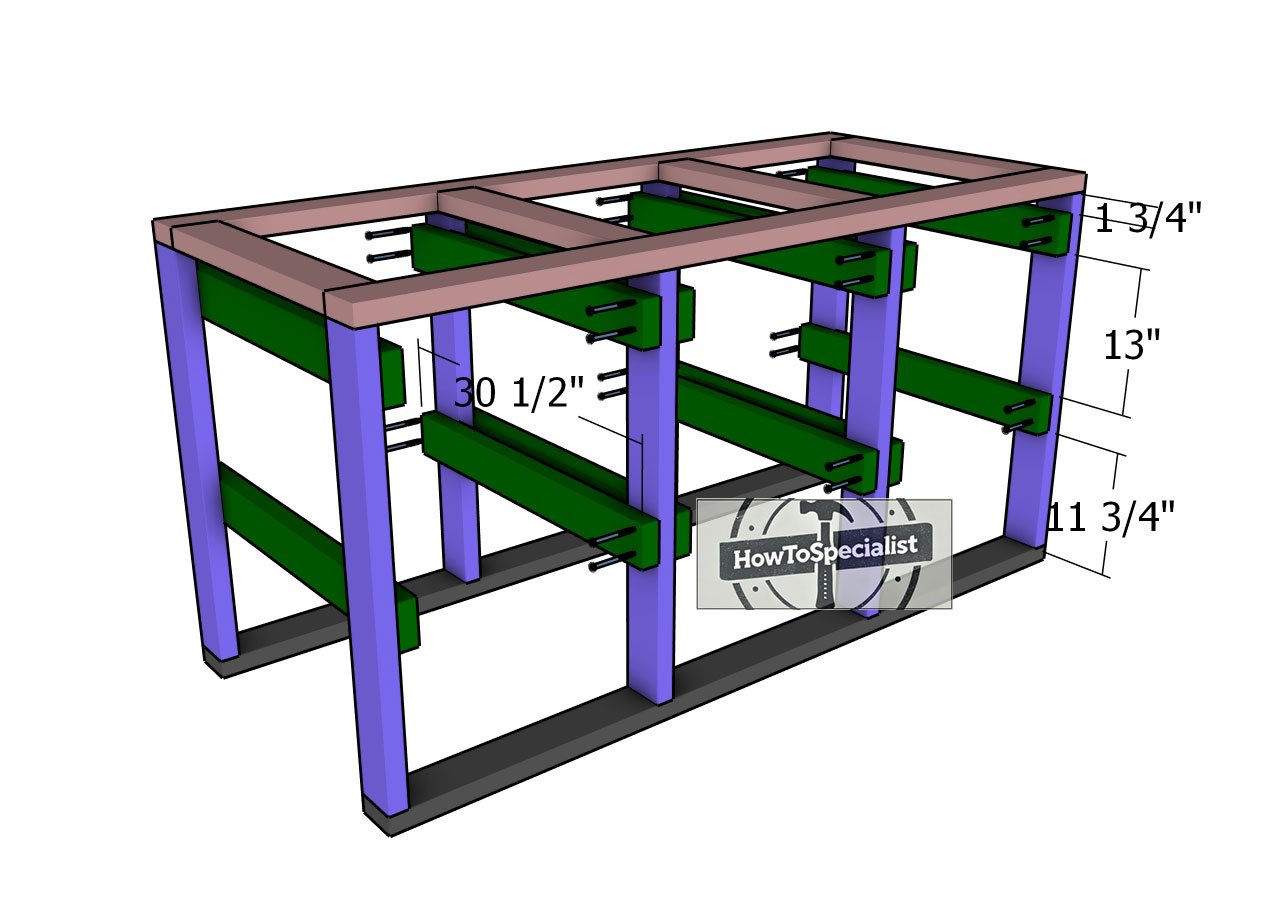
Workbench-cleats
Next, attach the 2×4 cleats to the workbench frame. Align the cleats properly, then drill pilot holes to prevent the wood from splitting. Secure them to the frame with 2 1/2″ screws for a snug and sturdy fit. Remember, this is the point where you can make any necessary adjustments to the cleat spacing to match the size of the totes you’ll be using.
Step 3: Finishing touches
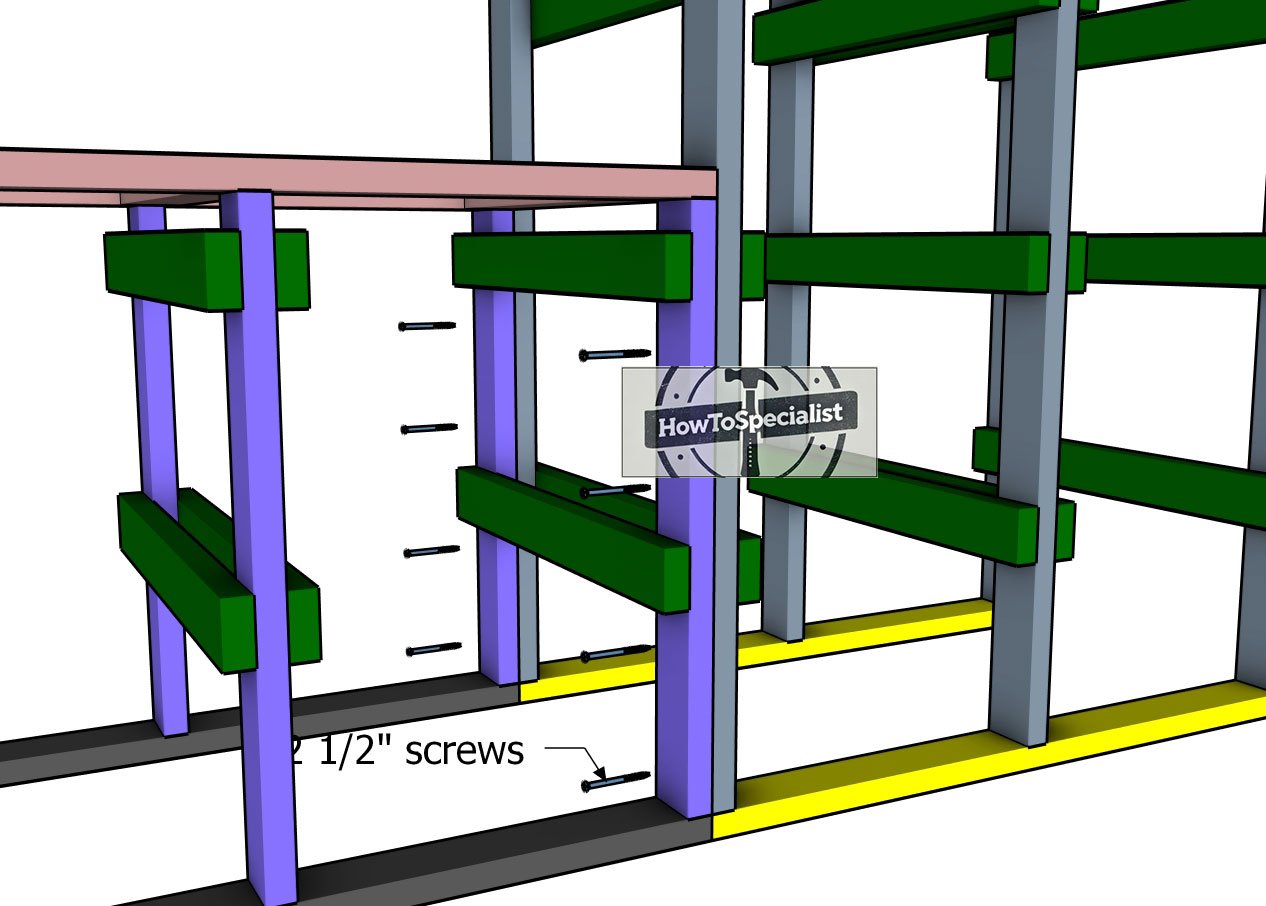
Assembling the combo
With the storage workbench and tower unit assembled, it’s time to bring them together into one cohesive unit. Align the edges carefully, and decide whether you want the tower on the left or right, it’s your call based on your workspace layout.
Once you’ve got them positioned, drill pilot holes to prevent splitting, and then insert screws to lock the two units together tightly. Double-check that everything is flush and square for a clean, professional finish.
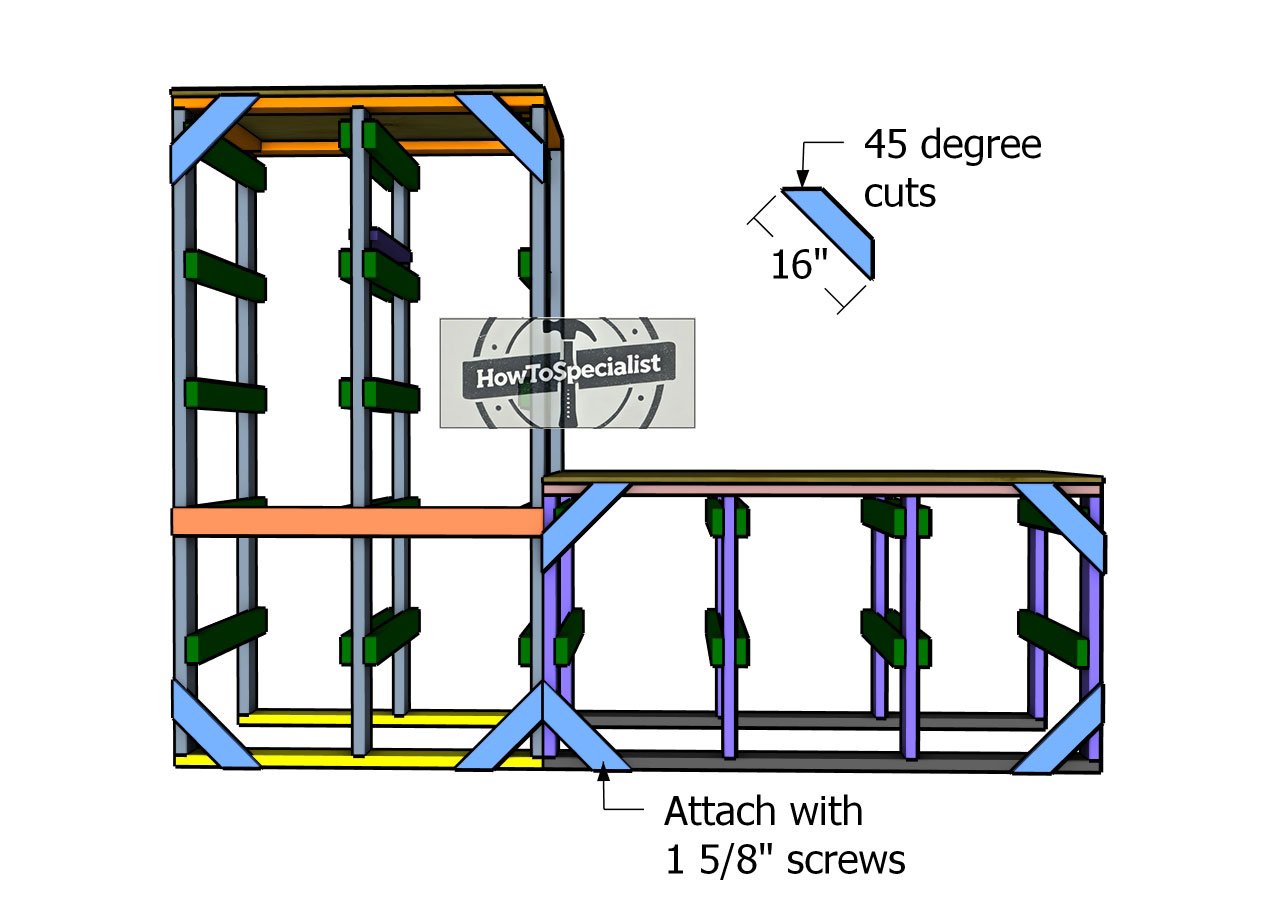
Braces
To enhance the rigidity of your tote storage rack, add 1×4 diagonal braces. Cut both ends of the braces at a 45-degree angle for a snug fit. Before attaching the braces, make sure the uprights are perfectly plumb.
Once aligned, secure the braces in place with 1 5/8″ screws. This step will not only stabilize the structure but also give it a more finished and professional look. Strong, sturdy, and ready to hold those totes!
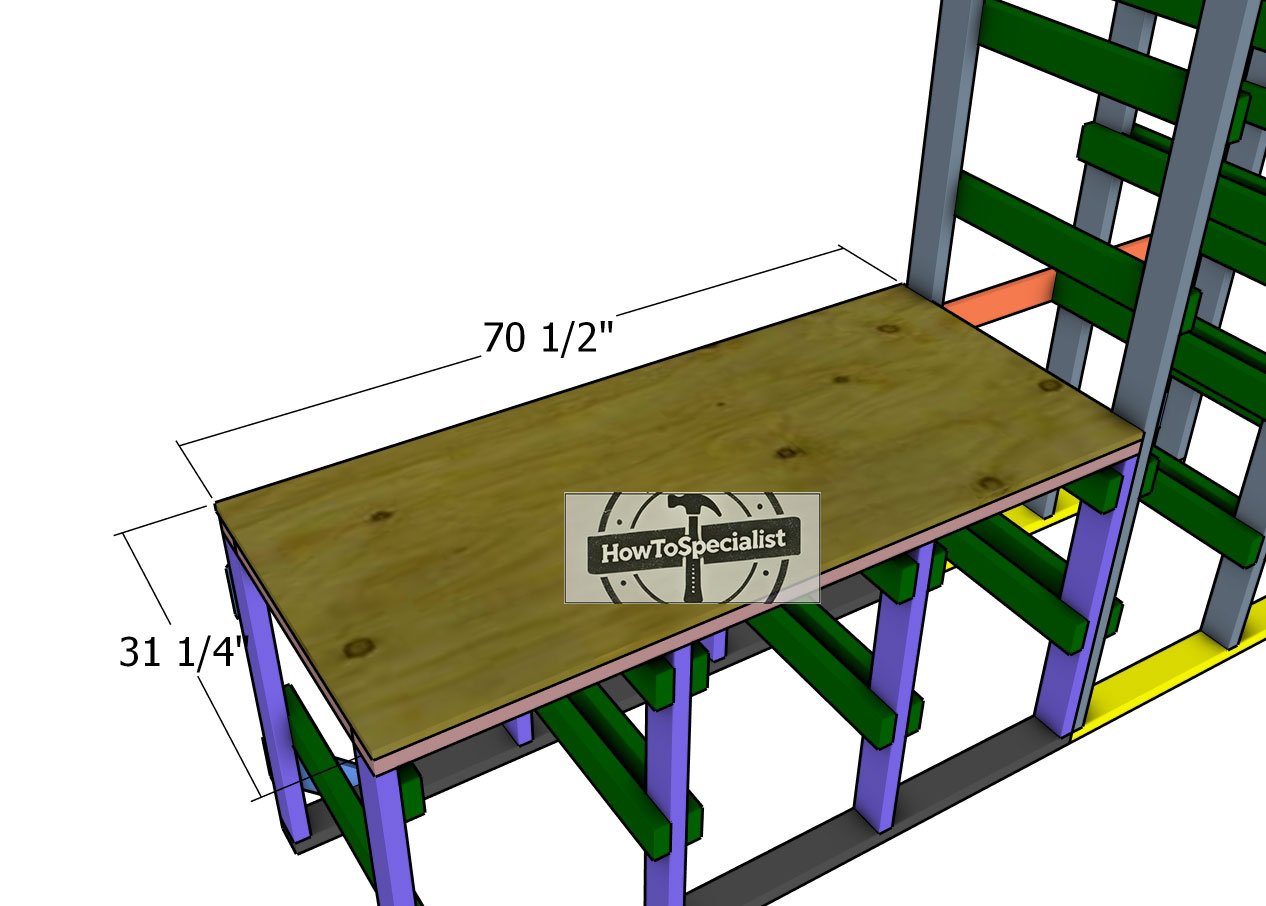
Workbench tabletop
Cut the tabletop for the workbench from 3/4″ plywood to fit snugly over the top frame. Position it carefully, ensuring all edges are flush with the frame. Secure the plywood to the frame using 1 5/8″ screws, spacing them every 8″ along the edges and across the framing.
Storage rack top
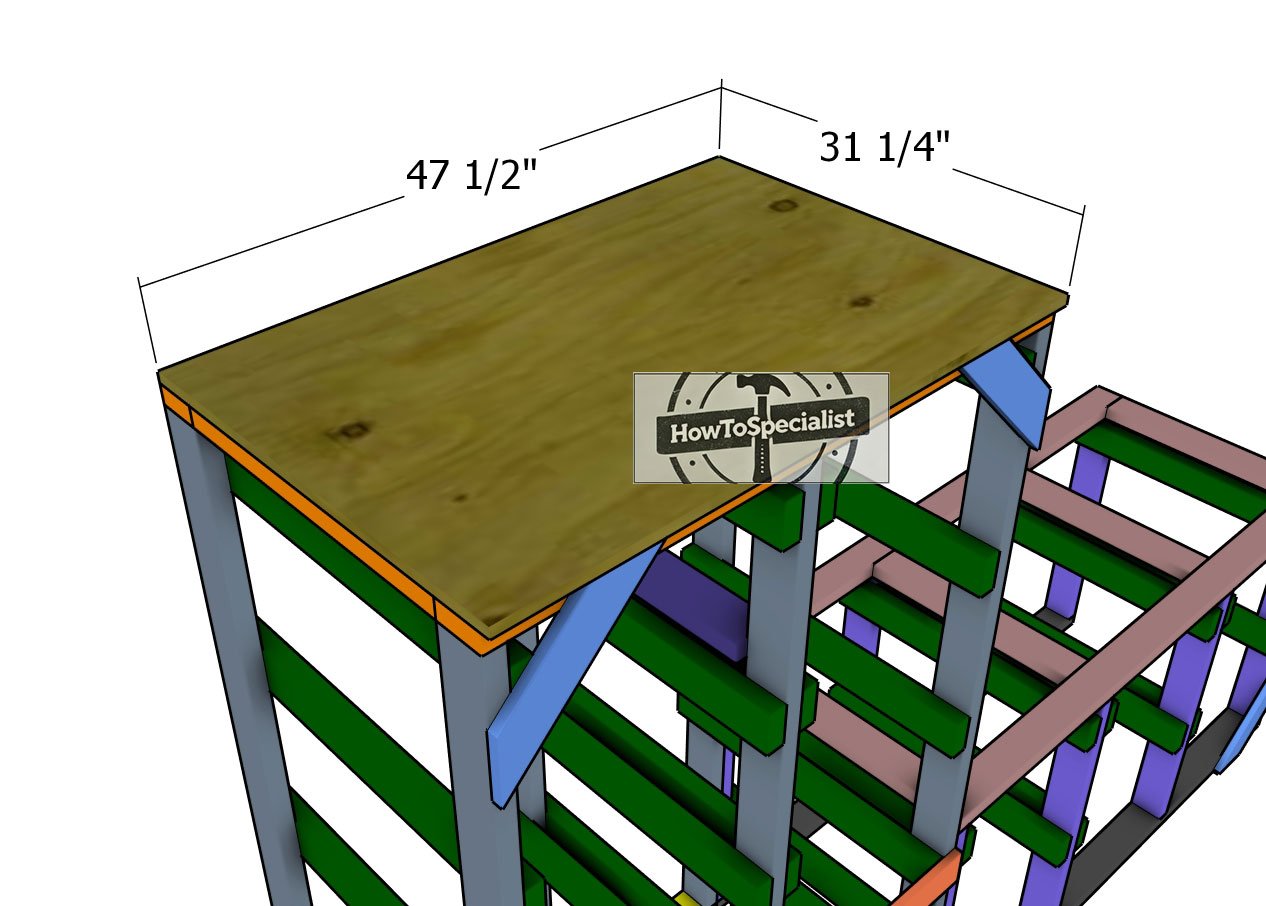
Cut the top shelf for the tower unit from 3/4″ plywood to match the dimensions of the frame. Place it on top of the tower, ensuring the edges are perfectly flush with the uprights. Drill pilot holes to prevent splitting, then secure the shelf with 1 5/8″ screws. Space the screws every 8″ along the framing to lock it tightly in place.
Fitting the totes
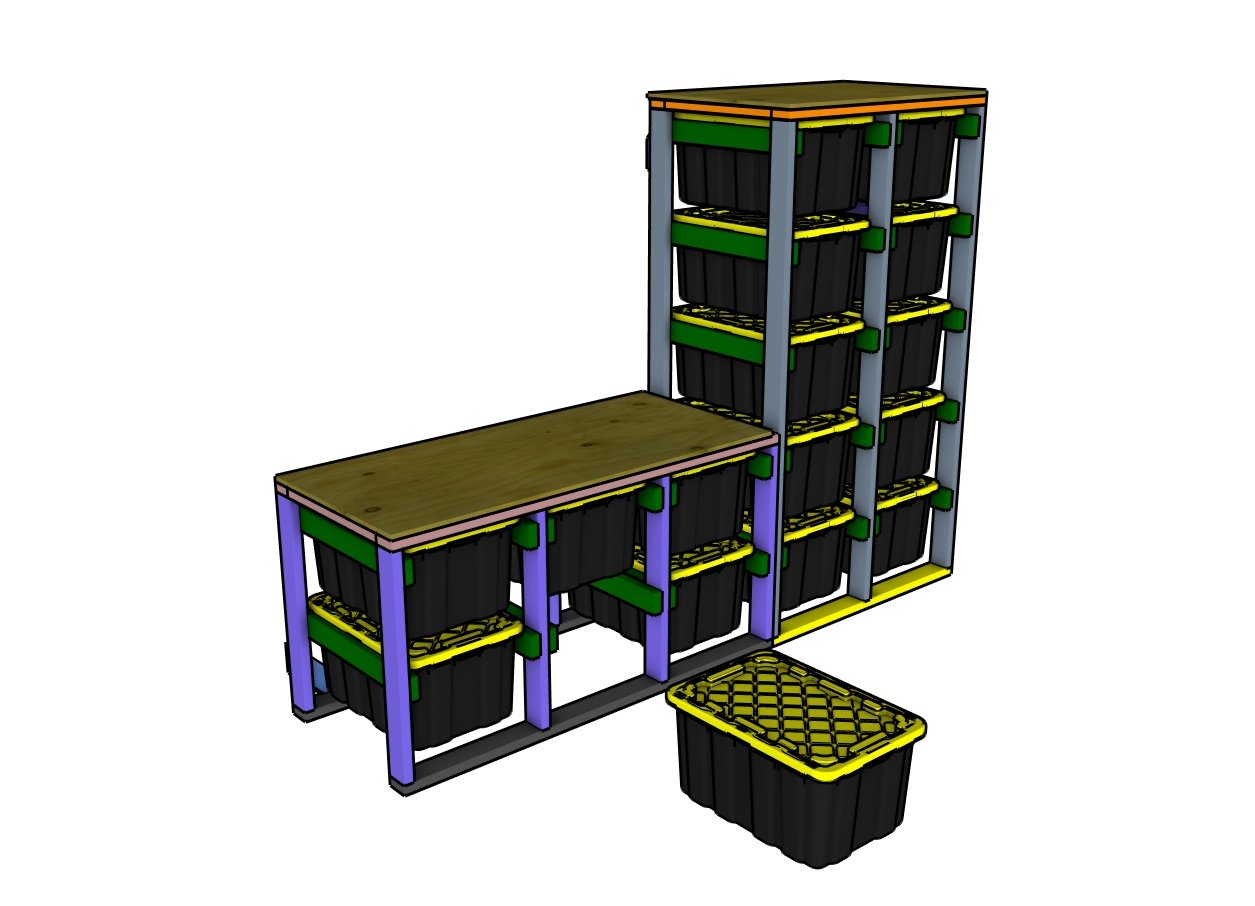
Last but definitely not least, it’s time to take care of the finishing touches—this is where your project truly comes to life! Start by filling all screw holes and any gaps with wood putty. Use a putty knife to ensure the filler is flush with the surface. Let the wood putty dry completely, typically a few hours, but always check the manufacturer’s instructions for the best results.
Once the putty is dry, it’s time to prep the surface for a smooth and professional finish. Begin sanding with 120-grit sandpaper to remove any rough spots or excess filler, then move up to 220-grit sandpaper for a buttery smooth finish. Don’t forget to sand along the edges and corners for a consistent look and feel. Wipe down the entire piece with a damp cloth or tack cloth to remove dust and debris before applying your finish.
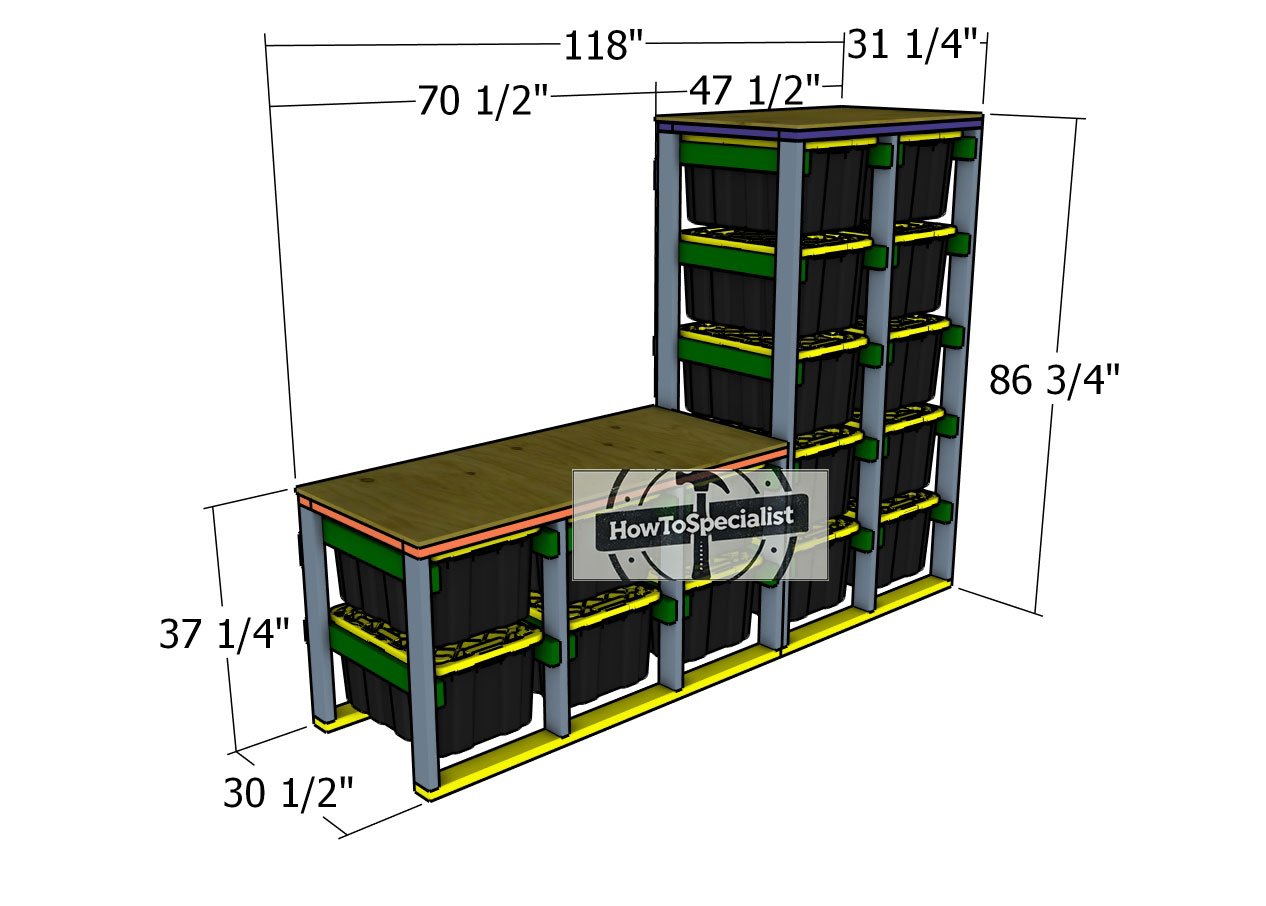
Dimensions-for-tote-storage-unit
Now for the fun part: adding color and protection! Choose a stain if you want to highlight the natural beauty of the wood grain, or go with paint for a pop of color that suits your space. Apply your chosen finish with a brush, roller, or cloth, depending on the product instructions. For best results, apply in thin, even coats, letting each coat dry completely before adding the next. Most projects will benefit from at least two to three coats for durability and a polished appearance.
If you’re using stain, consider adding a clear polyurethane topcoat for extra protection against wear and tear. For painted finishes, a clear acrylic sealer can help preserve the color and extend the life of your project.
Easy tote storage unit plans
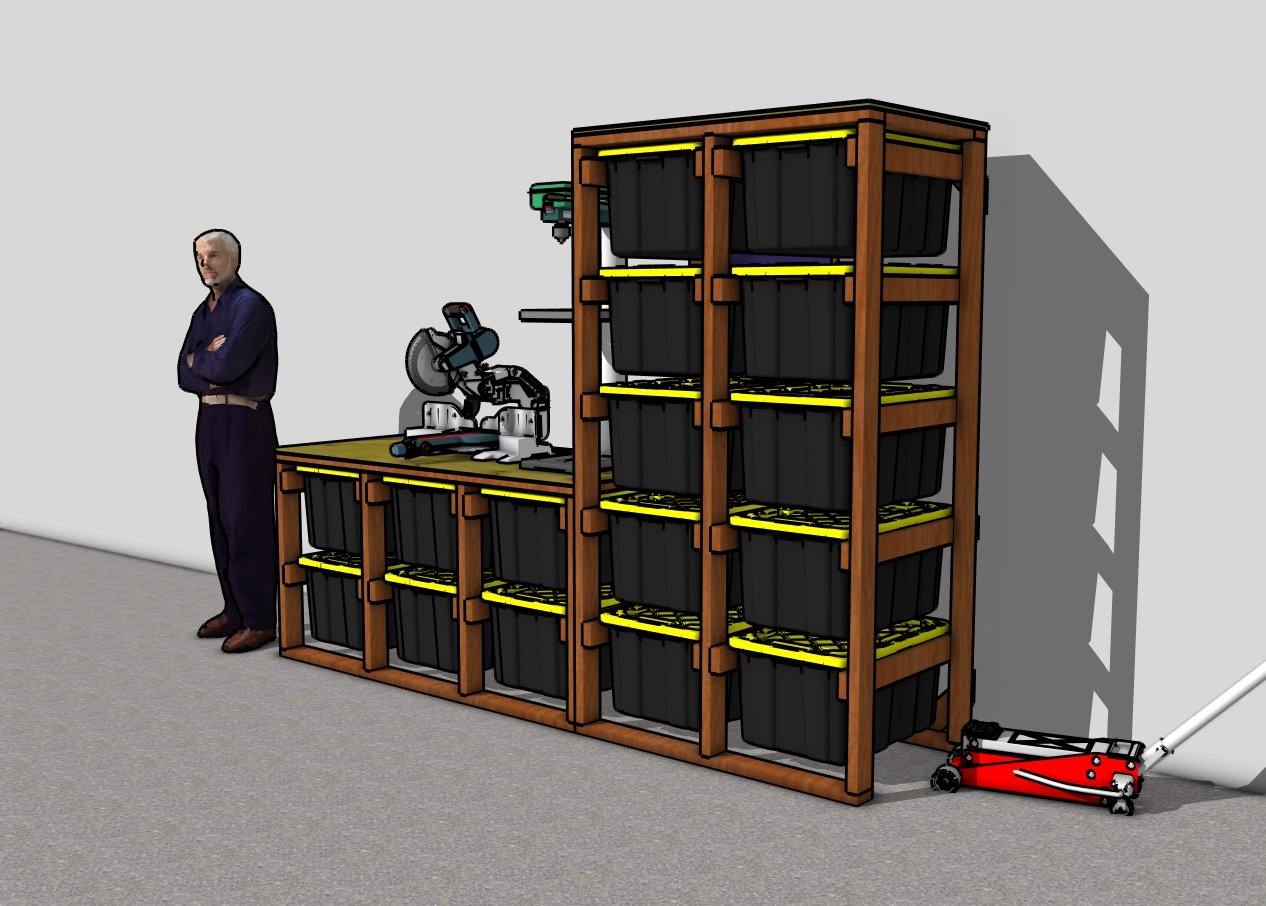
With these finishing touches complete, you’ll have a stunning, sturdy, and fully functional storage workbench and tower unit that will serve you well for years to come! This makes for a great addition to your garage since it can also be used as a miter saw table, perfect if you are intro building wood projects.
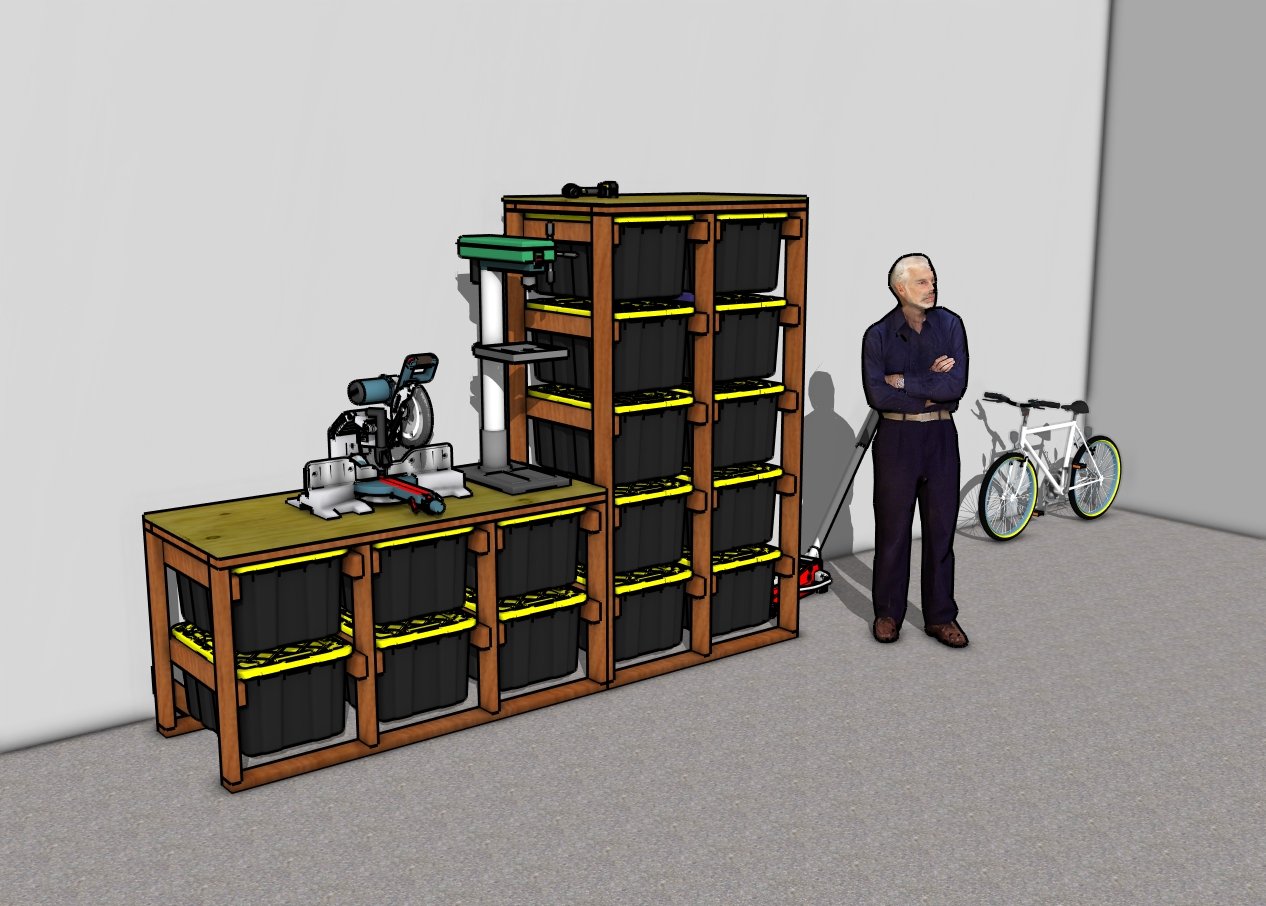
DIY Tote rack combo
And there you have it: a custom-built storage workbench and tower unit that’s as functional as it is satisfying to build! Whether you’re organizing tools, storing totes, or just maximizing your workspace, this project delivers both utility and style.
The beauty of DIY projects like this is the freedom to customize every detail to fit your needs and personality. Adjust the dimensions, add a splash of color, or even incorporate additional features like hooks or shelves, the possibilities are endless!
Thanks for checking out my DIY tote storage workbench and tower unit combo plans! Be sure to explore my other projects for more fantastic ideas. Don’t forget to hit the LIKE button and SHARE with your friends using the social media links below.

