Struggling to keep your garage or workshop organized? A DIY storage rack for 27-gallon totes is the perfect solution to maximize space and keep everything neatly stored. This heavy-duty rack is designed to hold up to 20 storage totes, making it ideal for organizing tools, seasonal decorations, camping gear, and more. With a sturdy 2×4 frame, custom cleat supports, and optional mobility upgrades, this project is built for durability and efficiency. Whether you’re a woodworking enthusiast or a weekend DIYer, this step-by-step guide will help you build a strong, space-saving tote rack with ease.
In this tutorial, we’ll walk you through the entire process, from cutting and assembling the frame to securing the cleats and adding reinforcements for maximum stability. You’ll also find pro tips on making your rack even more functional, such as adding casters for mobility or labeling slots for easy access. With clear instructions and simple materials, you can create a custom storage solution that keeps your space organized and clutter-free for years to come.
We recommend you to invest in the best materials you could afford. Therefore, you should buy weather-resistant lumber, such as pine or cedar. Always take accurate measurements before adjusting the size of the components at the proper size. Drill pilot holes trough the components before inserting the wood screws, to prevent the wood from splitting. My plans come with a full cut / shopping list and they are PDF Download and Print friendly. See all my Premium Plans HERE.
Made from this plan
Pin it for Later!
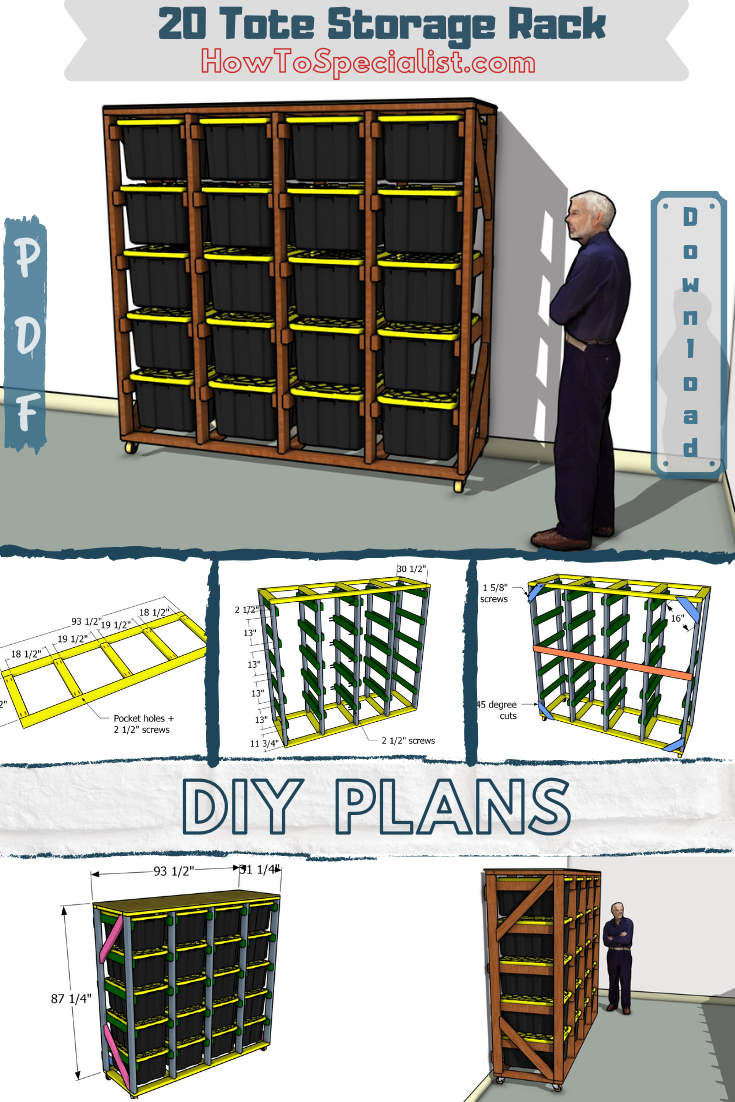
How to Make a Large 27-gallon Tote Rack – DIY Plans

Building-a-20-tote-storage-rack
Materials
A – FRAME – 2×4 lumber 93 1/2″ – 4 pieces
A – FRAME – 2×4 lumber 23 1/2″ – 10 pieces
B – UPRIGHTS – 2×4 lumber 83 3/4″ – 10 pieces
C – CLEATS – 2×4 lumber 30 1/2″ – 40 pieces
D – BRACES – 1×4 lumber 16″ – 4 pieces
E – BACK SUPPORT – 1×4 lumber 93 1/2″ – 1 piece
F – SIDE BRACES – 2×4 lumber 35″ – 4 pieces
G – TOP SHELF – 1/2″ plywood 31 1/4″x93 1/2″ – 1 piece
- 2×4 lumber 8 ft – 30 pieces
- 2×4 lumber 10 ft – 1 piece
- 1×4 lumber 8 ft – 1 piece
- 1×4 lumber 6 ft – 1 piece
- 1/2″ plywood – 4’x8′
- 27 gallon storage tote – 20 pieces
- 1 5/8″ screws – 100 pieces
- 2 1/2″ screws – 250 pieces
- 3 1/2″ screws – 50 pieces
- stain / paint – 1 can
- Glue – 1 piece
- Wood putty – 1 can
- 2″ caster wheels – 4 pieces
Tools
- Miter saw, Pocket hole jig
- Drill machinery, Drill bits, Jigsaw
- Safety gloves, Glasses
- Chalk line, tape measure, spirit level, carpentry pencil
Time
- One weekend
Related
- Wooden storage bins plans
- Crate display plans
- Tote rack workbench combo plans
- Mobile tote rack plans
Step 1: Building the main frame
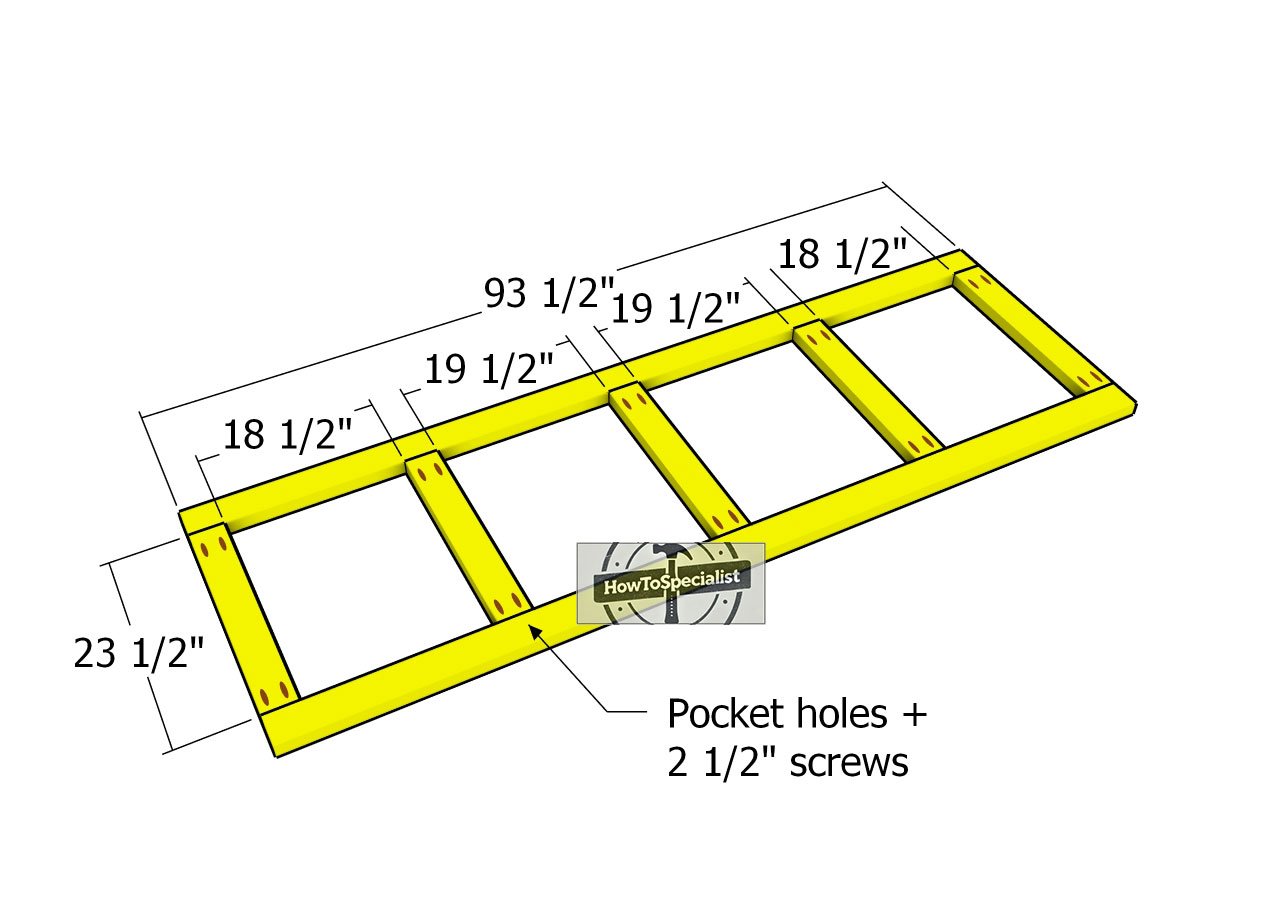
Base-and-top-frames
Start this project by assembling the frames for your storage unit—the backbone of a sturdy and reliable build. Cut the 2×4 components with precision, as accurate cuts ensure a seamless fit. Drill pocket holes at both ends of the 23 1/2-inch pieces using a pocket hole jig for strong, clean connections. Lay everything out on a flat, level surface, aligning the edges flush before securing.
Before fastening, check that the corners are perfectly square using a speed square—this step ensures stability and proper alignment. Once confirmed, drive 2 1/2-inch screws through the pocket holes, locking the frame together for a rock-solid foundation built to last.
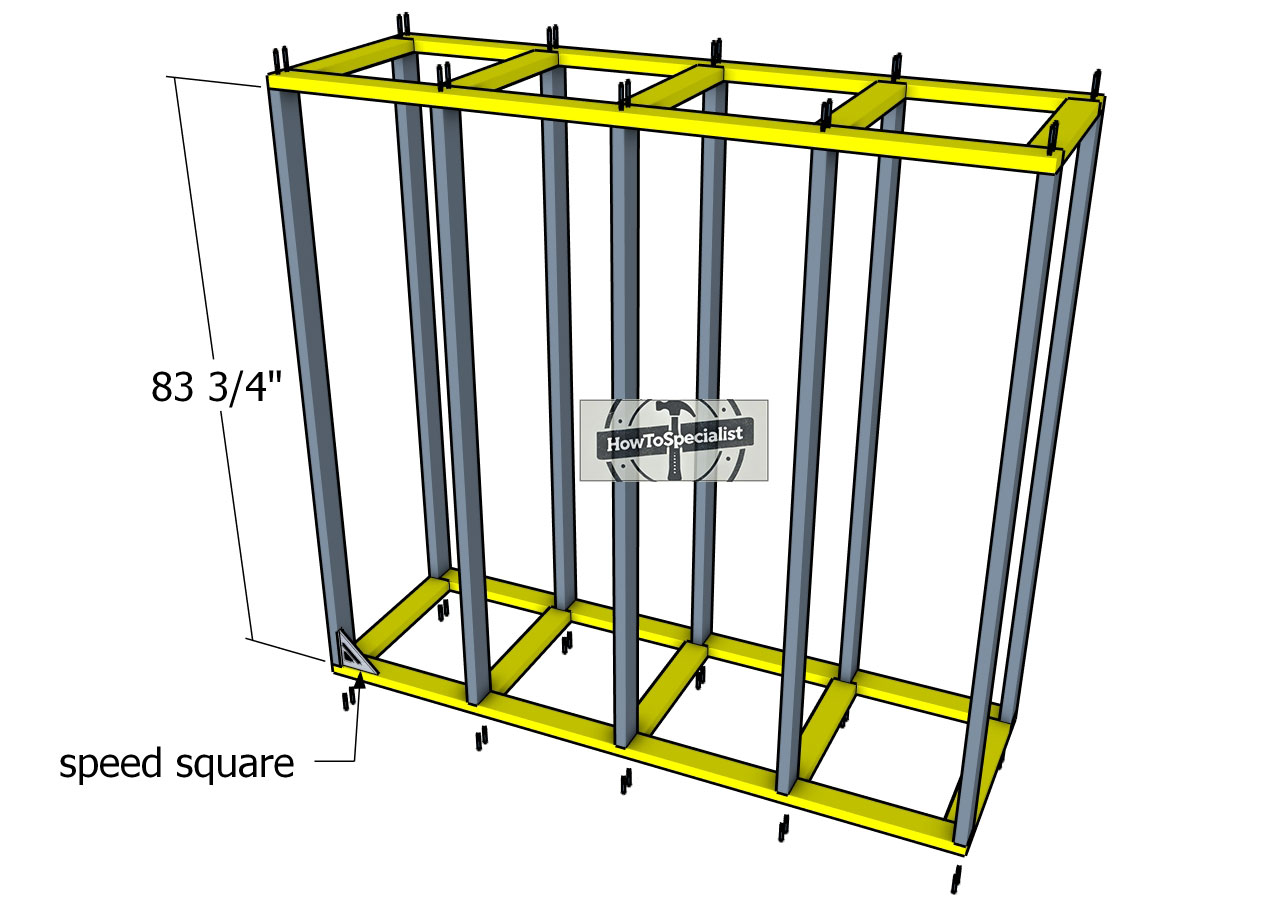
Assembling-the-frame-of-the-rack
Now it’s time to bring the storage rack frame to life! Drill pilot holes through the top and bottom frames to prevent splitting, then attach them to the uprights using 3 1/2-inch screws. Secure each joint with two screws for maximum stability—this step is all about precision, so take your time to get it right.
As you assemble, check the corners with a speed square to keep everything perfectly aligned. A key tip: adjust the spacing between the uprights to fit your storage totes snugly, ensuring they slide in and out smoothly. This small customization goes a long way in making your storage unit both functional and efficient.
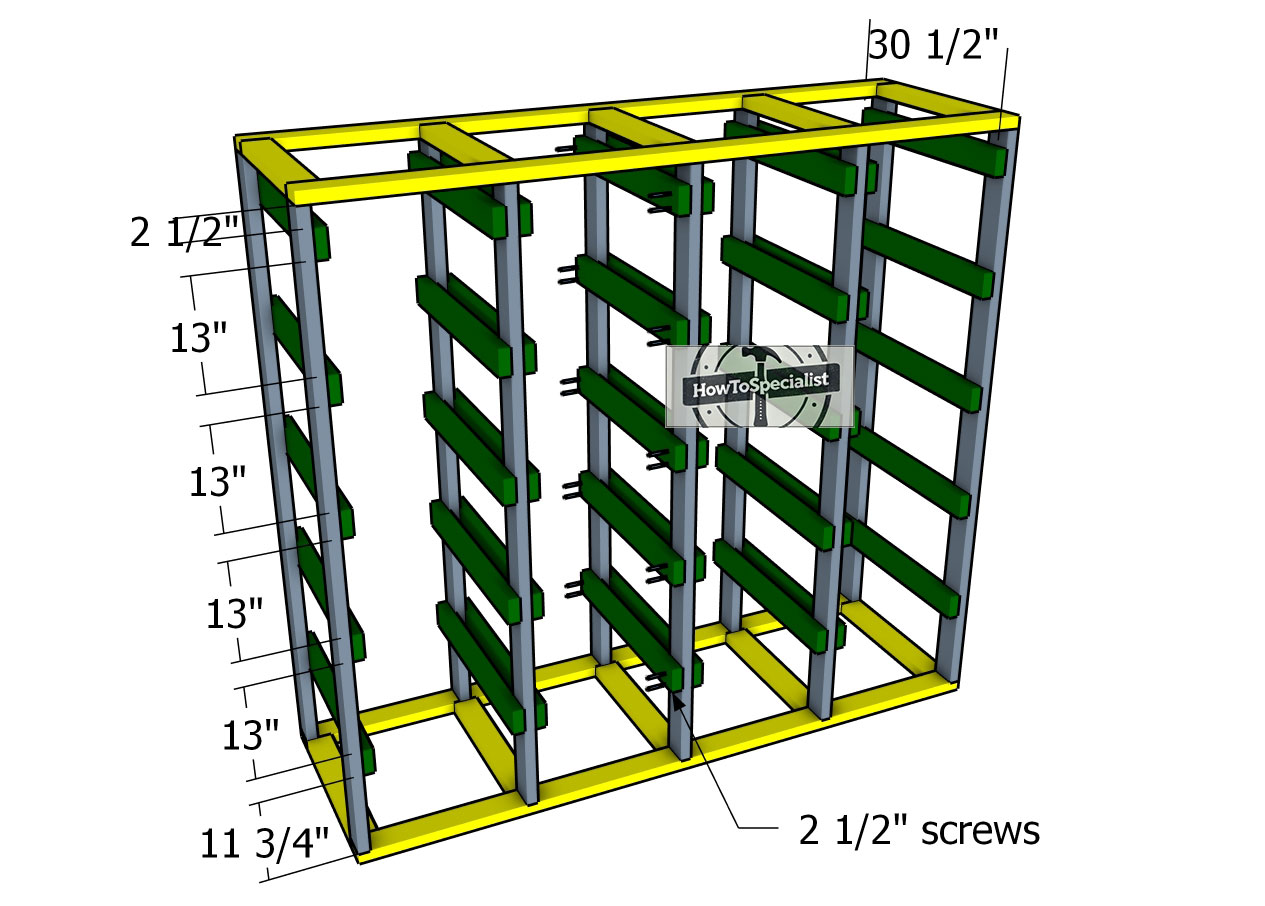
Attaching-the-cleats
Next, install the 2×4 cleats to support the storage totes and bring your rack to life. Align each cleat flush with the uprights at both the front and back for a clean, professional look. To maintain even spacing, use spacers—this simple trick ensures uniform gaps, making the unit both functional and visually appealing.
Drill pilot holes through the cleats to prevent splitting, then secure them with 2 1/2-inch screws, using two per joint for maximum strength. These cleats are key to holding the weight of your storage totes securely, so take your time to get them properly aligned. With this step complete, your rack is well on its way to being a sturdy and reliable storage solution.

Fitting-the-caster-wheels
Make your storage rack mobile by attaching caster wheels to the bottom frame. Position the casters at the outer corners to ensure stability and smooth movement. If the wheels don’t come with their own screws, use 1 1/4-inch screws to secure them firmly in place. This simple upgrade adds flexibility, making it easy to rearrange your space while keeping your storage rack fully functional.
Step 2: Fitting the braces
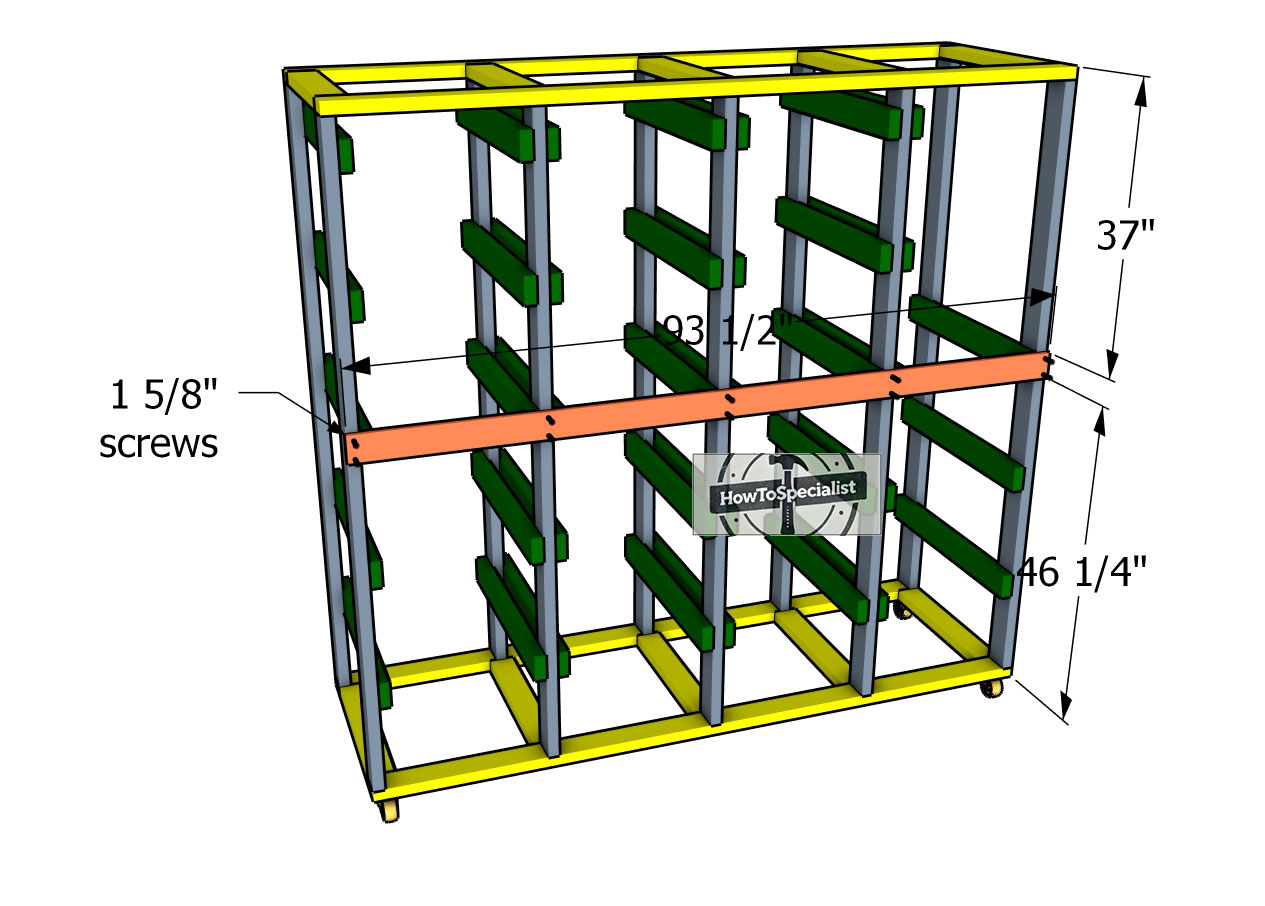
Attaching-the-back-support
Now, reinforce the storage unit by adding a 1×4 support to the back for extra rigidity. First, ensure the posts are perfectly plumb by checking their alignment with a level. Double-check that all corners are square, as precise angles are key to a sturdy frame.
Once everything is properly aligned, drill pilot holes into the 1×4 to prevent splitting, then attach it to the uprights with 2 1/2-inch screws. This simple addition strengthens the entire structure, keeping it stable and secure even under heavy loads.
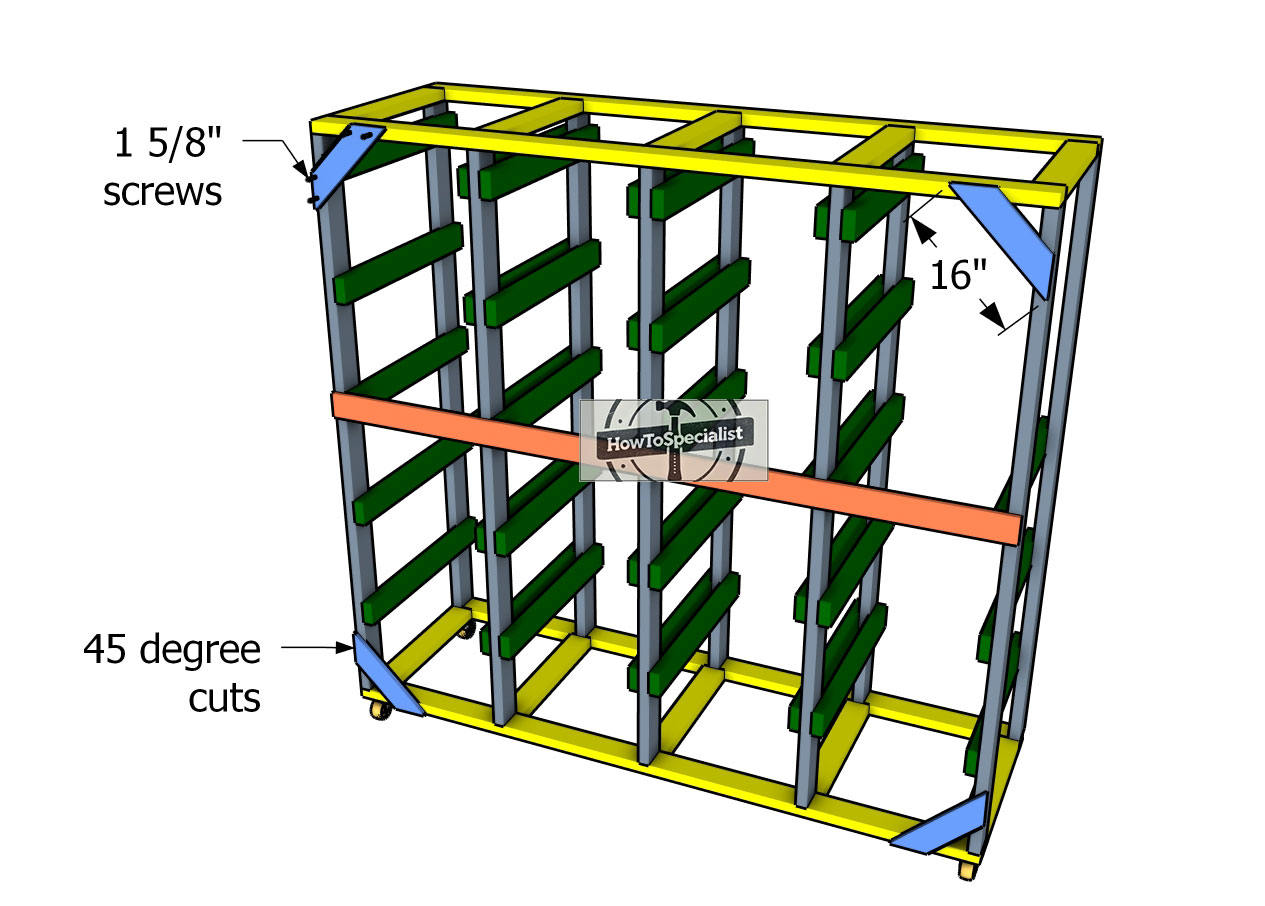
Back-braces
To enhance the stability of your tote storage rack, install 1×4 diagonal braces. Cut the ends of each brace at a 45-degree angle for a precise and snug fit. Before attaching them, use a level to ensure the uprights are perfectly plumb—proper alignment is key for the braces to provide maximum support.
Once positioned correctly, secure the braces with 2 1/2-inch screws, driving them into the uprights and frame. This step significantly strengthens the entire structure while adding a clean, professional finish. With the braces in place, your rack will be rock-solid and ready to handle your storage totes with ease.
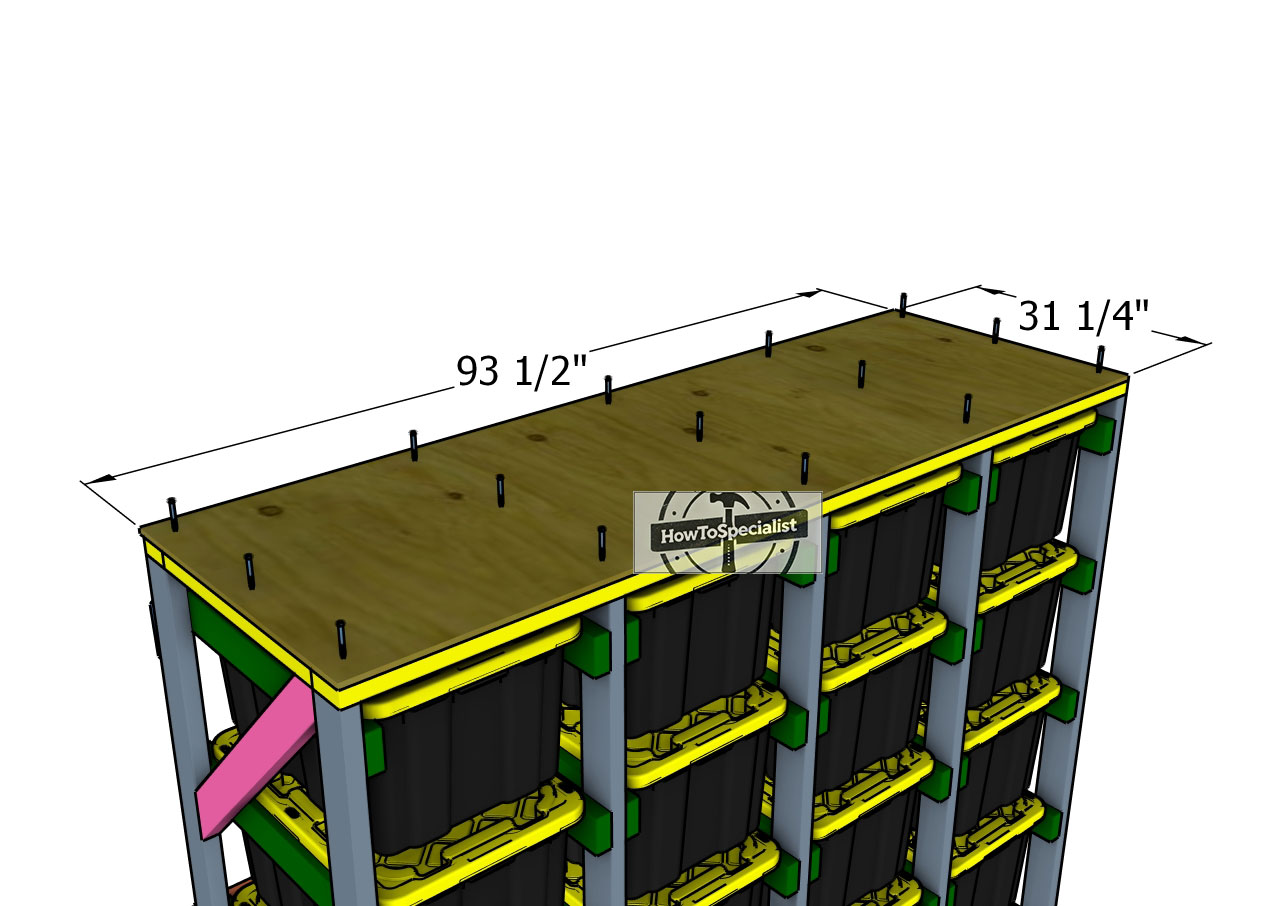
Attaching-the-top-shelf
If you want to maximize your storage capacity, consider adding a 1/2-inch plywood shelf to the top of the rack. This extra surface is perfect for storing boxes, tools, or any miscellaneous items that need a designated spot.
Align the plywood flush with the front of the rack for a clean, seamless look. Drill pilot holes to prevent splitting, then secure it with 1 5/8-inch screws. This simple upgrade not only increases storage space but also gives your rack a polished, finished appearance—strong, functional, and ready for anything.
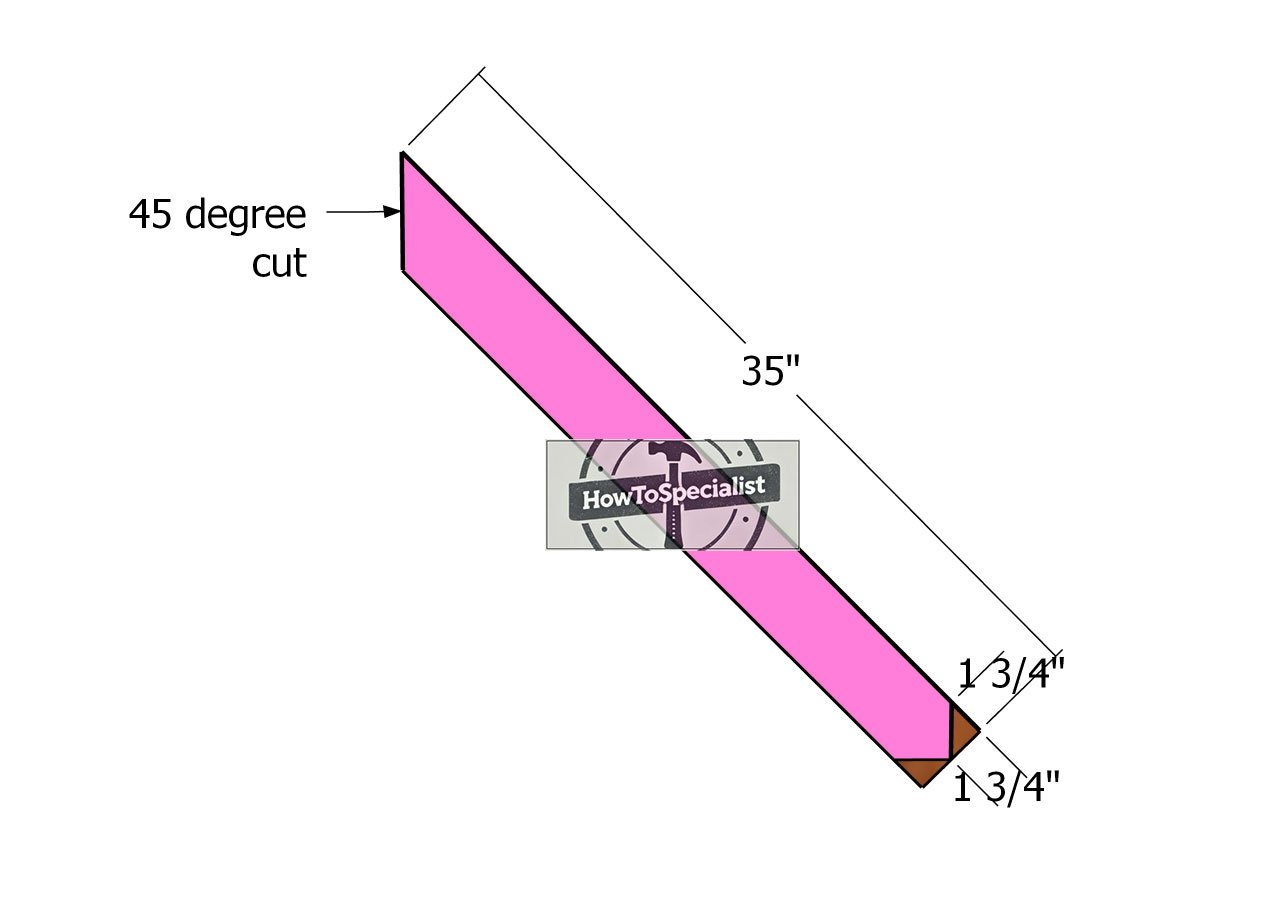
Side-braces
For the side braces, use sturdy 2×4 lumber to ensure reliable support. Cut both ends at a 45-degree angle with a miter saw for a precise, snug fit. This angled design enhances stability while giving your storage rack a clean, professional look. Take your time with the cuts to ensure seamless integration into the structure.
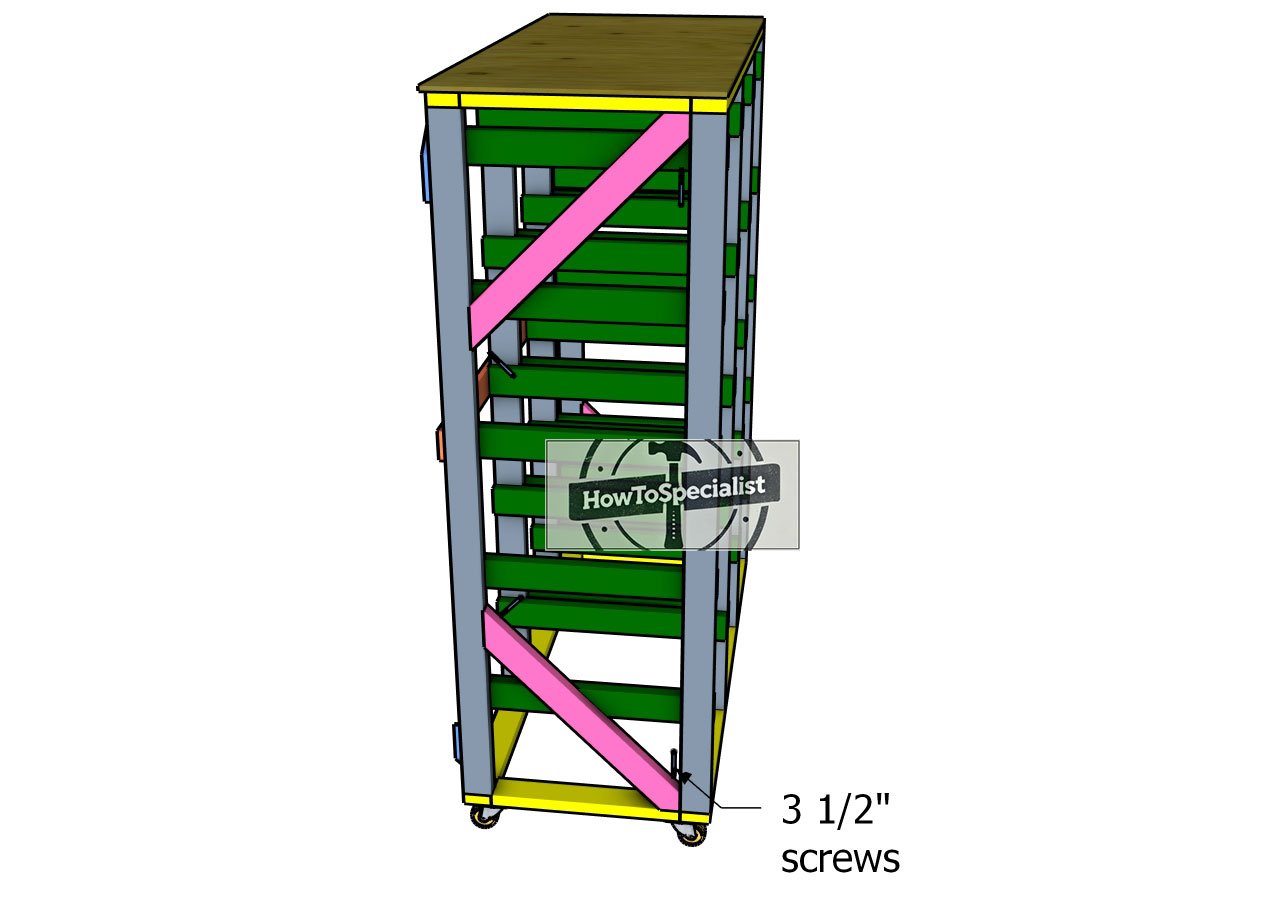
Fitting-the-side-braces
Attach the 2×4 side braces to the storage rack, following the placement shown in the diagram. Before securing them, use a level to check that the uprights are perfectly plumb—proper alignment is crucial for stability.
Drill pilot holes at each joint to prevent splitting, then fasten the braces with 3 1/2-inch screws for a strong, secure connection. These braces reinforce the sides while adding extra durability, ensuring your storage rack stays sturdy under heavy loads.
Tote storage rack plans 20 units
For the finishing touches, sand down all rough edges and surfaces to create a smooth, splinter-free finish. If you want added protection and a polished look, apply a wood stain or paint that matches your space. For garage or workshop use, consider a durable exterior-grade paint or sealant to protect the wood from moisture and wear.
To take this project to the next level, consider labeling each tote for easy organization or adding a plywood back panel for extra rigidity. Small details like these can make a huge difference, turning a solid storage rack into a truly customized and efficient storage system that meets your exact needs.
Step 3: Finishing touches
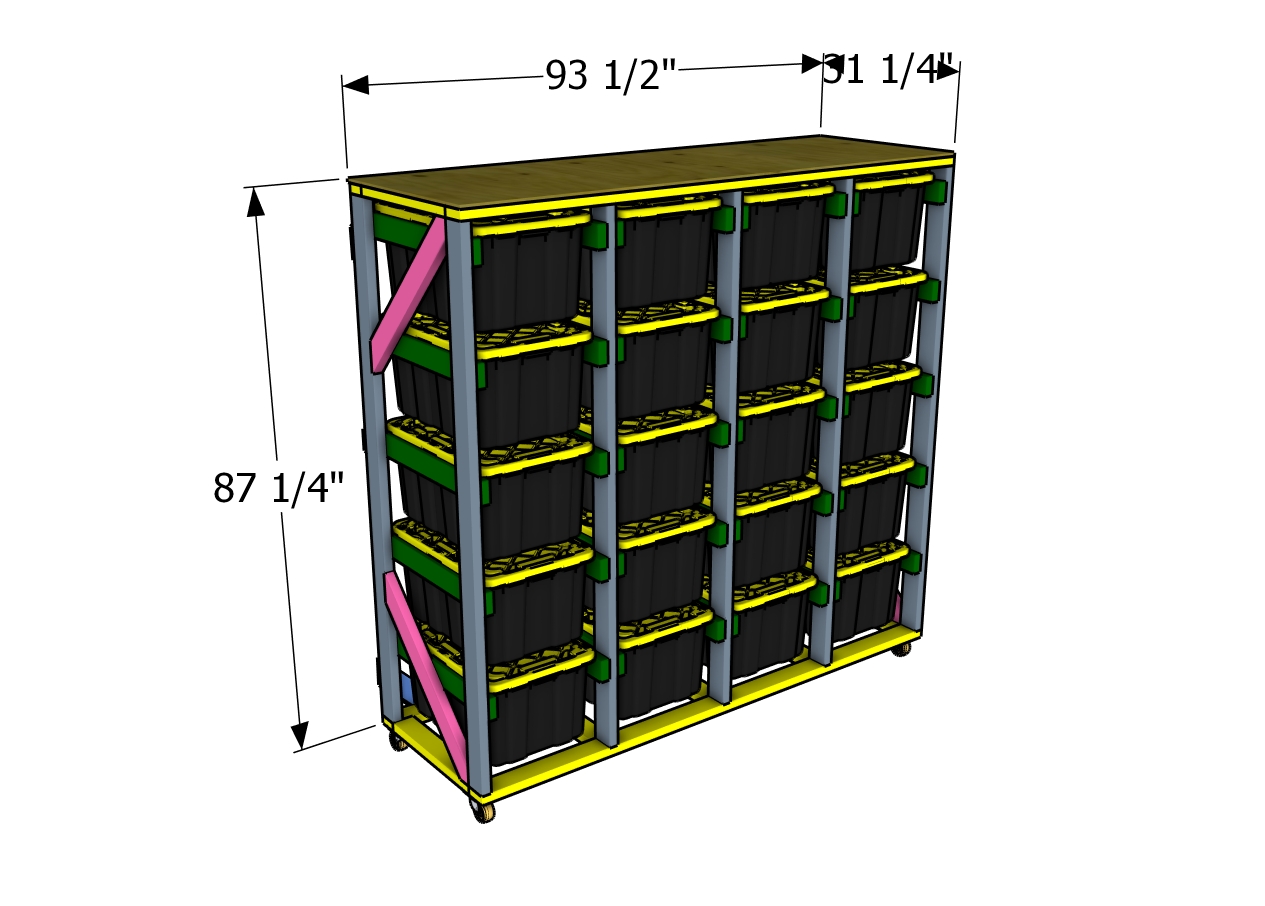
Dimensions
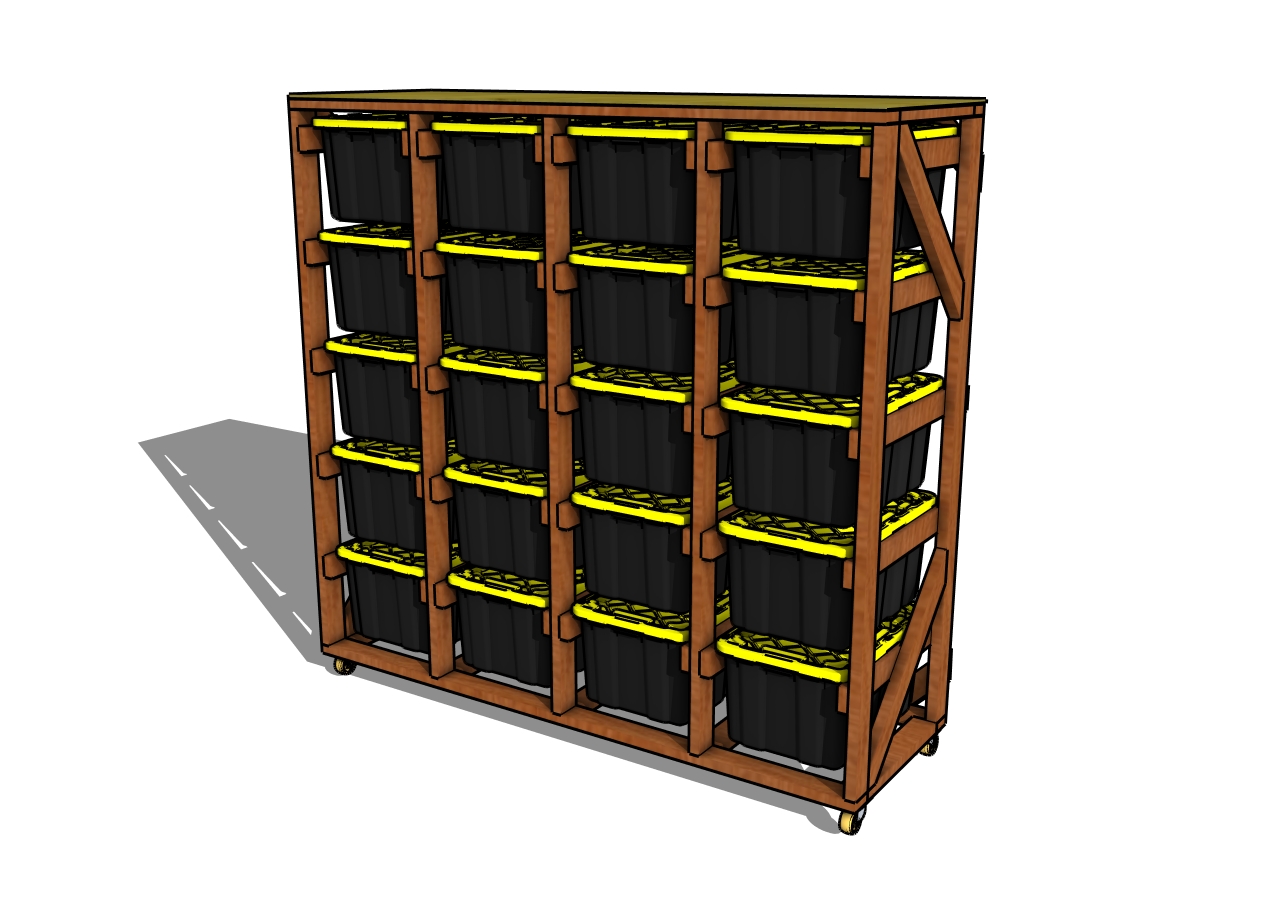
With your storage rack complete, you now have a rock-solid solution that’s both functional and versatile. Designed to hold up to 20 pieces of 27-gallon plastic totes, this rack maximizes your space while keeping everything neatly organized. Whether you’re storing seasonal decorations, tools, or household items, this custom-built unit is ready to handle it all.
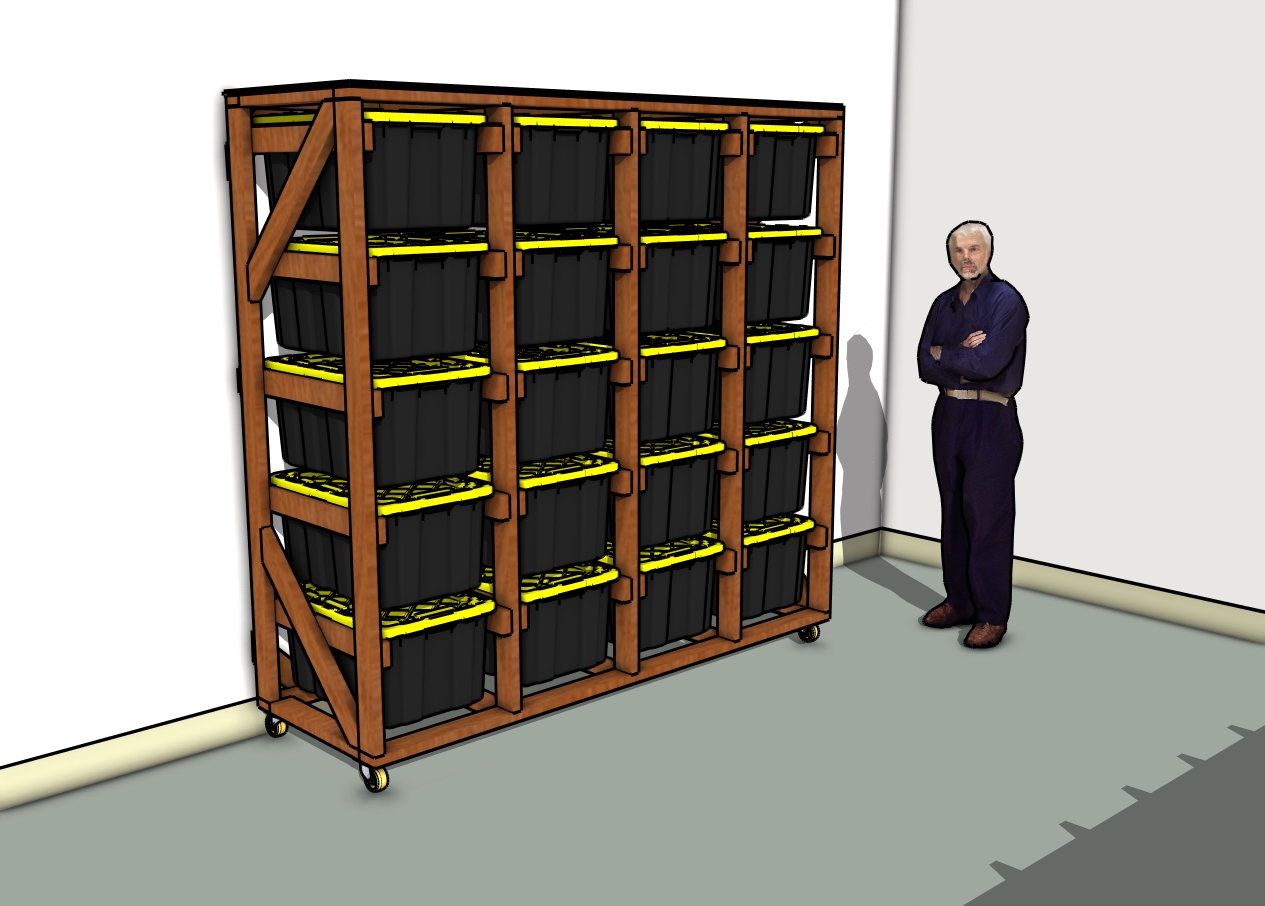
Take a step back and admire your work—a sturdy, efficient storage system that brings order to your garage or workshop. With proper planning and a bit of effort, you’ve created a practical project that will serve you for years to come.

How to build a 20 tote storage rack
DIY 20 tote Rack

Thanks for checking out my how to make a 20 tote storage rack! Be sure to explore my other projects for more fantastic ideas. Don’t forget to hit the LIKE button and SHARE with your friends using the social media links below.