Building your own storage workbench is a game-changer for any DIY enthusiast or woodworker. Not only does it provide a sturdy workspace, but it also keeps your tools and materials organized with built-in storage solutions like shelves, cleats, and even a pegboard panel. This project is perfect for maximizing functionality in your workshop, whether you’re working on home repairs, woodworking projects, or crafting tasks. Plus, with the added mobility of caster wheels, you can move your workbench wherever it’s needed.
This project is beginner-friendly and can be completed in a weekend, taking about 6–8 hours, depending on your skill level and tools. The total cost is approximately $150–$200, depending on the materials and hardware you choose. By following these detailed instructions, you’ll not only save money but also create a custom workbench tailored to your needs. Ready to get started? Let’s dive in!
We recommend you to invest in the best materials you could afford. Therefore, you should buy weather-resistant lumber, such as pine or cedar. Always take accurate measurements before adjusting the size of the components at the proper size. Drill pilot holes trough the components before inserting the wood screws, to prevent the wood from splitting. My plans come with a full cut / shopping list and they are PDF Download and Print friendly. See all my Premium Plans HERE.
Made from this plan
Pin it for Later!

How to Make a 3×7 Storage Workbench
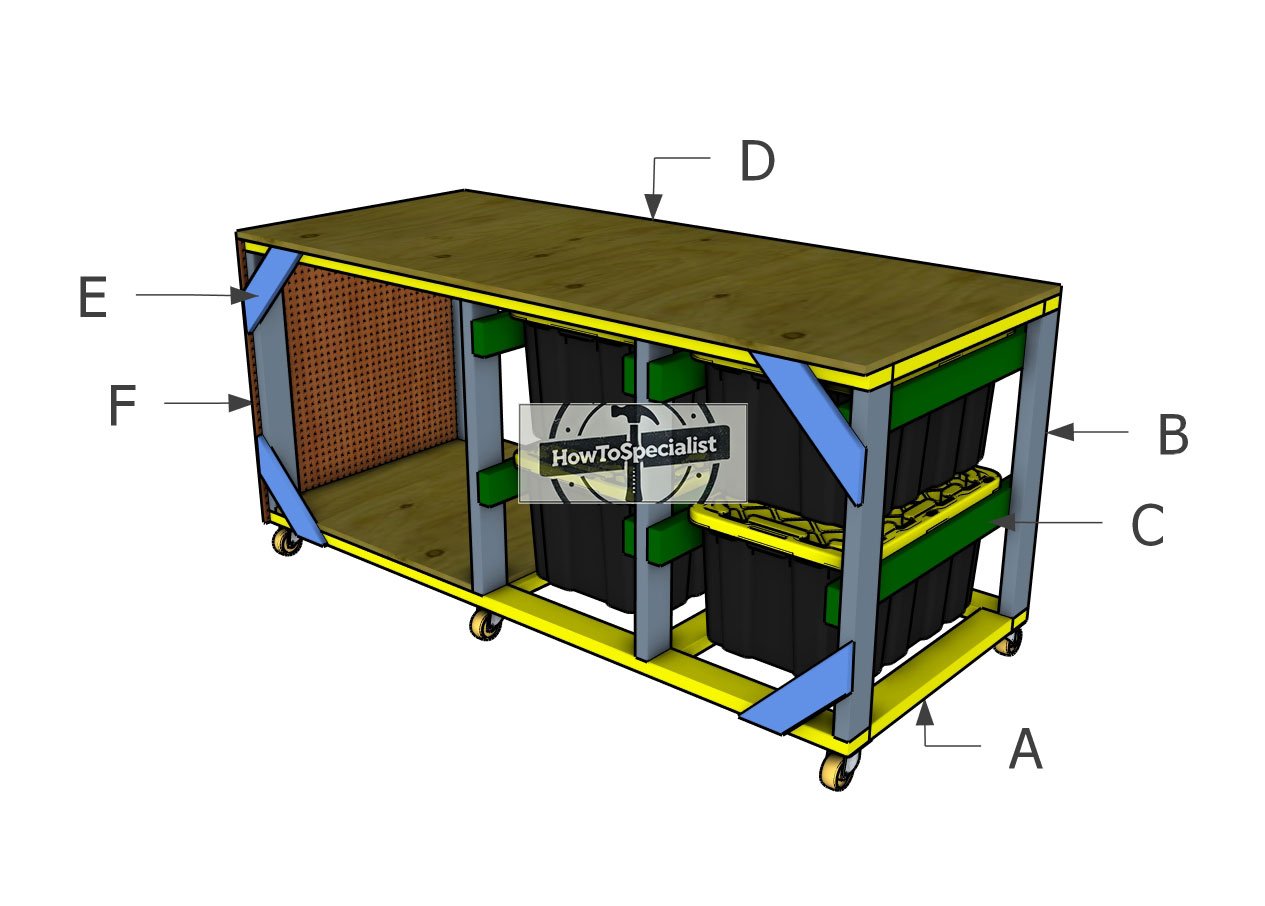
Building-a-3×7-workbench
Materials
A – FRAME – 2×4 lumber 83 3/4″ – 4 pieces
A – FRAME – 2×4 lumber 28 1/4″ – 8 pieces
B – UPRIGHTS – 2×4 lumber 32 1/2″ – 8 pieces
C – CLEATS – 2×4 lumber 35 1/4″ – 8 pieces
D – TABLETOP -3/4″ plywood – 3’x7′
D – SHELF -3/4″ plywood – 35 1/4″x37 3/4″ – 1 piece
E – BRACES – 1×4 lumber 16″ – 4 pieces
E – PEGBOARD – 1/4″ pegboard – 36″x35 1/2″ – 1 piece
- 2×4 lumber 10 ft – 9 pieces
- 2×4 lumber 6 ft – 2 pieces
- 1×4 lumber 6 ft – 1 piece
- 3/4″ plywood – 4’x8′
- 3/4″ plywood – 4’x4′
- 1/4″ pegboard – 4’x4′
- 1 5/8″ screws – 100 pieces
- 2 1/2″ screws – 50 pieces
- 3 1/2″ screws – 200 pieces
- stain / paint – 1 can
- Glue – 1 piece
- Wood putty – 1 can
- 27 gallon toe – 4 pieces
- heavy duty caster wheels with brake – 6 pieces
Tools
- Miter saw, Circular saw, Pocket hole jig
- Drill machinery, Drill bits, Jigsaw
- Safety gloves, Glasses, Speed square
- Chalk line, tape measure, spirit level, carpentry pencil
Time
- One weekend
Related
Step 1: Building the main frame
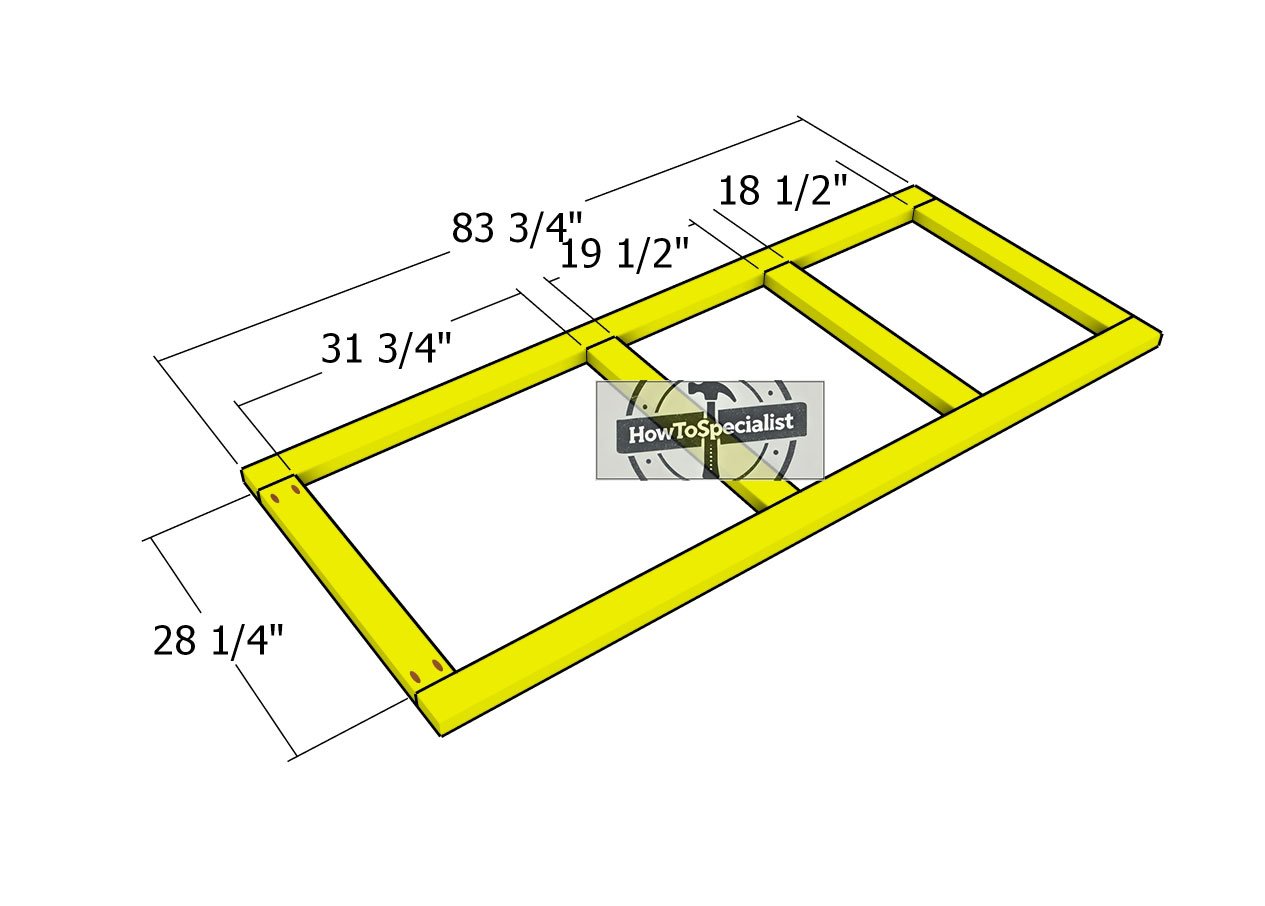
Assembling-the-frames
To kick off this project, you’ll start by building the two frames for the storage workbench. Begin by cutting the components according to the diagram. Drill pocket holes at both ends of the 28 1/4″ pieces. Lay everything out on a flat, level surface, ensuring all the edges line up perfectly.
Double-check that the corners are square, then apply wood glue to the joints. Finally, secure the frame with 2 1/2″ screws.
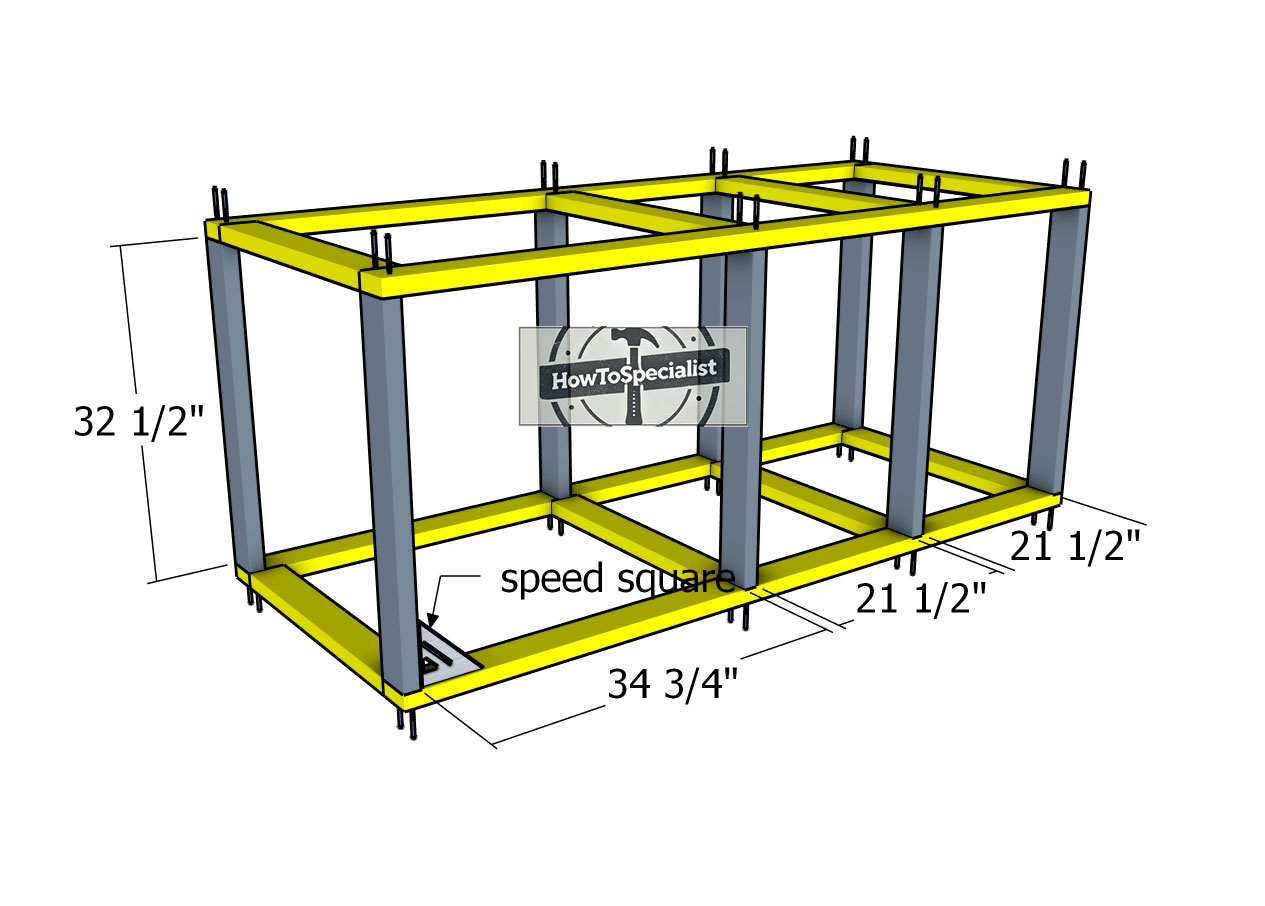
Assembling-the-frame-of-the-workbench
Attach the uprights to the frames next. Drill pilot holes through the frames, then secure the uprights with 3 1/2″ screws. Before driving in the screws, take a moment to double-check that the corners are square. Precision here ensures the structure stays solid and true as you move forward.
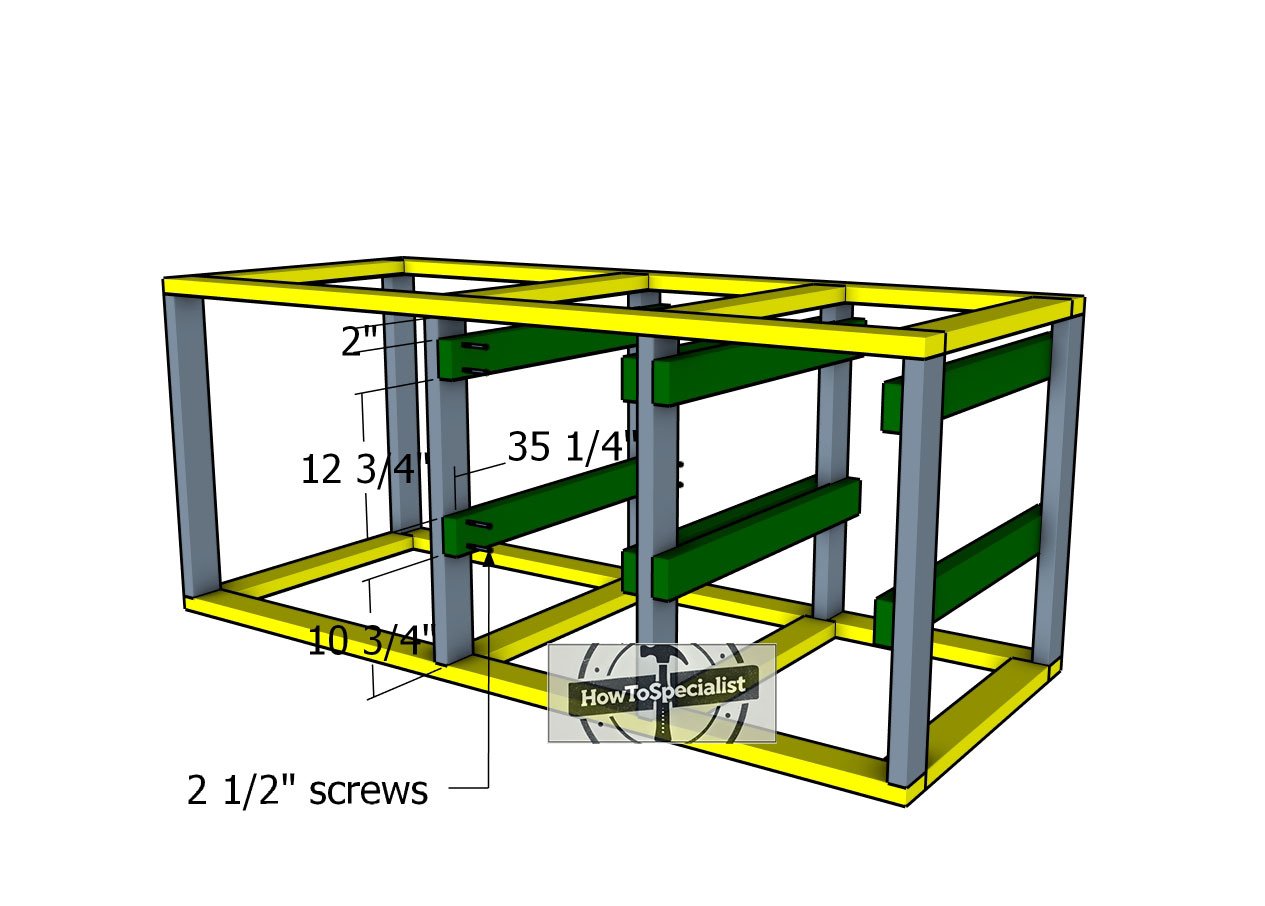
Fitting-the-cleats-for-the-totes
Secure the 2×4 cleats to the uprights, as these will support the totes and allow them to slide in and out smoothly. Adjust the spacing between the cleats to match the dimensions of your totes. Drill pilot holes, then fasten the cleats with 2 1/2″ screws. Be sure to use a spirit level to confirm the cleats are perfectly horizontal—this small step makes a big difference in functionality.
Step 2: Fitting the braces
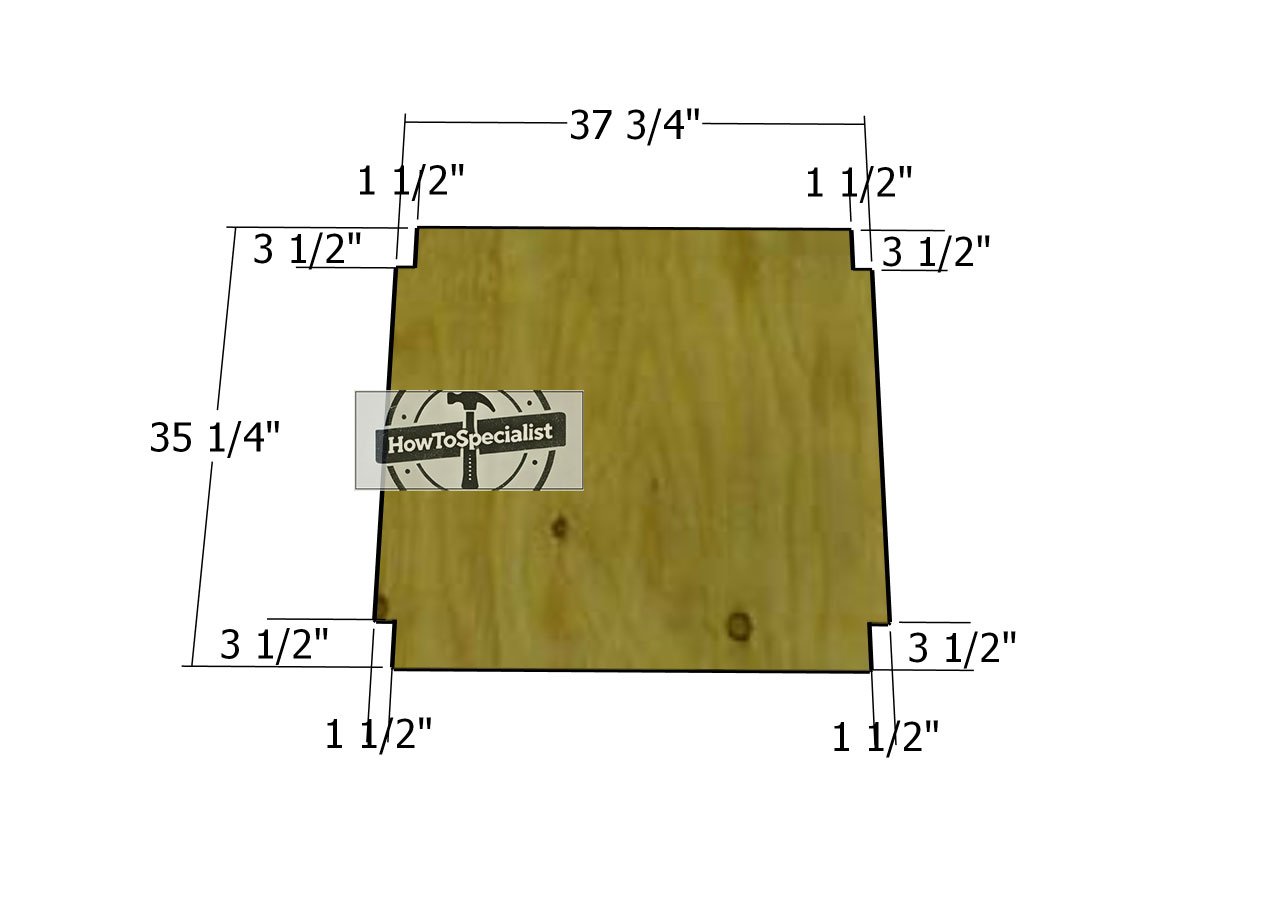
Shelf-panel
For the shelf and tabletop panels, cut 3/4″ plywood to size. Mark your cut lines carefully, ensuring accuracy, and then use a circular saw to make any necessary notches in the panels. Take your time with the cuts—clean edges will make assembly smoother and give the finished piece a polished look.
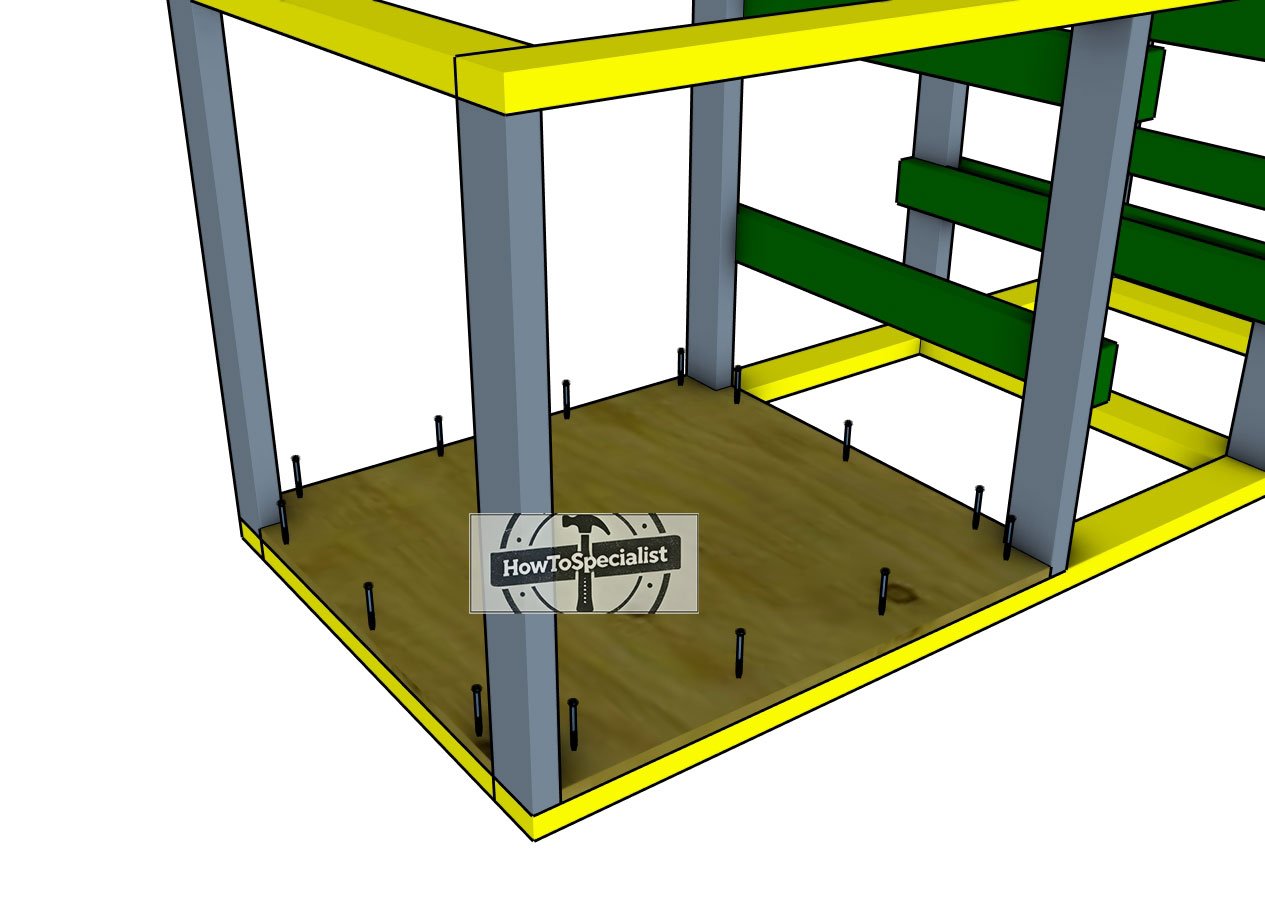
Fitting-the-shelf
Position the shelf onto the lower frame and secure it in place using 1 5/8″ screws. Start by drilling pilot holes and countersinking them to ensure the screw heads sit flush with the surface for a clean finish. Space the screws evenly, about every 8″ along the framing, for solid support and a professional touch.
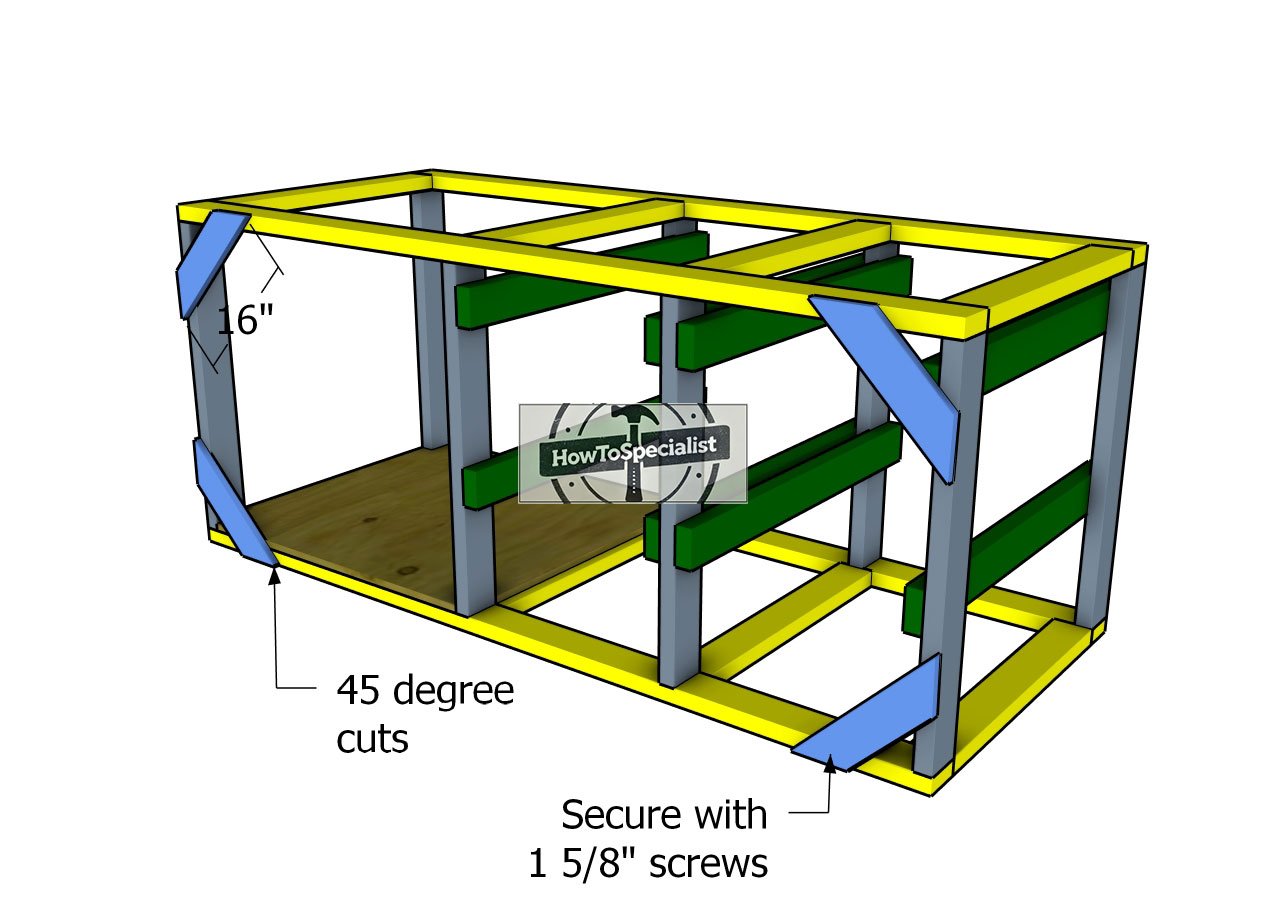
Fitting-the-back-braces
To reinforce the structure and make the storage workbench heavy-duty, install braces along the back. Cut both ends of the braces at a 45-degree angle for a snug fit. Secure them in place using 1 5/8″ screws, driving two screws into each joint for maximum stability. Double-check that the corners are square before attaching the braces—this step ensures a rock-solid frame that’s built to last.
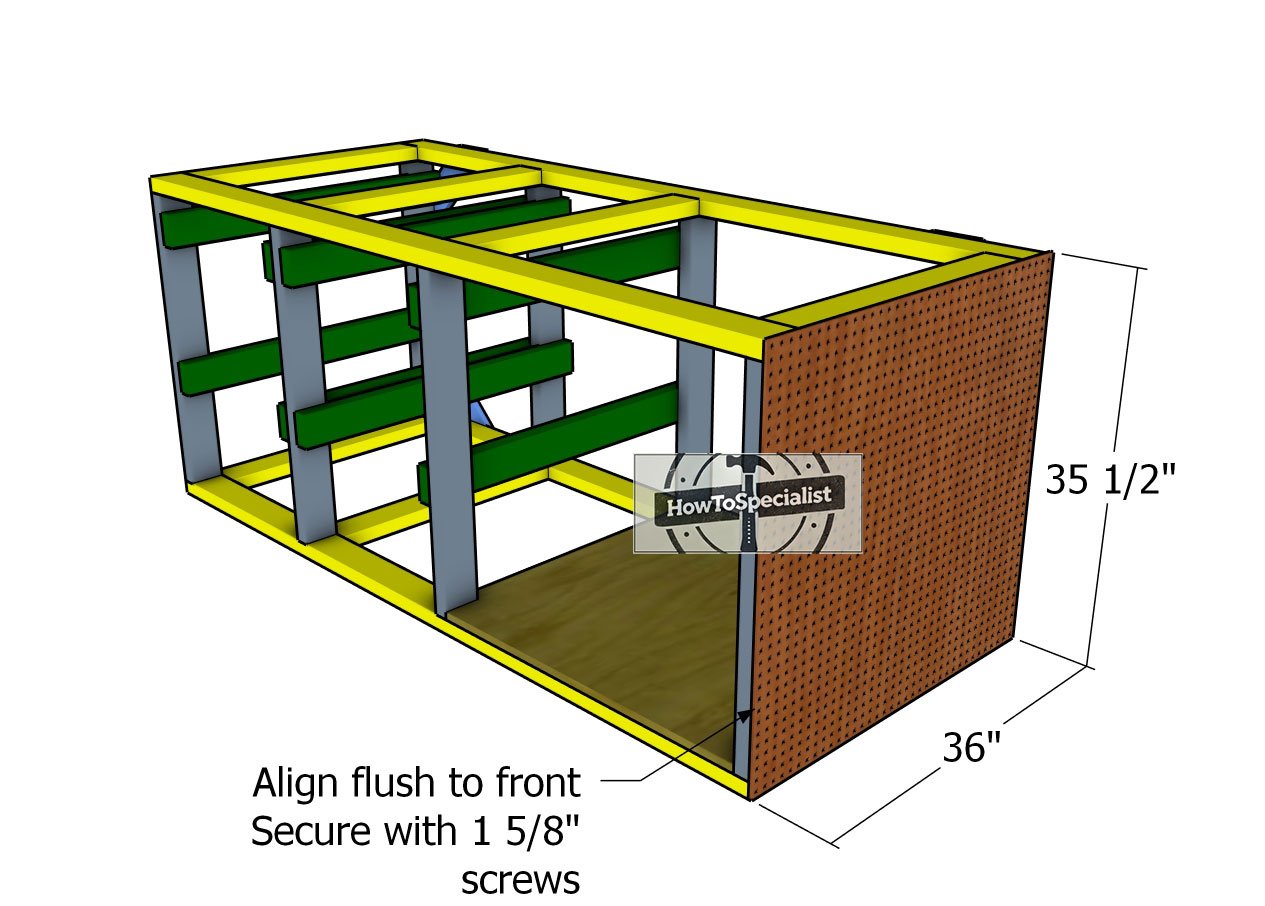
Attaching-the-pegboard
Enhance the functionality of your workbench by adding a 1/4″ pegboard panel to one side. This will give you plenty of space to hang tools and keep your workshop organized. Cut the pegboard to the correct size, then align it with the top and front edges of the workbench. Secure the panel to the side frame using 1 5/8″ screws, ensuring it’s flush and stable. This small addition goes a long way in making your workbench a versatile workspace.
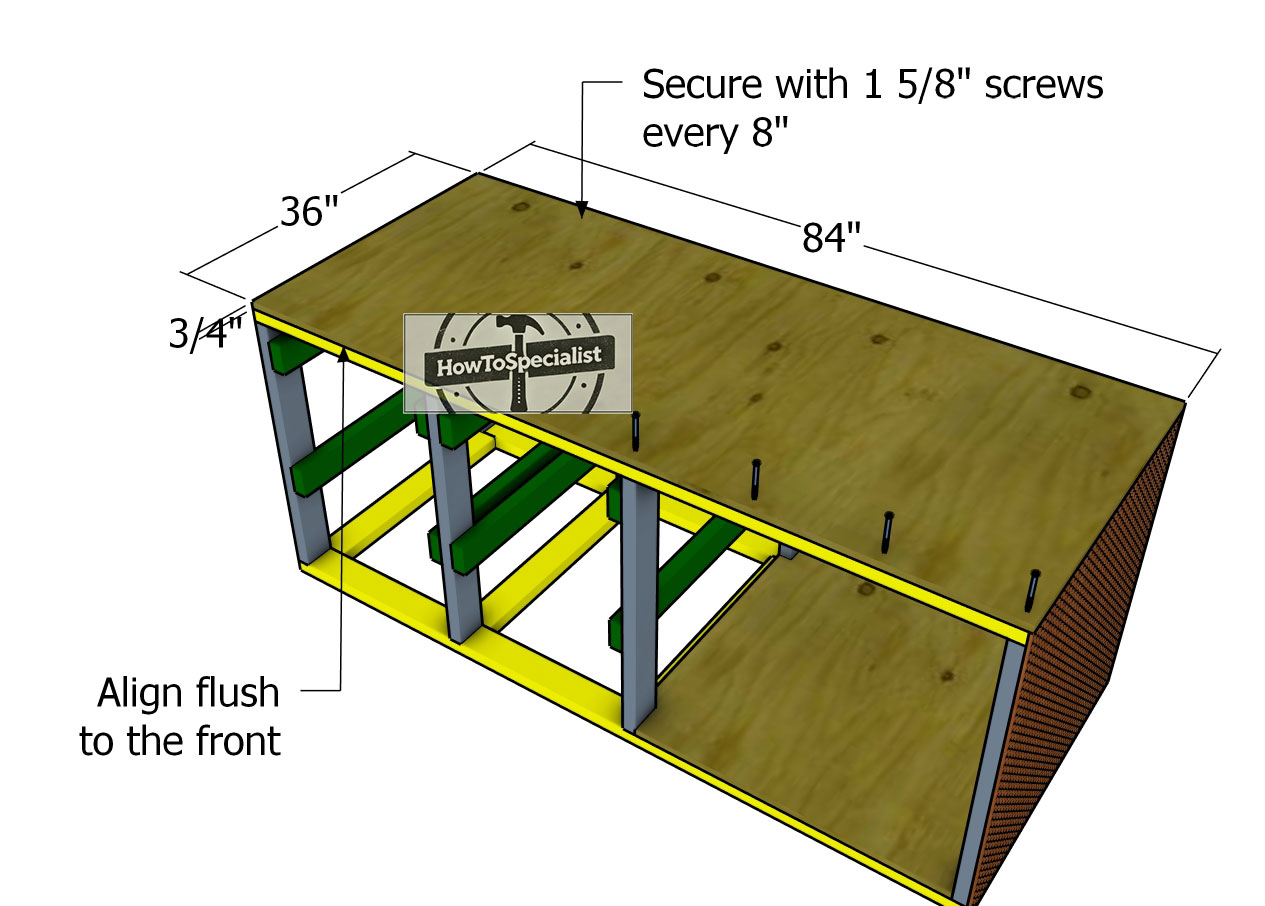
Fitting-the-tabletop
Cut the tabletop from 3/4″ plywood and position it on top of the structure, aligning the edges flush with the front and sides. Apply wood glue to the joints for extra strength, then secure the tabletop with 1 5/8″ screws, spaced every 8″ along the frame. For a more robust surface, consider adding a second layer of 3/4″ plywood on top. Additionally, you can drill dog holes through the tabletop, allowing you to use clamps and maximize versatility for your woodworking projects.
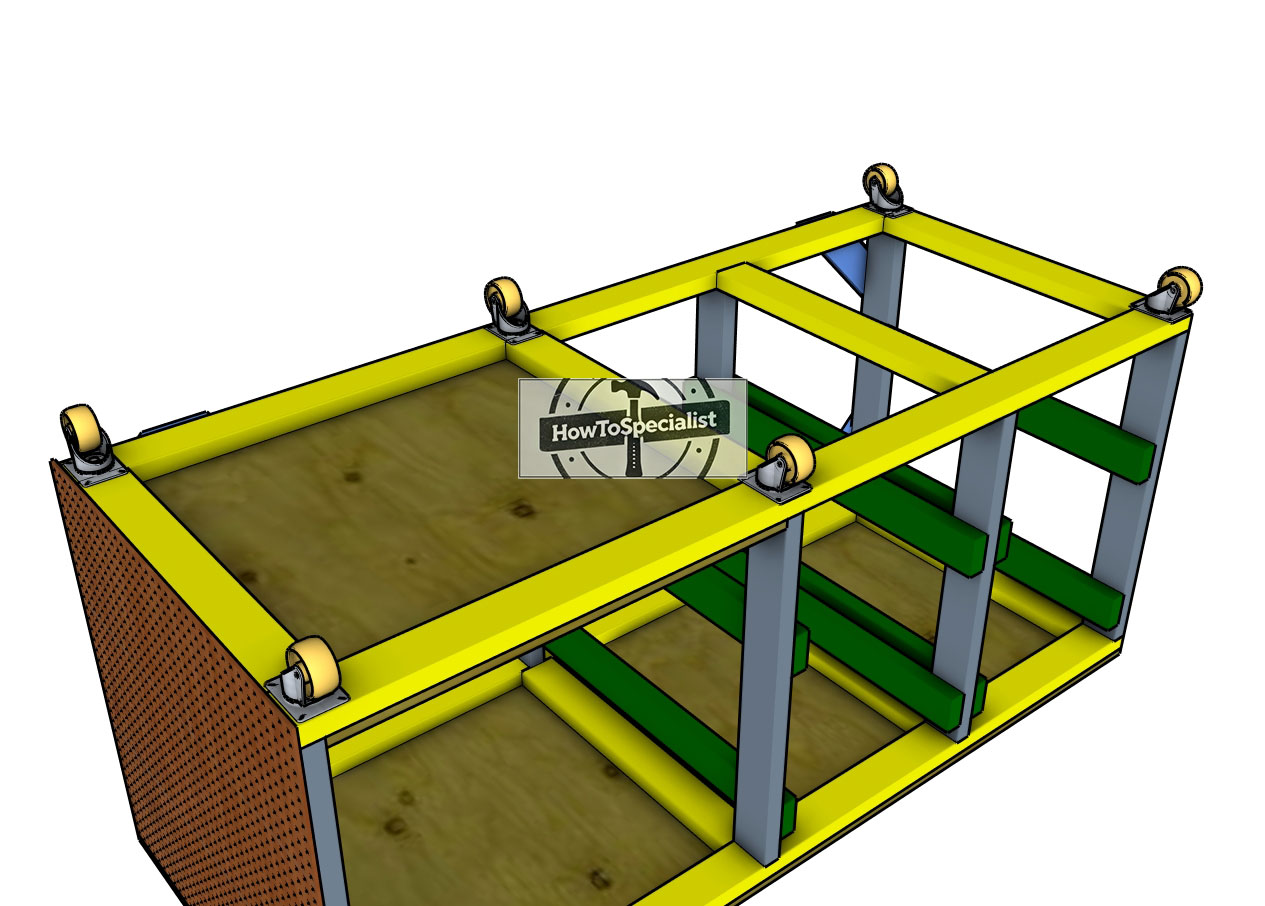
Attaching-the-caster-wheels
Make your workbench mobile by adding heavy-duty caster wheels to the bottom. You’ll need six caster wheels, as shown in the plans. Opt for wheels with built-in brakes so you can lock the workbench securely in place when working on a project. Attach the casters firmly to the frame, ensuring they’re evenly spaced for stability and smooth movement. Mobility and stability—it’s the perfect combination for any workshop setup!
Step 3: Finishing touches
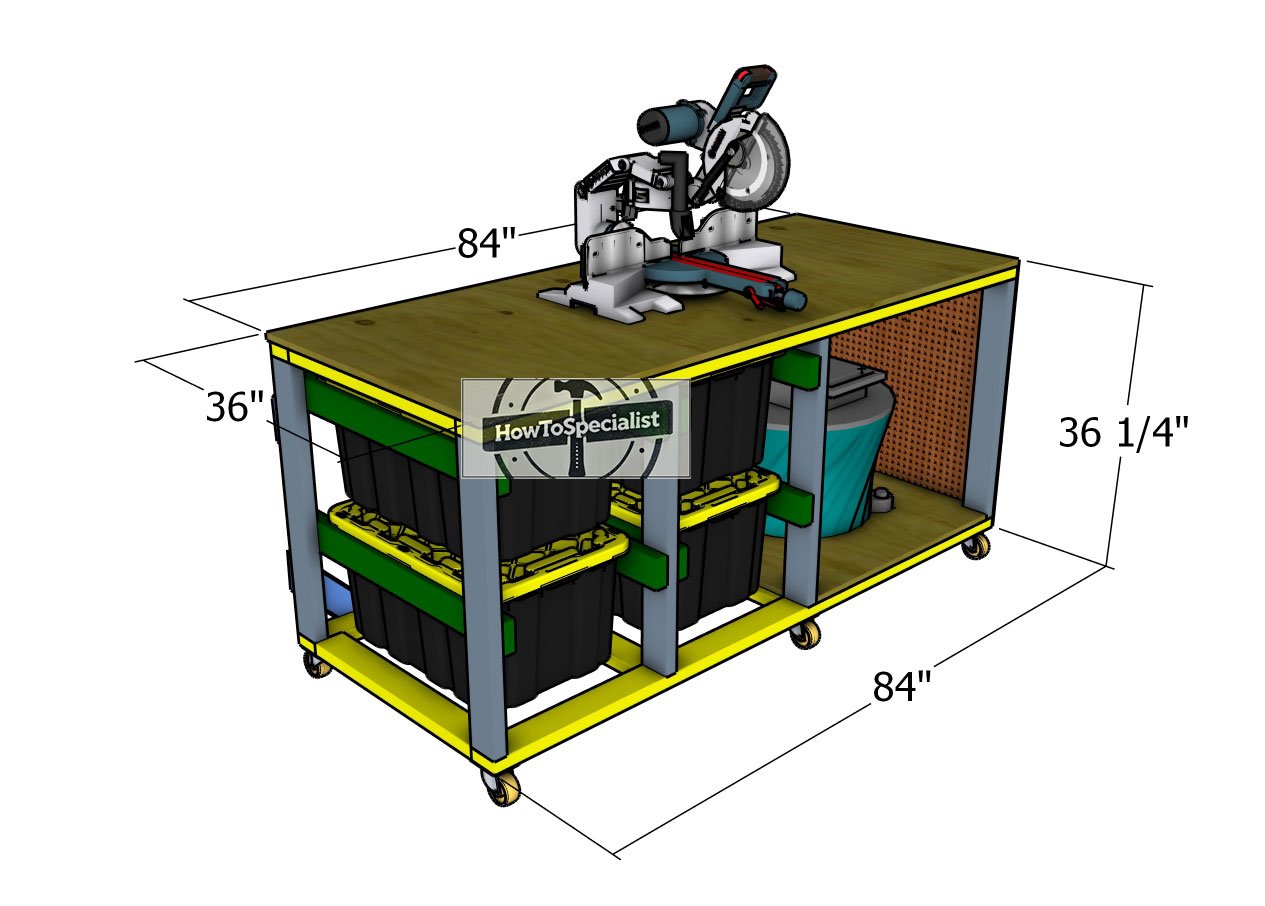
3×7-workbench-dimensions
To give your workbench a polished look, sand all the surfaces thoroughly with medium and fine-grit sandpaper. Focus on smoothing out any rough edges or imperfections, ensuring a clean and safe finish. Once sanded, you can apply a wood stain or paint of your choice to protect the wood and match your workshop’s style. Don’t forget to seal it with a clear coat for added durability and to make cleaning easier.
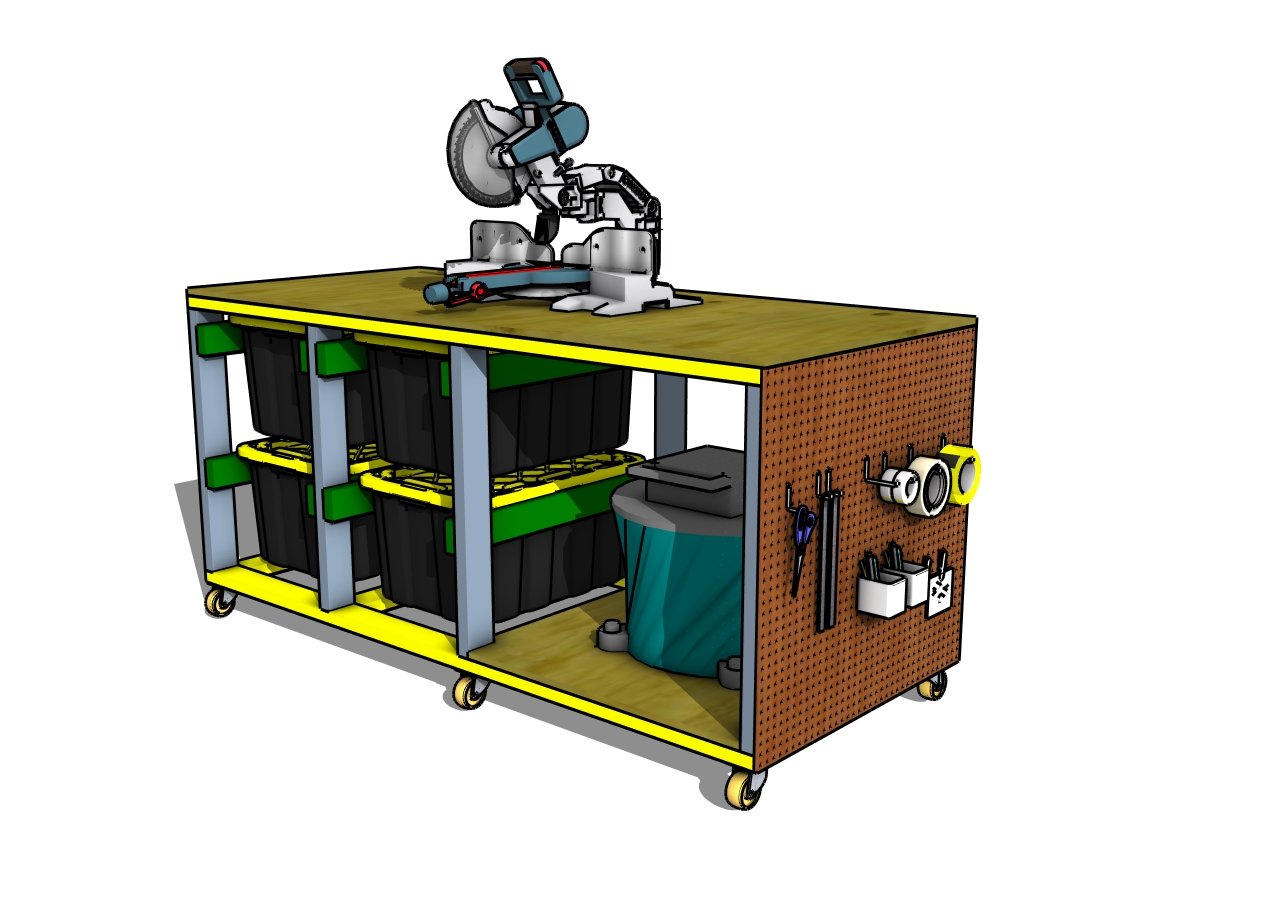
How to make a workbench with storage totes
As a final touch, consider adding accessories to boost functionality. Install hooks or magnetic strips on the pegboard for additional tool storage, or mount a power strip along the side for easy access to outlets. These small upgrades make your workbench not just a sturdy build but also a highly efficient workspace tailored to your needs.
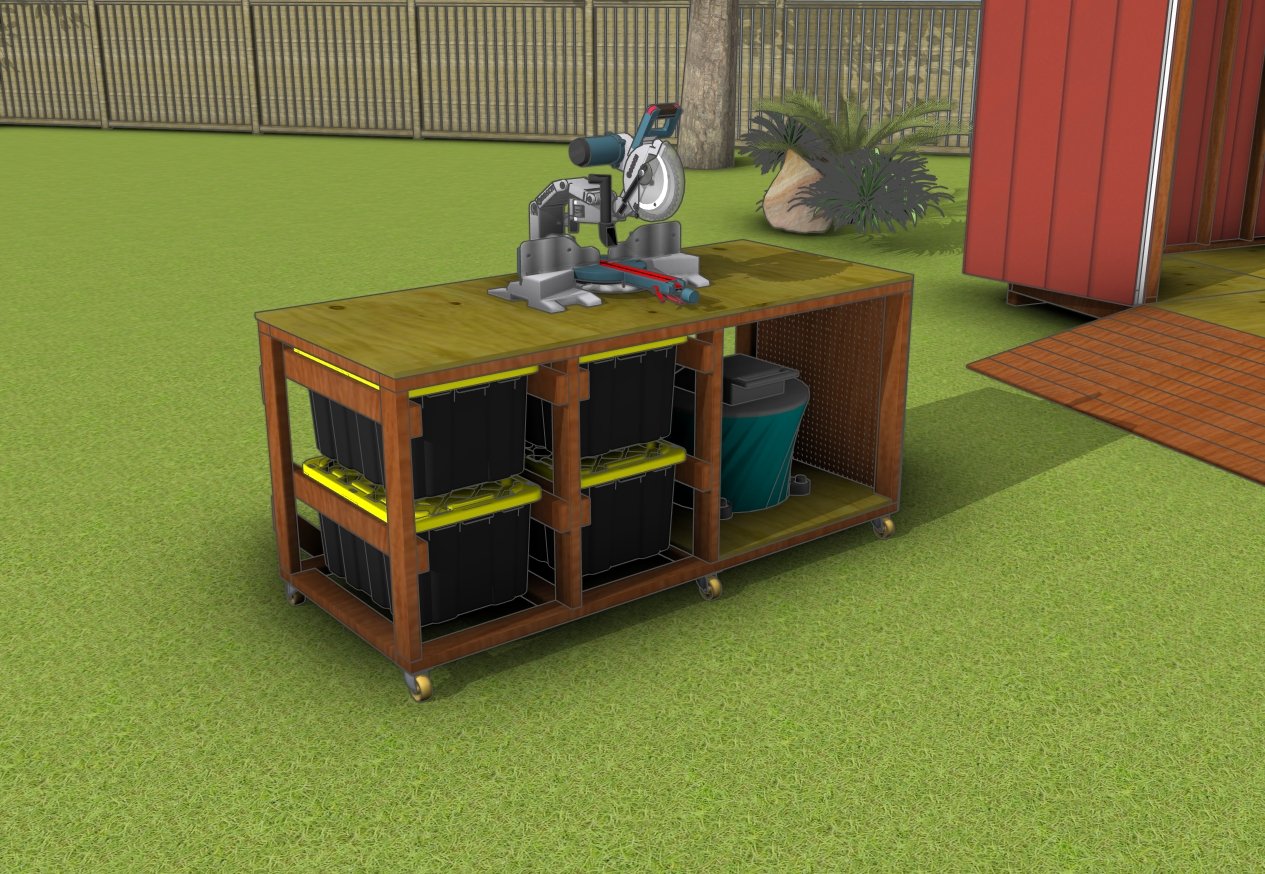
DIY 3×7 workbench plans
With your workbench complete, you’ve got yourself a versatile, durable, and highly functional addition to your workshop. From storage to mobility and everything in between, this project is designed to make your woodworking tasks smoother and more enjoyable.
If you enjoyed this project, be sure to explore other DIY plans and tutorials on the blog. Whether you’re looking to organize your space, build furniture, or tackle outdoor structures, we’ve got plenty of ideas to inspire your next build. Stick around, and let’s keep creating together!
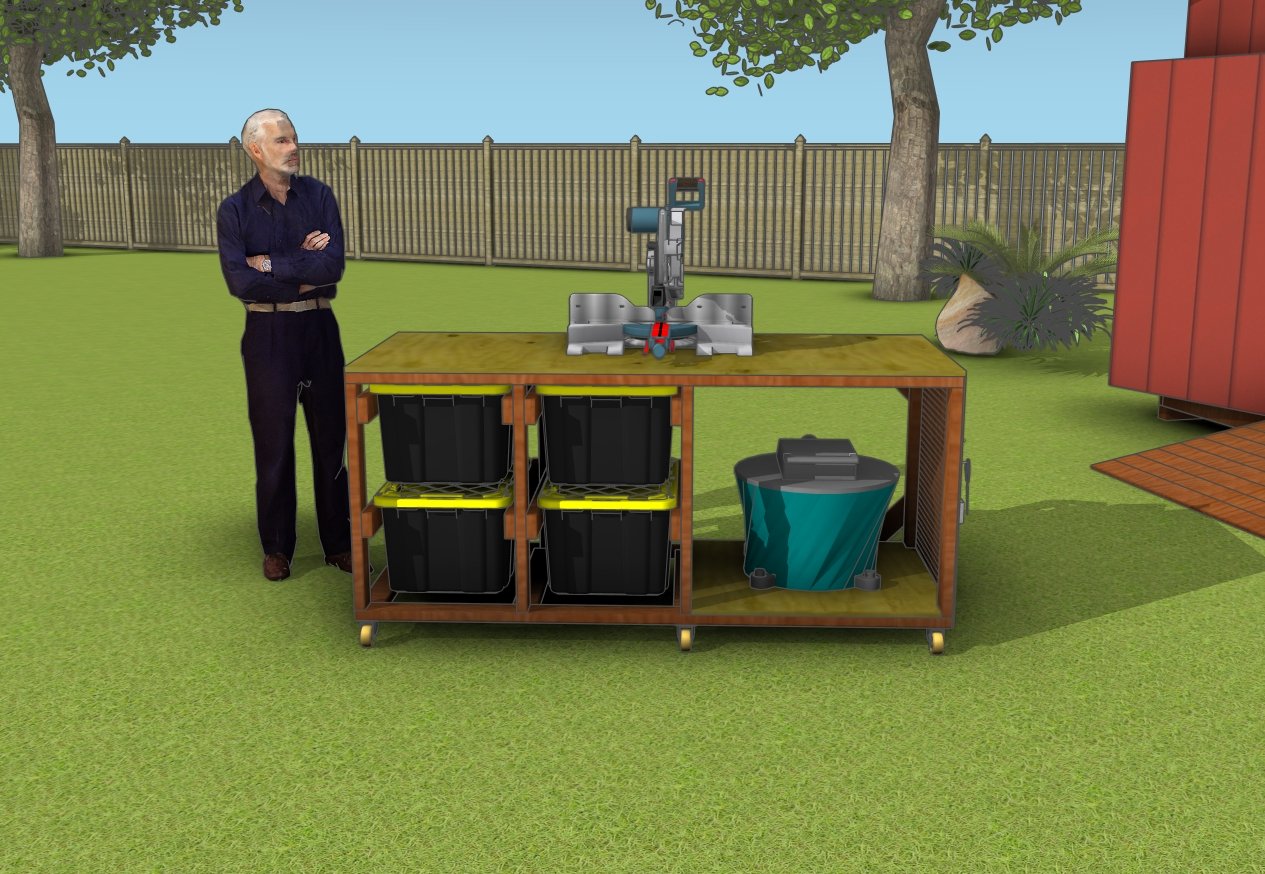
How to make a 3×7 workbench
Thanks for checking out my how to make tote storage 3×7 workbench! Be sure to explore my other projects for more fantastic ideas. Don’t forget to hit the LIKE button and SHARE with your friends using the social media links below.

