This article is about how to install a metal stud ceiling. The benefits of steel studs over the traditional wood studs are significant: they have a lighter weight, they are perfectly straight and have a good resistance over time. In addition, taking into consideration our experience in this area, we consider that in most cases metal stud framing is a better choice. As strange as it might sound, in western Europe this technology is used in virtually any domestic project, so you can imagine there are few drawbacks coming with this approach.
Nevertheless, we wouldn’t recommend you using regular metal studs, if you are going to install heavy cabinets, mirrors or chandeliers; in this case you could go for solid wood studs or for heavier gauge metal framing, which come unfortunately at a greater cost. Irrespective of your choice, you will find in this step by step article all necessarily instructions to install a metal stud ceiling by yourself.
Framing a metal stud ceiling is not difficult if you buy the right materials for your needs and use the right techniques. Work with great care and make sure you place the folding stair on a sturdy surface, otherwise you risk injuring yourself. If you don’t have any experience in the field, it would be better to leave this project to a team of qualified professionals. Last but not least, we recommend you to check out the rest of our how to projects if you want to get the best home improvement tips.
Materials
- Metal studs and tracks
- Screws
- Accessories (metal brackets for fastening the metal studs)
- Sandpaper
Tools
- Safety gloves, safety glasses
- Measurement tape
- Carpenter pencil
- Drill machinery with hammering function
- Electric screwdriver
- Hammer, metal scissor, ladder
Tips
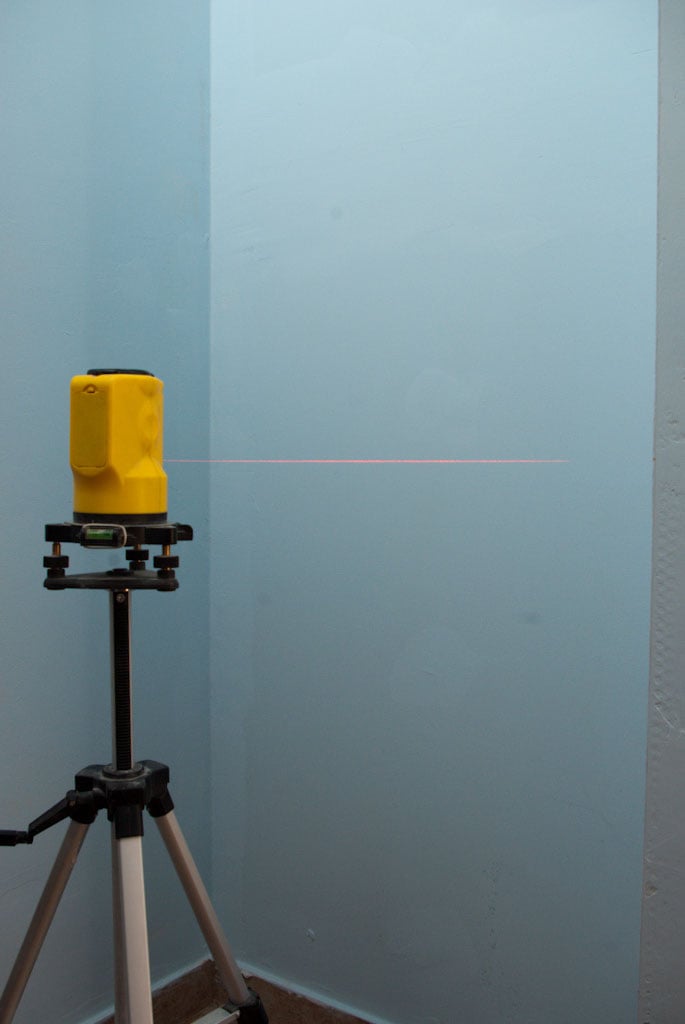
- Use a laser level to make sure the ceiling will be perfectly leveled
- Use safety glasses and gloves
Installing metal track ceiling frame

Using the laser level
The first and most important step of the project is to set a straight level line around the room, at the specific height you want to install the metal stud ceiling frame. There are several alternatives of doing this thing, so you can choose the most convenient one. On one hand, you can use a laser level, which represents the best option in terms of reliability, but this might come at high cost for diy-ers. Just set the laser straight and then mark the contour line of the room. As well you could use a water level, to make a few marks, and then a straight line, to draw the contour.
On the other hand, you can use a water level and make marks around the corners of the room. Then, you should use a caulk line to draw the guidance lines around the ceiling. It is more than obvious that this approach takes more time, but it is equally effective and comes at a lower cost. Nevertheless, of your choice, jut make sure the contour line is leveled so you can build a cheap and simple metal stud ceiling frame.

Installing metal track framing
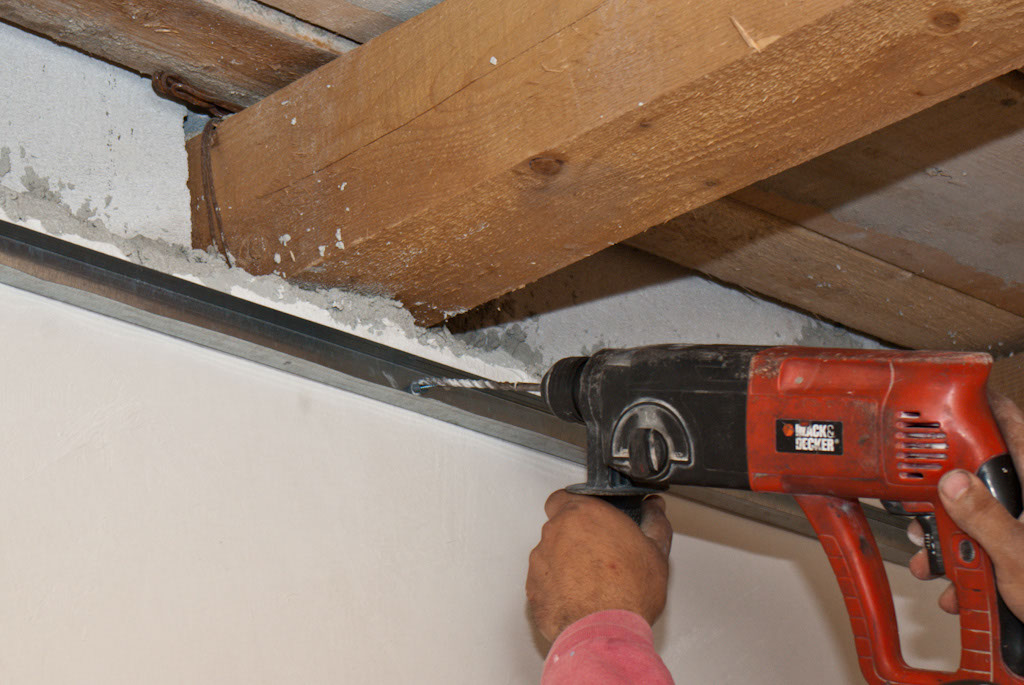
After we have drawn the contour, we have proceeded to the installation of the first metal track. You should always start with the longest wall of the room. In order to do that, we have drilled holes through the metal track in the supporting wall, made of bricks.
Afterwards, we have locked the metal track with screws and dowels. If we had dealt with a timber frame, then it would have been possible to screw the metal track directly in the studs, without pilot holes. The most important aspect is to install the track perfectly straight, otherwise you will get a curved ceiling.

Screwing in the metal track
Next, we have continued installing the metal track around all the walls using the same technique. The metal track must be fixed in screws every 15”/40 cm.
It is essential to secure firmly the metal track in the walls, as it will support the metal studs, and eventually the drywall ceiling. For concrete walls use one and a half inch screws and appropriate dowels, as for wood walls use one inch wood screws.

Metal track frame fixed to wall
This is how the metal track should look after it has been secured with screws.
Note that there might be small gaps between the metal profiles and the wall, if the latter is not perfectly straight, but you shouldn’t be worried unless the gaps are relatively large (over half an inch), in which case you should straighten the wall first. When securing the metal track, make sure you are choosing only the best pieces you can get, as you shouldn’t choose deteriorated ones.

Cutting metal stud
The next step is to complete the frame on the longest walls of the room, by fixing the rest of the metal track. Most probably you will have to adjust the length of the metal studs, so it is the time to make a cut using a measuring tape (to mark the right dimension) and metal scissors.
The cuts should be made as precise as possible, making sure the edges are straight. Use safety gloves, to avoid injuring yourself in the sharp edges.

Metal track ceiling joints
After we had finished installing the metal tracks alongside the longest walls, we continued securing the rest of the perimeter. Notice that around corners, you should install a L-shaped metal track.
In order to create the L-shaped metal track, we used tin snips to cut the metal studs flanges . Consequently, at any corner of the room, the metal tracks should overlap each other at least 15”/40 cm; the new piece of metal should be placed in the channel of the installed metal track. Use screws to secure the frame.

Taking measures to install metal studs
After we have completed installing the metal track, we’ve made marks every 15”/40 cm, using a carpenter’s pencil and a measuring tape. These marks represent the layout for the metal studs we’ll have installing, to complete the ceiling frame.
If you secure the studs at a greater distance, then you risk getting a crooked ceiling. Just observe these distances, make sure the track is leveled and you are on the way of building a great drywall ceiling. Make sure you make the marks on opposite walls starting in the same direction.
Metal stud ceiling framing

Installing the metal studs
In this image you can see the process of installing the central stud in the metal track. When cutting the metal studs, make sure that they will fit easy in the channel and you don’t have to push them with force.
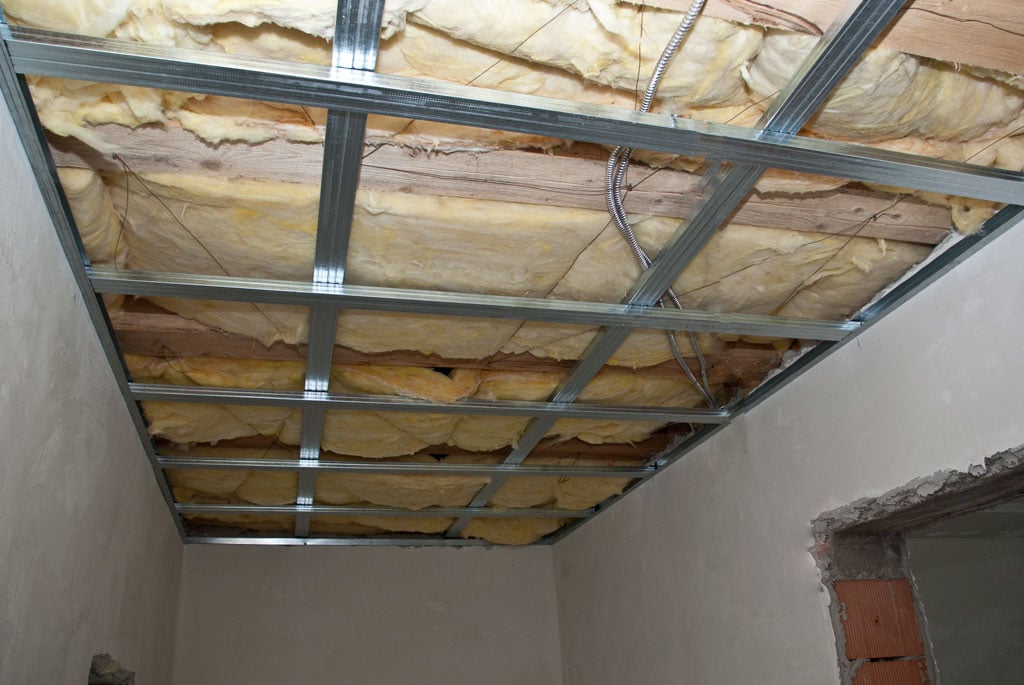
After we have inserted the metal studs inside the channels, we fastened them to the metal tracks with screws. Also, you might notice that we have installed mineral wool isolation, before framing the metal studs.
Notice that you have to install two layers of metal studs, one in the metal tracks and the other one above the metal tracks, perpendicular on the previous layer of metal studs. Make sure you drive in screws to make the metal stud frame rigid. When using the ladder make sure the support surface is firm, and the ladder is in well condition. It is better to work in team, ideally with a certified professional.

Installing the metal stud brackets
The final step is to secure the whole metal frame by using metal brackets. First you should screw them in the wood studs, or in the ceiling structure. Next, we straightened the bracket’s flanges and secured them with screws to the metal studs.
In most of the cases, the bracket is too long, so you have to cut the excess material with metal scissors. This operation is usually unobserved by diyers, but we assure you that on the long rung, you won’t have any issue with your drywall ceiling, if you secure the metal stud frame with brackets.

Metal stud ceiling frame
The metal stud ceiling frame is completed, after about 3 hours of continuous work. The metal tracks and studs are installed firmly, therefore the frame is perfectly level, as we have used the laser level.
Make sure you install the metal studs every 15-25”, otherwise they won’t be able to support the weight of the plasterboards. Remember that a wrong measurement can make the difference between a successful project and a total fiasco, so hire a specialist if you don’t have experience in the field.
My best tips on framing a metal stud ceiling:
Framing a ceiling with metal studs is a great way to ensure a lightweight, strong, and straight structure, perfect for both residential and commercial spaces. While working with metal studs may seem intimidating at first, it’s easier than you think with the right tools and techniques. Here are my best tips for framing a metal stud ceiling that will make the process smooth and successful.
1. Plan and Measure the Ceiling Layout
- Assess the Ceiling Space: Measure the height and dimensions of your ceiling carefully. If you’re framing over an existing structure (like drywall), make sure to account for any obstacles like pipes, ducts, or electrical wiring.
- Layout Planning: Mark the locations of your ceiling joists and light fixtures on the wall, ensuring that they’re evenly spaced. The standard spacing for metal studs is either 16 or 24 inches on center.
- Drop Ceiling Consideration: If you’re building a drop ceiling, be sure to plan for the necessary headroom and decide how far the ceiling will be dropped.
2. Gather the Right Tools and Materials
- Metal Studs and Track: Use light-gauge steel studs (commonly 25 gauge for residential) and corresponding U-shaped track pieces to frame the ceiling.
- Screws: Make sure to get self-tapping metal screws designed for steel framing. These are crucial for attaching the studs to the track and to each other.
- Tools: You’ll need tin snips, a screw gun, a level, a plumb bob or laser level, and a stud crimper to make the job easier.
- Safety Gear: Don’t forget to wear gloves to protect your hands from the sharp edges of the metal studs.
3. Install the Perimeter Track
- Mark the Ceiling Height: Start by marking the perimeter of the ceiling where the metal track will be installed. Use a laser level or chalk line to ensure it’s straight.
- Attach the Track: Secure the U-shaped perimeter track to the walls using drywall screws or concrete fasteners, depending on the surface. Make sure the track is level and properly aligned along all four walls.
- Double-Check Alignment: It’s crucial that the perimeter track is level to ensure the ceiling is flat once the framing is completed.
4. Cut Metal Studs to Size
- Measure Twice, Cut Once: Measure the distance between the perimeter tracks and cut your metal studs accordingly. Use tin snips or a chop saw with a metal-cutting blade to make precise cuts.
- Smooth Edges: Metal studs can have sharp edges after cutting, so smooth them out with a metal file or deburring tool to avoid injury.
5. Fasten Studs to the Perimeter Track
- Start at One End: Begin by inserting the first metal stud into the perimeter track. Use a level to ensure the stud is plumb.
- Secure with Screws: Use self-tapping metal screws to secure the stud to the track. For extra stability, you can use a stud crimper to lock the stud into place without screws.
- Continue Spacing Studs: Install the remaining studs, ensuring they are spaced at either 16 inches or 24 inches on center, depending on your ceiling load requirements.
6. Cross Bracing and Support
- Install Cross Bracing: Add cross braces, also called bridging, between the metal studs to provide additional support and prevent twisting. Use C-channel bracing or blocking, and attach it with screws.
- Consider Additional Support for Heavy Fixtures: If you’re planning to install heavy light fixtures or ceiling fans, add extra bracing in those areas to support the weight.
7. Level the Ceiling with Furring Channels
- Install Furring Channels: Attach furring channels perpendicular to the metal studs. These channels will help distribute the weight of the ceiling and ensure everything is level.
- Use Hanger Wires: If your ceiling requires a drop or suspended structure, use hanger wires to support the furring channels from the ceiling joists above. Space these wires at regular intervals to maintain even support.
8. Run Electrical Wiring and HVAC Ducts
- Install Before Drywall: Before you finish framing, run any necessary electrical wiring or HVAC ducts through the metal studs. Use pre-punched holes in the studs to make this process easier.
- Grommets for Wires: Add plastic grommets around electrical wiring to prevent damage from the sharp edges of the metal studs.
9. Add Drywall or Ceiling Panels
- Measure and Cut Drywall Panels: Once the metal stud ceiling is framed, measure and cut drywall sheets to size. Secure them to the metal studs with drywall screws.
- Leave Space for Fixtures: Be sure to leave openings for any light fixtures, ceiling fans, or vents.
- Finishing Touches: After the drywall is up, tape and mud the joints for a smooth finish.
Framing a ceiling with metal studs is a reliable and efficient method, particularly for modern construction. With the right tools and careful planning, you can create a lightweight, strong, and level ceiling frame. By following these steps and tips, you’ll have a durable structure ready for drywall installation or any finishing touches.
Thank you for reading how to install metal stud ceiling and we recommend you to check out our other projects. In addition, don’t forget to share our projects with your friends, by using the social media widgets.

11 comments
Thanks for your detailed instructions, but how exactly can you screw those two perpendicular layers of the metal studs? It seems you have to put something inside the lower stud to allow fasteners not to go to through the air before entering the upper stud.
The lower studs sit inside the track, while the top studs are secured to the ceiling with clips.
I have read this several times and still have absolutely no idea how the bottom layer of studs is attached to the channels above.
The bottom layer of studs is secured to the top layer of studs with screws. The bottom layer of studs goes in the track. The top layer goes above the track. The top layer of studs is secured to the joists with brackets.
What about if you don’t have any joist above?
I don’t know how to proceed in that situation. I only show the work I’ve done.
Bad instructions and not enough pictures of how the work was accomplished. It would also be helpful to have dimensions of the material that you used and a link to a possible source of supply. Thank you.
FYI: You can’t install the joists in the weak-loading direction meaning: you can’t use them “flat.” That is insane! You have to install them using the “strong axis” (upright, longest dimension shall be vertical.” This ceiling as shown, will eventually fail, if it already hasn’t.
Thank you for the concern, but that ceiling is after 8-9 years now, spotless. Not even a single crack. You cannot even fit the joists inside the perimeter tracks vertically, because they are designed to install the joists “flat”. I’m not sure what field you are working in, but in the European residential construction industry, this is the standard.
I found this article helpful but after reading several times, and reviewing the Q&A, I have the same difficulty as others understanding how the studs are screwed to the track and each other. Do you screw up through the bottom of the track into the stud that is inserted into the track or through the track from above into the outer flange on each side of the stud? For the perpendicular studs do you screw down from the top through the top stud into the outer flanges of the lower stud or up through the lower stud into the upper? Any clarification or additional pictures would be greatly appreciated.
Thanks for this, it’s very helpful. You mentioned the frame was complete in 3 hours of continuous work – how large of an area was done?