This article is about how to build a concrete ceiling. Pouring a concrete ceiling is not a common technique in United States, but is used on a large scale in Europe. Nevertheless, although it is more expensive and it takes longer as compared to a wood stud ceiling, it still has a few advantages which could make you think again when building your house. Consequently, when building a concrete ceiling the rigidity of your house will be much better and it could support more weight, as compared to light constructions. On the other hand, a concrete ceiling is so strong and durable, that you won’t hear any footsteps when sitting on the ground floor.
Building a concrete ceiling will increase the phonic insulation and durability of your house. But these advantages come together with a few drawbacks, such as the higher cost of the project or the fact that pouring a concrete ceiling may take up to several months, until you can actually build the walls and the roof. In addition, you have to build a formwork to be able to build the concrete ceiling.
Pouring a concrete ceiling is difficult without the help of a qualified engineer. In addition, you have to observe your local codes in order to get the construction permits. The thickness of the concrete ceilings varies according to the weight it has to support, but it is usually between 5-6” for residential constructions. Taking into consideration the weight of the rebar structure, as well as the weight of the concrete, building a sturdy form is essential for any project. Therefore, use thick wooden boards or panels to build the form and support the whole structure with 4×4 posts.
Made from this plan
In order to build a concrete ceiling, you need the following:
Materials
- 1×4 wood boards for building the formworks / tego plywood boards
- 4×4 wood posts to support the ceiling / adjustable metal posts
- Nails/wood screws to fasten the formwork
Tools
- Safety gloves, glasses
- Measuring tape, carpentry pencil, l-square
- Circular saw/jigsaw to build the formwork
- Hammer
Tips
- Use boots, as not to get your cloths and skin dirty with concrete
- Clean thoroughly your tools after you have finished the project
- Wear protective glasses and gloves, to avoid possible injuries
- Make sure the ceiling formwork is perfectly level
Time
- Few hours up to a day, according to the surface of your foundation and the number of workers
My best tips for building a concrete ceiling:
Building a concrete ceiling can provide strength, durability, and fire resistance to a structure. While it’s a more involved project than typical ceilings, with the right approach, it’s a highly effective solution for both residential and commercial buildings. Here are my best tips for building a concrete ceiling.
1. Plan the Ceiling Structure
Before getting started, it’s essential to plan the structure carefully:
- Determine the load requirements for the concrete ceiling based on the building’s purpose. This helps decide the thickness and reinforcement needed.
- Ensure you have proper support during and after construction, as a concrete ceiling carries substantial weight.
2. Build a Strong Formwork
Formwork is what will shape and hold the concrete until it sets, so building strong and stable formwork is key:
- Use plywood panels supported by wood or metal beams to create a solid form.
- Reinforce the formwork with temporary props or scaffolding underneath to ensure it holds the weight of the wet concrete.
- Double-check that the form is level, square, and securely fastened. Any gaps or misalignment can affect the finished product.
3. Install Reinforcement
Concrete alone isn’t strong enough for structural loads, so you’ll need to install reinforcement:
- Lay steel rebar in a grid pattern throughout the formwork. Make sure the rebar is properly supported using rebar chairs so that it sits in the middle of the concrete slab, not at the bottom.
- Depending on the design, you may also need to add reinforcing mesh for added strength.
- Ensure the reinforcement is securely tied together and properly positioned within the form.
4. Prepare and Mix the Concrete
When it comes to mixing concrete for a ceiling, you want a mix that’s strong and durable. A standard mix ratio is 1 part cement, 2 parts sand, and 4 parts gravel, with water added gradually until you reach the right consistency:
- Use a concrete mixer to get a consistent blend.
- If you’re pouring a large ceiling, consider ordering ready-mix concrete for convenience and efficiency.
5. Pour the Concrete Carefully
Pouring concrete for a ceiling is more challenging than for a floor because gravity is working against you. Here’s how to do it:
- Start pouring the concrete at one corner, working your way across the formwork.
- Pour the concrete evenly and avoid overloading any one spot to prevent the formwork from shifting or collapsing.
- Use shovels or a concrete pump to spread the concrete evenly across the form.
6. Vibrate the Concrete
Vibrating the concrete helps remove air pockets and ensures a strong, solid ceiling:
- Use a concrete vibrator or manually tap the sides of the formwork to settle the concrete and eliminate air voids.
- Make sure the concrete fills all corners and spaces in the formwork for a consistent, solid finish.
7. Smooth and Level the Surface
After the concrete is poured and vibrated, use a trowel to smooth and level the surface of the ceiling. It’s essential to ensure the ceiling surface is flat and uniform, especially if it will be visible or painted later:
- Trowel the surface in long, smooth strokes, ensuring no ridges or uneven spots are left behind.
- For a perfectly flat ceiling, consider using a bull float to further level the surface.
8. Let the Concrete Set
Allow the concrete to set and cure before removing the formwork. Depending on the temperature and humidity, this can take anywhere from 24 hours to several days:
- Keep the surface moist by misting it with water or covering it with plastic sheeting to slow the curing process.
- This ensures the concrete gains full strength and helps prevent cracks from forming.
9. Remove the Formwork Carefully
After the concrete has cured, it’s time to remove the formwork. Be cautious during this step:
- Start by removing the temporary supports and props from underneath the formwork.
- Gently detach the plywood panels from the concrete, taking care not to chip or damage the surface.
10. Cure the Concrete for Strength
Concrete gains its full strength over time, and proper curing is essential:
- Continue misting the concrete regularly or cover it with curing blankets for 7-14 days to ensure it stays moist.
- Avoid placing any heavy loads or making modifications to the ceiling during this curing period.
Bonus Tip: Add Insulation or Finishing Once the concrete ceiling is complete, consider adding a layer of insulation or a plaster finish to improve energy efficiency and give the ceiling a smooth, polished look.
By following these tips, you’ll be able to pour a concrete ceiling that’s strong, durable, and built to last. Whether you’re working on a garage, a basement, or a commercial building, a well-executed concrete ceiling adds lasting value and structural integrity to any project.
Building a formwork for the concrete ceiling

Building ceiling formwork
In order to build the concrete ceiling, one has to make a proper formwork. Building the formwork is a complex process, but anyone can do a job in a professional manner, provided it has some experience in working with lumber.
The complete details of the formwork, as well as of the reinforcing structure, have to be provided in the plans of your house. Remember that building a concrete ceiling is essential for the durability of your house, so you have to consult a qualified professional before starting such a project. In addition, you have to observe your local codes and get all the needed construction permits, as your safety is at stake.
Smart Tip: when building the formwork, you have to use pressure-treated lumber, as to make sure it will support the weight of the reinforcing bars, as well as the concrete.

Formwork for concrete
As you can see in these images, you have to build first the frame of the formwork, by using 4×4 lumber. On this structure you should install 2×4 wooden boards or tego plywood boards. The first option is better for the ones with a tight budget, but we recommend you to use tego plywood boards as the bottom of the ceiling will be perfectly straight, and you won’t have to put extra-effort to make it level.
If you are using wooden boards, you have to make sure they are straight and in a good condition. In addition, make sure you don’t leave gaps between the wooden boards, as the concrete might leak.
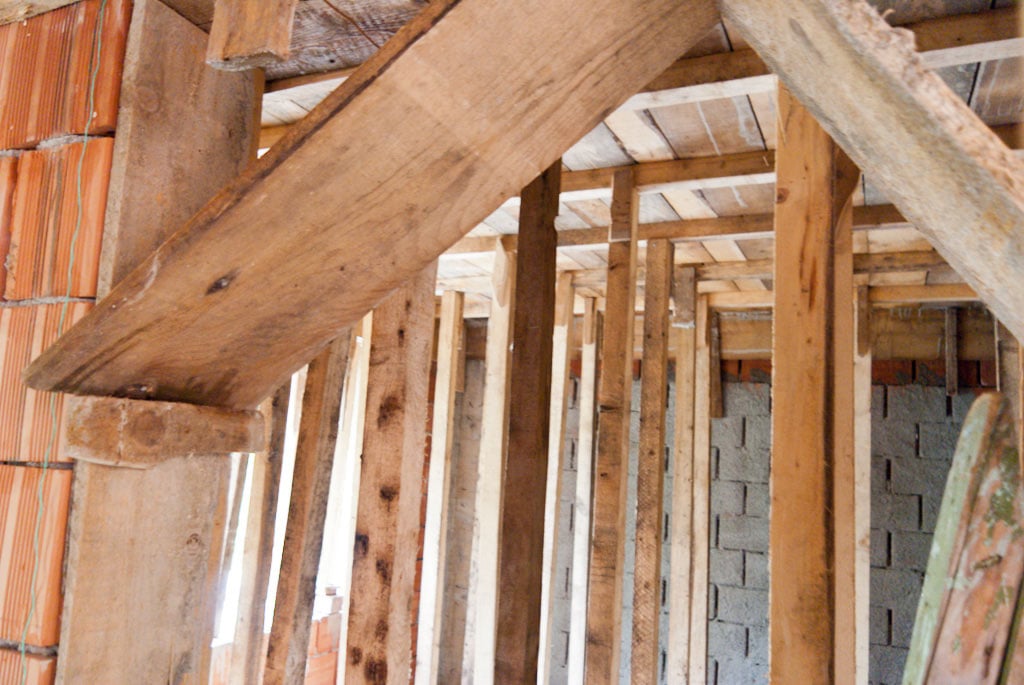
Building ceiling concrete formwork
You can see the ceiling form from inside of the house, as to get a better grasp of the procedure. It might look unusual for the vast majority of you, but this is the proper way of pouring a concrete ceiling. You should notice that there are many 4×4 posts installed every 15”, in both directions, as to support the weight of the reinforcing structure and of the concrete.
Smart Tip: Rent adjustable metal posts when building your concrete ceiling. They support more weight and adjust to the height of your rooms.
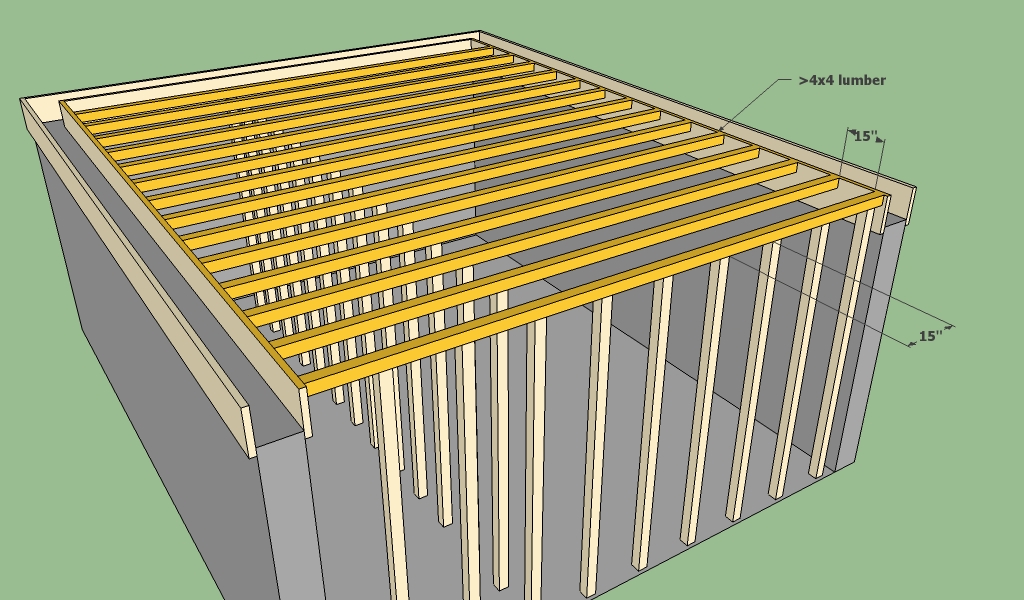
Ceiling formwork structure
We have drawn this sketch, as to show you in detail, how it should look the structure of the ceiling formwork. As we have already said, these details will be provided by the architects, but we want to get you accustomed to these construction techniques.
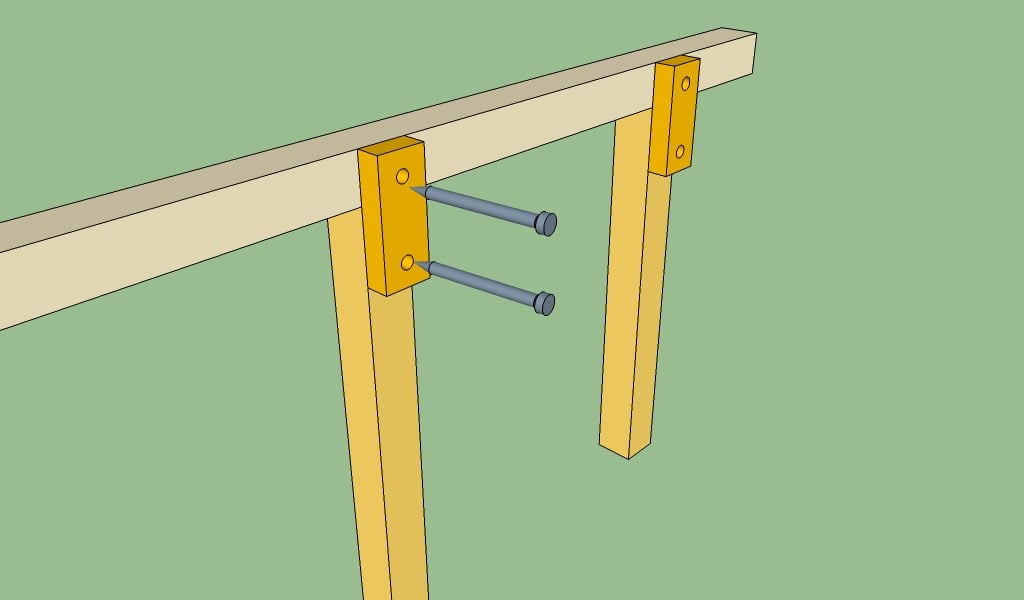
Ceiling formwork joint
If you are using 4×4 posts, you have to thoroughly fasten them to the structure of your ceiling. Consequently you should use a 2×4 lumber and a few nails to lock them firmly. Use a level to make sure the 4×4 posts are plumb.
Building reinforcing structure for the concrete ceiling
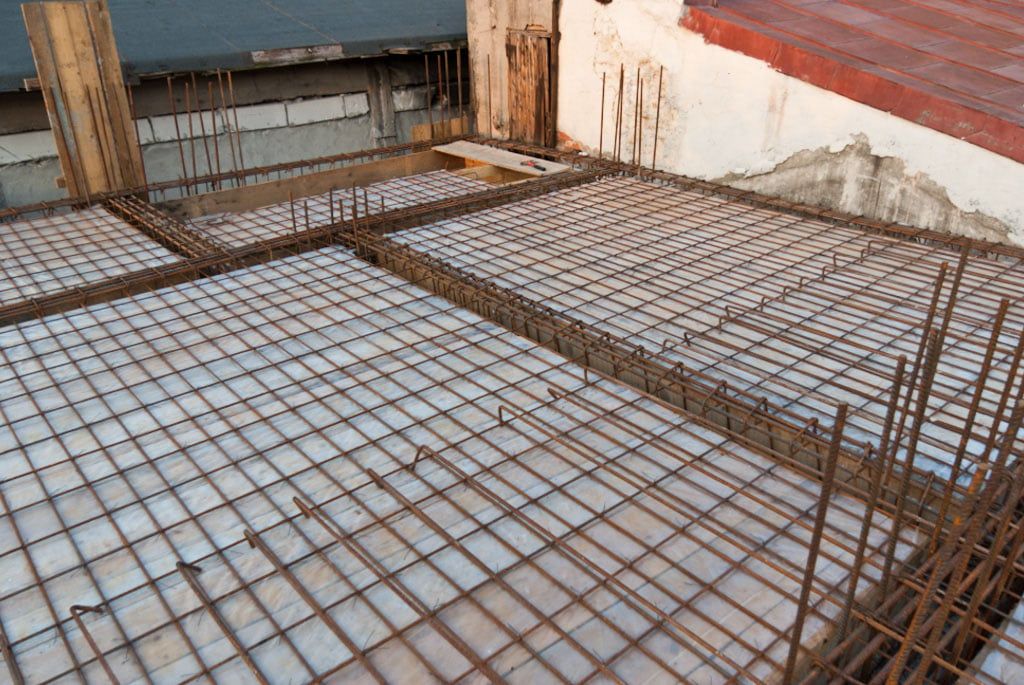
Concrete ceiling rebar structure
After you have built the formwork for pouring the concrete ceiling, you have to build and lock into position the reinforcing structure. As the concrete ceiling is almost floating, being supported only by several walls and pillars, you have to use a lot of rebars (the architect will compute the needed amount of rebars)

Rebar structure
In this image you can see a close-up with the reinforcing structure of the concrete ceiling. You might have noticed the rebar beams and you might ask yourself about their purpose. The rebar beams are placed on top of the walls and are connected with the rest of the reinforcing structure of the concrete ceiling. In this way, the concrete ceiling will be supported by the walls and will be more rigid and durable.

Building concrete floor reinforcing structure
In this image you can see the reinforcing structure around the stairways. You could notice that we have used many rebars around the stairs and alongside walls.
How to pour a concrete ceiling

Pouring concrete with hose
After you have installed the formwork and the reinforcing structure, you have to pour concrete, as to finish the ceiling. Consequently, you should rent a concrete pomp and several hoses, to pour the concrete in the ceiling formwork.
In addition, you should order the needed amount of concrete from your local concrete company (they will deliver it with trucks). You should know that there are more types of concrete, so make sure you order the one which is indicated in your structural plans (usually for ceilings you have to use B 250). Ideally, you should hire an engineer to supervise the workers while they pour the concrete ceiling.
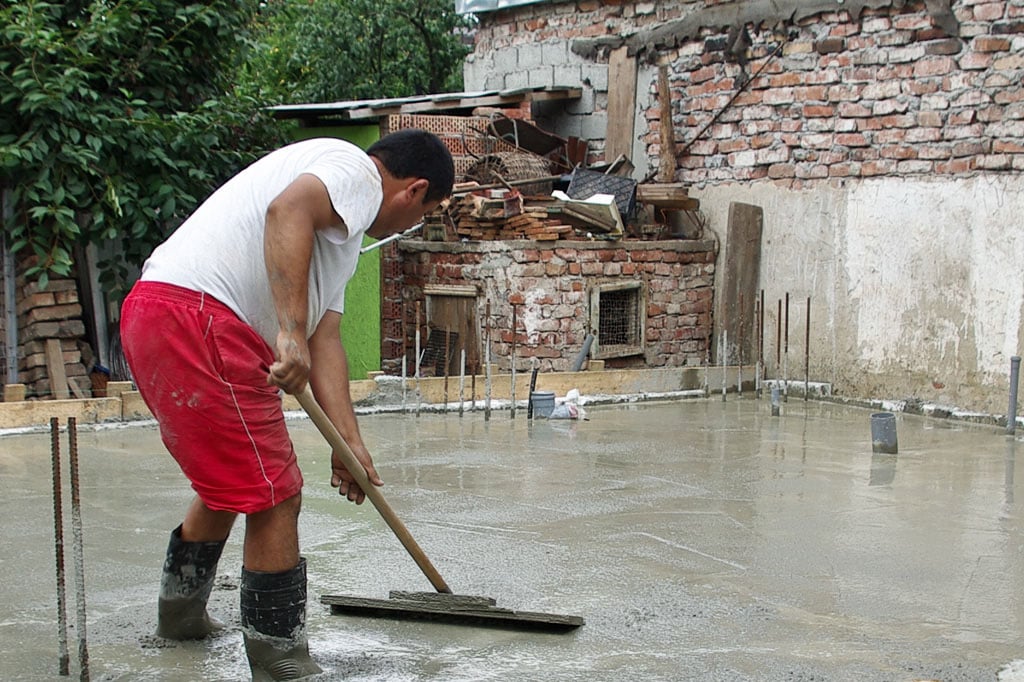
How to finish concrete
After you have poured concrete in the formwork, you have to finish it with a bull float from one end to the other. But first you should vibrate the concrete, as to make sure there are no pockets of air left in the concrete ceiling.
After you have used the concrete vibrator, you should finish the concrete surface with a bull float. Make sure you finish the surface properly, making sure it is perfectly level. Nevertheless, in most of the cases you will have to pour screed after the concrete ceiling has dried out to make it perfectly level.

Pouring concrete flooring
Next, you have to wait a couple of months until the concrete ceiling has dried out completely. After the ceiling has dried, you can remove the formwork and continue building the walls and the rest of your house.
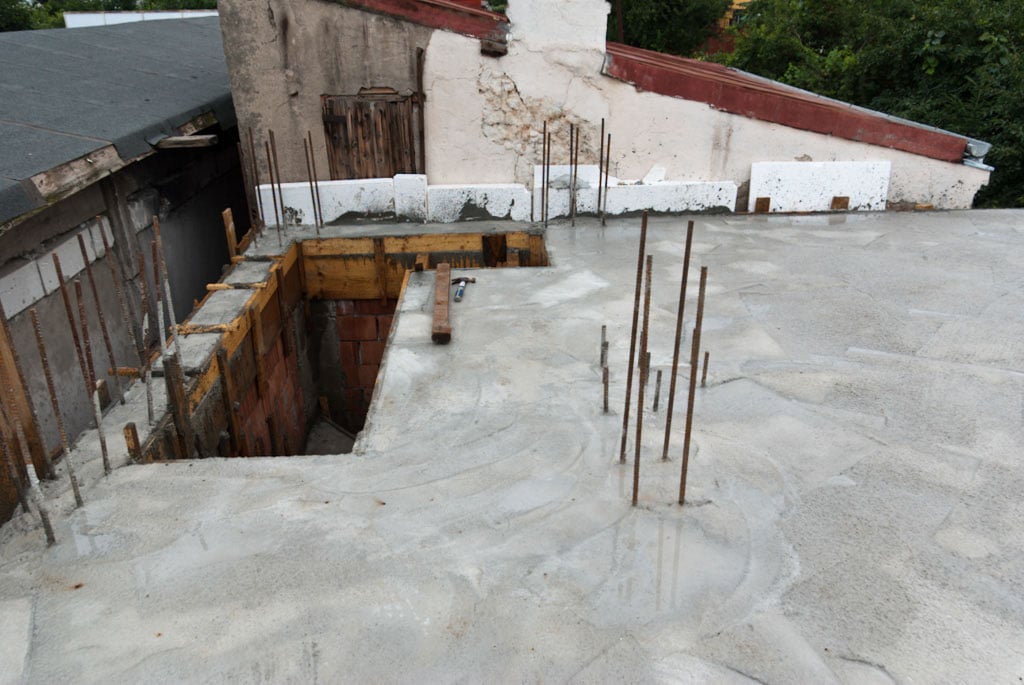
Pouring concrete flooring
Make sure you sprinkle water over the concrete ceiling, otherwise the ceiling will crack. In the worst case, you might even redo the concrete ceiling, if the cracks are too deep (the cracks might affect the rigidity of the ceiling).

Constructing concrete ceiling
After the ceiling has dried out properly, you can start building the walls and the roof of your house. Pouring a concrete ceiling is not very difficult if you follow the guidelines from your structural plans.

4 comments
Hi there,
We have a concrete ceiling in our apartment. I don’t think it has been sealed. Does it need to be?
Thanks,
katherine
I can’t answer that question because there a few techniques to pour a concrete ceiling. The best advice would be to talk to the engineers that built and supervised the construction.
You won’t hear footsteps when you sit on the ground floor because the concrete ceiling is so robust and resilient. Thank you so much for sharing!
How much support and spacing needed to pour a eight inch thick fourteen by twelve foot ceiling slash floor