This step by step diy project is about large pergola plans. If you want to build a learn more about building a 12×24 pergola, pay attention to this project. Follow the instructions and pay attention to the diagrams and build the structure, even if you are a beginner when it comes to woodworking. Take a look over the rest of the projects, to see more alternatives and design ideas.
You should always plan everything from the very beginning, in order to prevent costly mistakes and to save time. In most of the cases, you need a friend to give you a hand when assembling the large pergola. Invest in high quality lumber and plywood, as the components will be exposed to bad weather. Protect the components with appropriate paint or stain.
There are a few tips that you should take into account, if you want to get a professional result. Therefore, take accurate measurements and use professional tools when making the cuts or when drilling pilot holes. Align the components at both ends and add waterproof glue to the joints, if you want to create a rigid structure. See all my Premium Plans in the Shop.
Made from this plan
Large pergola plans
Building a large pergola
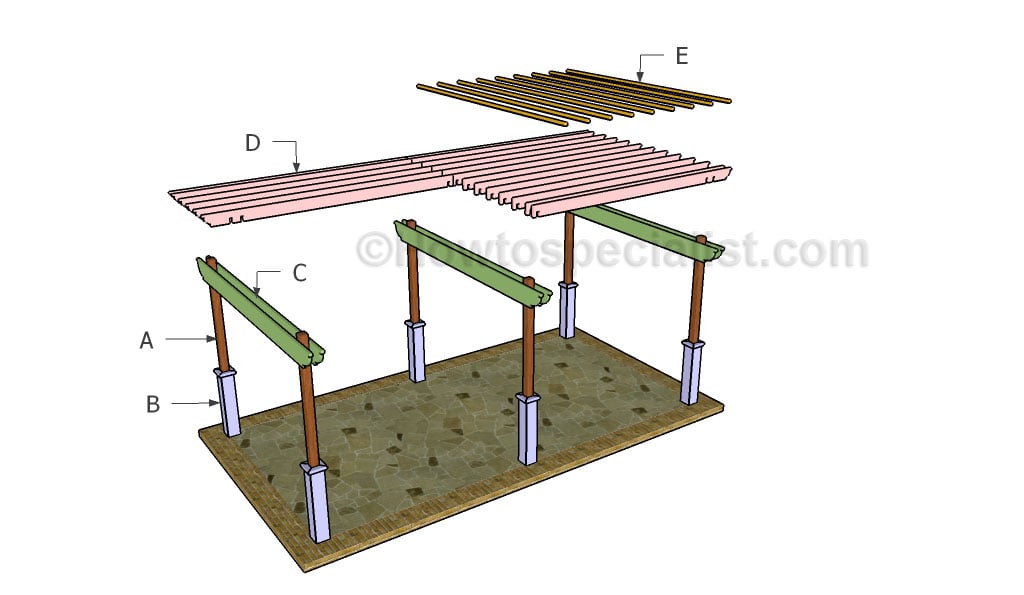
Materials
- A – 6 pieces of 4×4 lumber – 99″ long POSTS
- B – 24 pieces of 2×6 lumber – 36″ long, 24 pieces of 1×3 lumber – 8 1/2″ long TRIMS
- C – 6 pieces of 2×10 lumber – 141″ long SUPPORT BEAMS
- D – 26 pieces of 2×6 lumber – 144″ long RAFTERS
- E – 20 pieces of 2×2 lumber – 132″ long SLATS
- 6 pieces of 4×4 lumber – 10 ft
- 32 pieces of 2×6 lumber – 12 ft
- 20 pieces of 2×2 lumber – 12 ft
- 6 pieces of 2×10 lumber – 12 ft
- 3 pieces of 1×3 lumber – 8 ft
- post to beam connectors
- 6 post anchors
- 1 1/2″ structural screws
- 2 1/2″ screws
- 7″ carriage bolts
- 2″ nails
- glue, wood filler, stain
Tools
- Safety gloves, glasses
- Miter saw, jigsaw
- Chalk line, tape measure, spirit level, carpentry pencil
- Drill machinery and drill bits
Tips
- Use a good miter saw to make the angle cuts
- Drill pilot holes before inserting the screws
Time
- One Week
Related
Building a 12×24 pergola
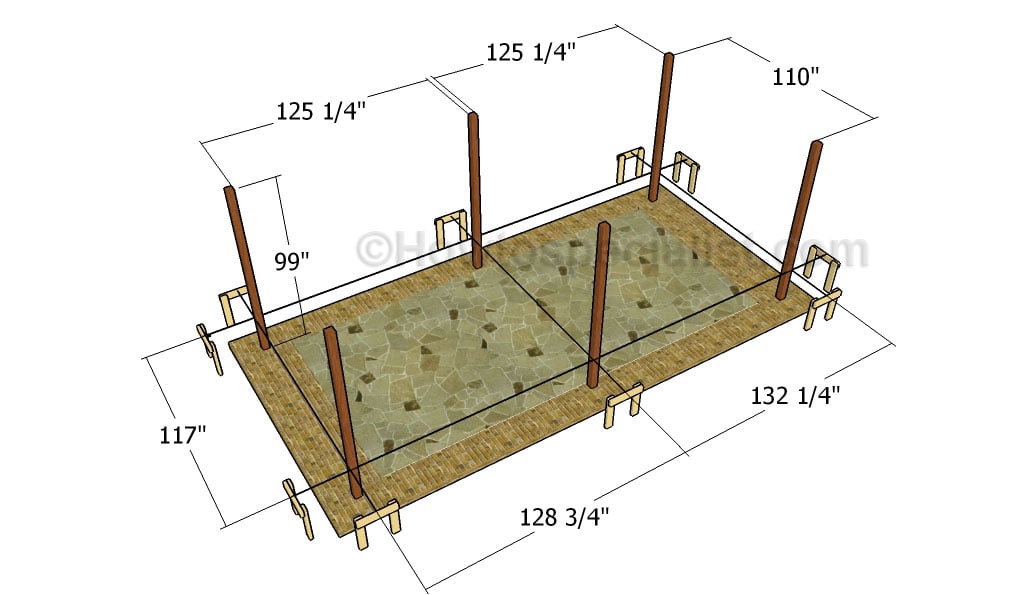
Laying out the large pergola
First of all, lay out the square gazebo in a professional manner. Select the location with attention, making sure the ground is perfectly level. Remove the grass layer and compact a layer of gravel. Use batter boards and string to make sure the posts will be properly placed. Apply the 3-4-5 rule to each corner of the layout in order to check if they are perfectly square. In addition, make sure the diagonals are perfectly equal before setting the posts into place.

Anchoring the post into concrete
After you have dug the holes (2-3′ deep, 12” in diameter) you should decide the anchoring system. If you want to set the post into concrete, the whole structure will gain more rigidity as compared to using adjustable anchors.
Compact 2” of gravel on the bottom of the holes, set the tube forms and pour a 4” layer of concrete. Set the posts into place, plumb them with a spirit level and lock them with two 2×4 braces.
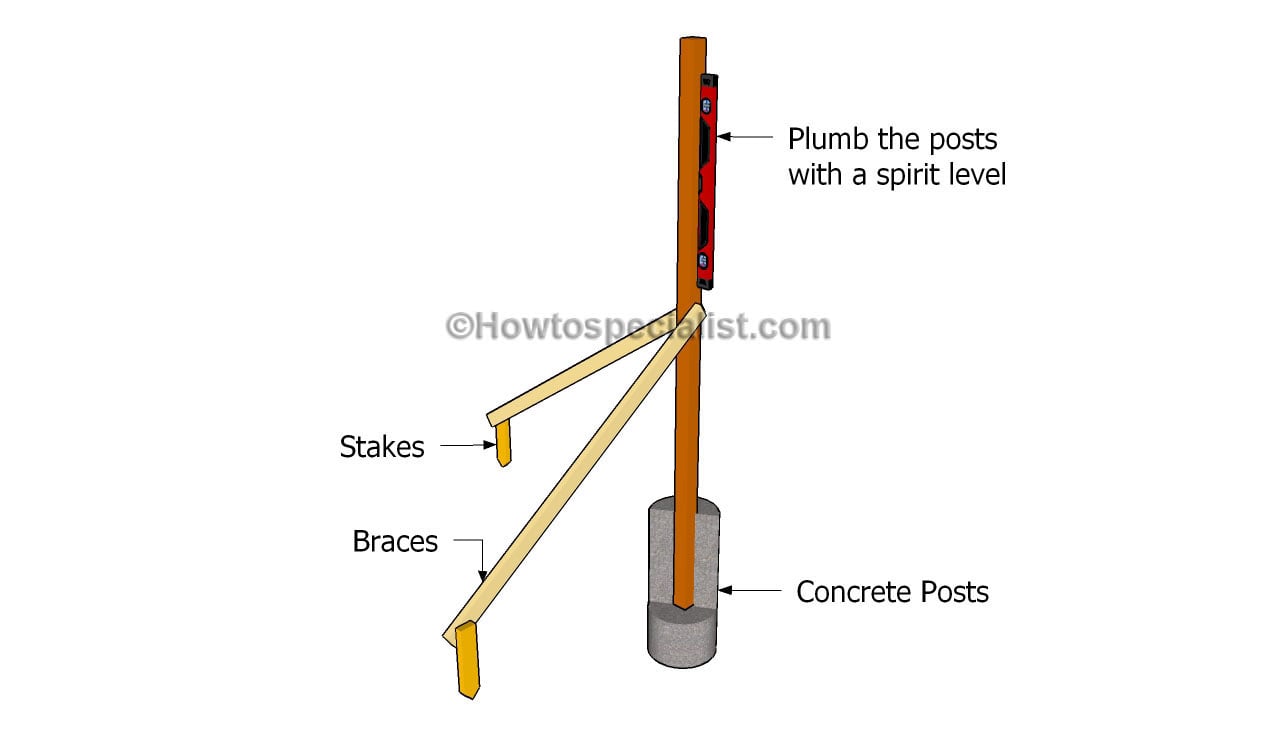
Fitting the posts
Setting the posts in concrete is essential for the rigidity of the square wooden gazebo. As you can easily notice in the diagram, we recommend you to dig 3′ deep holes and to pour 2″ gravel on the bottom. Install the tube forms to the holes. Secure the posts with braces before filling the forms with concrete.
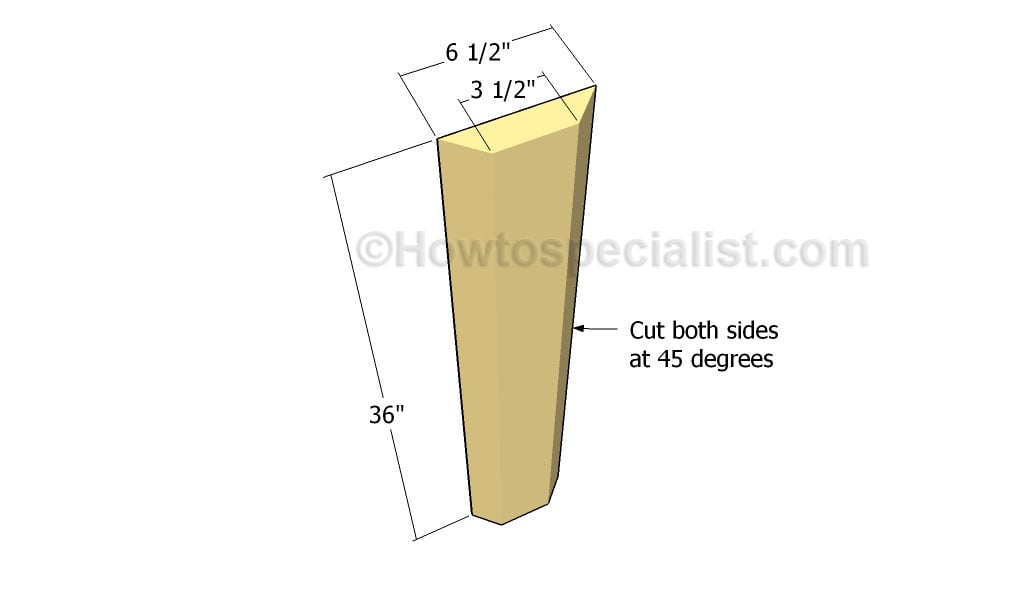
Building the trims
In order to enhance the look of the pergola, we recommend you to install trims to the base of the posts. Use 2×6 lumber to build the trims. Mark the cut lines and cut both side edges at 45 degrees. Smooth the edges with fine-grit sandpaper and remove the residues with a damp cloth.
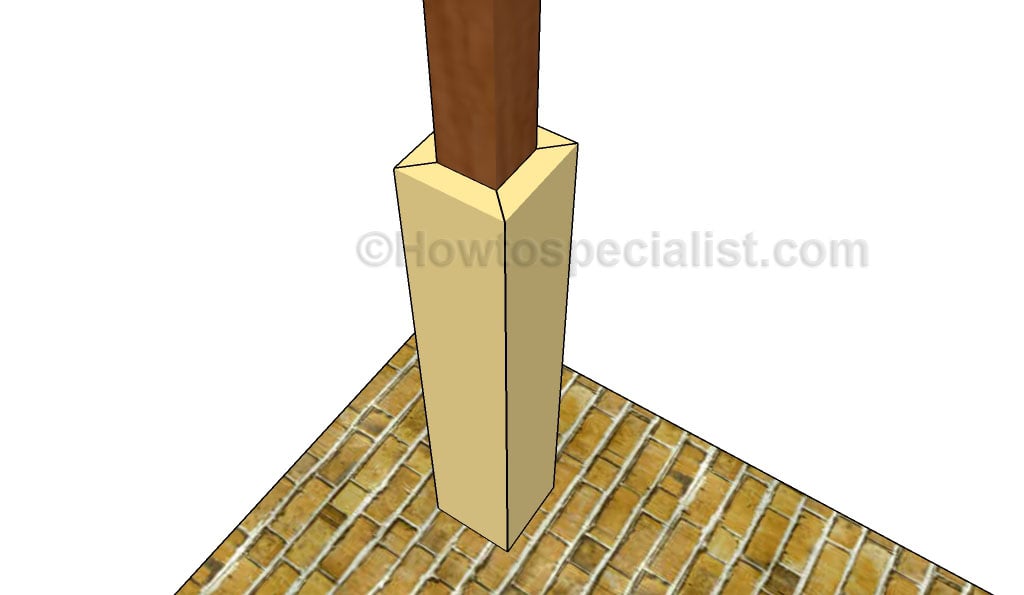
Fitting the bottom trims
Secure the trims to the posts, making sure you align everything with great care and attention. Drill pilot holes and secure the trims into place using 2″ nails. Add glue to enhance the bond of the joints and remove the excess with a damp cloth.
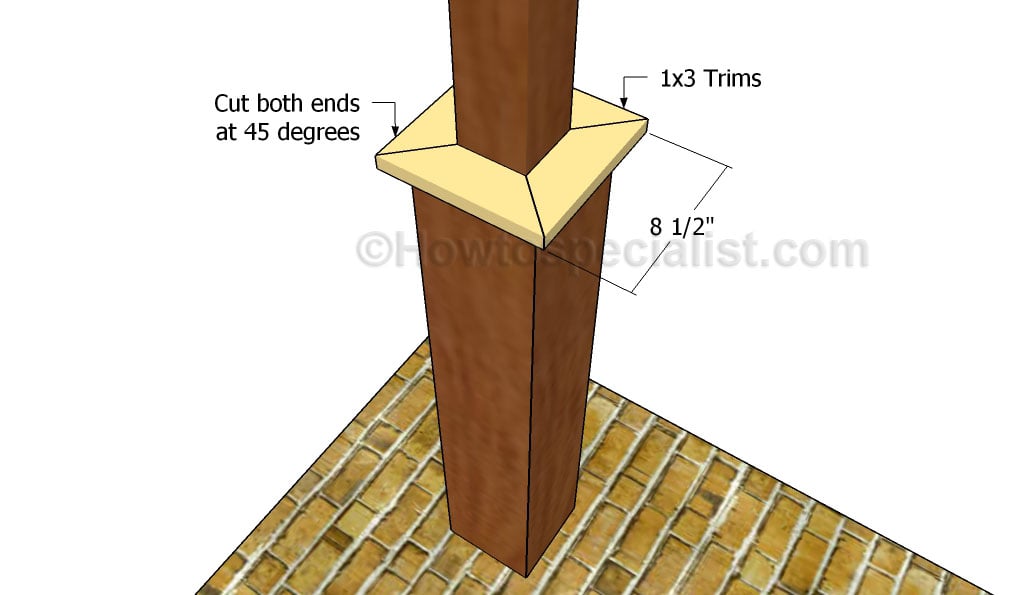
Installing the trims
After fitting the base trims to the posts, you need to install the top trims. Cut the components out of 1×3 lumber and secure them into place using 2″ brad nails. Leave no gaps between the components and make sure the joints are rigid.
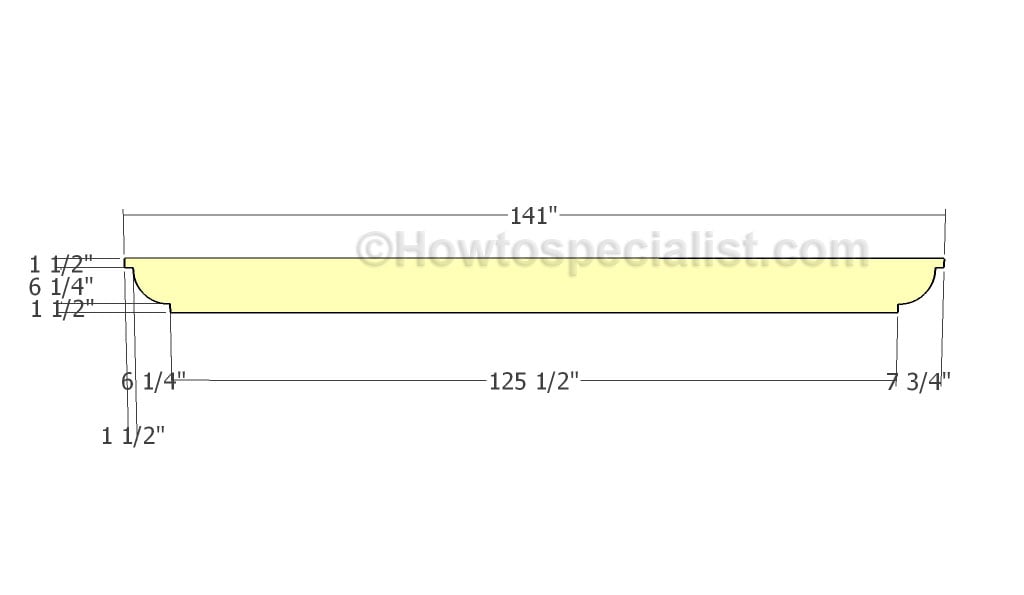
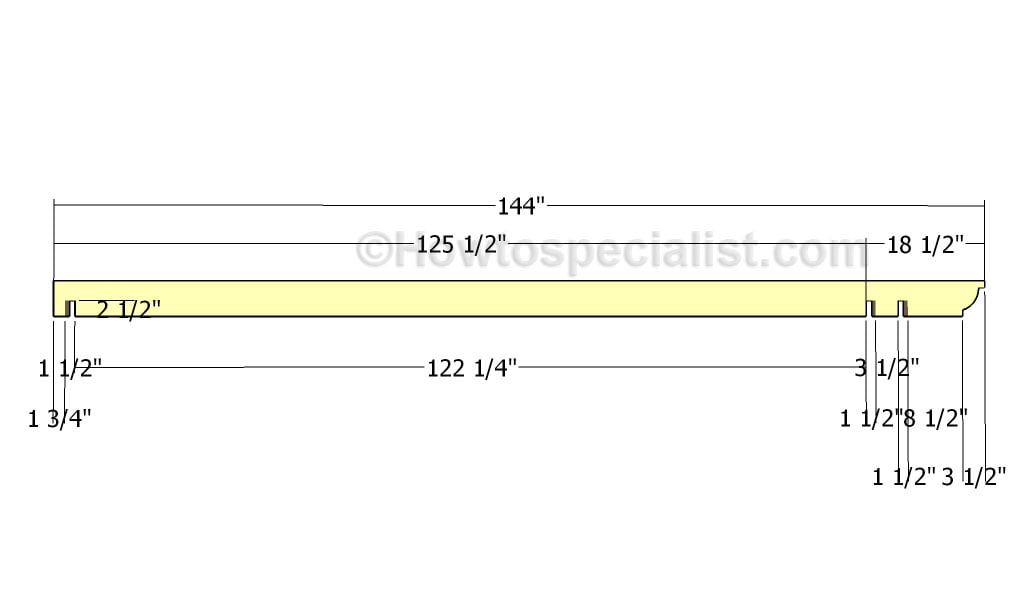
Building the support beams
The next step of the project is to build the support beams of the pergola. In order to get a professional result, we recommend you to build the support beams out of 2×10 lumber. Mark the cut lines at both ends of the beams and get the job done with a jigsaw, in order to make the curved cuts.
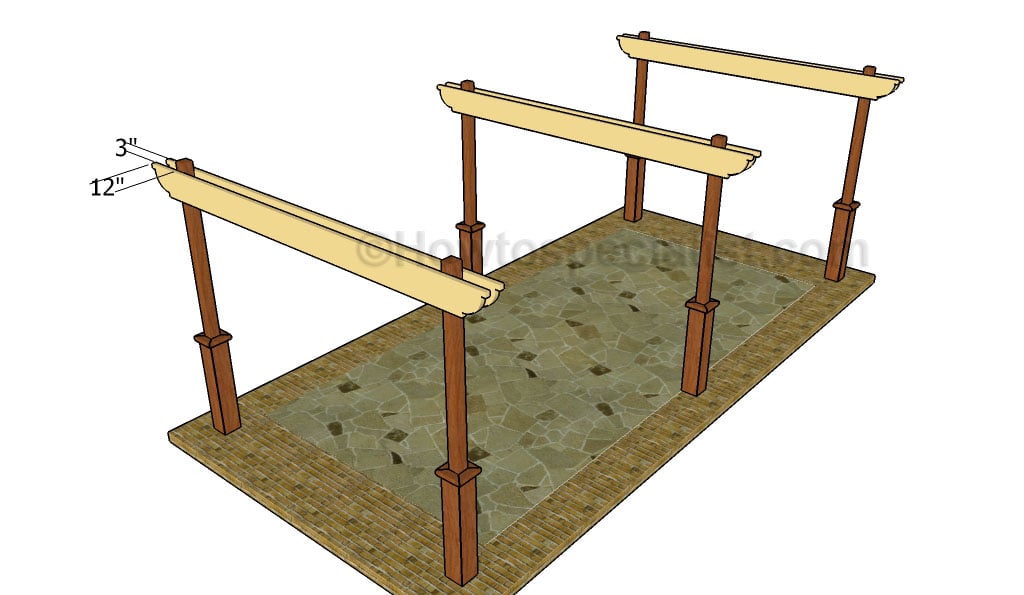
Fitting the support beams
Clamp the support beams to the posts, making sure you leave 3″ to the top of the posts. Use a spirit level to check if the beams are perfectly horizontal. Drill pilot holes through the posts and through the beams, before inserting the 7″ carriage bolts.
Building the rafters
Continue the project by building the rafters for the pergola. Use 2×6 lumber and mark the cut lines on the beams. Use a circular saw to make parallel cuts inside the marked areas and remove the excess with a chisel. Smooth the recess with sandpaper, otherwise the notches won’t be large enough to fit to the support beams.
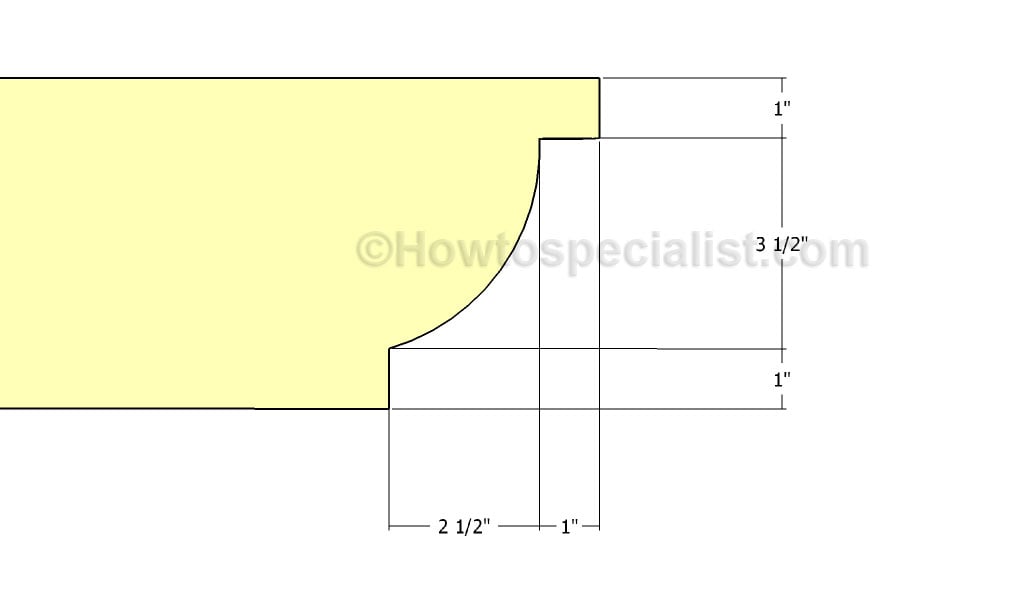
Building the decorative end of the rafters
Follow the information described in the diagram to cut the ends of the rafters in a decorative manner. Smooth the edges with fine-grit sandpaper.
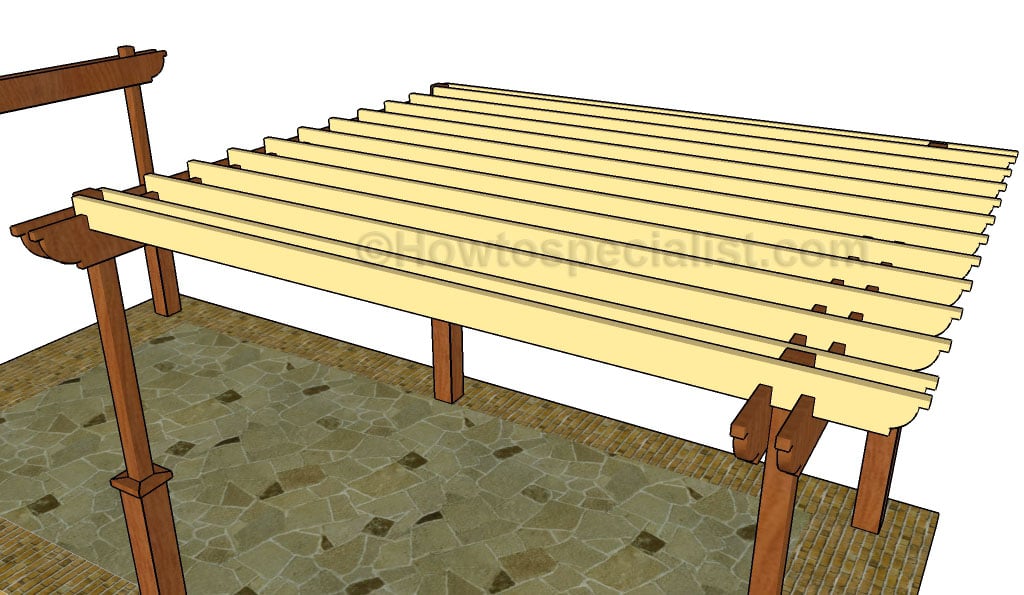
Installing the rafters
Fit the rafters to the support beams. Leave no gaps between the components and make sure the support beams fit inside the notches cut out in the rafters.

Fitting the rafters
Place the rafters equally-spaced, by using the information described in the diagram. Drill pilot holes through the rafters and insert 8″ screws into the support beams. Alternatively, you can use rafter ties and 1 1/2″ structural screws.
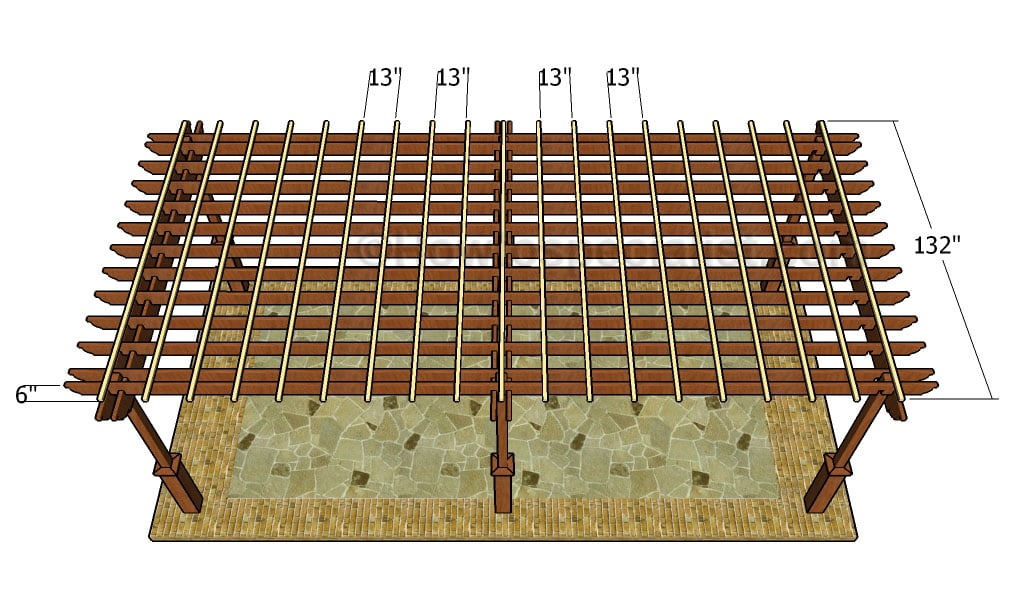
Fitting the top slats
In order to keep the rafters equally-spaced and to enhance the look of the large backyard pergola, we recommend you to install 2×2 slats to the top of the structure. Place the slats equally-spaced and center them to the structure. Drill pilot holes and insert 2 1/2″ screws to secure the slats into place.
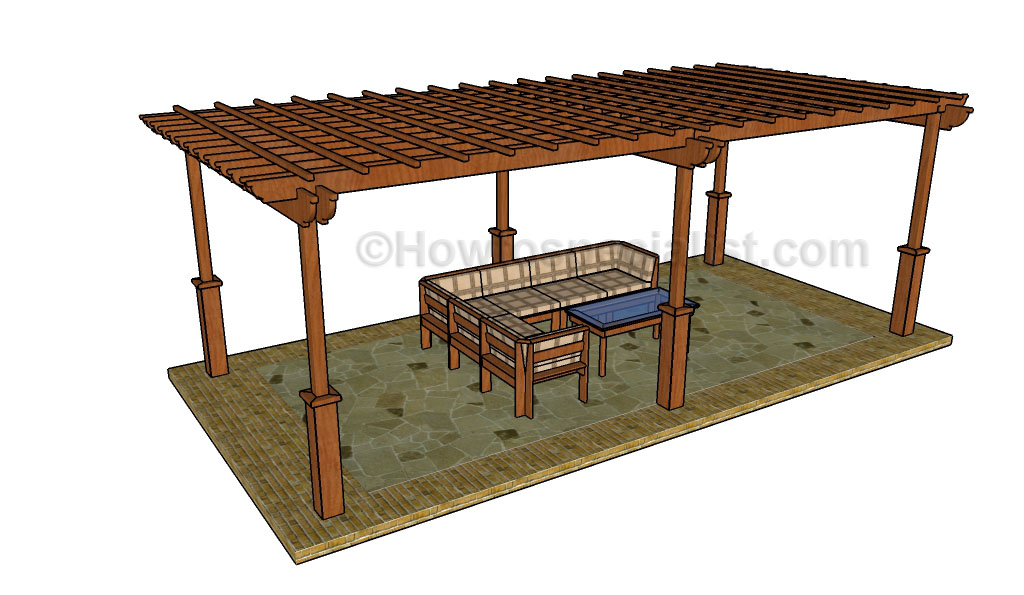
Large pergola plans
Last but not least, we recommend you to take care of the finishing touches. In order to get a professional result, fill the holes and the gaps with wood filler and let it dry out for a few hours. Check if there are protruding screws and fix this issue, if necessary.
Large pergola plans
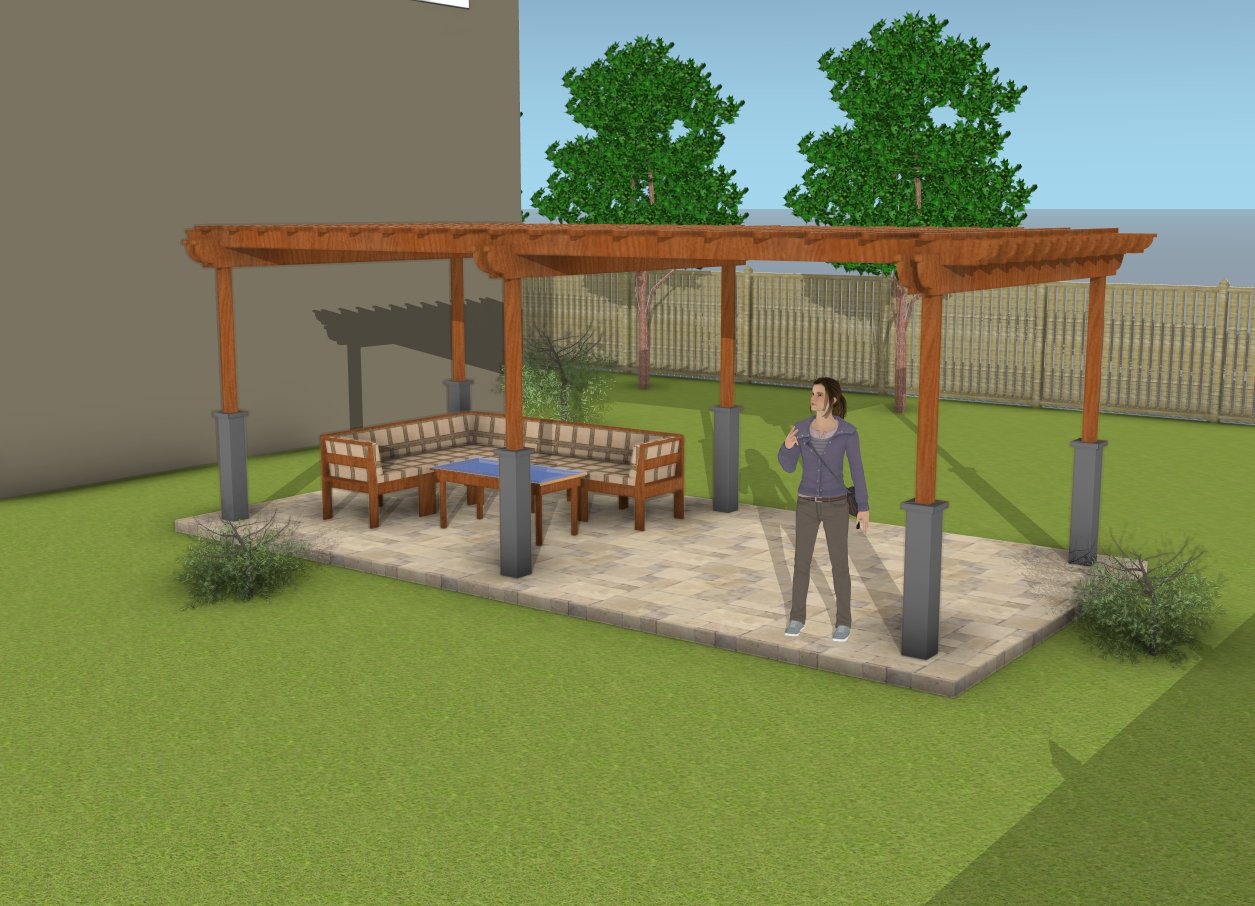
Building a large freestanding pergola out of wood is a fantastic way to make a bold, beautiful statement in your outdoor space! This spacious structure offers plenty of room for hosting gatherings, setting up a dining area, or creating a cozy lounge zone right in your backyard. Made from wood, it brings a natural, warm aesthetic that blends seamlessly with outdoor surroundings and can be customized with finishes or stains to match your style.
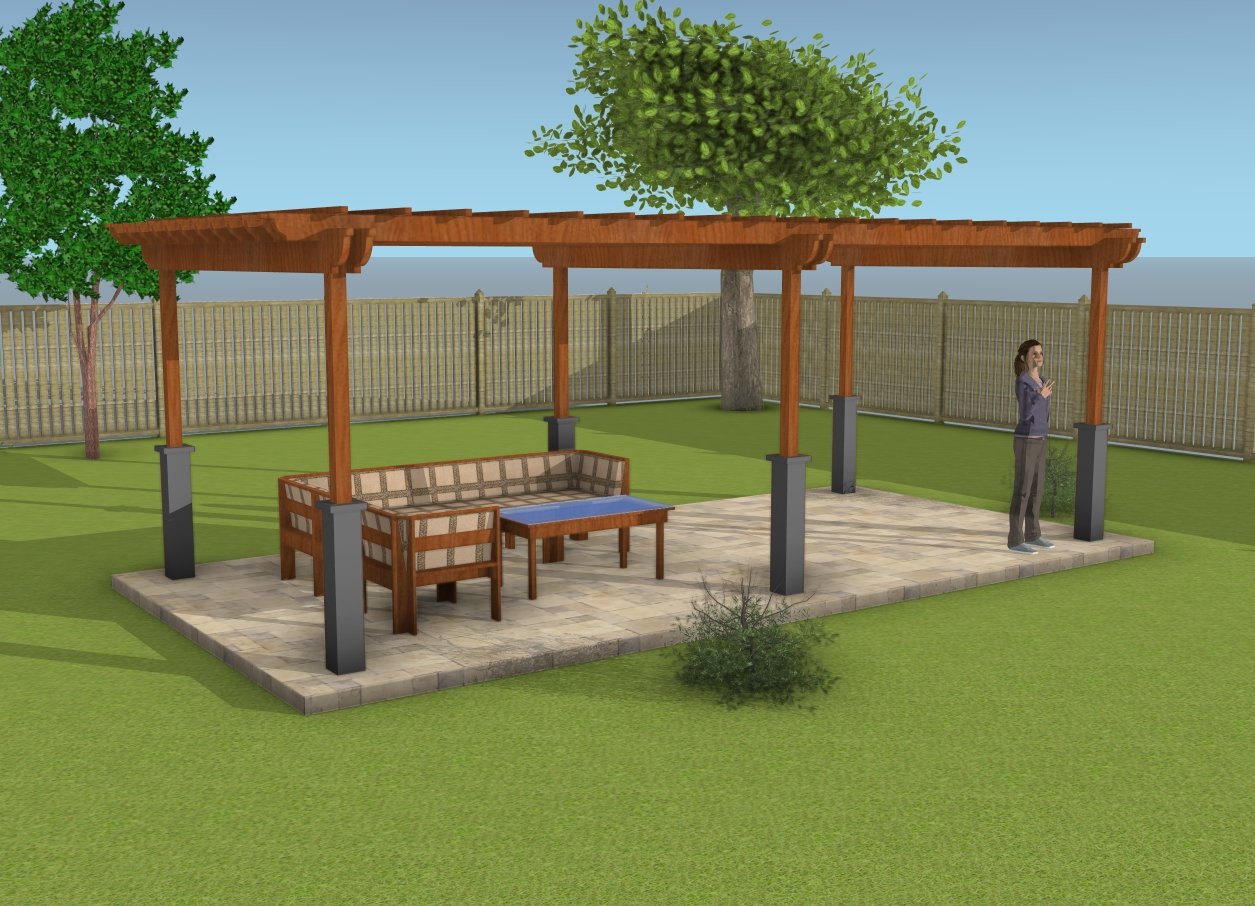
Wooden pergola – free plans
As a freestanding pergola, it provides the flexibility to place it wherever you like, making it an ideal focal point that draws attention and elevates the look of your yard. With the right touches like string lights, climbing plants, or even outdoor curtains, this large wooden pergola becomes an inviting retreat, perfect for enjoying outdoor living to the fullest!

How to build a large pergola
If you want to download the plans, please read the blog FAQs.
Thank you for reading our project about large pergola plans and we recommend you to check out the rest of the projects. Don’t forget to SHARE and LIKE our projects with your friends, by using the social media widgets, if you want to help us keep adding free woodworking plans.
3 comments
Thanks for plans. Have a 12×36 cement porch I want to a a pergola. How far apart should the post be from each other and the from the edge of the cement slab? Any help would be appreciated. Thanks Aragon
I don’t recommend attaching the posts to a concrete slab. You need footings that go under the frost line. You need a custom plans for your project so I can’t tell you numbers.
Love the plans, I’m working my way through building this right now, although the boxes at the bottom of each post require lumber that are 2×8’s and not 2×6’s. Further down in the plans you show how to cut to dimension and it has a width of 6 1/2 inches across which just isn’t possible with a 2×6. Thankfully I did a dry fit with a scrap piece of 2×6 to notice that it wouldn’t work. Other than that, this is a really nice design, thanks.