This article is about outdoor kitchen plans and design ideas. You might ask yourself why to invest money in an outdoor kitchen, if you already have one inside your house. We have built many outdoor kitchens, both with a traditional and modern designs, and we can say loudly that they are a good investment, especially if your family likes to spend their time in the backyard. In addition, we are strong supporter of brick pizza ovens, therefore we cannot conceive an outdoor kitchen without such a feature. Building the backyard kitchen is not easy but on the other hand neither difficult, if you know from the beginning what you want and plan in detail all the steps.
Generally speaking, you can choose from several designs, when planning your outdoor kitchen. On one hand, you can choose the build a traditional kitchen with stone contertops, a brick pizza oven and a cooking stove, or on the other hand you can design a island kitchen. In addition, you can build your backyard kitchen using concrete blocks, stone and bricks or you can purchase a mobile model, which can be stored in your garage and used when necessary.
You should take into consideration if building a roof is useful or not. In some cases, if you intend to use the outdoor kitchen regularly, the roof will protect you from the rain, while cooking. On the other hand, especially if you want to buy a mobile grill, the roof might be an expensive investment which won’t pay off eventually.
If you want an outdoor kitchen with a functional design, then you should install cabinets. On one hand, you can build a storage space under the counter-tops and add wooden shelves, or you could just buy cabinets made of wood resistant against water, moisture and heat. In addition, you should plan a space to keep your dishes and your cooking utensils. In order to build the storage space under the countertop, you could use concrete blocks or metal studs and drywall boards. The concrete blocks are more durable, while the drywall boards do not resist against water therefore you have to build a roof.
When preparing wood, the main priority should be your health. Subsequently, the countertop and the cabinets should be clean and proper to keep and prepare your food on them. Basically, that is the whole point of building an outdoor kitchen: to spend time with your family and friends in a nice environment, while cooking a great meal for them. Make sure you design a space for a small refrigerator, otherwise you will have issues with storing the meat in sanitary conditions. When laying the foundation of the pizza oven, you have to make sure the corners are right-angled, by using the well-known 3-4-5 rule. In addition measure the diagonals of each rectangle and make sure they are even.
Made from this plan
In order to plan and design an outdoor kitchen, you need the following:
Materials
- Concrete blocks, Concrete
- Rebars, Construction wire
- Wood forms, Bricks and fire bricks
- Refractory cement and fire clay
Tools
- Concrete mixer
- Margin trowel
- Construction bucket
- Safety gloves and glasses
Tips
- Choose the design of your outdoor kitchen according to your needs and tastes
- Plan thoroughly your outdoor kitchen, before purchasing the materials
Time
- Several weeks, according to the complexity of your design plans
My best tips on building an outdoor kitchen:
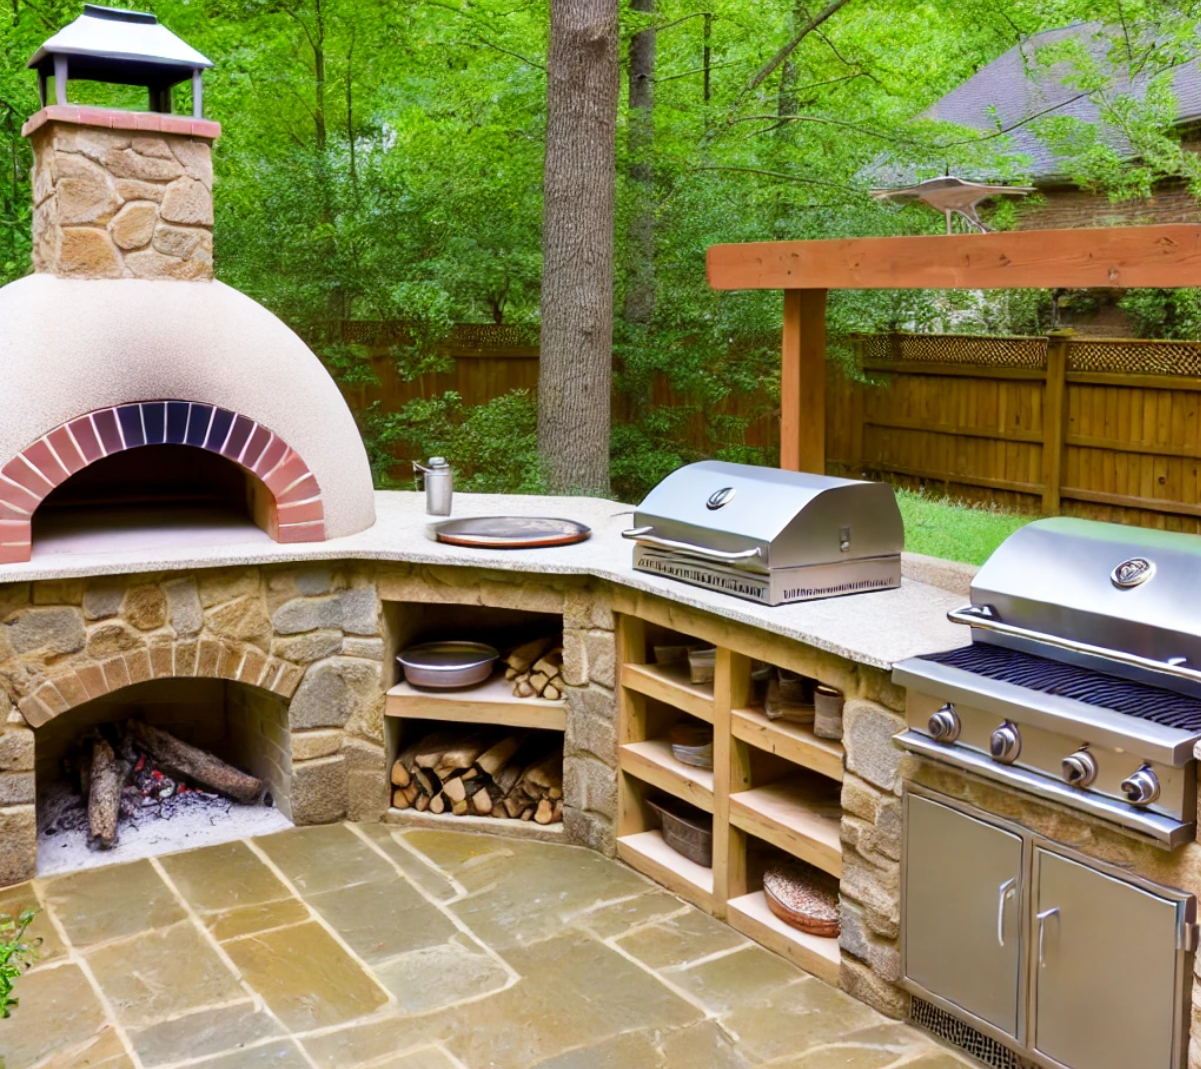
Building an outdoor kitchen is a great way to extend your living space and create an area for cooking and entertaining. Adding a pizza oven dome, an outdoor stove, a stone countertop, and underneath storage can make your outdoor kitchen both functional and stunning. Here are my best tips for building a custom outdoor kitchen that will be the centerpiece of your backyard.
1. Plan Your Layout
Start by planning the layout of your outdoor kitchen, taking into account your space and needs:
- Location: Choose a spot close to your house for easy access to utilities, like water and electricity. Make sure there’s good ventilation for the stove and pizza oven.
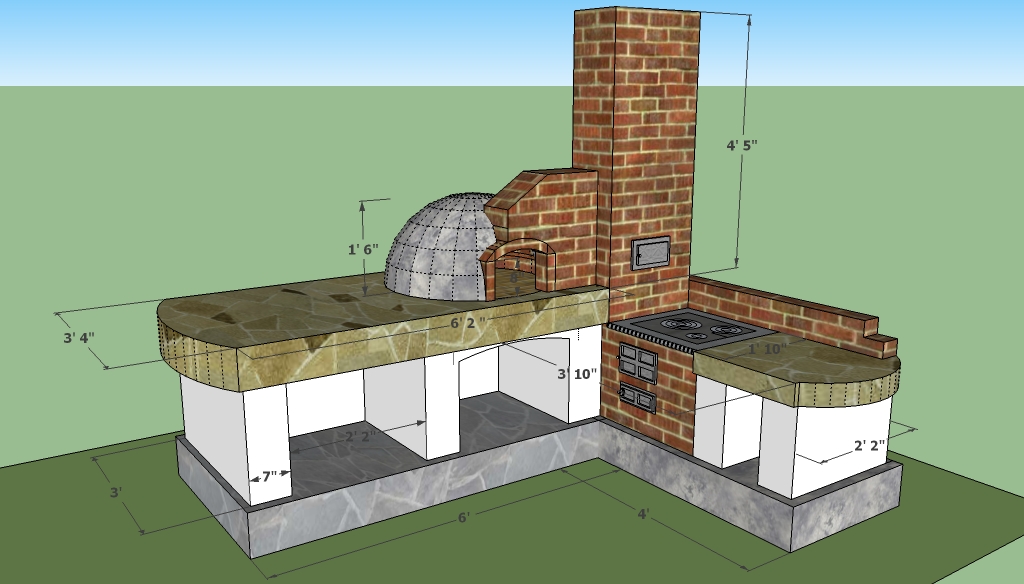
- Size: Consider the size of your cooking area, seating space, and prep area. A typical outdoor kitchen has at least 10-12 feet of countertop space.
- Zoning: Plan your kitchen with three main zones: the cooking zone (stove and pizza oven), the prep zone (countertop), and the storage zone (underneath).
Map out where each component will go to ensure a functional and efficient layout.
2. Build the Base Structure
The base structure will support your pizza oven, stove, countertop, and storage:
- Material: Use concrete blocks or bricks for a sturdy and durable base. These materials are weather-resistant and provide the necessary support for heavy elements like a pizza oven and stone countertop.
- Foundation: If your outdoor kitchen will be a permanent structure, start with a solid concrete foundation. This prevents shifting or settling over time.
- Height: Build the base to a standard countertop height of 36 inches for comfort when cooking and preparing food.
Make sure the base is level and securely built before moving on to the next steps.
3. Install the Pizza Oven Dome
The pizza oven is often the star of the outdoor kitchen, providing a unique cooking experience:
- Dome style: Opt for a semi-cylindrical or rounded dome made from fire bricks. This shape allows heat to circulate evenly, making it ideal for wood-fired pizzas and other dishes.
- Build the dome: Lay fire bricks in a circular shape, using heat-resistant mortar to secure them. Start at the base and work your way up, angling the bricks inward as you go.
- Chimney: Install a chimney flue at the top of the dome to vent smoke and improve airflow. Make sure it’s positioned to allow proper draft.
- Cure the oven: Once the dome is built, allow it to cure for several days, slowly building small fires to help dry the mortar and prevent cracks.
The pizza oven dome should be centered in your cooking zone for easy access.
4. Add an Outdoor Stove
An outdoor stove adds versatility to your kitchen, allowing you to cook more than just pizzas:
- Choose the right stove: Opt for a propane, natural gas, or wood-burning stove, depending on your preference. A built-in stove with multiple burners offers maximum functionality.
- Install safely: Ensure the stove is installed on a heat-resistant surface, with adequate clearance from other structures for ventilation and safety.
- Utility connections: If using a gas stove, plan for a safe and secure gas line connection. Make sure the line is installed by a licensed professional to meet safety codes.
Position the stove near the prep area for convenience when cooking.

5. Construct the Stone Countertop
A stone countertop adds both beauty and durability to your outdoor kitchen:
- Material choice: Use granite, marble, or concrete for the countertop. These materials are weather-resistant, heat-resistant, and easy to maintain.
- Measure and cut: Measure your countertop area carefully, allowing enough overhang for a comfortable prep space. Have the stone cut to size, or use pre-cut slabs if available.
- Install the countertop: Secure the stone to the base using adhesive mortar or construction adhesive. Ensure the countertop is level and aligned with the stove and pizza oven.
- Seal the stone: Apply a stone sealant to protect the surface from stains, water damage, and outdoor weather conditions.
A well-installed stone countertop provides ample space for meal prep and serving.
6. Incorporate Underneath Storage
Adding storage beneath the countertop keeps your cooking tools and ingredients organized:
- Shelving or cabinets: Build shelves or install weather-resistant cabinets under the countertop. Use treated wood or metal for the storage units, as these materials hold up well outdoors.
- Doors and drawers: Install cabinet doors or drawers to keep items protected from the elements. Choose stainless steel or weather-resistant materials for durability.
- Organization: Incorporate pull-out drawers for utensils, racks for pots and pans, and a designated area for storing firewood if you have a wood-burning pizza oven.
Underneath storage makes your outdoor kitchen more functional and organized, helping you keep everything within easy reach.
7. Add Finishing Touches
Complete your outdoor kitchen with the finishing touches that enhance both style and function:
- Lighting: Install outdoor-rated lighting above the cooking area and around the prep zones. Use LED strip lights or outdoor sconces for a cozy atmosphere.
- Seating: Add a bar counter with stools or nearby seating to create a social area where guests can gather while you cook.
- Shelter: Consider building a pergola or roof over your outdoor kitchen to provide shade and protect the cooking area from rain.
Finishing touches help transform your outdoor kitchen into a comfortable and stylish gathering place.
Bonus Tip: Add a Sink for Easy Cleanup If you have access to plumbing, consider adding a sink to your outdoor kitchen. It makes washing up and prepping food much easier, keeping you from running back and forth inside.
Outdoor kitchen foundation plans
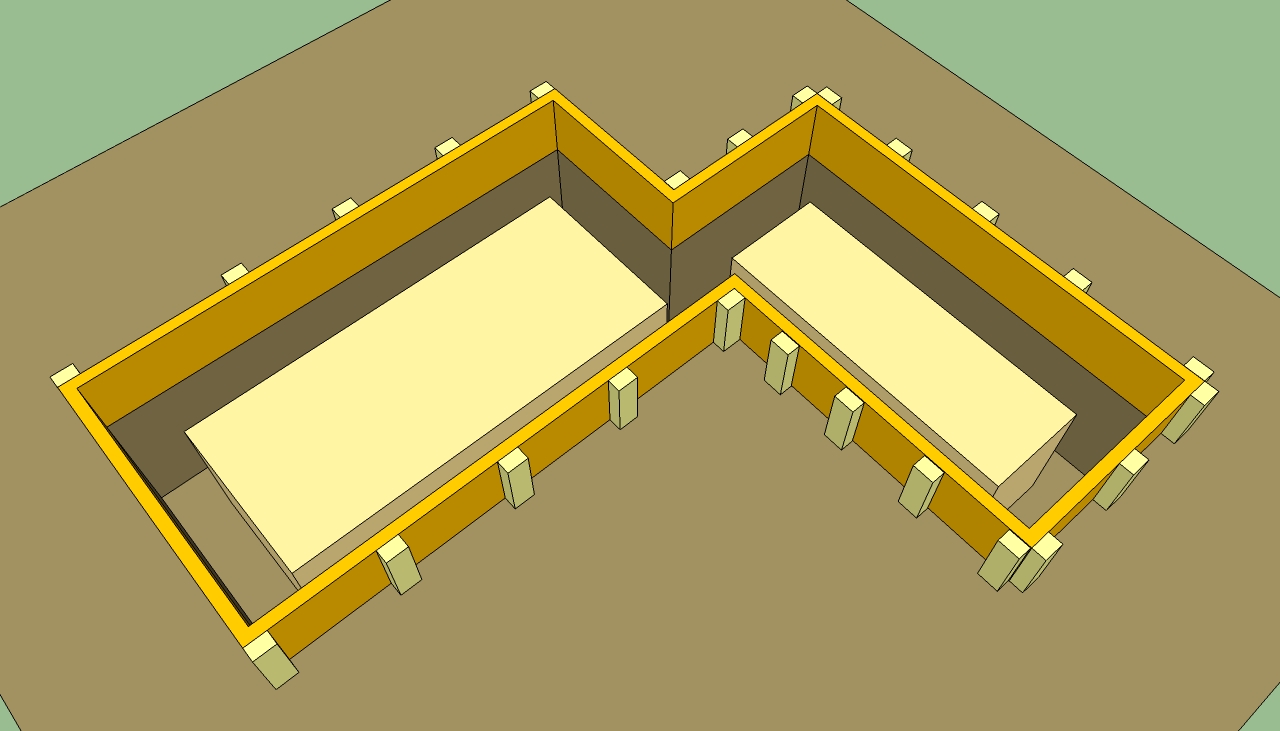
Step 1: Lay the foundation of your outdoor kitchen. In order to get a proper layout, you have to use wire and several wooden stakes.
Step 2: Dig the foundation. The depth of the foundation varies according to the soil structure, but in most of the cases 2′ deep footing will do a great job for your outdoor kitchen. Make sure you deposit the ground far enough from the site, otherwise it might slip into the trenches.
Step 3: Build and install the formwork. You have to use wooden boards, several 2×4 and nails stakes to build your form. Next, install the form along the trenches, Making sure they are secured properly
Step 4: Use a level to make sure the form is horizontal on all sides. This aspect is essential, otherwise you won’t be able to pour the concrete foundation properly. Check again if the foundation trenches are straight and have a constant depth.
Step 5: Install the reinforcing structure. If you designed an outdoor kitchen with concrete clock base and a stone countertop, then you have to reinforce the foundation to support the weight. You might have to consult a qualified engineer, as the reinforcing structure varies according to the soil and according to the weight it has to support. Tie the reinforcing bars with construction wire and place then inside the foundation trenches. Use a level to make sure the whole structure is perfectly level.
Step 6: Pour the concrete foundation. You can mix the concrete by yourself, using a concrete mixer and transport in with a wheelbarrow, or you can get it from your local concrete company. As it is a small quantity, it might be cheaper to mix it by yourself.
Step 7: Remove the form. Leave the concrete foundation to dry for several days before removing the formwork. If you have fastened the wooden boards with screws rather than nails, the job would be easier.
Outdoor kitchen plans free
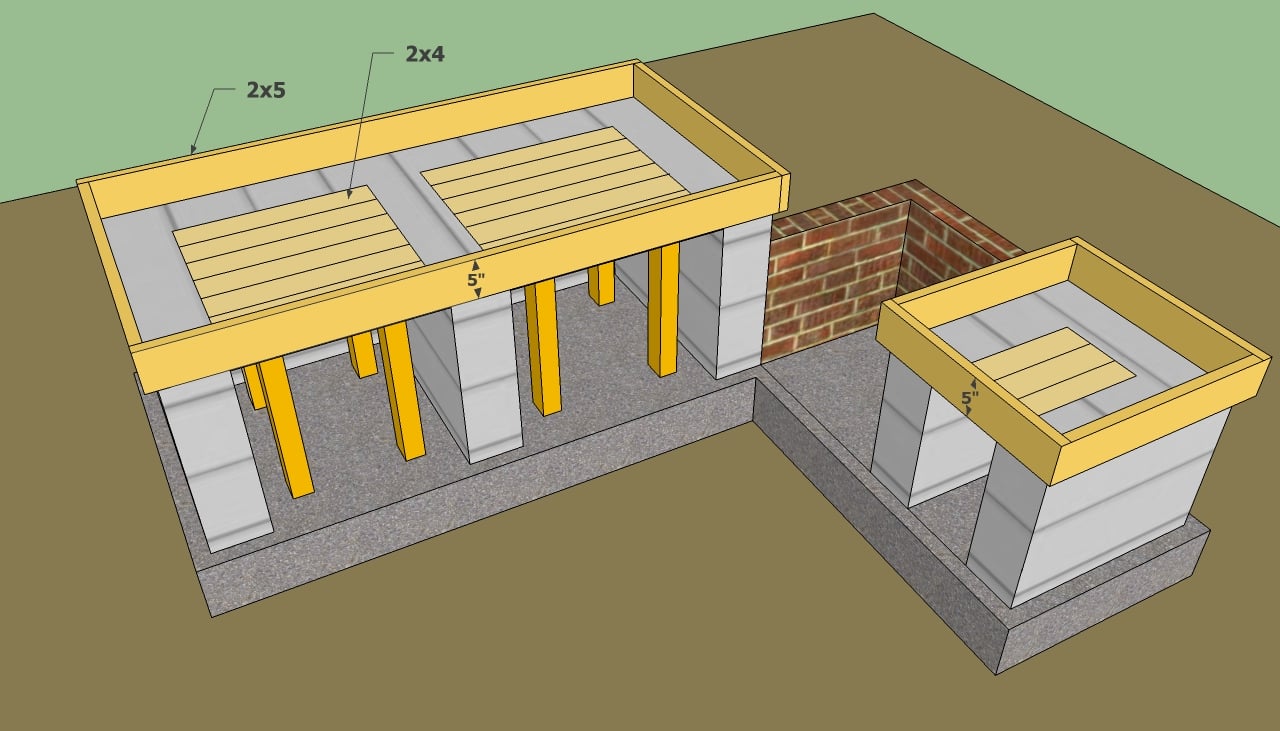
Step 1: Build the base of the outdoor kitchen. We usually use concrete blocks to create the base of the kitchen, but you can choose other materials as well (drywall, stone).
Step 2: Build the cooking stove. Use bricks and fire bricks to build the walls, as the concrete blocks won’t resist the heat developed by the burning woods. If you don’t need the stove, you can build a cabinet in its place.
Step 3: Build the form for the counter-top. Use 2×4 wooden boards and install a basic form, supported by 4×4 posts. Next install the side 2×5 wooden boards and secure them with screws. Use a level to make sure form is horizontal.
Step 4: Install a plastic foil over the 2×4 boards, as to prevent the concrete from slipping through the boards.
Step 5: Build the reinforcing structure for the concrete countertop. If you want to build a concrete countertop, you have to install a reinforcing structure as you can see in the image. You should notice the rabars are placed every 4”.
Tile the rebars with construction wire and place spacers under the reinforcing structures as to rise it around 2”, on the whole surface. Use safety gloves as to protect your skin.
Step 6: Pour concrete in the form. Taking into consideration you need a relatively small volume of concrete, we recommend you to mix it with a power mixer. Then level the concrete contertop with a straight edge along the side wooden boards.
Step 7: Install stone or granite on the concrete counter-top. The possibilities of decorating the counter-top are unlimited, so it all depends on your tastes and budget.
Step 8: Build the brick pizza oven. As we have already said, building a brick oven is a good idea, especially if you like the taste of home made pizza and bread. In addition, the cost of a brick oven shouldn’t be greater than 200 dollars, if you do it by yourself.
Step 9: Build the chimney for the pizza oven and for the cooking stove. You could decrease costs by laying the bricks on stretcher.
You might think that we haven’t actually built an outdoor kitchen with a traditional design. On the contrary, most of our project were about outdoor kitchens with a brick pizza oven and with a wood-fired cooking stove.
Strange as it might seem, these plans were more successful as compared to outdoor kitchens with a modern design. Maybe a traditional design encompasses the essence of an outdoor kitchen or maybe more and more people appreciate the ancient values and lifestyle.
By following these steps, you’ll be able to build a fully functional and stylish outdoor kitchen, complete with a pizza oven dome, stove, stone countertop, and storage. With careful planning and attention to detail, your outdoor kitchen will become a favorite spot for cooking and entertaining.
Thank you for reading our article about outdoor kitchen design and free plans. We recommend you to check out the rest of our projects and don’t forget to share our articles with your friends, by using the social media widgets.
Related projects:
How to build an outdoor pizza oven
How to build an outdoor kitchen


