This step by step woodworking project is about how to build a 8×16 pavilion – diy plans. Today, I’m super excited to share my plans for an 8×16 lean-to pavilion. This project is perfect for creating a cozy outdoor space, whether you want a spot to relax, entertain, or just enjoy the fresh air. We’ll go through the steps together, making sure it’s sturdy, stylish, and ready for anything. So grab your tools, and let’s get building! This structure is heavy duty, but please follow the building codes and make modifications, if necessary. See all my the gazebo plans HERE.
We recommend you to invest in the best materials you could afford. Therefore, you should buy weather-resistant lumber, such as pressure-treated lumber, cedar or redwood. If you use regular pine, I recommend you to apply the appropriate products to enhance its durability. Always take accurate measurements before adjusting the size of the components at the proper size. Drill pilot holes trough the components before inserting the wood screws, to prevent the wood from splitting. See all my Premium Plans HERE.
Made from this plan
8×16 Lean to Gazebo – DIY Plans
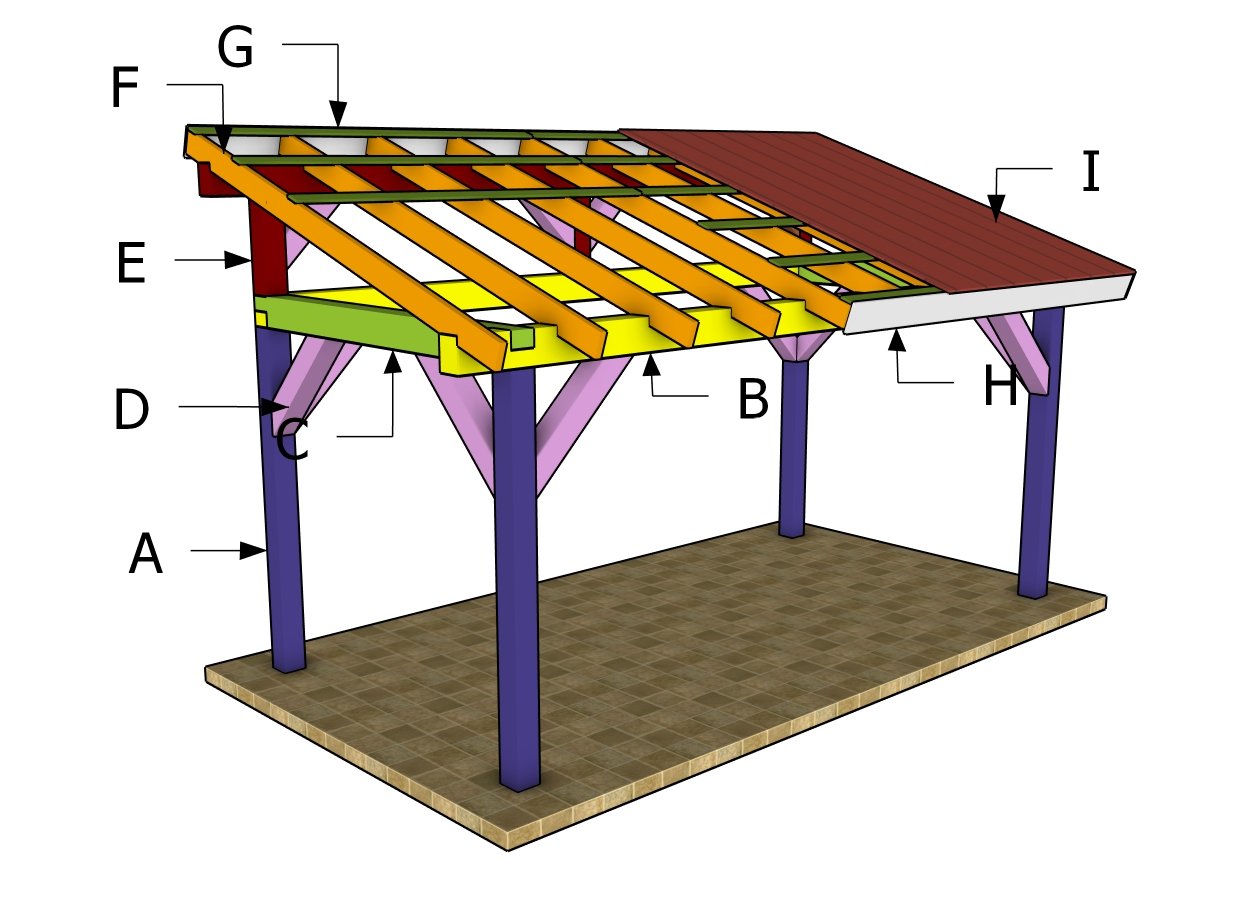
Building a 8×16 lean to pavilion
Materials
A – Posts – 6×6 lumber 7 ft – 4 pieces
B – Side plate – 6×8 lumber 16 ft – 1 piece
B – Side plate – 6×8 lumber 18 ft – 1 piece
C – Top plates – 6×8 lumber 8 ft – 2 pieces
D – Braces – 6×6 lumber 36″ – 8 pieces
D – Braces – 6×6 lumber 24″ – 4 pieces
E – Supports – 6×6 lumber 22 7/8″ – 3 pieces
E – Ridge Beam – 6×6 lumber 18 ft – 1 pieces
F – Rafters – 2×6 lumber 118 1/2″ – 10 pieces
G – Purlins – 1×4 lumber 10 ft – 6 pieces
G – Purlins – 1×4 lumber 8 ft – 6 pieces
H – Trims – 1×4 lumber 10 ft – 4 pieces
H – Trims – 1×4 lumber 8 ft – 2 pieces
*Buy Premium Plans for Cut and Shopping Lists
Tools
- Safety gloves, glasses
- Miter saw, jigsaw
- Chalk line, tape measure, spirit level, carpentry pencil
- Drill machinery and drill bits
Time
- One Week
How to build a 8×16 pavilion – PDF Download
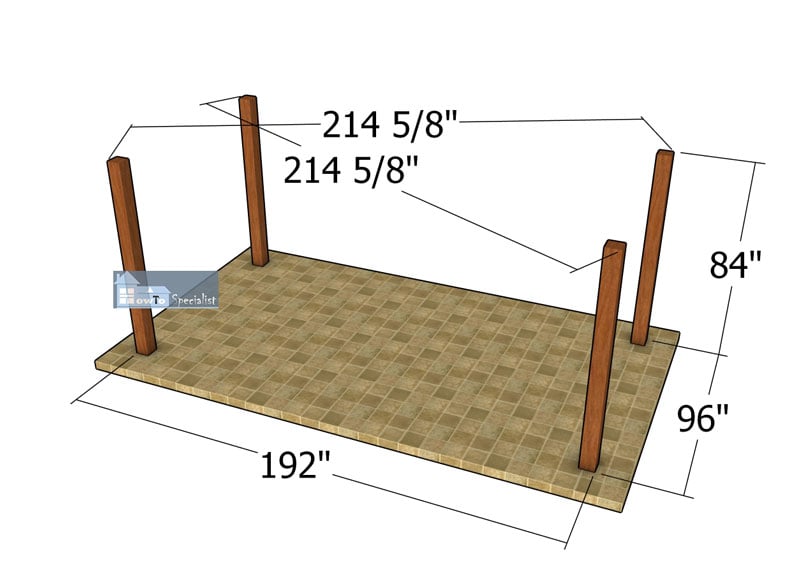
Post-layout—8×16-pavilion
For this 8×16 lean-to pavilion, we’ll need some pressure-treated lumber, concrete for the footings, and all the necessary hardware like screws and bolts. Having everything ready to go will make the process smoother and more enjoyable. Once we’ve got our supplies, we can jump right into setting the posts.
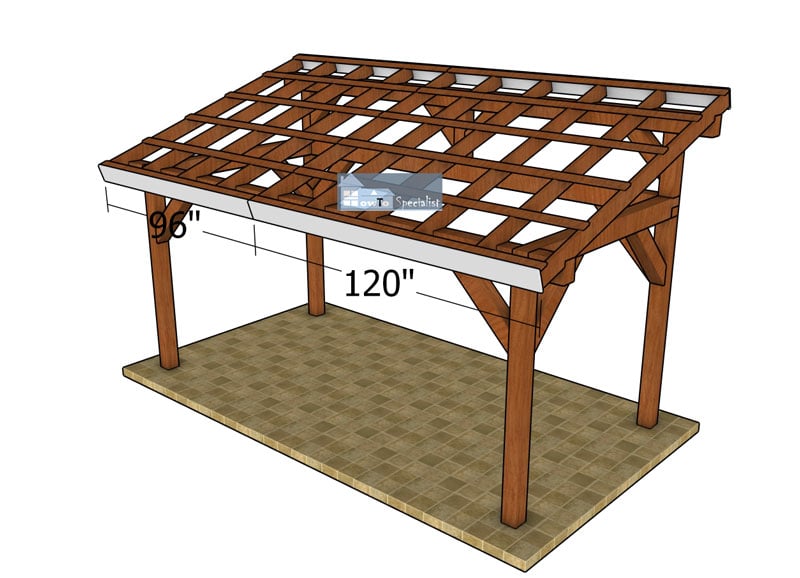
Now let’s get those posts laid out! Start by marking the corners of your 8×16 rectangle with stakes and string, making sure everything is nice and square. Measure 8 feet along one side and 16 feet along the other, using a tape measure to double-check your distances. Once you’ve got your rectangle marked out, dig your post holes about 3 feet deep to give your pavilion a solid foundation (or as in your local codes). Set the anchors in the concrete, ensuring they’re plumb and level. Now we’ve got a strong base to build on!
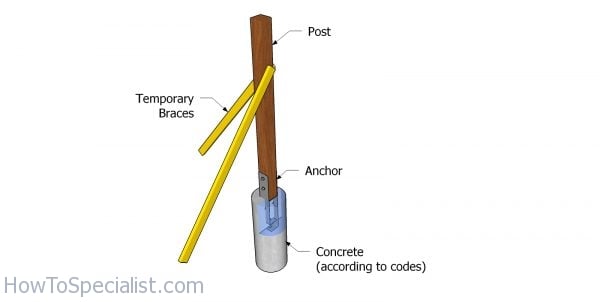
Setting the posts
After installing the posts you need to check the tops are aligned one with another. Use a laser level / water level to mark the horizontal line to the top of the posts. Use a circular saw to make the cuts if necessarily. In addition, you can adjust the height of the posts to suit your needs. Therefore, you can cut 1 ft from the 8 ft posts without any consequences; it is just a matter of taste if you want to have the clearance shorter.
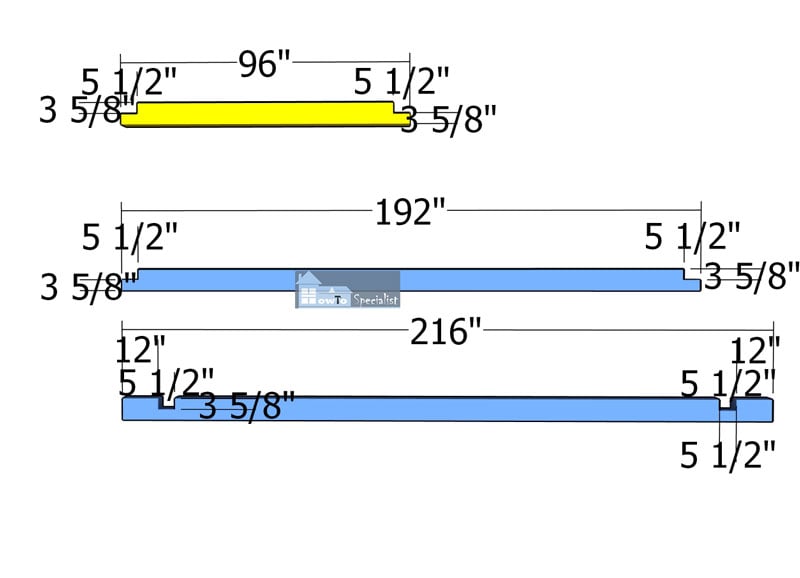
Top-plates—cut-details
We’re going to use 6×8 lumber for the top plates because it provides excellent strength and stability for our pavilion. This size ensures that the structure can handle the weight of the roof and any additional loads, like snow or wind. Plus, the wider surface gives us more area to securely attach the rafters, making the entire build more robust. Using 6x8s might be a bit more work upfront, but it’s totally worth it for the long-term durability and safety of our pavilion.
Making half-lap joints for the top plates is a great way to ensure a strong, stable connection. Start by measuring and marking where the top plates will intersect, then cut halfway through the thickness of the lumber at these marks. Clean out the wood between the cuts with a chisel to create a flat notch, and repeat this on the intersecting plate so they fit snugly together. Apply wood glue, fit the joints together, and secure them with clamps and a few screws or bolts for extra strength. This method ensures a solid, stable connection for the top plates.
Side-top-plates
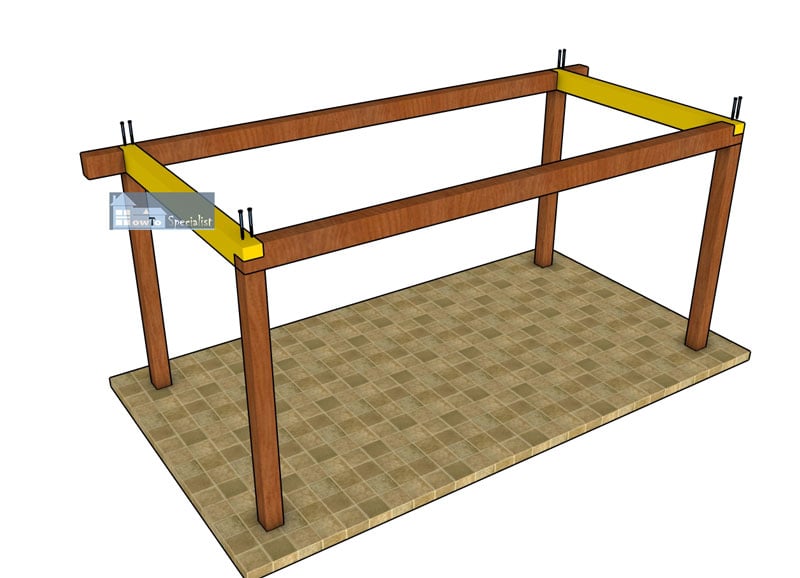
Lift the top plates onto the posts and align them with the edges. Drill pilot holes through the top plates into the posts, then secure them with 8″ heavy-duty screws. For extra stability, you could attach metal post-to-beam connectors at each intersection. Finally, check that everything is level and square before tightening all the fasteners completely.
Fitting-the-crossbeams
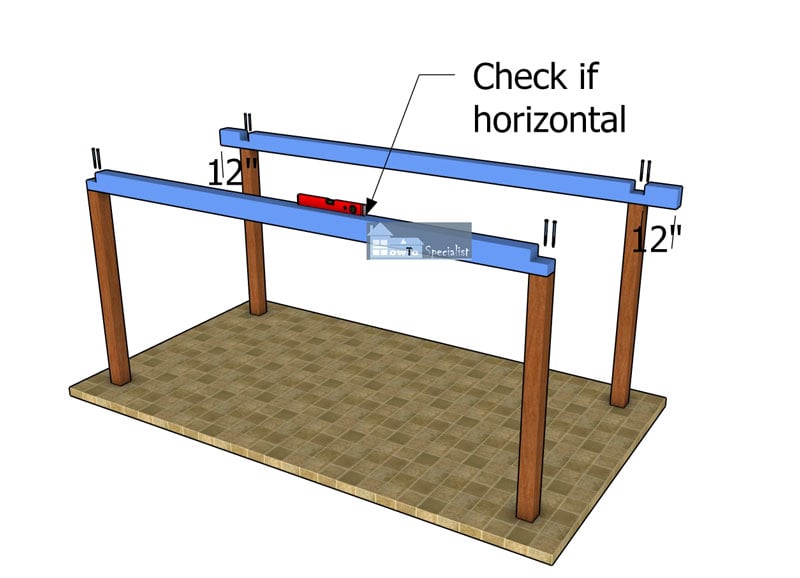
Fit the side top beams to the top of the pavilion. Drill pilot holes and insert 8″ screws, to assemble everything together tightly. Use a spirit level to make sure the plates are horizontal. Use a carpentry square to make sure the corners are right angled, as well.
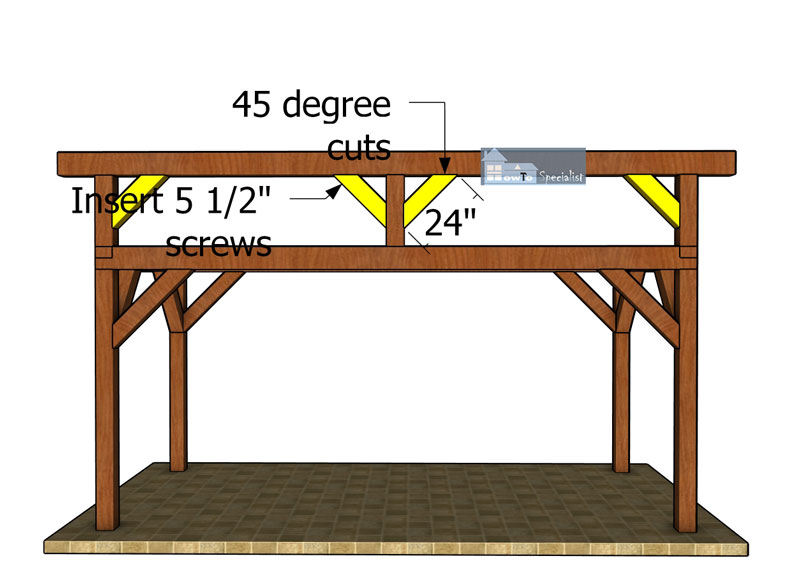
Fitting-the-braces—frame
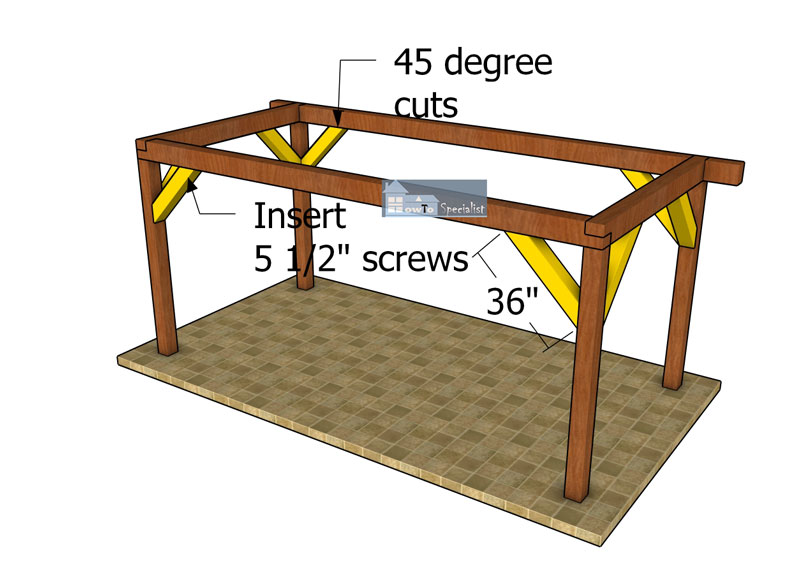
Adding diagonal braces is essential for stability. Cut the braces to length with ends angled at 45 degrees. Position them between the posts and top plates, ensuring a snug fit. Secure them with heavy-duty 5 1/2″ screws , checking that they are tight and stable. This will reinforce the structure and prevent any wobbling.
How to Build a Lean to Pavilion Roof
Top-supports
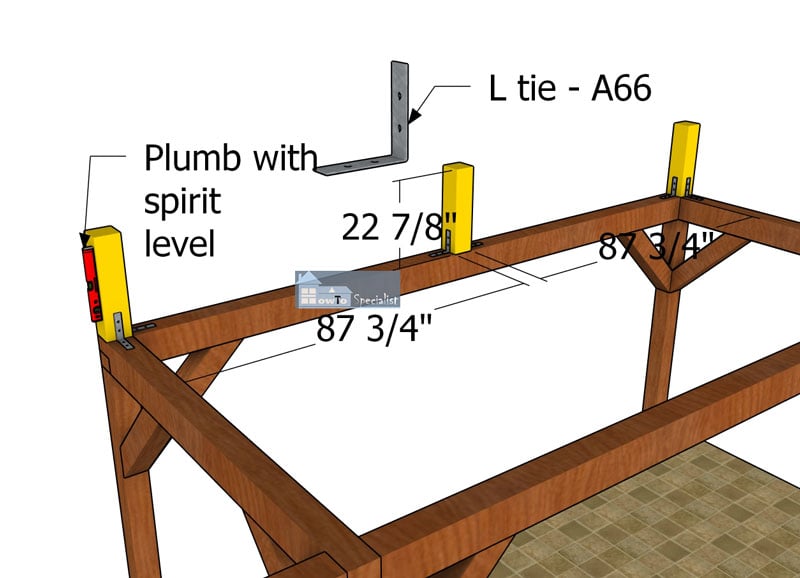
Use 6×6 lumber for the ridge beam supports. Center the supports to the back top plate and secure them into place with L brackets and 2 1/2″ structural screws. Plumb the posts with a spirit level before setting the supports into place.

Ridge-beam-installation
Use 6×8 lumber for the ridge beam. Notice the 12″ front and back overhangs. Place the ridge beam to the supports and make sure the corners are square. Use post to beam connectors and 2 1/2″ structural screws to secure the beam into place tightly.
Top-braces
Fit the diagonal braces to the ridge beam. Plumb the posts, drill pilot holes through the braces and insert 5 1/2″ screws into the supports and ridge beams. Use 2 screws for each joint.
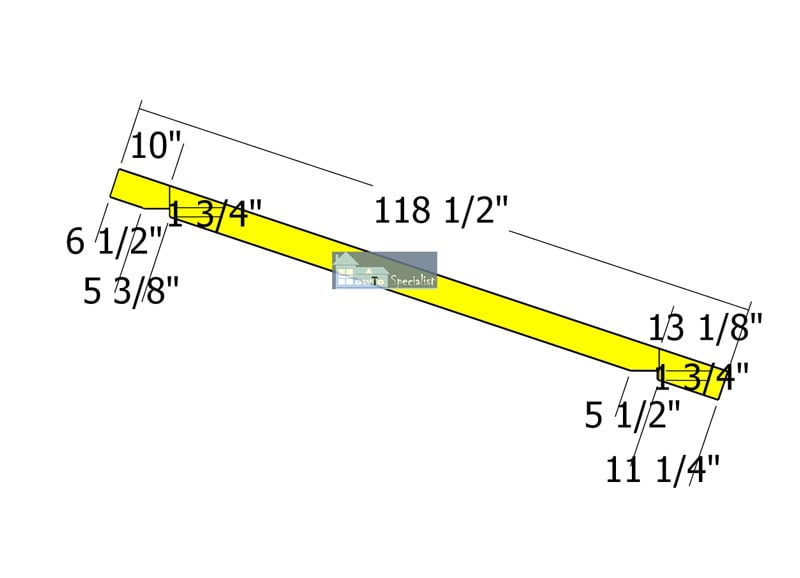
Rafters—cut-detail
Use 2×6 lumber for the rafters of the pavilion. First, measure the length needed for each rafter, including the roof pitch, and mark your cuts on the lumber. Use a circular saw to cut the birdsmouth notches. Test the first rafter to ensure a perfect fit before cutting the rest. Once satisfied, use the first rafter as a template to mark and cut the remaining rafters for consistency.

Fitting-the-rafters
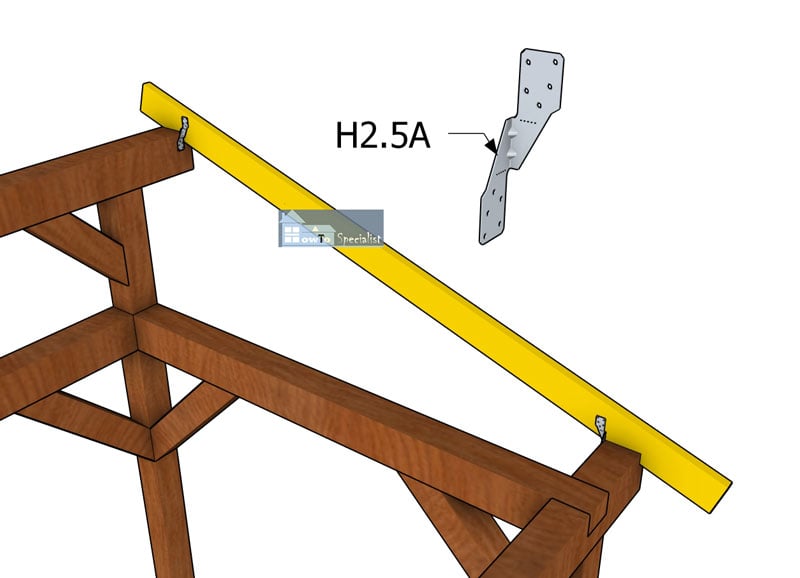
Rafter-detail
Next, position each rafter on the top plates, making sure they are evenly spaced (24″ OC) and aligned. Next, secure metal rafter ties to the top plates, aligning them with the rafters. Use 1 1/2″ structural screws to attach the ties to the rafters, ensuring a tight connection. Finally, double-check that all rafters are properly aligned and securely fastened for a stable structure.
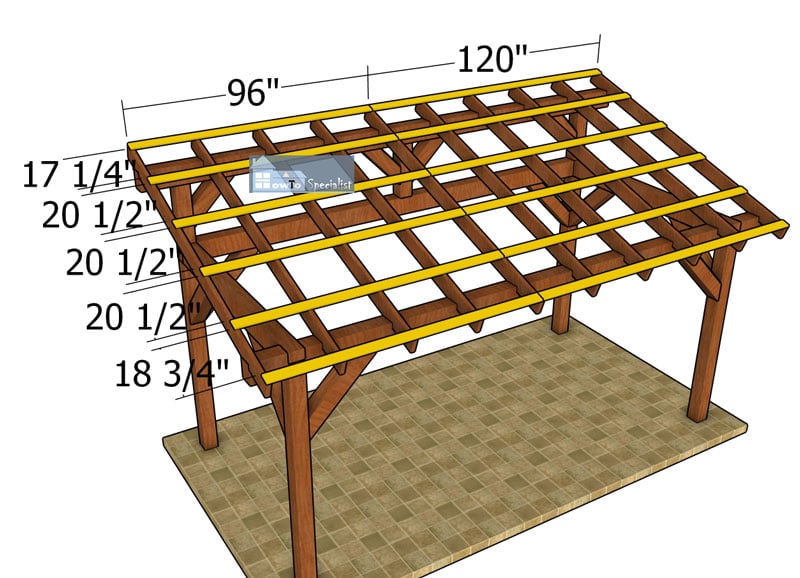
Fitting-the-purlins
This lean to pavilion will be covered with metal roofing, therefore fit the 1×4 purlins for the roof structure. Place the 1×4 purlins every 24″ on center and lock them to the rafters with 2 1/2″ screws. Align the edges at both ends, before inserting the screws.
Front-and-back-trims
Fit the 1×8 trims to the sides of the pavilion. Align the edges flush and insert 6d nails to lock them to the rafters.
Side-trims—grill-gazebo
Use 1×8 lumber for the front and back roof trims. Attach the trims to the rafters and insert 2″ / 6d nails to lock them into place tightly.
Fitting-the-roof-sheets
Start by installing the metal roofing panels at one end of the pavilion, aligning the first panel with the edge of the roof and securing it with screws through the pre-drilled holes. Overlap the next panel by one ridge and fasten it in the same manner, continuing this process across the roof.
At the ridge, place a ridge cap over the meeting point of the two roof sides, securing it with screws to ensure a watertight seal. Finish by attaching metal trim along the edges and eaves to provide a clean look and extra protection against the elements.
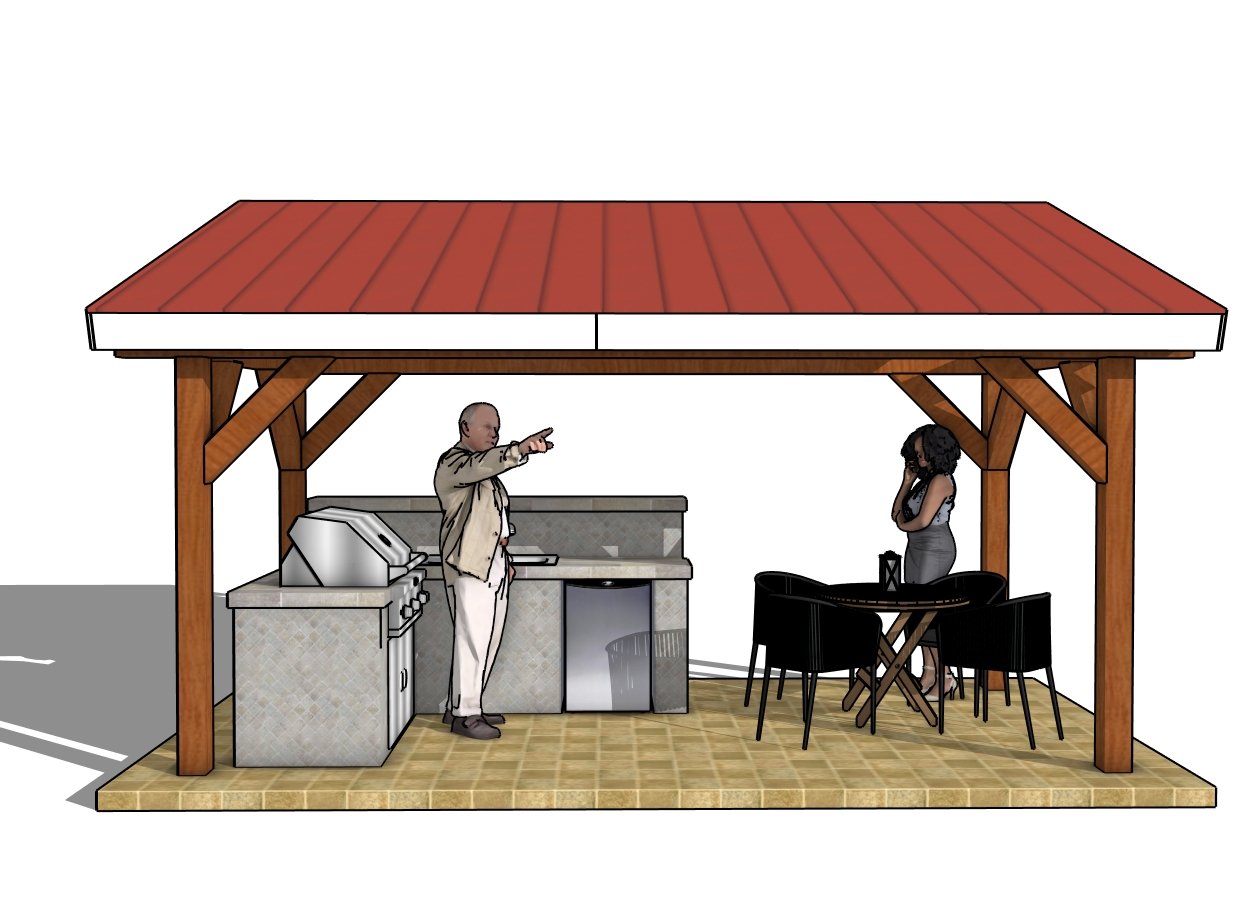
8×16 lean to pavilion – front view
To finish the wooden pavilion, start by sanding all the surfaces to smooth out any rough spots. Then, apply a weather-resistant stain or paint to protect the wood from the elements and enhance its appearance. Once the finish is dry, add any final touches. Lastly, inspect the entire structure to ensure all components are secure and everything looks great.
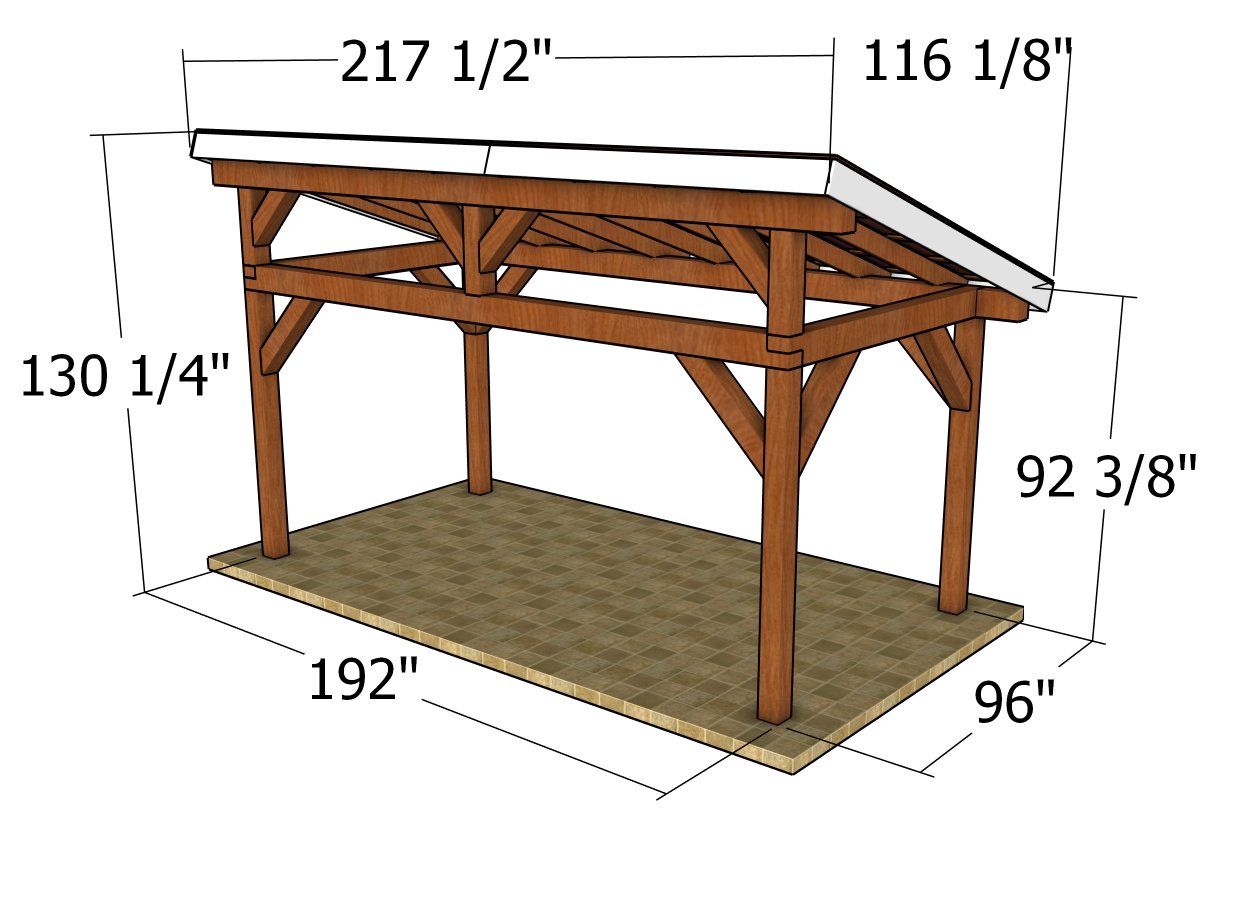
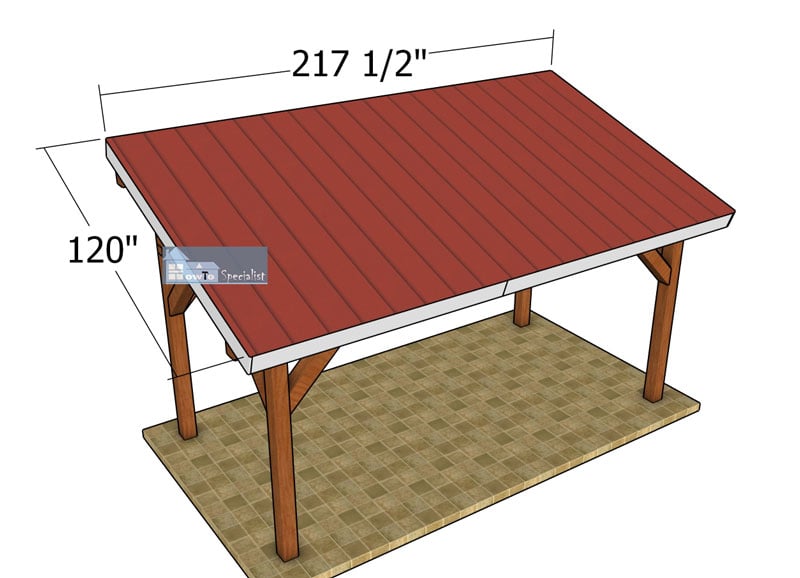
8×16 lean to pavilion – full dimensions
The 8×16 pavilion measures 8 feet in length and 16 feet in width, providing a spacious area suitable for various outdoor activities. You can use this pavilion for a BBQ grill. Just make sure to follow a few safety precautions. Position the grill away from any wooden posts or walls to prevent any fire hazards. Consider adding a heat-resistant mat or stone pad under the grill area to protect the floor. With these measures in place, you’ll have a fantastic and safe outdoor cooking space!

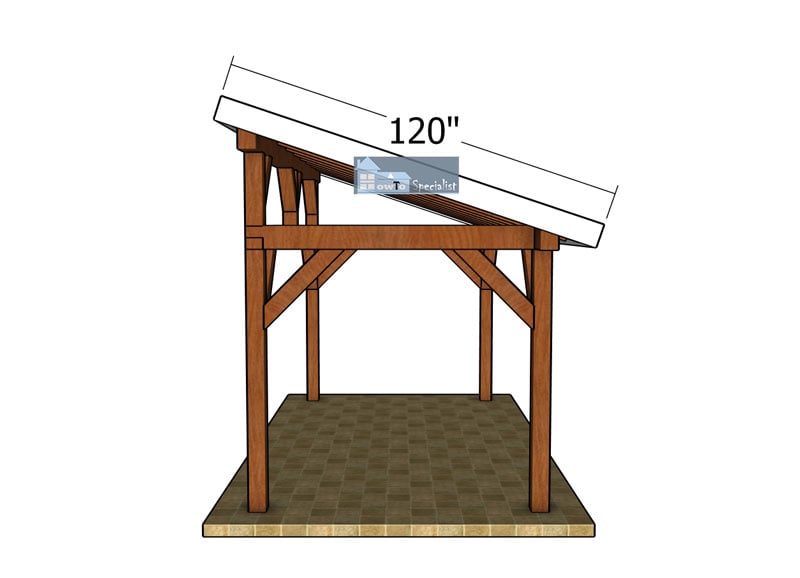
8×16 lean to pavilion – side view
Alright, there you have it! With these steps, your 8×16 lean-to pavilion is ready to provide a sturdy, stylish, and safe space for all your outdoor activities, including BBQ grilling. Just remember to follow those safety tips, and you’ll have a fantastic spot for gatherings and relaxation. Now, grab your tools and let’s get building!
This pavilion project, with its detailed steps, results in a functional and attractive addition to any backyard or garden. If you want to download the plans. just click on the GET PDF PLANS button bellow.
Thanks for reading about my 8×16 lean-to pavilion plans! Be sure to check out the rest of my projects for more great ideas. Don’t forget to LIKE and SHARE with your friends using the social media buttons. And SUBSCRIBE so you’re the first to get updates on my latest projects!

1 comment
What is the cost of this?