In this project, we’ll walk you through the process of building a sturdy and stylish 6×16 patio cover with asphalt shingles. Whether you’re looking to enhance your backyard for entertaining, create a shaded area for relaxing, or protect your outdoor furniture from the elements, this patio cover provides the perfect solution. With detailed instructions, material lists, and easy-to-follow diagrams, you’ll be able to complete this build in no time, even if you’re new to DIY projects.
The design features a durable ledger board attached to the house, a secure frame, and a weatherproof roof with asphalt shingles that will stand up to the elements for years to come. Throughout this guide, we’ll take you step-by-step through each phase of the project—from setting up the ledger board to laying down the shingles. By the end, you’ll have a beautifully finished patio cover that not only adds curb appeal but also provides lasting protection for your outdoor space.
We recommend you to invest in the best materials you could afford. Therefore, you should buy weather-resistant lumber, such as pressure-treated lumber, cedar or redwood. If you use regular pine, I recommend you to apply the appropriate products to enhance its durability. Always take accurate measurements before adjusting the size of the components at the proper size. Drill pilot holes trough the components before inserting the wood screws, to prevent the wood from splitting. See all my Premium Plans HERE.
Made from this plan
6×16 Patio Cover – Free DIY Plans
Building-a-6×16-lean-to-patio-cover
Materials
Tools
- Safety gloves, glasses
- Miter saw, jigsaw
- Chalk line, tape measure, spirit level, carpentry pencil
- Drill machinery and drill bits
Time
- One Week
Related
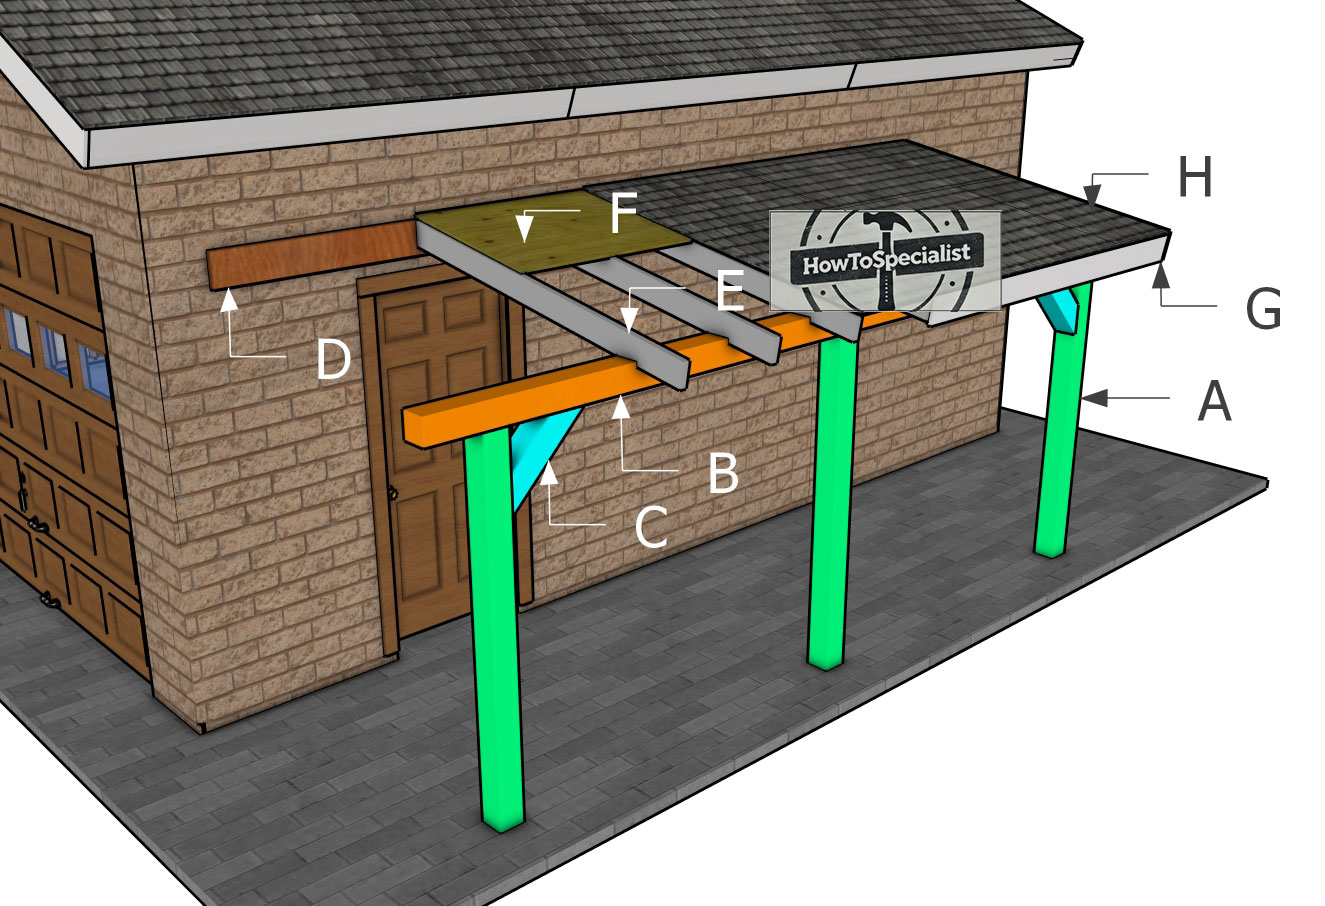
STEP 1: Building the frame of the patio cover
6×16-patio-cover—layout
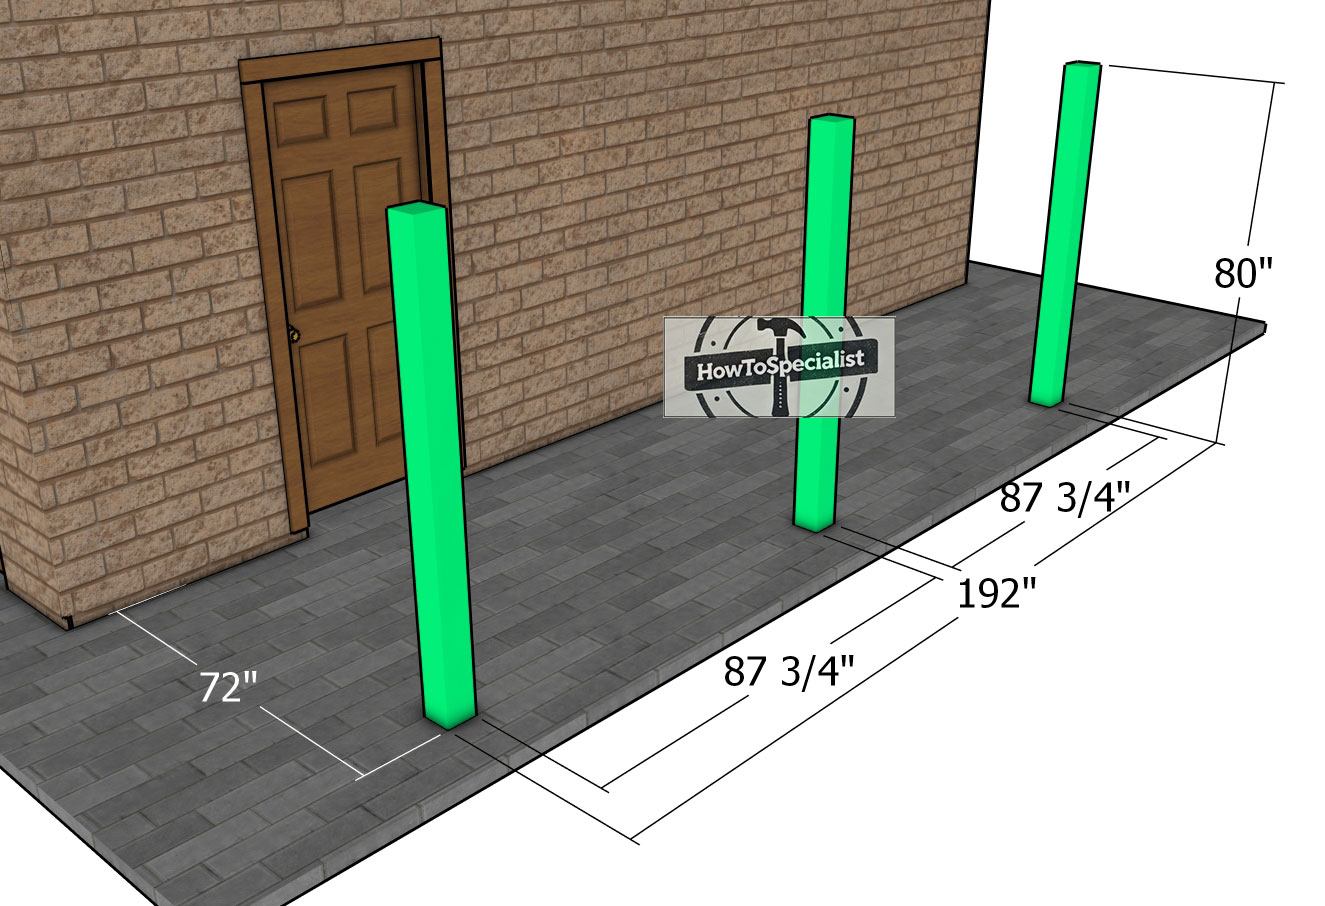
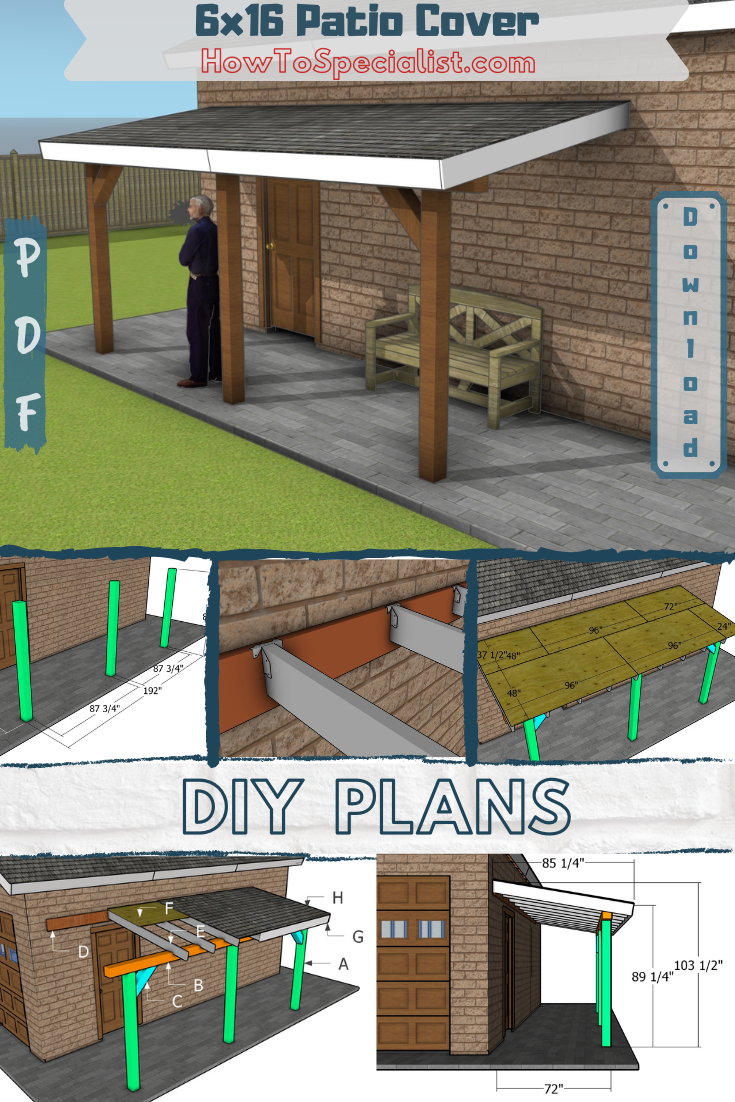
This diagram isn’t just about spacing—it also locks in the height of your posts. It clearly shows both the distance between the posts and their exact placement. Getting these measurements right is key to a smooth build, so take your time and double-check everything before moving forward.
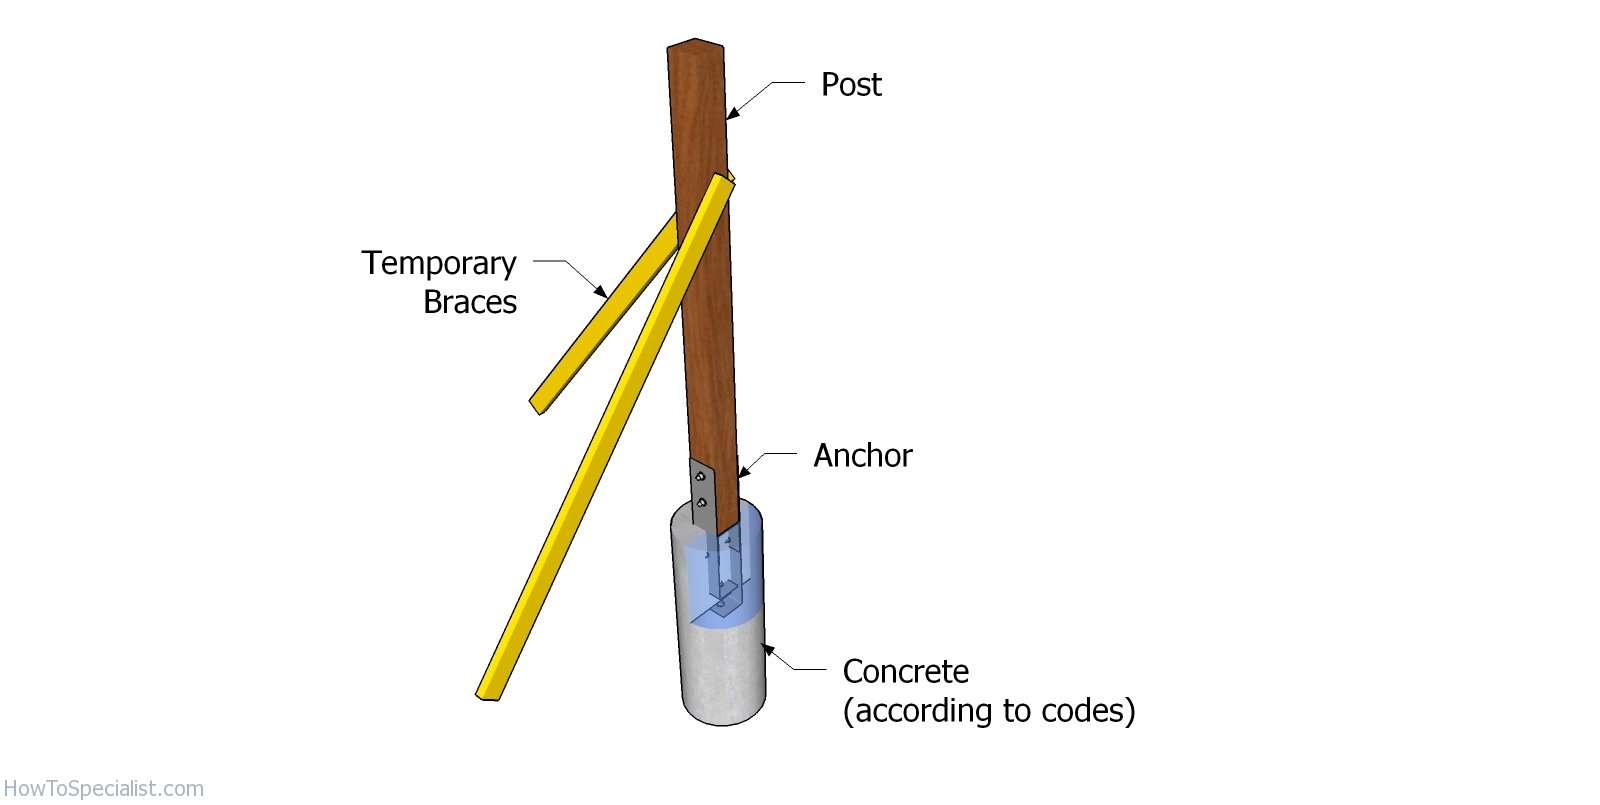
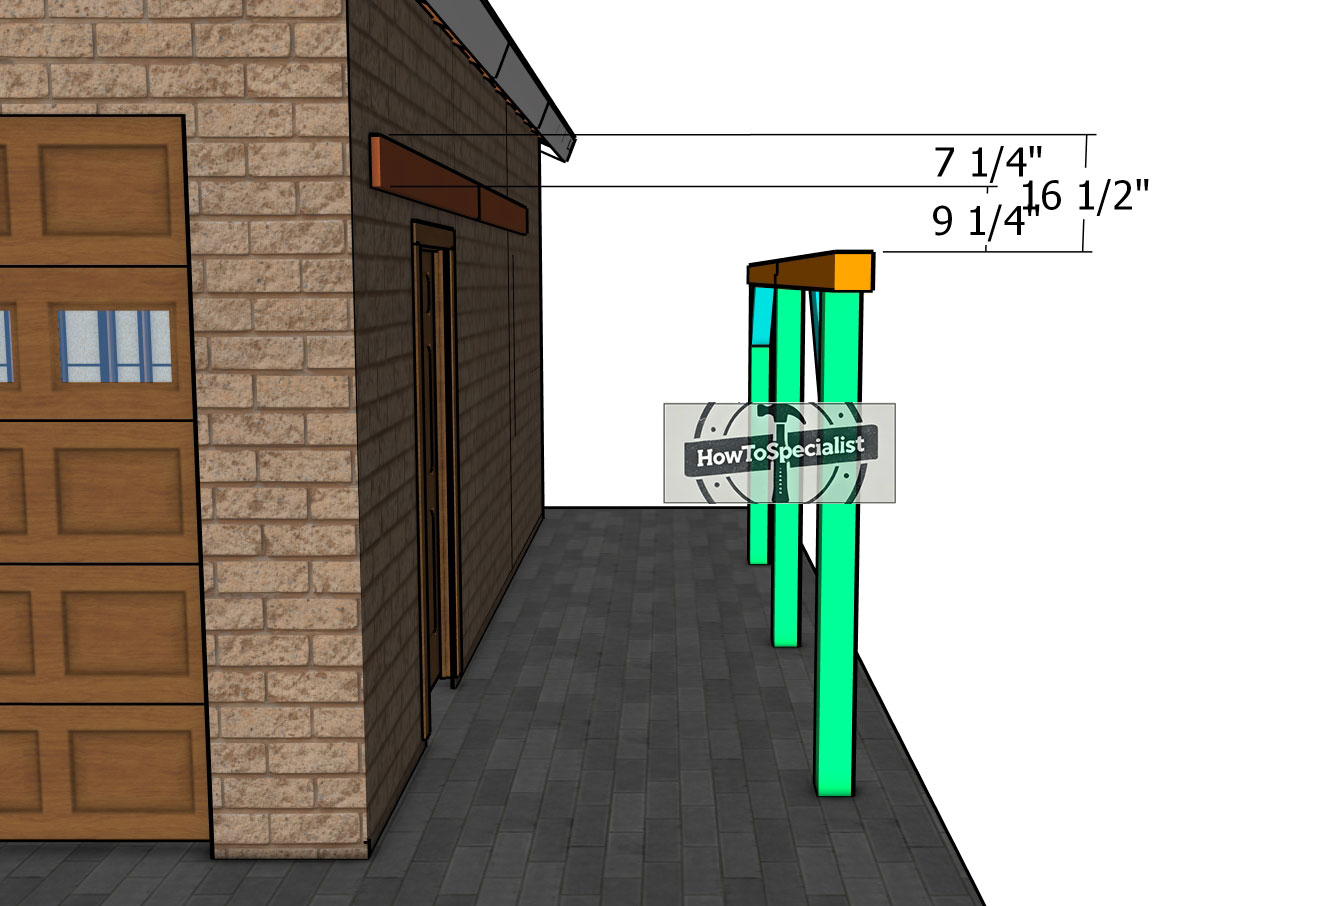
Setting the posts
After marking the location of the posts, you need to dig 3′ deep holes in the ground, using a post hole digger. Install tube forms and fit the posts into place, making sure they are perfectly plumb. Fill the forms with concrete and install the anchors. Use string and batter boards to align the anchors.
Please read the local codes so you determine the RIGHT depth for the footings. In addition, in some areas you might need to set the posts to concrete. That is why it’s essential to read the local codes, because the front line depth differs according to your location.
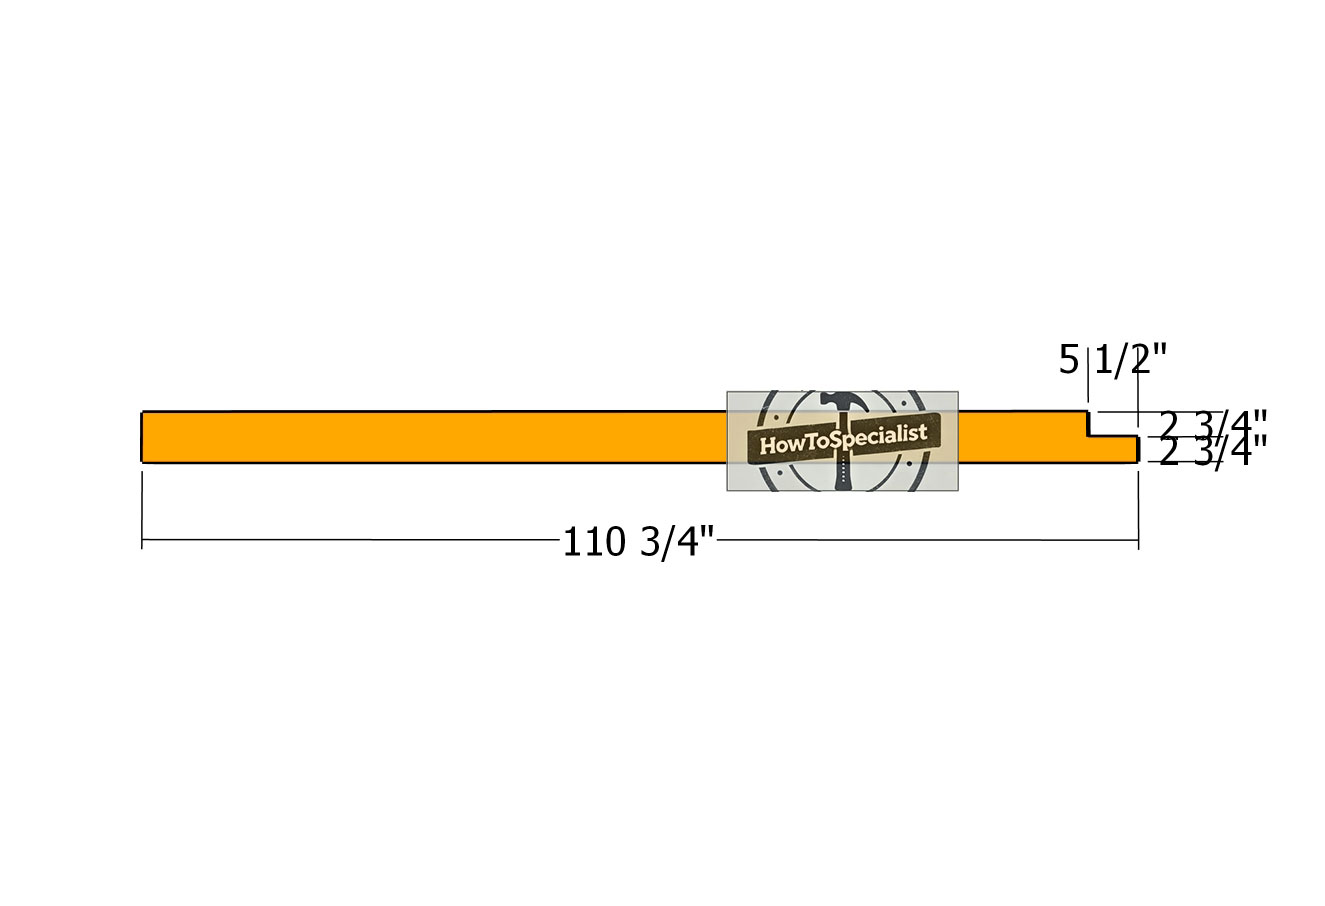
Top-support-beams
We will be using 6×6 lumber for the top support beams. Make 2 3/4″ deep notches to one end of the beams, as shown in the diagram. Use a circular saw and set the blade depth to 2 3/4″. Make parallel cuts inside the marked areas and remove the excess with a hammer and a chisel. You van also make a decorative cut to the other end of the beams.
Fitting-the-top-support-beams
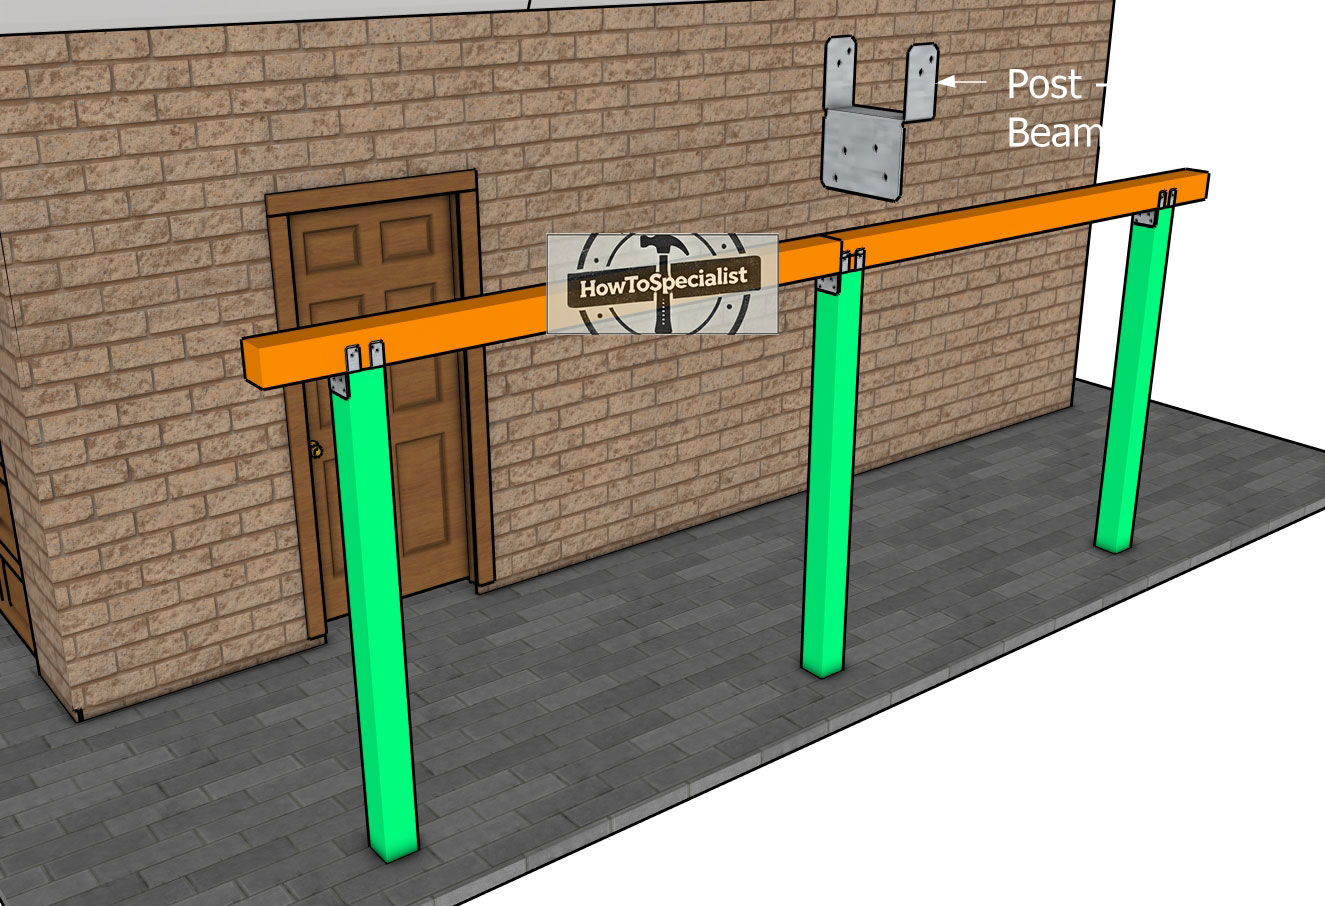
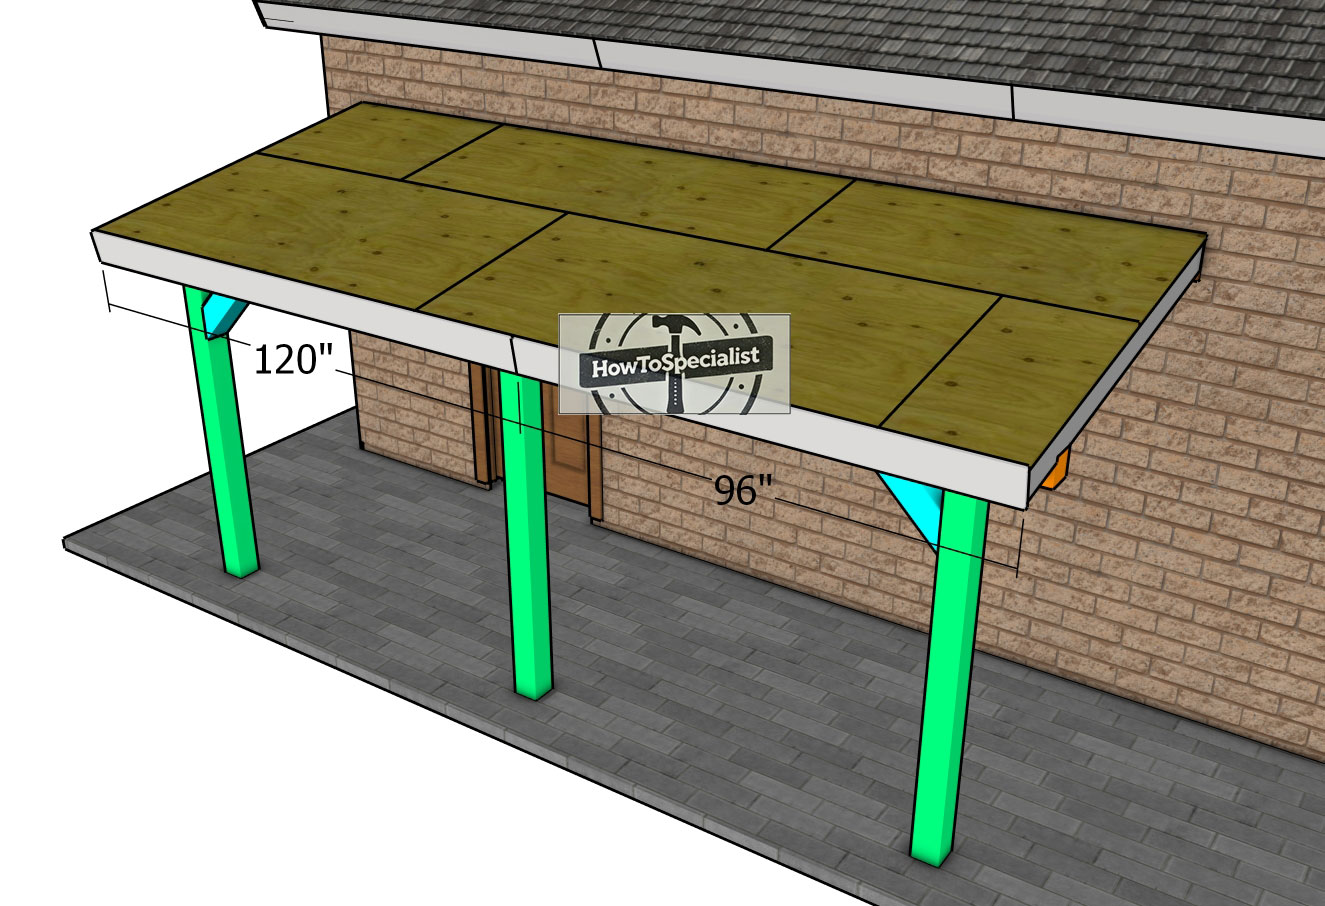
Fit the support beams to the top of the posts. Align the edges flush, leaving a 12″ overhang on both sides. You can also set the beams with no overhang, but I consider the side roof overhangs useful for protecting the wooden structure. Make sure the posts are vertical before attaching the top beams.
Use a spirit level to check if the top beams are perfectly horizontal. Secure the beams to the posts with connectors, as shown in the diagram. Insert 1 1/2″ structural screws / nails to lock the connectors tightly.
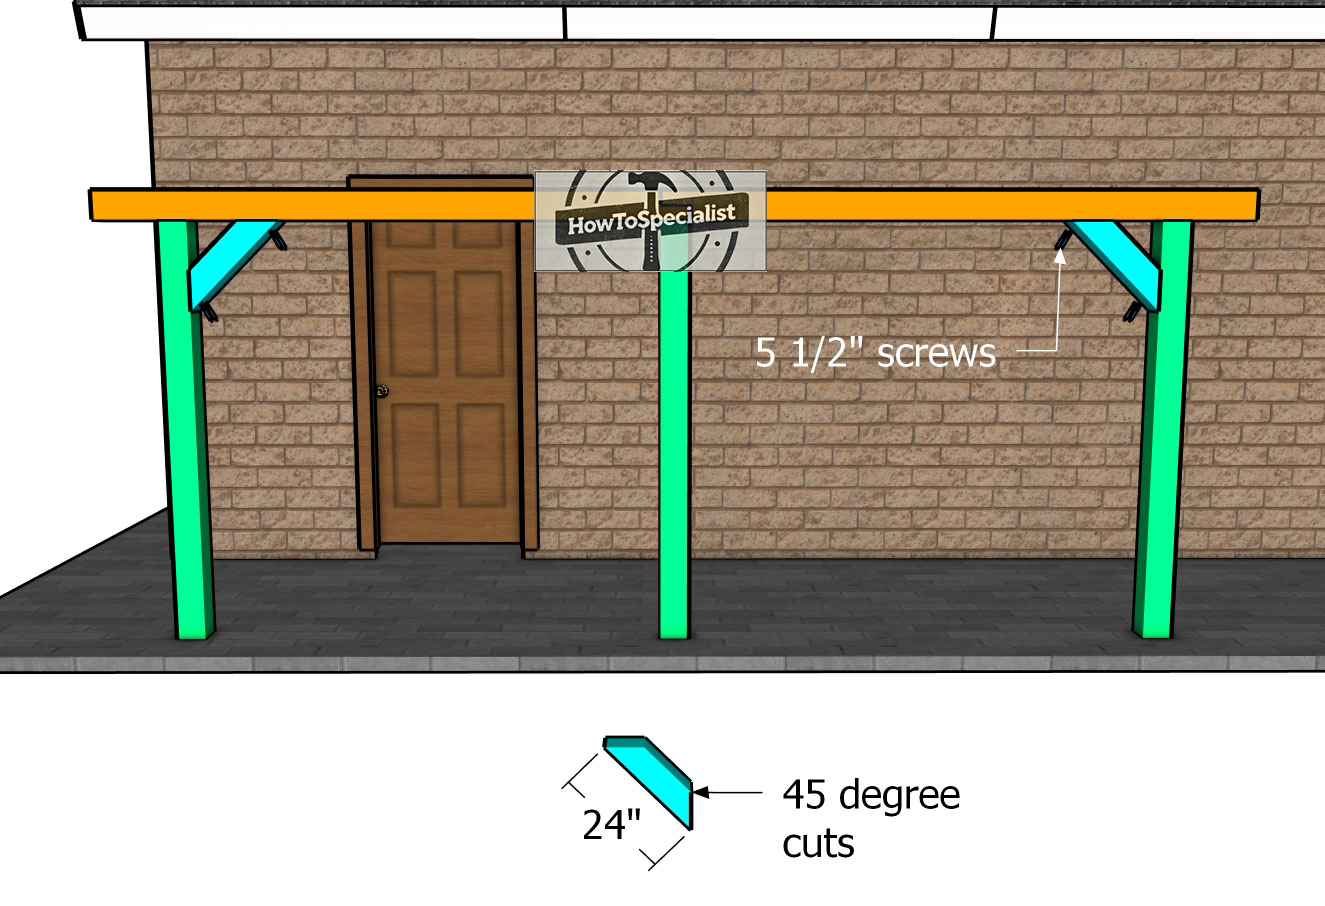
Braces
Use 6×6 lumber for the braces. These braces will enhance the rigidity of the structure. Make 45 degree cuts to both ends of the braces. Drill pilot holes and insert 5 1/2″ screws to lock them to the pavilion structure. Use 2 screws for each joint.
Ledger-board-alignment
Installing a 2×8 ledger board to the house is a crucial step in securing your patio cover. Start by marking the location where the ledger board will attach to the house, ensuring it is level and properly aligned with the structure. The ledger board should sit flush against the wall and be at the same height as the patio cover’s rim joist. Once you have the board in place, drill pilot holes through the ledger board into the wall, making sure the holes align with the studs or framing inside the house. This will create a solid anchor for the board to ensure the stability of the patio cover.
Next, secure the ledger board to the house using 4 1/2″ lag screws. Insert the lag screws through the pilot holes and tighten them until the board is firmly in place. Use at least two screws spaced evenly along the length of the ledger board to provide strong, secure support. Make sure the board is flush with the wall, and double-check that it remains level as you tighten each screw. This step ensures the ledger board is properly attached and capable of supporting the weight of the patio cover, providing a solid foundation for the rest of the structure.
STEP 2: Building the lean to roof
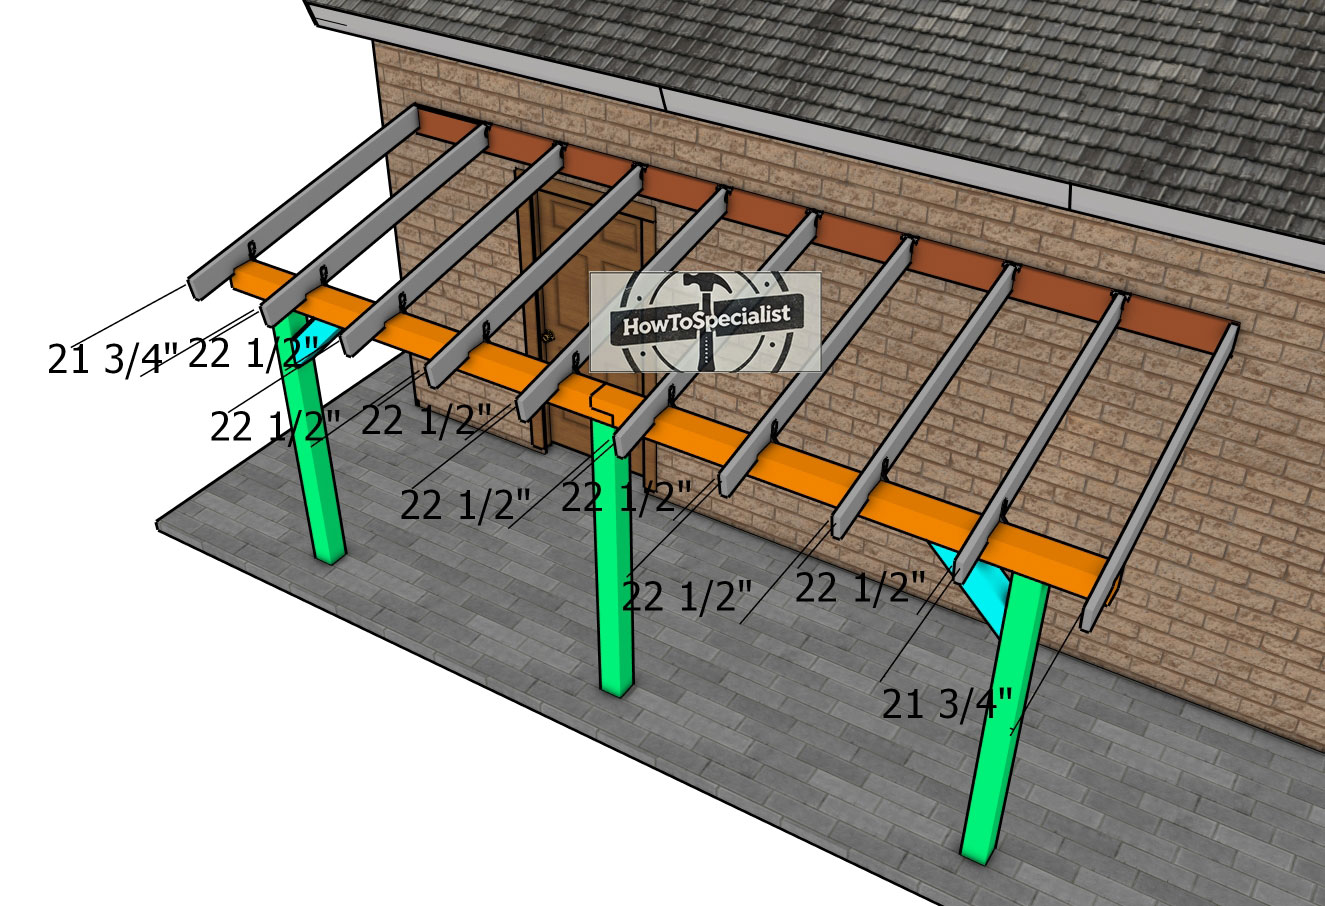
Fitting-the-rafters
Next, we need to attach the rafters to the top of the patio cover. Place the 2×6 rafters every 24″ on center. Use rafter hangers and 1 1/2″ structural screws to lock the rafters to the ledger boards. Use rafter ties and 1 1/2″ structural screws to secure the rafters to the support beams.
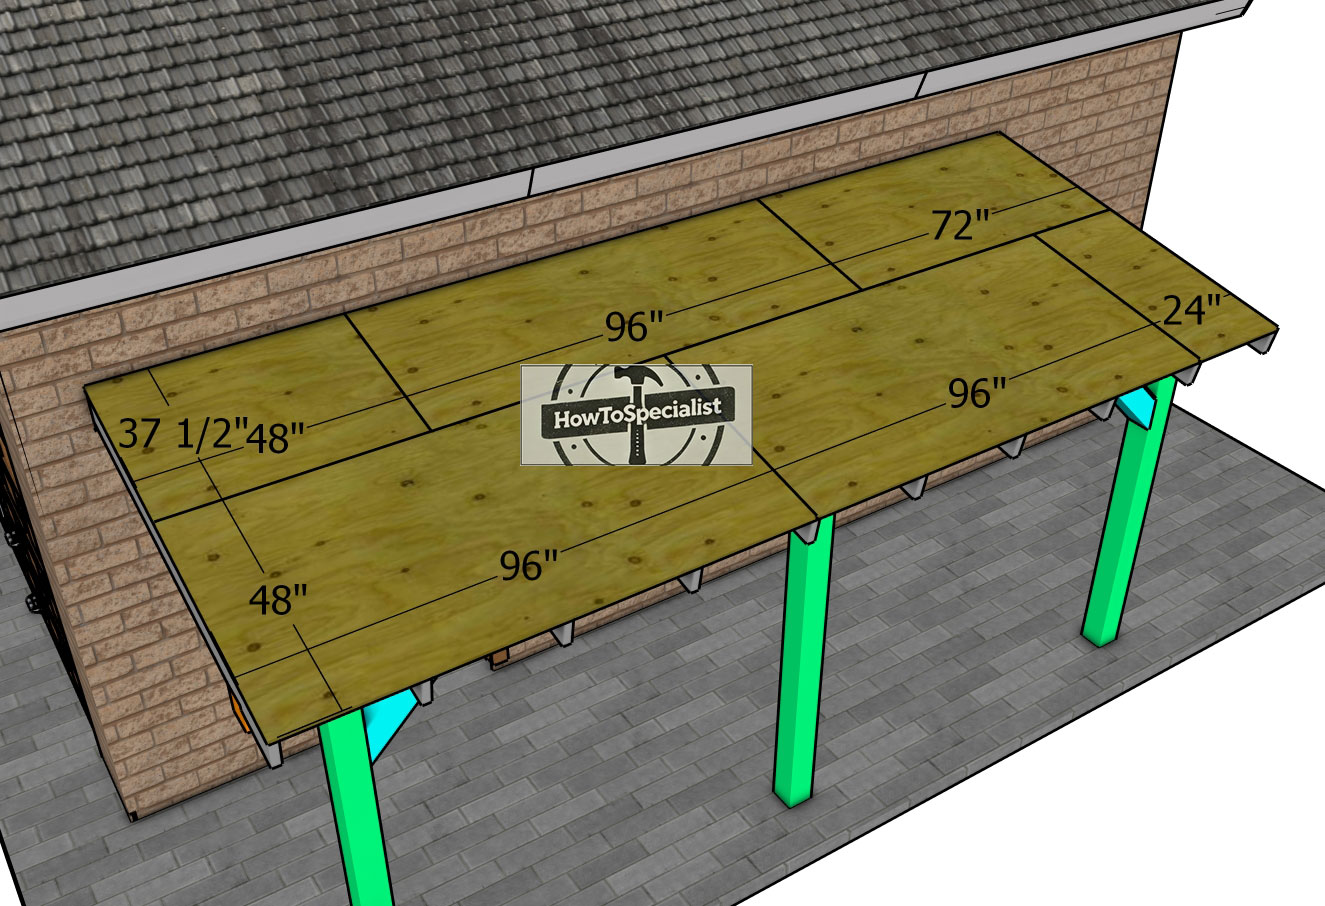
Roof-sheets
Next, we have to attach the 3/4″ plywood sheets to the top of the pavilion. To attach plywood to the lean-to pavilion roof, start by laying the plywood panels perpendicular to the roof rafters. Use 2 1/2-inch wood screws to secure the plywood to the trusses, placing screws approximately every 6 to 8 inches along the edges and every 12 inches in the field of the plywood.
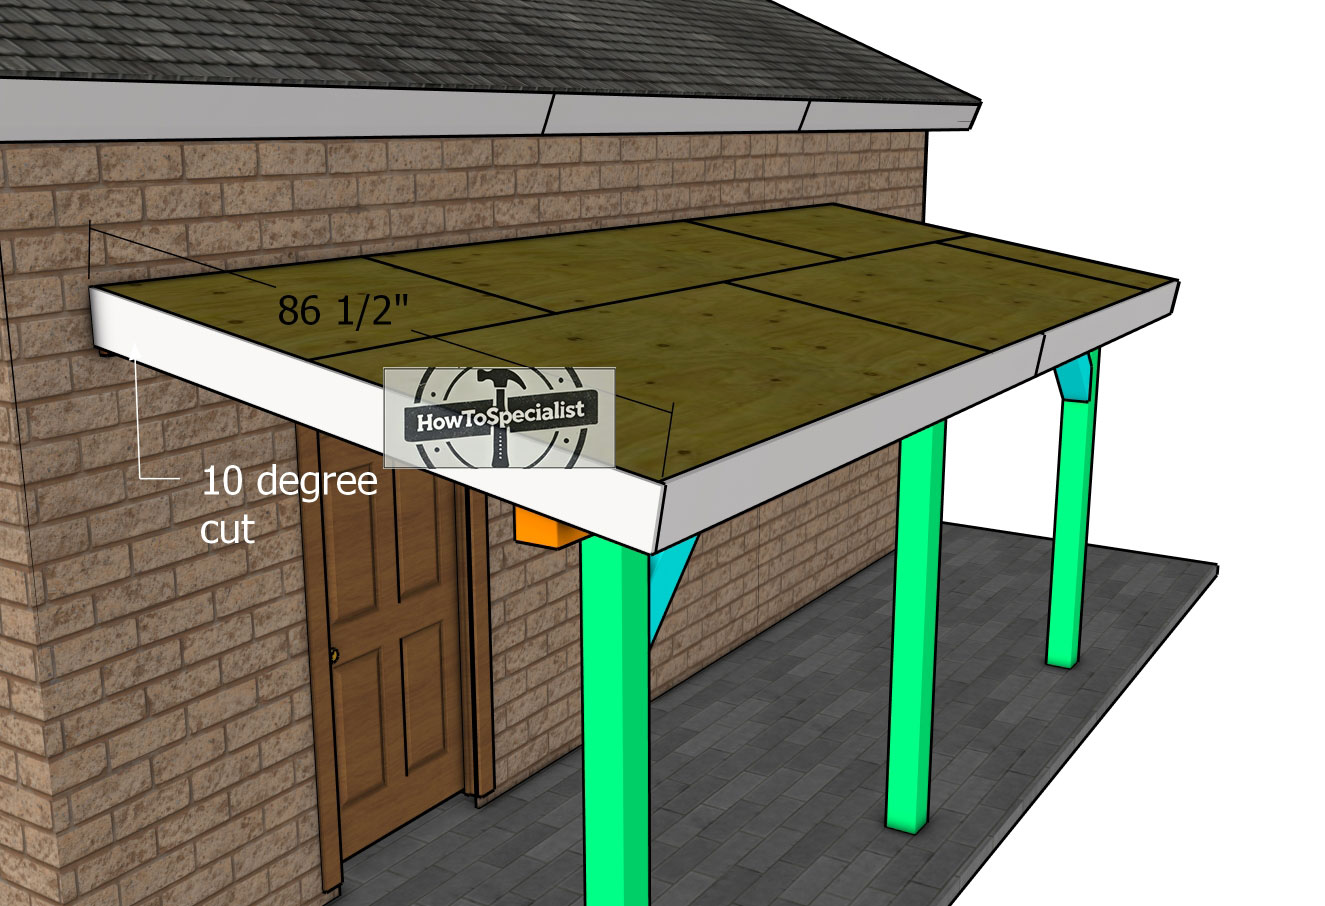
Front-roof-trims
Attach the 1×8 trims to the sides of the pavilion. Align the edges with the top edge of the roof sheets. Insert 2″ nails to lock the trims to the frame of the pavilion.
Side-roof-trims
Next, attach the trims to the front of the pavilion, as well. Align the edges flush and insert 2″ finish nails to lock them into place tightly.
Fitting the roofing
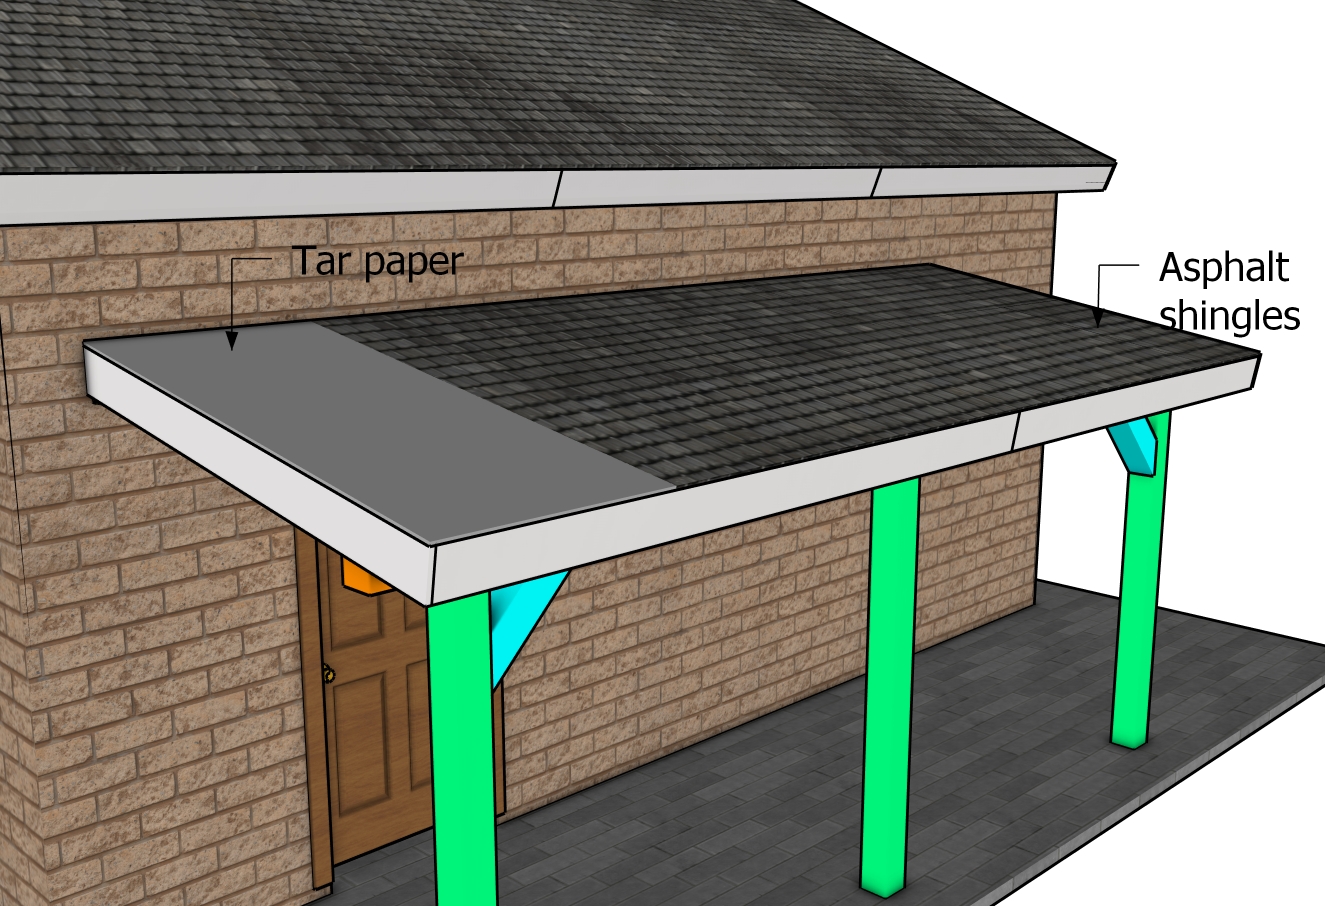
To install asphalt shingles to the new lean-to pavilion roof, begin by laying an asphalt underlayment over the plywood sheathing, ensuring complete coverage and proper overlapping. Start at the lower edge with a starter strip, securing it with roofing nails.
Lay the first row of shingles along the eaves, aligning the tabs with the starter strip and nailing them down. Continue installing subsequent rows, staggering shingle joints and following the manufacturer’s guidelines for overlap and fastening.
STEP 3: Finishing touches
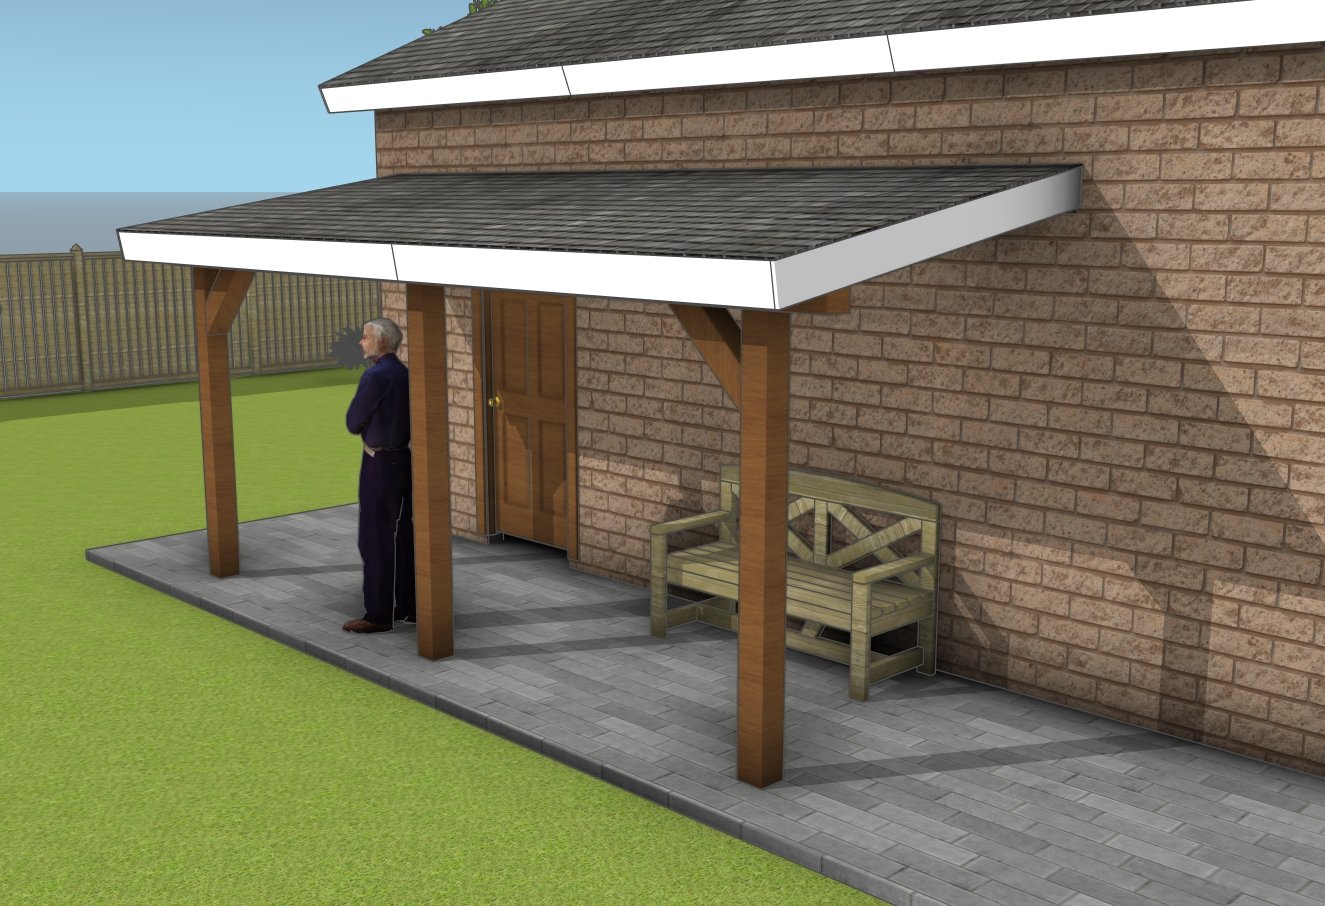
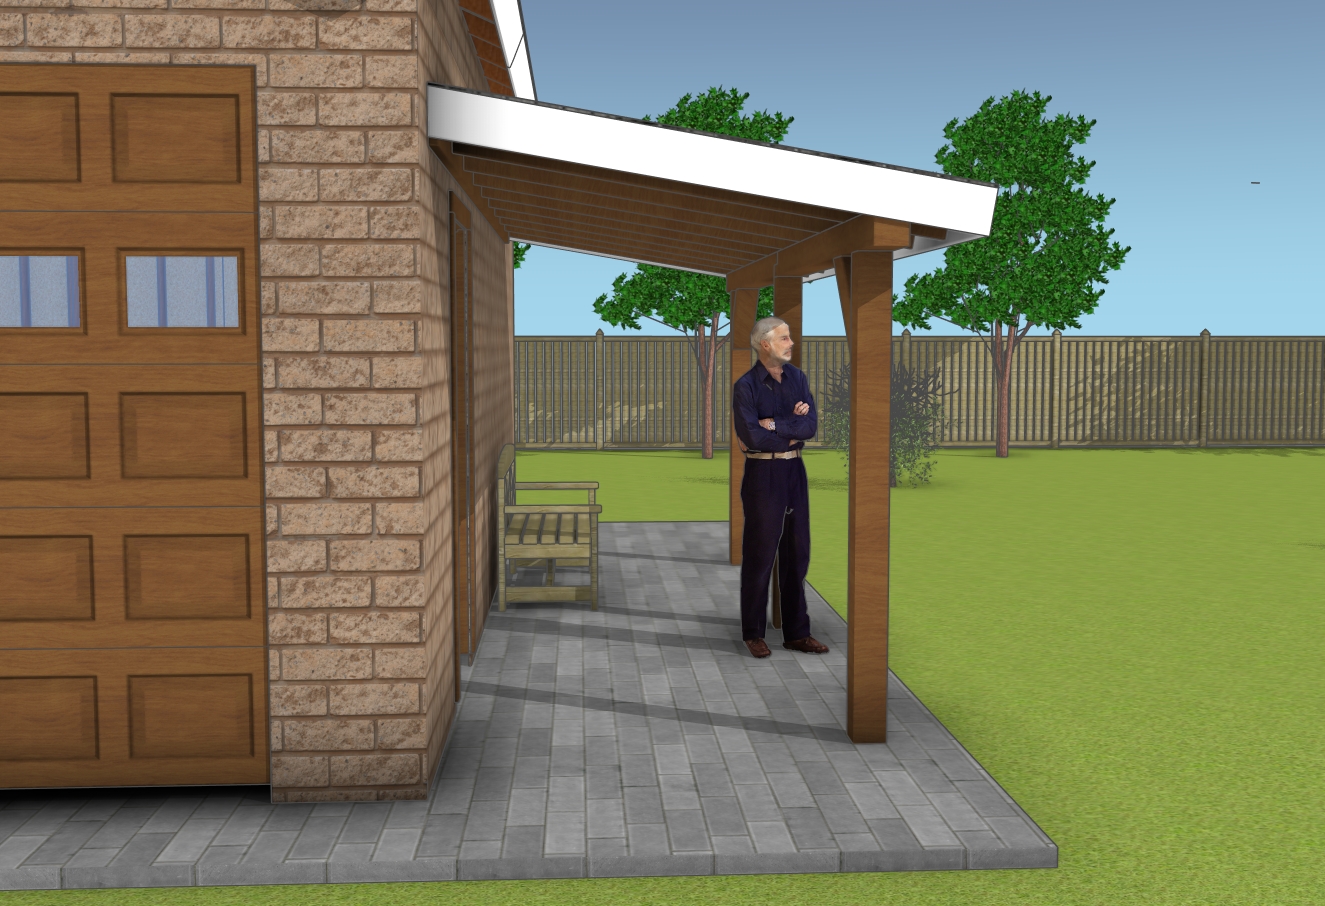
DIY 6×16 patio cover plans
Now that the main structure is up, it’s time for the finishing touches that will take your patio cover from “built” to “polished.” Start by filling any visible screw or nail holes with wood putty. This step smooths out imperfections and gives your project a clean, seamless look. If you’re working with pressure-treated lumber, make sure the wood is fully dry before applying putty—otherwise, it won’t adhere properly. Let it dry completely before moving on to the next step.
6×16 patio cover – side view
Once the putty is set, grab some sandpaper and smooth out the entire structure, focusing on rough edges and filled holes. A 120-150 grit sandpaper works great for this, knocking down any splinters or uneven spots while keeping the wood’s texture intact. If you want an ultra-smooth finish, do a final pass with a finer grit. This step isn’t just about looks—it also helps paint or stain adhere better and last longer. Now for the fun part—painting or staining.
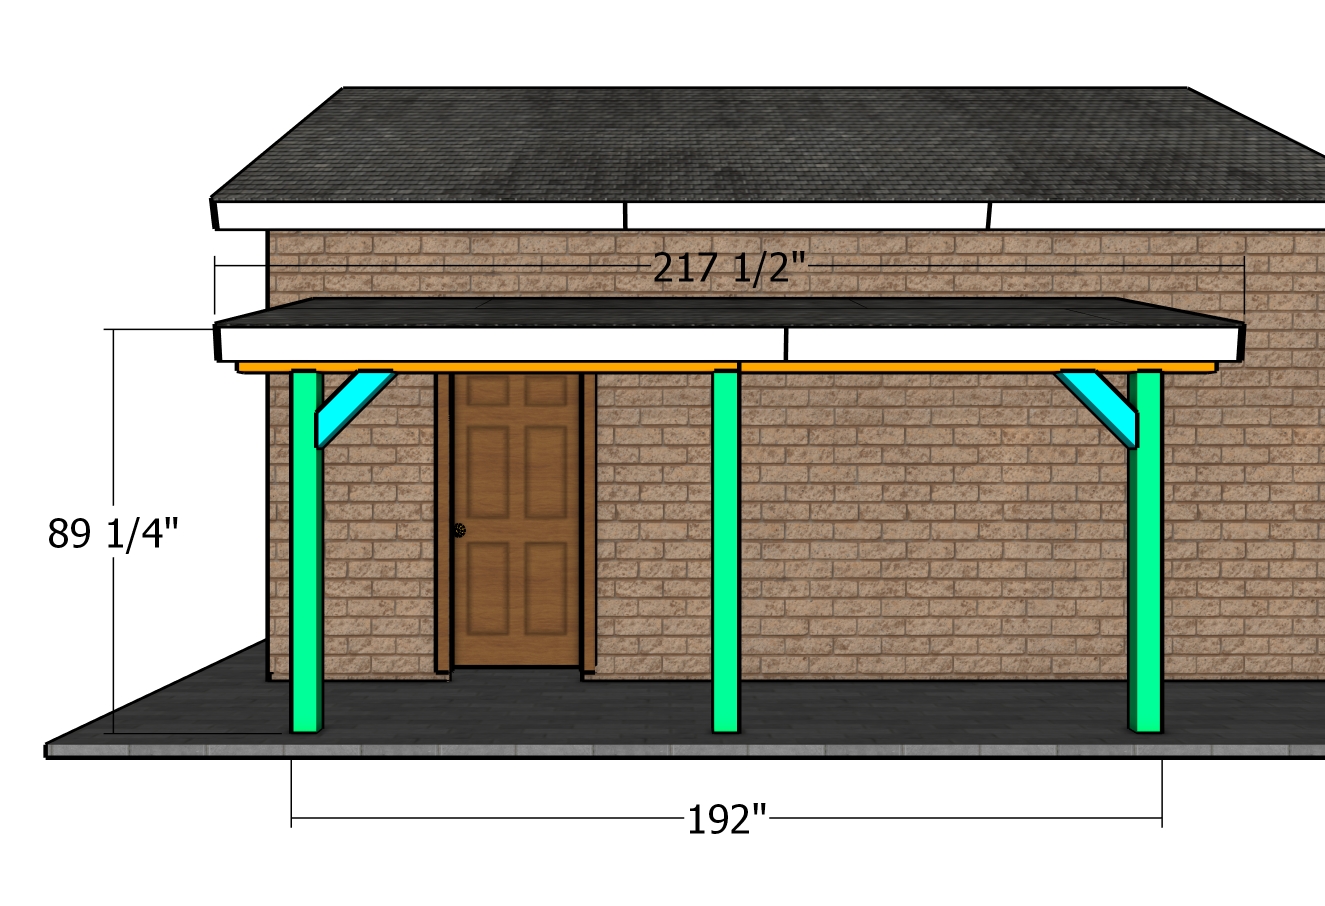
Front dimensions
If you want a sleek, modern look, go with exterior paint, applying a quality primer first to ensure good coverage. If you prefer a natural, rustic vibe, stain is the way to go. A high-quality outdoor wood stain enhances the wood grain while protecting it from moisture and UV rays. Whichever option you choose, use a brush, roller, or sprayer to apply the finish evenly. Don’t forget to seal any cut ends, as those are the most vulnerable to weather damage.
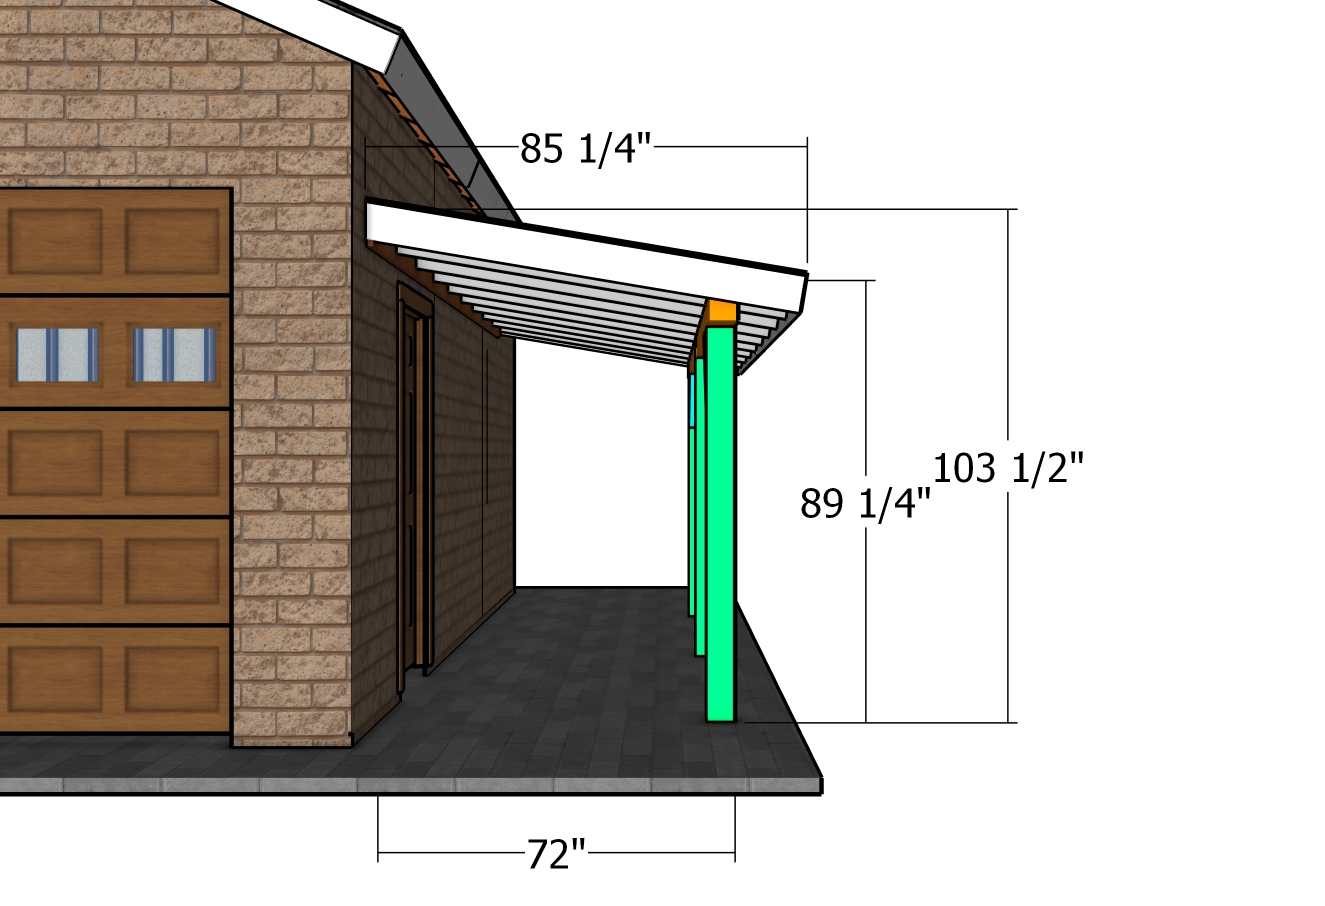
Side dimensions
With the 6×16 patio cover complete, you now have a beautiful, functional outdoor space that provides both shade and protection from the elements. Whether you’re relaxing outdoors, entertaining guests, or enjoying some time with family, this sturdy patio cover enhances your home while offering lasting durability. Thanks to the step-by-step plans and clear instructions, you’ve built something that not only adds value to your property but also creates a comfortable outdoor retreat. Enjoy your new space, and don’t forget to check out more plans for future DIY projects!
Pin it for later!

Thank you for reading my project about 6×16 patio cover plans and we recommend you to check out the rest of the projects. Don’t forget to LIKE and SHARE our projects with your friends, by using the social media widgets. SUBSCRIBE to be the first that gets our latest projects.
2 comments
Thank you so much for all these plans and instructions! I was looking on Pinterest for how to build a shed and a veranda myself. Thanks again 🙏🏻🇺🇦
My pleasure. Glad you like my plans.