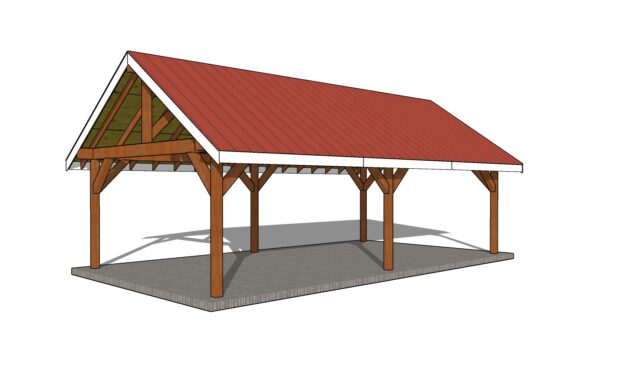
This step by step woodworking project is about how to build a 16×30 pavilion – diy plans. This is a really nice pavilion with a 16 ft width and a depth of 30 ft. This pavilion has the perfect size to be friendly to the budget, but also provide endless opportunities for outdoor activities. The roof has a 8:12 pitch and it features 2×6 rafters every 24″ on center. This structure is heavy duty, but please follow the building codes and make modifications, if necessary. See all my the gazebo plans HERE.
We recommend you to invest in the best materials you could afford. Therefore, you should buy weather-resistant lumber, such as pressure-treated lumber, cedar or redwood. If you use regular pine, I recommend you to apply the appropriate products to enhance its durability. Always take accurate measurements before adjusting the size of the components at the proper size. Drill pilot holes trough the components before inserting the wood screws, to prevent the wood from splitting. See all my Premium Plans HERE.
Made from this plan
16×30 Gable Rectangular Gazebo – DIY Plans
Buildig-a-16×30-gable-pavilion
Materials
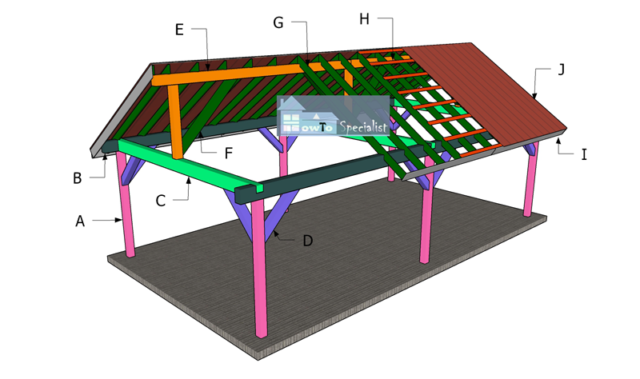
A – 6 pieces of 6×6 lumber – 96″ long POSTS
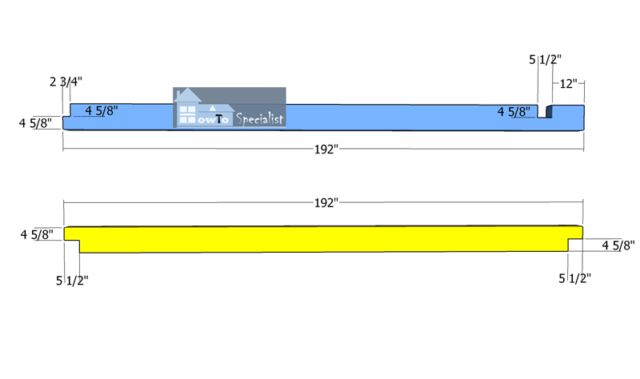
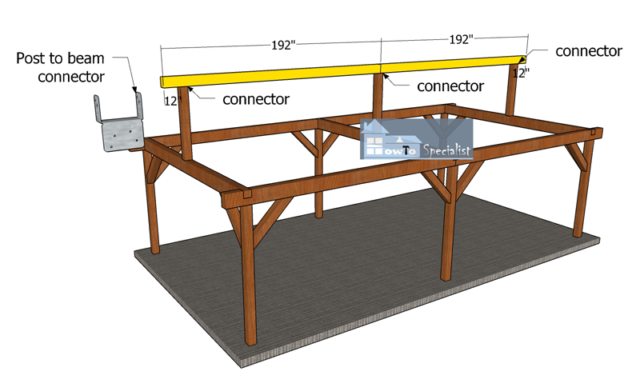
B – 4 pieces of 6×10 lumber – 192” long TOP RAILS
C – 3 pieces of 6×10 lumber – 192” long CROSSBEAMS
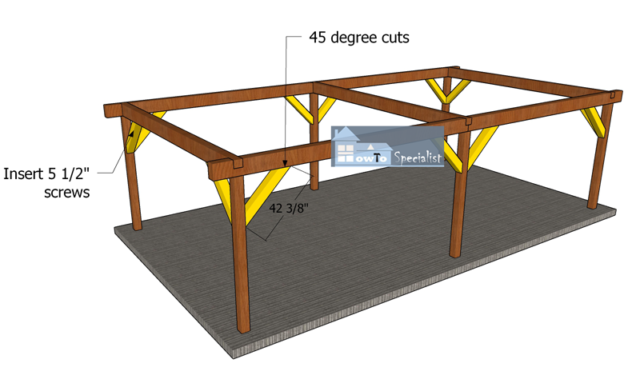
D – 12 pieces of 6×6 lumber – 42 3/8” BRACES
E – 3 pieces of 6×6 lumber – 53 1/4″ long, 2 pieces of 6×8 lumber – 192” RIDGE BEAM
F – 4 pieces of 6×6 lumber – 72” long BRACES
G – 36 pieces of 2×6 lumber – 12 ft RAFTERS
H – 40 pieces of 1×4 lumber – 132″ long, 20 pieces – 120” PURLINS
I – 4 pieces of 1×8 lumber – 132″ long, 2 pieces – 120”, 4 pieces – 145 1/8” TRIMS
*Buy Premium Plans for Cut and Shopping Lists
Tools
- Safety gloves, glasses
- Miter saw, jigsaw
- Chalk line, tape measure, spirit level, carpentry pencil
- Drill machinery and drill bits
Time
- One Week
How to build a 16×30 pavilion – PDF Download
Laying-out-the-posts
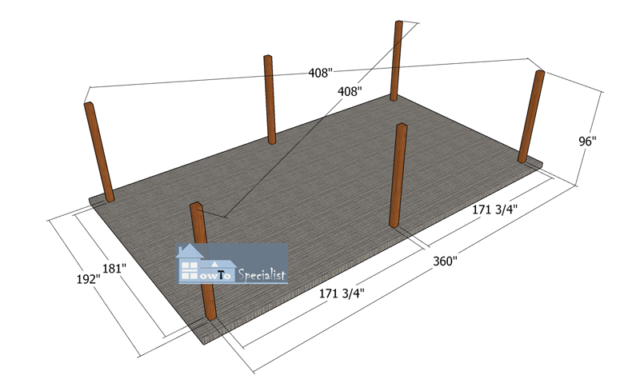
The first step of backyard project is to layout the large rectangular gazebo. Therefore, select the location for the outdoor pavilion and level the surface with attention. Make sure you remove the vegetation layer and even out the surface. Use batter boards and string to layout the location of the posts.
Apply the 3-4-5 rule to each corners, so you make sure they are square. Measure the diagonals and make adjustments so they are equal. This pavilion should be large enough for the needs of a family. Notice the large openings on all sides, making it a nice structure from an appeal point of view.
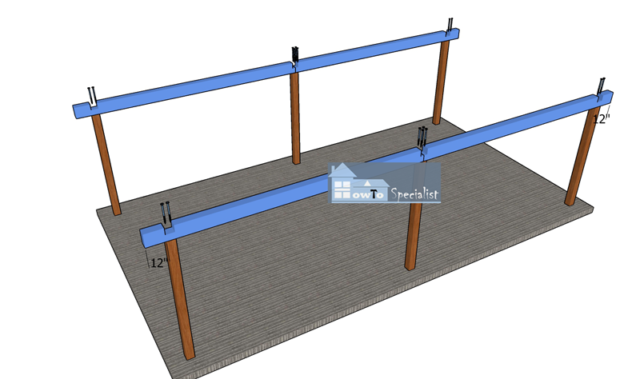
Setting the posts
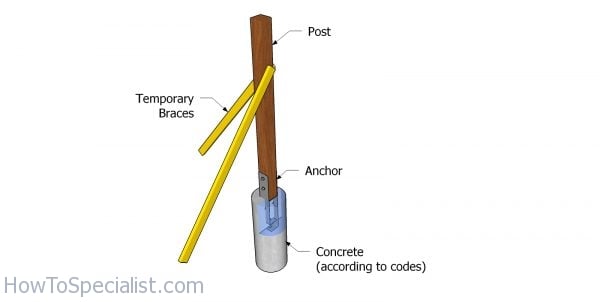
After marking the location of the posts, you need to dig 3′ deep holes in the ground and 16″ in diameter, using a post hole digger. Install tube forms and fill them with concrete. Secure the anchors. For this project we will use post anchors, so you don’t need to set the posts into concrete.
After installing the posts you need to check the tops are aligned one with another. Use a laser level / water level to mark the horizontal line to the top of the posts. Use a circular saw to make the cuts if necessarily. In addition, you can adjust the height of the posts to suit your needs. Therefore, you can cut 1 ft from the 8 ft posts without any consequences; it is just a matter of taste if you want to have the clearance shorter.
Top-plates
Use 6×10 lumber for the top plates,, because we have a 16 ft opening to the front of the pavilion. The 6x10s will make a really sturdy framing and the structure will not bow. Make notches to the beams, using a circular saw. Set the saw depth at 4 5/8″. Make the notches to the plates using a saw and a chisel.
Make parallel cuts and then remove the excess with a hammer and a chisel. Smooth the recesses with sandpaper. These cut outs will help you create half lap joints, which makes for a strong and durable way of bonding wood together.
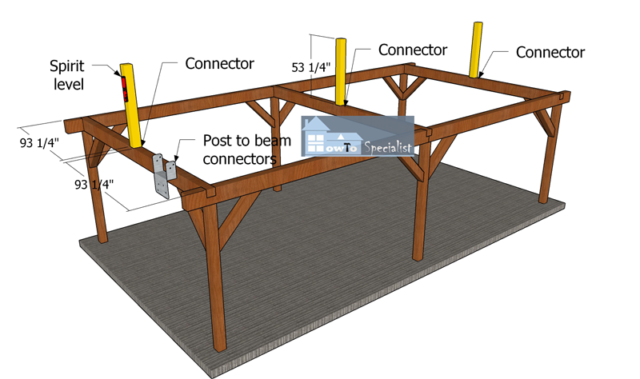
Fitting-the-top-side-plates
Lift the plates to the sides posts of the pavilion. Center the plates to the posts, making sure you have 12″ overhangs on both sides. Drill pilot holes and insert 10″ screws to lock them into place. Plumb the posts with a spirit level and check if the top plate is perfectly horizontal. Make sure the corners are square. Use 2 screws for each joint.
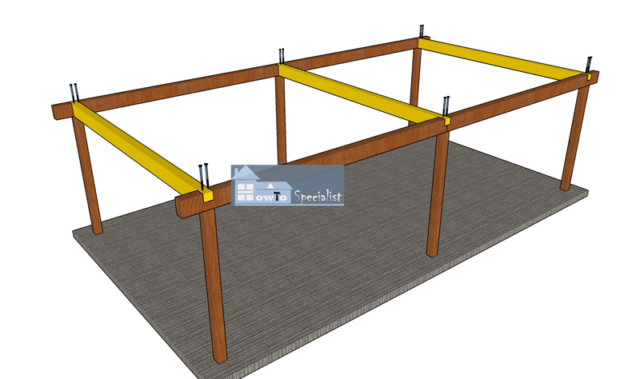
Fitting-the-cross-beams
Fit the crossbeams to the top of the pavilion. Drill pilot holes and insert 10″ screws, to assemble everything together tightly. Use a spirit level to make sure the plates are horizontal. Use a carpentry square to make sure the corners are right angled.
How to Build a Large Pavilion Roof
Fitting-the-braces-to-the-pavilion
Fit the 6×6 braces to the structure of the outdoor shelter. Make 45 degree cuts to both ends of the 6×6 beams. Plumb the posts of the pavilion and make sure the top beams are horizontal. Drill pilot holes and insert 5 1/2″ screws to lock the braces into place tightly.
Top-supports-for-ridge-beams
Use 6×6 lumber for the ridge beam supports. Center the supports to the cross plates and secure them into place with 2 1/2″ structural screws and post to beam connectors. Plumb the posts with a spirit level before setting the supports into place.
Fitting-the-ridge-beams
Use 6×8 lumber for the ridge beam. Notice the 12″ front and back overhangs. Place the ridge beam to the supports and make sure the corners are square. Use post to beam connectors and 2 1/2″ structural screws to secure the beam into place tightly.
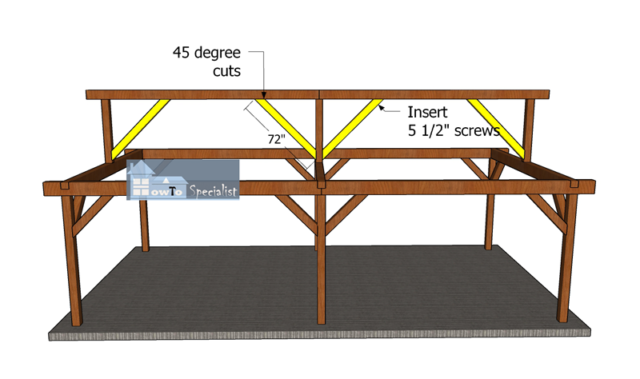
Braces-for-ridge-beams
Use 6×6 lumber for the diagonal braces. Make 45 degree cuts at both ends of braces and then fit them to the top of the gazebo, as shown in the diagram. Plumb the posts, drill pilot holes through the braces and insert 5 1/2″ screws into the supports and ridge beams. Use 2 screws for each joint. These braces will enhance the rigidity of the pavilion.
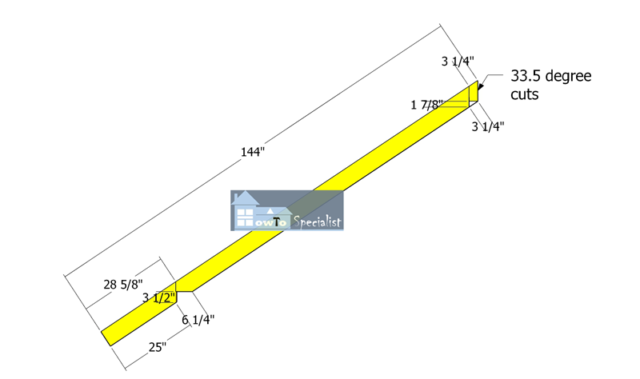
Rafters
Use 2×6 lumber for the rafters of the pavilion. Make 33.5 degree cuts to one end of the rafters and then make the birdsmouth cuts, as shown in the diagram. The roof has a 8:12 pitch which corresponds to a 33.5 degree slope.
You are free to play with the angles and change the roof slope. Just remember that changing the angles will also change the height of the ridge beam supports. Mark the cut lines to the beams and get the job done with a circular saw. The birdsmouths cuts are needed so you can fit the rafters to the plates and ridge beam properly.
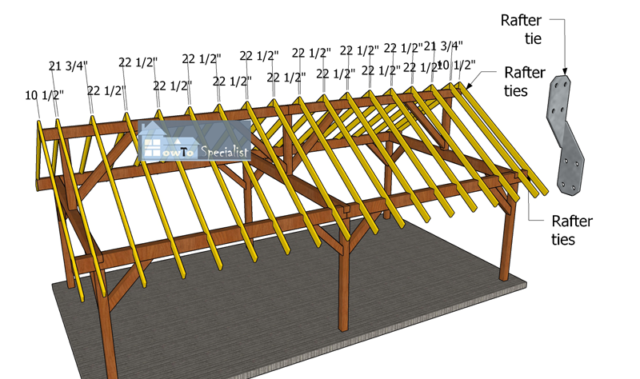
Fitting-the-rafters
Fit the rafters to the top of the pavilion. Use the info from the diagram to space the rafters every 24″ on center. The numbers you see in the plans represents the distance between the rafters. Use rafter ties and 1 1/2″ structural screws to lock the rafters into place tightly.
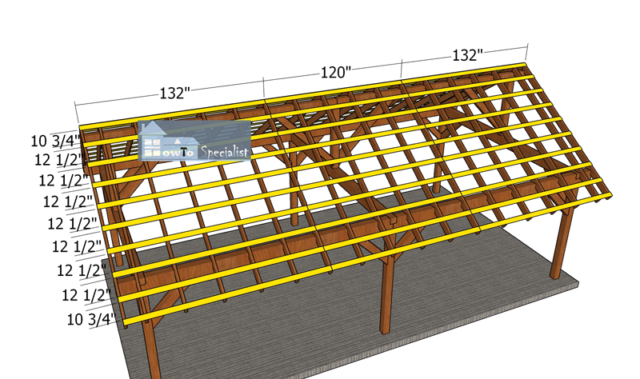
Fitting-the-purlins
This gable pavilion will be covered with metal roofing, therefore fit the 1×4 purlins for the roof structure. Place the 1×4 purlins every 16″ on center and lock them to the rafters with 1 5/8″ screws. Align the edges at both ends, before inserting the screws.

Fitting-the-side-trims
Fit the 1×8 trims to the sides of the pavilion. Align the edges flush and insert 6d nails to lock them to the rafters.

Gable-end-trims
Use 1×8 lumber for the front and back roof trims. Make 33.5 degree cuts to one end of the trims. Attach the trims to the rafters and insert 2″ / 6d nails to lock them into place tightly.
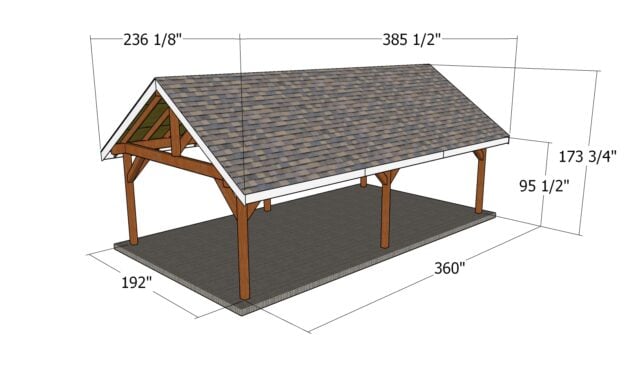
16×30 Gable Pavilion Plans – dimensions
Fit the metal roofing sheets to the top of the pavilion. Align the edges flush and insert 3/4″-1″ roofing screws to lock the panels to the purlins. In addition, fit drip edges to al sides of the roof, making sure you read the manufacturer’s instructions.
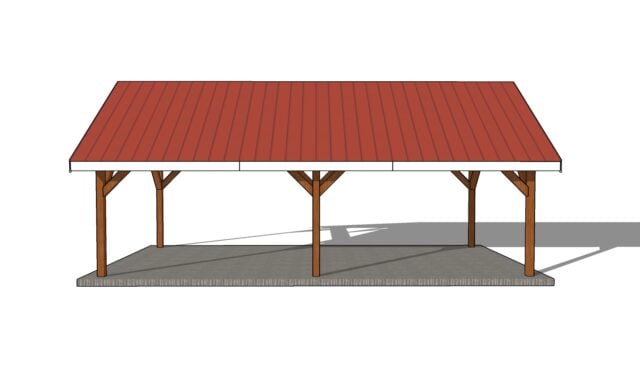
16×30 Gable Pavilion Plans – side view
This is a relatively small pavilion, so if you have a big family or many friends, I recommend you to take a look over the rest of my designs, for example this 20×24 pavilion or this 12×16 pavilion.
This will be one of the most popular pavilion plans in the world, because from my research and statistics, this makes for the perfect size and design. You have in one package: beautiful design, perfect size for a grill / pizza oven, sturdy enough for snow.
Last but not least, you need to take care of the finishing touches. Therefore, fill the holes with wood putty and then smooth the surface with sandpaper. Apply a few coats of paint or stain over the components to enhance the look of the shed and to protect the components from decay. Since you are here, you might as well take a look over over my screened gazebo plans.
If you want to download the plans. just click on the GET PDF PLANS button bellow.
Thank you for reading my project about 16×30 gable pavilion plans and we recommend you to check out the rest of the projects. Don’t forget to LIKE and SHARE our projects with your friends, by using the social media widgets. SUBSCRIBE to be the first that gets our latest projects.

1 comment
Awesome!