This diy article is about flower box plans. We show you how to build a simple flower box, using common materials and tools, basic woodworking techniques and a lot of imagination. If you love taking care of your flowers or you just want to enhance the look of your deck / patio, you should make an simple planter with a rustic appearance. Taking into account the low complexity of the project, we can say that anyone can get the job done, even though you haven’t worked before with lumber. Don’t forget that you could adjust the design and the size of the flower box, according to your needs and tastes, while using the same techniques described in the tutorial. See all my Premium Plans in the Shop.
Made from this plan
In order to build a flower box, you need the following:
Materials
- A – 4 pieces of 2×2 lumber 15” long; 2 pieces of 2×2 lumber 27” long FRAME
- B – 4 pieces of 3” long wood screws SCREWS
- C – 4 pieces of 2×2 lumber 12 1/2” long SUPPORTS
- D – 9 pieces of 1×4 lumber 15” long FLOOR
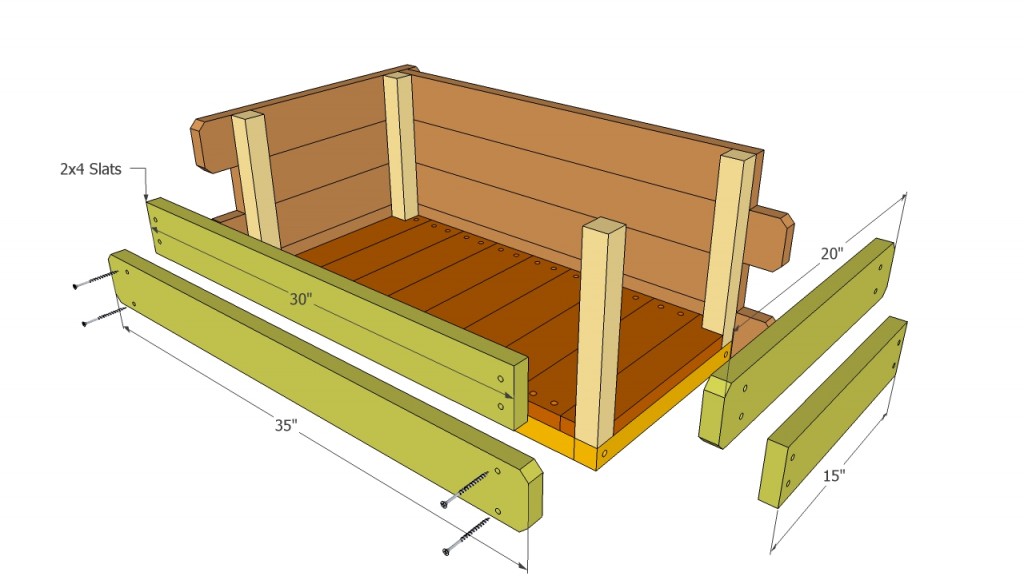
- E – 4 pieces of 1×4 lumber 35” long SIDE WALLS
- F – 4 pieces of 1×4 lumber 30” long SIDE WALLS
- G – 4 pieces of 1×4 lumber 20” long SIDE WALLS
- H – 4 pieces of 1×4 lumber 15′ long SIDE WALLS
- I – 2” screws SCREWS FOR FLOOR
- J – 2 – 3” screws SCREWS FOR SIDE WALLS
- 2 pieces of 2×2 lumber – 8 ft
- 6 pieces of 1×4 lumber – 8 ft
- 2 1/2″ screws
- 1 1/4″ screws
- glue, stain
- wood filler
Tools
- Safety gloves, glasses, Miter saw
- Chalk line, tape measure, spirit level, carpentry pencil
- Drill machinery and drill bits
Tips
- Smooth the edges of the wooden boards, with a router
- Pre-drill holes in the wooden components, before driving in the screws
- Countersink the head of the screws
- Align the components before locking them into place
- Don’t use lumber that is likely to crack or shrink
- Don’t over-tighten the screws to prevent wood from splitting
Time
- Two Hours
Related
Flower Box Plans
Building a flower box should be straight forward job, as you only have to cut several components and lock them into place with screws. If you take the measurements accurately, use proper tools with a sharp blade and align everything before driving in the screws, you shouldn’t face any kind of issues.
How to Build a Flower Box

Flower Frame Plans
Firstly, you have to build the base of the flower box, from 2×2 perfectly straight lumber. Select the wood with great care, making sure it doesn’t have any cracks or other visible flows. After you cut the components at the right size, using a miter saw, you have to pre-drill several holes, 1/2” from the edges and insert the 3” screws

Installing the floor of the box
Afterwards, you have to cut the 1×4 slats that will be the floor of the flower box. Work with great care and attention, making sure the cuts are accurate and the components are equal. Notch the first and the last board, to fit between the corner supports.
Next, install four 2×2 supports along each corner of the wood box, as in the image. Drill pilot holes trough the frame, before inserting 3” screws in the corner supports.

Building a flower box
Continue the project by installing the walls of the flower box, making sure you cut the 1×4 slats at the right size and align properly, before attaching them to the supports, with 2” screws.
As you can notice, we have chosen a simple design for the box, but which still has a rustic appearance. Therefore, you don’t need to finish the boards too much, to enhance the natural look of the flower planter.

Flower boxes plans
Install the components into place, after you have pre-drilled the holes, ensuring you don’t over-tighten the screws. In order to protect the flower box from water damage or wood decay, apply at least two coats of varnish. Make sure the paint is nontoxic to the plants.
Thank you for reading our article about flower box plans and we recommend you to check the rest of our projects. Don’t forget to share our articles with your friends, by using the social media widgets.

