Welcome to today’s woodworking free plan, where we’re diving into something that brings both charm and functionality into your living space—a farmhouse TV stand. This project is about more than just building a piece of furniture; it’s about creating a centerpiece that adds warmth and character to your home, a piece that says, “We love the cozy, rustic vibes that only a handcrafted piece can bring.”
Now, whether you’re a seasoned builder or just dipping your toes into the world of DIY, this project is designed with you in mind. We’re going to walk through each step with precision and care, ensuring that by the end of this build, you not only have a beautiful new addition to your living room but also a sense of accomplishment that comes from crafting something with your own two hands.
We recommend you to invest in the best materials you could afford. Therefore, you should buy weather-resistant lumber, such as pine or cedar. Always take accurate measurements before adjusting the size of the components at the proper size. Drill pilot holes trough the components before inserting the wood screws, to prevent the wood from splitting. My plans come with a full cut / shopping list and they are PDF Download and Print friendly. See all my Premium Plans HERE.
Made from this plan
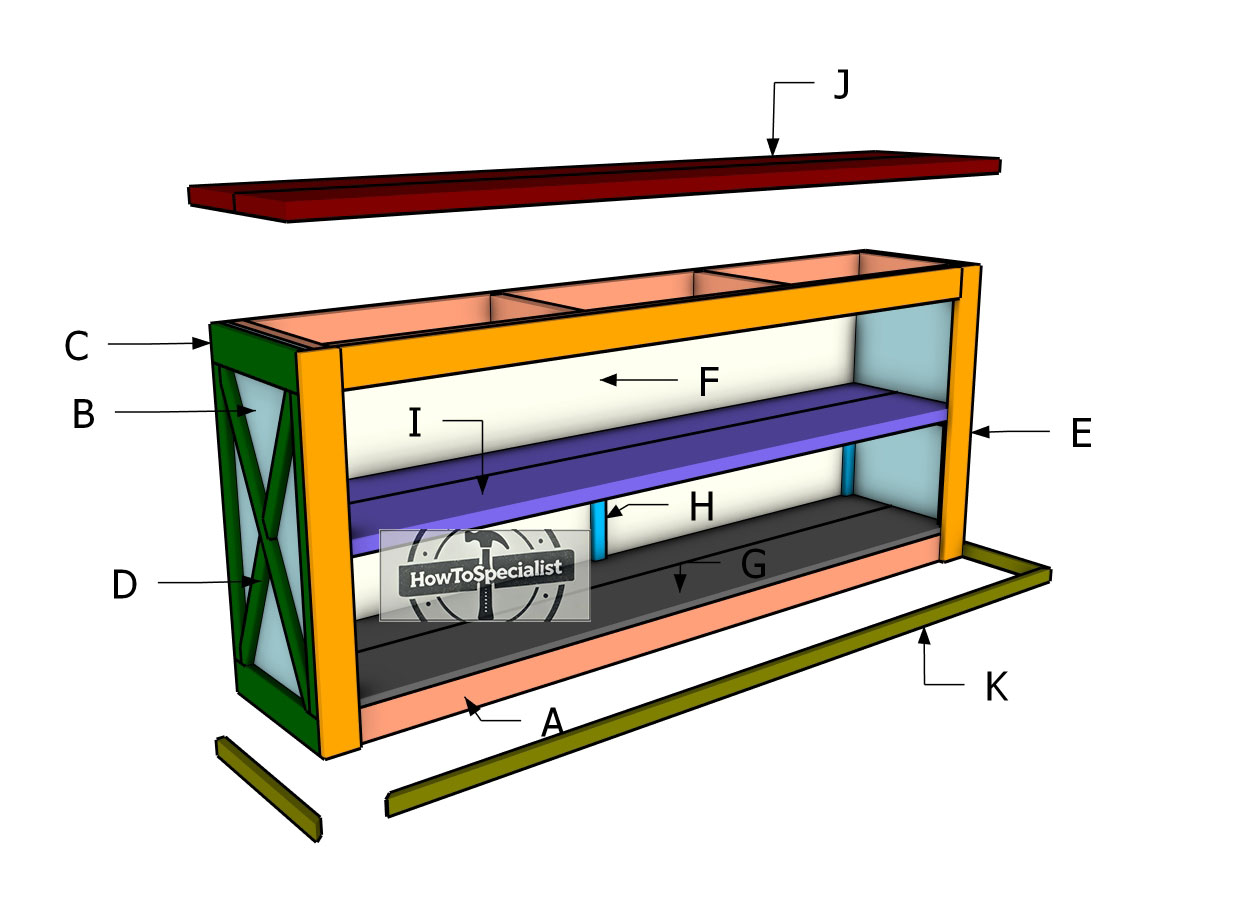
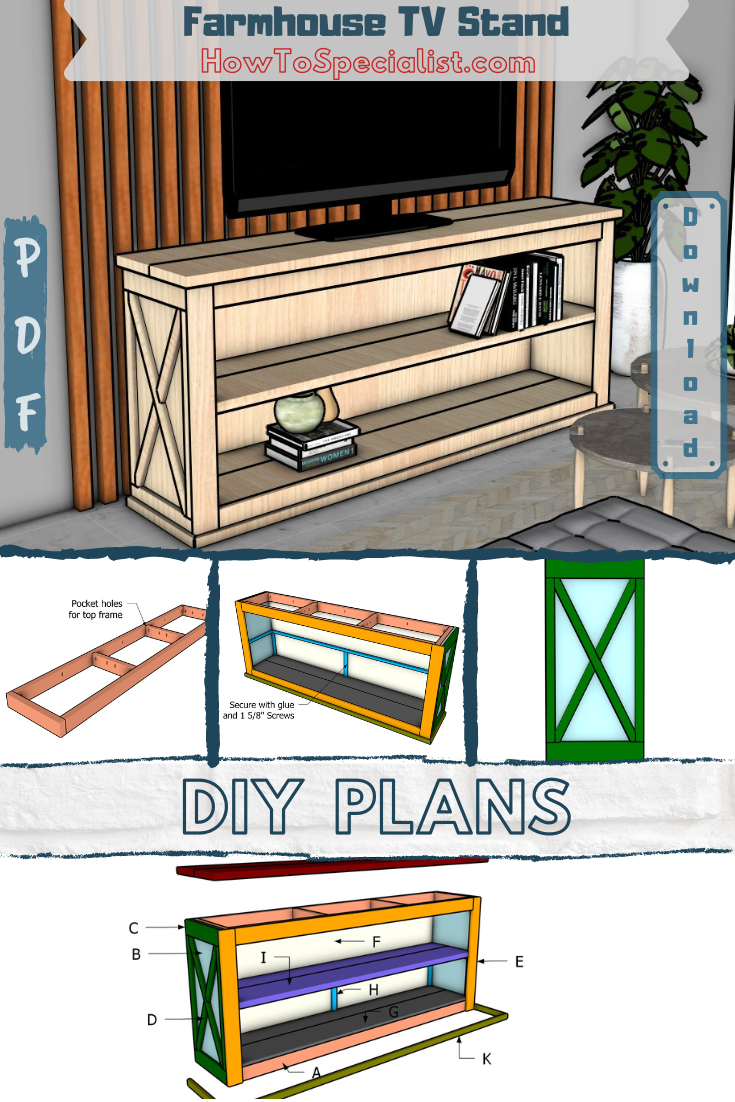
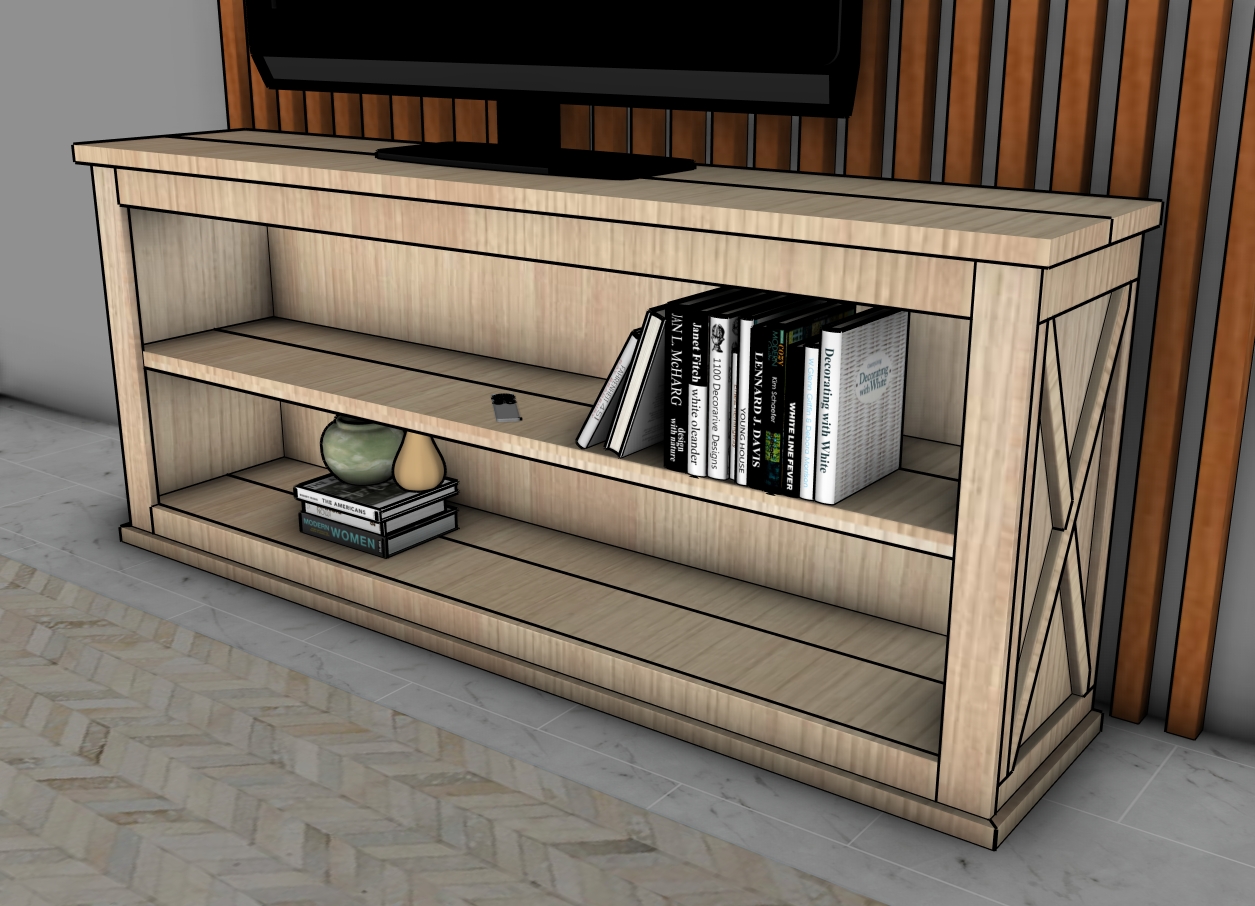
Farmhouse TV Stand – Free Plans
Building-a-farmhouse-TV-stand
Materials
A – FRAMES – 2×4 lumber 81″ – 4 pieces
A – FRAMES – 2×4 lumber 17″ – 4 pieces
A – FRAMES – 2×4 lumber 14″ – 4 pieces
B – SIDE PANELS – 3/4″ plywood 17 1/4″x36″ – 2 pieces
C – SIDE TRIMS – 1×4 lumber 17 1/4″ – 4 pieces
C – SIDE TRIMS – 1×2 lumber 29″ – 4 pieces
D – X TRIMS – 1×2 lumber 32 1/4″ – 4 pieces
E – FRONT TRIMS – 1×4 lumber 80″ – 2 pieces
E – FRONT TRIMS – 1×4 lumber 36″ – 2 pieces
F – BACK PANEL – 1/4″ plywood 36″x84″ – 1 piece
G – FLOOR – 1×8 lumber 84″ – 1 piece
G – FLOOR – 1×10 lumber 84″ – 1 piece
H – SHELF SUPPORT – 1×2 lumber 12 5/8″ – 6 pieces
H – SHELF SUPPORT – 1×2 lumber 17″ – 2 pieces
H – SHELF SUPPORT – 1×2 lumber 84″ – 1 piece
I – SHELF – 2×8 lumber 84″ – 1 piece
I – SHELF – 2×10 lumber 84″ – 1 piece
J – TABLETOP – 2×10 lumber 89″ – 2 pieces
K – BOTTOM TRIM – 1×2 lumber 18 3/4″ – 2 pieces
K – BOTTOM TRIM – 1×2 lumber 88 1/2″ – 2 pieces
- 2×10 lumber 8 ft – 3 pieces
- 2×8 lumber 8 ft – 1 piece
- 2×4 lumber 8 ft – 5 pieces
- 1×4 lumber 8 ft – 4 pieces
- 1×2 lumber 8 ft – 8 ft
- 2″ nails – 100 pieces
- 1 piece of 3/4″ plywood – 4’x4′
- 1 piece of 1/4″ plywood – 4’x8′
- 3 1/2″ screws – 100 pieces
- 2 1/2″ screws – 50 pieces
- 1 5/8″ screws – 100 pieces
- 1 1/4″ screws – 100 pieces
Tools
- Circular saw
- Drill machinery, drill bits
- Safety gloves, glasses
- Chalk line, tape measure, spirit level, carpentry pencil
Time
- One weekend
Related
- TV stand plans
- Media console plans
- Farmhouse Console Table
- Modern farmhouse table plans
- Farmhouse nightstand plans
Pin for later!
Wooden TV Stand – Building the frame
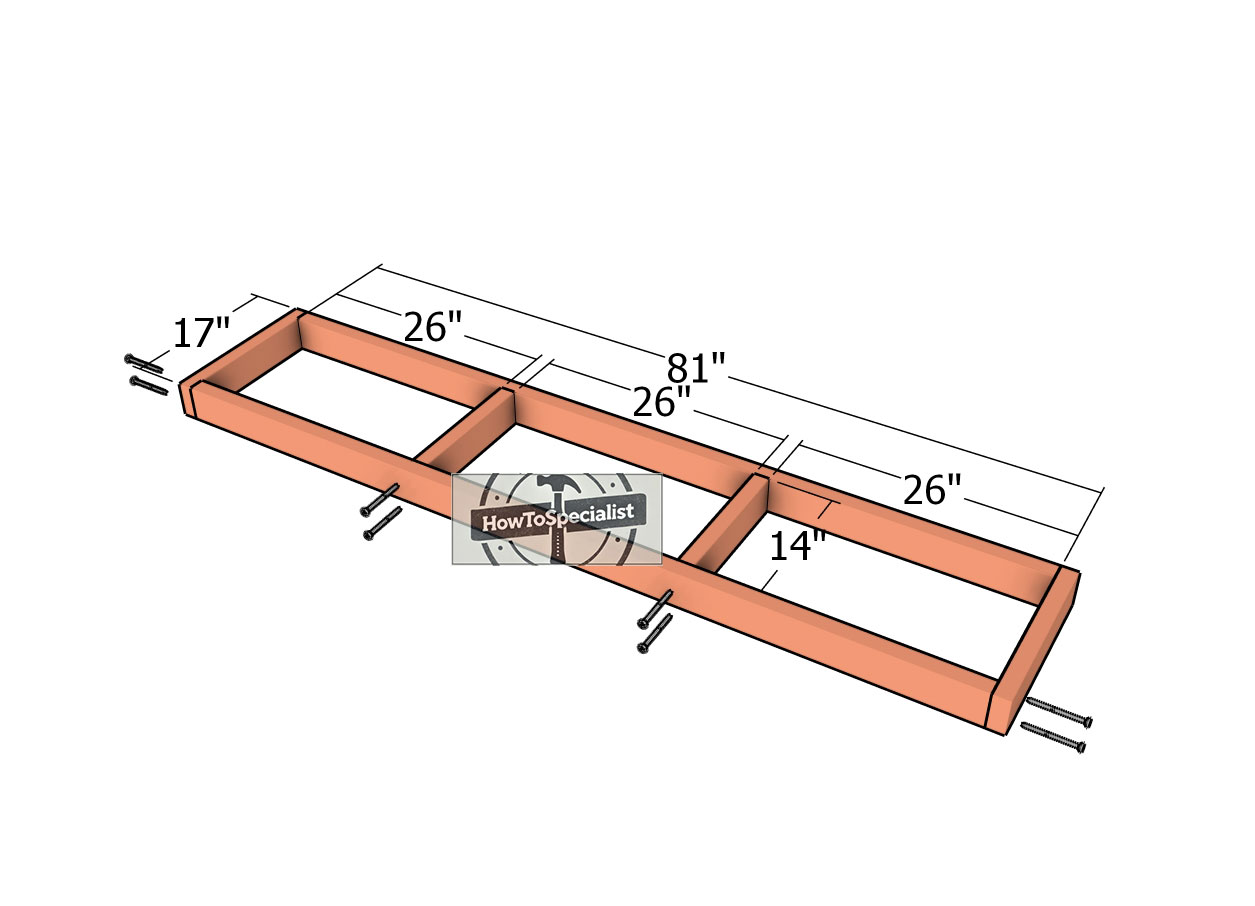
Assembling-the-frames
The first step in this project is building the two main frames for the TV stand. Start by cutting your 2×4 lumber to the specified dimensions. Once you’ve got everything prepped, lay your pieces out on a level surface to ensure accuracy as you work.
Next, drill pilot holes in the appropriate spots, then secure the pieces together with 3 1/2″ screws to ensure a tight, sturdy fit. As you assemble the frames, grab a speed square to check that your corners are perfectly right-angled—this will help keep everything aligned and ensure a professional-looking result.

Pocket-holes-for-top-frame
It’s important to note that for the top frame, you’ll need to drill pocket holes to prepare for attaching the tabletop boards. This allows you to secure the boards with hidden screws, giving the finished piece a clean, seamless look.
Make sure to position those pocket holes strategically along the top frame so that when it’s time to attach the tabletop, everything comes together smoothly without visible hardware. This step not only adds to the overall strength of the build but also enhances the aesthetic appeal of your TV stand.

Fitting-the-side-panels
The next step in assembling your TV stand is to attach the 3/4″ plywood sides. Start by aligning the edges so they’re perfectly flush with the front of the frame. Once everything is lined up, take a moment to ensure the panels are plumb and square—this is crucial for a sturdy, well-built piece.
After double-checking the alignment, drill pilot holes to prevent splitting, then secure the panels with 1 5/8″ screws. Make sure to use at least three screws per joint to guarantee a strong connection that will stand the test of time.
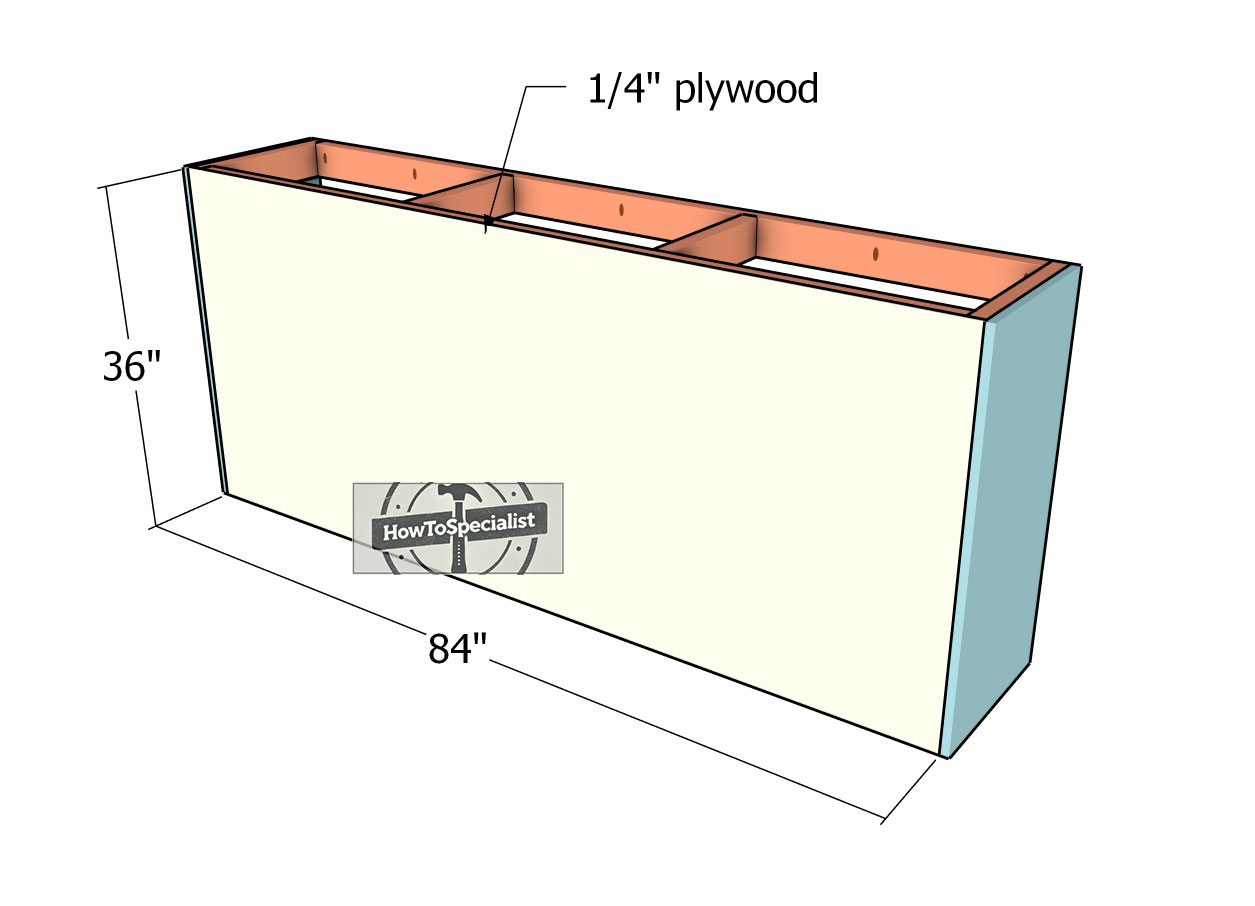
Fitting-the-back-panel
Next, it’s time to attach the 1/4″ plywood back panel to your TV stand. Begin by carefully aligning the edges so that they’re flush with the rest of the frame. Once everything is in position, secure the back panel by inserting 1 1/4″ screws, ensuring a tight and stable fit.
To keep the panel firmly in place, space the screws every 8 inches along the framing, which will provide consistent support and durability for the entire structure. This step will give your TV stand added stability and a clean, finished look from the back.
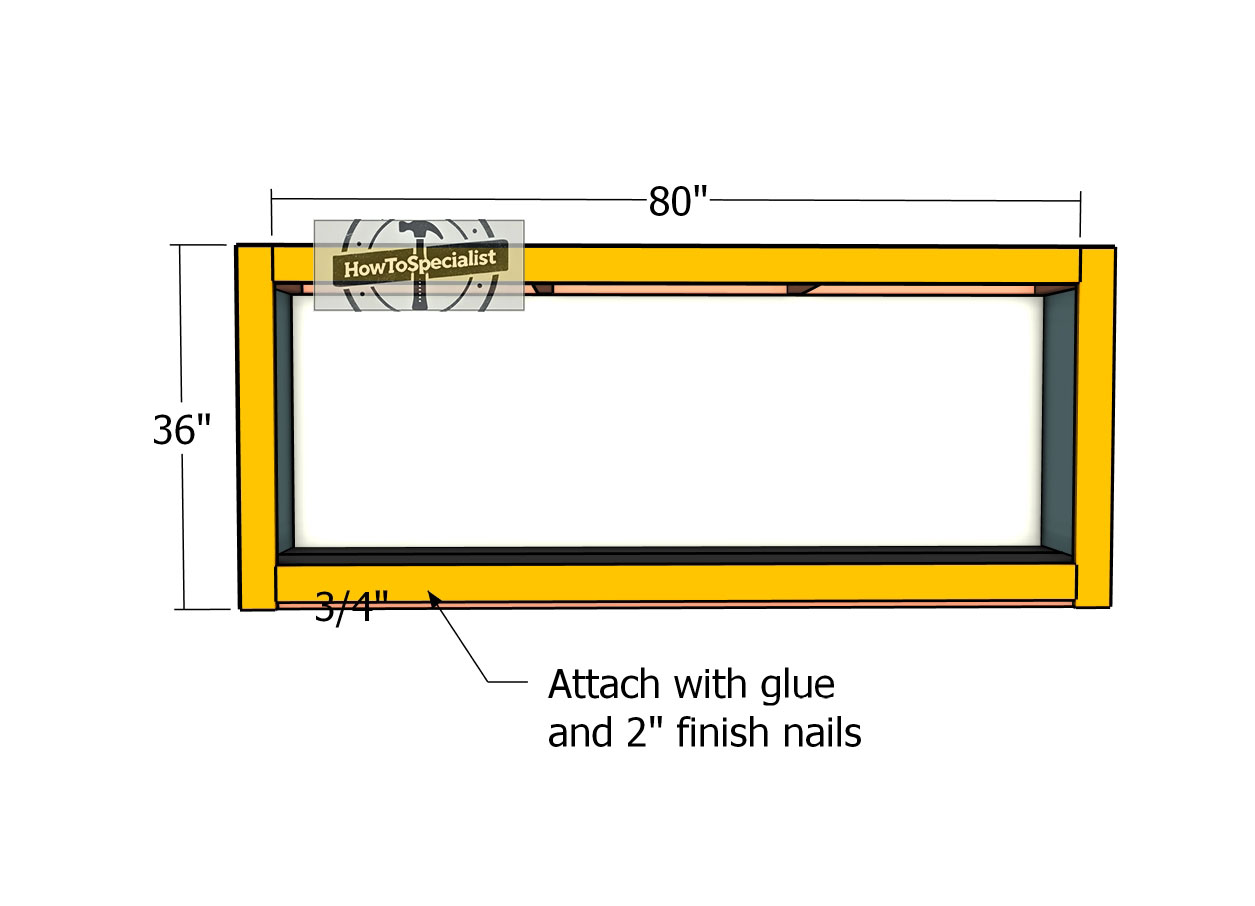
Attaching-the-side-trims
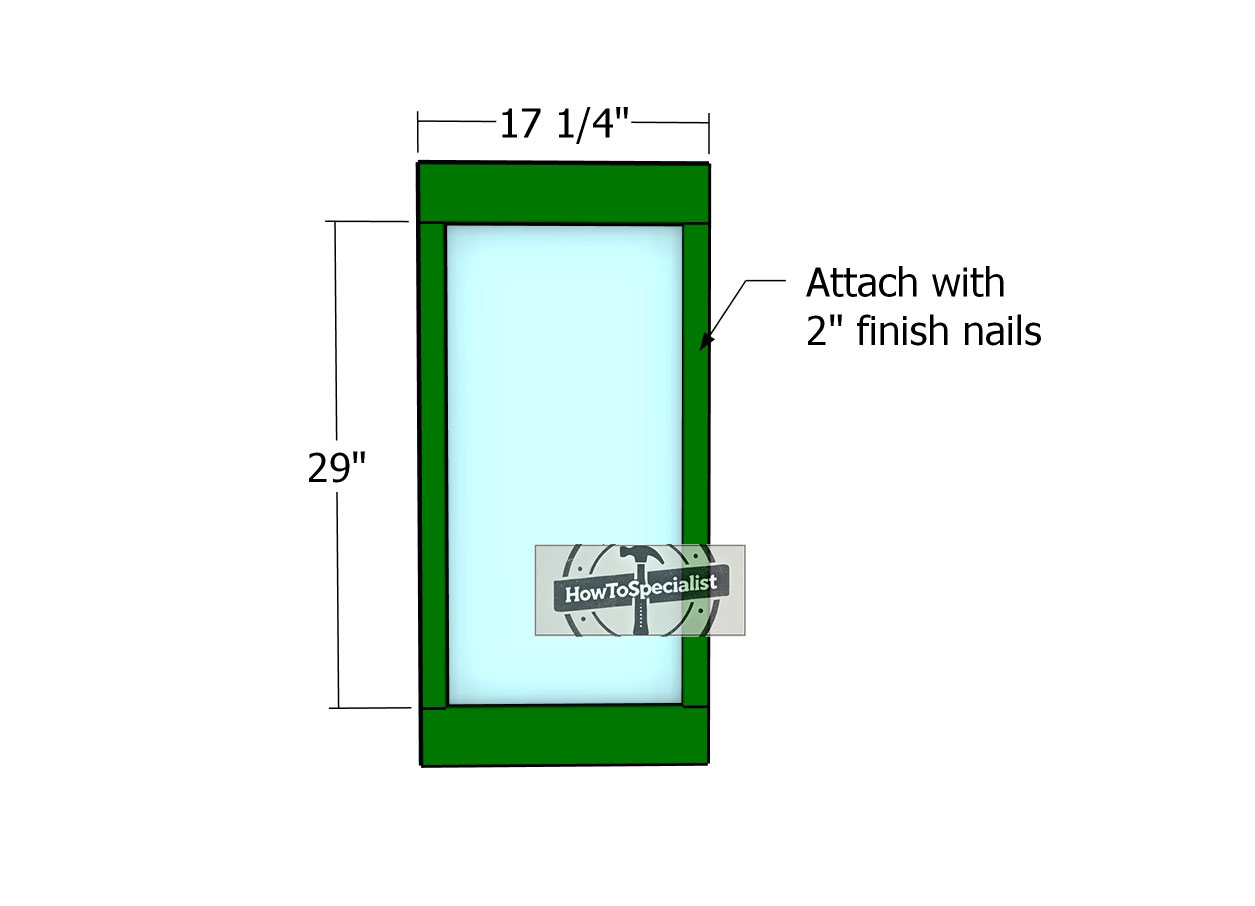
To continue the project, it’s time to add the finishing touches by attaching the trims to the sides of the TV stand. For this step, use 1×4 boards for the top and bottom trims, and 1×2 boards for the side trims. Apply a generous amount of wood glue to the back of each trim piece, then position them carefully, making sure the edges are perfectly aligned.
Secure the trims with 2″ finish nails, ensuring they are tightly locked in place. Take extra care to leave no gaps between the trim pieces, as this will give your TV stand a polished, seamless appearance that really elevates the overall design.
X – Trims
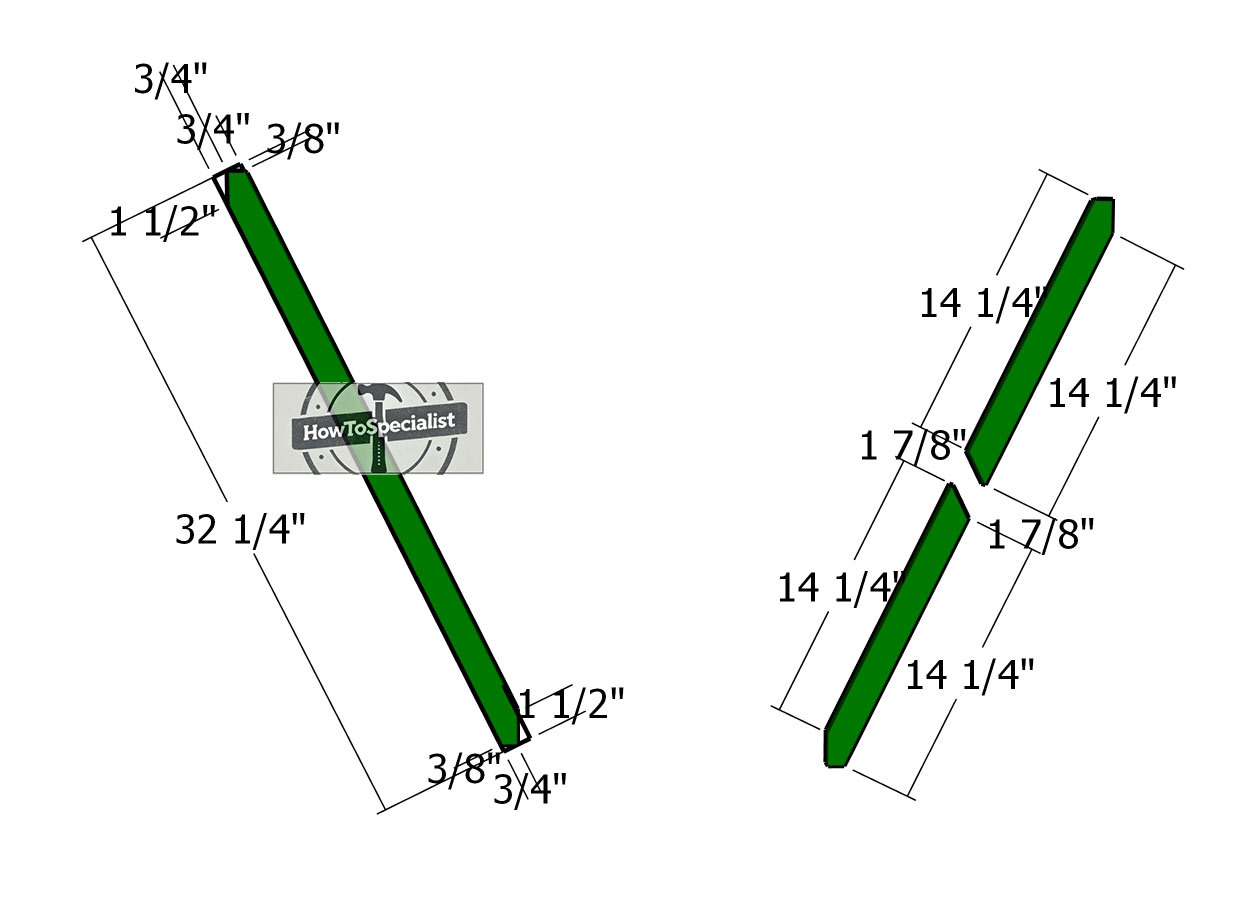
The X-shaped trims on the sides of the TV console table will bring that classic rustic charm to your project, making it truly stand out. Start by marking the cut lines on your 1×2 boards, ensuring your measurements are precise for a perfect fit. Once your lines are marked, use a saw to carefully cut along them.
After cutting, take some sandpaper and smooth out the edges of each piece, removing any rough spots or splinters. This attention to detail will not only enhance the look of your finished piece but also ensure that everything fits together seamlessly.
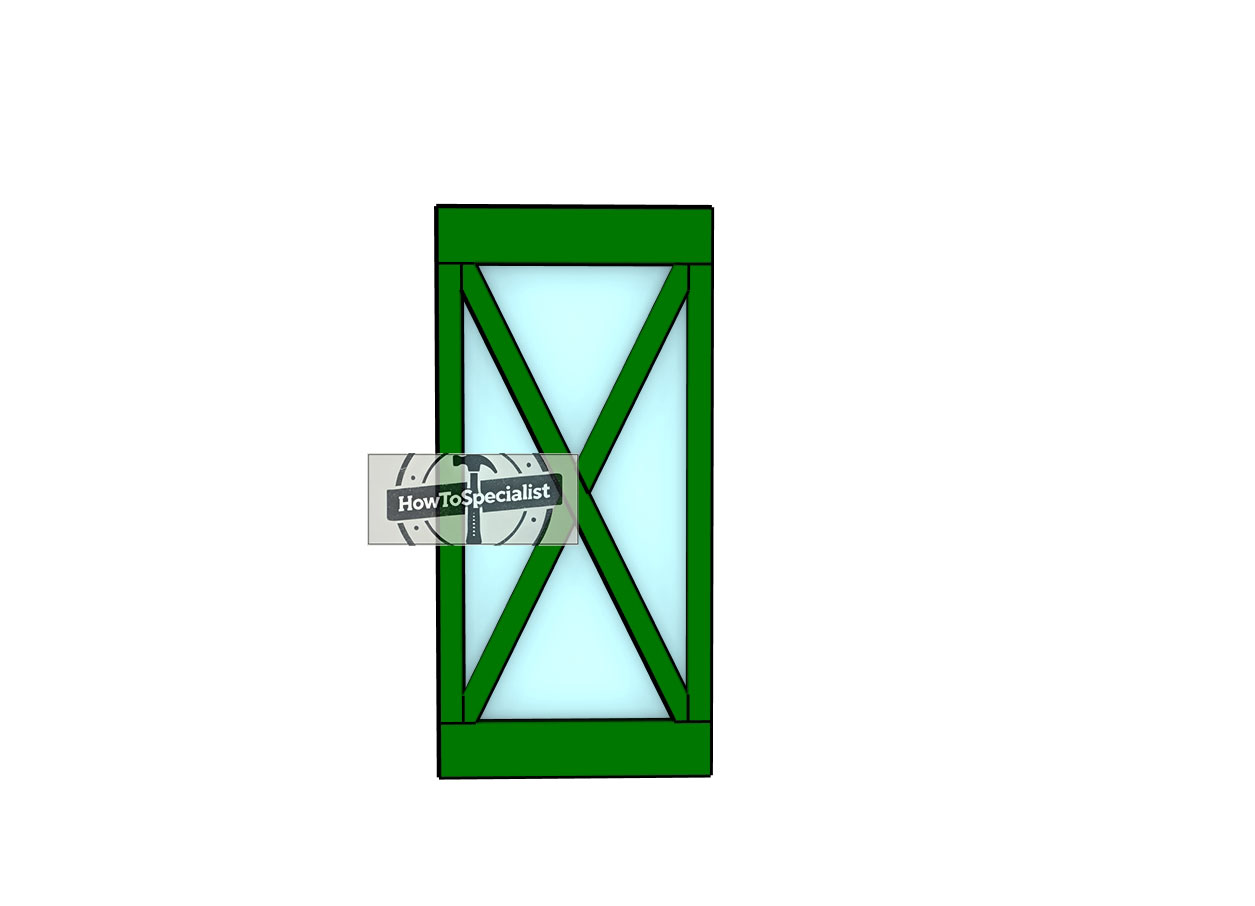
Side-Trims
Now that your X-shaped trims are ready, it’s time to attach them to the sides of the TV stand. Apply wood glue to the back of each trim piece, then carefully position them on the plywood panels, making sure everything lines up perfectly. Once in place, secure the trims with 2″ nails to ensure they are firmly locked in. The combination of glue and nails will give your X trims both a strong bond and a clean, finished appearance, adding that rustic charm you’re aiming for.
Floor-slats—TV-stand
Next up, we’ll construct the floor for your storage TV stand. For this, you’ll use a 1×8 and a 1×10 board, each cut to 84″ in length. If your boards measure slightly less than the standard width—around 7 1/2″ and 9 1/2″—you can leave small gaps between them to accommodate the difference.
Once you have the boards positioned, drill pilot holes along the edges to prevent the wood from splitting. Then, secure the boards to the framing by inserting 1 5/8″ screws, making sure everything is tightly fastened for a sturdy and reliable base. This floor will not only provide strong support but also enhance the overall structure of your TV stand.
Attaching-the-front-trims
To give your TV stand a polished and attractive finish, the next step is to attach the 1×4 trims to the front face. Start by aligning the edges of each trim piece so that they sit flush with the surrounding surfaces. Once everything is in position, apply wood glue to the back of each trim piece to ensure a strong bond.
Then, secure the trims in place with 2″ finish nails, making sure they’re tightly fastened for a clean, seamless look. These front-facing trims will not only enhance the aesthetic appeal of your TV stand but also add a touch of elegance and sophistication to the overall design.
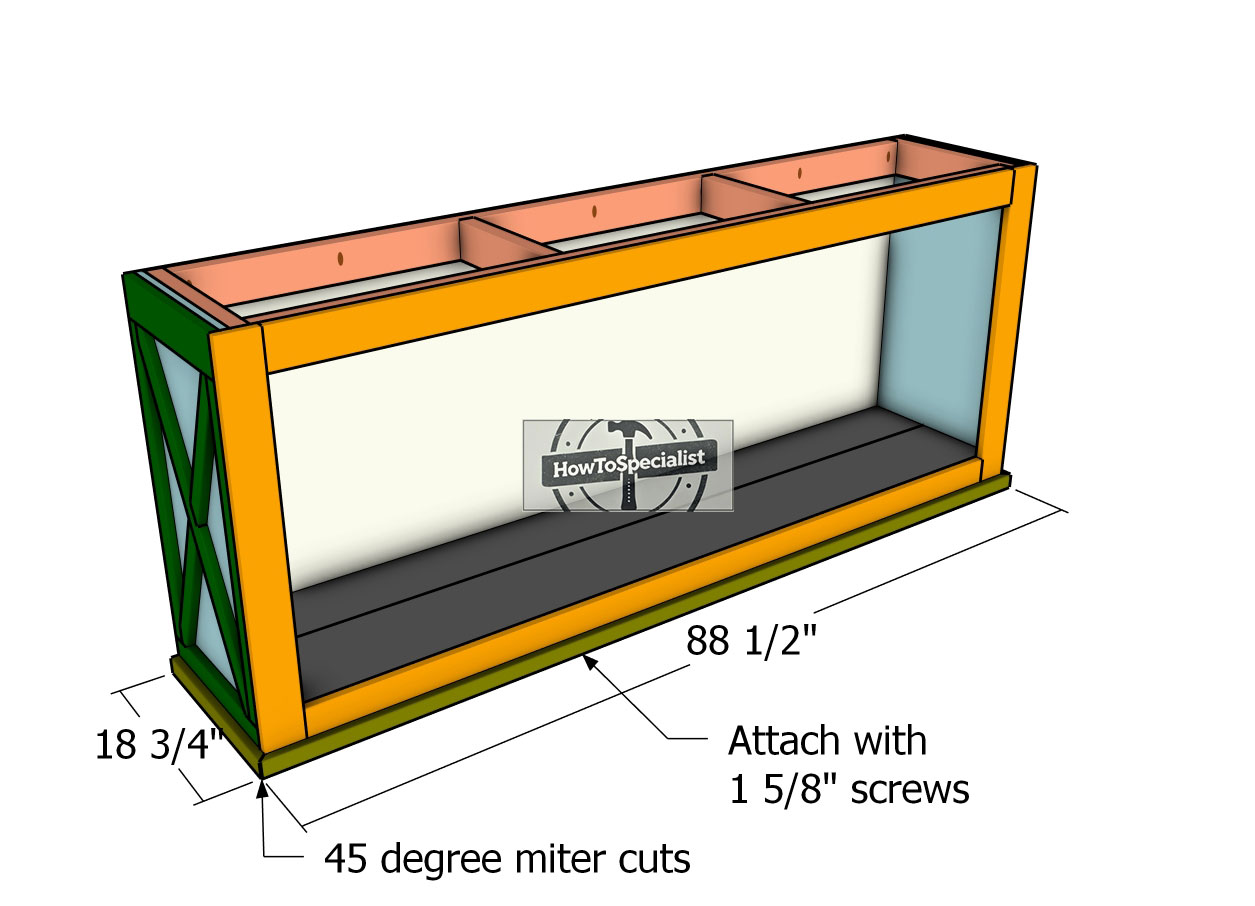
Fitting-the-base-trims
Add 1×2 trims to the base of the stand. Make 45 miter cuts to joint the trims together. Use 1 5/8″ screws or 2″ finish nails and glue to lock the trims into place tightly.
Attaching the shelf
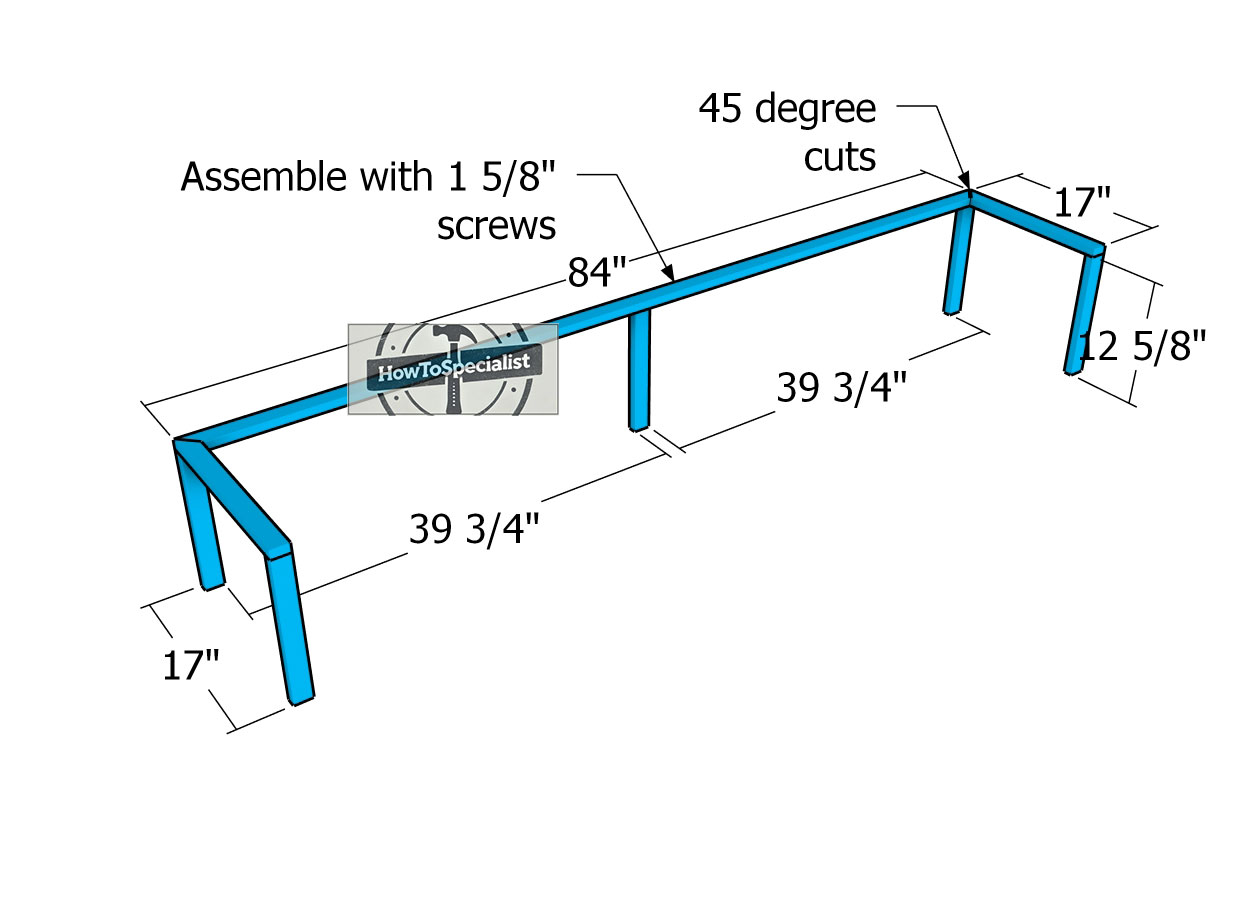
Assembling-the-shelf-support
To complete the base of your TV stand with a refined touch, you’ll want to add 1×2 trims around the bottom. Begin by making 45-degree miter cuts at the ends of each trim piece so they join together seamlessly at the corners. Once your cuts are precise, position the trims along the base, ensuring everything lines up perfectly.
Secure the trims using either 1 5/8″ screws or 2″ finish nails, along with wood glue for added strength.
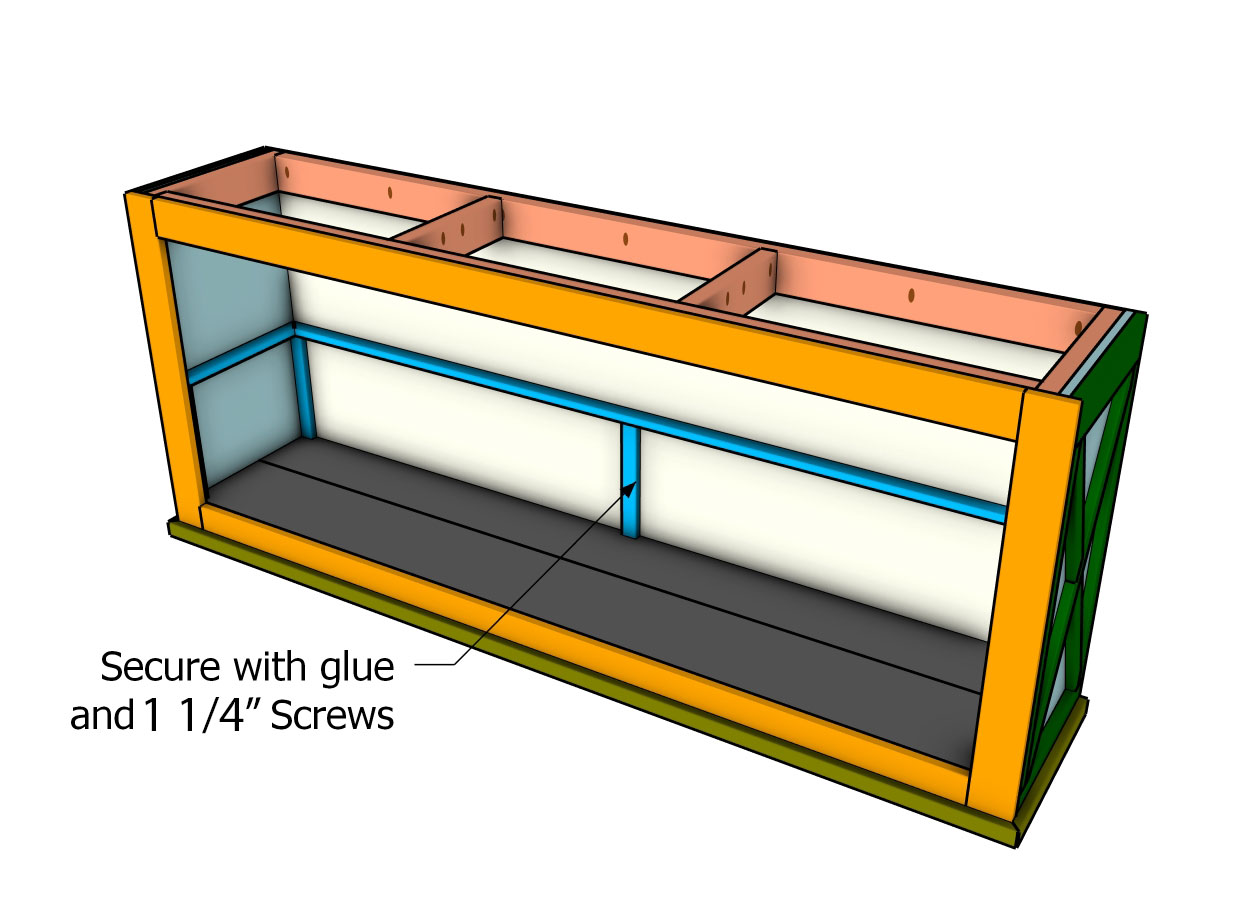
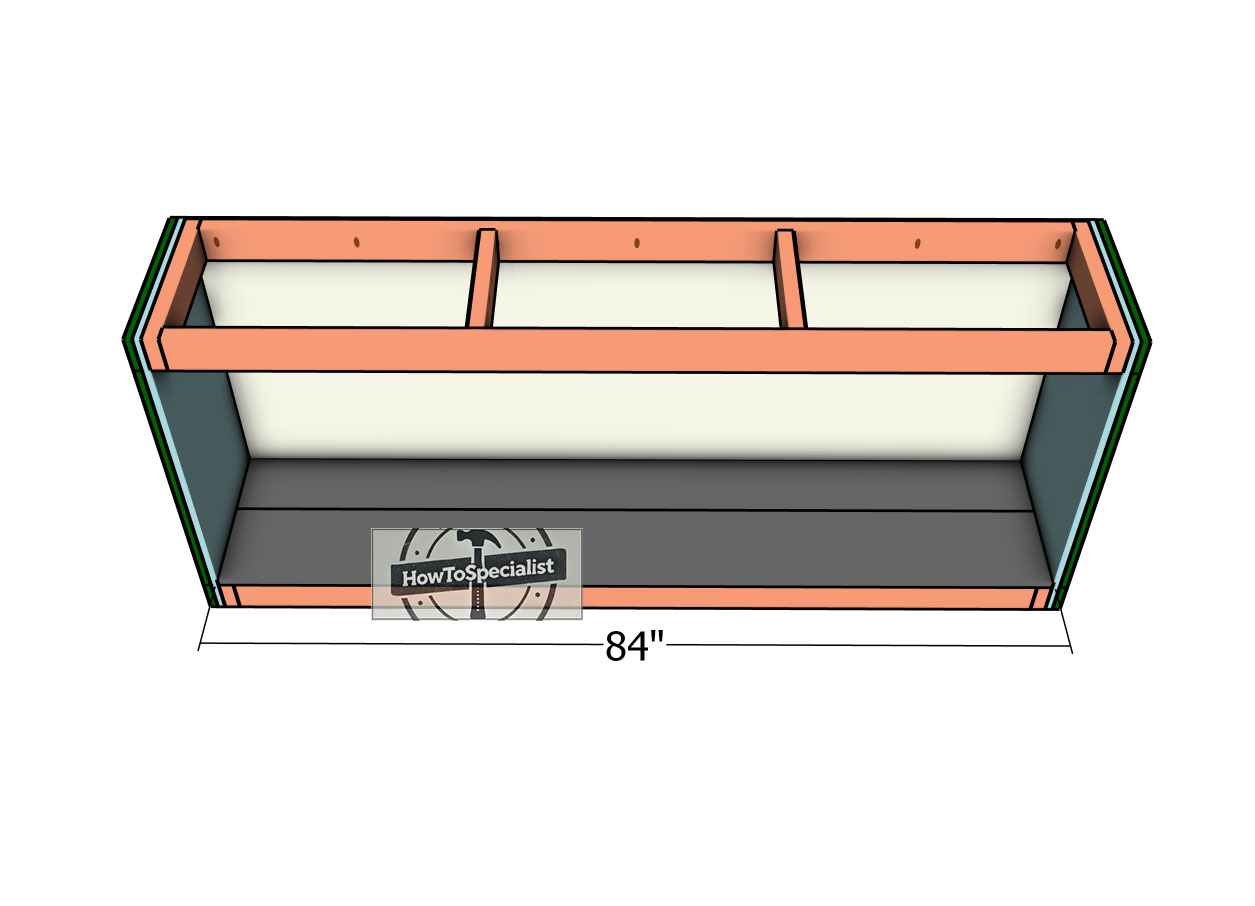
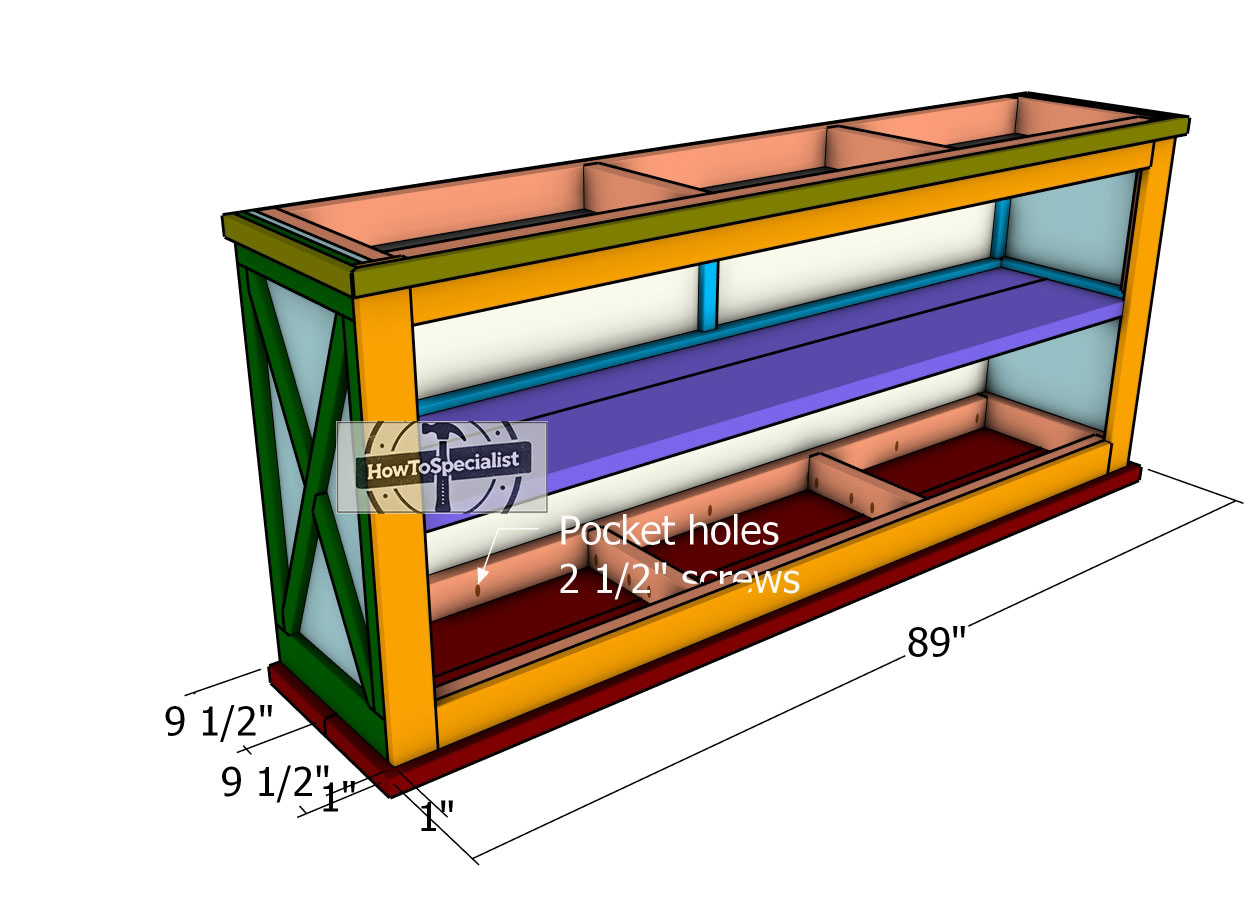
Fitting-the-shelf-supports
To ensure your TV stand is sturdy and well-supported, it’s time to attach the internal frame. Position the frame inside the stand, making sure it’s properly aligned. Secure it in place using 1 1/4″ screws, along with wood glue for added stability. As you work, use a level to ensure the supports are perfectly horizontal—this is crucial for maintaining the integrity and balance of your stand.
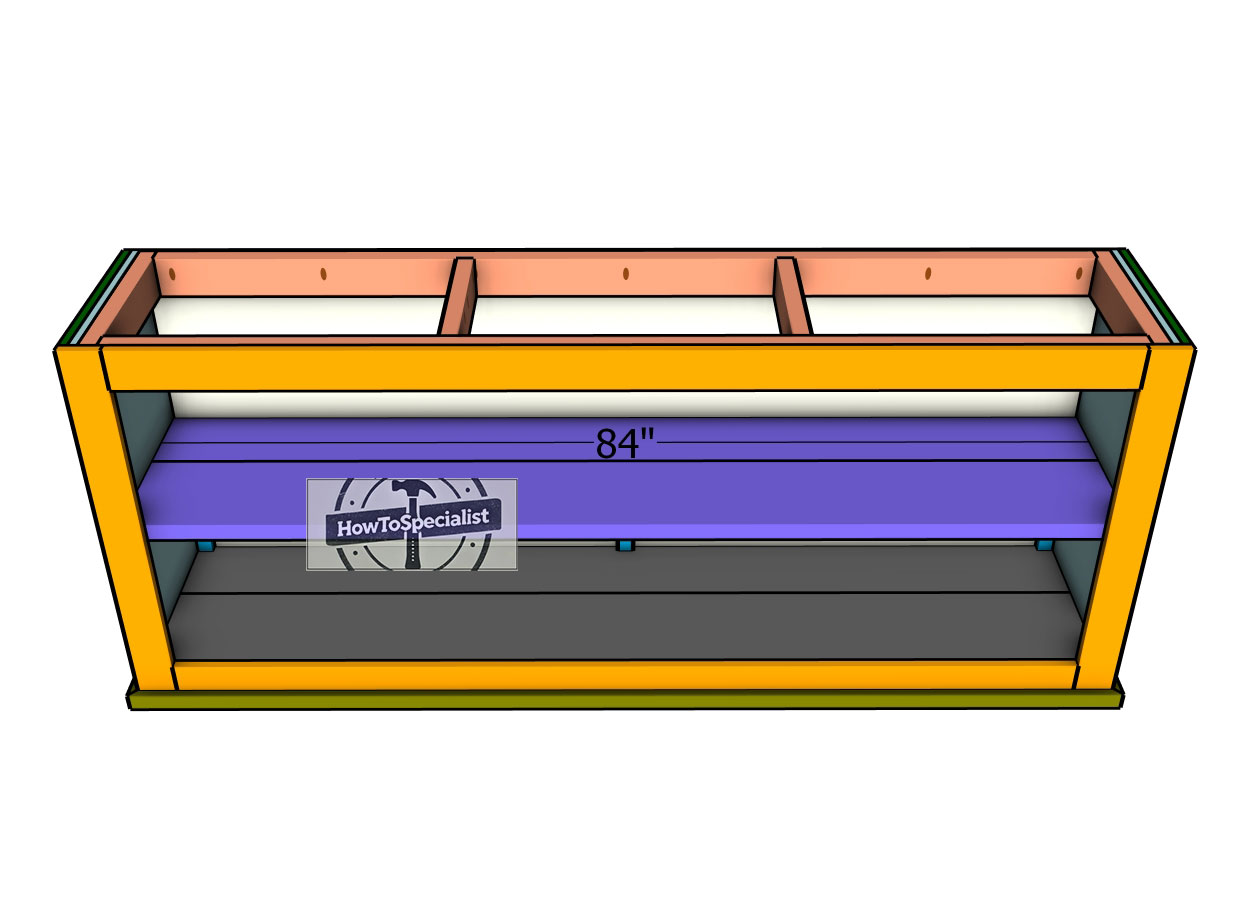
Attaching-the-shelf-boards
Now it’s time to install the slats for the middle shelf, following the layout provided in your plans. For this shelf, you’ll be using a 2×8 and a 2×10 board. Carefully fit these boards inside the structure, ensuring they are aligned correctly and sit securely within the frame.
The combination of the 2×8 and 2×10 will give your shelf the strength and stability needed to hold whatever you plan to store on it, while also maintaining the rustic charm of the overall design. Once in place, make sure the slats are level and well-supported to complete this step of the build.
Attaching-the-tabletop
For the tabletop, we’ll be using two 2×10 boards. Start by laying the boards flat on a level surface, ensuring they’re aligned edge-to-edge. Apply wood glue between the boards to create a strong bond. Once the boards are securely glued together, center the TV stand on top of the tabletop, positioning it according to the diagram.
With everything in place, insert 2 1/2″ screws through the pre-drilled pocket holes to firmly attach the stand to the tabletop. This step will ensure that your tabletop is securely fastened and aligned, providing a stable and attractive surface for your TV stand.
Finishing touches
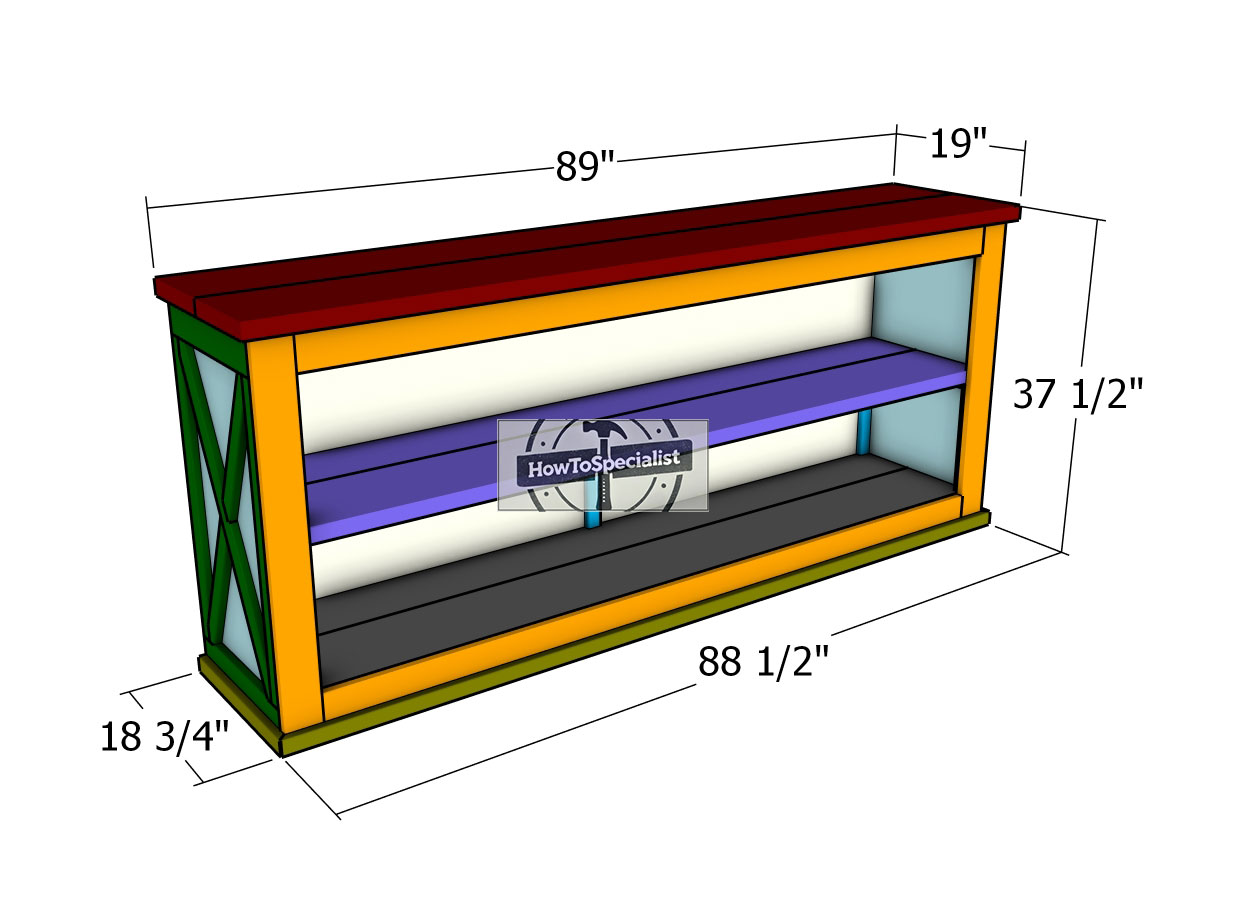
Wooden-TV-Stand—DIY-Plans—Dimensions
When it comes to materials, we’re looking at a modest investment that delivers a big impact. Expect to spend around $100 to $150 on quality lumber, depending on your choice of wood and local prices. Add in hardware – screws – and you’re looking at another $20. Finish it off with paint or stain, and you’re looking at an additional $15 to $25.
So, all in, this project should land somewhere between $100 and $150, a small price to pay for something that will last for years and enhance your space with that farmhouse flair.
Wooden TV Stand plans
As for time, this project is one you can tackle over a weekend. I’d estimate a solid 8 to 10 hours of work, depending on your experience level and whether you’re working solo or with a helping hand.
You’ll want to budget about 2 to 3 hours for cutting and prepping the wood, 4 to 5 hours for assembly and hardware installation, and another hour or two for finishing touches like sanding and staining. Spread that out over a couple of days, and you’ll have yourself a beautiful, custom-built TV stand before you know it.
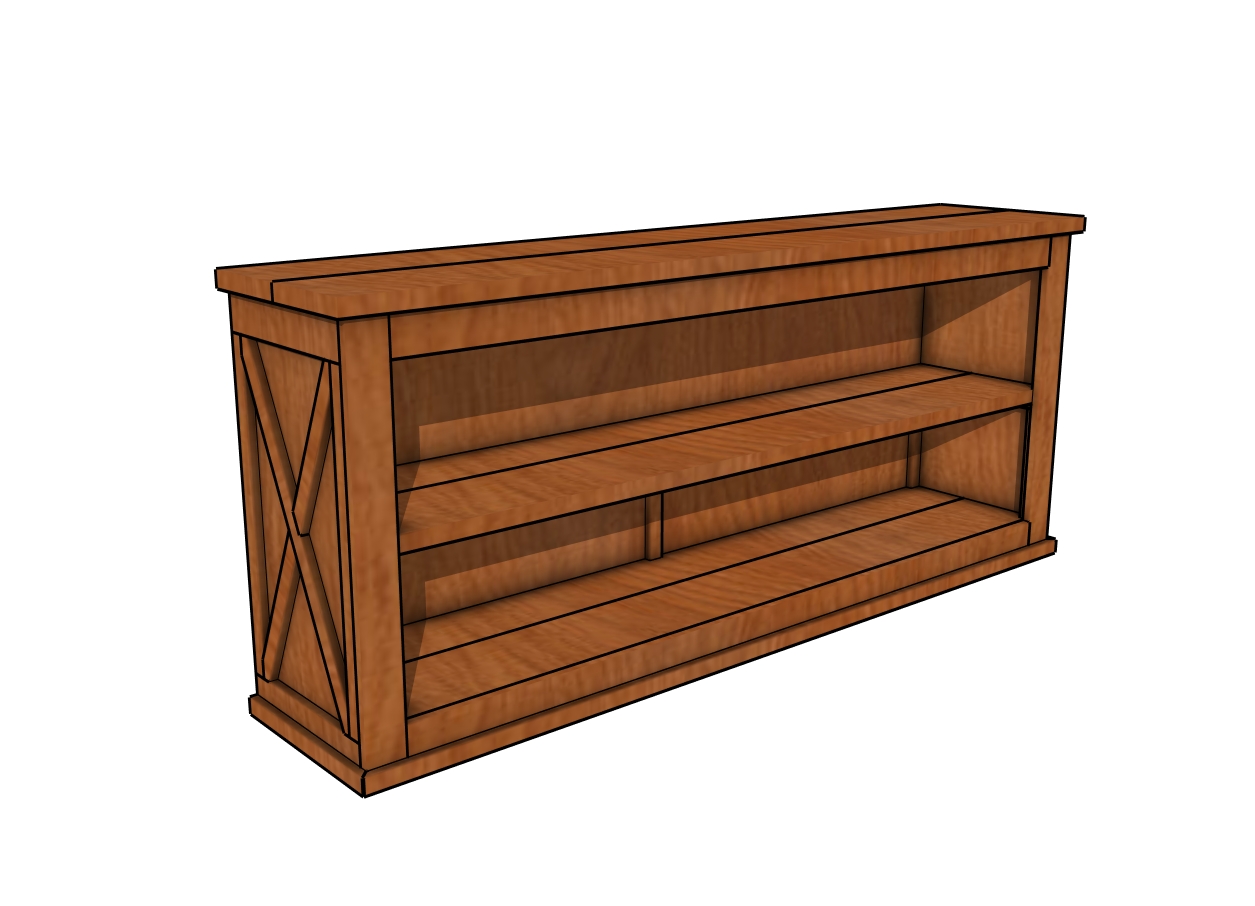
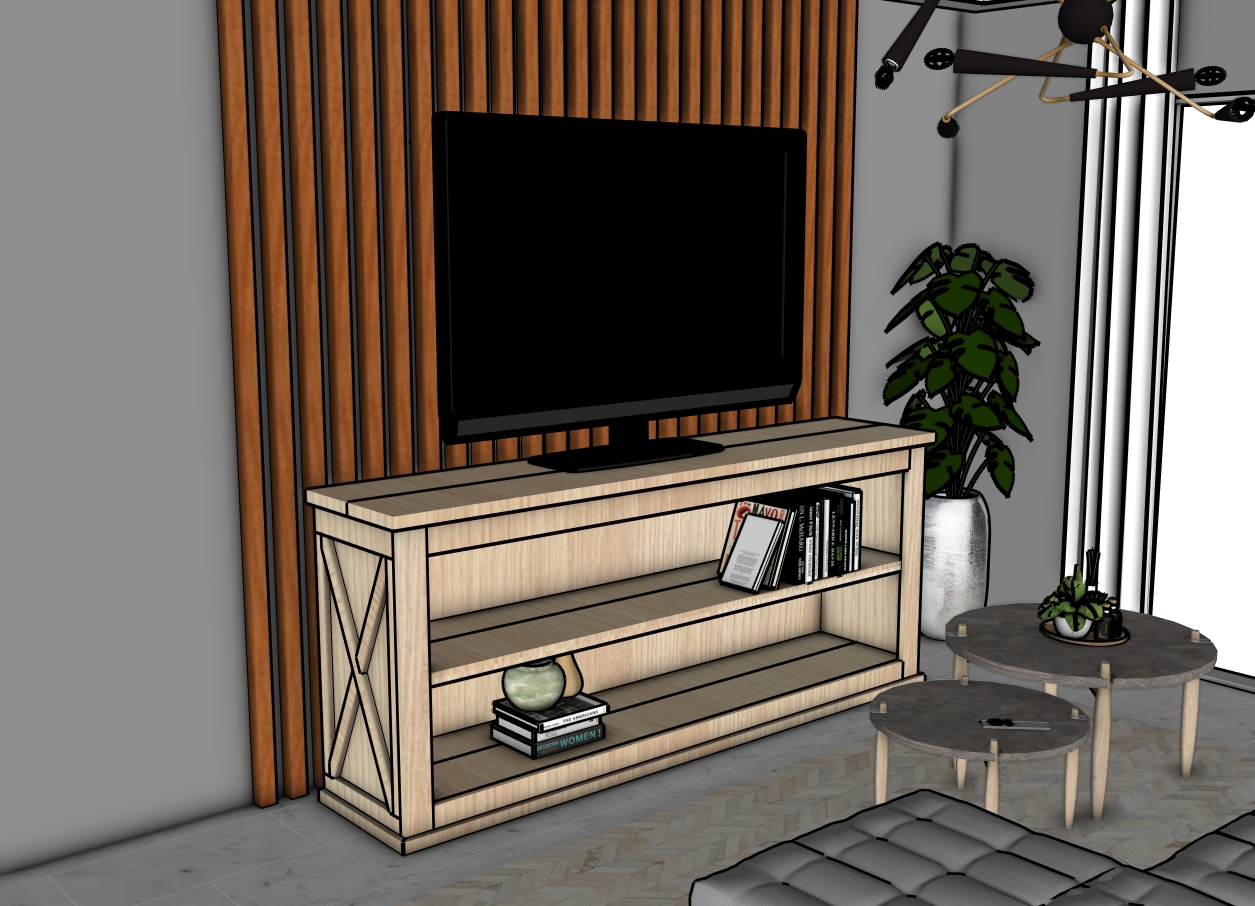
DIY Farmhouse TV Stand
So, with a bit of planning and a good weekend’s worth of work, you’ll be able to craft something that’s not just functional but also a reflection of your style and skill.
Farmhouse TV Stand plans
What makes this project so special is the blend of practicality and style. You’ve created a stand that’s sturdy enough to support your TV and all its accessories, with plenty of storage to keep everything organized. But beyond that, you’ve crafted a piece that brings warmth and a touch of rustic elegance into your home. The beauty of the farmhouse design is in its simplicity and timeless appeal, and you’ve captured that perfectly here.
Smart Tip: I can’t wait to see how you make it your own – don’t forget to share your finished projects with me! In addition, take a look over the rest of my shed plans HERE.
Thanks for checking out my farmhouse TV stand plans! Be sure to explore my other projects for more fantastic ideas. Don’t forget to hit the LIKE button and SHARE with your friends using the social media links below.