This step by step woodworking project is about deer stand roof plans. After assembling the frame for the deer stand, you need to attach the exterior walls and to build the roof for the structure. In addition, you have to build the door and to hang it into place tightly. Work with attention and check out PART 1 of the project, to lean how to build the frame of the person deer blind.
We recommend you to invest in the best materials you could afford. Therefore, you should buy quality lumber, such as pine. Always take accurate measurements before adjusting the size of the components at the proper size. Drill pilot holes trough the components before inserting the wood screws, to prevent the wood from splitting. See all my Premium Plans in the Shop.
Made from this plan
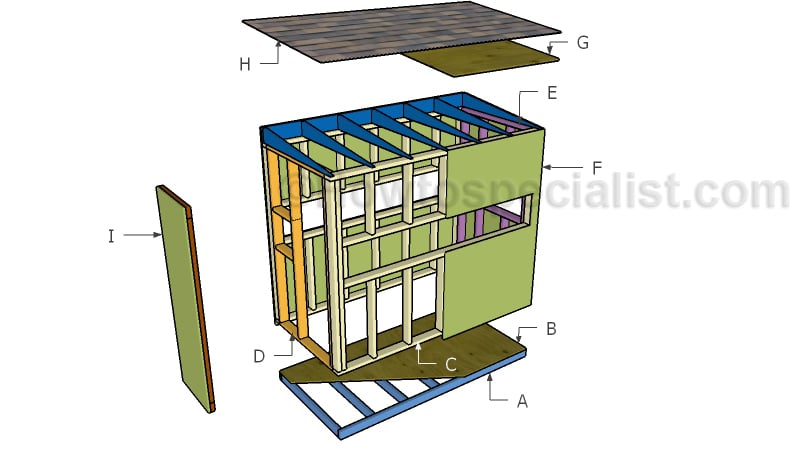
Materials
- E – 1 piece of 2×6 lumber -96″ long, 7 pieces of 2×6 lumber – 46 1/2″ long RAFTERS
- F – 2 pieces of 3/4″ plywood – 48″x77″ long, 4 pieces – 48″x82 1/2″ long WALLS
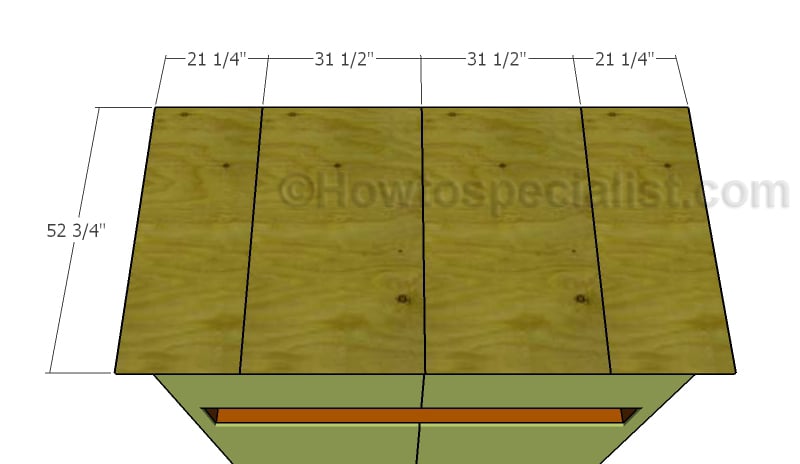
- G – 2 pieces of 3/4″ plywood – 21 1/4″x52 3/4″ long, 2 pieces – 31 1/2″x52 3/4″ long ROOF
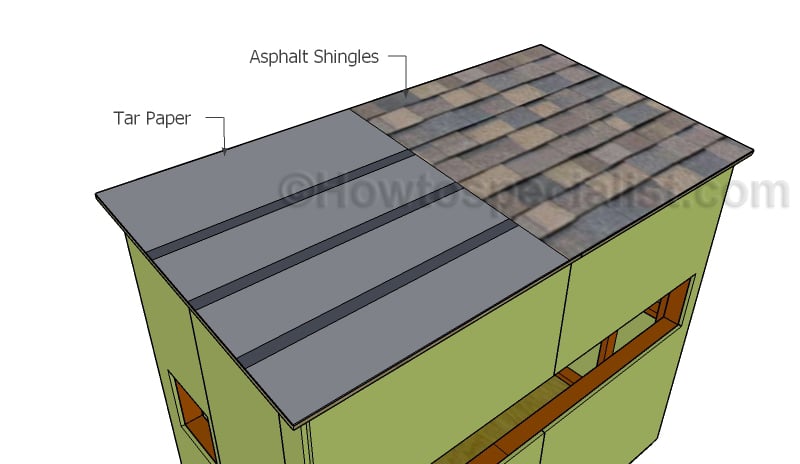
- H – 50 sq ft of tar paper, 50 sq ft of asphalt shingles ROOFING
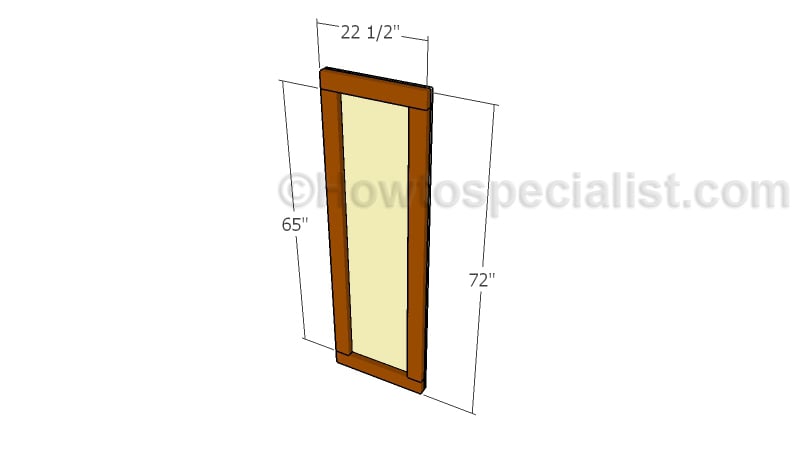
- I – 2 pieces of 2×4 lumber – 65″ long, 2 pieces – 22 1/2″ long DOOR
- 2 pieces of 2×4 lumber – 8′
- 5 pieces of 2×6 lumber – 8′
- 8 piece of 3/4″ plywood – 4’x8′
- 50 sq ft of tar paper, 50 sq ft of asphalt shingles
- 3 hinges, 1 latch
- 500 pieces of 2 1/2″ screws
- 100 pieces of 1 1/4″ screws
- wood glue, stain
- stand brackets
Tools
- Safety gloves, glasses
- Miter saw, jigsaw
- Chalk line, tape measure, spirit level, carpentry pencil
- Drill machinery and drill bits
Time
- One Weekend
Deer Stand Roof Plans
Building the rafters
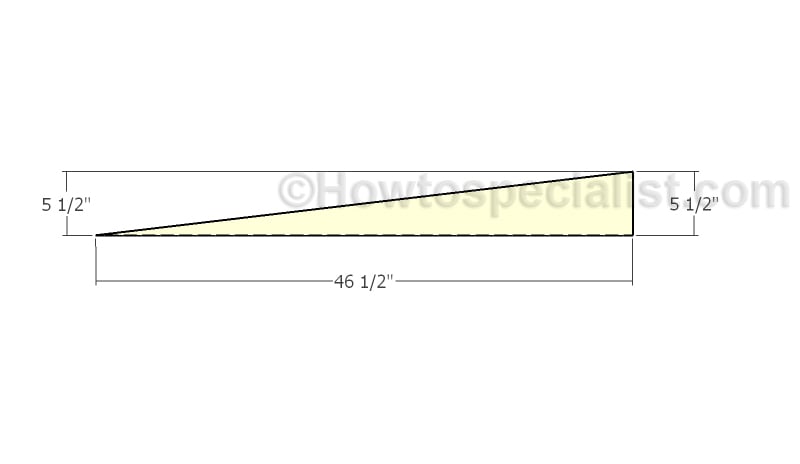
First of all, you need to build the rafters for the deer stand. Mark the cut lines on the 2×6 lumber and get the job done with a circular saw. Smooth the edges with sandpaper for a professional result. Cut the beams on diagonal, so that you get two rafters with one cut.
Fitting the rafters
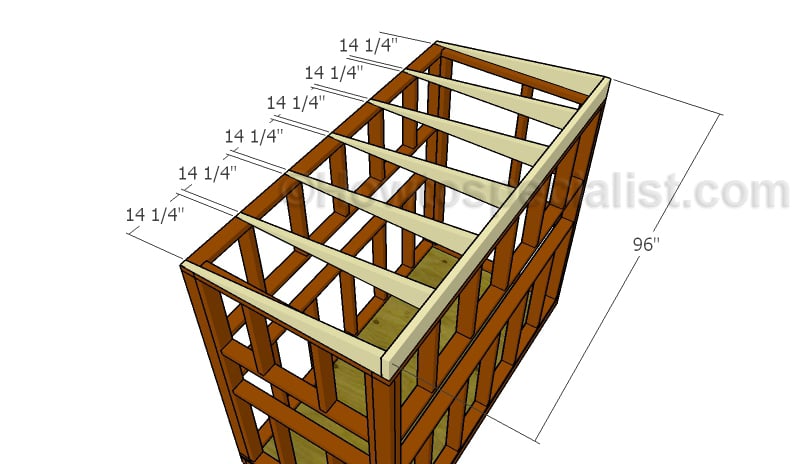
Fit the rafters to the top of the deer stand. making sure you place them equally spaced. Drill pilot holes through the rafters and insert screws into the top plates. Fit a 2×6 beam to the end of the rafters for a professional result. Drill pilot holes before inserting the screws to prevent the wood from splitting.
Building the exterior walls
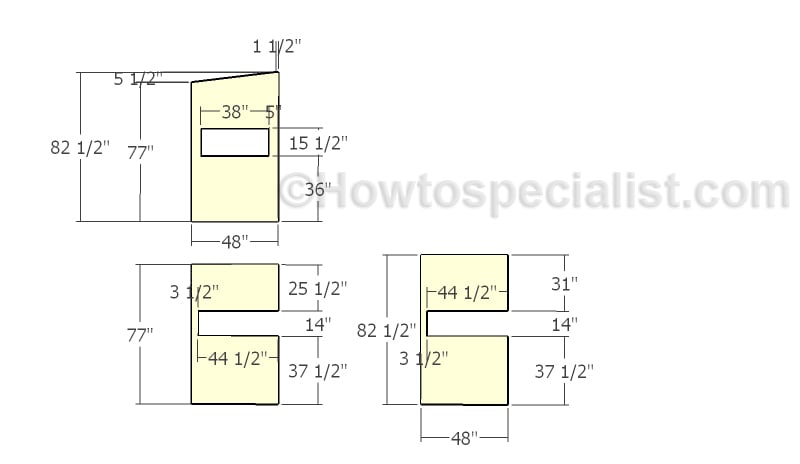
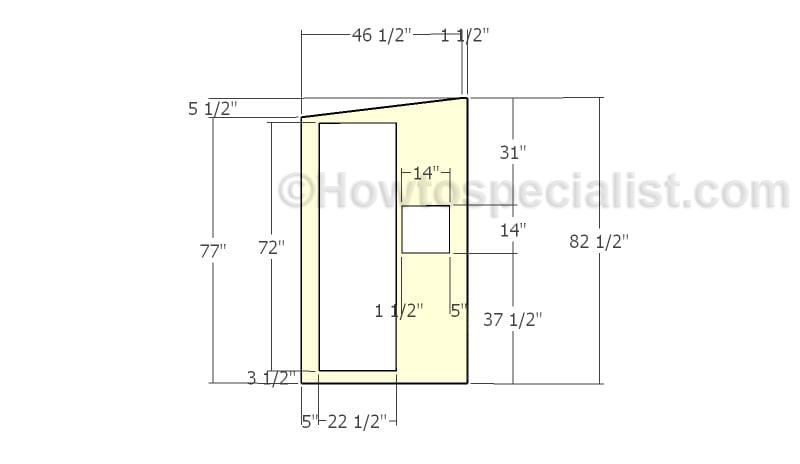
Build the exterior walls for the deer stand from 3/4″ plywood. Mark the cut lines on the plywood sheets and get the job done with a circular saw. Smooth the edges with sandpaper for a professional result.
Building the back exterior wall
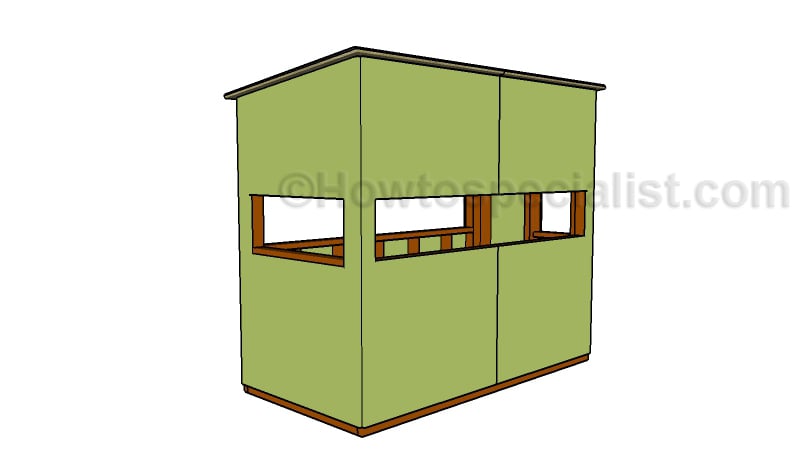
Build the back wall from 3/4″ plywood. Cut out the door opening with a circular saw. In addition, as you notice in the diagram you need to cut out a window opening.
Fitting the exterior walls
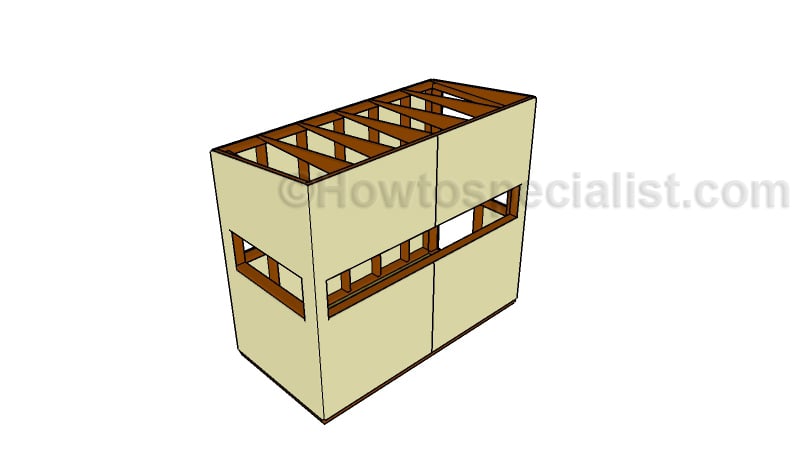
Attach the exterior walls to the deer blind frame. Align the edges with attention, making sure they are flush. Use 2″ brad nails to lock the panels to the framing.
Fitting the roofing sheets
Build the roof from 3/4″ plywood. Leave no gaps between the sheets and lock them to the rafters with 1 1/4″ screws. Insert the screws every 8″ along the rafters. Make sure you center the sheets into place, so that you get equal overhangs.
Fitting the roofing
Cover the roof of the deer stand with tar paper. Staple the underlayment to the roof tightly. Next, you need
Building the deer blind door
Use the panel you have cut out in the previous steps. Build a frame from 2×4 lumber. Assemble the frame using 2 1/2″ pocket screws. Make sure the corners are square and secure the panel into place using 1 1/4″ screws or 2″ brad nails.
Fitting the door
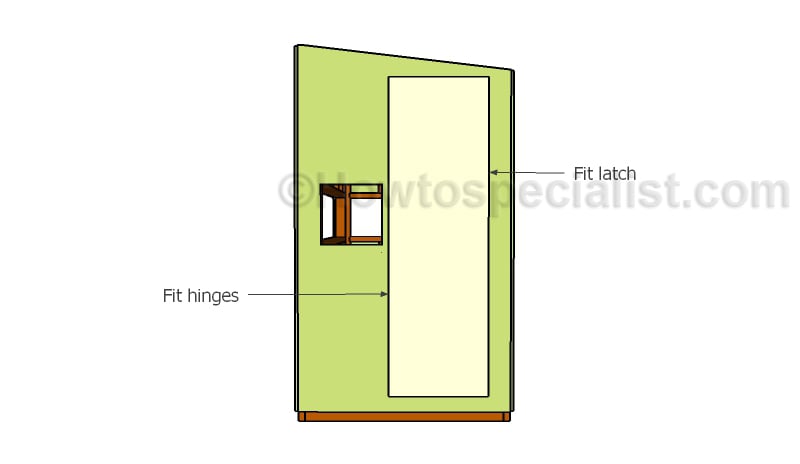
Fit the door to the opening and secure it into place with hinges. In addition, attach a latch to keep it closed.
2 person deer stand plans
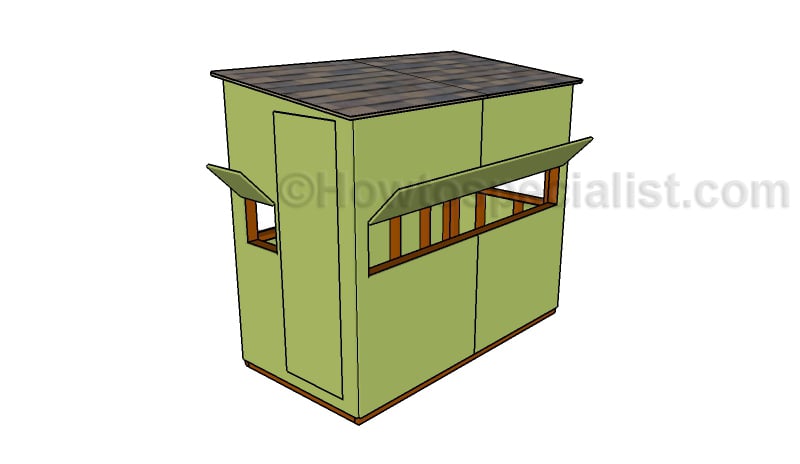
The last step of the project is to take care of the finishing touches. Make sure the joints are rigid and apply a few coats of paint to make it blend easily with the nature.
Thank you for reading our project about free 4×8 deer stand plans and we recommend you to check out the rest of the projects. Don’t forget to LIKE and SHARE our projects with your friends, by using the social media widgets. SUBSCRIBE to be the first that gets our latest projects.
<< PREVIOUS | NEXT >>

10 comments
Did you find that the roof rafters are/were strong enough given that they are cut down to 1/16th of an inch by the time they reach the other side/2 X 4? Also, how is the 2×6 roof rafter that goes along the back of the box attached? Thanks, KEC.
I find that sturdy enough, but you are free to come up with your roof structure design. You can leave about one 1″ at the end of the rafters, but that will let the air in between the rafters. You can secure the 2×6 slat with 2 1/2″ pocket holes, or you could just toe nail it into place.
Thank you! I have a bunch of metal so I think I will side and roof the structure in metal. I like the size and the design. Your plans have been very helpful.
You’re welcome. Metal roof frame sounds sturdy, so if you are a good welder it should be easy. Looking forward to seeing how it turns out!
I’ve been mulling over and hand drafting deer blind plans for weeks now. I found your site and WHAM! there are the plans I’ve had in my head. My plan is to elevate the stand on 7′ telephone poles so the only thing I would do differently is use 2×8’s for the main floor joists. Keep up the good work. Thanks.
Thanks. Looking forward to seeing your projects.
advice on the best way to cut the rafters with a circular saw via the diagonal cut making sure to have a straight cut?
You use a carpentry square to draw the cut line and then to make the cut straight.
Currently building this, planning to put on 4×4, floor will be 5ft off the ground, will be shingling exterior and adding insulation as it’s going to be in the snow belt of northern Michigan. preassembling frane walls and materials and will have to construct off grid the rest of the way.
That sounds like an awesome project. Let me know how it goes, I would love to see your deer stand.