There’s nothing quite like the satisfaction of building something that’s both functional and beautiful. Today, I’m excited to share my latest project with you: 10×16 deer-proof raised garden bed plans. If you’ve ever tried to keep a garden safe from the relentless appetites of deer, you know it’s no small task. But with a little bit of elbow grease, some quality materials, and a solid plan, we’re going to create a garden that not only keeps those pesky critters at bay but also adds a touch of rustic charm to your backyard.
Now, this isn’t just any raised garden bed—this one’s built to last, designed with durability in mind, and crafted to be as sturdy as the lumber it’s made from. But as you lay out the first few boards, something about the project will feel almost too perfect. The wood seemed to fit together a bit too smoothly, the nails sinking in with a kind of eerie precision, like the garden bed had a mind of its own and couldn’t wait to start its duty.
But that’s the beauty of woodworking, isn’t it? There’s always a bit of the unexpected, a little magic hidden in every grain of wood. So stick around, because by the end of this, you’ll have a garden bed that’s not just deer-proof, but a testament to the kind of craftsmanship that brings your wildest gardening dreams to life. See my other DIY projects HERE.
We recommend you to invest in the best materials you could afford. Therefore, you should buy weather-resistant lumber, such as pine or cedar. Always take accurate measurements before adjusting the size of the components at the proper size. Drill pilot holes trough the components before inserting the wood screws, to prevent the wood from splitting. My plans come with a full cut / shopping list and they are PDF Download and Print friendly. See all my Premium Plans HERE.
Made from this plan
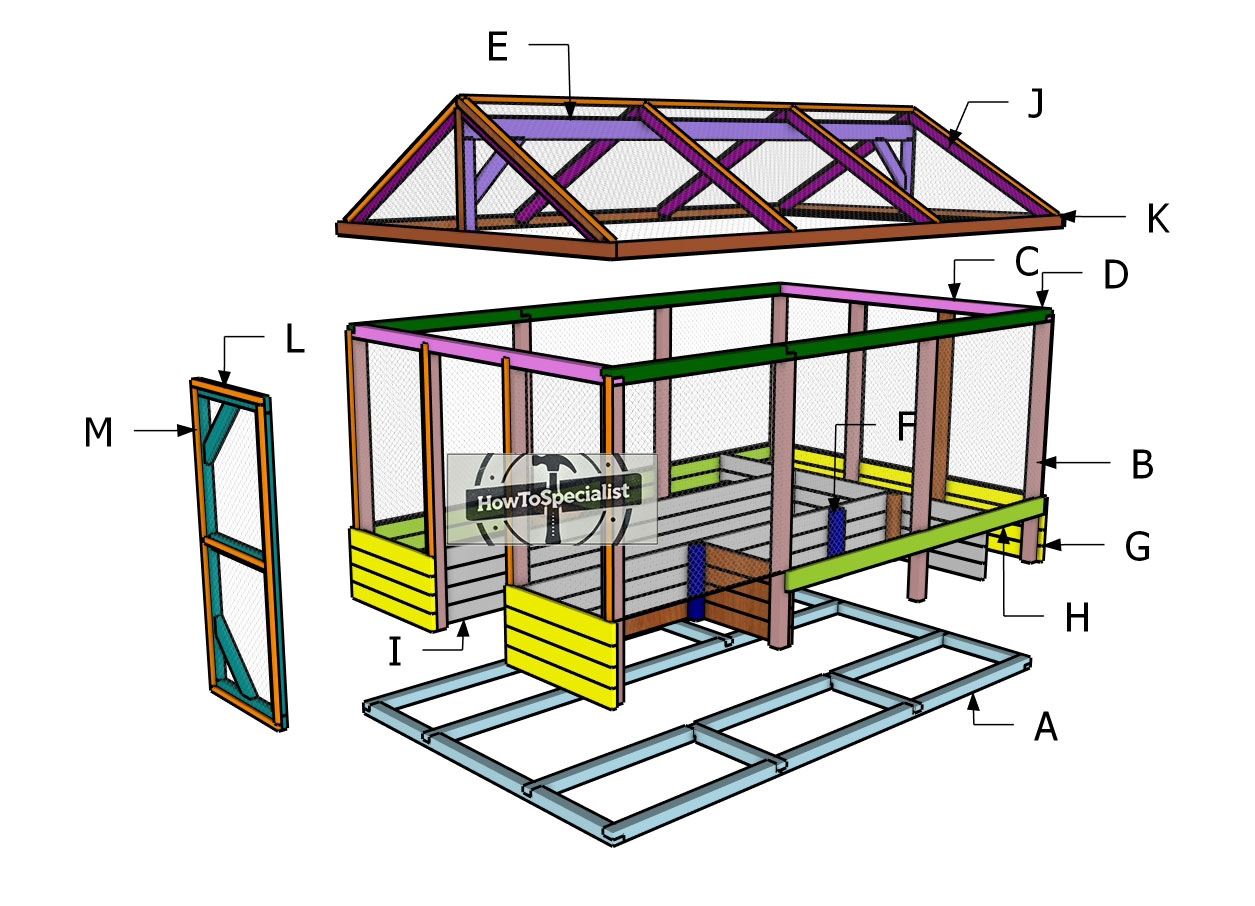
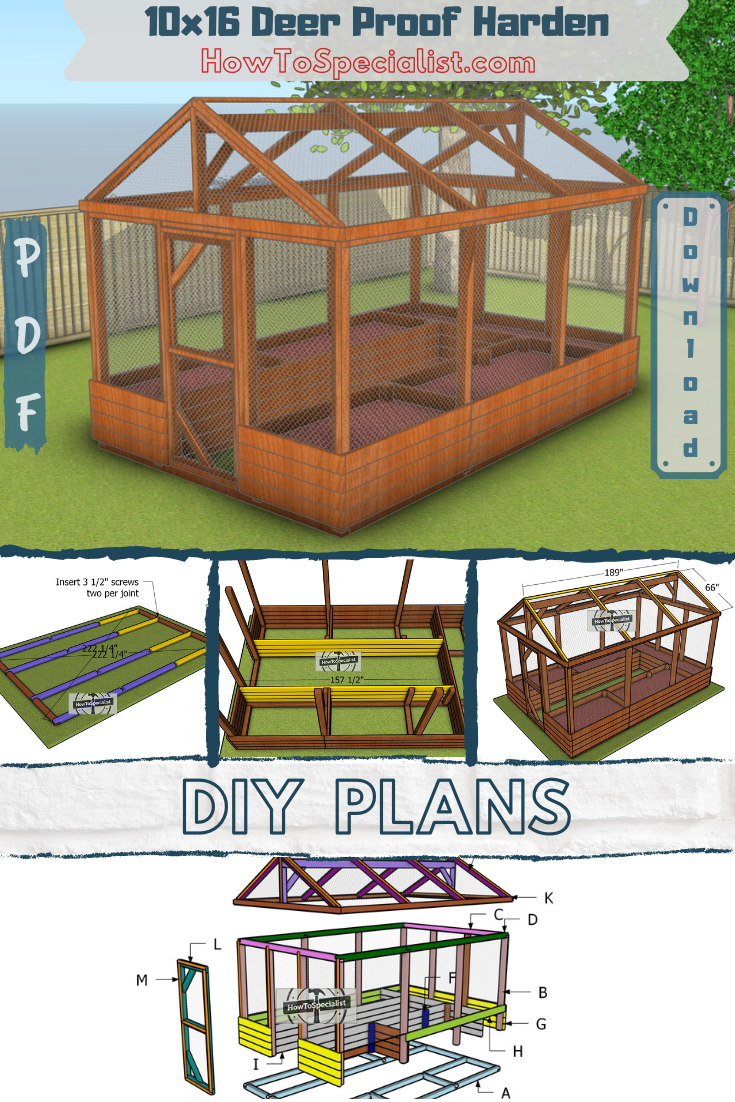
10×16 Enclosed Garden with Roof – Free Plans
Building-a-10×16-raised-garden-bed
Materials
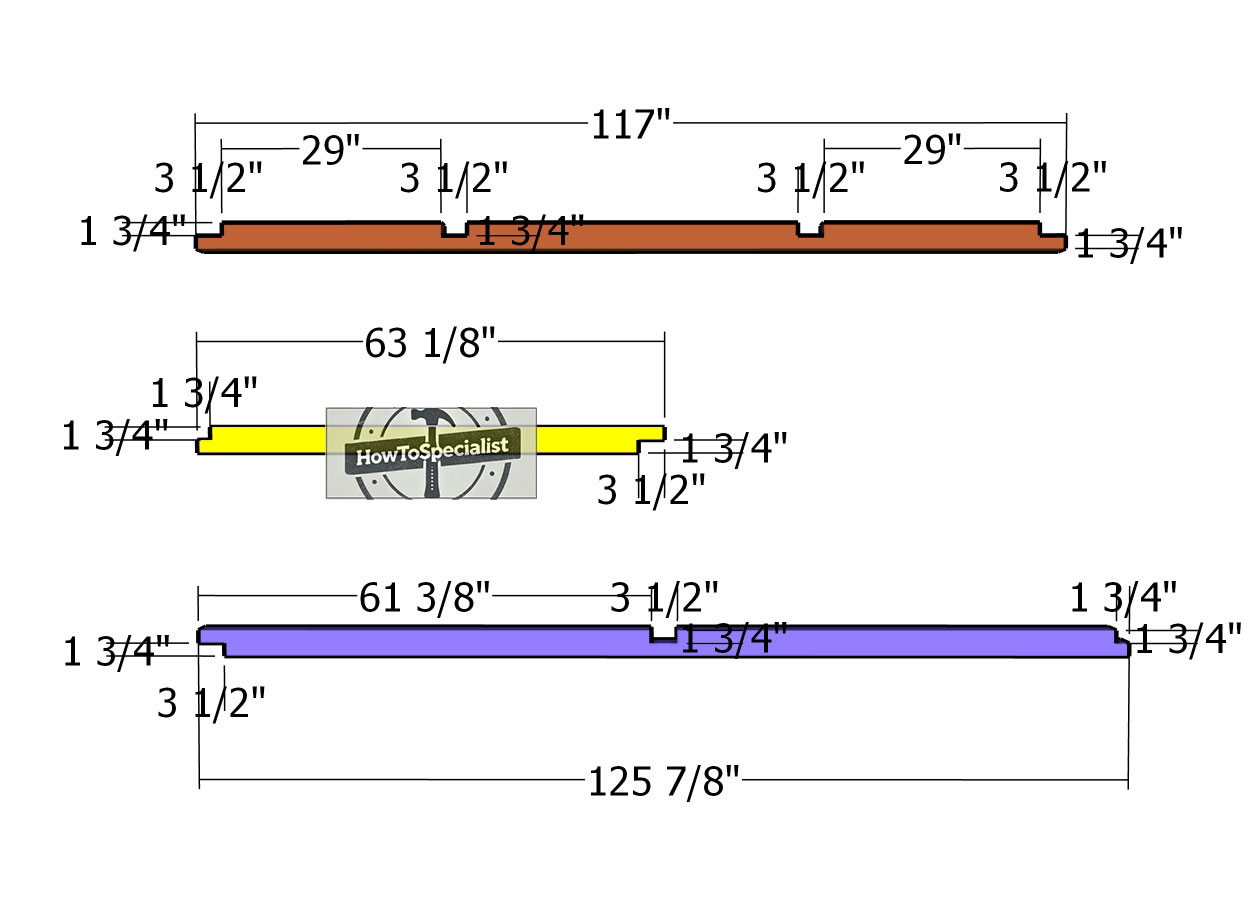
A – BASE – 4×4 lumber 117″ – 4 pieces
A – BASE – 4×4 lumber 63 1/8″ – 4 pieces
A – BASE – 4×4 lumber 125 7/8″ – 2 pieces
A – BASE – 4×4 lumber 36″ – 4 pieces
B – UPRIGHTS – 4×4 lumber 80 1/2″ – 12 pieces
C – TOP PLATES – 4×4 lumber 117″ – 2 pieces
D – TOP PLATES – 4×4 lumber 64 7/8″ – 2 pieces
D – TOP PLATES – 4×4 lumber 127 5/8″ – 2 pieces
E – RIDGE BEAM – 2×4 lumber 25 7/8″ – 2 pieces
E – RIDGE BEAM – 2×4 lumber 189″ – 1 piece
F – POSTS – 4×4 lumber 22″ – 6 pieces
G – END SLATS – 2×6 lumber 120″ – 4 pieces
G – END SLATS – 2×6 lumber 42 1/2″ – 8 pieces
H – SIDE SLATS – 2×6 lumber 125 7/8″ – 8 pieces
H – SIDE SLATS – 2×6 lumber 63 1/8″ – 8 pieces
I – INTERIOR SLATS – 2×6 lumber 157 1/2″ – 8 pieces
I – INTERIOR SLATS – 2×6 lumber 117″ – 4 pieces
I – INTERIOR SLATS – 2×6 lumber 36″ – 8 pieces
J – RAFTERS – 2×4 lumber 68 5/8″ – 8 pieces
K – BOARDS – 2×4 lumber 189″ – 2 pieces
K – BOARDS – 2×4 lumber 120″ – 2 pieces
L – DOOR – 2×4 lumber 73″ – 2 pieces
L – DOOR – 2×4 lumber 34 1/2″ – 2 pieces
L – DOOR – 2×4 lumber 27 1/2″ – 1 piece
L – DOOR – 2×4 lumber 24″ – 2 pieces
M – TRIMS – 1×2 lumber 189″ – 2 pieces
M – TRIMS – 1×2 lumber 66″ – 8 pieces
M – TRIMS – 1×2 lumber 64 3/4″ – 4 pieces
M – TRIMS – 1×2 lumber 60 1/2″ – 8 pieces
M – TRIMS – 1×2 lumber 34 1/2″ – 2 pieces
M – TRIMS – 1×2 lumber 77″ – 2 pieces
M – TRIMS – 1×2 lumber 31 1/4″ – 1 piece
- 21 pieces of 4×4 lumber – 8 ft
- 4 pieces of 4×4 lumber – 10 ft
- 6 pieces of 4×4 lumber – 12 ft
- 16 pieces of 2×6 lumber – 8 ft
- 8 pieces of 2×6 lumber – 10 ft
- 8 pieces of 2×6 lumber – 12 ft
- 8 pieces of 2×6 lumber – 14 ft
- 1 piece of 2×6 lumber – 16 ft
- 12 pieces of 2×4 lumber – 8 ft
- 2 pieces of 2×4 lumber – 10 ft
- 2 pieces of 2×4 lumber – 16 ft
- 23 pieces of 1×2 lumber – 8 ft
- 2 pieces of 1×2 lumber – 16 ft
- 36 pieces of A66 brackets
- 2 boxes of 1 1/2″ structural screws
- 50 pieces of 5″ screws
- 200 pieces of 3 1/2″ screws
- 200 pieces of 1 5/8″ screws
- 300 sq ft of landscape fabric
- staples
- 3 hinges 3″x3″
- 1 door latch
- 500 sq ft of deer proof netting
Tools
- Circular saw
- Drill machinery, drill bits
- Safety gloves, glasses
- Chalk line, tape measure, spirit level, carpentry pencil
Time
- One week
Pin for later!
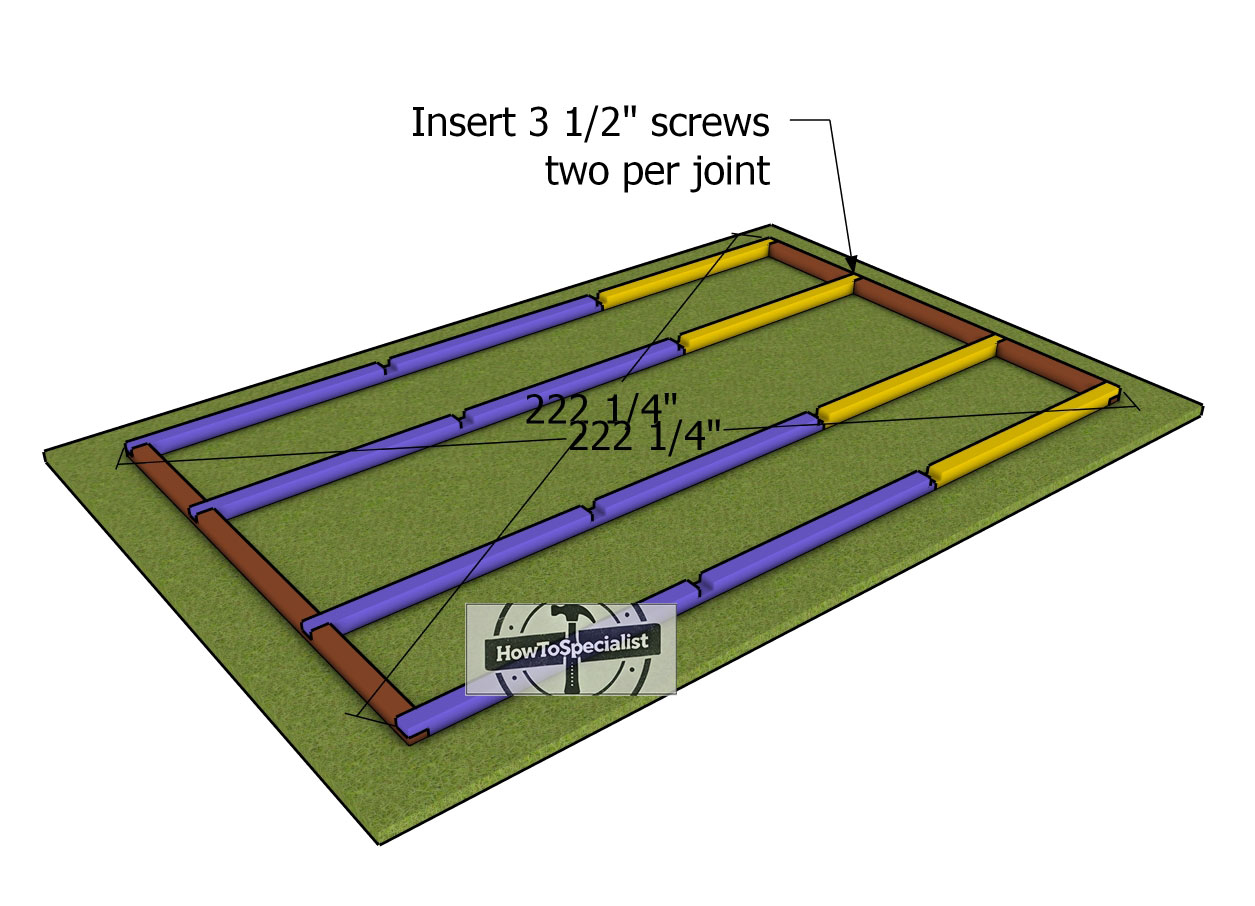
Raised Garden Bed With Deer Fence Plans – Base
Cutting-the-skids
The first step of the project is to cut and assemble the base for the raised garden bed. Mark the cut lines to the 4×4 beams and then get the notches with a circular saw. Make parallel cuts inside the marked areas and then remove the excess with a chisel.
Assembling-the-base-for-the-garden-beds
Before starting the 10×16 deer-proof raised garden bed, the first step is preparing the area. The chosen spot is a sunny corner of the yard, where the soil remains a bit untamed. Clearing the space involves dealing with stubborn weeds, which seem almost unwilling to relinquish their hold.
Once the ground is cleared, the dimensions of the bed are marked with stakes and string. As the soil is leveled, there’s an unusual sense of anticipation in the air, as if the earth itself knows that something special is about to take shape.
Lay the skids on the ground and align the components as shown in the diagram. Check if the diagonals are equal, drill pilot holes and insert 3 1/2″ screws to lock everything together tightly.
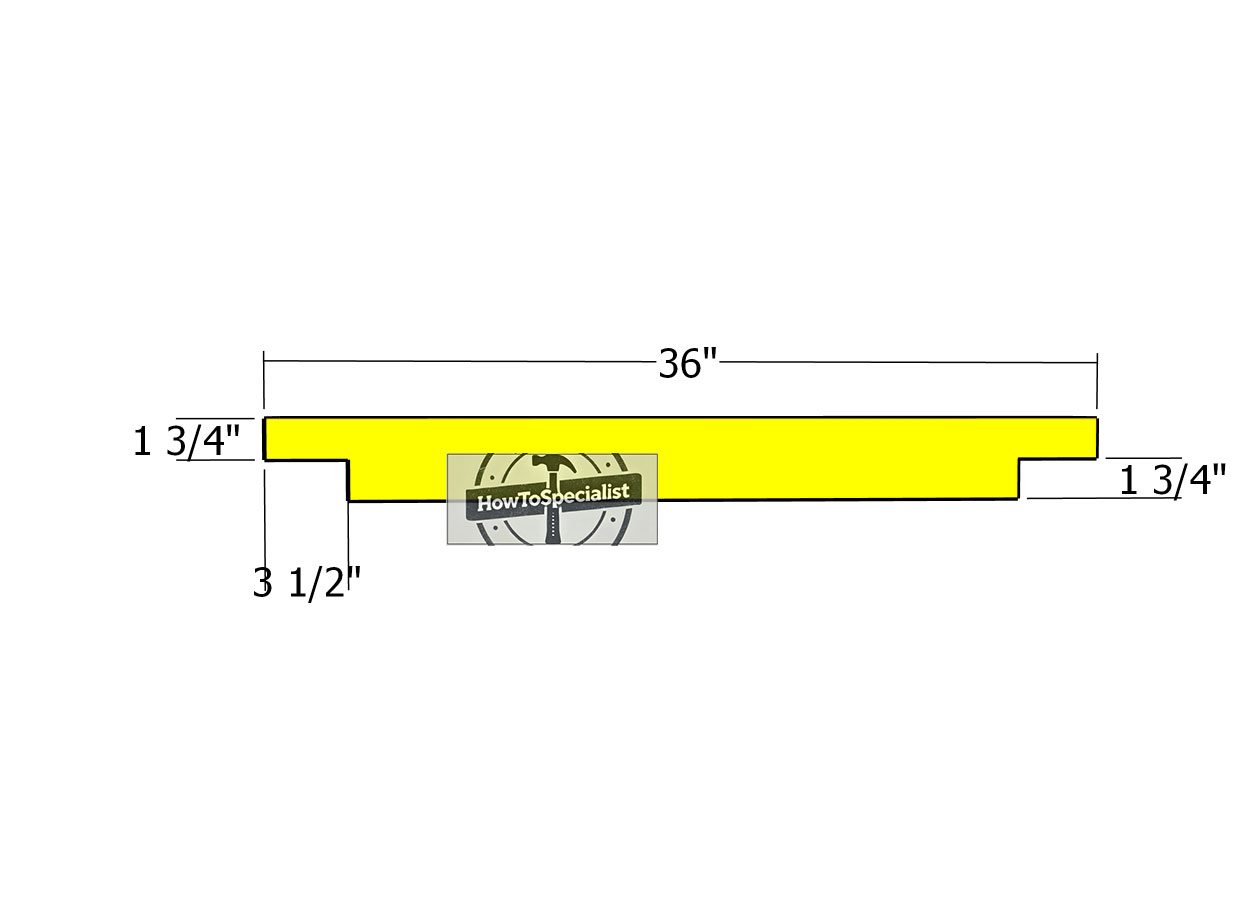
Base-blockings
Use 4×4 lumber for the base blockings. Make notches to both ends of the blockings, as well, as shown in the diagram.
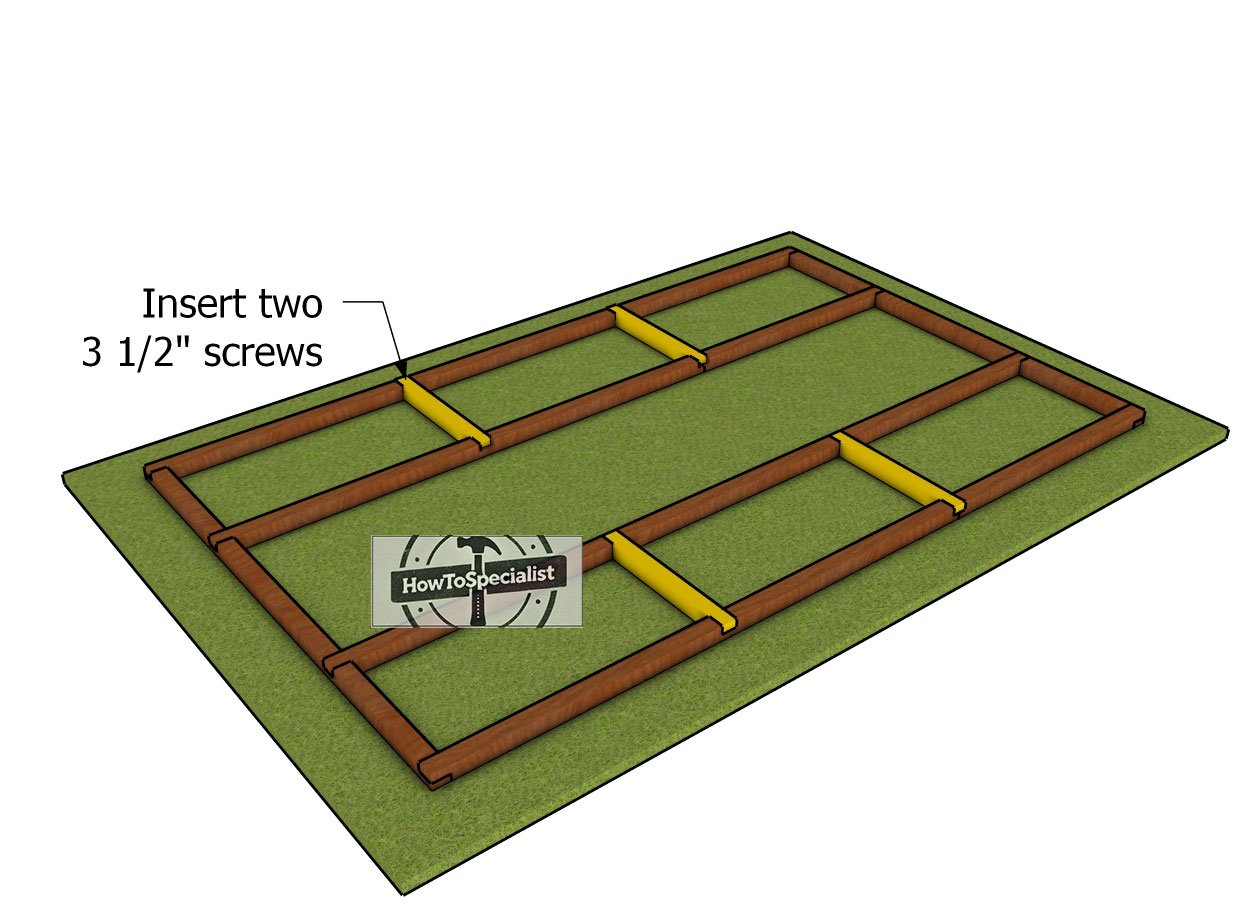
Fitting-the-base-blockings
Fit the blockings to the base of the project. Align the edges and secure them into place with 3 1/2″ screws. Drill pilot holes to prevent the wood from splitting.
Building the garden beds

Attaching-the-uprights
Fit the 4×4 uprights to the base of the garden bed. We need to set these posts to create a support structure for the garden beds and roof.
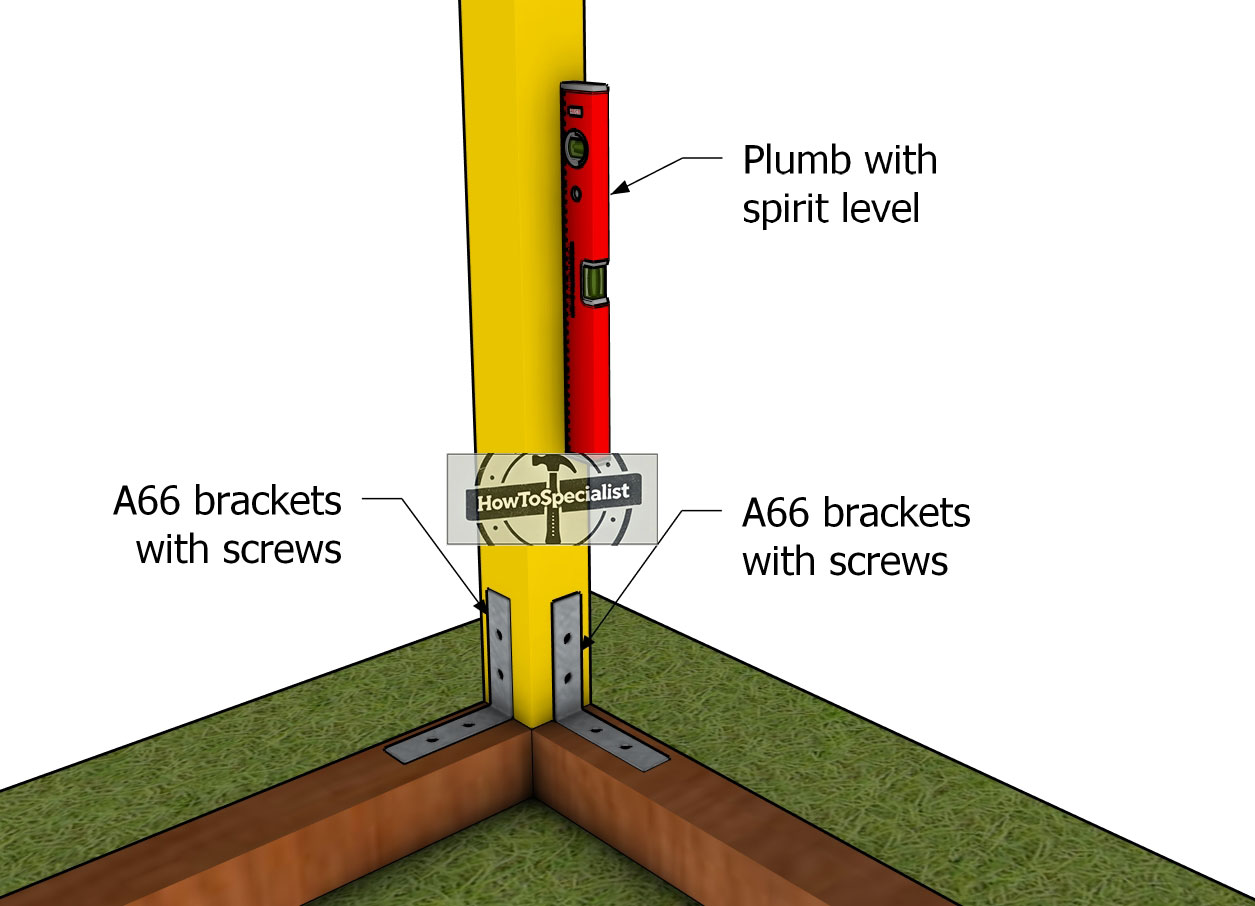
Detail—setting-the-posts
Use a spirit level to plumb the posts before setting them to the base skids with A66 brackets and 1 1/2″ structural screws.
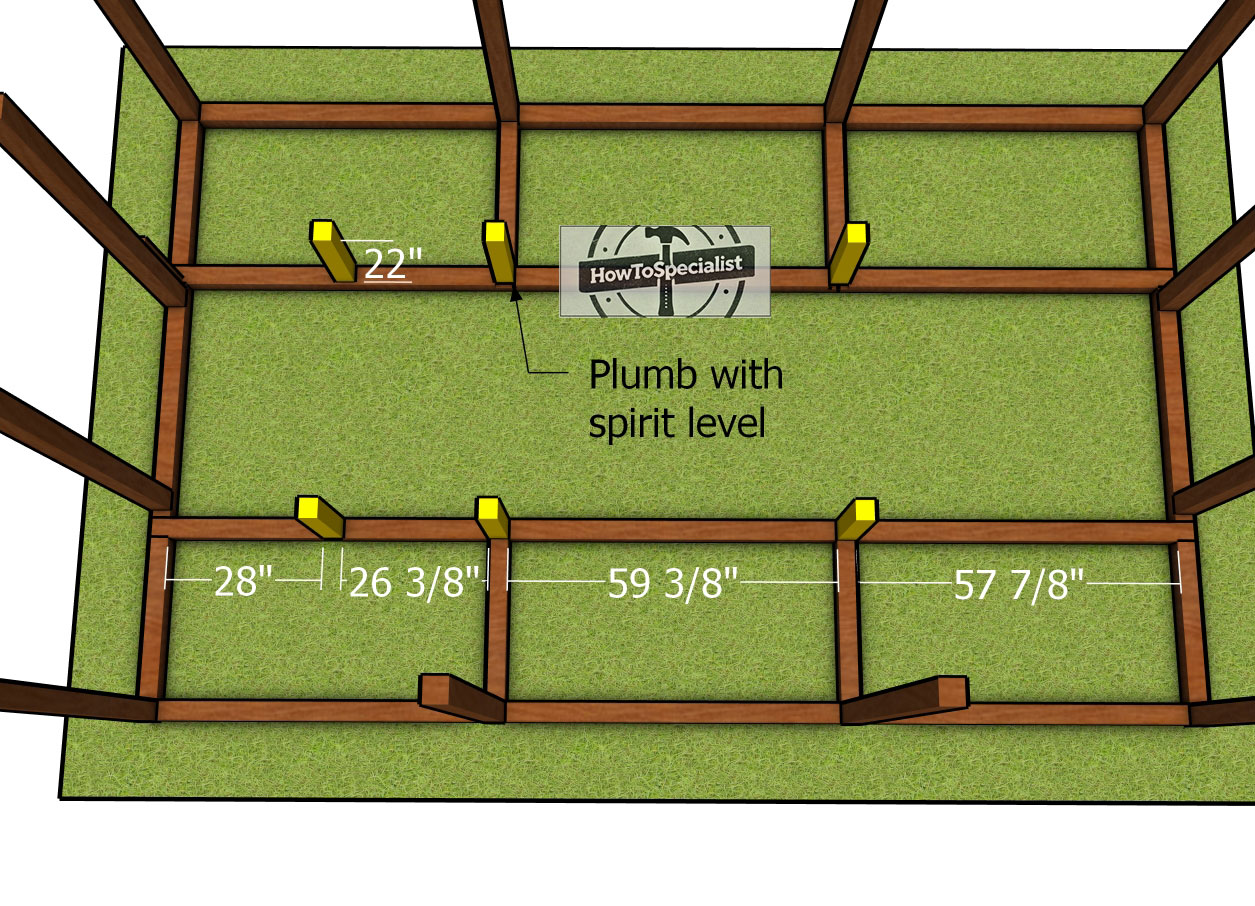
Fitting-the-interior-supports
Fit the rest of the 4×4 uprights to the skids, as shown in the free diy plans. Use A66 brackets and screws to lock them into place. Use two brackets for each post and plumb them with a spirit level.
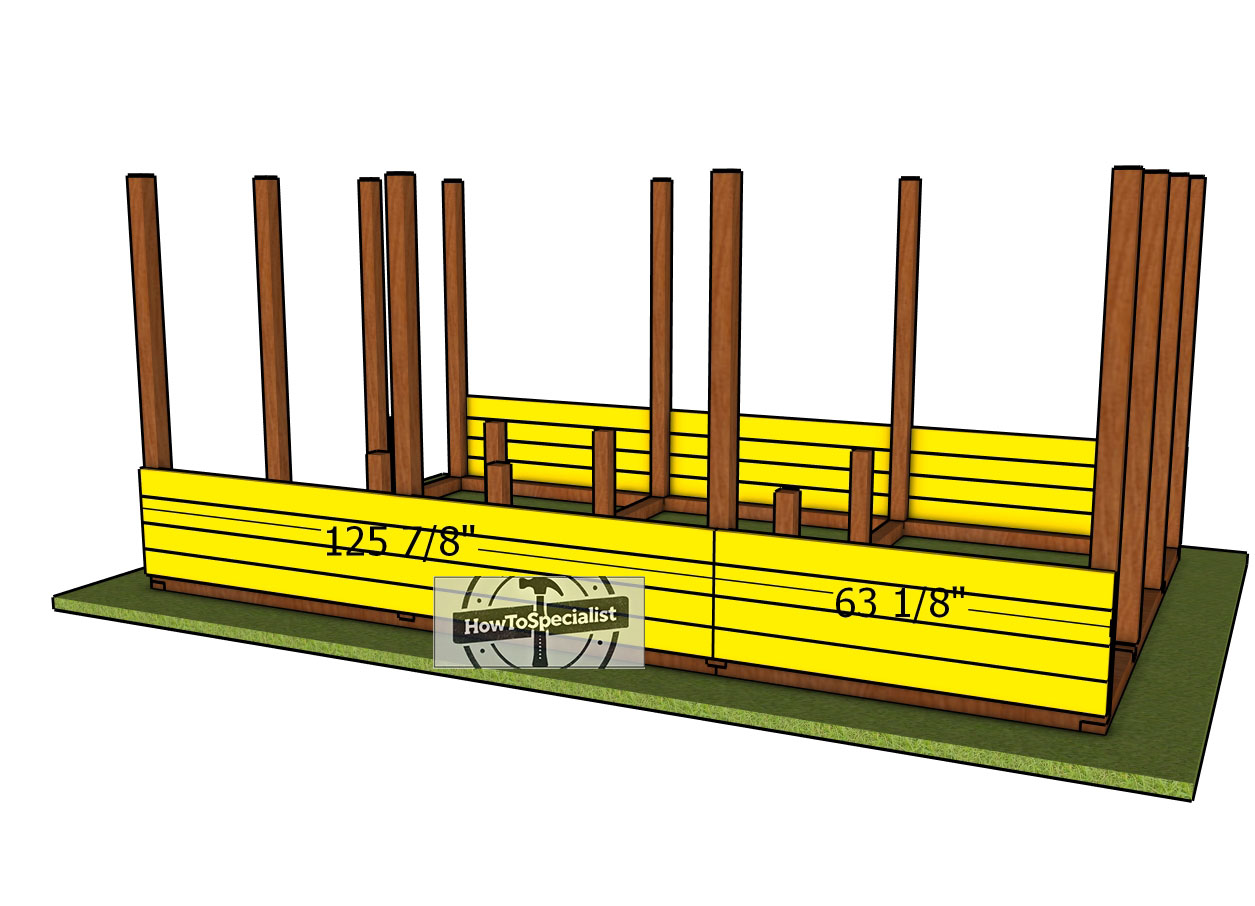
Side-slats
Attach the 2×6 boards to the sides of the deer proof garden. Leave no gaps between the boards and align them at both sides of the structure. Drill pilot holes through the boards and insert 3 1/2″ screws into the frame.
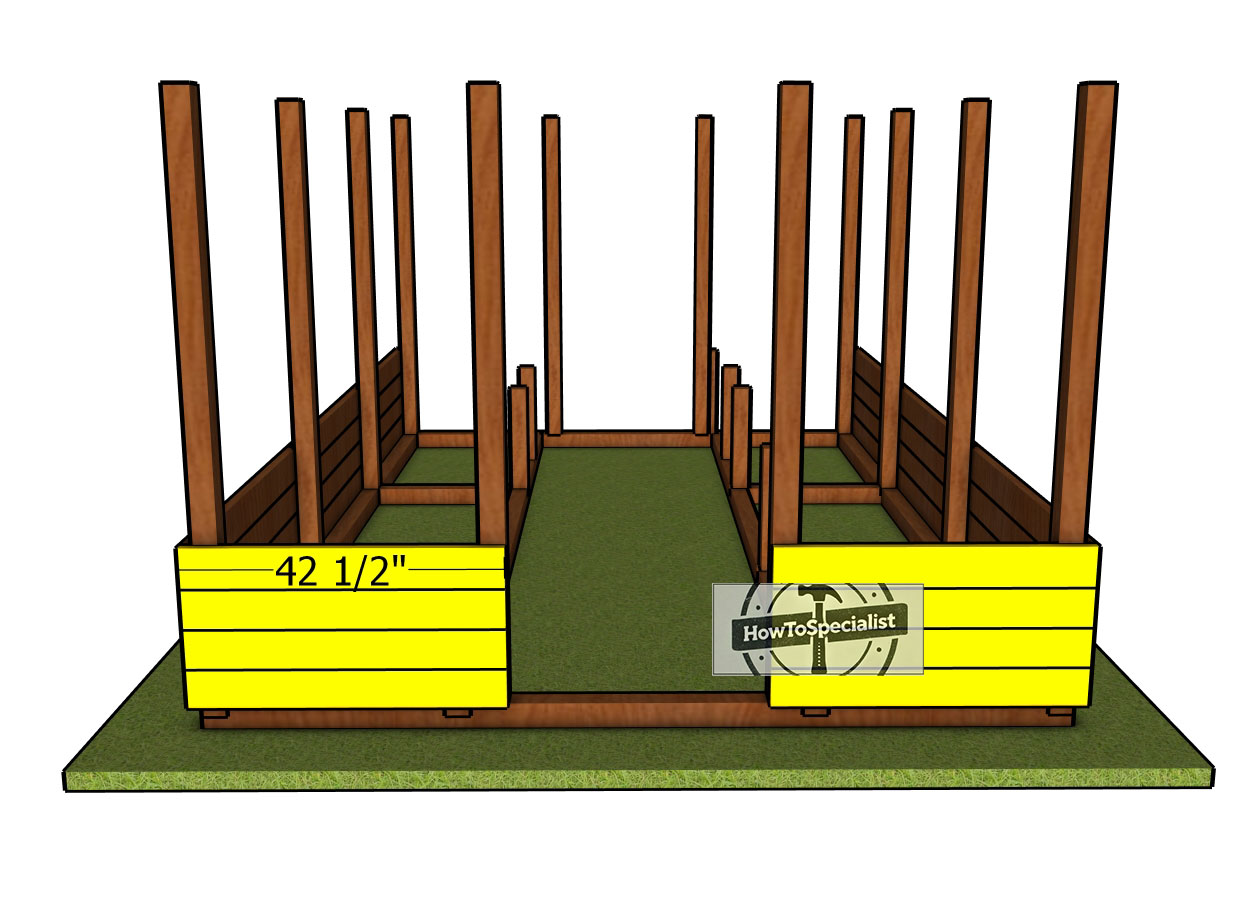
Fitting-the-front-slats
Cut the boards and attach them to the front of the garden beds. Align the edges flush around the door opening,
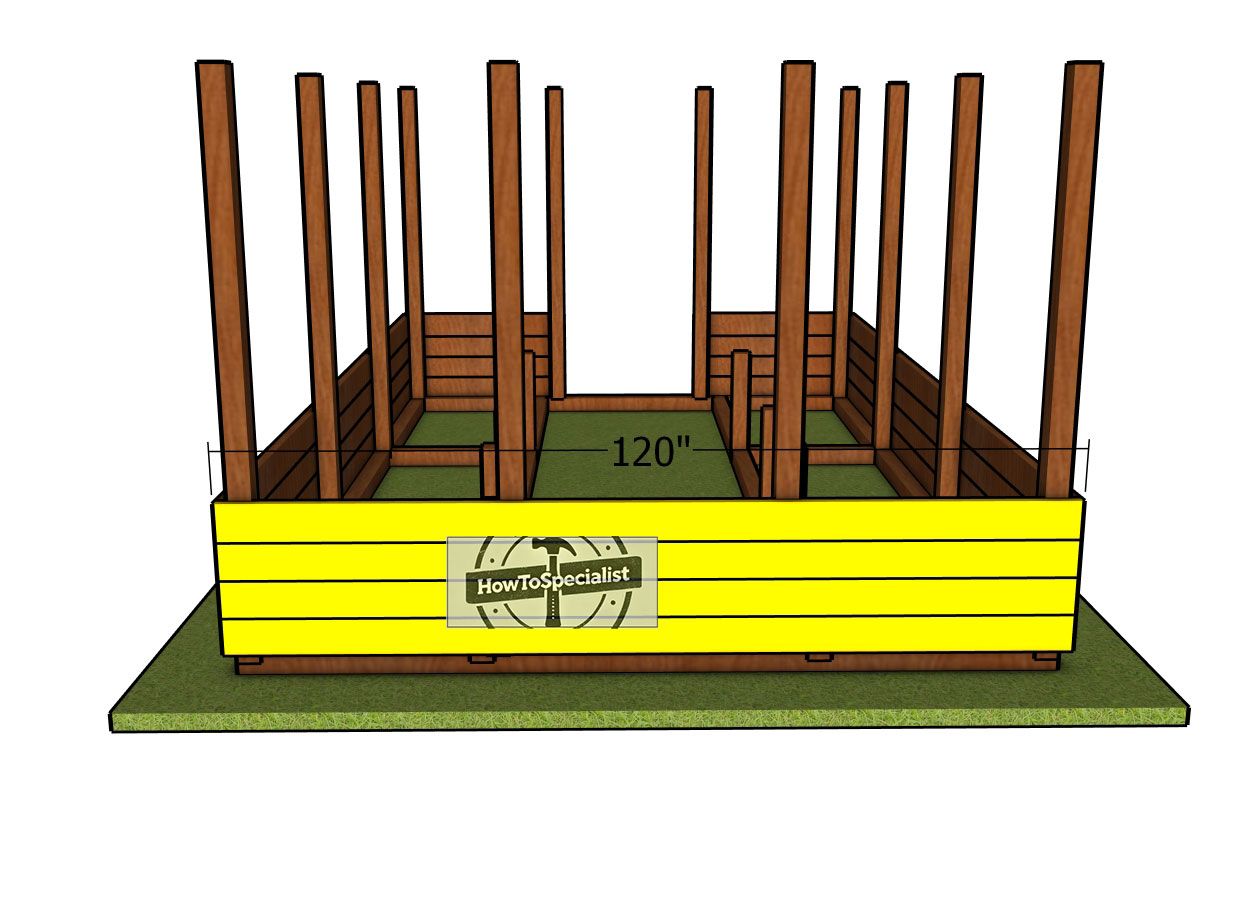
Back-slats
Fit the boards to the back of the structure. Use 3 1/2″ screws, two at each end of the boards.
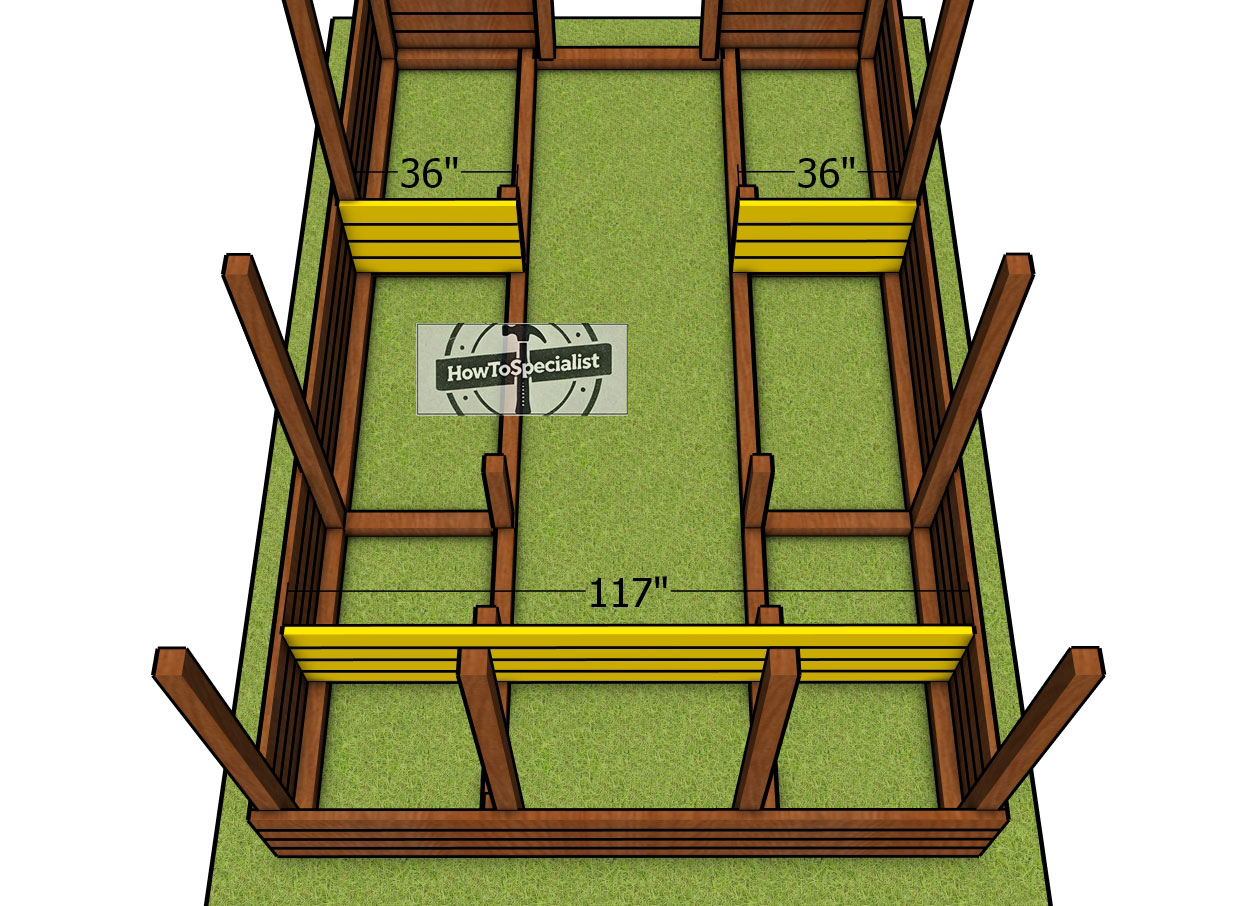
Attaching-the-partition-boards
Fit the 2×6 boards to the interior of the structure to create the garden beds. Cut the boards at 36″ and at 117″ and attach them into place
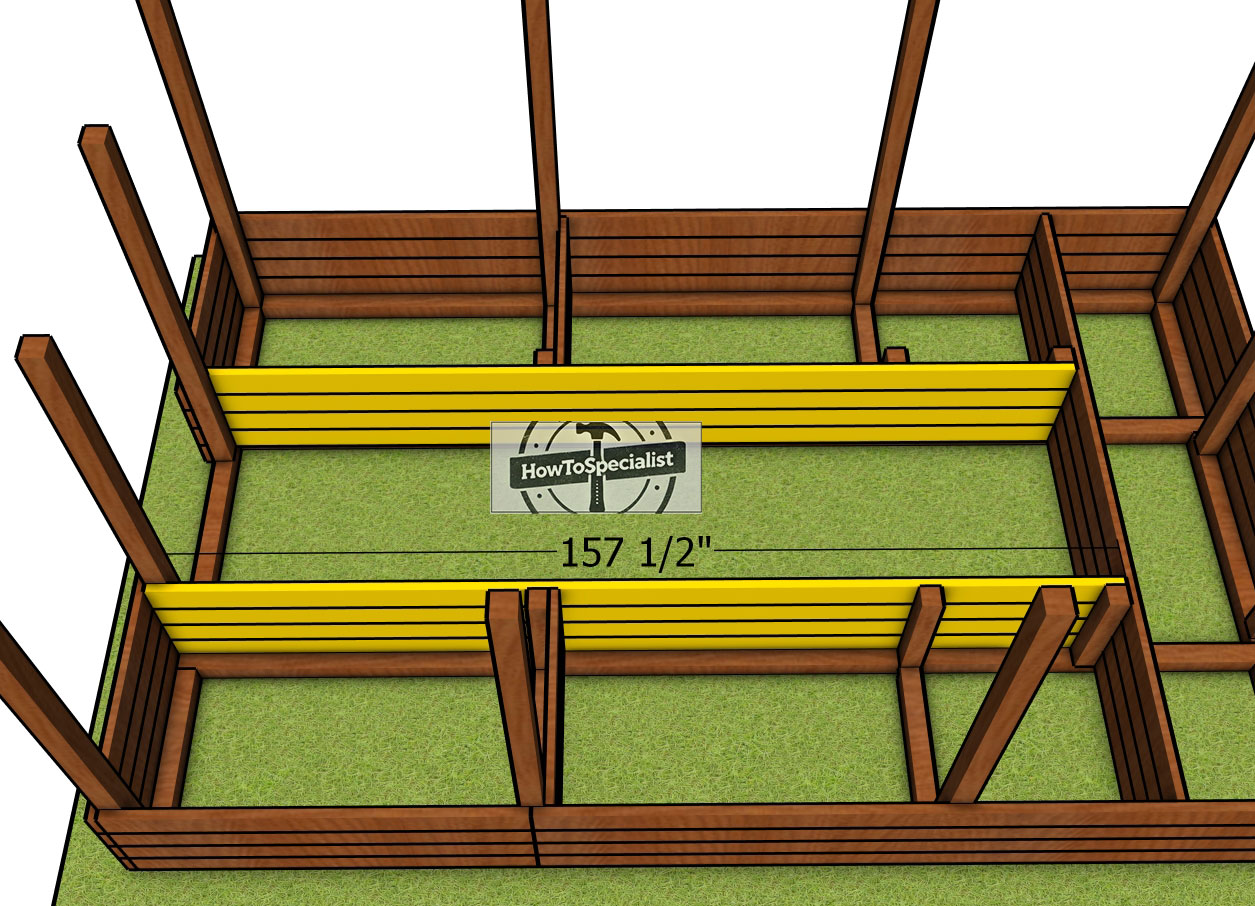
Raised-garden-bed-boards
Complete the raised garden beds by attaching the rest of the 2×6 boards.
When fitting landscape fabric inside your planters, don’t forget to cover the walls as well—it’s a small step that offers big benefits. Lining the walls with fabric helps keep the soil in place, prevents erosion, and adds another barrier against weeds sneaking in from the sides. Start by cutting the fabric to size, making sure it covers both the bottom and the walls of the planter. You’ll want it to fit snugly, with no gaps or loose edges.
Once you’ve got it positioned just right, secure it with staples or tacks along the top edges and at the bottom corners. This not only keeps the fabric in place when you add soil but also ensures that your planter is as sturdy and low-maintenance as possible. It’s a simple, quick step that helps your planter stay in great shape for years to come, protecting your plants and giving them the best possible environment to thrive.
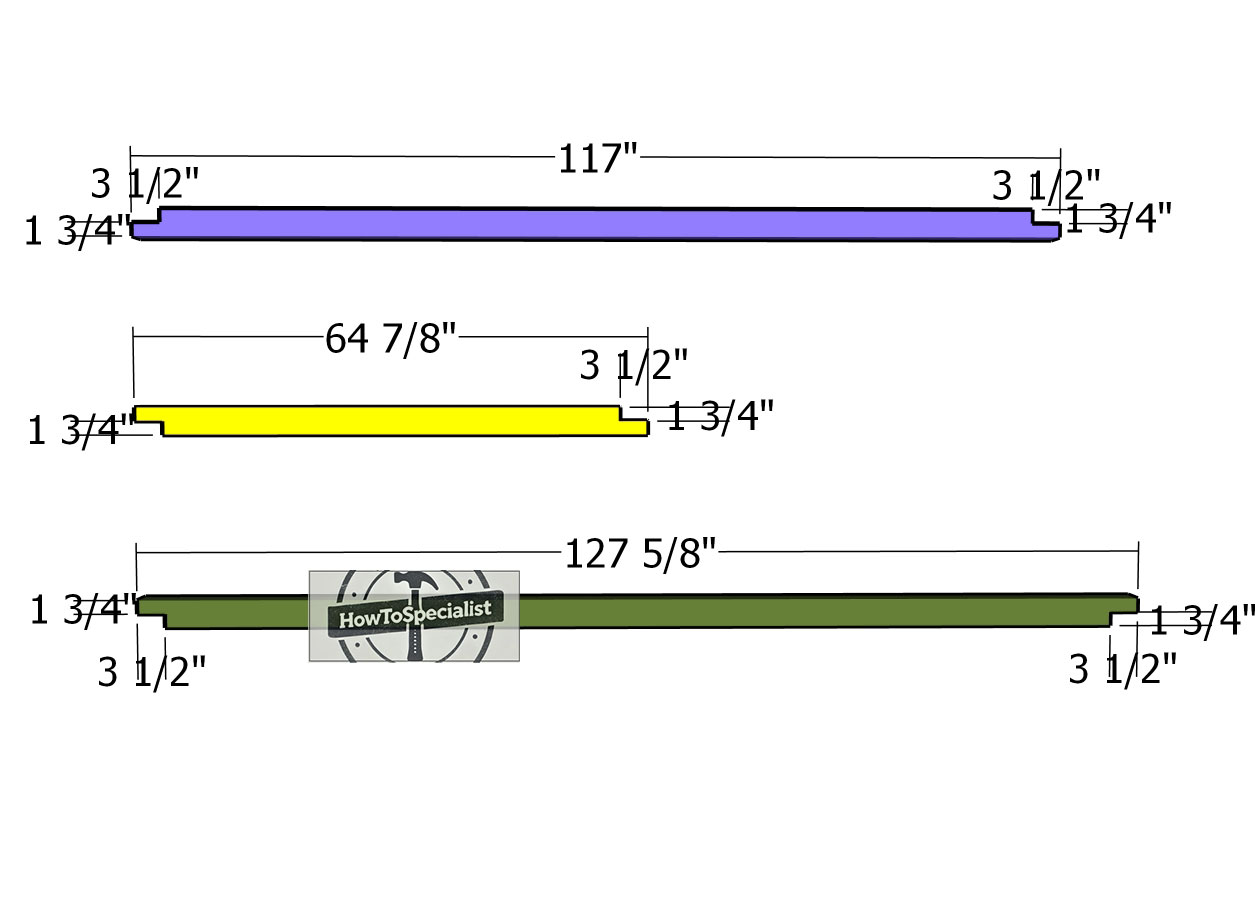
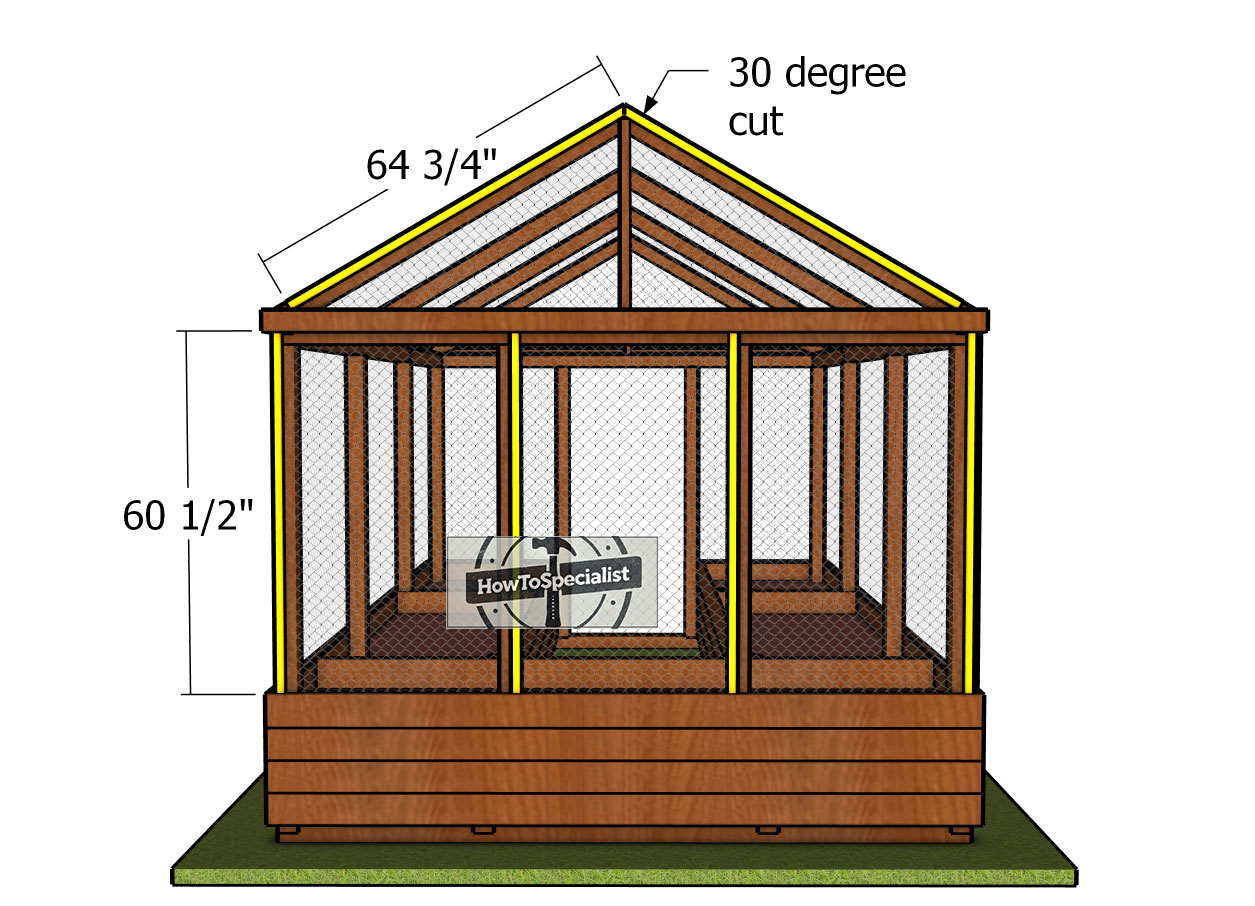
Top-plates
Use 4×4 lumber for the top plates. Make the notches to the beams, as shown in the diagram. Use a circular saw to make the parallel cuts inside marked areas and remove the excess with a hammer and a chisel.
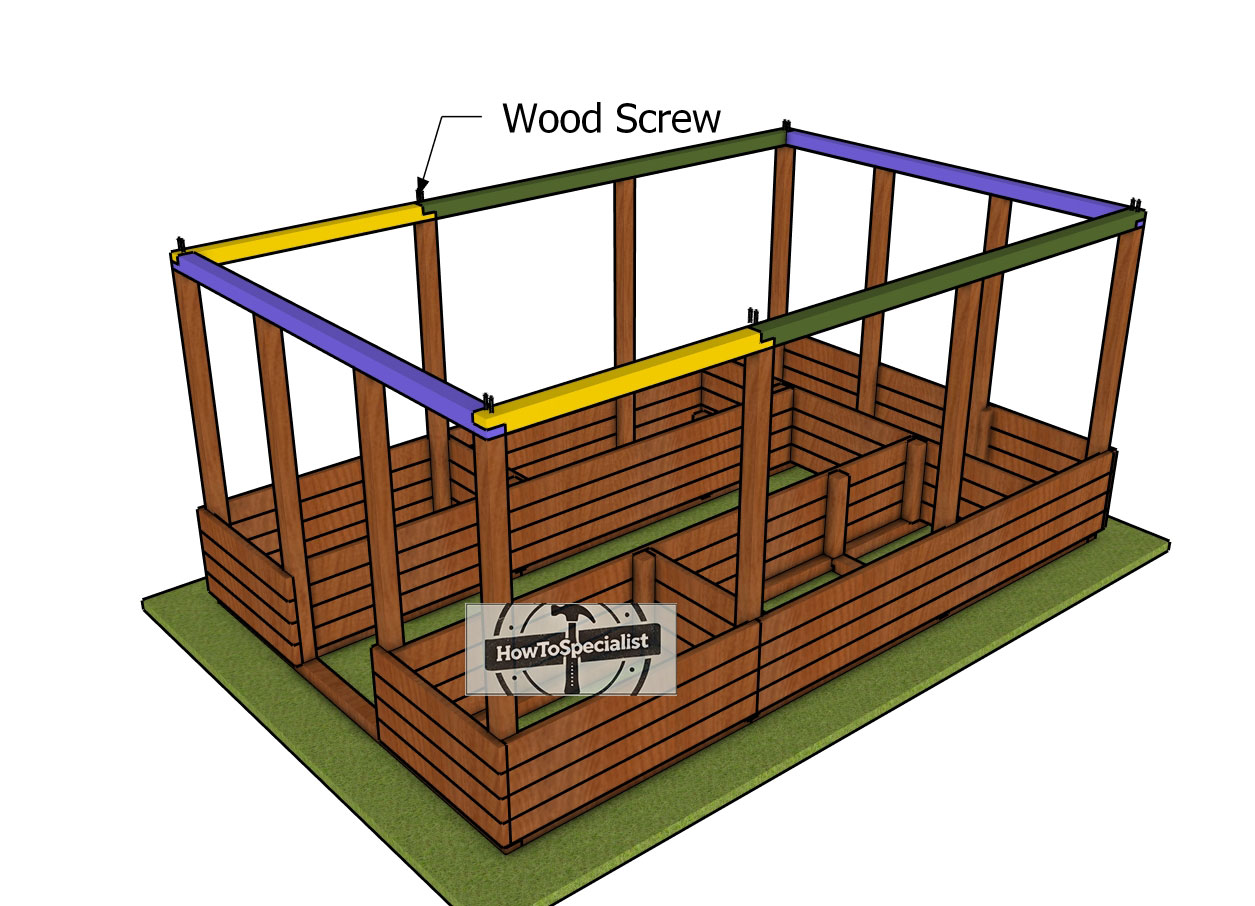
Attaching-the-top-plates
Fit the top plates to the top of the uprights. Align the edges flush, drill pilot holes and insert 5″ screws to lock them into place tightly. First attach the end plates and then attach the side plates.
Building the gable roof
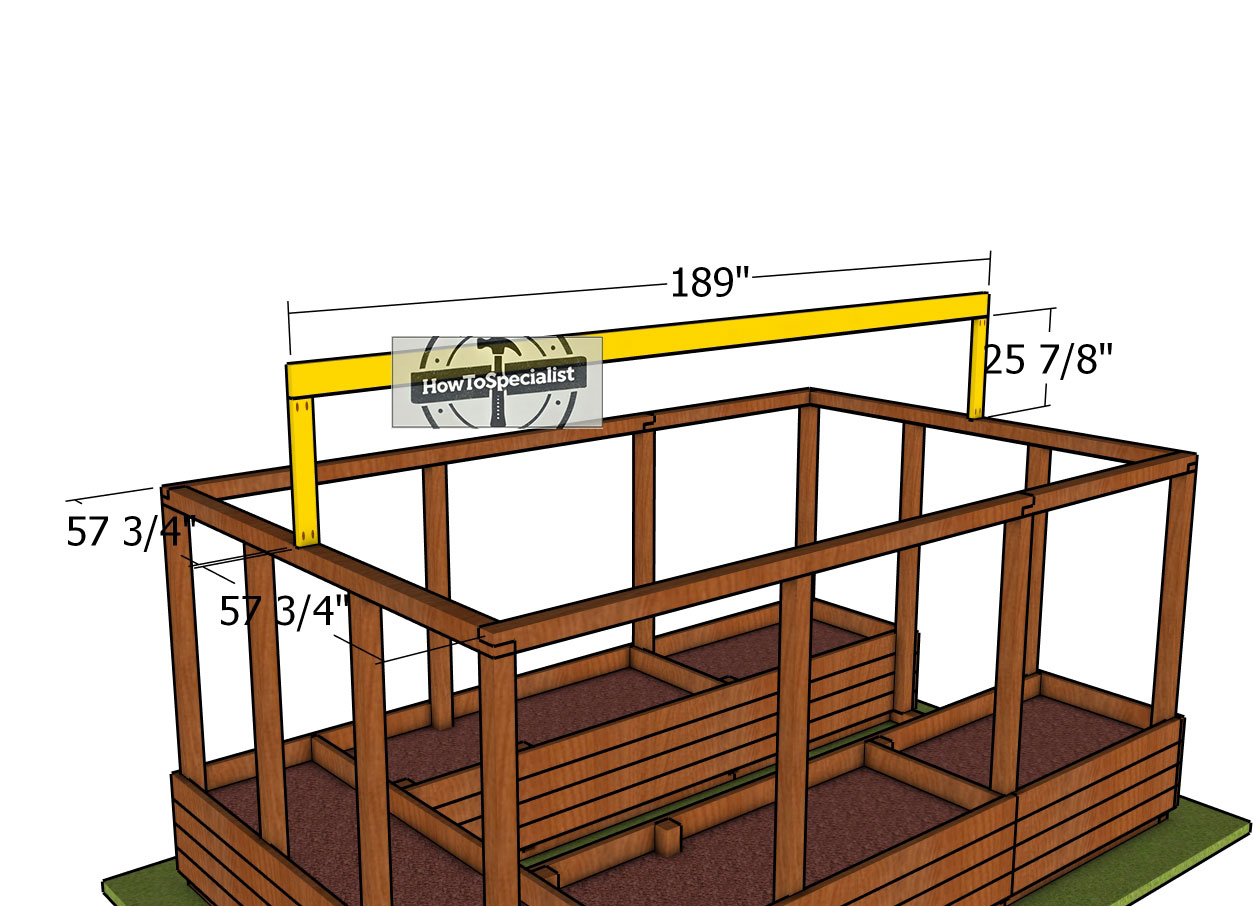
Attaching-the-ridge-beam
Use 2×6 lumber for the ridge beam and its supports. Cut the supports at 25 7/8″ and then drill pocket holes at both ends. Use 2 1/2″ screws to lock the supports to the center of the top plates. Plumb the supports with a spirit level before locking them into place tightly. Attach the ridge beam to the supports and lock it into place with 2 1/2″ screws.
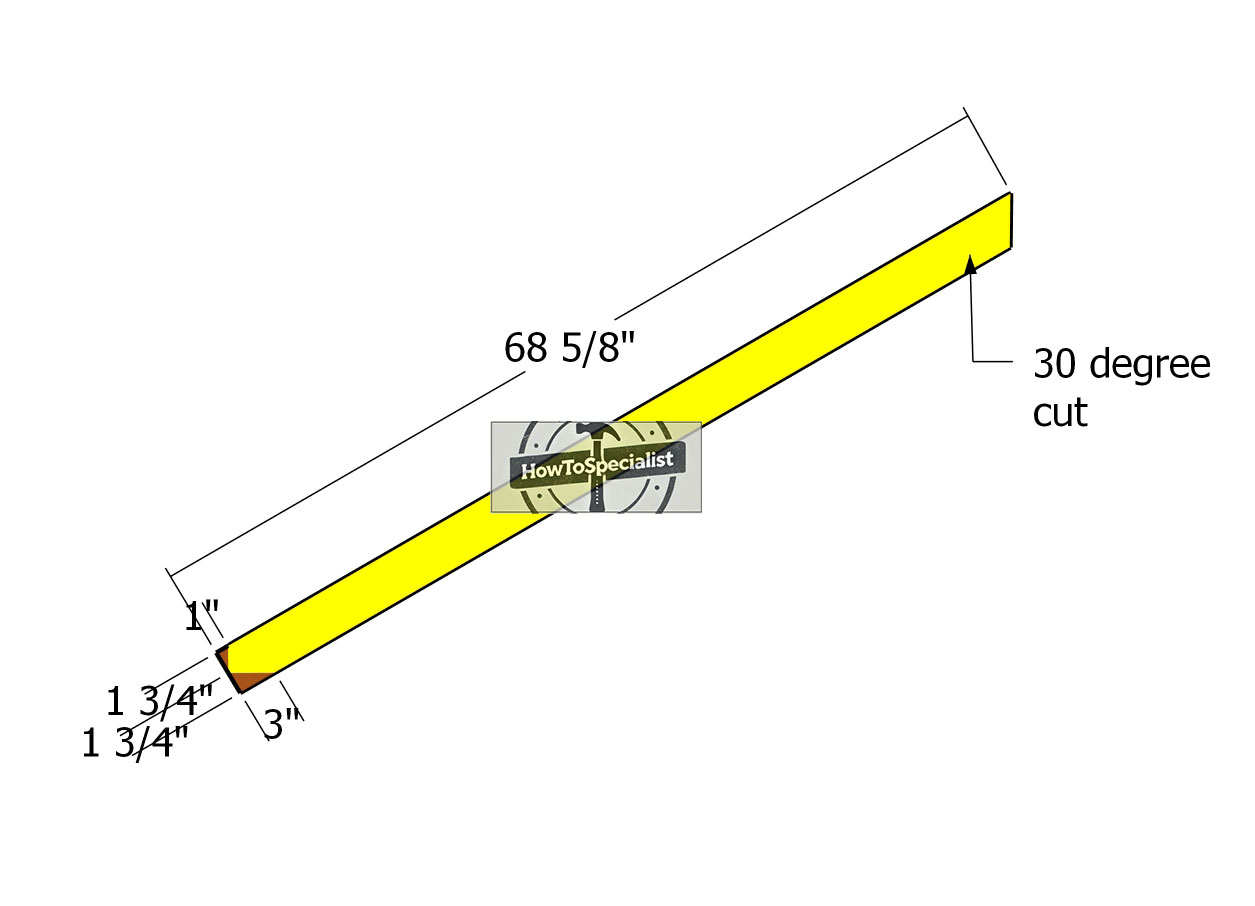
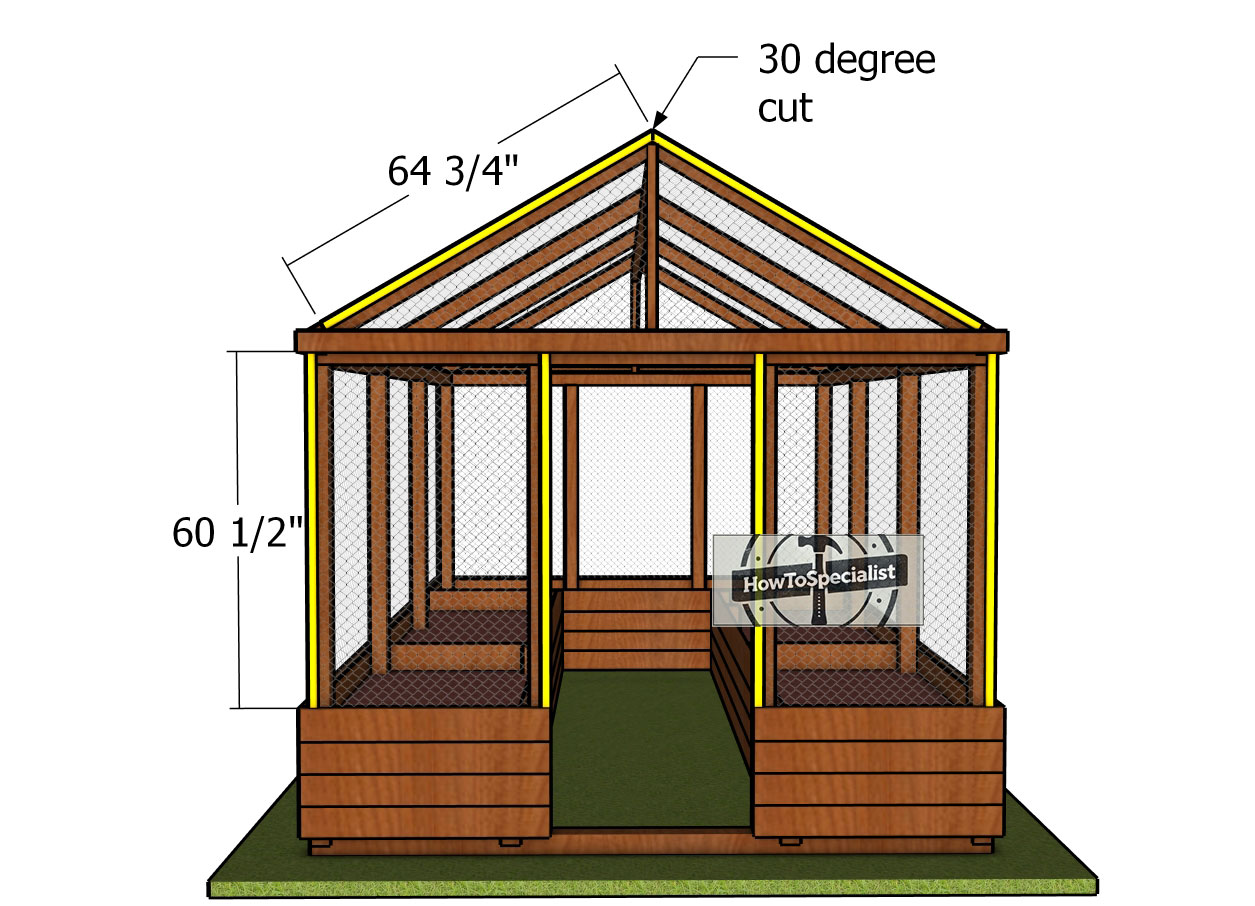
Cutting-the-rafters
We will use 2×4 lumber for the rafters. Make a 30 degree cut to one end of the boards and make a few cuts to the opposite end, as shown in the diagram. Smooth the edges with sandpaper.
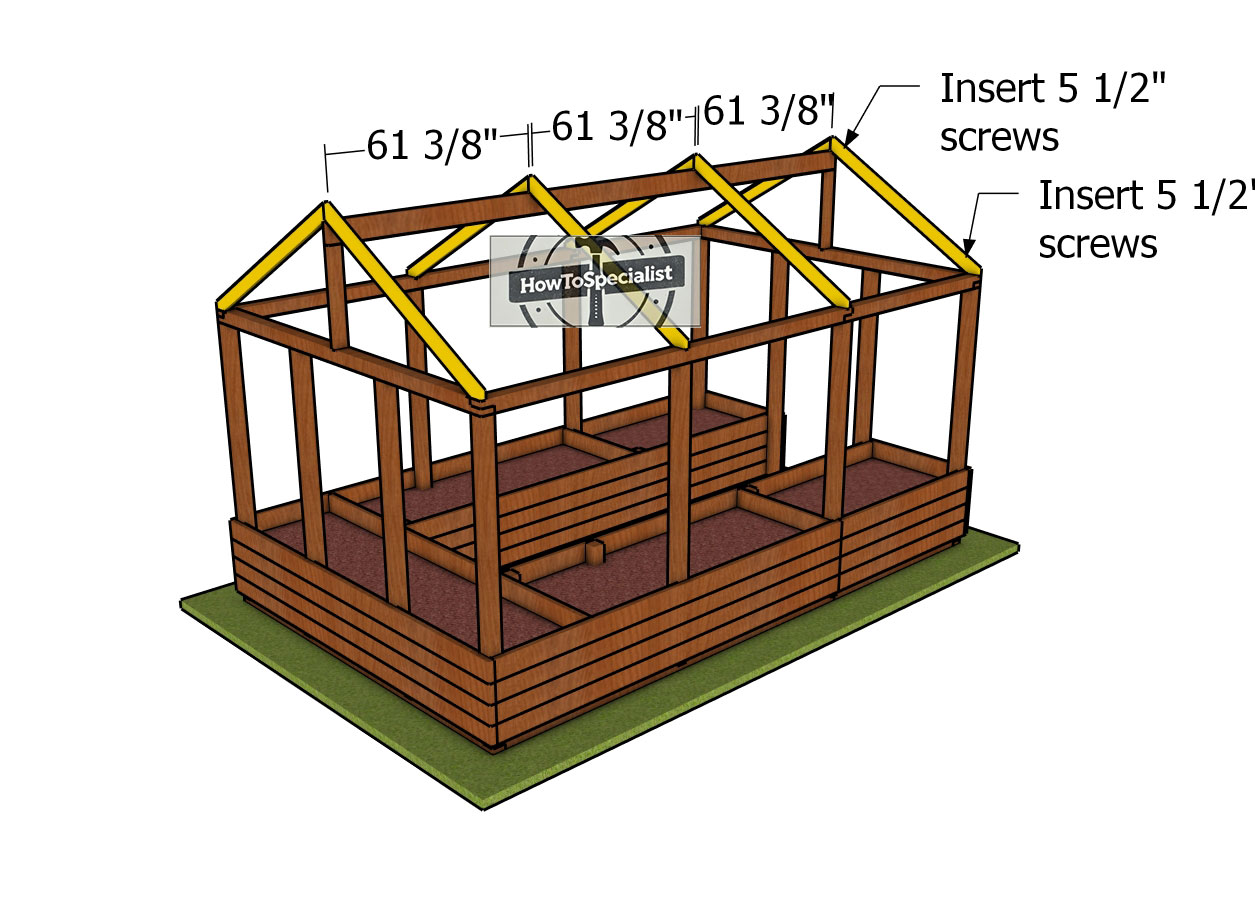
Fitting-the-rafters
Fit the rafters to the top of the structure. We need these rafters so we can install netting to the roof as well, and keep the garden safe from birds as well. Use 5 1/2″ screws to lock the rafters to the plates and ridge beam. Drill pilot holes before inserting the screws to prevent the wood from splitting.

Ridge-beam-braces
Next, I suggest installing 2×4 braces to the ridge beam to add some extra support. This will make the difference on the long run and keep your structure safe from strong winds.
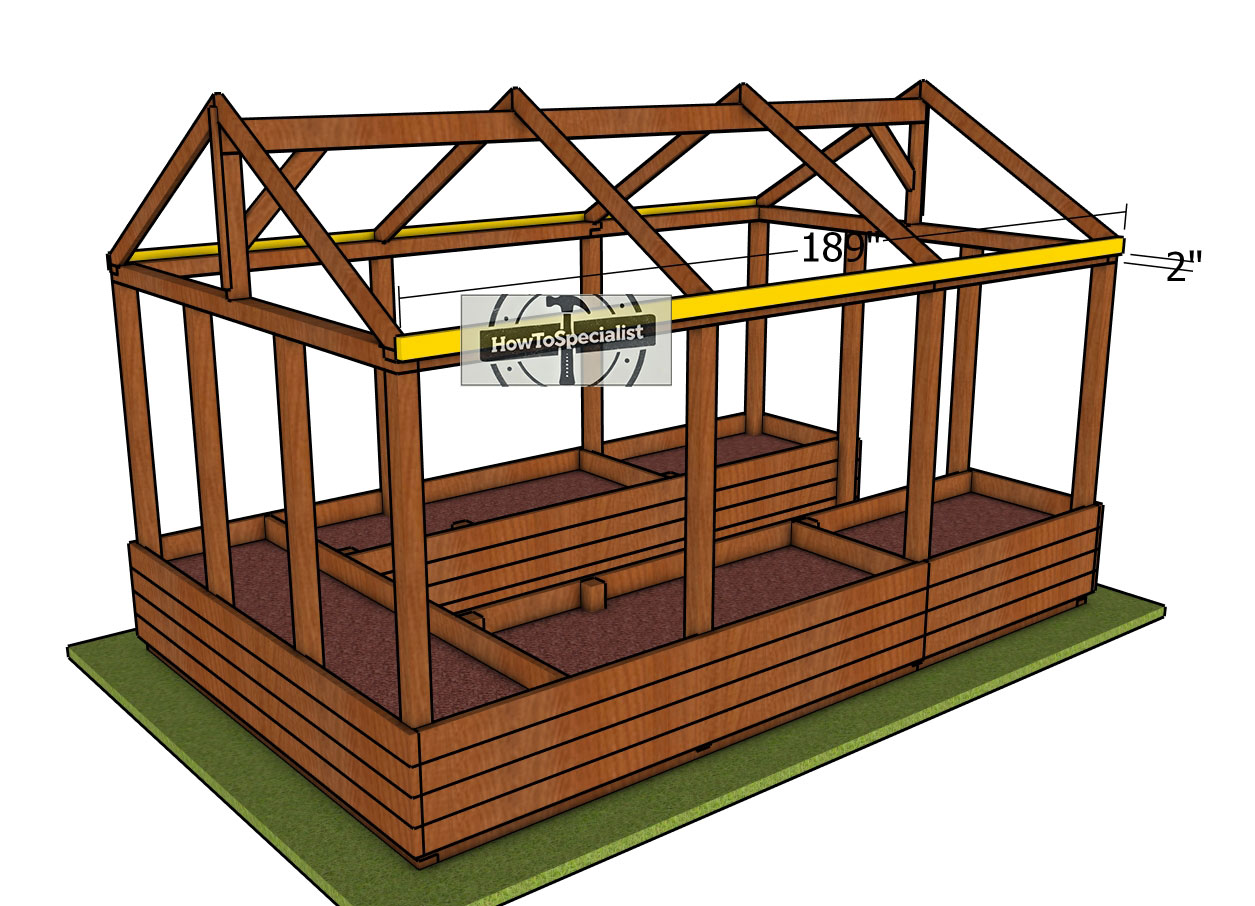
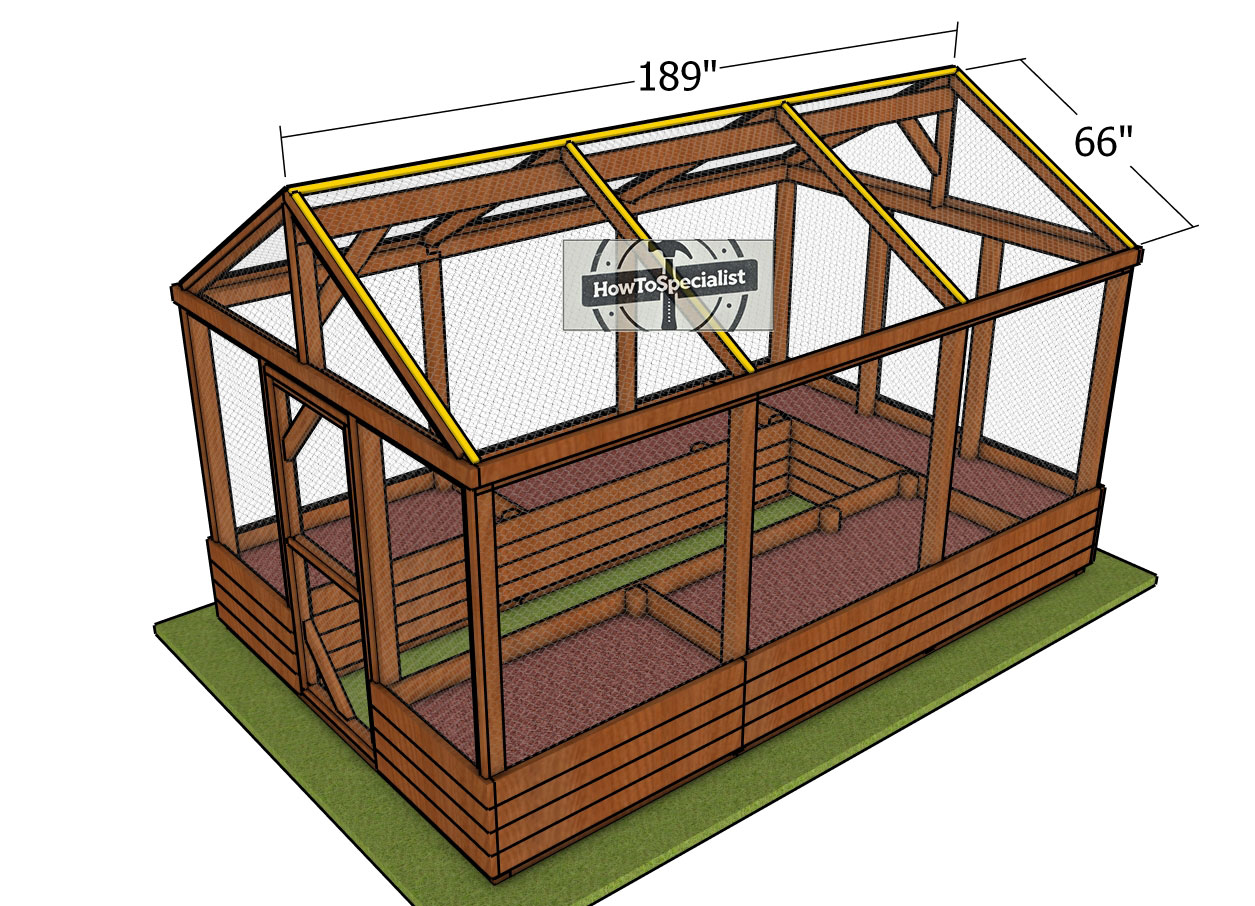
Side-boards
Attach the 2x4s boards to the sides of the roof, as in the diagram. Use 3 1/2″ screws every 8″ to lock the board into place. Insert a few screws into the rafters, as well.
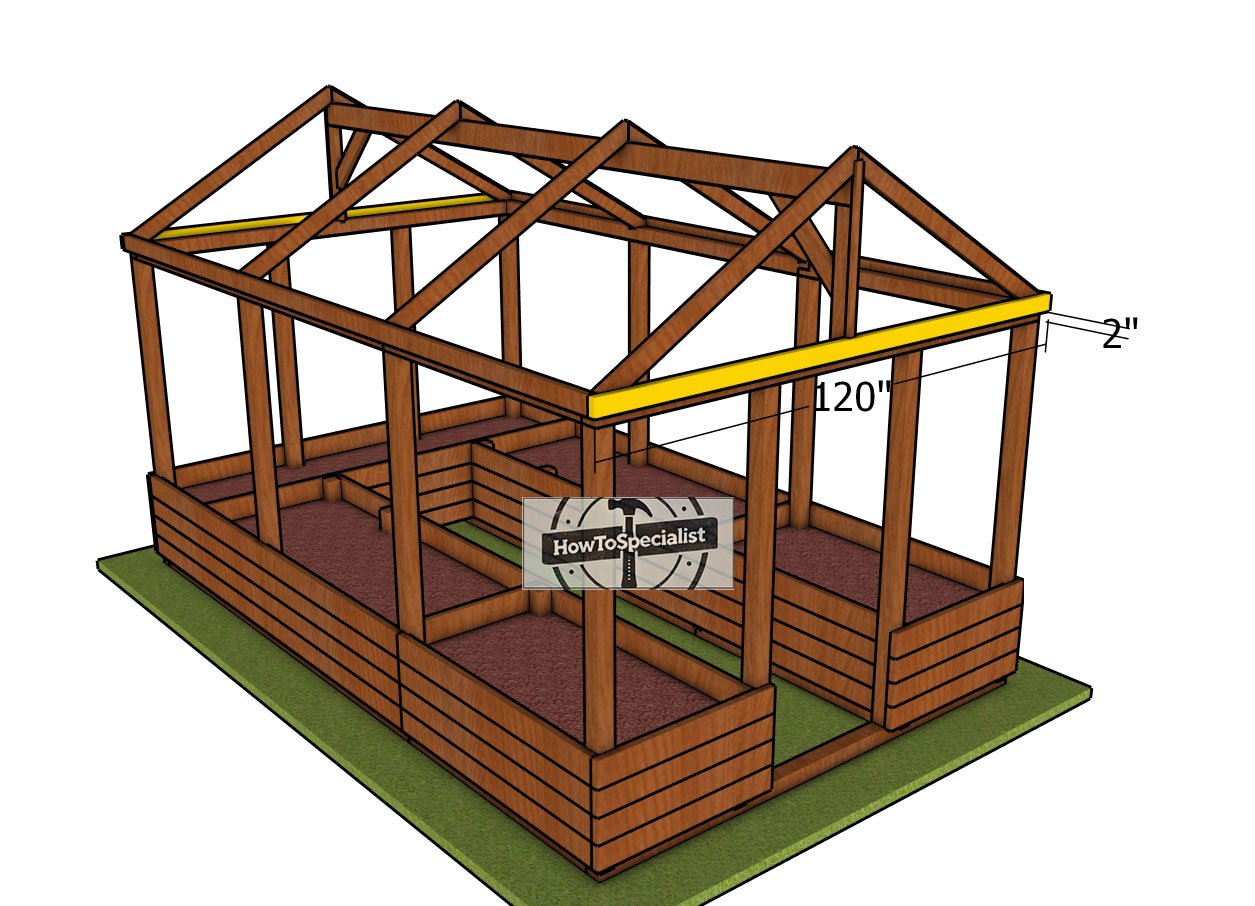
End-boards
Fit the 2×4 boards to the front and back of the
Back-trims
Attach the netting to the exterior of the fenced garden and lock it into place with 1×2 boards to the back of the structure. Use 1 5/8″ screws every 8″ to lock them into place tightly.
Front-trims
Attach the netting and the trims to the front of the 10×16 garden, as well.
Roof-trims
Last but not least, attach the netting and the trims to the top of the roof. This will protect your vegetables from birds and other unwanted guests.
Building the door

Building-the-door-frame
We will frame the door from 2×4 lumber. Cut the components to the dimensions shown above. Drill pocket holes at both ends of the vertical and middle components. Lay everything on a level surface and align the edges flush. Assemble with 2 1/2″ screws. Attach the braces with pocket holes at both ends, as well.
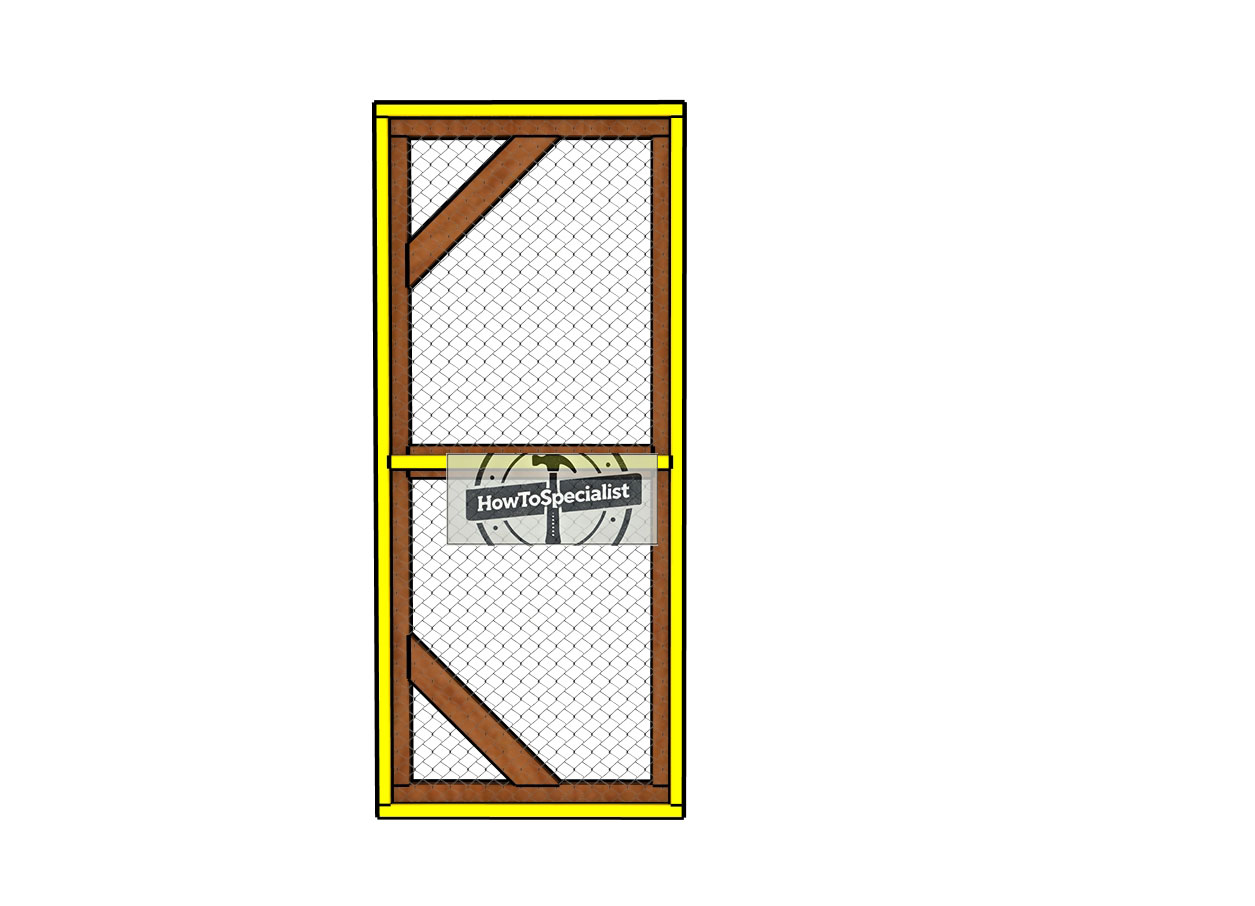
Door-trims
Cover the door with netting and then attach the 1×2 trims, as shown in the diagram. Use 1 5/8″ screws to lock the trims into place tightly.
Fitting-the-front-door
Let’s talk about what it’s going to take to bring this 10×16 deer-proof raised garden bed to life in terms of both time and money. First, let’s break down the materials. You’re looking at cedar boards for the frame, a few sturdy posts, hardware like screws and hinges for the door, and heavy-duty netting to cover the sides and roof. Cedar isn’t the cheapest option, but it’s worth the investment for its durability and natural resistance to rot and pests.
For a project of this size, you’re probably looking at around $800 to $1,200 in materials, depending on local prices and whether you already have some tools on hand. As for time, if you’re working solo and taking your time to get everything just right, you should plan for about three weekends. That includes prepping the area, cutting and assembling the wood, installing the netting, and adding any finishing touches. If you’re efficient or have a helping hand, you might knock it out in a couple of weekends. It’s a bit of a commitment, but when you see that garden bed standing strong, keeping your plants safe and sound, you’ll know it was worth every penny and every hour spent.
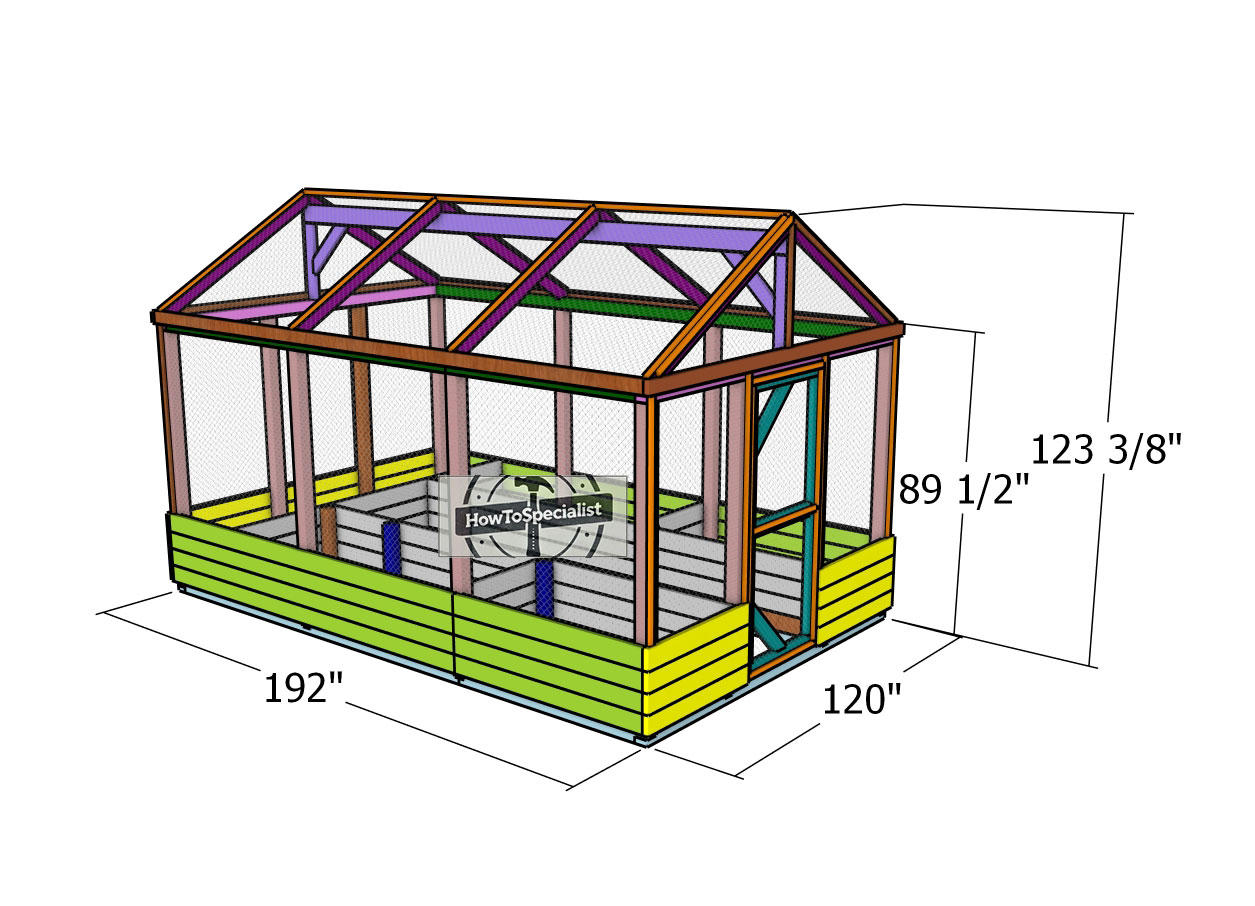
10×16-deer-proof-garden—dimensions
Cedar is safe for raised garden beds. In fact, it’s one of the best materials you can use. Cedar wood is naturally resistant to rot, decay, and insect damage, making it an excellent choice for outdoor projects like garden beds. It also contains natural oils that help preserve the wood and protect it from the elements, which means it can last for many years without the need for chemical treatments.
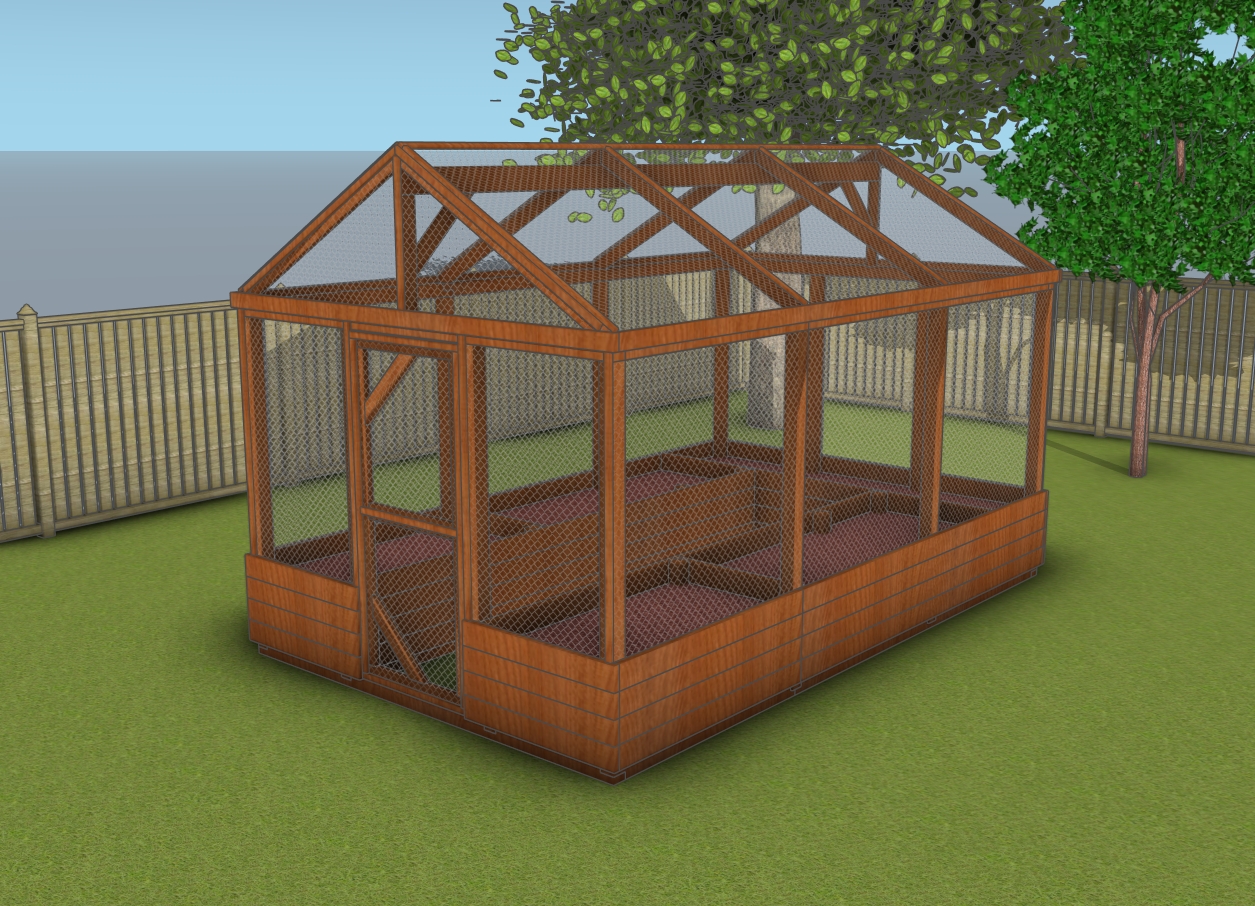
Deer proof raised garden bed plans
This natural resistance makes cedar a safe option for growing edible plants, as it doesn’t require any additional treatments that could leach harmful chemicals into the soil. Additionally, cedar is less likely to warp or split compared to other types of wood, which adds to the durability and longevity of your raised garden bed.
How to build a raised garden
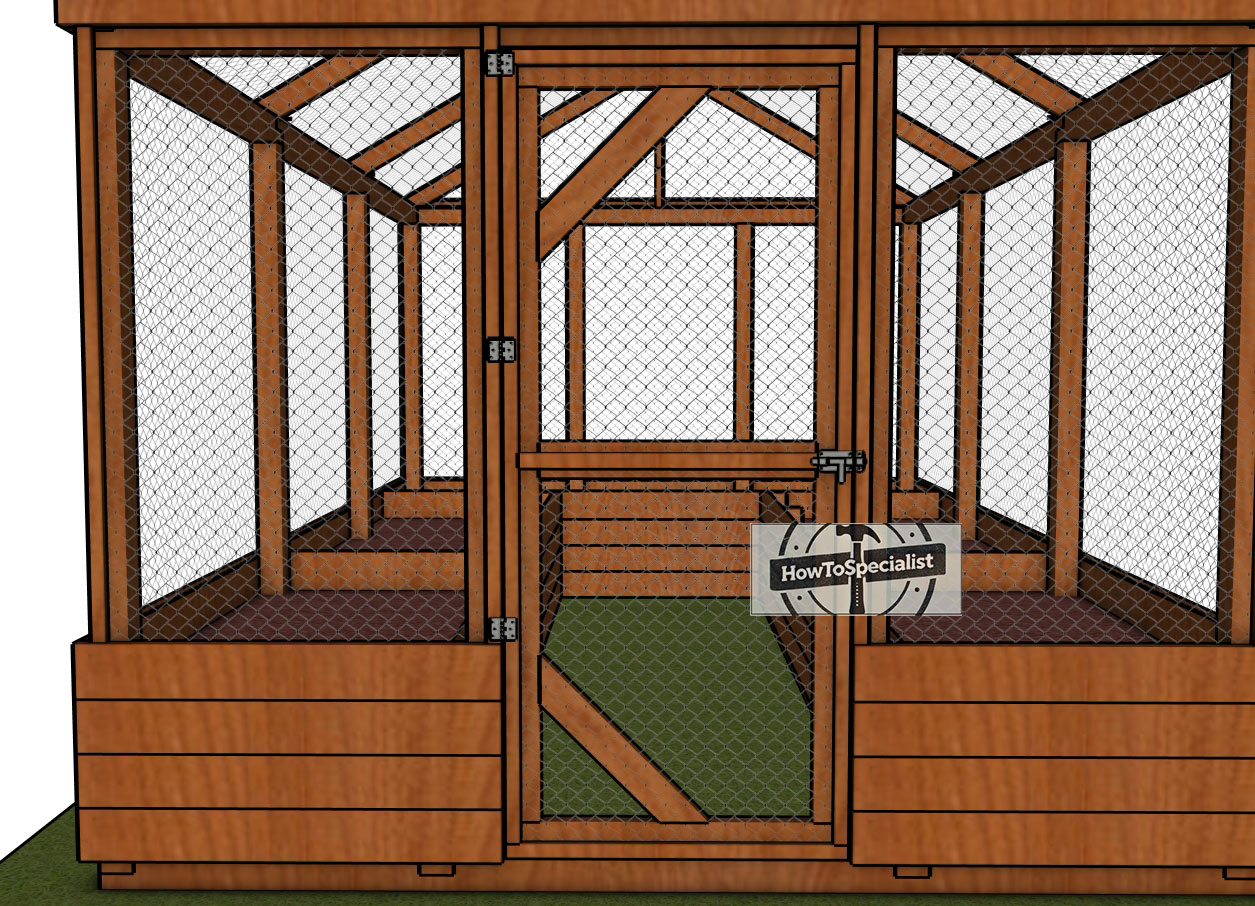
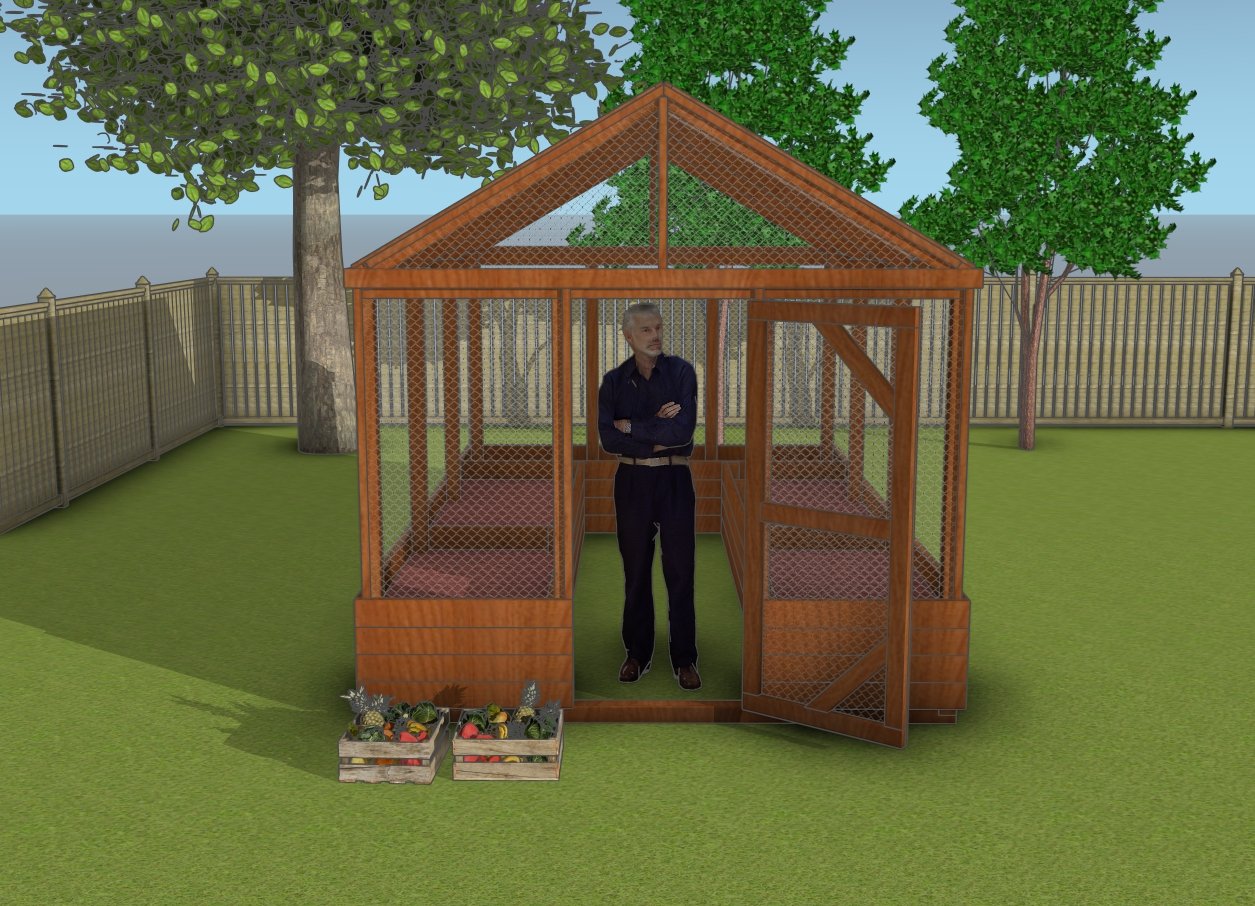
The 10×16 deer-proof garden bed, complete with a gambrel roof, front door, and netting on all sides, offers a fortress-like sanctuary for your plants. The front door makes accessing your plants a breeze, letting you tend to your garden with ease while keeping unwanted visitors out.
The netting on all sides and the roof acts as an impenetrable barrier against deer and other pests, yet still allows sunlight and rain to nourish your plants. It’s not just a garden bed; it’s a secure haven where your vegetables and flowers can thrive, untouched by the outside world.
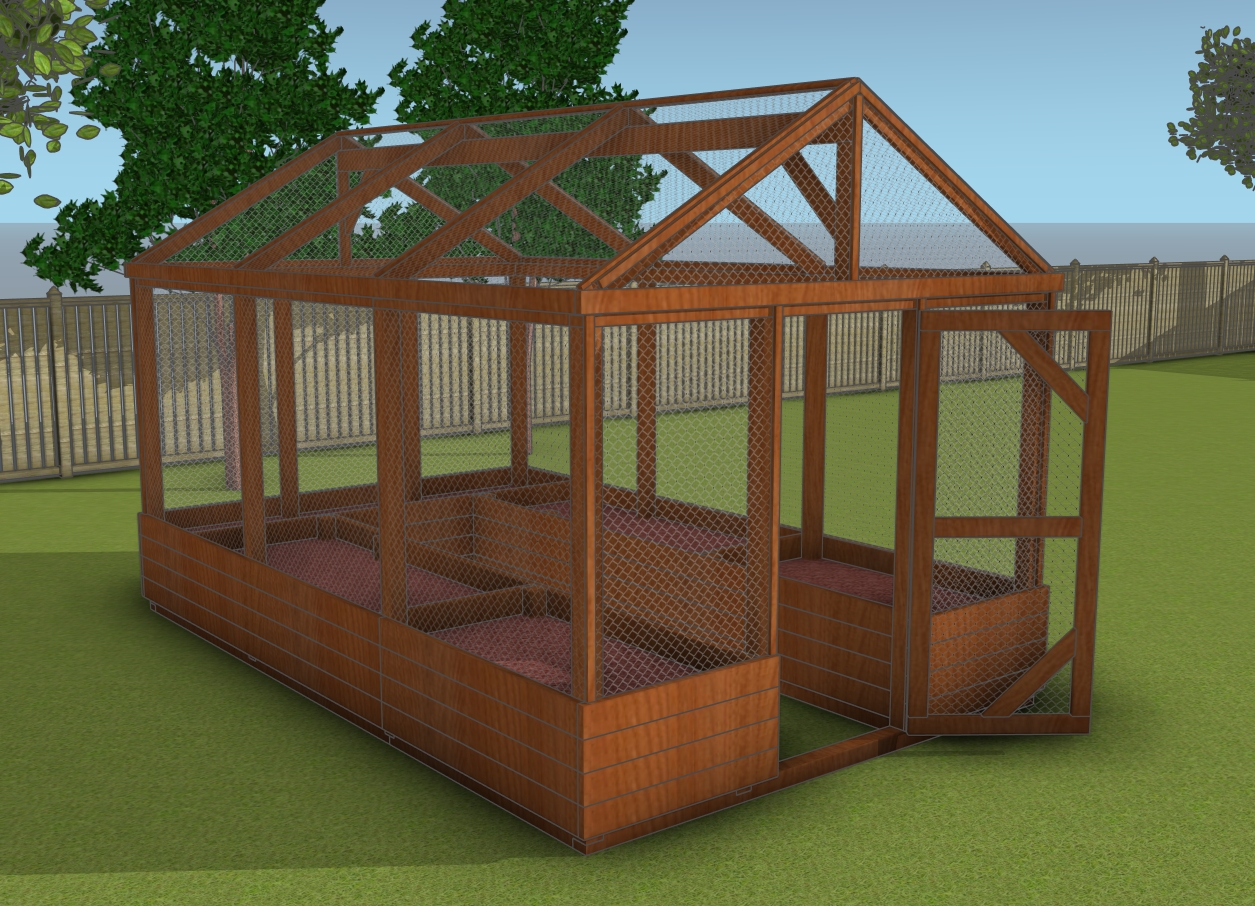
10×16 garden bed with deer proof fences
Smart Tip: I can’t wait to see how you make it your own – don’t forget to share your finished projects with me! In addition, take a look over the rest of my shed plans HERE.
Thanks for checking out my 10×16 deer proof garden bed plans! Be sure to explore my other projects for more fantastic ideas. Don’t forget to hit the LIKE button and SHARE with your friends using the social media links below.