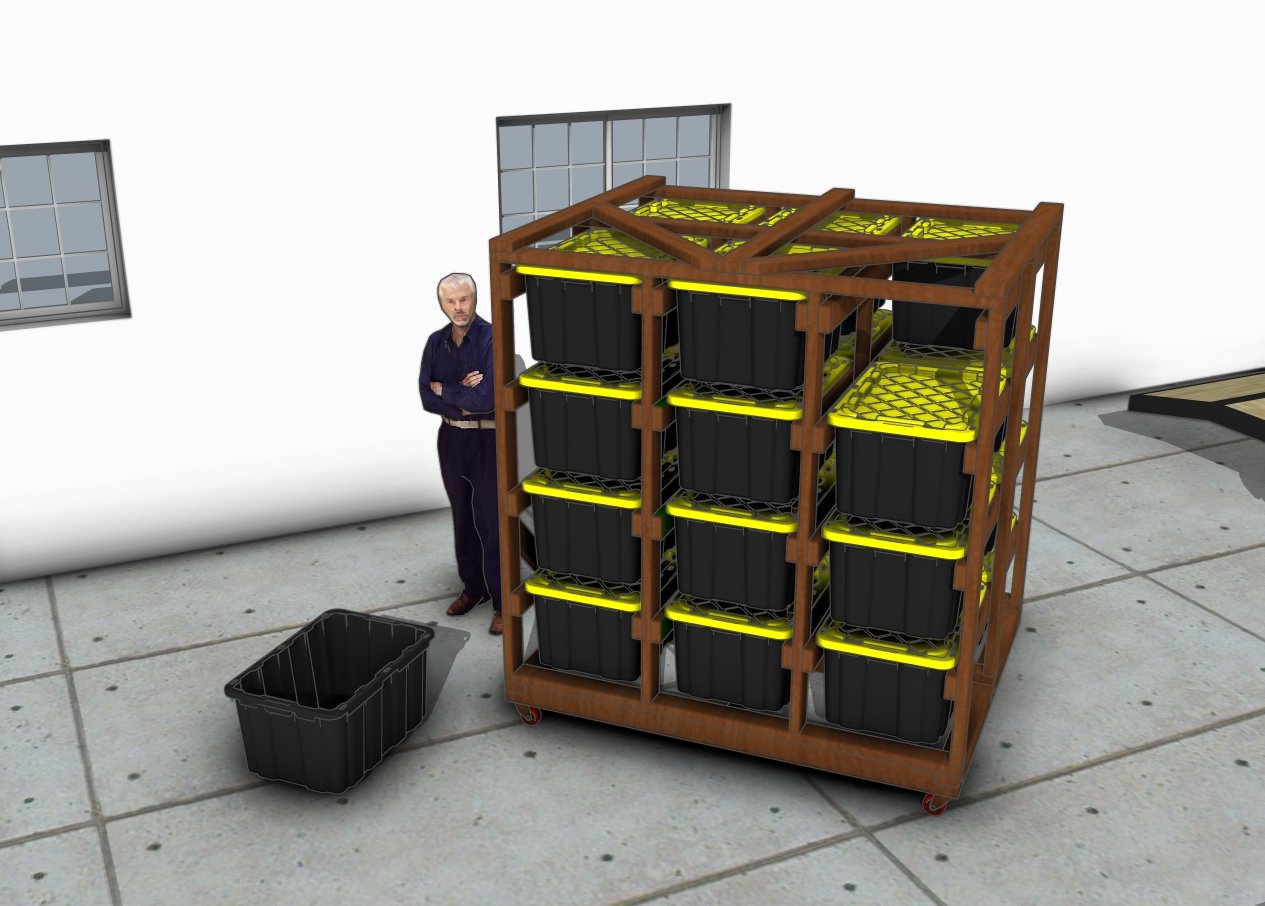
Are you tired of searching through cluttered piles of totes and boxes in your garage or storage room? These DIY tote storage system plans are here to save the day! Designed to hold up to 24 standard 27-gallon totes, this project is all about bringing order to your space while keeping everything easily accessible. Whether it’s holiday decorations, tools, or kids’ sports gear, this rack provides a sturdy and efficient solution that’s built to last. With its robust design and customizable finish, you’ll finally have a storage system that works for you and looks great doing it.
The best part? You can build this rack in about 8–10 hours, and it’ll cost you approximately $120–$150, depending on the materials you have on hand. It’s a straightforward project that even beginners can tackle with confidence. In this article, I’ll walk you through every step, sharing tips and tricks to make the process smooth and enjoyable. So, roll up your sleeves and let’s transform your storage space into a perfectly organized haven—you won’t regret it!
We recommend you to invest in the best materials you could afford. Therefore, you should buy weather-resistant lumber, such as pine or cedar. Always take accurate measurements before adjusting the size of the components at the proper size. Drill pilot holes trough the components before inserting the wood screws, to prevent the wood from splitting. My plans come with a full cut / shopping list and they are PDF Download and Print friendly. See all my Premium Plans HERE.
Made from this plan
Pin it for Later!
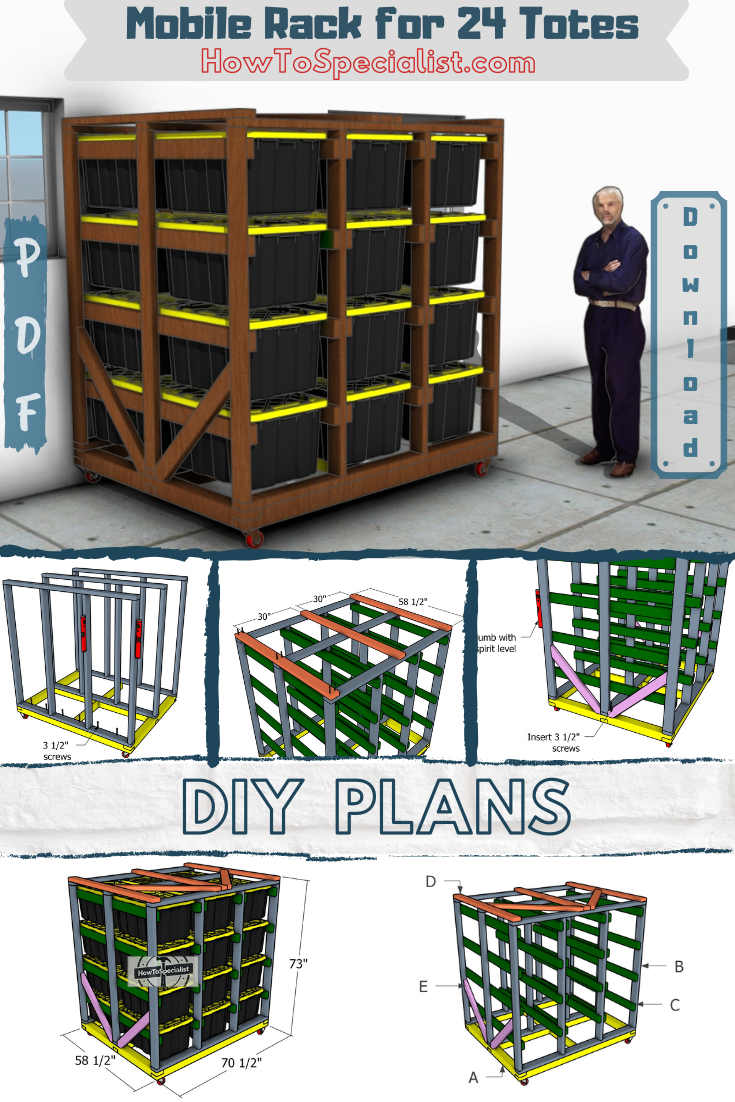
Mobile rack for 25 storage totes
How to Make a Mobile Tote System – Free DIY Plans
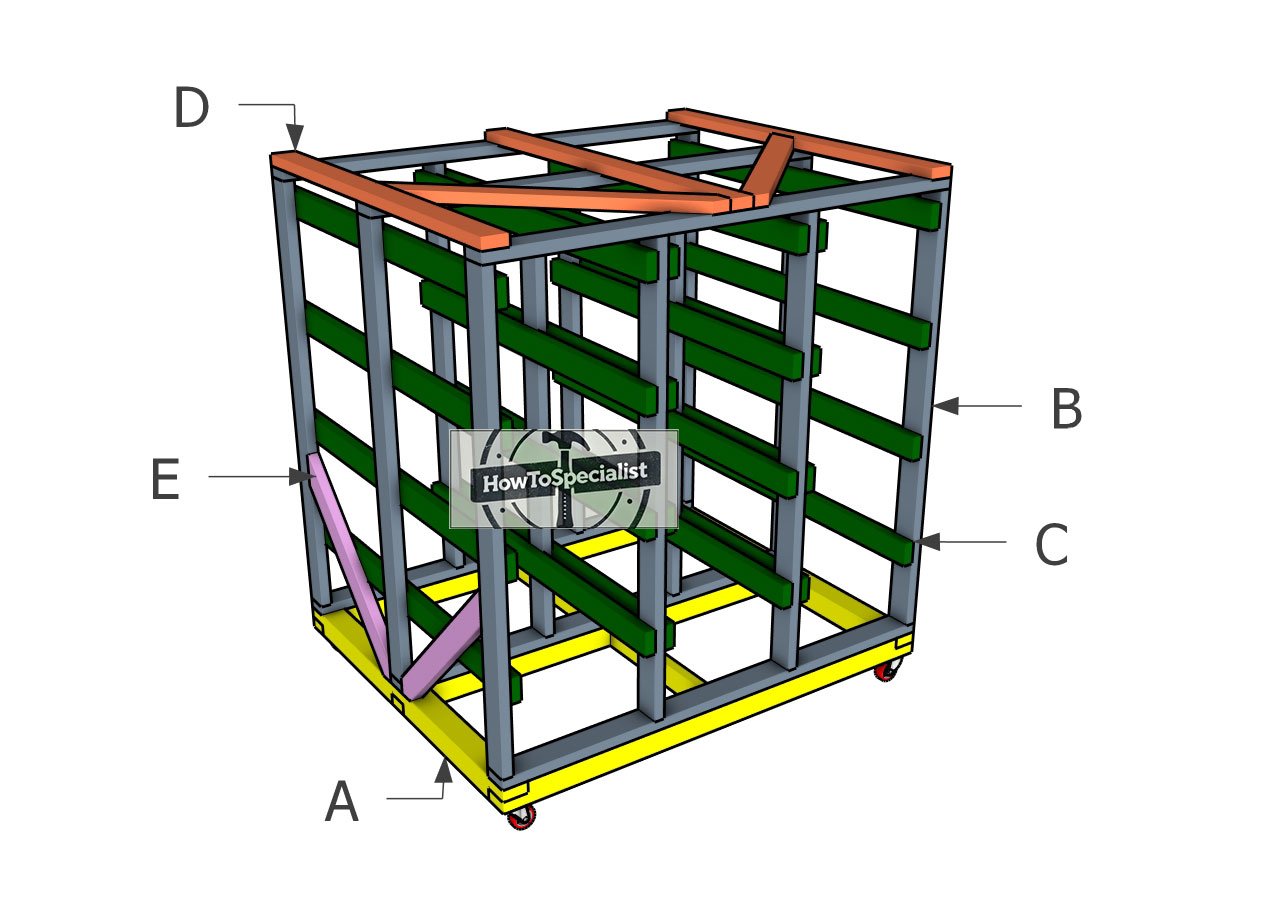
Making-a–tote-storage-rack-on-casters
Materials
A – SKIDS – 4×4 lumber 70 1/2″ – 3 pieces
A – SKIDS – 4×4 lumber 58 1/2″ – 2 pieces
B – UPRIGHTS – 2×4 lumber 65″ – 12 pieces
C – CLEATS – 2×4 lumber 58 1/2″ – 24 pieces
D – TOP SUPPORTS – 2×4 lumber 58 1/2″ – 3 pieces
D – TOP BRACES – 2×4 lumber 44 1/4″ – 2 pieces
E – SIDE BRACES – 2×4 lumber 35 3/4″ – 4 pieces
- 4×4 lumber 8 ft – 3 pieces
- 4×4 lumber 10 ft – 1 piece
- 2×4 lumber 8 ft – 5 pieces
- 2×4 lumber 10 ft – 12 pieces
- 2×4 lumber 12 ft – 9 pieces
- 27 gallon storage tote – 24 pieces
- 2 1/2″ screws – 200 pieces
- 3 1/2″ screws – 100 pieces
- stain / paint – 1 can
- Glue – 1 piece
- Wood putty – 1 can
- 2″ caster wheels – 4 pieces
Tools
- Miter saw, Pocket hole jig
- Drill machinery, Drill bits, Jigsaw
- Safety gloves, Glasses
- Chalk line, tape measure, spirit level, carpentry pencil
Time
- One weekend
Related
Step 1: Building the main frame
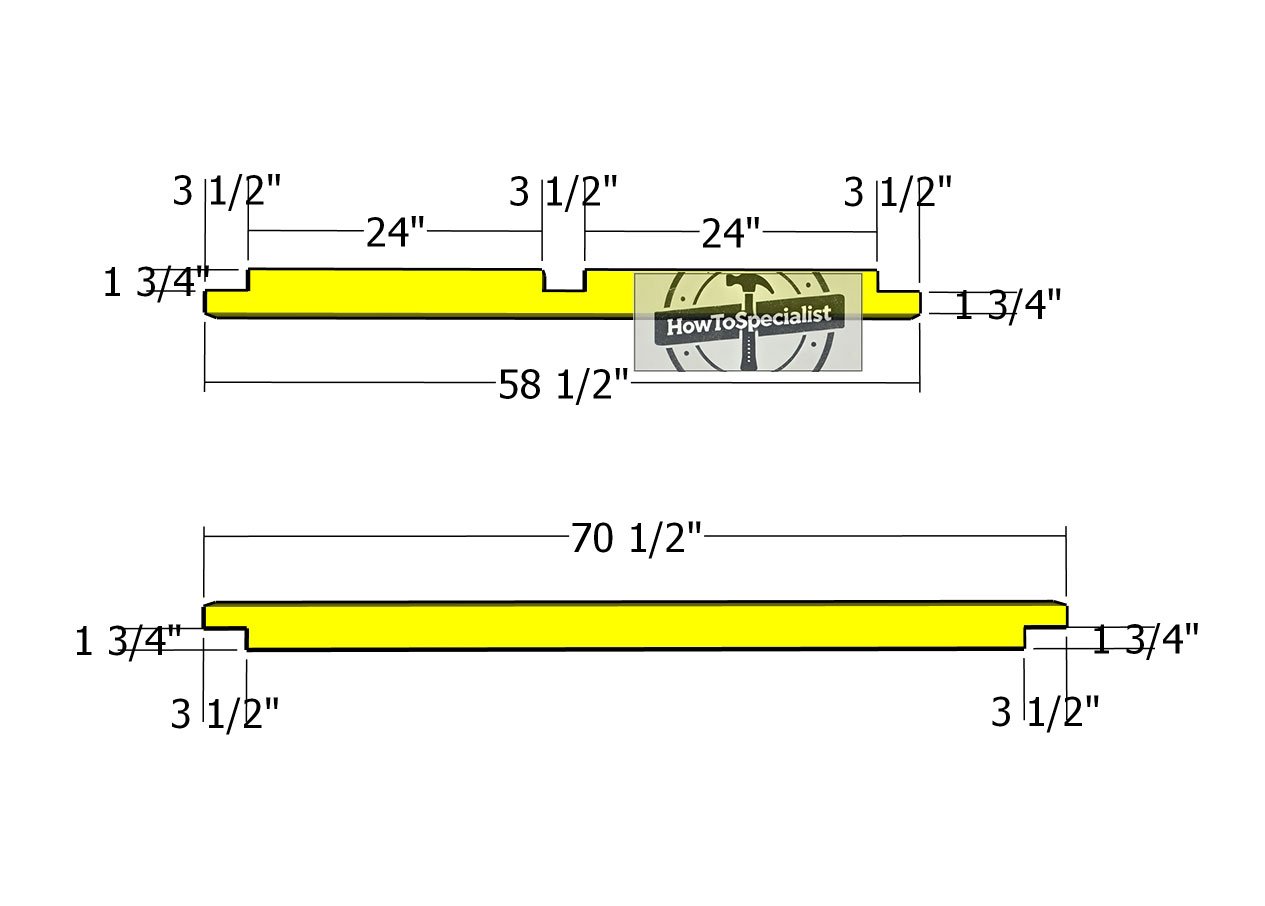
Skids
We’re kicking off this project with the base, the backbone of your tote storage rack. For a setup this sturdy, we’re going with 4x4s to ensure it can handle the weight of the rack and those loaded storage totes without breaking a sweat. This is a heavy-duty build, so we’re not skimping on materials, quality matters when you want something to last.
Grab your circular saw and set the blade depth to 1 3/4″ to notch the skids. This step is all about precision, so take your time. Once the cuts are made, use a chisel to clean out the excess material and follow up with sandpaper to smooth the recess. A solid base starts with clean, precise work, and this foundation is setting the tone for the rest of the project.
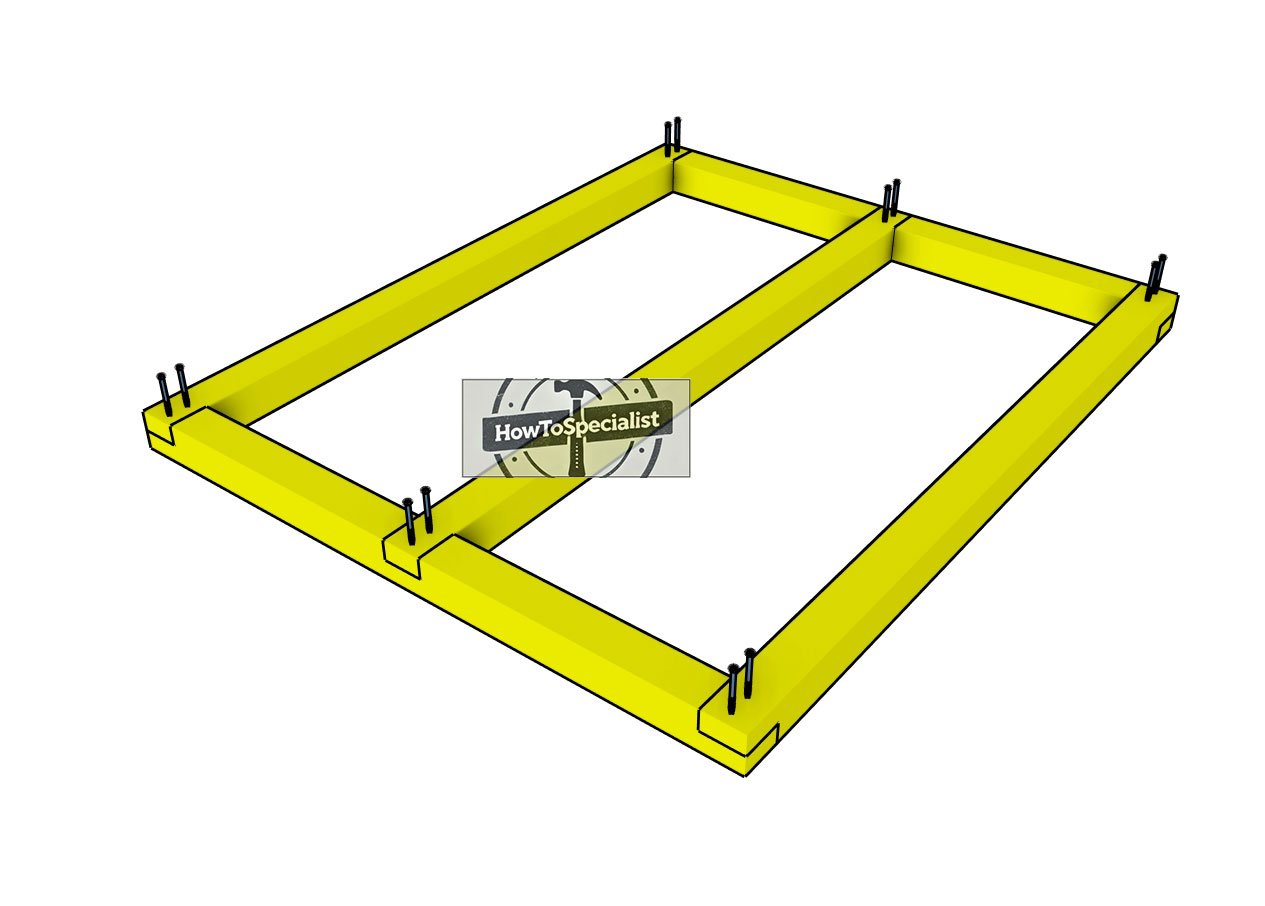
Assembling-the-base-frame
Now it’s time to assemble the skids, bringing that sturdy base to life. Lay them out as shown in the diagram, ensuring the corners are perfectly square—precision here is non-negotiable. Use a speed square to double-check everything before moving on.
Once aligned, drill pilot holes to prevent splitting and secure the joints with 3 1/2″ screws. Make sure you drive in at least two screws per joint for a connection that’s rock-solid and ready to take on the weight of your rack and totes.
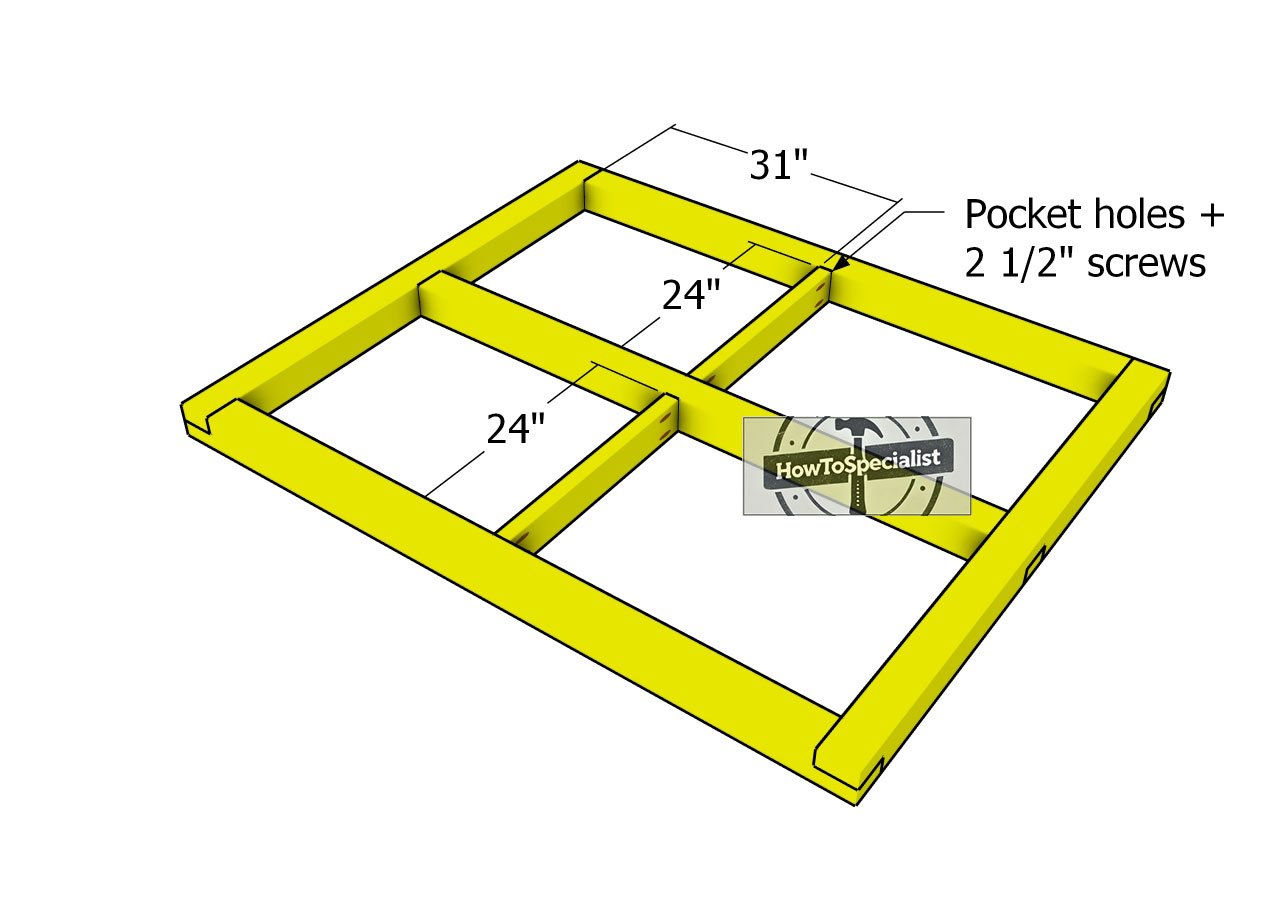
Fitting-the-middle-base-supports
Attach 2×4 supports to the base frame. Drill pocket holes at both ends, center them into place and insert 2 1/2″ screws to lock them to the skids.
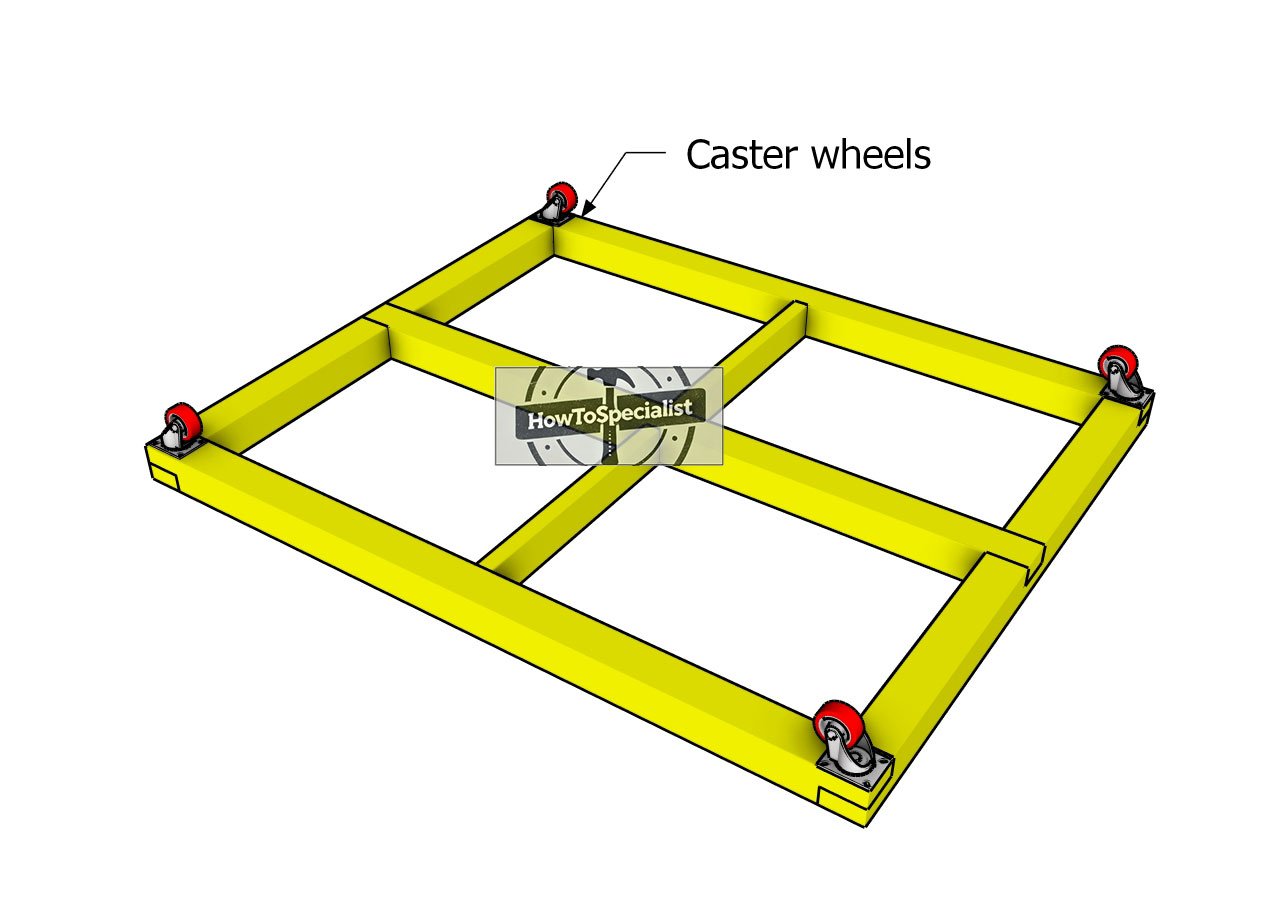
Attaching-the-caster-wheels
Let’s take this rack to the next level by adding caster wheels, turning it into a mobile storage powerhouse. With wheels attached, you’ll be able to effortlessly move the rack around your workshop, garage, or storage room like it’s no big deal. Convenience? Check.
Position the caster wheels at the outer corners of the skid frame for maximum stability and balance. Secure them firmly with screws, make sure they’re snug and ready to roll. This simple upgrade makes your rack not just functional but versatile, ready to adapt to wherever you need it most.
Step 2: Building the storage rack
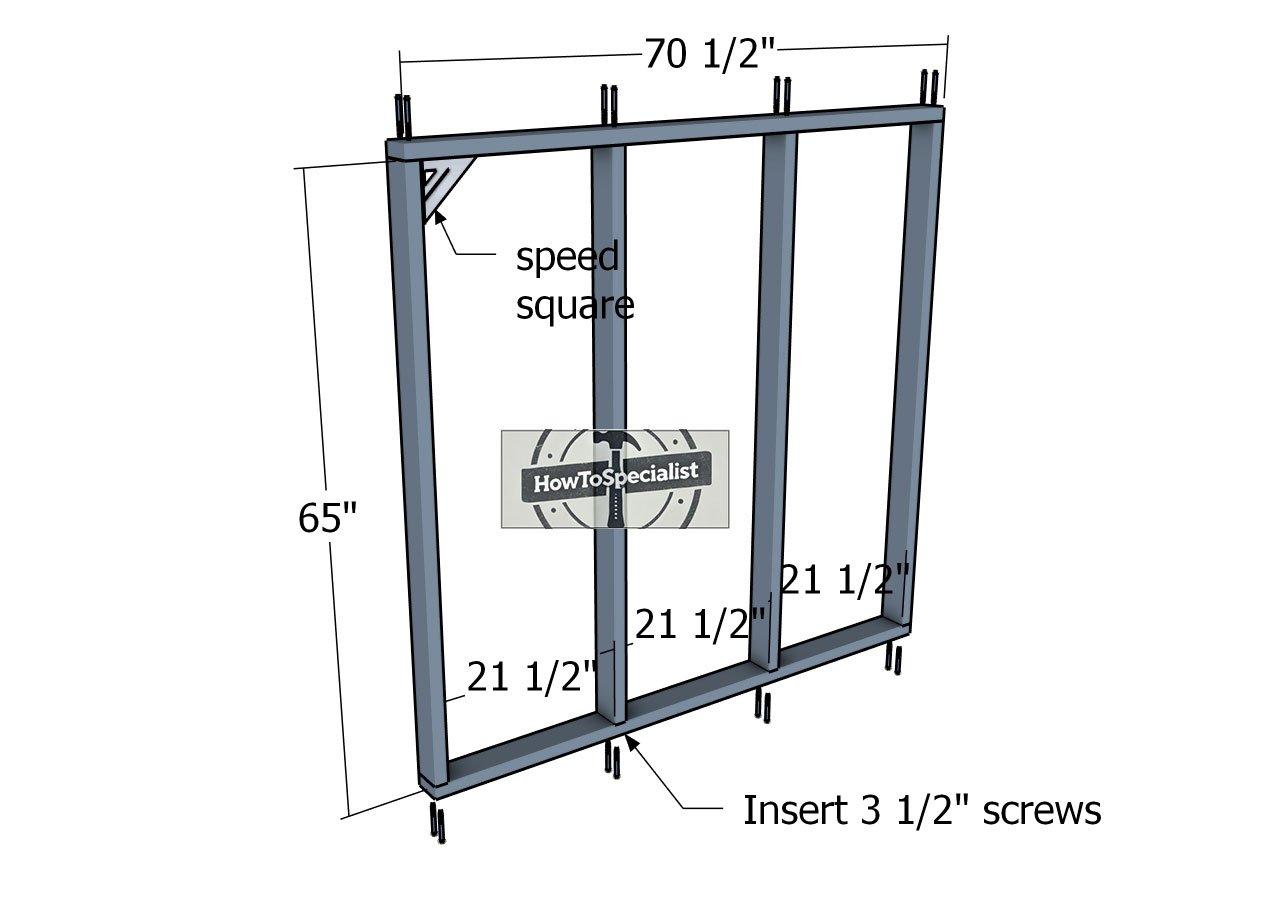
Assembling-the-frames
Now it’s time to build the frames for your storage rack. While there are different approaches to constructing the frame, assembling it like a shed frame keeps things straightforward and solid. Start by drilling pilot holes through the plates to prevent splitting, then secure the studs in place using 3 1/2″ screws.
Make sure to space the studs evenly—this step is key to maintaining a balanced and strong structure. As you assemble, use a speed square to double-check the corners are square. Precision here means a sturdy, reliable rack that can handle the weight of those totes without breaking a sweat.
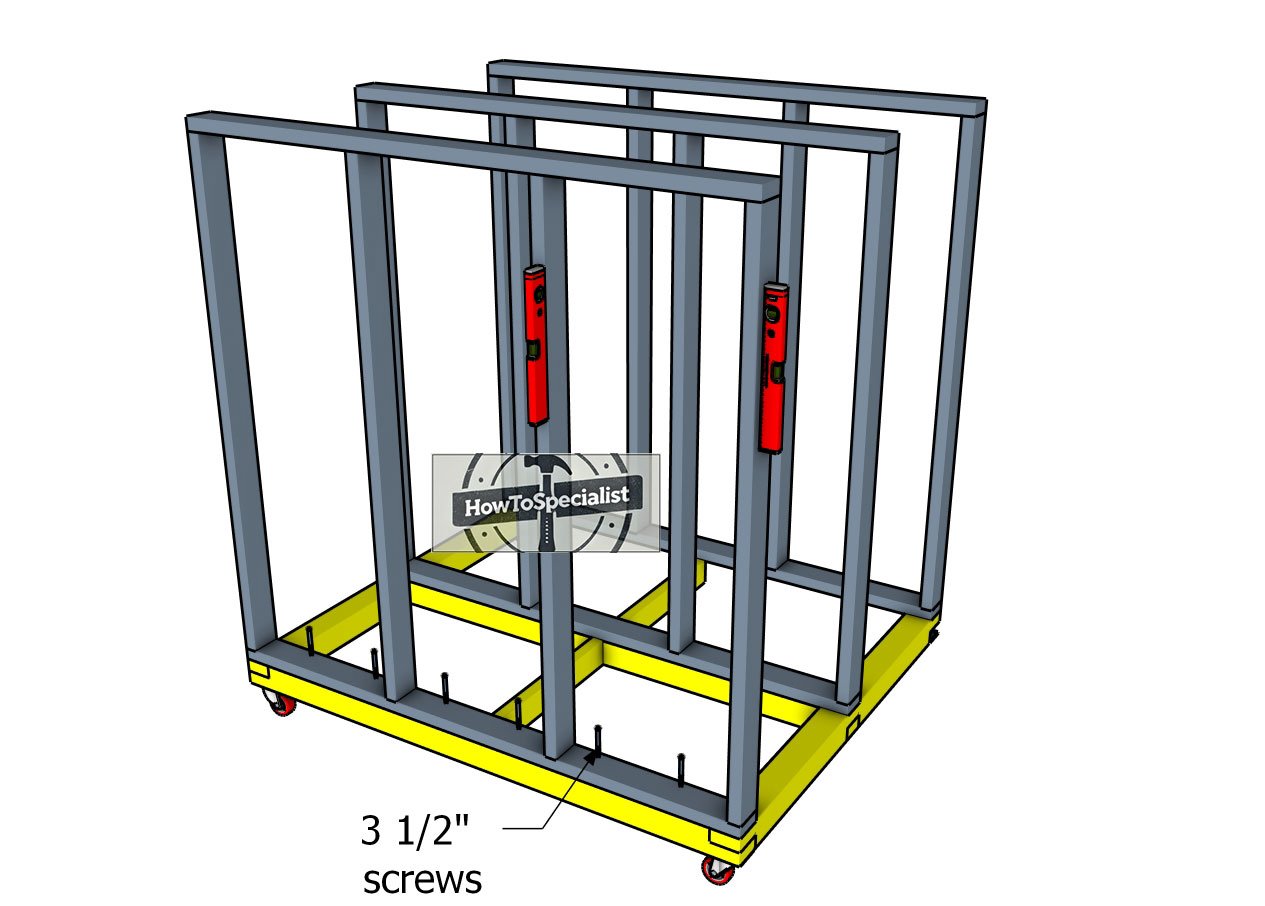
Attaching-the-frames
Lay the assembled frames onto the base of the rack, aligning the edges flush with the skids below. Take your time to ensure everything is perfectly positioned—this alignment is key to a strong and stable build.
Next, use a spirit level to plumb the frames, making sure they’re standing straight and true. Once everything is aligned and square, drill pilot holes to prevent splitting, then secure the frames to the base with 3 1/2″ screws. This connection locks the frames into place, creating a solid foundation that’s ready to support the rest of your storage rack.
Fitting-the-cleats
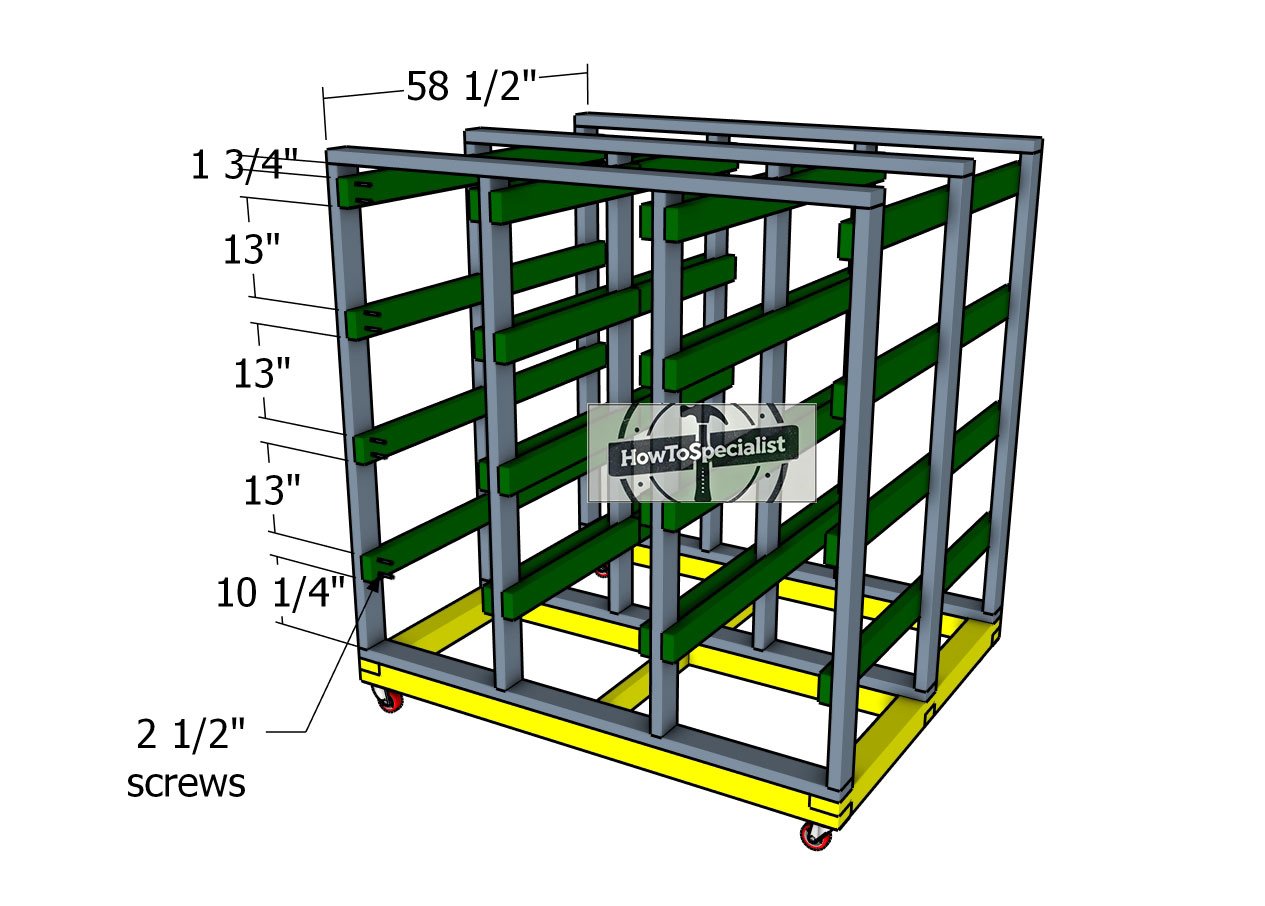
Now comes the fun part—attaching the cleats that will hold your storage totes. These cleats are what make the rack functional, letting you slide totes in and out effortlessly. Align each cleat to the front and back of the rack frame, ensuring they’re perfectly level using a spirit level. Taking the time to get this right ensures your totes will sit securely and evenly.
Drill pilot holes into the cleats to avoid splitting the wood, then secure them tightly with 2 1/2″ screws. For added precision, consider using spacers made from scrap wood to maintain consistent gaps between the cleats. This method is quick, easy, and ensures a professional finish.
Installing-the-top-slats
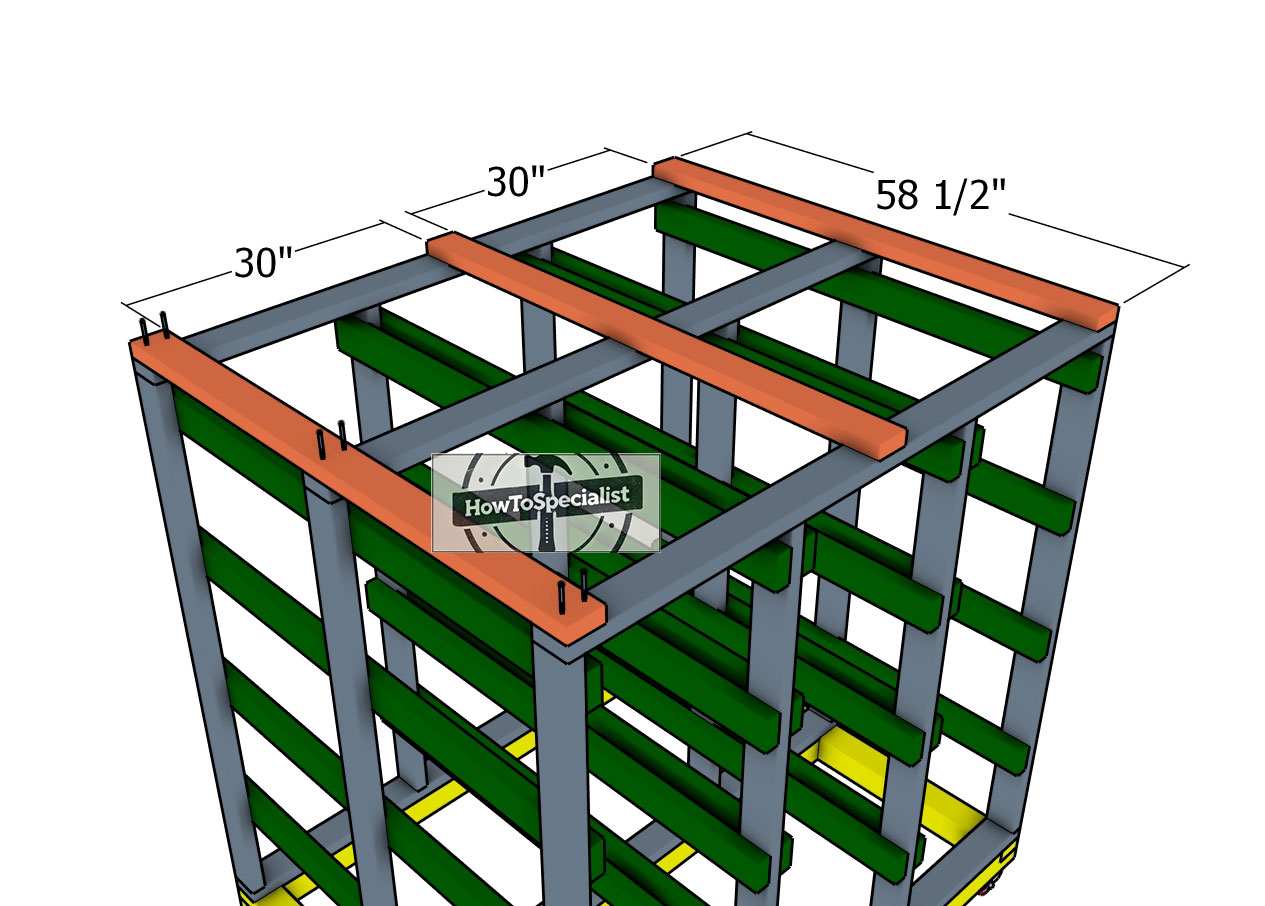
Secure the 2×4 supports to the top of your DIY tote storage system to add stability and reinforce the overall structure. Position the supports carefully, ensuring they align perfectly with the frame for a clean and balanced fit.
Drill pilot holes to prevent the wood from splitting, then fasten the supports tightly with 2 1/2″ screws. These top supports play a crucial role in stabilizing the rack, especially when it’s fully loaded, ensuring it remains strong, steady, and ready for action.
Step 3: Adding the braces
Braces-for-storage-unit
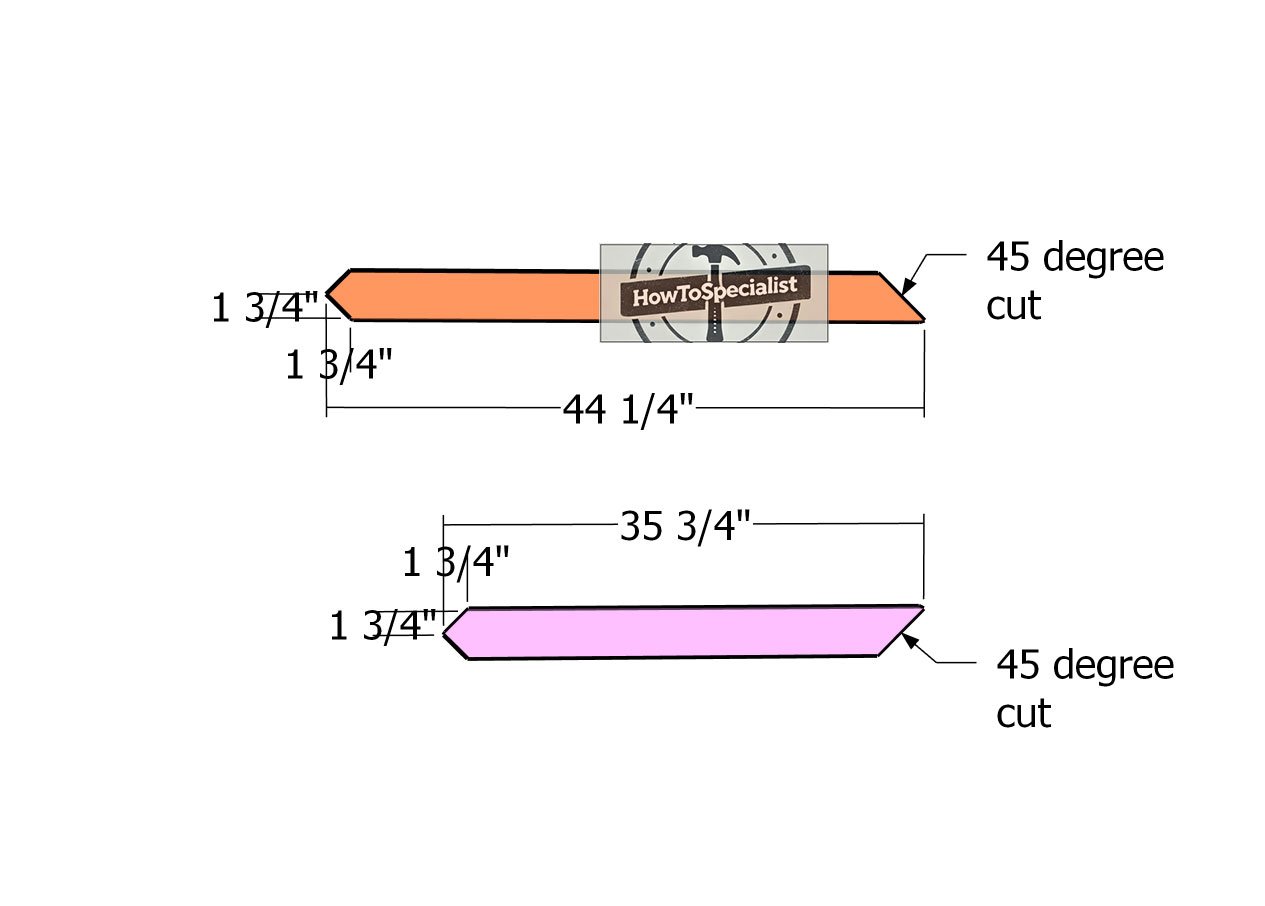
To ensure your storage rack is rock-solid and wobble-free, add diagonal braces to the sides and top. These braces will significantly enhance the stability of the structure, especially when fully loaded with totes.
Cut the braces with precision by setting your miter saw to 45 degrees and making angled cuts at both ends, following the measurements in your diagram. Take your time with this step to ensure a snug fit—clean, accurate cuts are the key to braces that provide maximum support. Once cut, these braces will lock everything together, giving your rack the strength to handle heavy use with ease.
Fitting-the-side-braces
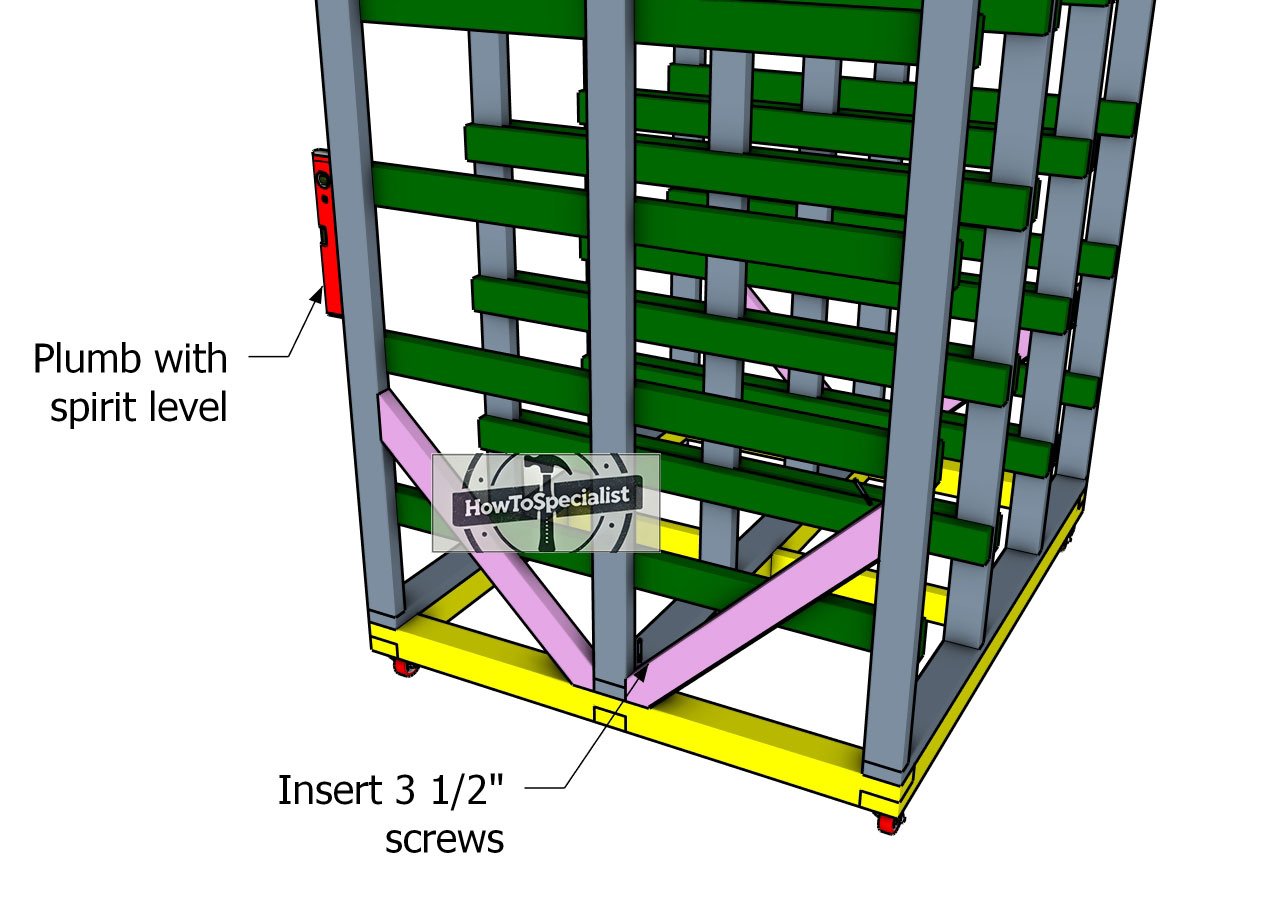
Ensure the frames of your storage rack are perfectly plumb by using a spirit level. Once aligned, fit the diagonal braces snugly to the sides of the rack. These braces are crucial for stability, so take your time to position them correctly.
Drill pilot holes into the braces to prevent splitting, then secure them to the storage shelves with 3 1/2″ screws. Tighten each connection firmly to lock the braces in place, creating a sturdy and wobble-free structure that’s ready to handle the weight of your storage totes with confidence.
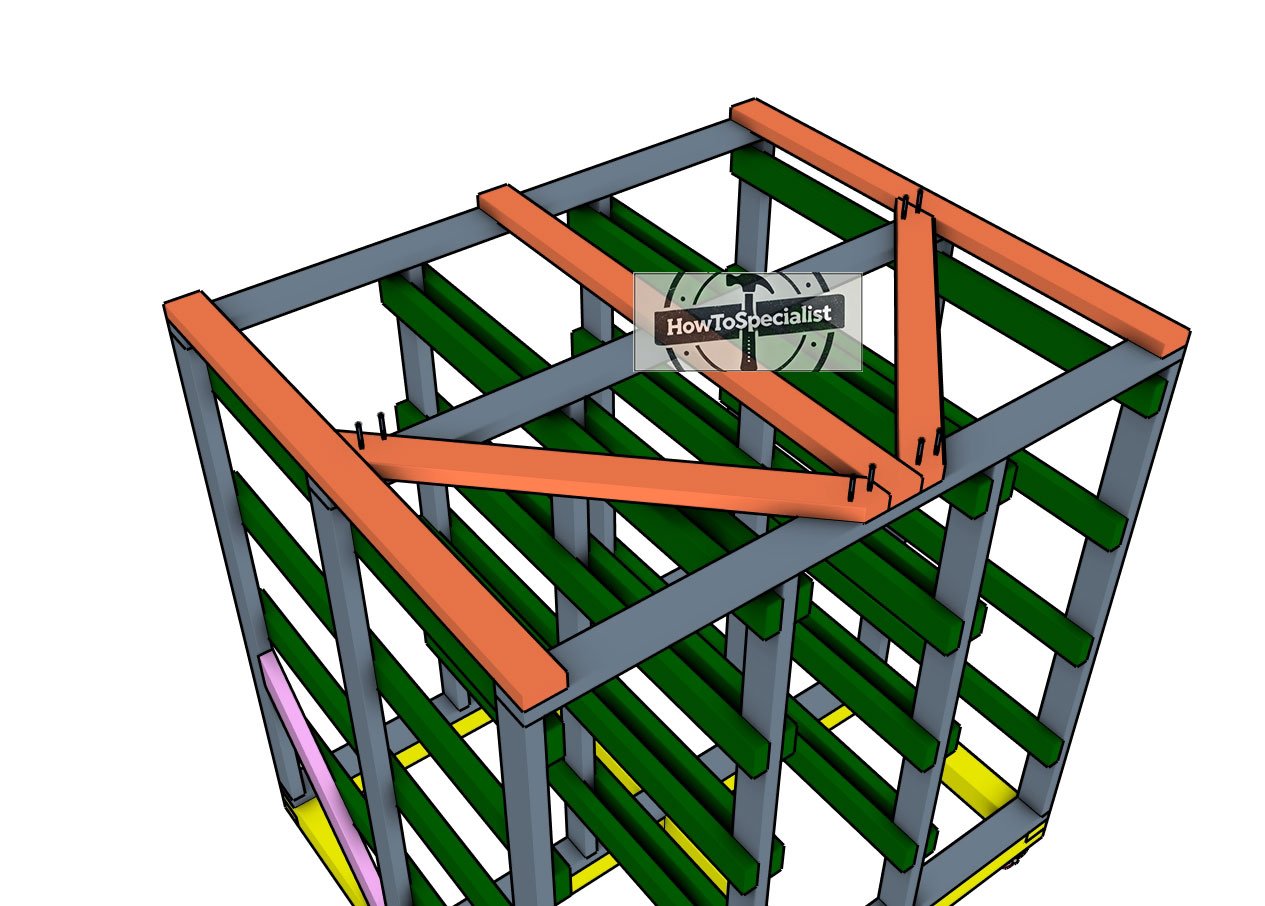
Top-diagonal-braces
Attach the diagonal braces to the top of the rack, ensuring the edges align perfectly with the frame for a clean, professional look. Drill pilot holes into the braces to prevent splitting, then secure them tightly with 2 1/2″ screws. These braces will reinforce the top of the rack, adding stability and ensuring the entire structure remains solid and secure, even when fully loaded with storage totes.
Step 4: Finishing touches
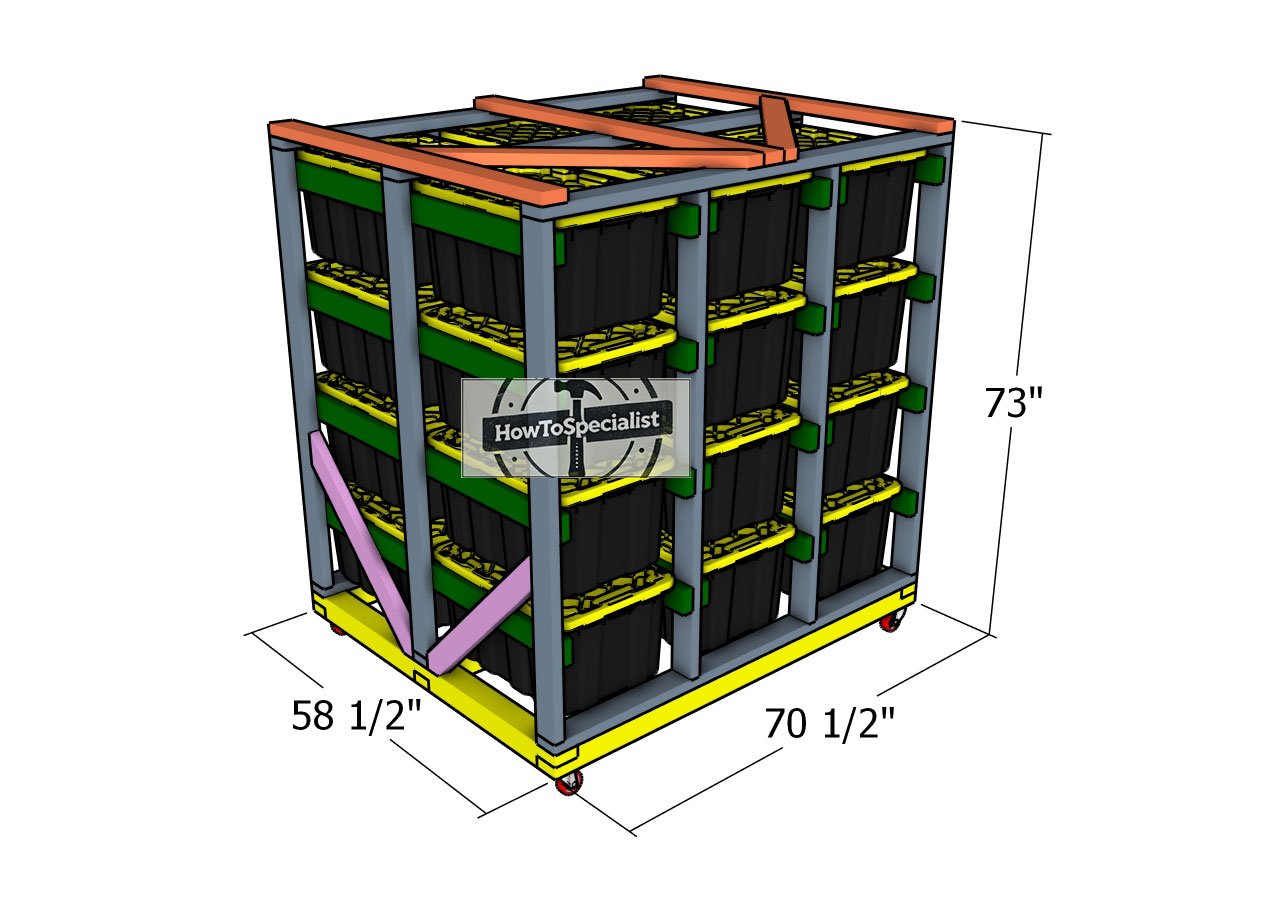
24-tote-storage-rack—dimensions
Before adding your finish, take a moment to fill any holes, dents, or imperfections with wood putty for a flawless look. Apply the putty with a putty knife, pressing it into screw holes and any visible gaps or cracks. Allow it to dry completely, then sand the surface smooth to ensure a seamless finish.
Once the surface is prepped, move on to adding your color and protection. Whether you opt for stain to enhance the wood grain or paint for a bold statement, apply your finish in thin, even coats. Let each coat dry thoroughly before adding the next.
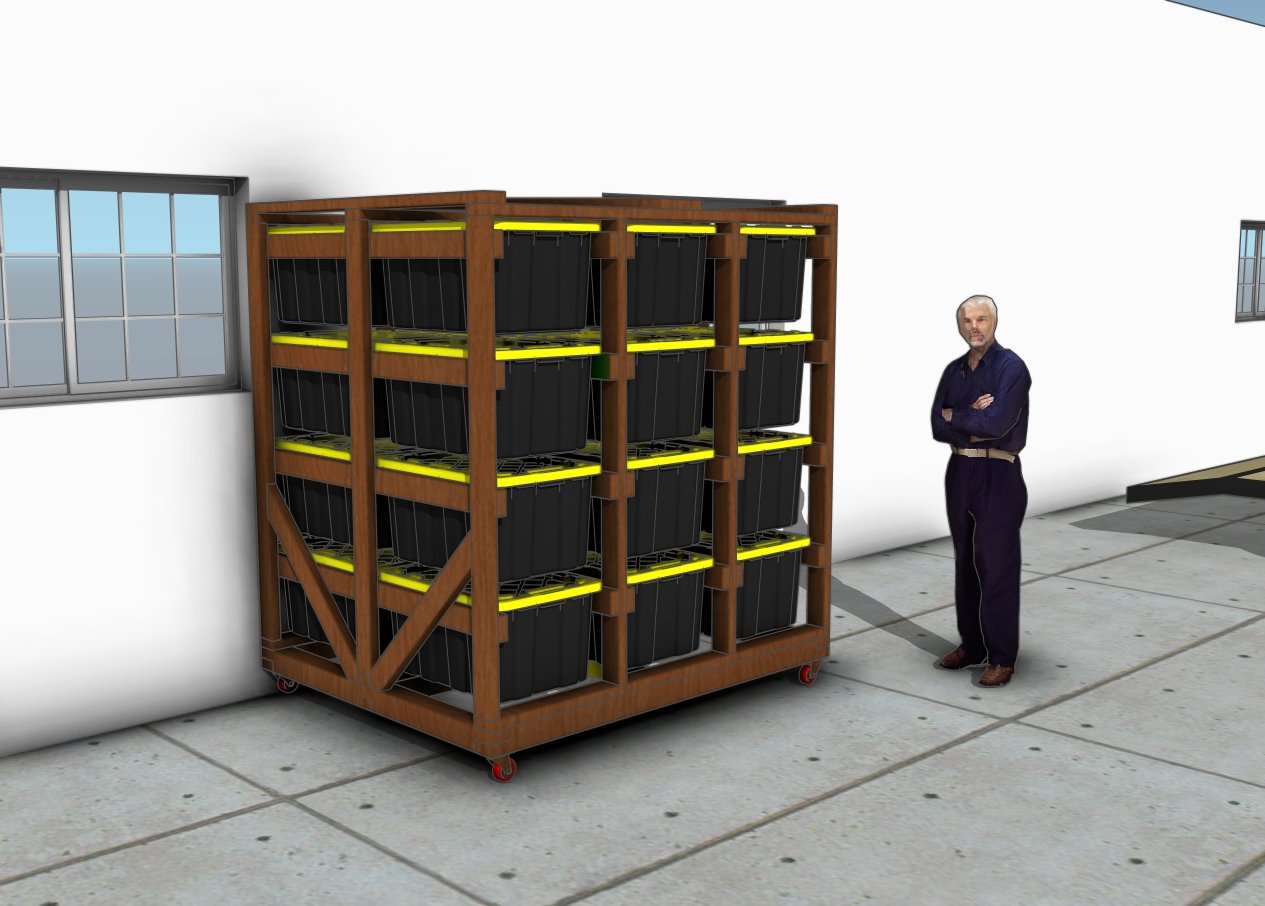
How to make a 24 tote storage rack
This storage rack is a game-changer for organizing your space and simplifying your life. Designed to hold up to 24 standard 27-gallon totes, it keeps your items neatly stored and easily accessible. Whether it’s tools, seasonal decorations, or everyday essentials, this rack eliminates the clutter and gives everything its own place.
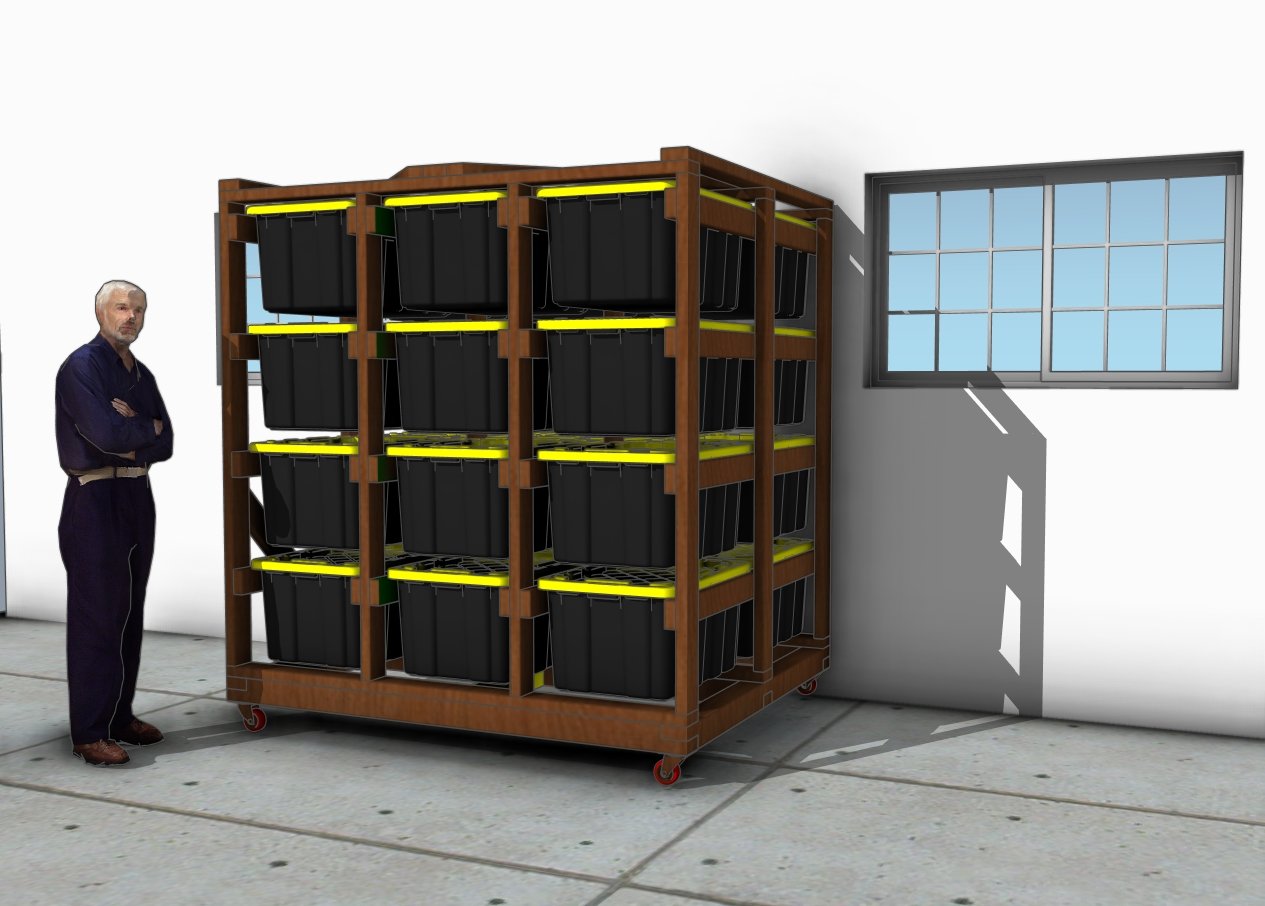
DIY Mobile tote storage rack plans
With sturdy construction and evenly spaced cleats, sliding totes in and out is effortless, making it easy to find what you need in seconds. Plus, its compact design maximizes storage capacity without taking up too much room in your garage, workshop, or storage area. Say goodbye to messy piles and hello to an organized, stress-free space!
Mobile tote storage rack plans
Thanks for checking out my how to make a mobile tote organizer system! Be sure to explore my other projects for more fantastic ideas. Don’t forget to hit the LIKE button and SHARE with your friends using the social media links below.

