This step by step diy project is about how to build a twin bed. In this project we show you all there is to know about making a rustic twin bed out of wooden boards. Nevertheless, even if the techniques required are straight forward and almost anyone with basic carpentry techniques can get the job done, there are a few tricks and tips you should be aware of, before starting the project.
Buy quality lumber, if you want to obtain a professional result. As you probably know pine boards and posts are one of the best choices, as they have an exquisite appearance and are highly durable. In addition, the wooden boards should be perfectly straight and in a very good condition (no chips, dents, cracks or dents). Wrote down the necessary amount of lumber as well as their sizes, before going to lumber store.
Drill pilot hols trough the wooden components before driving in the screws, to prevent the wood from splitting. Moreover, add glue to the joints to make them rigid. Align the components at bot ends before driving in the screws, if you want to get a professional result. Use a spirit level to plumb the headboard and the footboard, as well as to make sure the cleats are horizontal. See all my Premium Plans in the Shop.
Made from this plan
In order to build a twin bed frame, you need the following:
Materials
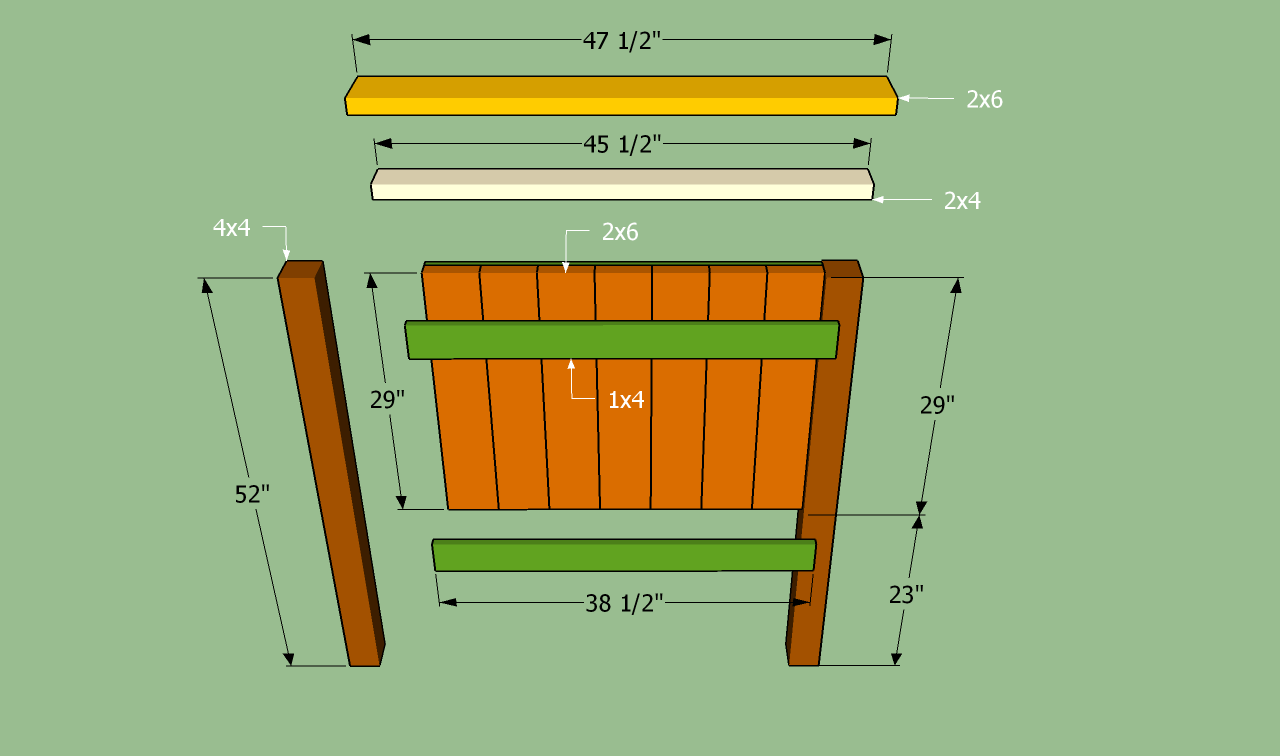
- A – 2 pieces of 4×4 lumber – 52”, 1 piece of 2×4 – 45 1/2”, 1 piece of 2×6 – 47 1/2” HEADBOARD LEGS & TRIMS
- A – 7 pieces of 2×6 lumber – 29”, 4 pieces of 1×4 lumber – 38 1/2” HEADBOARD PANEL
- B – 2 pieces of 4×4 lumber – 22”, 1 piece of 2×4 – 45 1/2”, 1 piece of 2×6 – 47 1/2” FOOTBOARD LEGS & TRIMS
- B – 7 pieces of 2×6 lumber – 16”, 4 pieces of 1×4 lumber – 38 1/2” FOOTBOARD PANEL
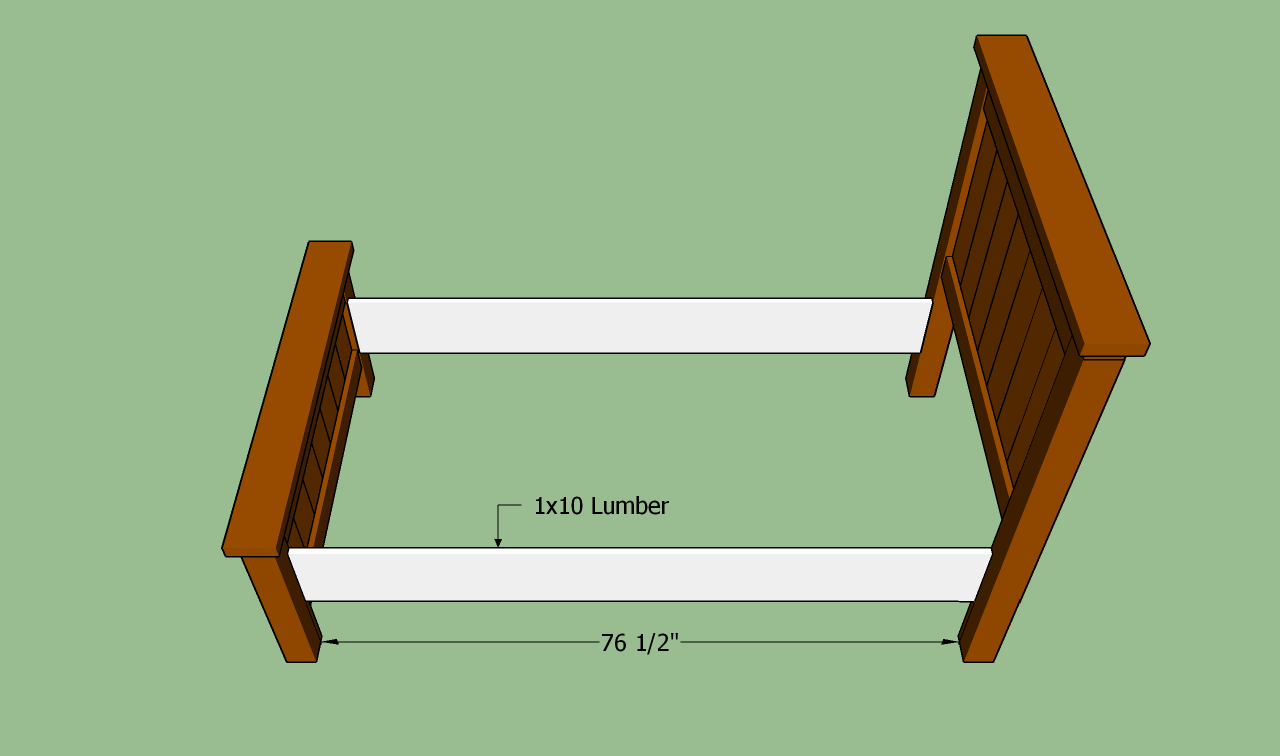
- C – 2 pieces of 1×10 lumber – 76 1/2” SIDE TRIMS
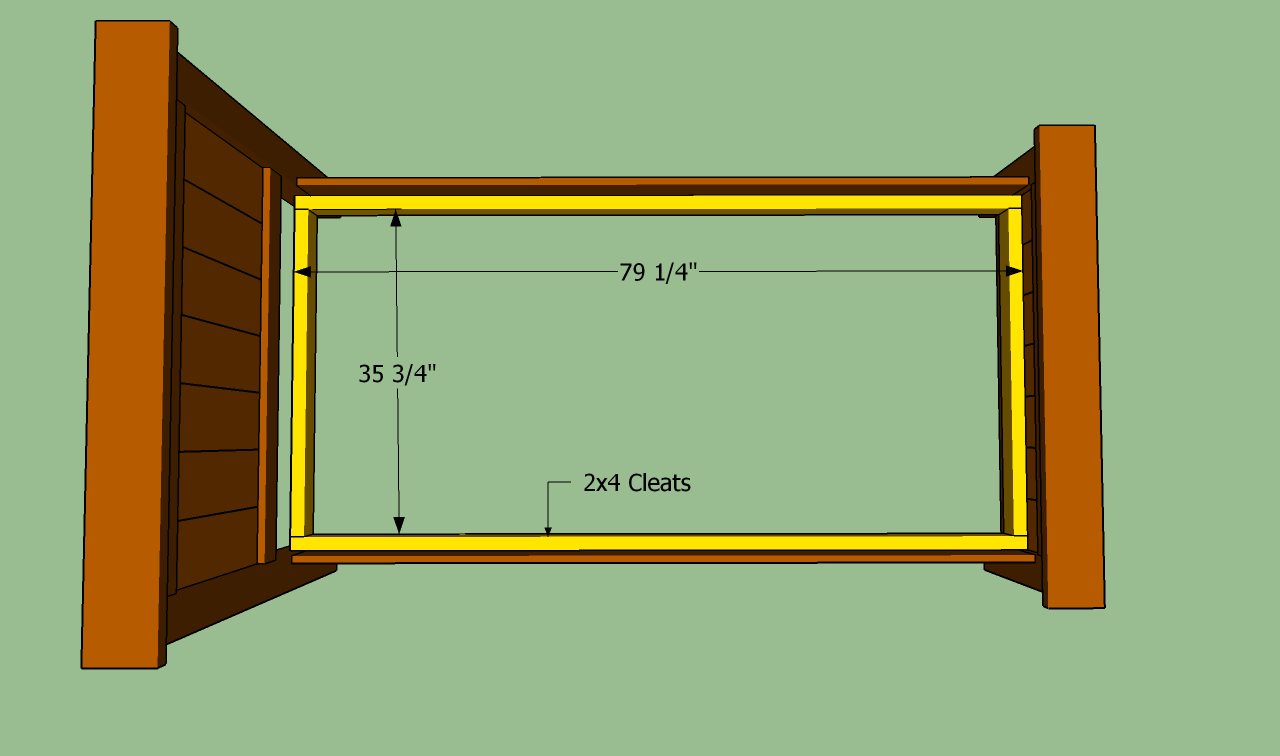
- D – 2 pieces of 2×4 lumber – 79 1/4” long, 2 pieces of 2×4 lumber – 35 3/4” long CLEATS
- E – 16 pieces of 1×4 lumber – 38 1/2” long SLATS
- 2 pieces of 4×4 lumber – 8 ft
- 4 pieces of 2×4 lumber – 8 ft
- 5 pieces of 2×6 lumber – 8 ft
- 8 pieces of 1×4 lumber – 10 ft
- 2 pieces of 1×10 lumber – 8 ft
- mattress
- 1 1/4″ screws
- 2 1/2″ screws
- 1 1/4″ brad nails
- glue, stain
Tools
- Safety gloves, glasses
- Miter saw, jigsaw
- Chalk line, tape measure, spirit level, carpentry pencil
- Drill machinery and drill bits
Tips
- Pre-drill holes in the wooden components, before driving in the screws
- Apply several coats of wood stain to the wooden components
- Adjust the size of the headboard, according to your needs and tastes
Time
- One Day
Related
Building a twin bed frame

Building a twin bed frame
Building a wooden bed frame for your kid is not the most complex woodworking project, so any person with basic skills could get the job done in just a weekend. If you follow the instructions described in this article and adapt the plans to your needs, you could build a beautiful bed frame.
How to make a twin bed

Building the headboard
The first step of the project is to build the headboard, using the plans you should notice in the image. Build the legs of the bed out of 4×4 lumber, while the panel should be made of 1×4 and 2×6 boards. First, build the panel, by using 1 1/4” wood screws and wood glue.

Twin bed headboard
As you can see in the image, the panel should be centered, as well as the top header. Work with great care and attention, checking if the corners are square and the components properly aligned.
If you have followed the plans and instructions, the headboard should have a neat and rustic appearance. Make sure the 1×4 trims are flush with the 2×6 slats, if you want to get a professional result.

Building the footboard
Continue the project by installing the footboard, as in the image. You should set the height of the components according to the size of the mattress, therefore you should buy everything before starting the assembly.
If you don’t want to use a pocket hole system, you should drill pilot holes trough the posts and insert 4 1/2” into the headboard. Add glue to enhance the bond of the components.

Twin bed footboard plans
After assembling the footboard, it should look similar to the one in the image. It is essential to pay attention to details, if you want to build a durable twin bed. Take you time when assembling the components and drive in enough screws to make the parts rigid.
As you can see in the plans, you should offset the panel about 1/4” on both sides, as compared to the 4×4 legs.

Building the sides of the bed
Next, install the sides of the bed. As we have already emphasized, you should install the 1×10 wooden components at the most convenient height for your needs (according to the size of the mattress and the design you’re after).

Installing the cleats
Continue the woodworking project by fitting the cleats to all sides of the bed frame. In order to get the job done properly, you could use 2×4 boards or 2×2 lumber, if you want to keep the bed frame as light as possible.
Secure the cleats to the posts and to trims every 10”, as to make the twin bed frame rigid. The cleats have to be level, so make sure you use a spirit level, when driving in the screws.

Installing the support slats
In order to support the mattress properly and to distribute the weight evenly, we recommend you to place 1×4 slats on top the cleats, every 1 1/2”. If you want to get consistent gaps at both ends of the slats, you should place a wood block between the slats.

How to build a twin bed
Last but not least, you need to take care of the finishing touches. If you want to get a professional result, we recommend you to fill the holes with wood filler and let it dry out for several hours. Sand the surface with 120-grit sandpaper and vacuum the residues, before applying the coats of stain or paint.
If you want to download the plans. just click on the GET PDF PLANS button bellow.
Thank you for reading our project about how to build a twin bed frame and we recommend you to check out the rest of the projects. Don’t forget to share our projects with your friends, by using the social media widgets.

2 comments
at the end of the plans i see the statement “f you want to download the plans. just click on the GET PDF PLANS button bellow” however i do not see that button anywhere. it would be nice to find it as i intend to build 3 separate beds out of these plans as well as some other bedroom items while doing a full makeover of my childrens bedrooms. is there a way to make these easier to download? even if its necessary to pay for the downloads?
This is a free plans. You have an orange PRINT button at the end of the article.