This step by step article is about how to build a simple chair. If you want to build a chair by yourself, you could get the job done in a weekend, using just common tools and materials. There are many designs and shapes you could choose from, therefore you have to plan everything from the very beginning, as to fit your needs and tastes. A simple chair with a back support and a straight-forward seat is a great choice for beginners, as you need just basic woodworking skills.
Buy quality lumber if you want to obtain a durable result and to keep the expenditures under control. Buy cedar or redwood, making sure all the boards are perfectly straight and in a perfect condition. The slats should have a smooth surface from bottom to top, if you want to get a nice appearance. Work with good judgement and attention, in order to prevent costly mistakes.
In order to obtain a professional result, you should align the boards at both ends. In addition, drill pilot holes in the wooden components before inserting the screws, to prevent the wood from splitting. Ensure the corners are right-angled after each step, by using a carpentry square. Moreover, don’t forget to plumb the sides of the desk, as well to make sure the top of the desk is horizontal. See all my Premium Plans in the Shop.
Made from this plan
In order to build a simple chair, you need the following:
Materials
- 2 pieces of 2×2 lumber – 17 1/2″ long FRONT LEGS
- 2 pieces of 2×4 lumber – 39″ long BACK LEGS
- 4 pieces of 1×4 lumber – 16″ long APRONS
- 1 piece of 1×3 lumber – 16″ long BACK SUPPORT
- 1 piece of 1×4 lumber – 16″ long BACK SUPPORT
- 4 pieces of 1×2 lumber – 3 1/2″ long CLEATS
- 1 piece of 1/2” plywood – 18 1/2″x19″ long SEAT
- 1 piece of 2×4 lumber – 8 ft
- 1 piece of 2×2 lumber – 4 ft
- 1 piece of 1×4 lumber – 8 ft
- 1 piece of 1×3 lumber – 2 ft
- 1 piece of 1×2 lumber – 2 ft
- 1 piece of 1/2″ plywood – 2’x2′
- wood glue
- stain
- 1 1/4″ screws
Time
- Safety gloves, glasses, Miter saw saw, jigsaw
- Chalk line, tape measure, spirit level, carpentry pencil
- Drill machinery and drill bits
- Router, 1/4” round bit, Pocket hole jig
Tips
- Pre-drill holes in the wooden components, before driving in the screws
- Smooth the exterior edges of the components, by using a router with a 1/4” bit
Time
- One weekend
Related
Building a wooden chair
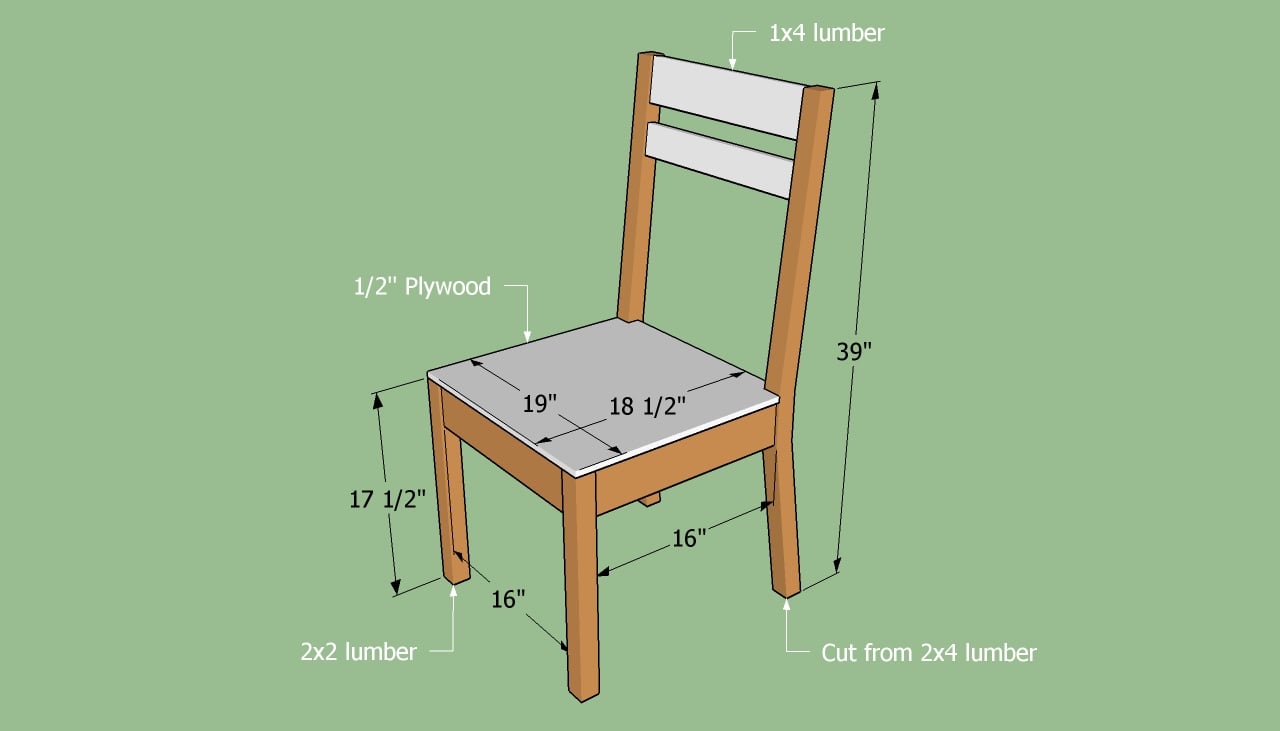
Building a simple chair
Building a wooden chair is easier than you could imagine, provided the right tools and materials are used. Any inexperienced do-it-yourself-er could get the job done in a professional manner in just a weekend, if you follow our step by step instructions.
How to build a simple chair
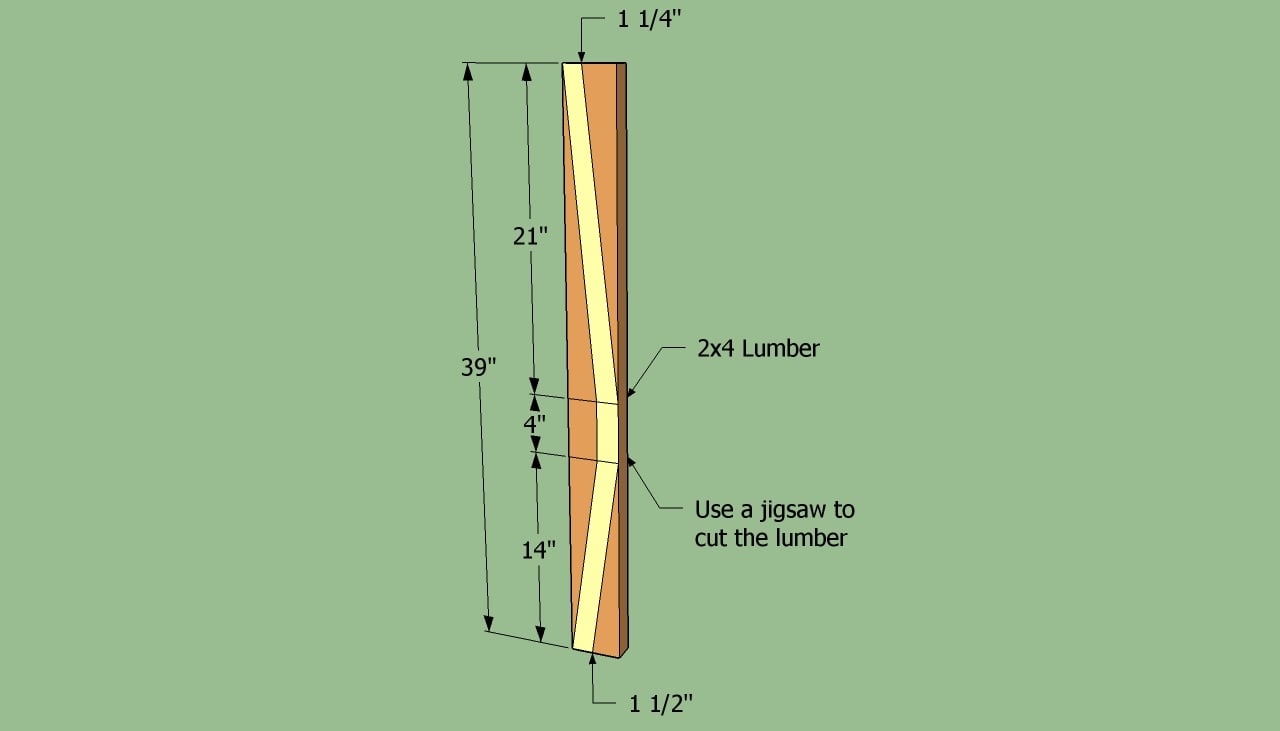
Building the back legs
First of all, you need to build the legs of the chair. While the construction of the front legs is a straightforward task, building the back legs is a little more complicated, as you need to cut out them from a 2×4 beams. In order to obtain a professional result, we recommend you to follow the pattern illustrated in the image.
Use a jigsaw to cut the legs, from the 2×4 slat. Smooth their edges, using a router or a sand-block.
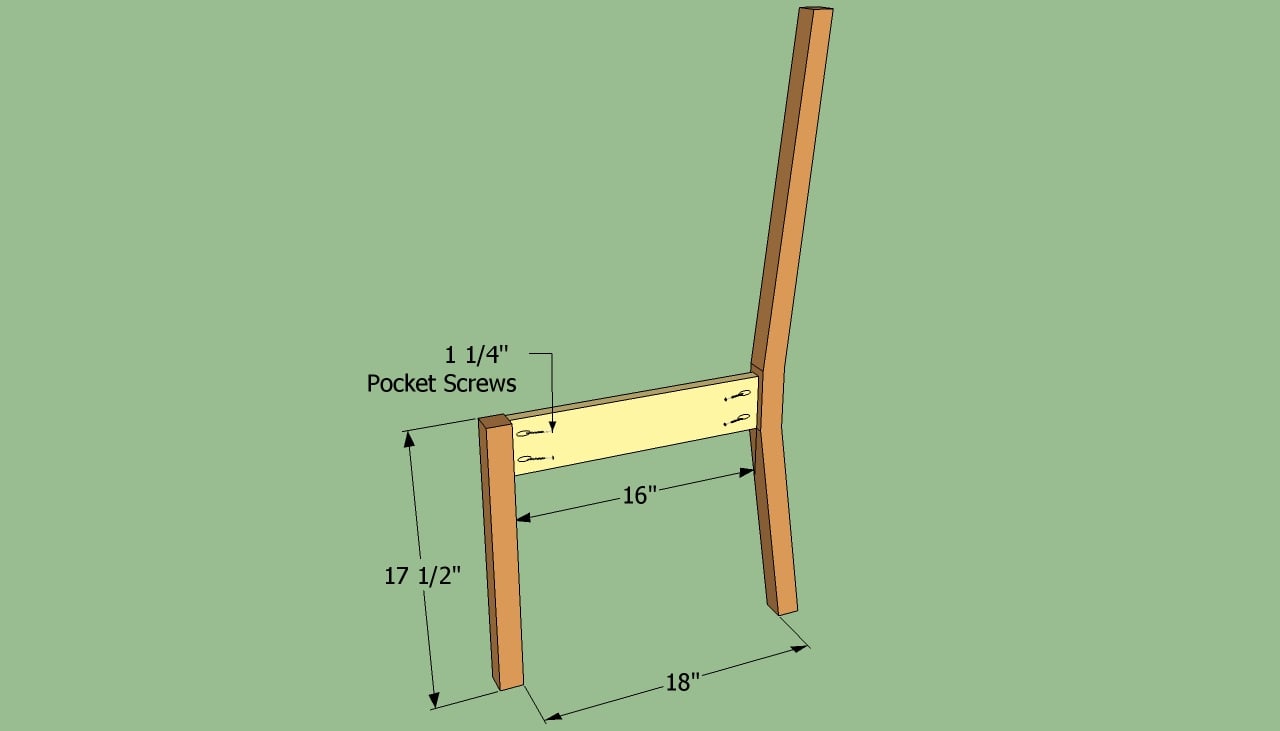
Installing the aprons
Afterwards, continue the woodworking project by building the front legs and securing them to the back legs. Cut the side aprons from 1×4 lumber and install them into place with screws and wood glue.

Installing the front and back aprons
After building both sides of the chair, you should lock them together with the front and the back aprons. Apply a significant quantity of wood glue on the edges of the components, in order to enhance the bond of the joints.
Adjust the size of the chair, as to fit your needs, but use the same techniques described above. Plumb the sides of the chair, before driving in the 1 1/4” screws trough the pilot holes.
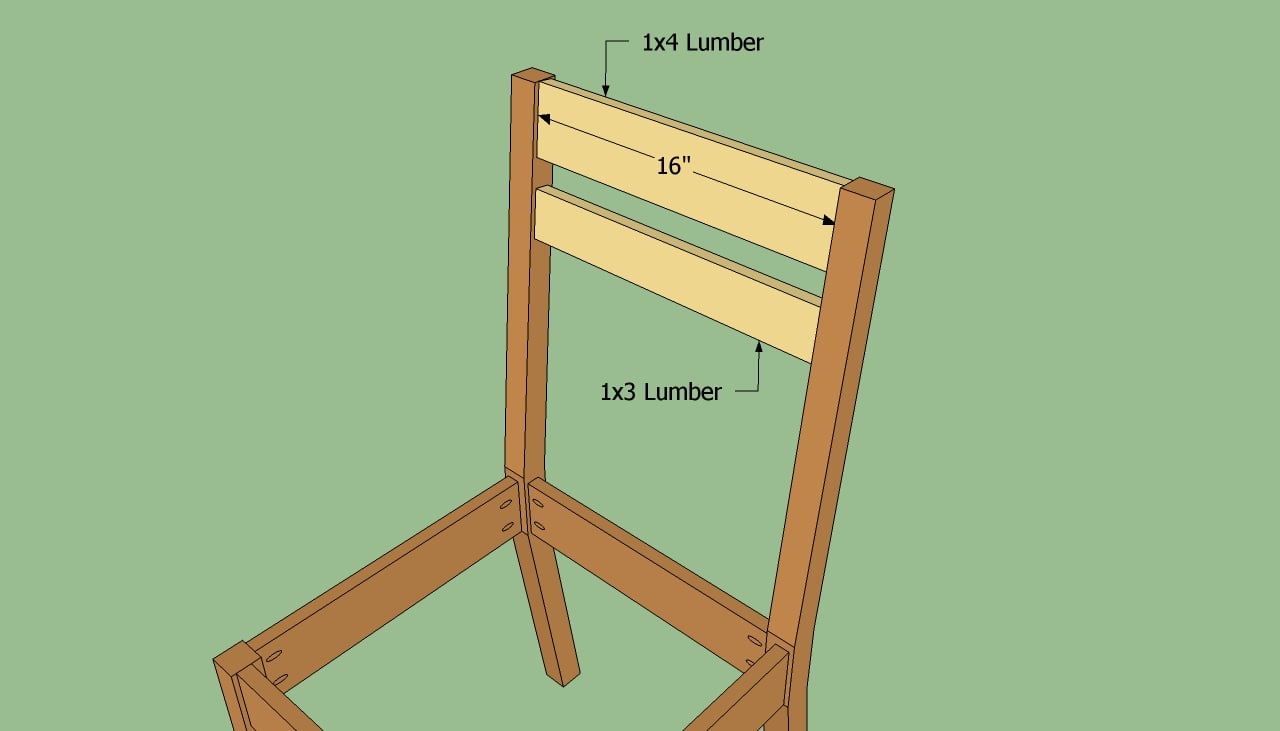
Back support plans
Afterwards, build the seat support of the wooden chair. In order to get the job done in a professional manner, you could use slats of different sizes, such as 1×3, 1×4 or even 1×6 lumber. Cut the slats at the right size, using a miter saw and align it into place properly.

Installing the seat supports
Before attaching the seat of the wooden chair, you have to reinforce the for corners with 2×2 braces. As you can see in the image, you have to cut both ends of the braces at 45º, using a miter saw. Place the braces into place, drill pilot holes and insert the 2” wood screws.
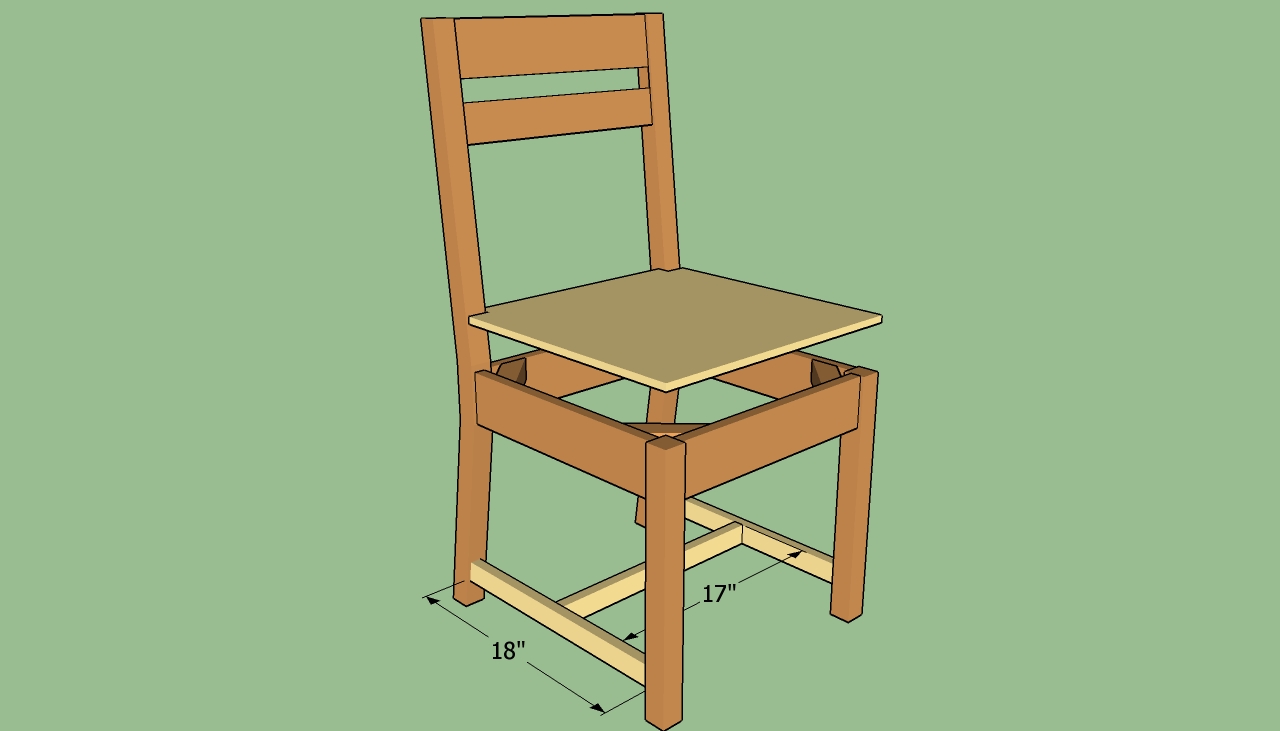
Attaching the chair braces
Work with good judgement and attention, if you want to obtain a nice appearance. Build the seat of the chair from 1/2” plywood, making sure you natch the back corners, to fit around the legs. Apply wood glue on the top edges of the aprons and clamp the plywood piece into place.
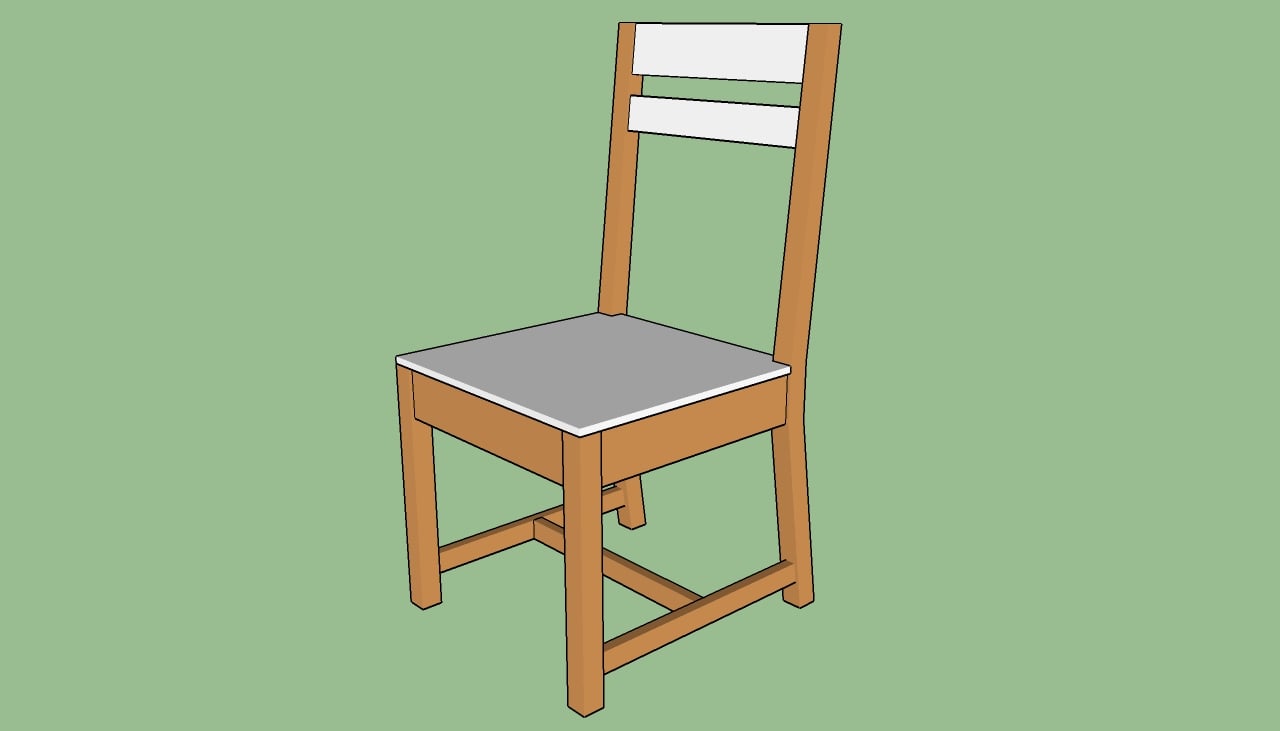
How to build a simple chair
Last but not least, you should take care of the finishing touches. Therefore, fill the holes with a good wood putty and let it dry out for at least several hours. Afterwards, sand the surface with 120 grit sandpaper.
Thank you for reading our article about how to build a simple chair and we recommend you to check out the rest of our projects. Don’t forget to share our articles with your friends, by using the social media widgets.

8 comments
What size are the braces on the bottom? It’s not listed in the materials or instructions.
They are listed in the diagram: 17″ and 18″
chair braces, on the bottom what is the width and the thickness?
1x2s – 3/4″x1 1/2″
its good
What is the main thickness and width in mm
Sir very nice need more update
i have different design of chairs to make, can you assist mw ith material size and cutting plans as you have done in the above chair