This step by step article is about how to build a farmhouse table. If you want to add a little character to your dining room, you should consider building a simple farmhouse table. This woodworking project is complex, but we can assure you can do the job by yourself, in just a weekend, if you use the right plans and carpentry techniques. Use quality lumber, such as pone, cedar or redwood, in order to build a durable table with a nice appearance.
Adjust the size of the table to your needs, making sure you us the same woodworking techniques presented in this step-by-step guide. Make a list with all the materials needed for this project and buy them from the store that give you the best offer in terms of price and quality. Make sure the wooden beams are perfectly straight and don’t have any kind of visible flaws, such as twists, decay or chips. Drill pilot holes in the components, before inserting the screws, to prevent the wood from splitting.
Apply a good glue to the components before locking them together, and clamp the joints with C-clamps to enhance the bond. Align the components properly, before driving in the screws, using a spirit level. Round the exterior edges of the components to obtain a nice appearance. In order to make the lumber look old and rough, use an appropriate wood stain (such as weathered wood stain). See all my Premium Plans in the Shop.
Made from this plan
Diy farmhouse table plans
Materials
- 4 pieces of 4×4 lumber – 29″ long POSTS
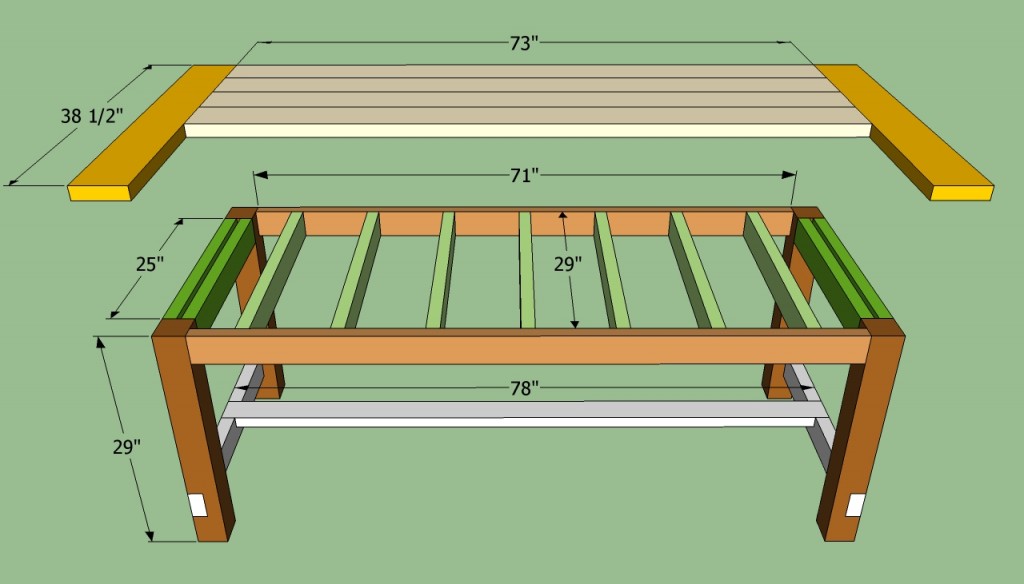
- 4 pieces of 2×4 lumber – 25″ long, 2 pieces – 71″ long, 7 pieces – 29″ long APRONS
- 7 pieces of 2×6 boards – 73″ long, 2 pieces – 38 1/2″ long TABLETOP
- 2 pieces of 2×4 lumber – 32″ long, 1 piece – 78″ long STRETCHER
- 2 1/2” wood screws – SCREWS
- 3” wood screws – SCREWS
- Wood glue, 2 1/2″ pocket screws
- 1 piece of 4×4 lumber – 10 ft
- 7 pieces of 2×4 lumber – 8 ft
- 8 pieces of 2×6 lumber – 8 ft
- 2 1/2″ screws
- 1 1/4″ screws
- glue, stain
- wood filler
Tools
- Safety gloves, glasses
- Miter saw saw, jigsaw
- Chalk line, tape measure, spirit level, carpentry pencil
- Drill machinery and drill bits
- Router, 1/4” round bit
- Pocket hole jig
Tips
- Pre-drill holes in the wooden components, before driving in the screws
- Smooth the exterior edges of the components, by using a router with a 1/4” bit
Time
- One weekend
Related
How to build a wood farmhouse table
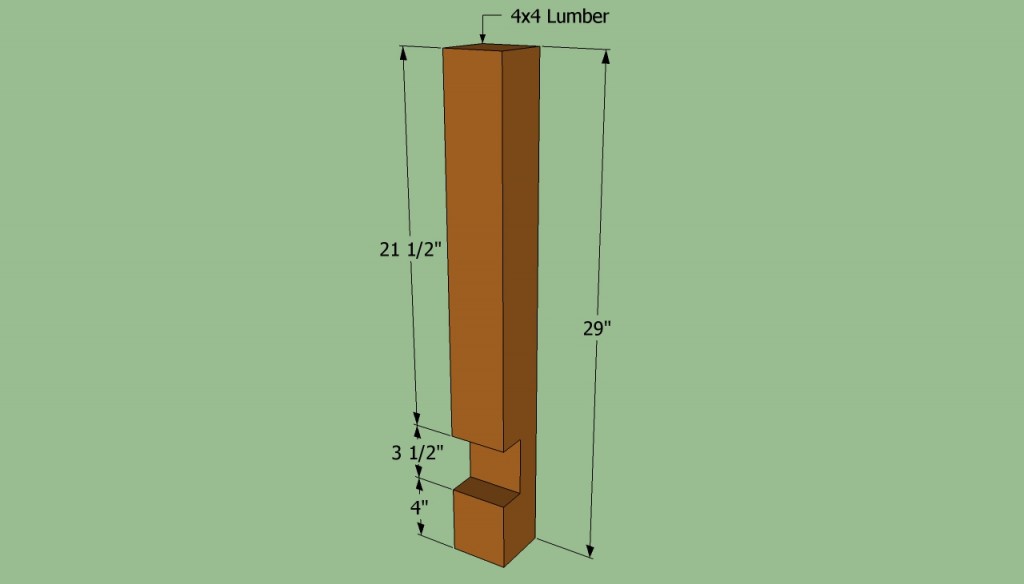
Building the table legs
First of all, you need to build the four legs of the table, as you can notice in the image. In order to make the legs, you could use 4×4 lumber or join together two pieces of 2×4 lumber. Irrespective of the case, make sure you notch the legs, as in the image, ensuring you don’t damage the lumber.
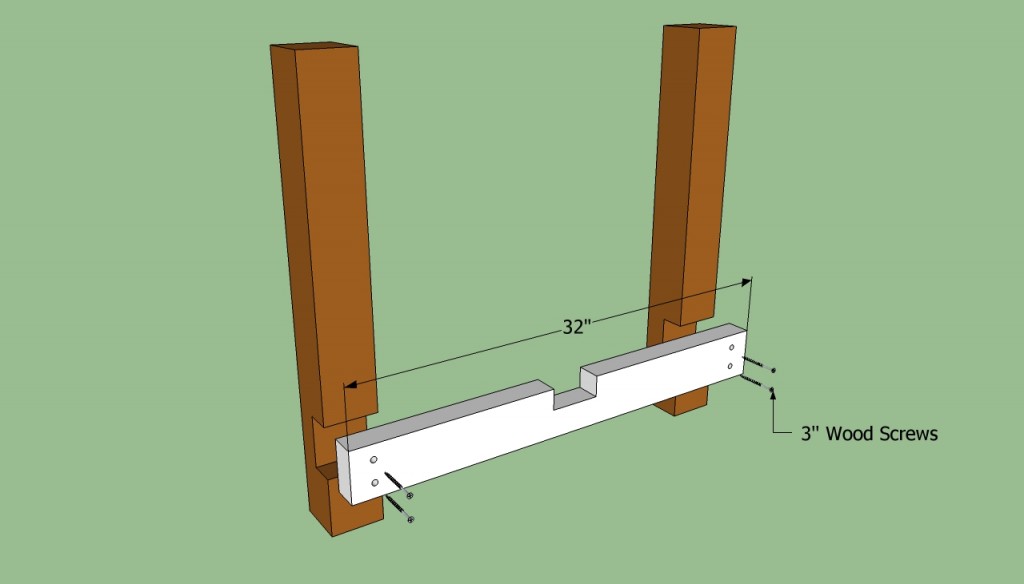
Installing the stretcher support
After building the four legs, join them together with 2×4 wooden supports. These braces would lock the legs together and will support the table stretcher. Place the legs on a level surface and align them properly. Make sure the diagonals are equal, before locking the supports into place.
The supports should be oriented towards the inside of the table, if you want to obtain a nice appearance. If you want a rustic look, place the joints towards the exterior of the table.
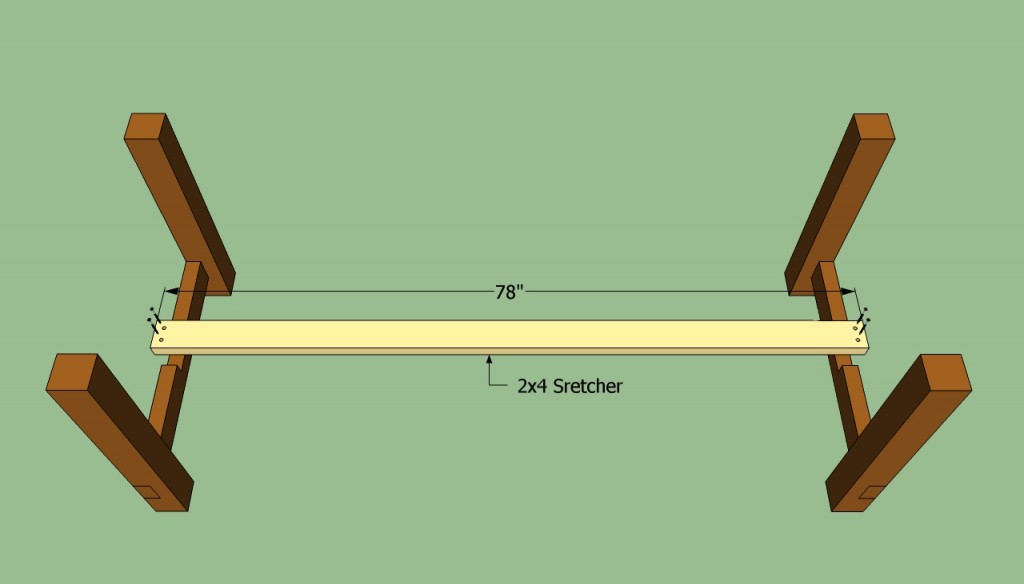
Installing the table stretcher
The next step of the woodworking project is to install the 2×4 stretcher and to lock it into place with 2 1/2” wood screws. Plumb the ends of the table with a spirit level, before installing the stretcher.
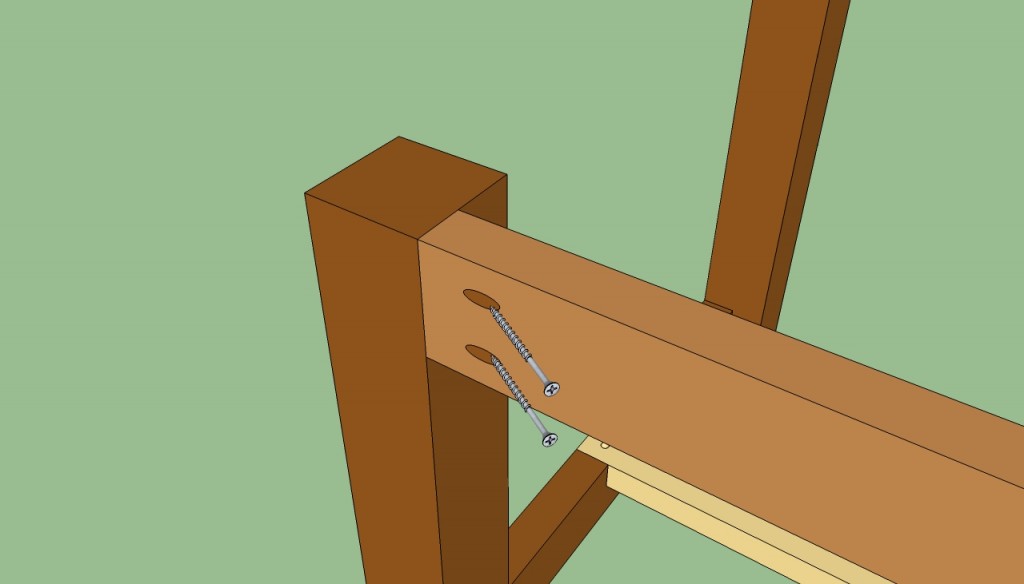
Building the side aprons
Afterwards, you need to fit the side aprons into place. Cut the 2×4 lumber at the right dimension with a miter saw and fit it into place, making sure the components are aligned at both ends and perfectly plumb.
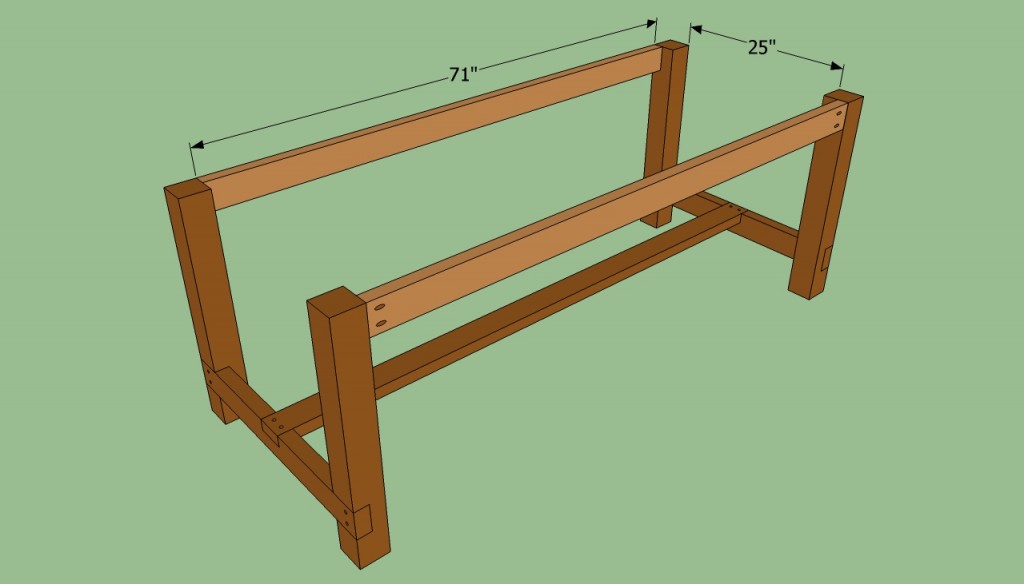
Farmhouse table plans
Install the opposite apron, in the same manner described above. Use a spirit level to make sure the components are level and the sides of the table plumb. Drill pilot holes in the components before inserting the screws, in order to prevent the wood from splitting.
Apply a lot of glue to make these joints more rigid. All components has to be aligned properly and the diagonals of the top should be equal.
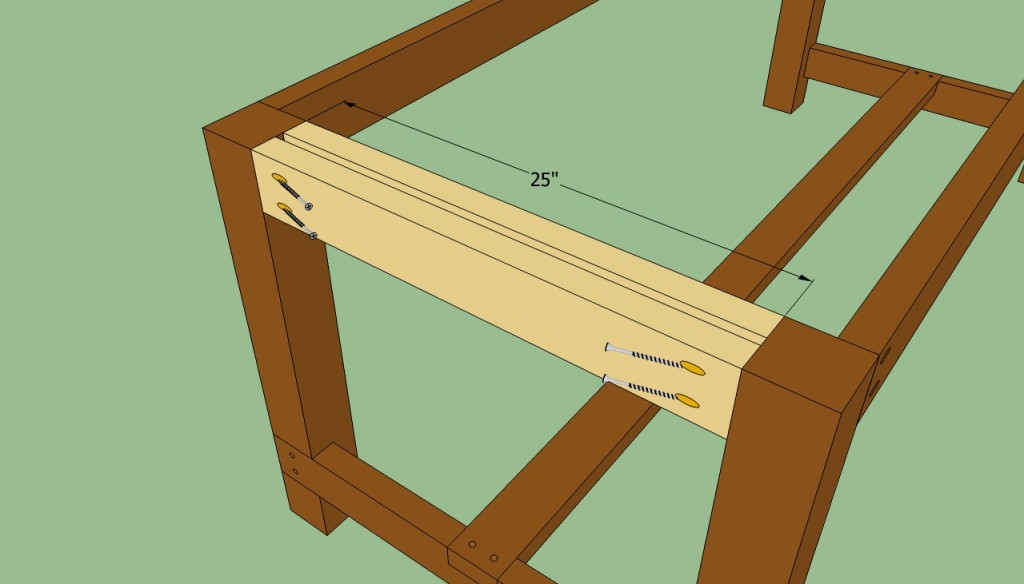
Installing the end aprons
Continue the project by installing the end aprons. As you can see in the image, you need to install double aprons at both ends of the table, to obtain a rigid frame. Fit the aprons between the legs and check the corners for squareness.
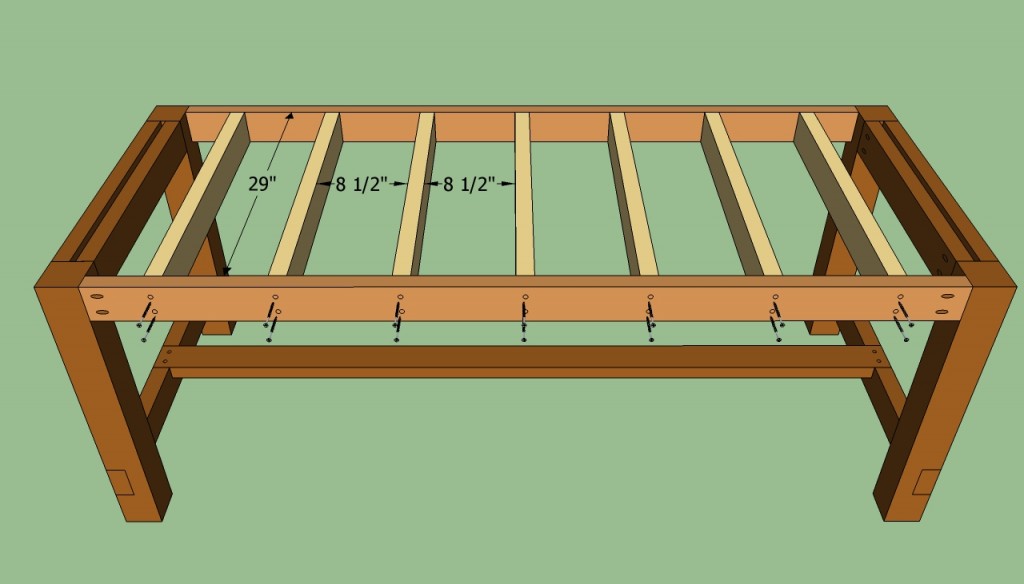
Installing the top of the table
Before installing the top of the dining table, install the wooden supports every 8 1/2”, as in the plans. Drill pilot holes trough the side aprons and drive in the 3” wood screws.
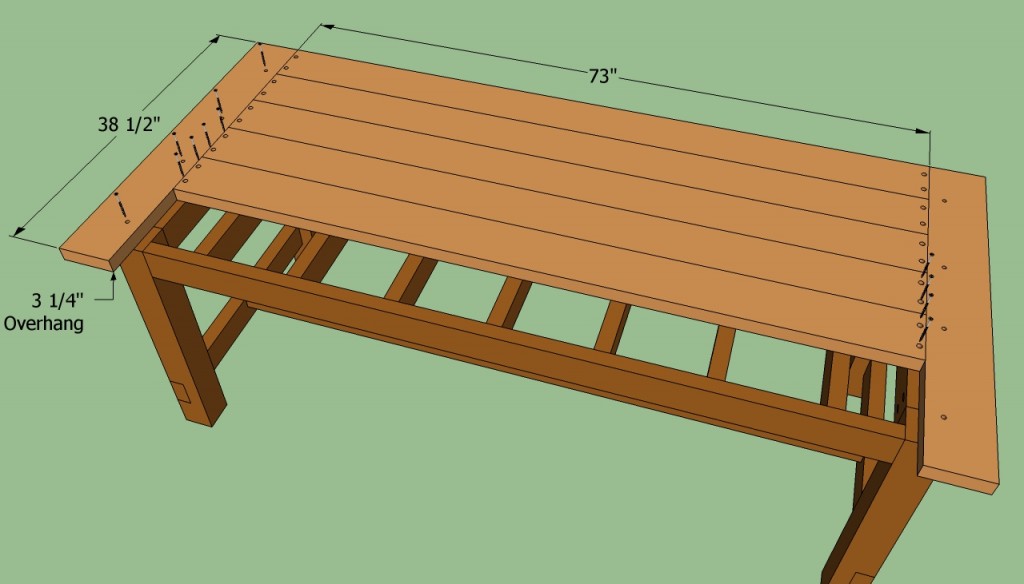
Installing the top of the farmhouse table
Install the top slats, as to build the top of the farmhouse table. As you can see in the image, you need to build the end slats first, and then the rest of the components. Drill several pilot holes in the slats, making sure you countersink the head of the screws.
Diy farmhouse table plans
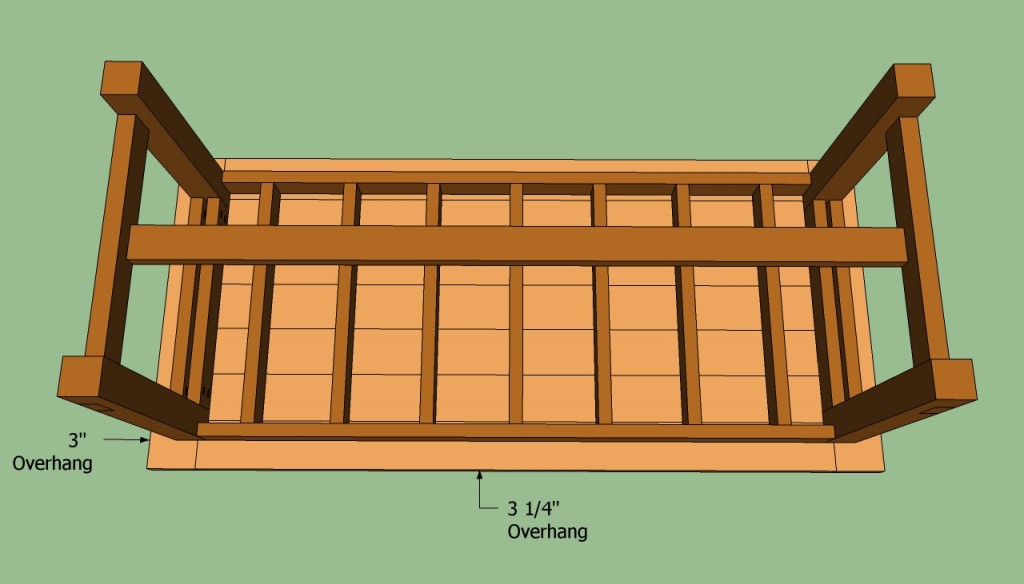
The end 2×6 slats should overhang about 3”, while the side 2×6 slats should overhang about 3 1/4”. Work with good judgement and with great care, as to make sure the farmhouse has a nice appearance.
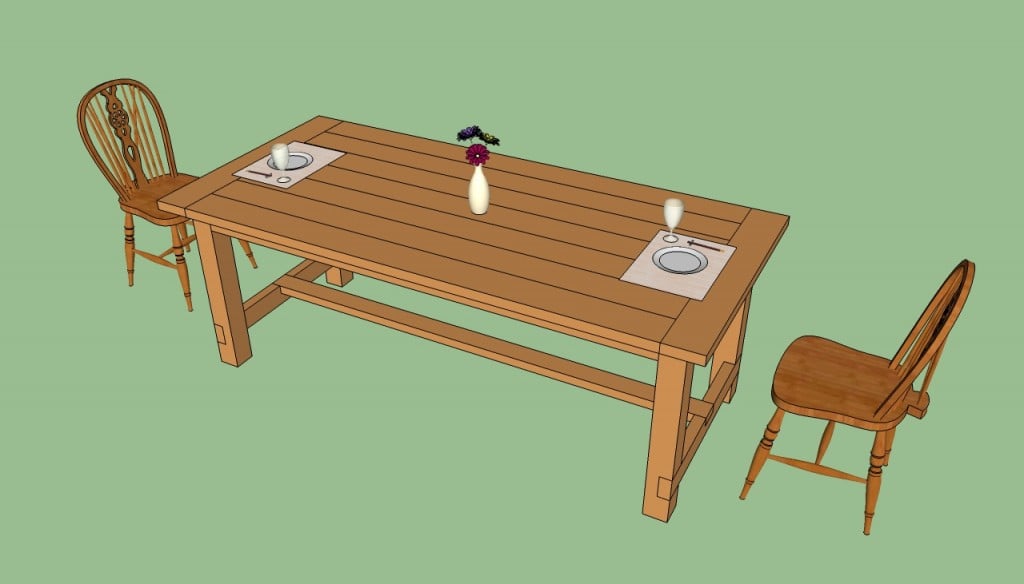
How to build a farmhouse table
After you have assembled all the wooden components together, you need to take care of the finishing touches. Fill the head of the screws with a good wood filler and let the compound to dry out properly.
Thank you for reading our article about how to build a farmhouse dining table and we recommend you to check out the rest of our projects. Don’t forget to share our articles with your friends, by using the social media friends.

7 comments
The materials list is incorrect. 4each 2x4x25 is correct however the 2each 2x4x25 sholder be 2 each 2x4x32.
Thanks for the feedback. I’ve updated the cut list.
Love the detailed plans and instructions. Thank you for sharing.
You’re welcome. Good luck with the project and let me know how it comes out!
What are the requirements for the size of the table you are building and the area you have
to put the table in?
Thanks
About 10’x8′
For the horizontal side aprons, notch the top of the 4×4 legs so the legs are supporting the weight rather than the fasteners.
Increase the length of the side aprons and the overhang of the table top — as shown the ends are nearly useless — anyone sitting at the ends will be bashing their feet/ankles on the frame’s cross piece.
Put any pockets on the interior so you don’t need to use wood putty — sooner or later the wood will shrink enough that joints will loosen and you will want to be able to tighten them without gouging out wood putty.
If you’re going to the trouble of building a table, use better quality wood than pine. Oak isn’t that expensive at the big-box hardware stores, and will make a much more attractive and stable table. Consider using pegs and glue instead of screws.