Building your own farmhouse queen-size bed is not just a rewarding project — it’s an opportunity to create a piece that will be the centerpiece of your bedroom for years to come. With its rustic charm and sturdy design, this bed has all the hallmarks of classic farmhouse style, with a touch of DIY magic. Whether you’re upgrading your space or starting fresh, this project is perfect for anyone who wants to add a little warmth and craftsmanship to their home. Plus, who wouldn’t love to say, “Yeah, I built that”?
In this step-by-step guide, I’ll walk you through building this gorgeous queen-size bed from start to finish and come with free plans, as well. From the solid 4×4 posts to the stylish X trims, you’ll learn how to create a bed that combines beauty and durability. Grab your tools, roll up those sleeves, and let’s get started, because your dream bed is just a few cuts and screws away!
We recommend you to invest in the best materials you could afford. Therefore, you should buy weather-resistant lumber, such as pine or cedar. Always take accurate measurements before adjusting the size of the components at the proper size. Drill pilot holes trough the components before inserting the wood screws, to prevent the wood from splitting. My plans come with a full cut / shopping list and they are PDF Download and Print friendly. See all my Premium Plans HERE.
Made from this plan
Queen Size Bed – Video!
Farmhouse Queen size Bed Frame – Free Plans
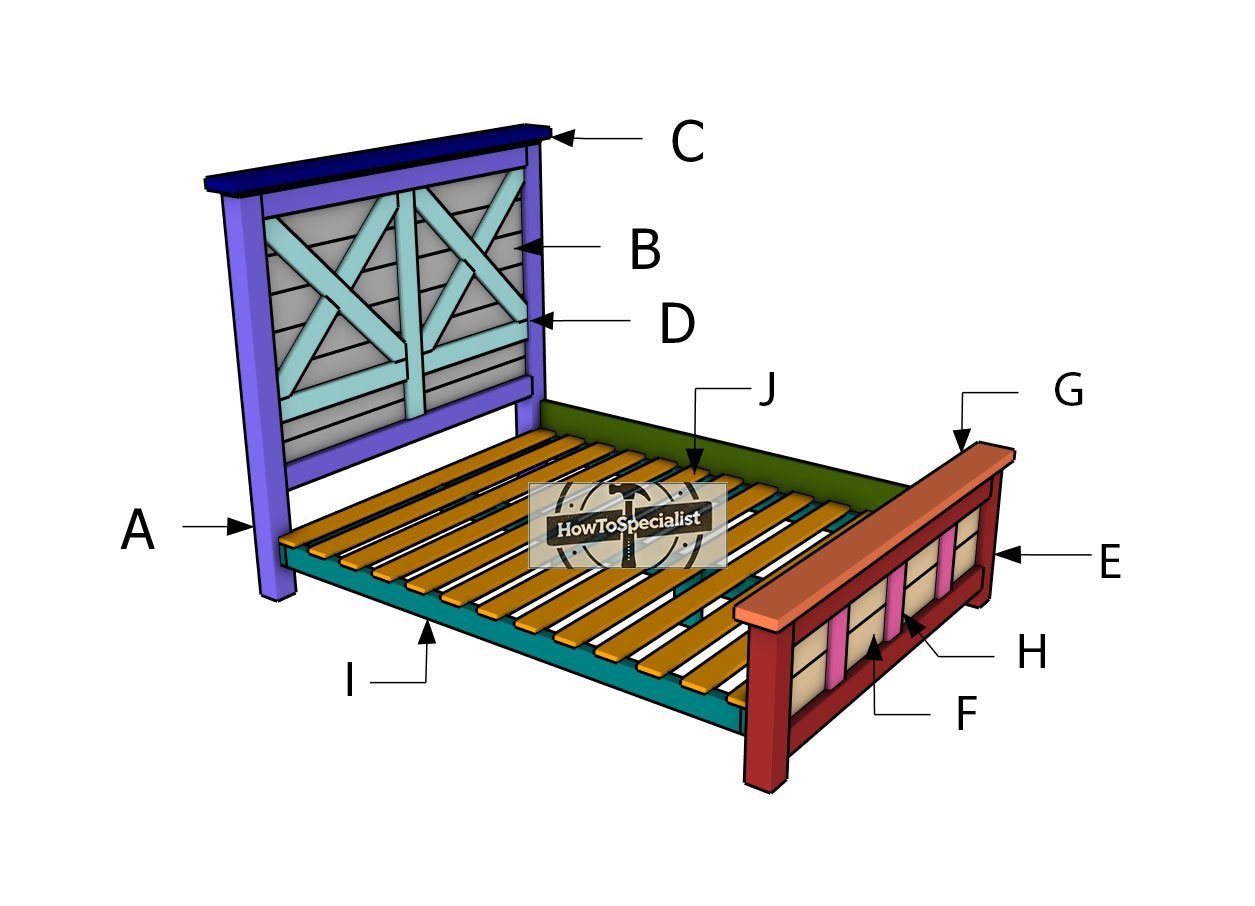
Building-a-bed-frame
Materials
A – LEGS – 4×4 lumber 60″ – 2 pieces
A – FRAME – 4×4 lumber 56″ – 2 pieces
B – PANEL – 1×6 lumber 56″ – 6 pieces
C – TRIMS – 1×4 lumber 64 1/2″ – 1 piece
C – TRIMS – 2×6 lumber 66 1/2″ – 1 piece
D – X TRIMS – 1×4 lumber 26 1/4″ – 2 pieces
D – X TRIMS – 1×4 lumber 36 1/2″ – 1 piece
D – X TRIMS – 1×4 lumber 37″ – 2 pieces
D – X TRIMS – 1×4 lumber 16 3/4″ – 4 pieces
E – FRAME – 4×4 lumber 21″ – 2 pieces
E – FRAME – 4×4 lumber 56″ – 2 pieces
F – PANEL – 1×6 lumber 56″ – 2 pieces
G – TRIM – 1×4 lumber 64 1/2″ – 1 piece
G – TRIM – 1×6 lumber 66 1/2″ – 1 piece
H – TRIMS – 2×2 lumber 11″ – 3 pieces
I – BED FRAME – 2×4 lumber 60 1/2″ – 2 pieces
I – BED FRAME – 2×4 lumber 78 1/2″ – 3 pieces
I – BED FRAME – 2×4 lumber 9″ – 2 pieces
J – BED SLATS – 1×4 lumber 60 1/2″ – 13 pieces
- 4×4 lumber 8 ft – 2 pieces
- 4×4 lumber 10 ft – 2 pieces
- 1×10 lumber 8 ft – 2 pieces
- 1×4 lumber 8 ft – 2 pieces
- 1×4 lumber 10 ft – 3 pieces
- 1×4 lumber 12 ft – 6 pieces
- 1×6 lumber 10 ft – 5 pieces
- 2×4 lumber 8 ft – 5 pieces
- 2×6 lumber 12 ft – 1 piece
- 3 1/2″ screws – 30 pieces
- 2 1/2″ screws – 100 pieces
- 1 5/8″ screws – 100 pieces
- 1 1/4″ finish nails – 50 pieces
- Stain / paint – 1 piece
- Glue – 1 piece
Tools
- Miter saw
- Drill machinery, drill bits
- Safety gloves, glasses
- Chalk line, tape measure, spirit level, carpentry pencil
Time
- One week
Related
- Farmhouse nightstand plans
- Farmhouse console table plans
- Farmhouse Coffee table plans
- Farmhouse TV Stand plans
Pin for Later!
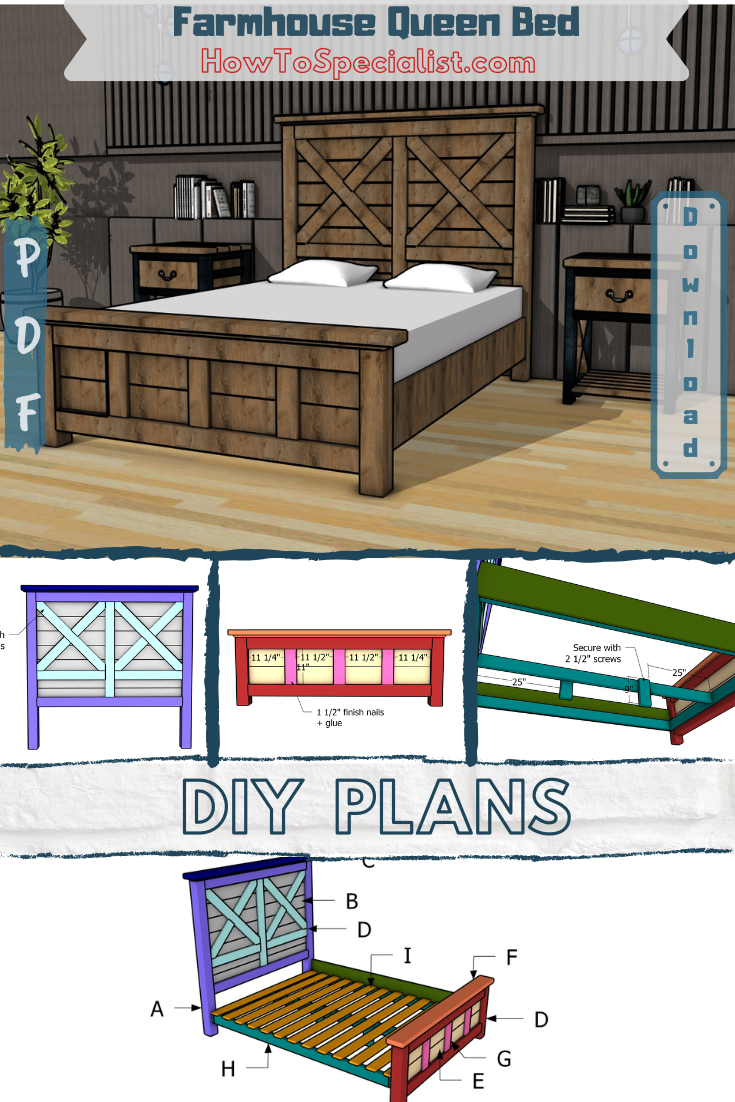
Cut layout diagrams
Step 1: Building the frames
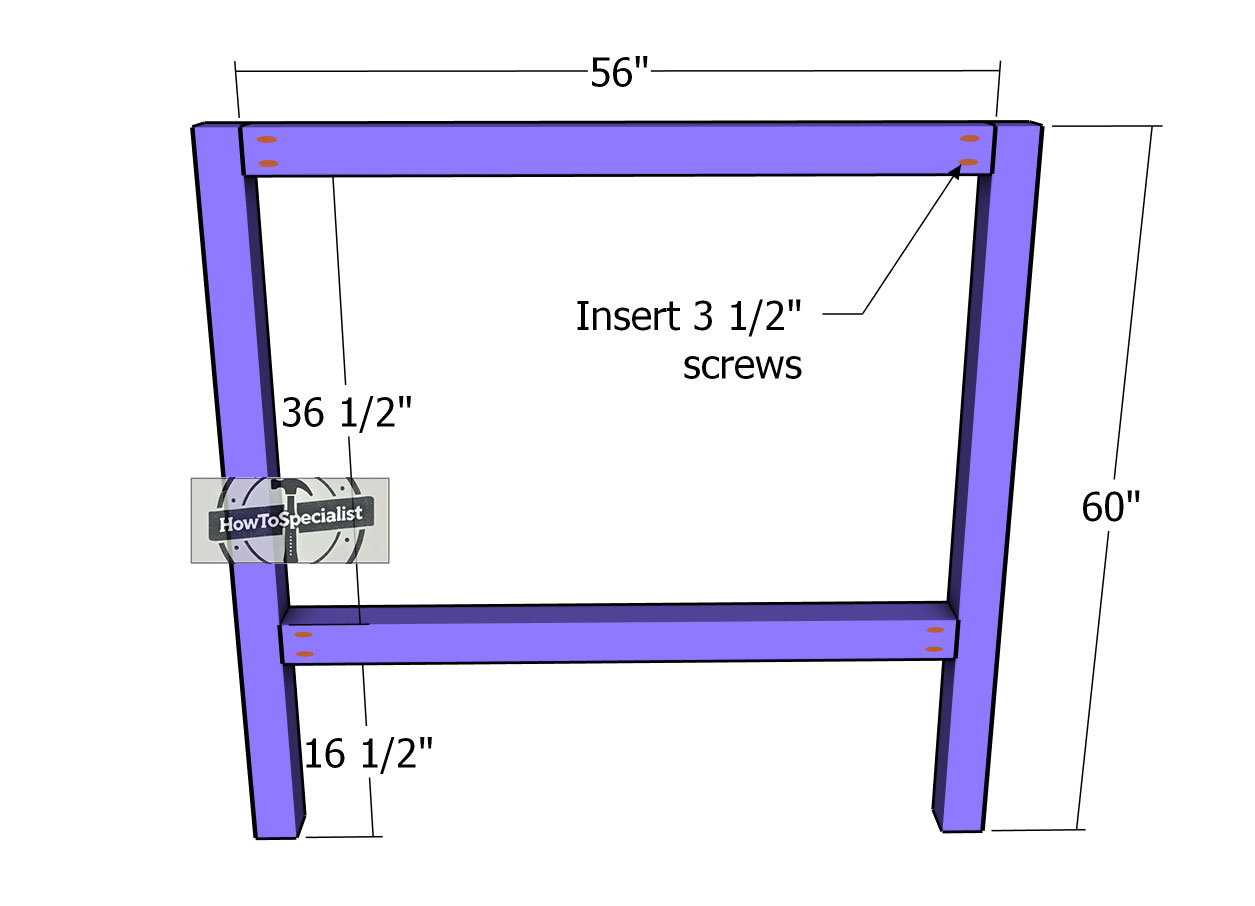
Headboard-frame
Alright, let’s kick things off by getting that headboard frame together. We’re using some solid 4×4 lumber here, strong enough to handle whatever life throws at it (or at least a few pillows). Grab your drill and knock out those pocket holes at both ends of the horizontal supports. Now comes the fun part: assembling it all.
Use 3 1/2″ screws and a generous amount of glue. Remember, we’re not just building a frame, we’re building a legacy here! Keep those edges flush, and double-check that your corners are square — precision is key. After all, if we’re gonna do this, we’re doing it right!
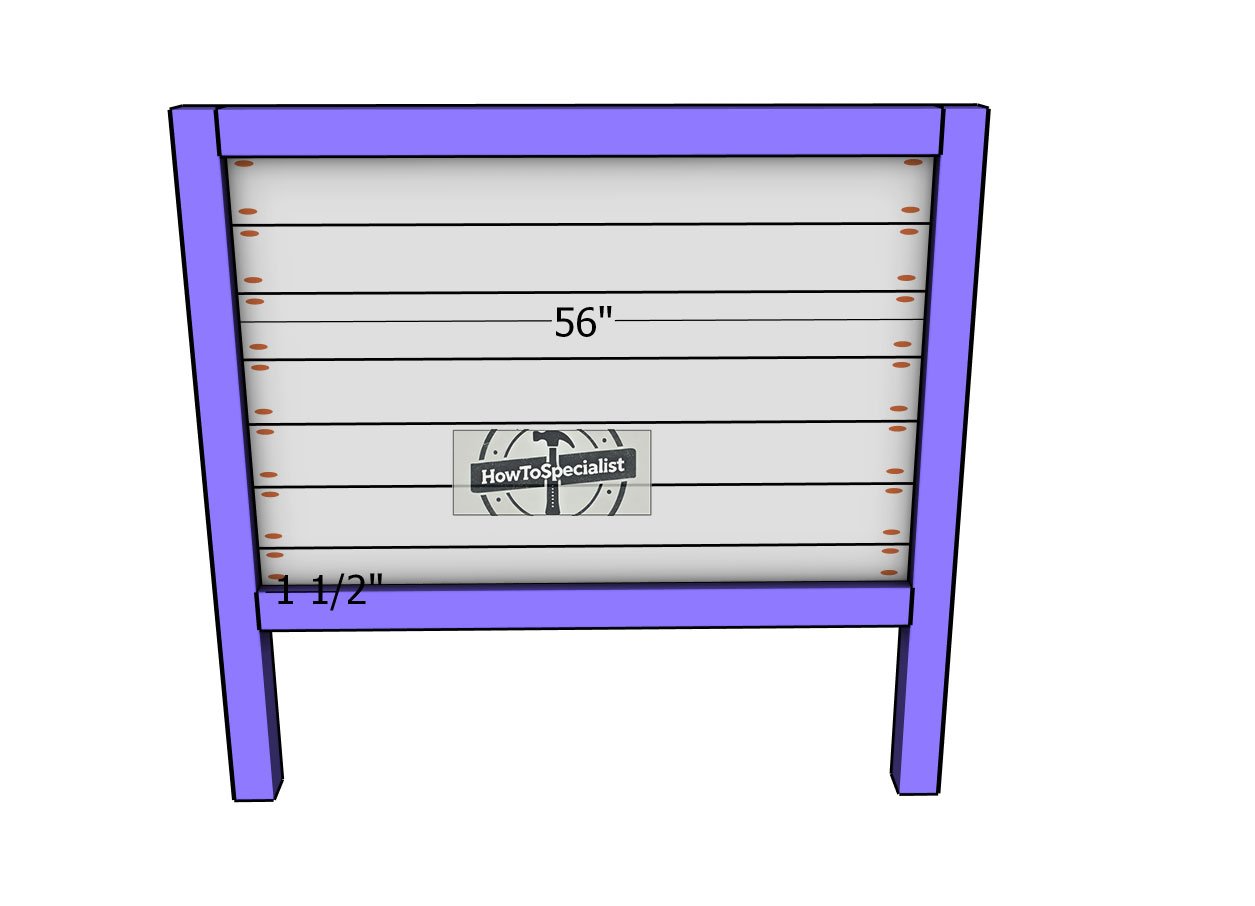
Headboard-slats
Now, here’s the secret sauce: make sure those pocket holes are facing the back, we’re not about to show off the hardware here. Let’s keep things clean and sleek for that polished look. Once you’ve cut the boards and drilled those pocket holes on both ends, it’s time to fit them snugly inside the frame.
Pro tip: Inset them 1 1/2″ from the frame, as shown in the diagram (because, yes, we’re following the plan like champs!). No gaps between the slats, folks. We want this thing tighter than a drum! Secure everything with 1 5/8″ screws, and boom, you’ve got yourself a solid, professional-looking headboard.
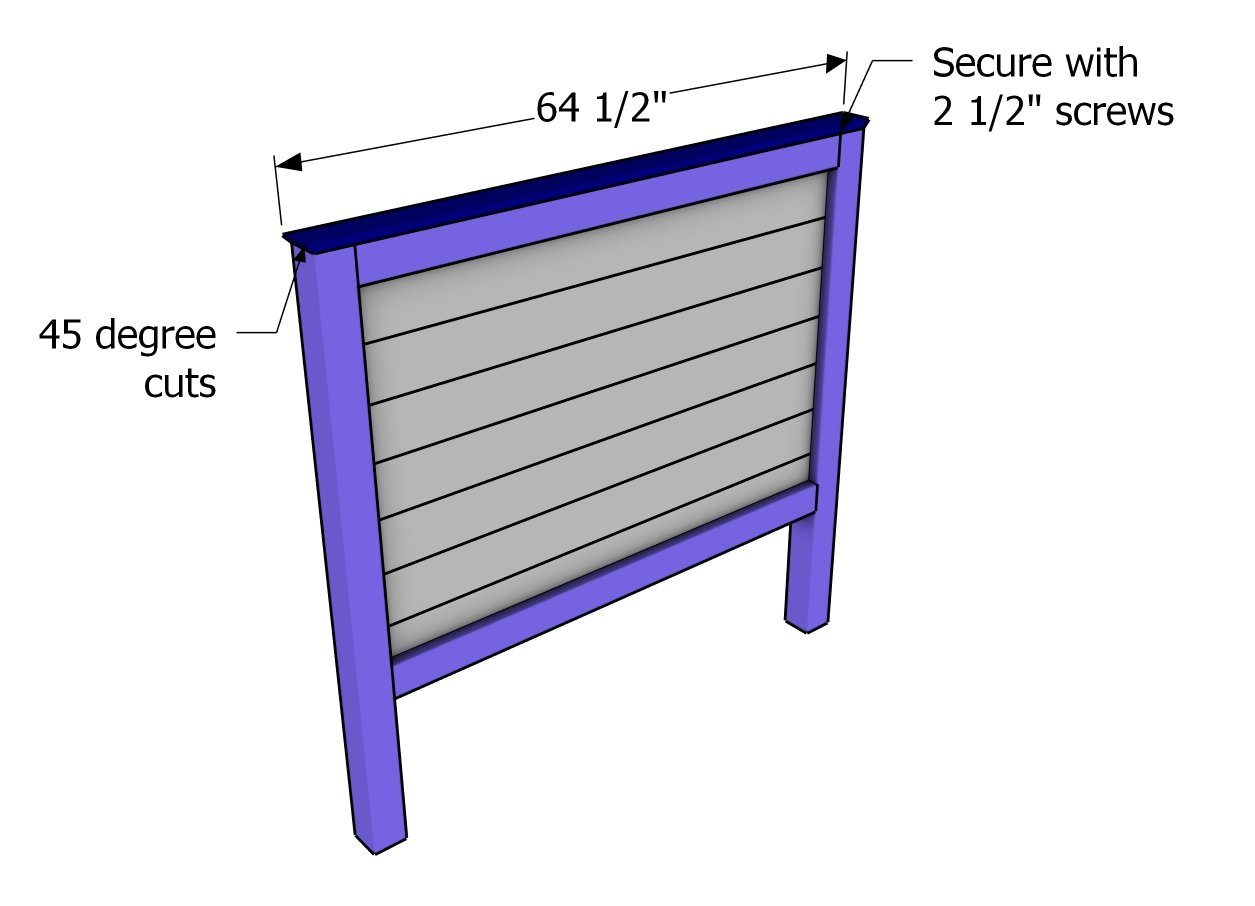
Headboard trim
Now it’s time to add the finishing touch — attaching the 1×4 board to the top of the headboard. This is where we really elevate the design (pun totally intended). Go ahead and make those sharp 45-degree cuts on both ends of the trim, like a boss.
Once that’s done, secure the trim to the frame with 1 5/8″ screws and a healthy dose of glue, because, let’s face it, we want this thing rock solid. Make sure to space those screws every 10 inches. Consistency is key here!
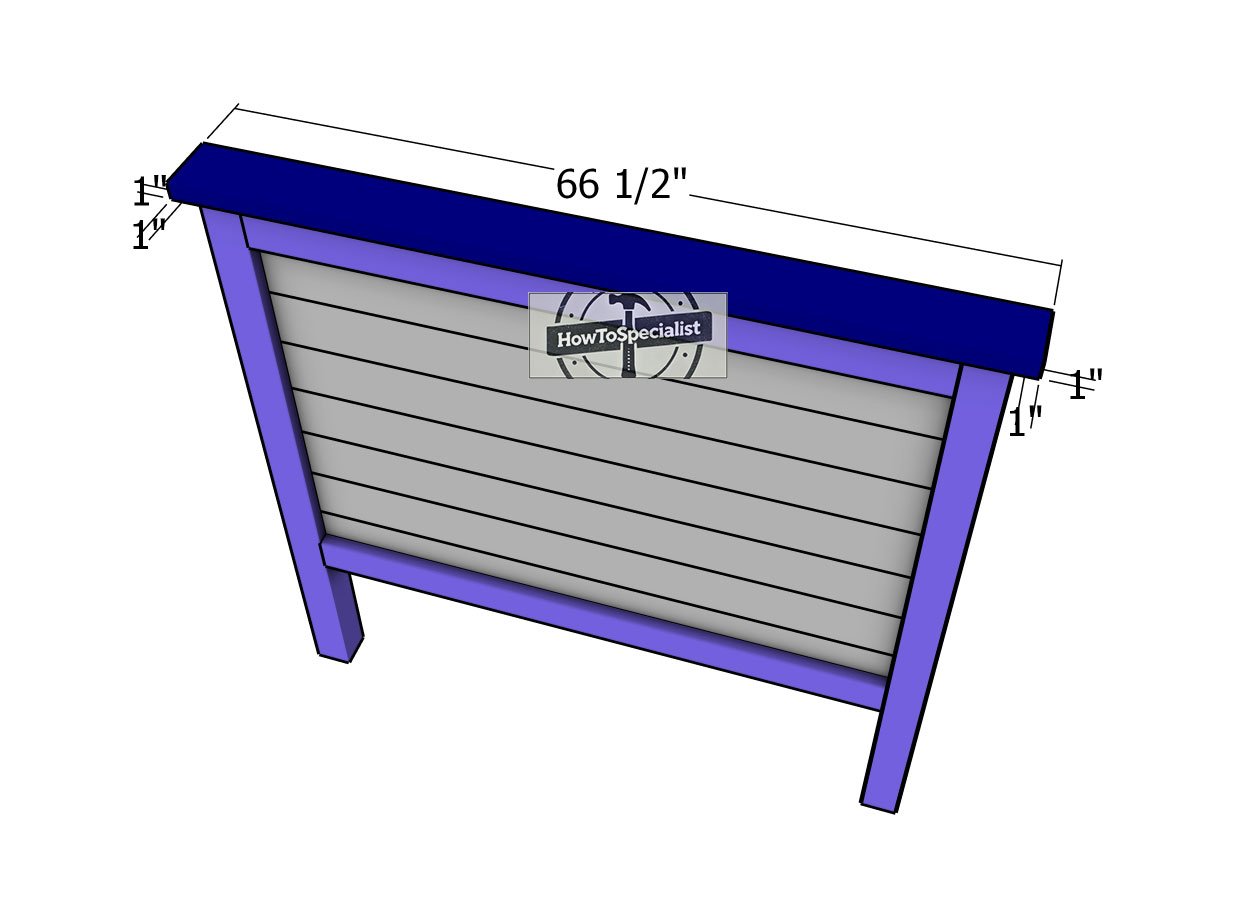
Fitting-the-top-trim—headboard
Alright, time to really bring it home by attaching that 2×6 top trim to the headboard. You want to center the trim perfectly so you’ve got a nice, even 1″ overhang on all sides, because we’re all about that symmetry!
Add a bit of glue to the joints for that extra hold. Then, drill some pilot holes (don’t skip this step; your screws will thank you later) and lock everything into place with 2 1/2″ screws. Tighten it up, and now your headboard is looking sleek, solid, and just plain awesome!
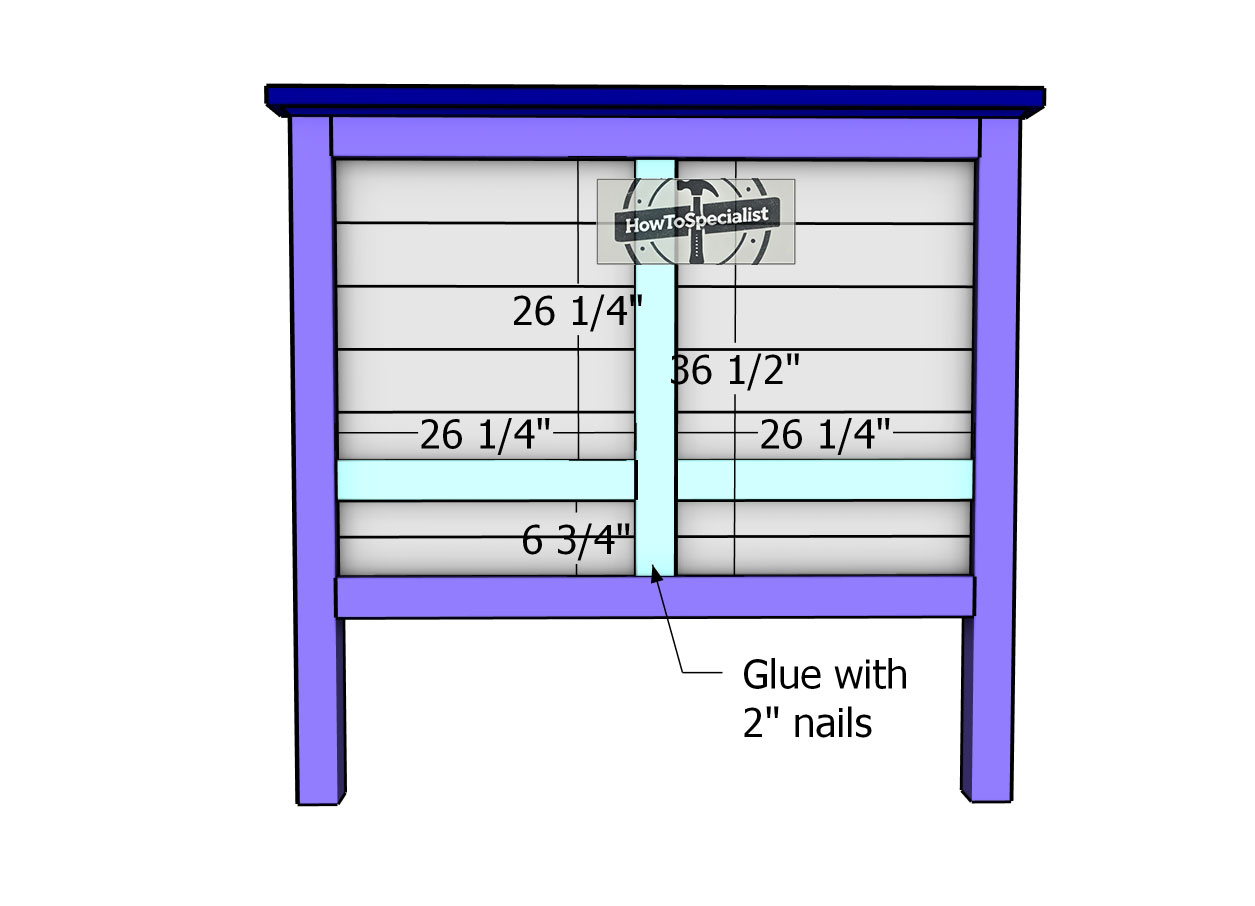
Front-trims-for-headboard
Now comes the fun part — adding those decorative trims to the front of the headboard! This is where we really show off the craftsmanship. Cut those 1×4 boards to size, and get ready to dress things up. Use glue and 1 1/4″ nails to attach them into place, making sure everything is snug and aligned. Think of it as giving your headboard a stylish jacket, it’s all in the details!
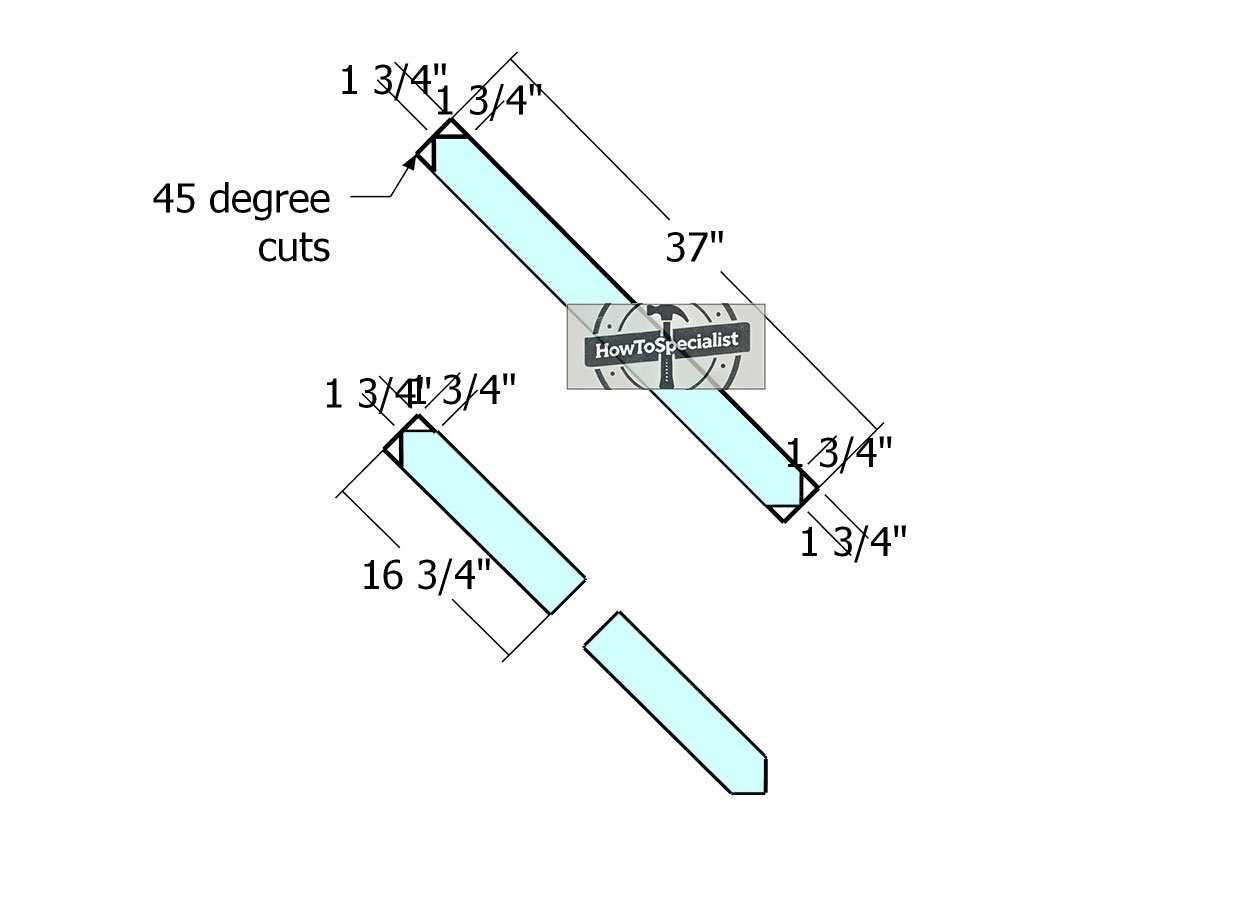
X-trims—cut-detail
Alright, we’re at the point where things get a little fancy — adding the X trims! Grab those 1×4 boards and let’s get to work. You’ll want to make 45-degree double cuts on one end of each trim (don’t worry, it sounds trickier than it is). Once you’ve got those angles down, smooth out the edges with some sandpaper. We want those trims to fit together seamlessly, like puzzle pieces. This step is all about precision and style, so take your time.
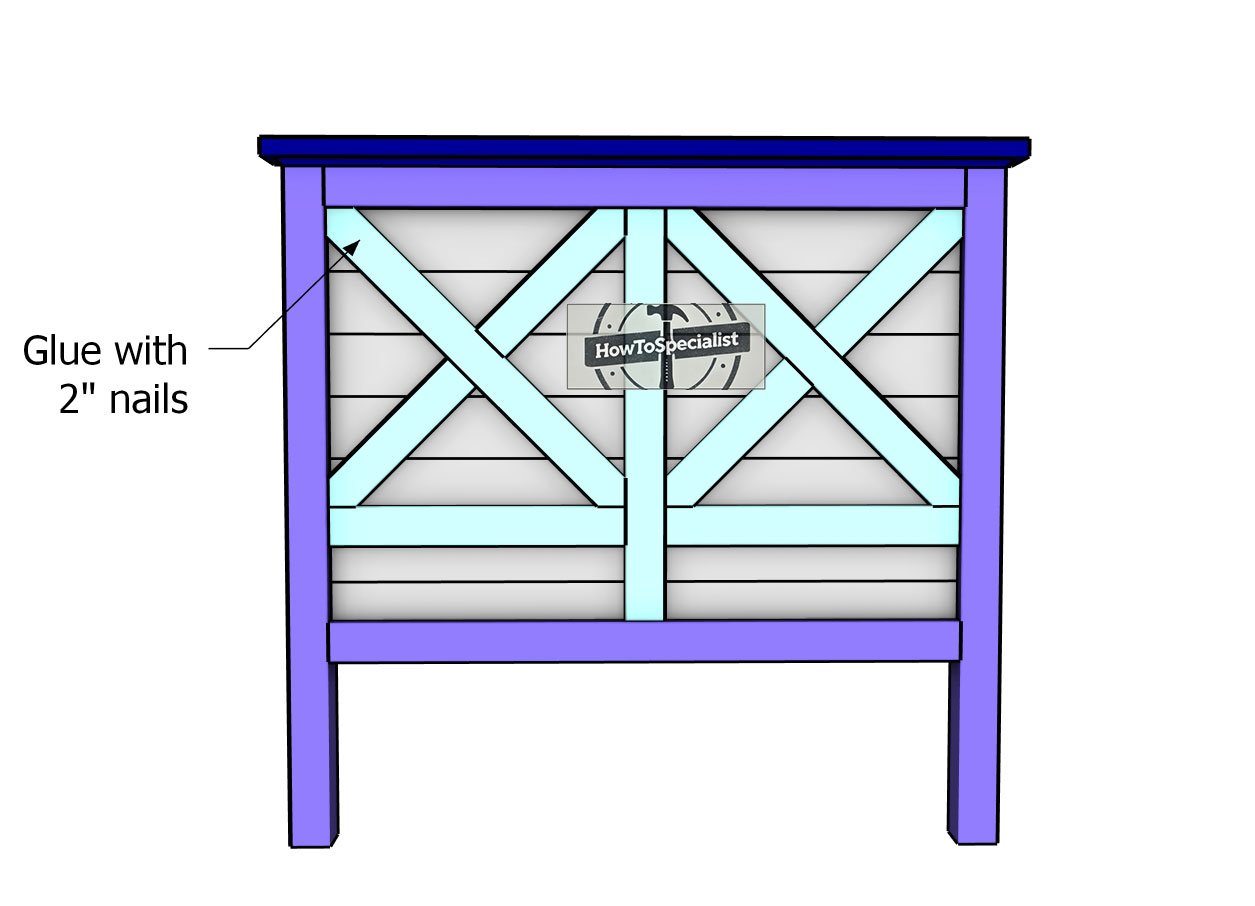
Attaching-the-X-trims-to-the-headboard
Now it’s time to attach those beautiful X trims to the headboard. Align the edges nice and flush, we’re going for perfection here! Add a little glue to make sure everything stays right where it’s supposed to. Then grab your 1 1/4″ finish nails and secure those trims into place. Think of the nails as the finishing touches that lock in the magic. Once they’re set, step back and admire your handiwork.
Step 2: Building the footboard
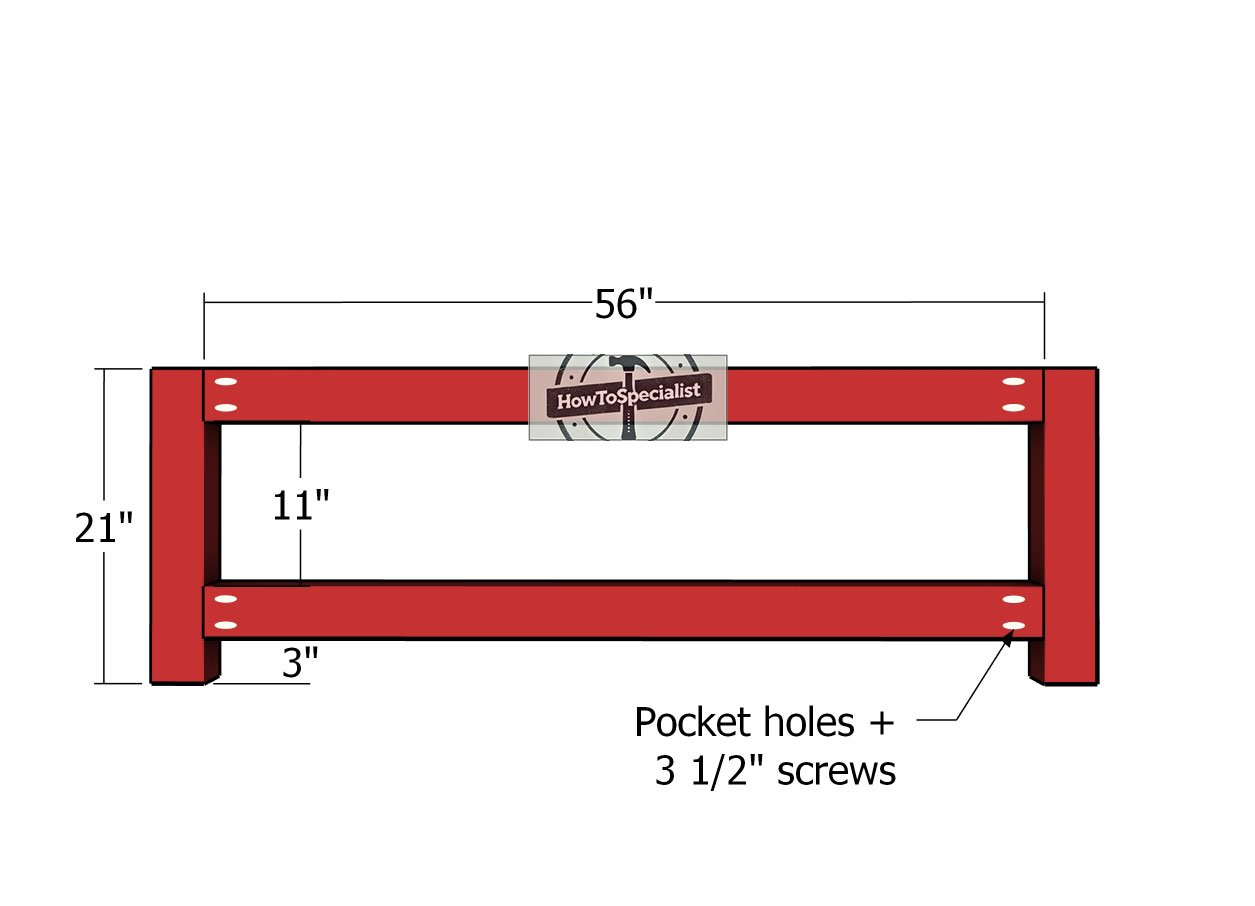
Footboard-frame
Alright, let’s get rolling on the footboard! We’re starting with the main frame, so grab those horizontal components and drill pocket holes at both ends. Now, secure them to the legs using 3 1/2″ screws and a solid dab of glue. Make sure those edges are perfectly aligned and glued tight, because we want this thing to last! And don’t forget, check that those corners are square. This is the foundation, and we’re laying it down like pros.
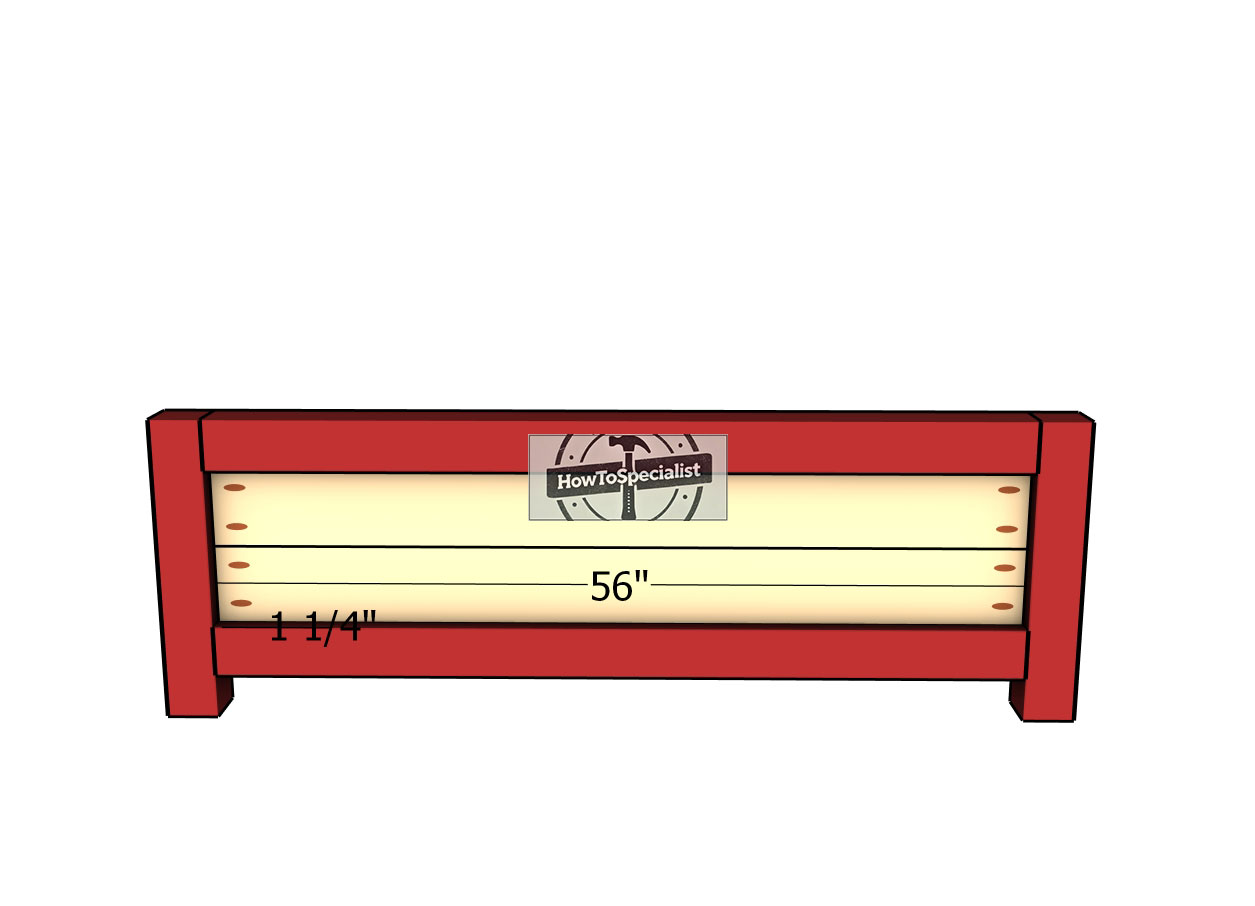
Footboard-slats
Now let’s give that footboard some structure by adding the 1×6 boards for the panel. Start by drilling pocket holes at both ends of the boards, because we’re all about that secure fit. Then, use 1 5/8″ screws to lock them into place on the legs. Pro tip: inset the boards 1 1/4″ from the frame face, we’re looking for a nice, clean finish here!
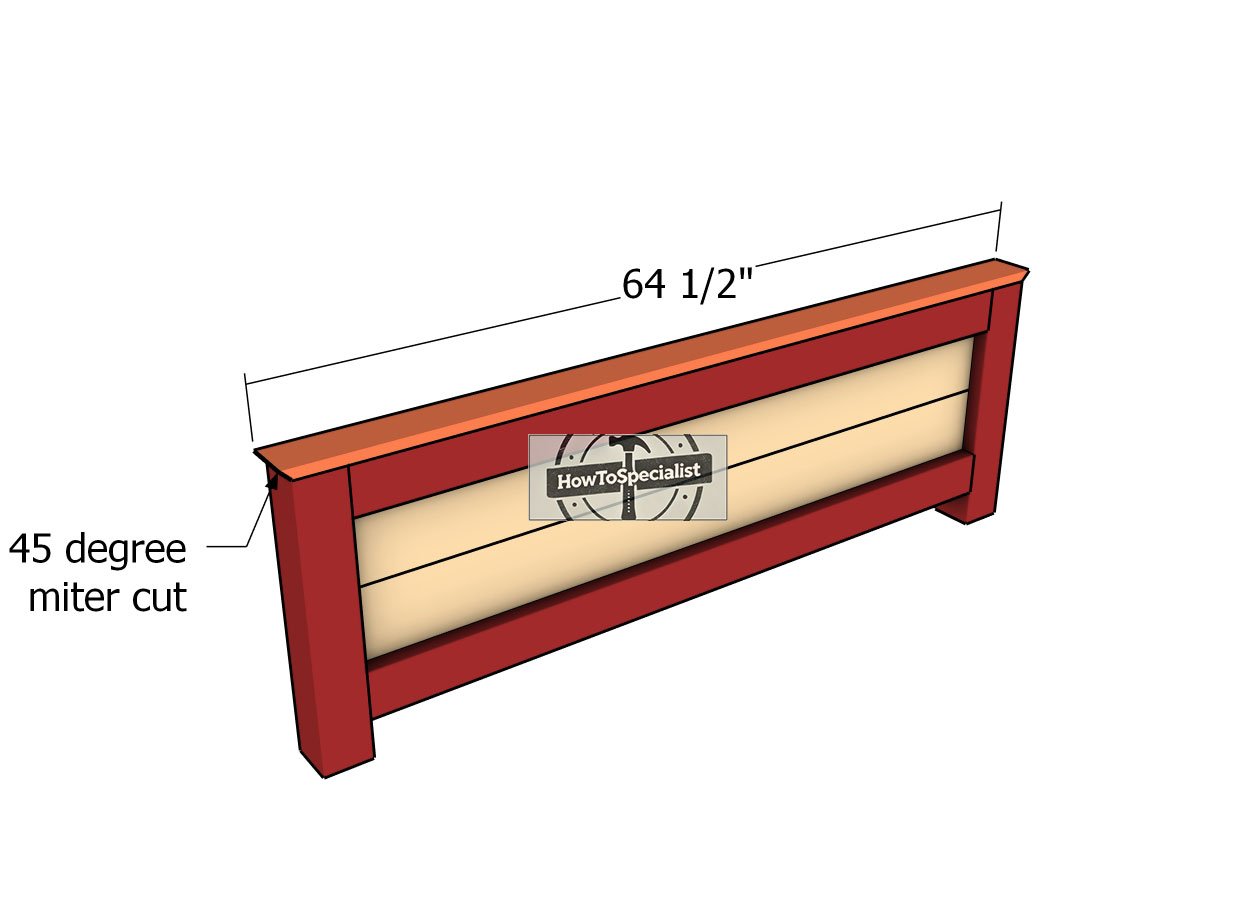
Footboard-trim
Time to give the footboard a little extra flair by fitting the 1×4 trim! Make those sharp 45-degree miter cuts on both sides of the trim, nothing says “pro-level craftsmanship” like clean mitered edges. Once you’ve got that cut perfectly, attach the trim and lock it in place with 1 5/8″ screws and some trusty glue. Be sure to space those screws every 10 inches for that uniform look.
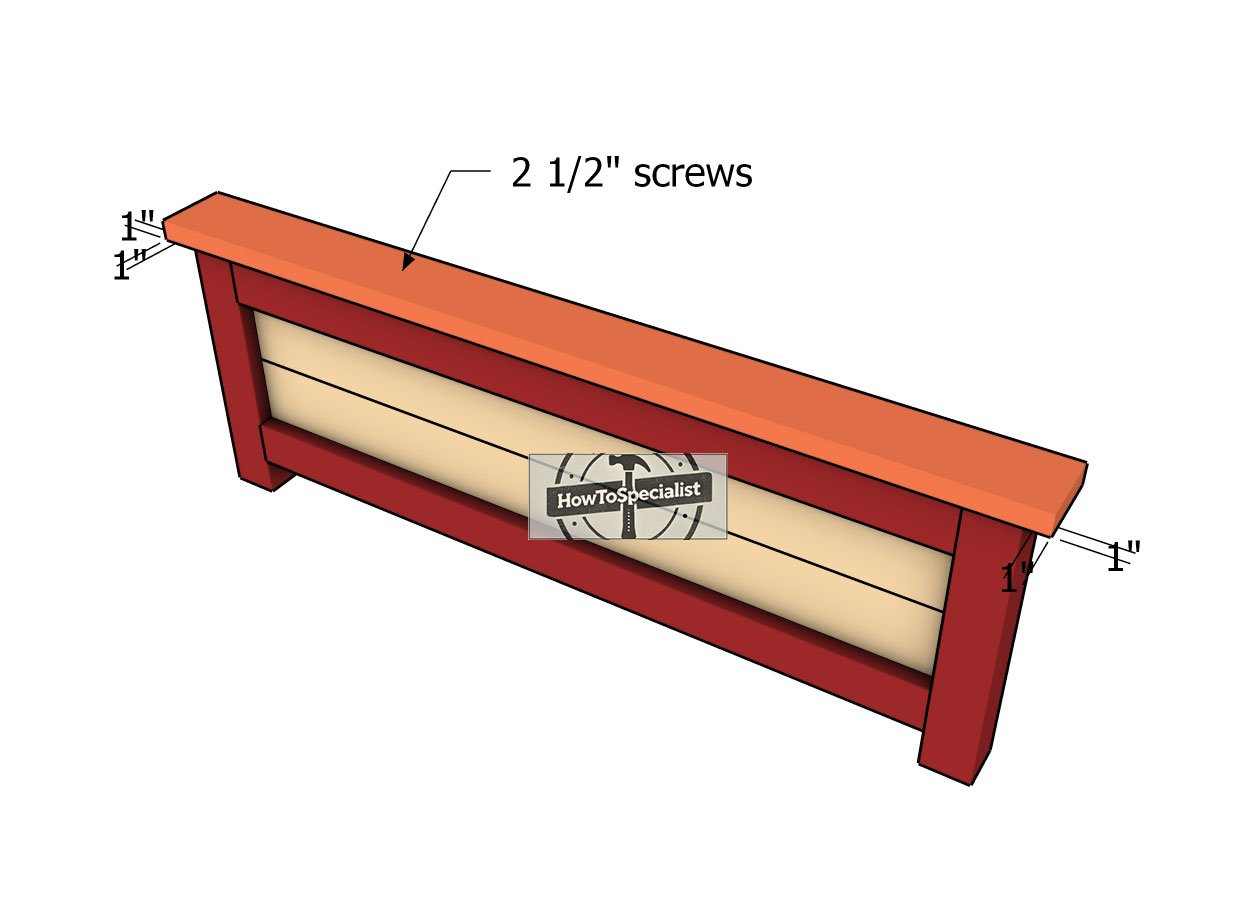
Fitting-the-footboard-top-trim
Let’s bring it all together with the 2×6 top trim for the footboard! Align those edges carefully so you’ve got a clean 1″ overhang on all sides. Once everything’s in position, break out the glue and 2 1/2″ screws to lock it down tight. Make sure to space those screws every 10 inches for that solid, professional finish. This is the cherry on top of your footboard masterpiece, making it both sturdy and stylish.
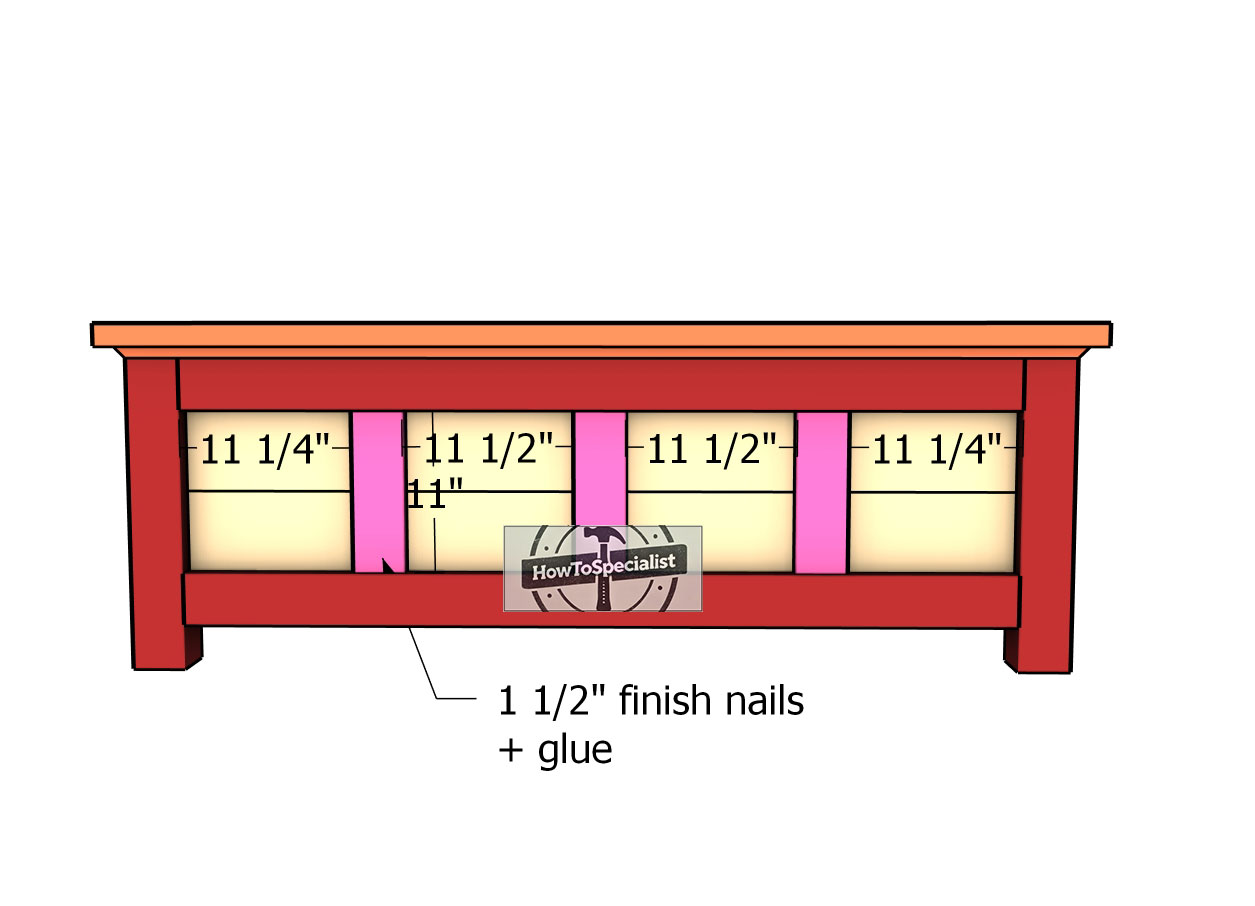
Footboard-trims
Last but definitely not least, it’s time to add those 1×4 decorative trims to the front of the footboard. Use 1 1/4″ finish nails and some glue to secure the trims tightly into place. Make sure everything is aligned and snug because these trims are the finishing touch that’ll have everyone admiring your handiwork. And just like that, you’ve built yourself a footboard that’s not only strong but looks incredible too.
Step 3: Assembling the bed frame
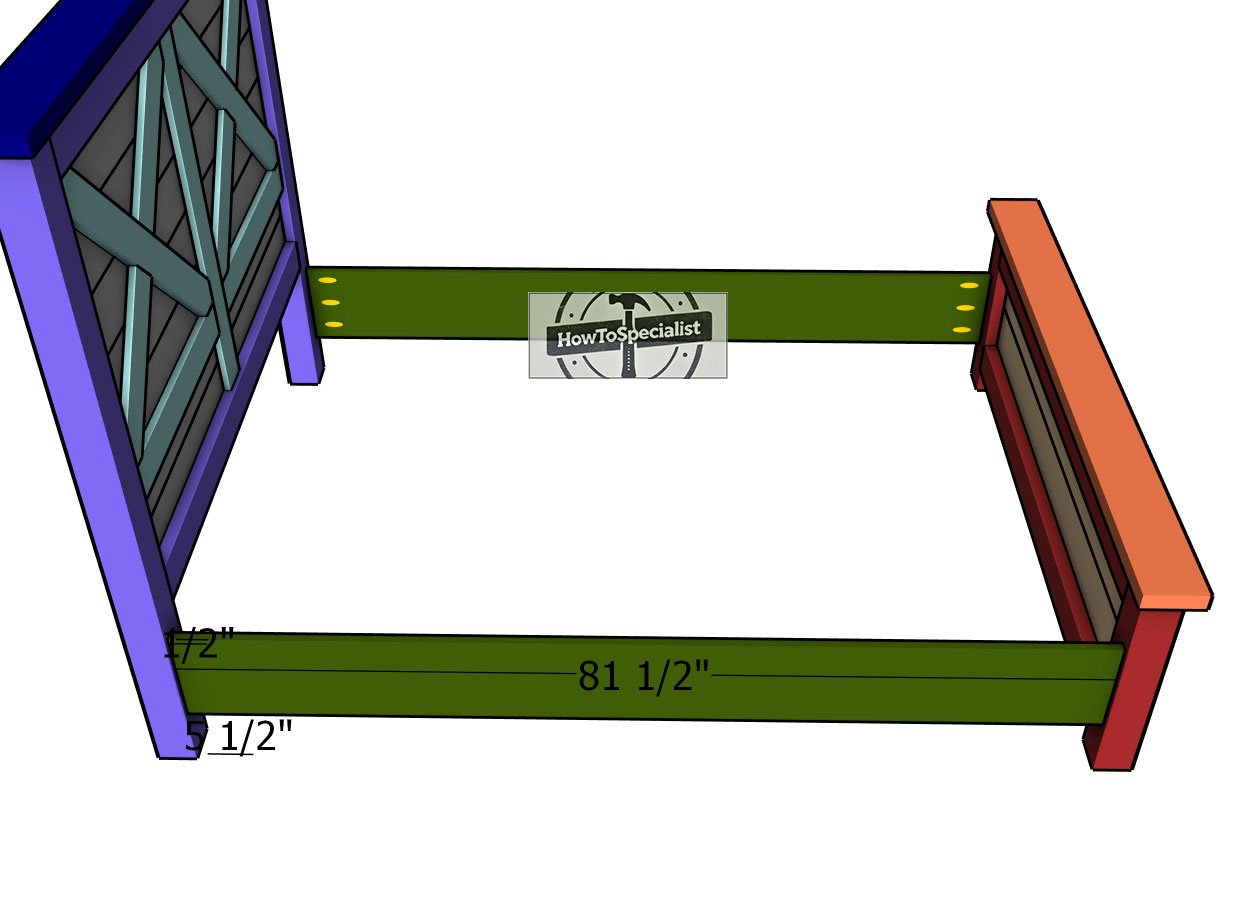
Fitting-the-side-boards
Alright, we’ve got the headboard and footboard looking sharp, now it’s time to bring them together with the side rails! Cut your 1×10 boards to a solid 81 1/2″. Drill pocket holes at both ends of the rails, then attach them to the bed using 1 5/8″ screws. Make sure to align the rails 5 1/2″ from the ground and inset them 1/2″ from the legs, just like the plans show.
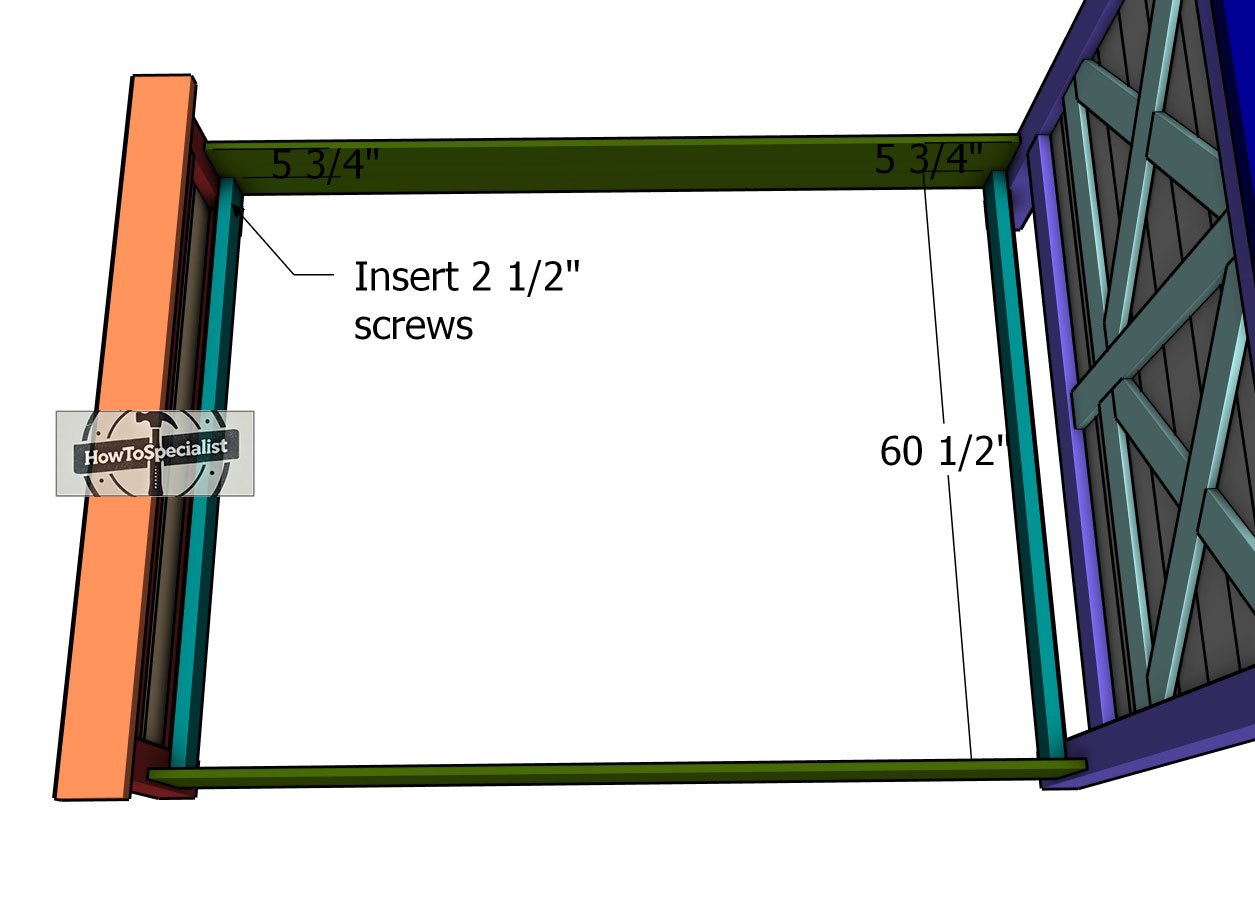
Interior-frame
Now we’re building the foundation that will hold the mattress ! Start by attaching your 2×4 boards to both the footboard and headboard. You know the drill: make sure to drill those pilot holes first (because we’re pros like that), then lock everything into place with 2 1/2″ screws. Space those screws every 8 inches to keep things sturdy and strong. This is the backbone of the bed, so you want it rock solid. Once you’re done, your bed frame is ready for the mattress and a great night’s sleep!
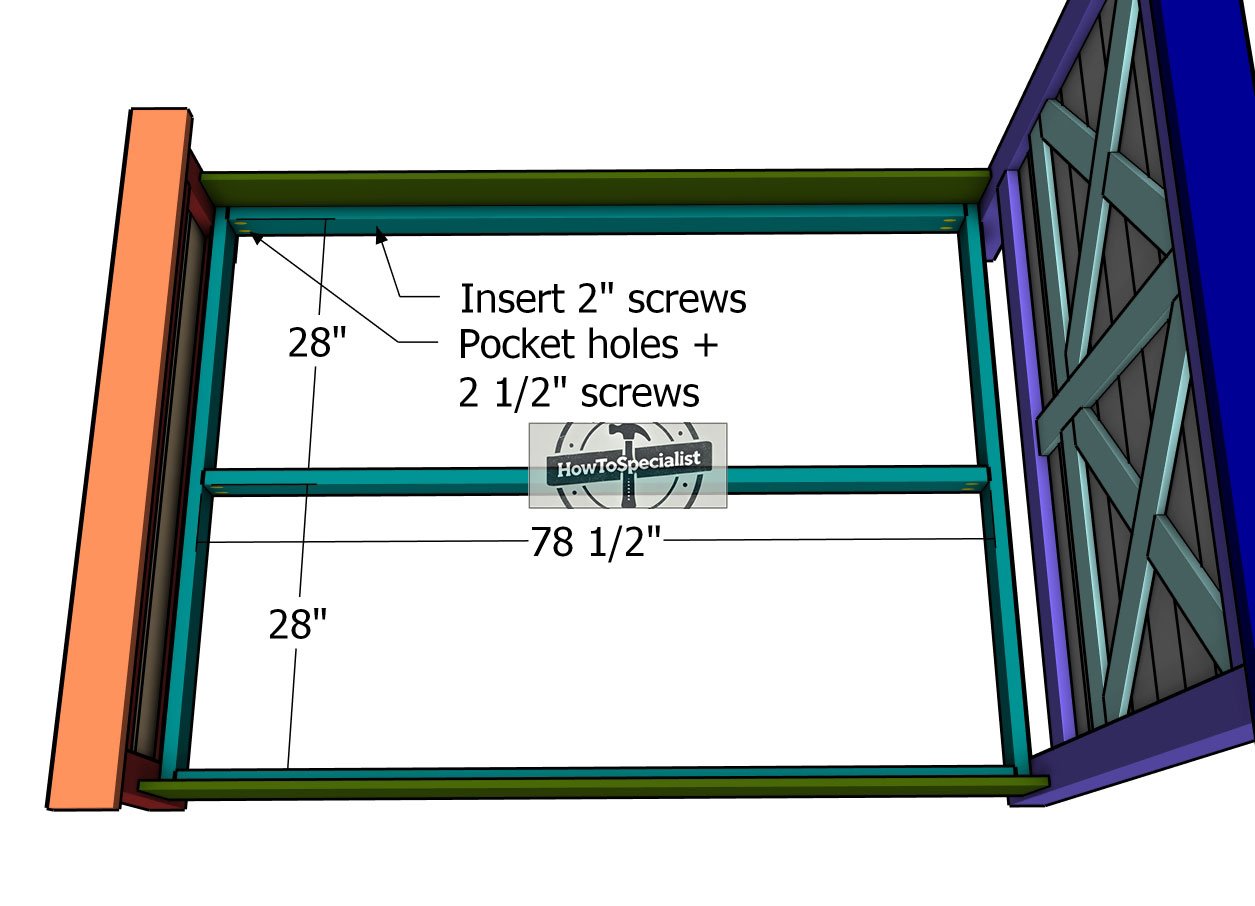
Base-frame—queen-bed
Next up, let’s lock in the middle boards to add that extra strength to the frame. Drill pocket holes at both ends of the boards and secure them into place using 2 1/2″ screws. Make sure those edges are perfectly flush. And of course, double-check that the corners are square because we want everything lined up just right. With this step, you’re building a frame that can stand the test of time (and a few good naps!).
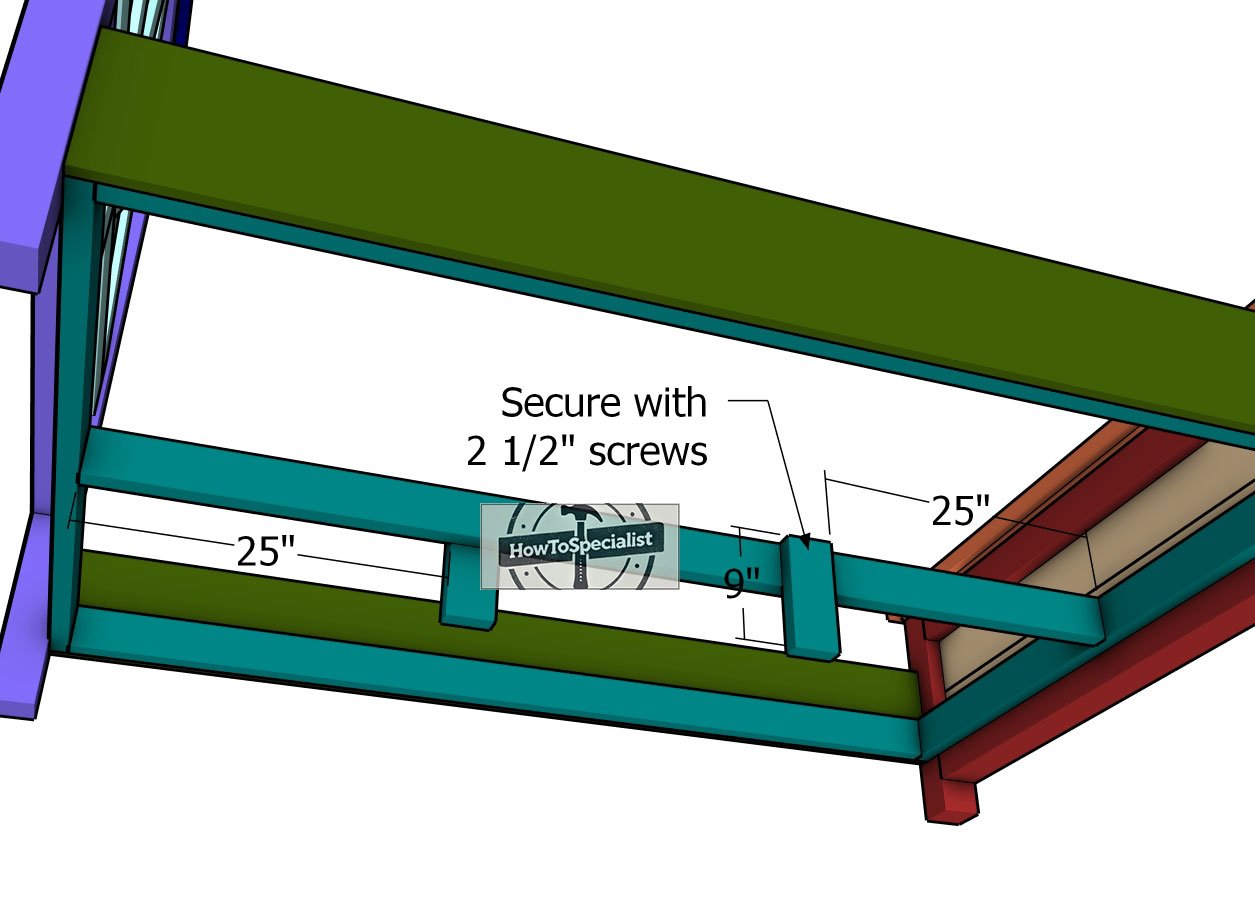
Attaching-the-middle-legs
Now it’s time to give your bed that extra support by adding the middle legs. Cut the legs from sturdy 2×4 lumber — these will be the unsung heroes holding everything steady. Attach the legs to the support using 2 1/2″ screws, making sure to use 2 screws for each joint to lock them in nice and tight. With these legs in place, your bed frame is going to be as solid as they come.
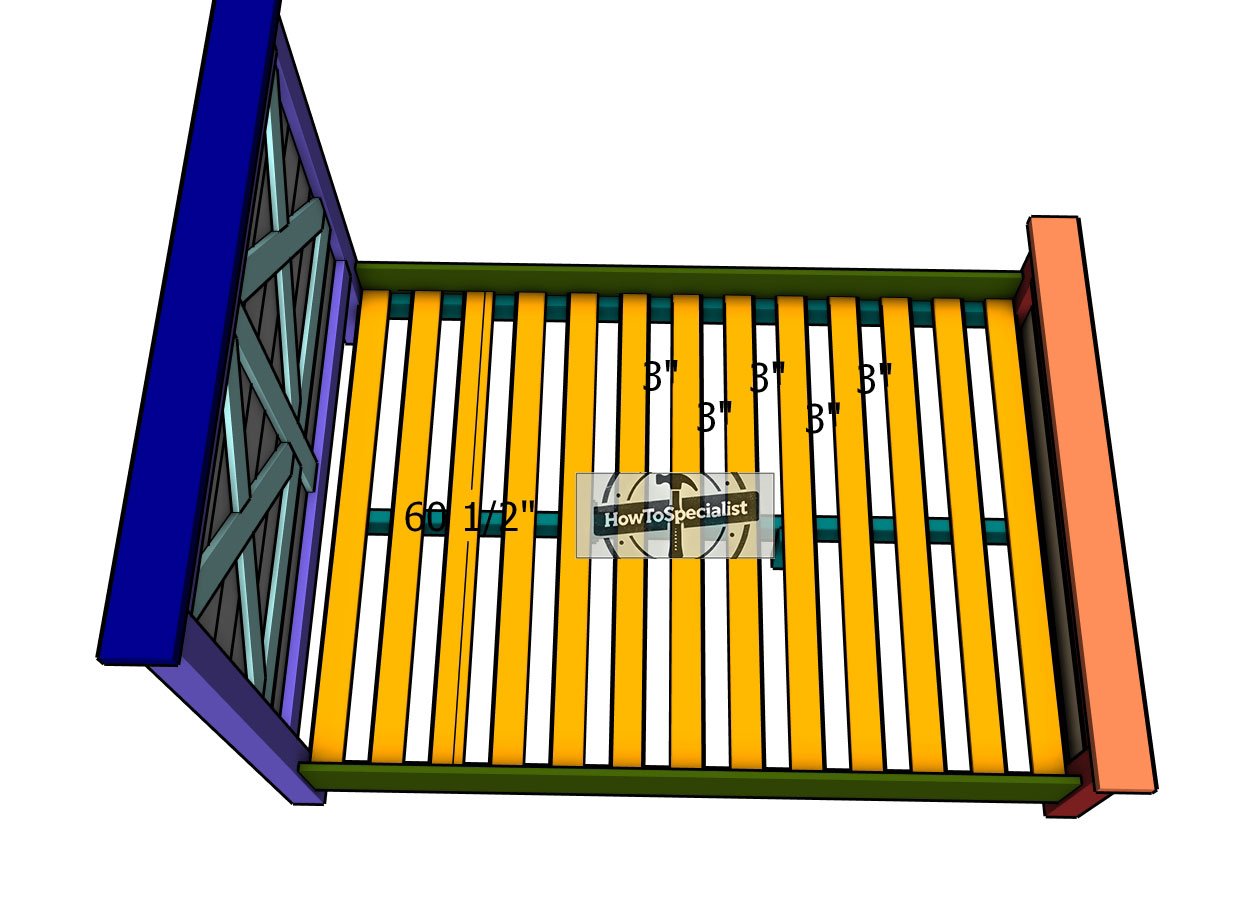
Fitting-the-slats
Last but definitely not least, attach the 1×4 slats to complete the bed frame. Grab a 3″ spacer to keep those gaps perfectly even between the boards — we’re going for both form and function here. Drill pilot holes (we’re still sticking to pro habits!) and secure the slats tightly with 1 5/8″ screws. Once those boards are locked into place, your bed is officially complete and ready to hold up a mattress like a champ. You’ve built something amazing, well done!
Step 4: Finishing touches
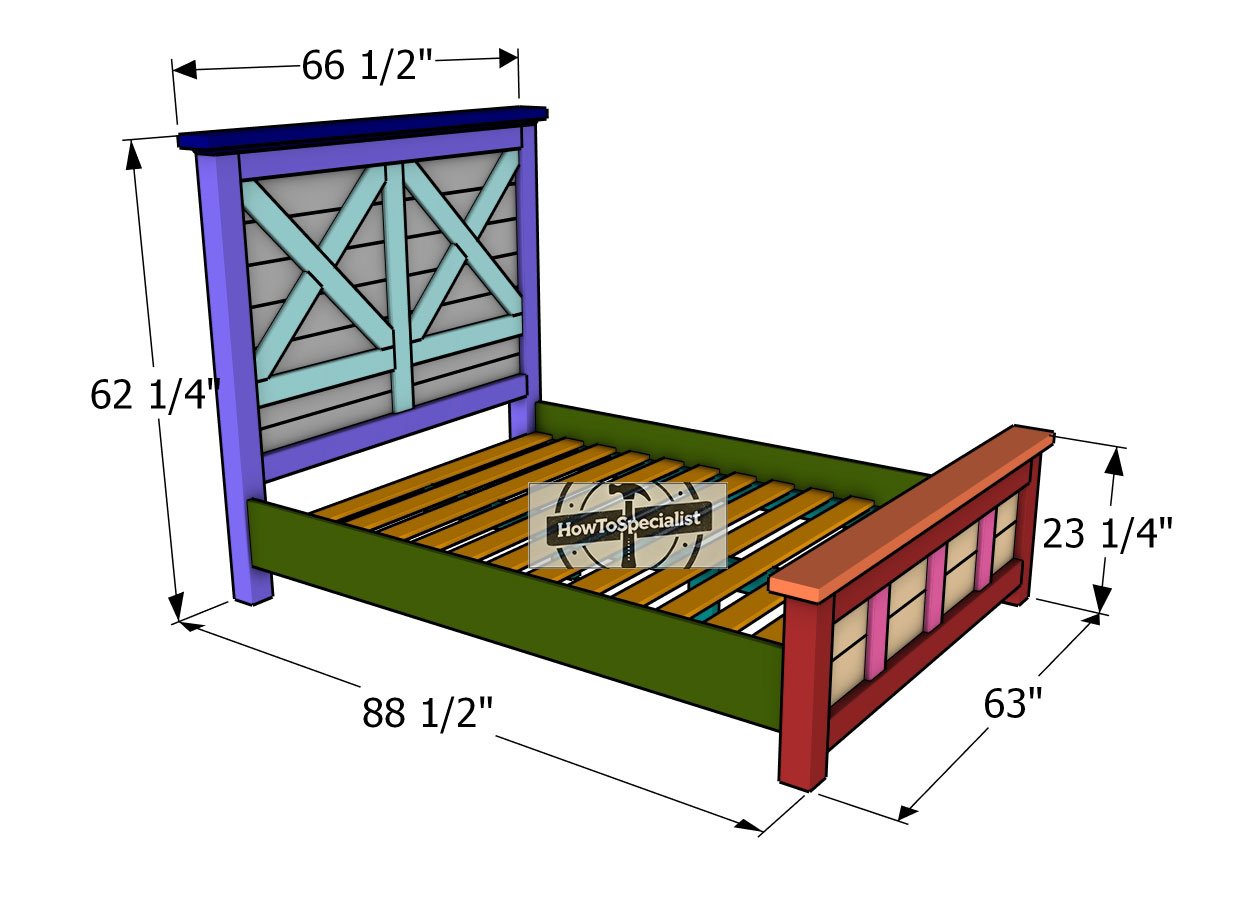
Farmhouse-bed-frame—dimensions
The finishing touches are what truly bring this farmhouse queen-size bed to life. After all the hard work of assembling the frame, attaching the decorative X trims, and securing the slats, it’s time to make sure your project looks as good as it functions. Start by giving the entire bed a thorough sanding to smooth out any rough edges and prepare the wood for staining or painting.
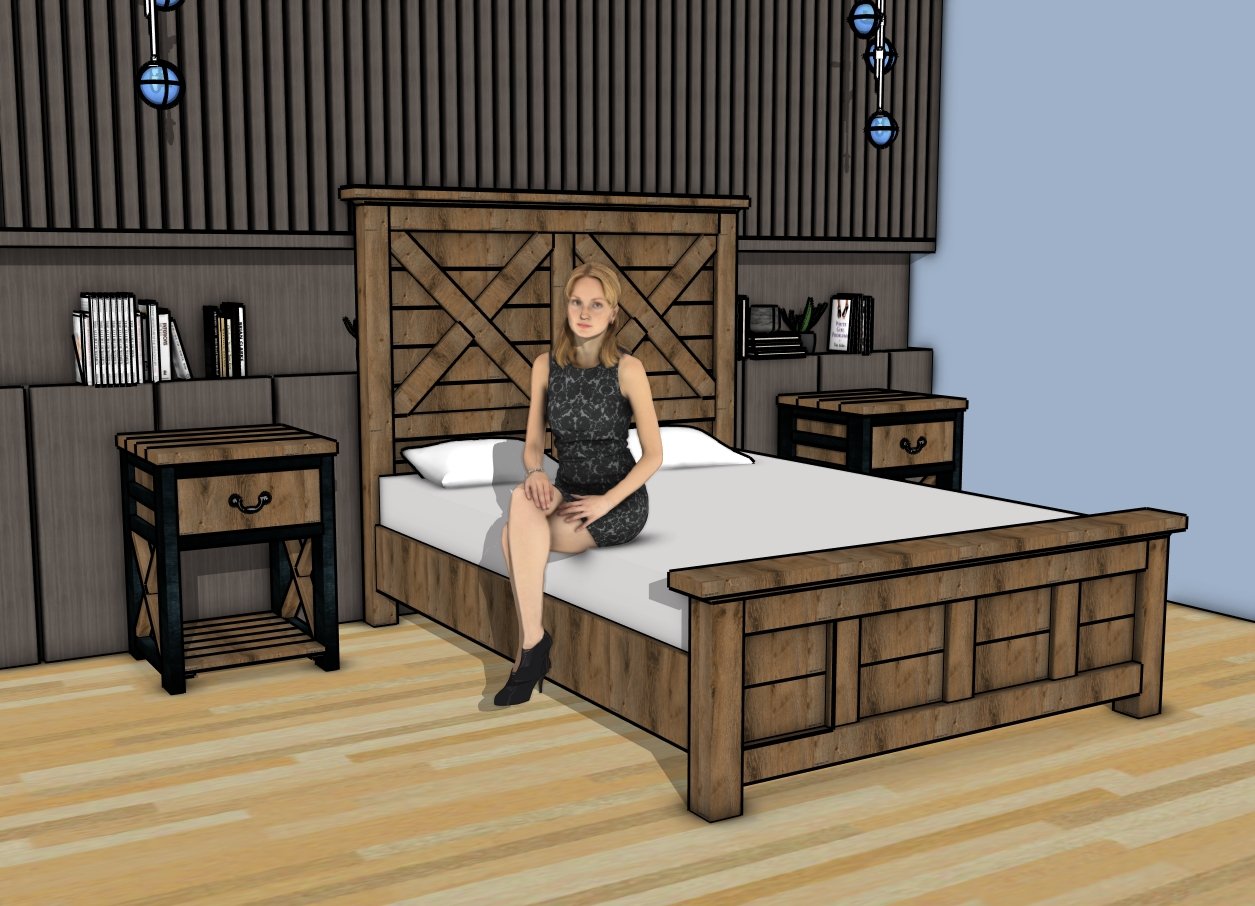
How to build a queen bed
Whether you go for a classic dark stain to highlight the natural grain or a fresh coat of white paint for that clean, rustic farmhouse look, these finishing steps will elevate your bed to the next level. Once sealed and finished, you’ll have a stunning, handcrafted centerpiece that’s ready for a good night’s rest!
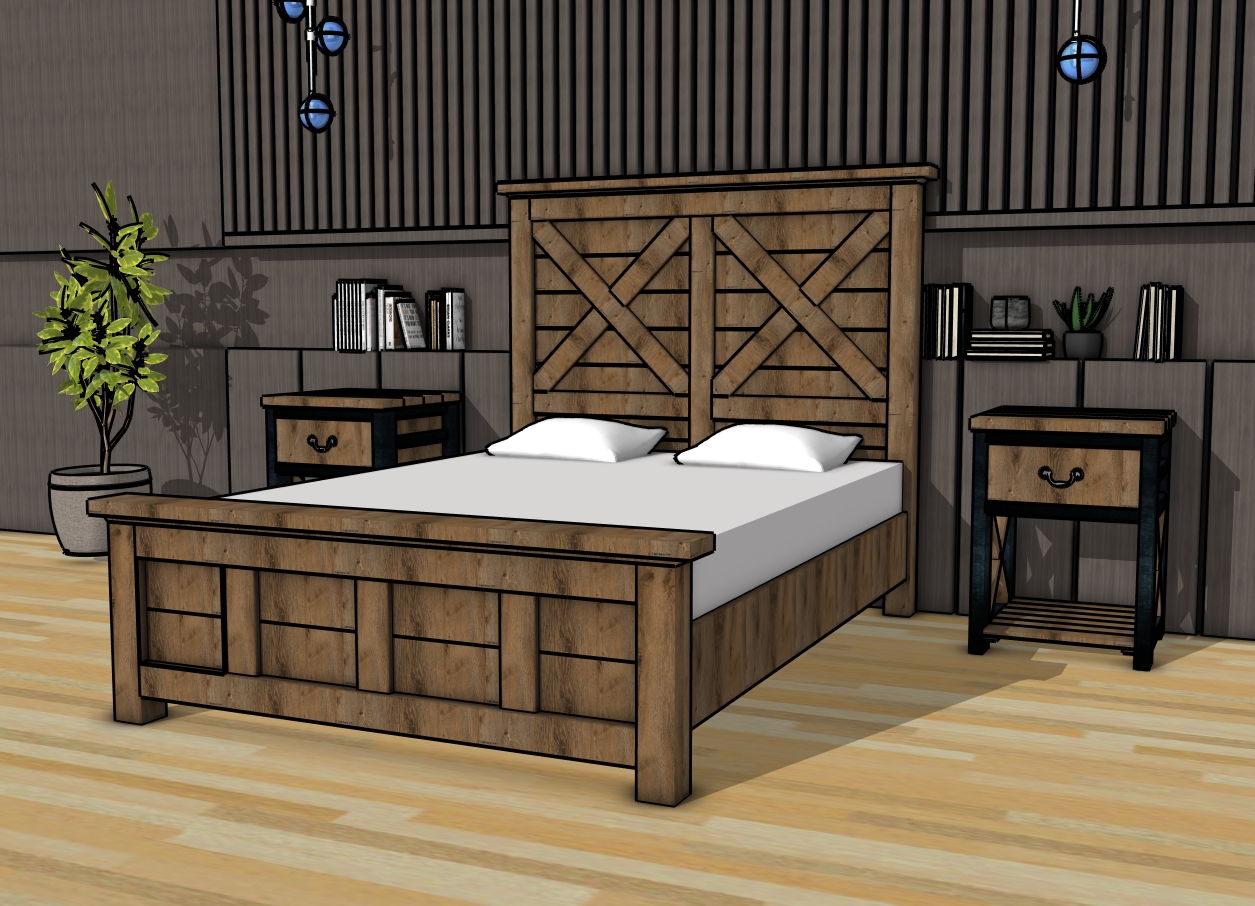
Farmhouse bed frame plans – queen size
And just like that, you’ve built yourself a stunning farmhouse queen-size bed! Whether this is your first big woodworking project or you’re a seasoned DIYer, take a moment to step back and appreciate the work you’ve put in. This bed isn’t just furniture, it’s a piece of craftsmanship that you’ve created with your own two hands. Now, every time you walk into your bedroom, you’ll be greeted by a beautiful reminder of your hard work and dedication.
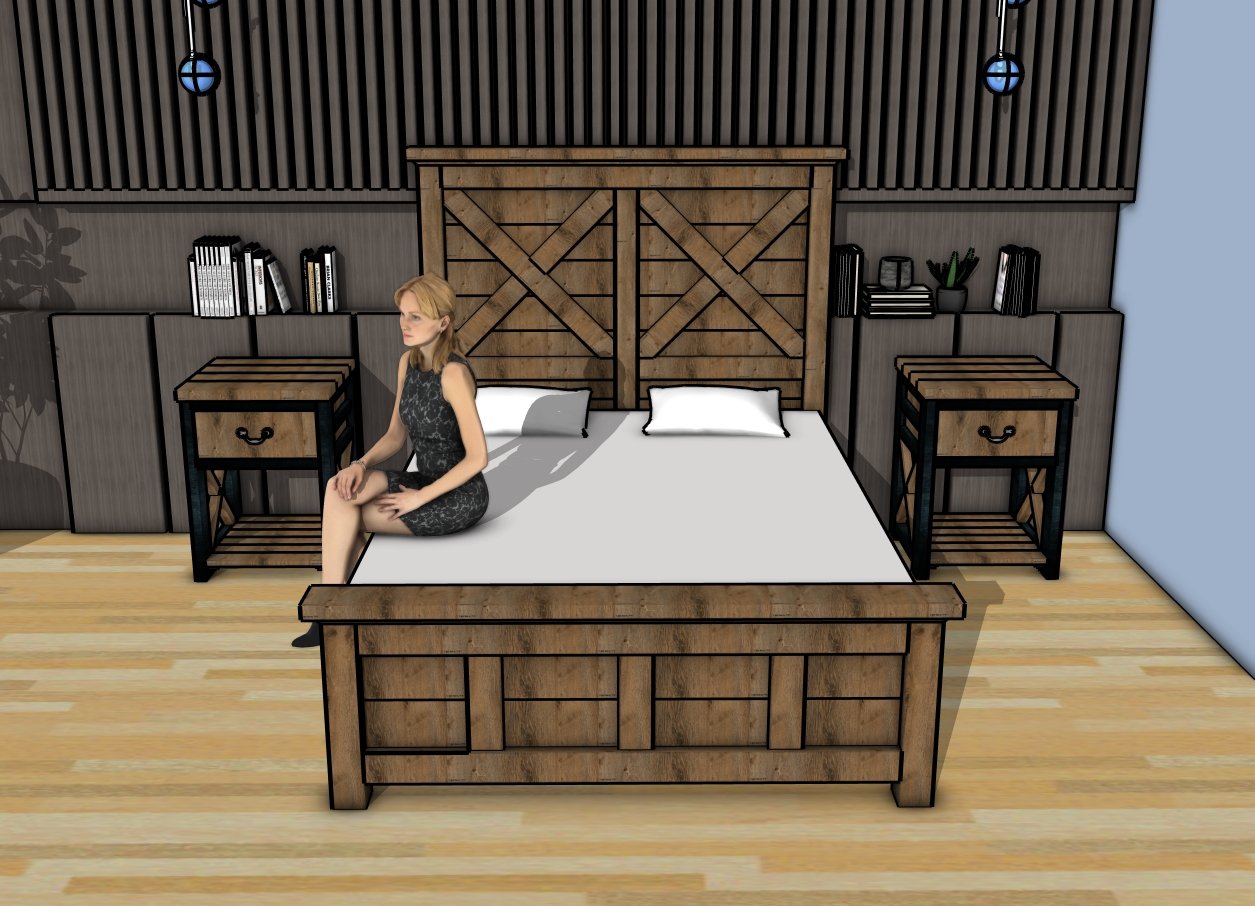
DIY farmhouse queen bed plans
If you followed along and built your own bed, I’d love to hear about your experience and see the final result! Drop a comment or share a photo of your project, we’re all about celebrating the DIY wins here. Thanks for joining me on this build, and stay tuned for more exciting projects that’ll keep your home looking amazing and your DIY skills sharp. Until next time, keep building and keep creating!
Thanks for checking out my farmhouse queen-size bed frame plans! Be sure to explore my other projects for more fantastic ideas. Don’t forget to hit the LIKE button and SHARE with your friends using the social media links below.

