Looking to add a touch of rustic charm to your home? These free farmhouse chair plans are just what you need! Whether you’re a seasoned DIYer or just starting out, this project combines classic farmhouse style with sturdy design elements, giving you a beautiful piece that’s both functional and stylish. In this step-by-step guide, I’ll walk you through each part of the process, from cutting the lumber to adding those signature X-back details. With just a few tools and materials, you’ll have a custom-built farmhouse chair that adds warmth and character to any space.
Building this farmhouse chair is both time-efficient and budget-friendly! With basic tools and a straightforward design, you can expect to complete this project in about 4-6 hours, perfect for a weekend DIY. As for the cost, using standard lumber and hardware, the materials should come in around $40-$60, depending on local prices and any customization you choose. If you already have some supplies on hand, like screws or wood glue, you’ll save even more. This project gives you a high-quality, stylish chair without breaking the bank—ideal for anyone looking to add farmhouse charm on a budget!
We recommend you to invest in the best materials you could afford. Therefore, you should buy weather-resistant lumber, such as pine or cedar. Always take accurate measurements before adjusting the size of the components at the proper size. Drill pilot holes trough the components before inserting the wood screws, to prevent the wood from splitting. My plans come with a full cut / shopping list and they are PDF Download and Print friendly. See all my Premium Plans HERE.
Made from this plan
Pin it for Later!
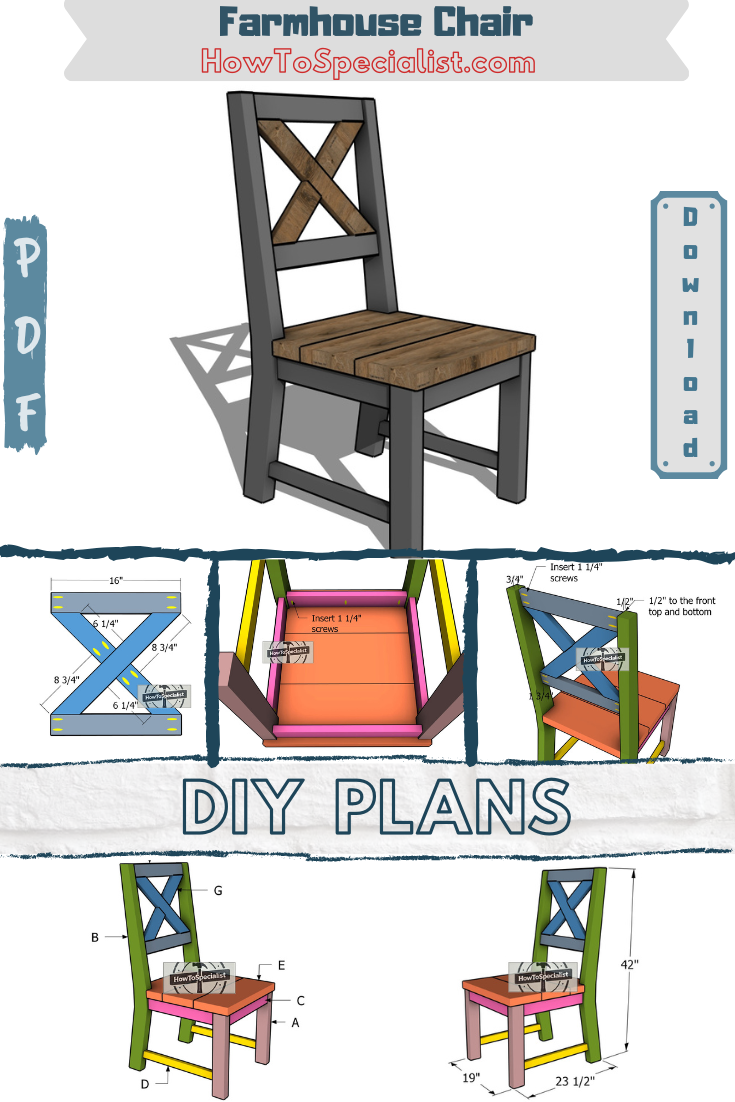
Farmhouse Chair – Free Plans
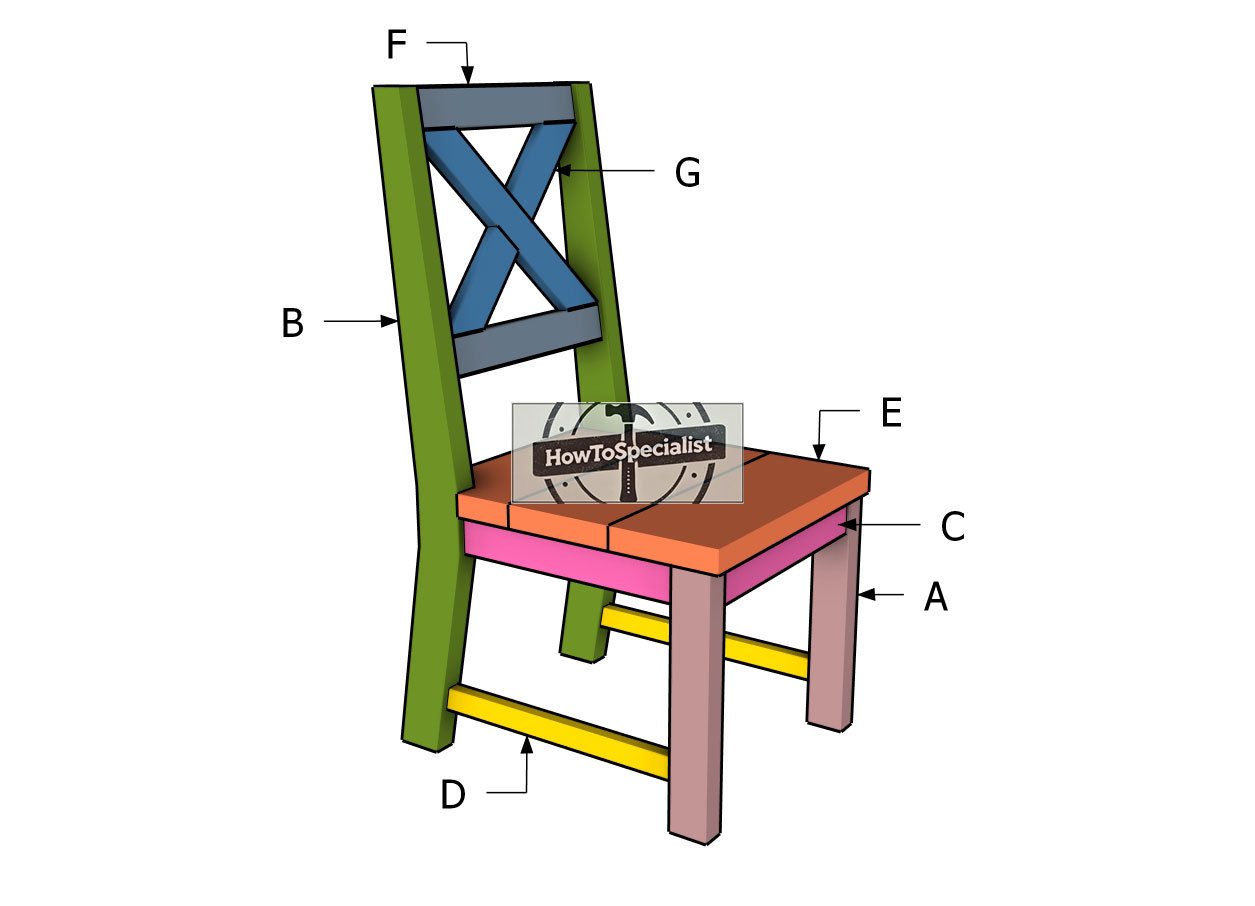
Building-a-farmhouse-chair
Materials
A – FRONT LEGS – 2×3 lumber 16 1/2″ – 2 pieces
B – BACK LEGS – 2×6 lumber 42″ – 2 pieces
C – SUPPORTS – 1×3 lumber 15 1/2″ – 2 pieces
C – SUPPORTS – 1×3 lumber 16″ – 2 pieces
D – BASE SUPPORTS – 1×2 lumber 17 1/2″ – 2 pieces
E – SEAT SLATS – 2×8 lumber 19″ – 3 pieces
F – TRIMS – 1×3 lumber 16″ – 2 pieces
G – X-TRIMS – 1×3 lumber 20 1/4″ – 1 piece
G – X-TRIMS – 1×3 lumber 8 3/4″ – 2 pieces
- 2×6 lumber 8 ft – 1 piece
- 2×8 lumber 6 ft – 1 piece
- 2×3 lumber 4 ft – 1 piece
- 1×3 lumber 8 ft – 2 pieces
- 1×2 lumber 4 ft – 1 piece
- 1 1/4″ screws – 100 pieces
- 2″ finish nails – 10 pieces
- Stain / paint – 1 piece
- Glue – 1 piece
Tools
- Miter saw
- Drill machinery, drill bits
- Safety gloves, glasses
- Chalk line, tape measure, spirit level, carpentry pencil
Time
- One week
Related
Step 1: Building the base of the chair
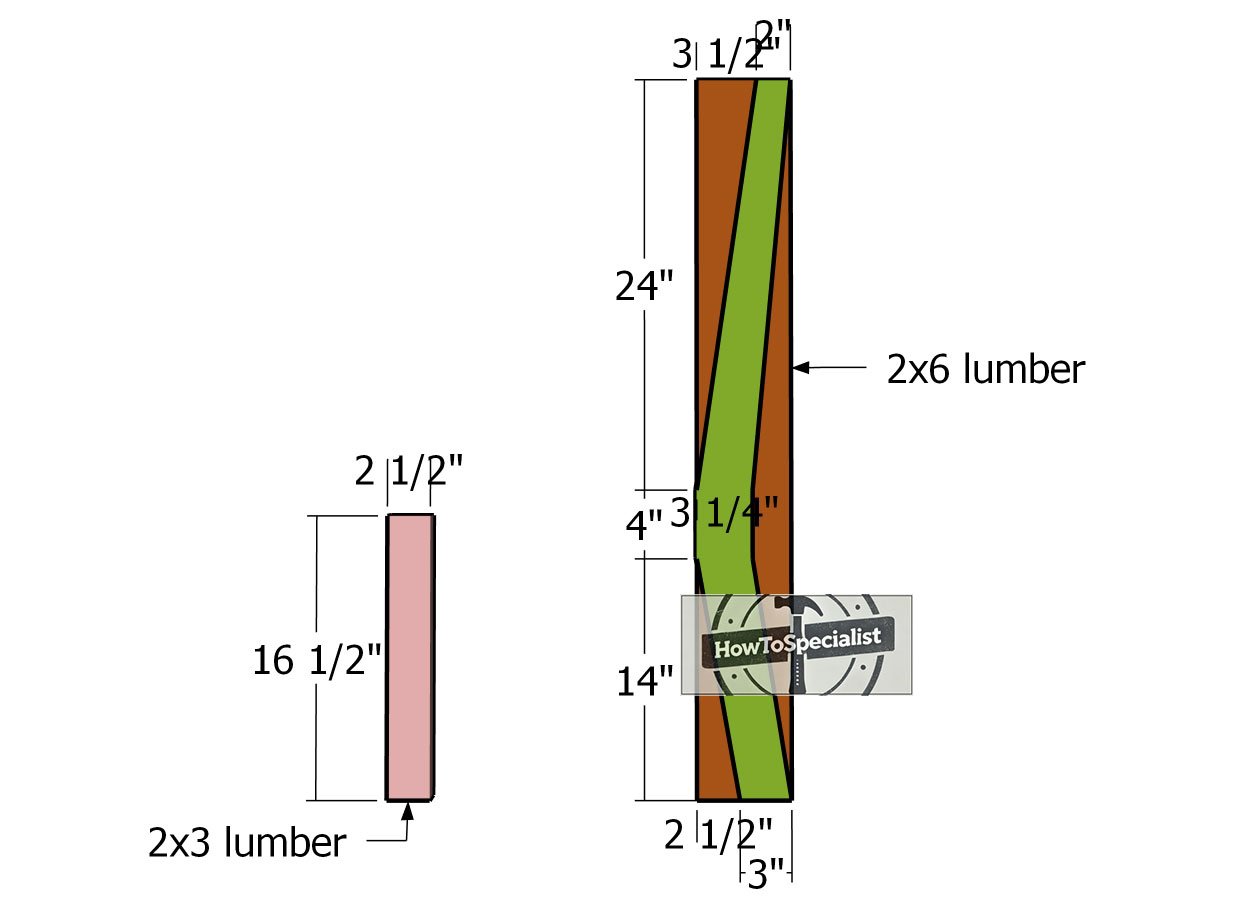
Legs
Alright, let’s kick off this project by building the legs for our rustic chair. First things first: we’re picking out the right lumber to keep this build solid and looking sharp. For the front legs, grab some 2×3 lumber—these will give the chair a balanced, sturdy base. For the back legs, reach for the 2x6s; they’ll give the chair that extra bit of height and rustic charm we’re after. Now, mark your cut lines carefully, fire up that circular saw, and let’s make it happen!
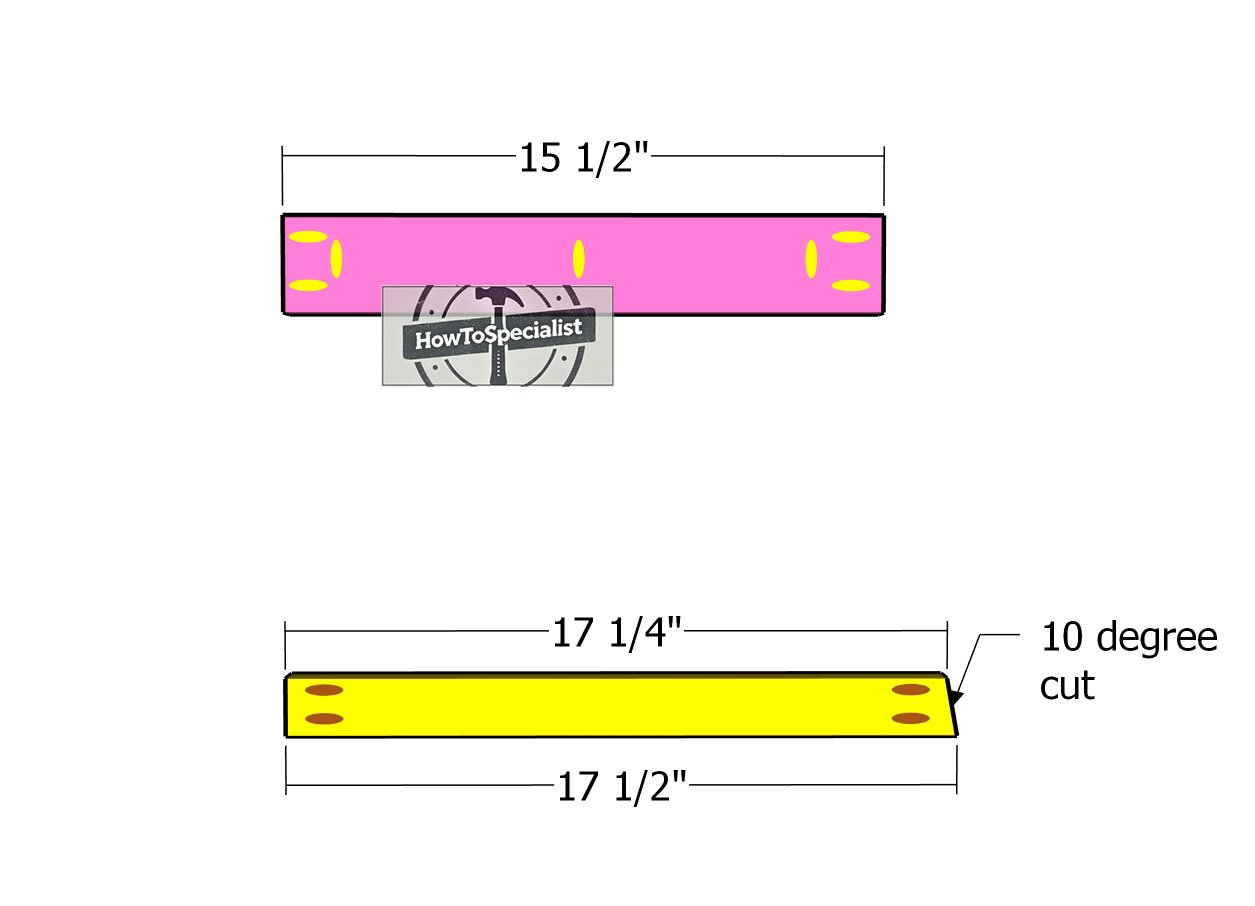
Side-supports
Next up: let’s tackle those side supports for our farmhouse chair. For the top support, we’ll go with 1×3 lumber to keep things sturdy up top. The bottom support calls for 1×2 lumber, just right for stability without adding bulk. Now, here’s a little trick: as shown in the diagram, make a clean 10-degree cut on that bottom support. This slight angle gives the chair a nice finish and adds a touch of style.
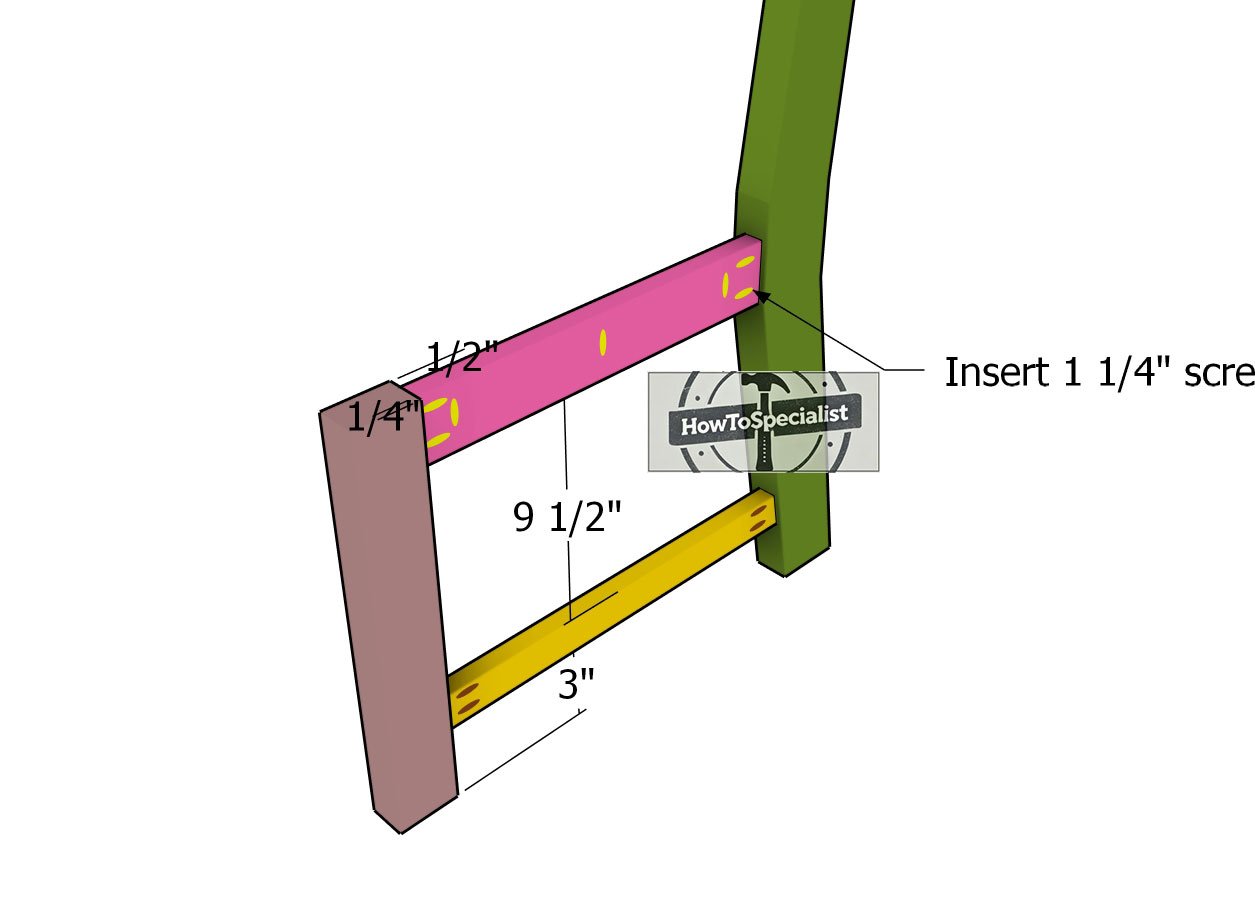
Fitting-the-side-supports
Now it’s time to bring those sides together by attaching the supports to the legs. Here’s the key: check out those pocket holes on both ends of the supports, that’s where the magic happens! Grab some 1 1/4″ screws and drive them through those pocket holes to anchor the supports firmly to the legs. And don’t forget the detail that makes this build look pro-level: leave a 1/2″ inset from the outer edge of the legs for a clean, polished look.
Step 2: Building the seat of the chair
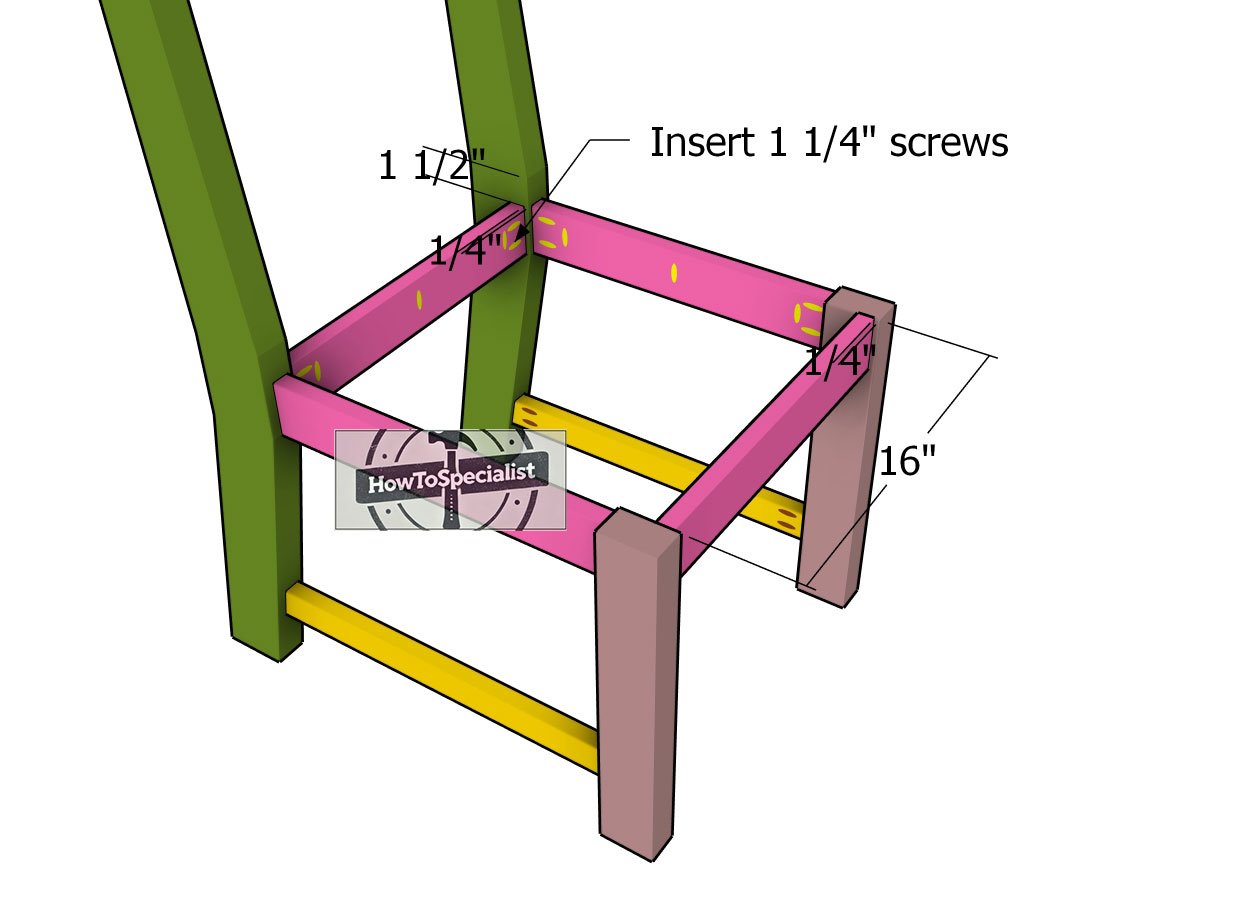
Front-and-back-supports
Alright, let’s pull this chair together by attaching the front and back supports. Just like before, those pocket holes are our friends here, use them to guide your 1 1/4″ screws and lock everything into place. Make sure each piece is aligned nice and flush, and watch your chair take shape!
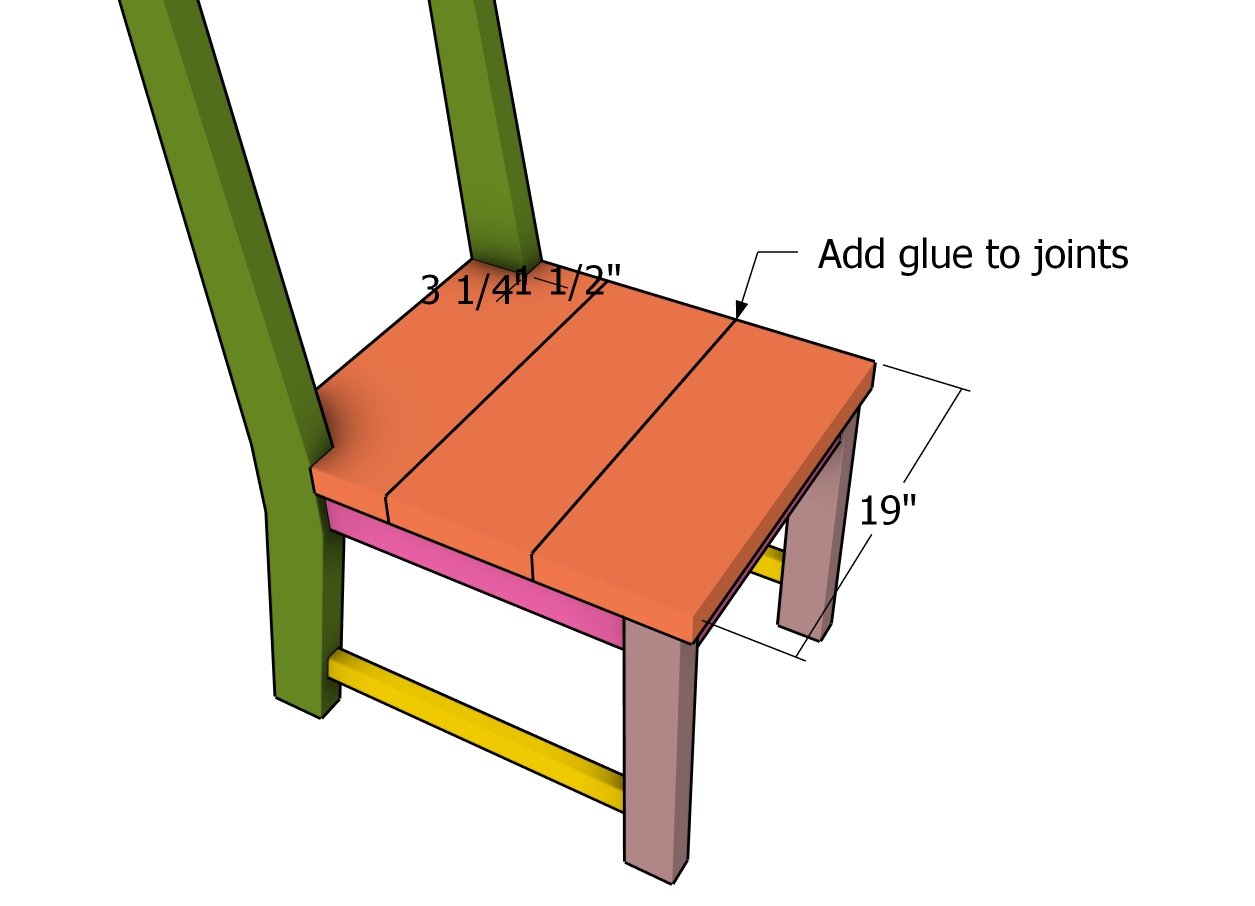
Seat slats
For the seat, let’s go with 2×8 lumber, nice and sturdy! Cut your boards to size, and when you get to that back slat, make precise notches to fit snugly around the legs. This step gives the chair a clean, custom look that’ll hold up over time. Apply a bit of wood glue between each board to lock them in place, and press them together tightly to avoid any gaps.
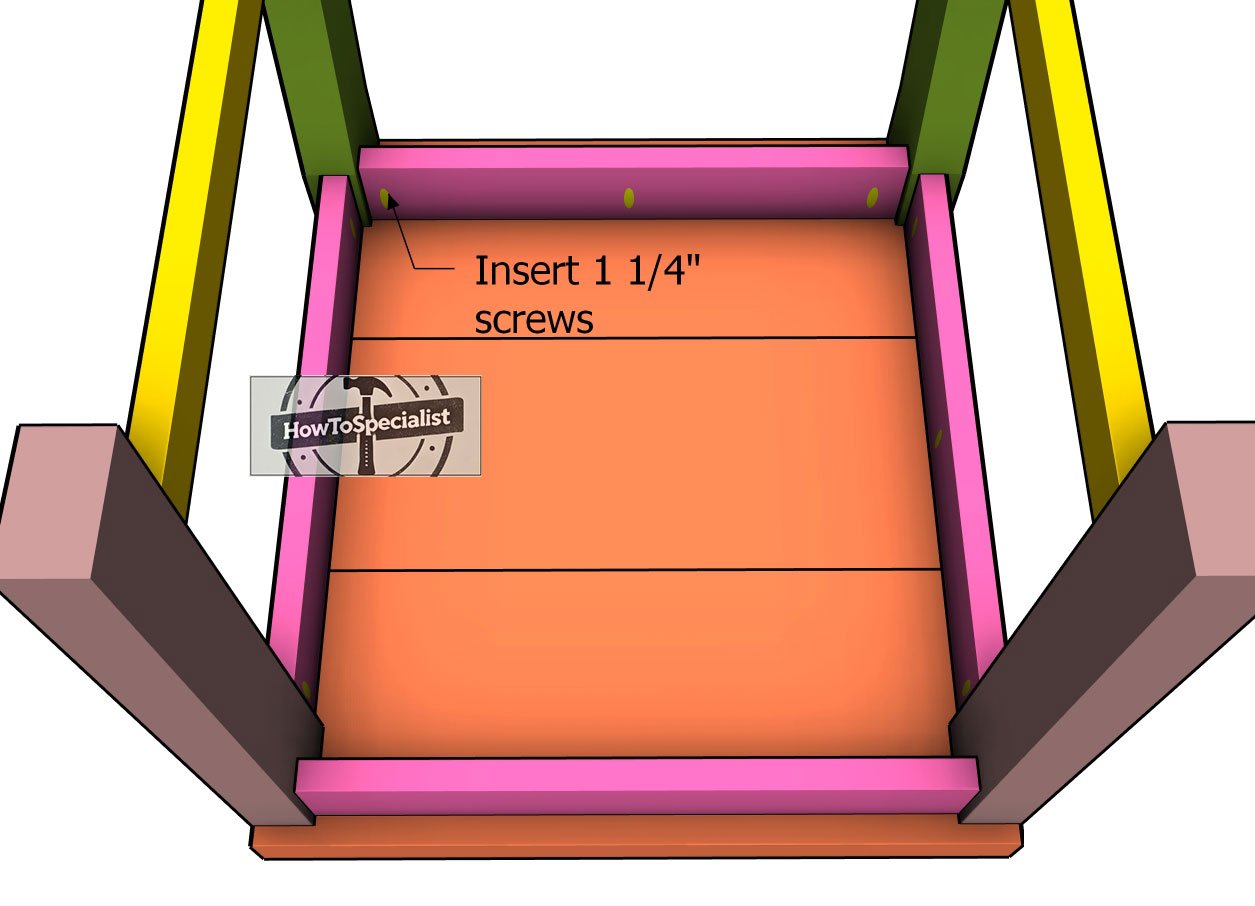
Attaching-the-seat-slats
Now let’s anchor that seat to the chair frame using pocket holes for a solid, seamless finish. Grab your 1 1/4″ screws and drive them through those pocket holes to lock the frame securely to the seat. This step really ties everything together, so take your time to make sure everything’s flush and secure. With this final connection, you’ve got yourself a sturdy, good-looking farmhouse chair ready for action!
Step 3: Building the backrest
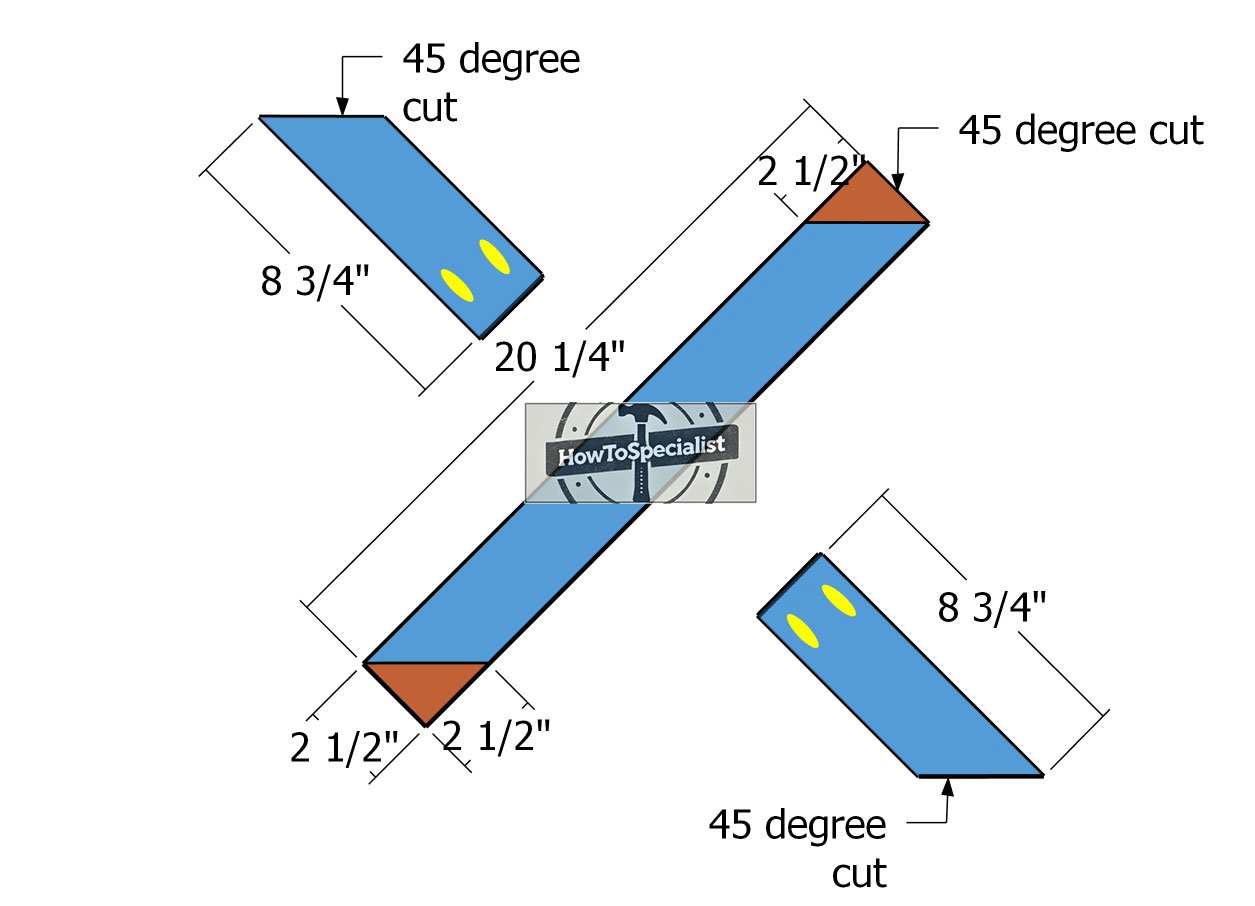
X-trims
To complete this farmhouse chair, we’re going classic with a traditional X-backrest. This design is all about style and strength, and it’s super beginner-friendly! For those X-trims, grab some 1×3 lumber and cut each piece at a 45-degree angle – simple, right?
Just follow the diagram, and you’ll see how it all lines up perfectly. Don’t forget to drill pocket holes so you can secure everything firmly. With these easy cuts and strong connections, your chair will have that iconic farmhouse look without breaking a sweat.
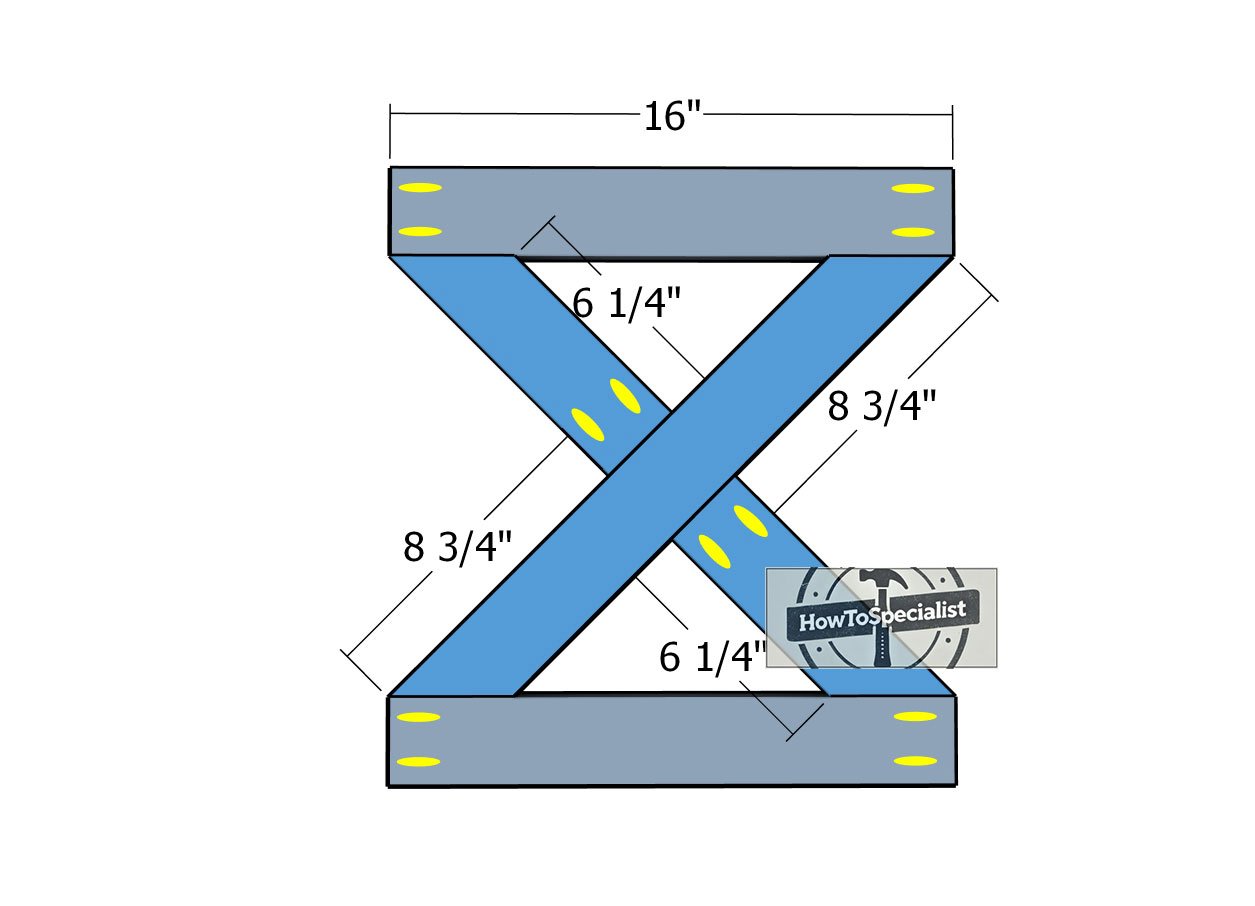
Backrest-assembly
Now, let’s get that X-backrest assembled! Start by aligning the X-trims just as shown in the plans. Once they’re lined up, fasten them with 1 1/4″ screws to hold everything together.
Next, secure the X-trims to the top and bottom boards with a couple of 2″ finish nails and a dab of wood glue for extra strength. Make sure the edges are flush for that clean, polished look. With everything aligned and locked down, your farmhouse chair backrest will have that iconic, sturdy finish we’re after.
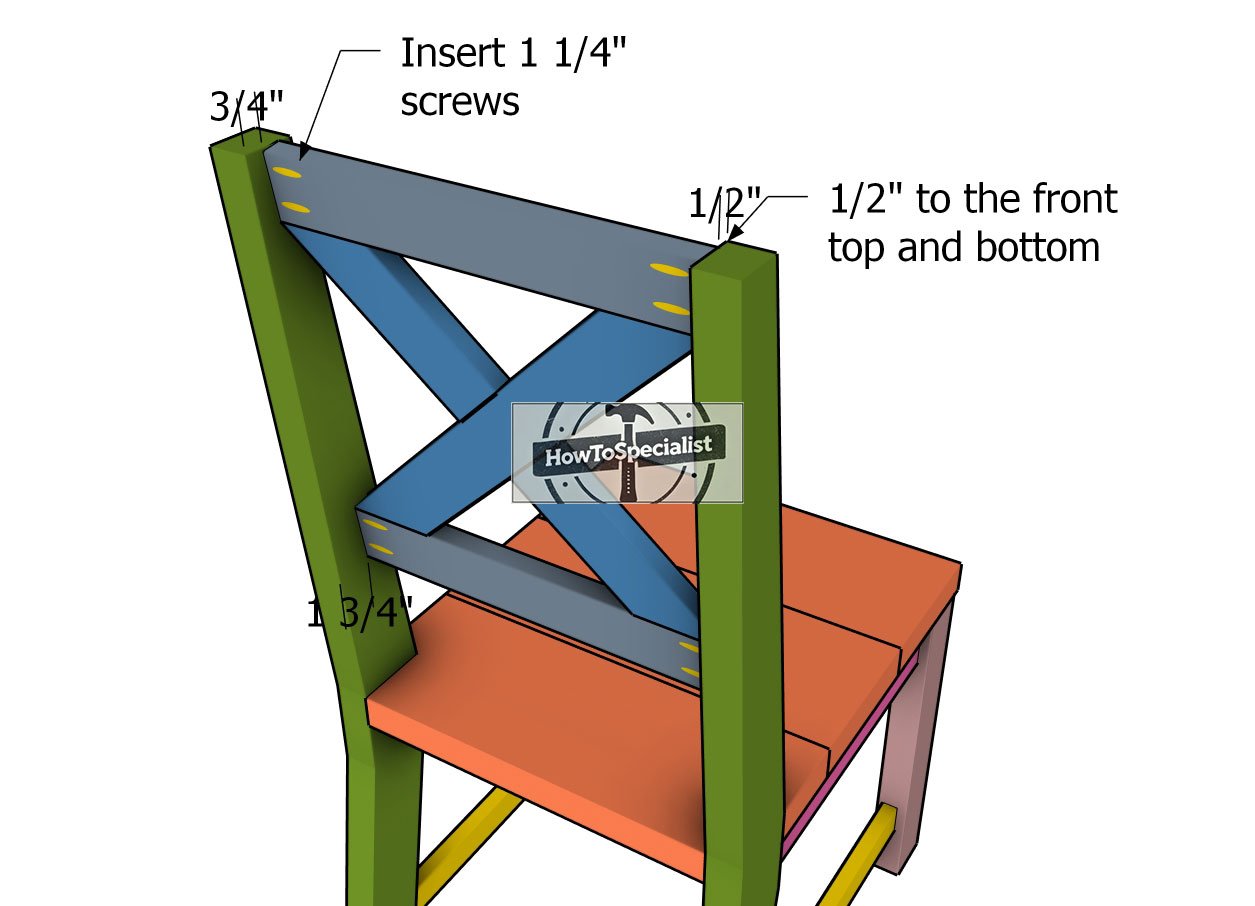
Fitting-the-backrest
Time to attach the backrest and give our chair that final farmhouse touch! Position the backrest with a 1/2″ inset from both the front and bottom edges, as shown in the plans. This little inset adds depth and style to the design. Once it’s aligned, grab your 1 1/4″ screws and secure the backrest to the back legs. Make sure everything’s tight and sturdy, and you’ve got yourself a beautiful farmhouse chair with a signature X-back that’s ready to impress!
Step 4: Finishing touches
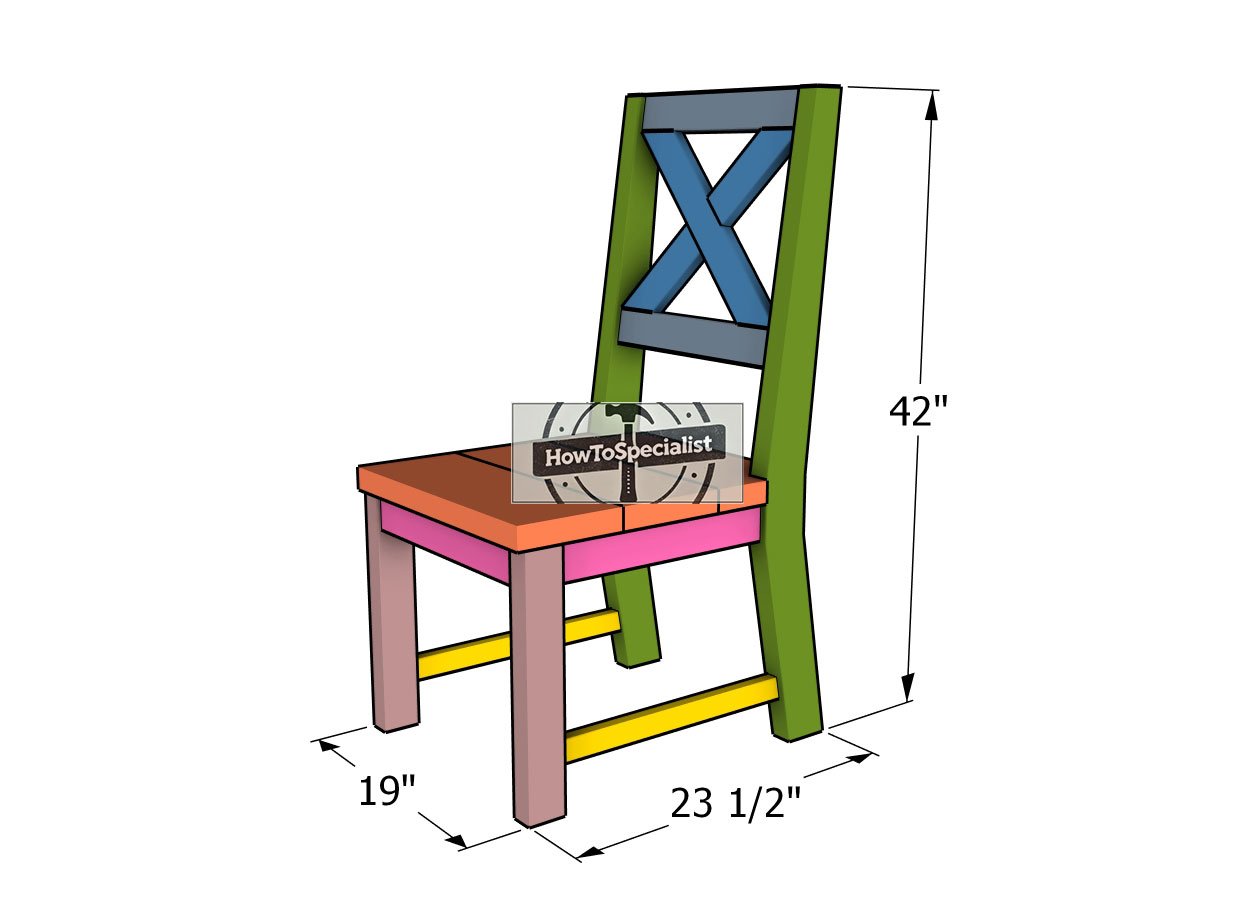
Wooden-chair—dimensions
To wrap up this project, let’s talk finishing touches! Start by sanding down all surfaces, especially those edges and corners, to make sure everything is smooth and splinter-free. Once you’ve got that nice, even finish, apply your choice of stain or paint to bring out the character of the wood and match your style.
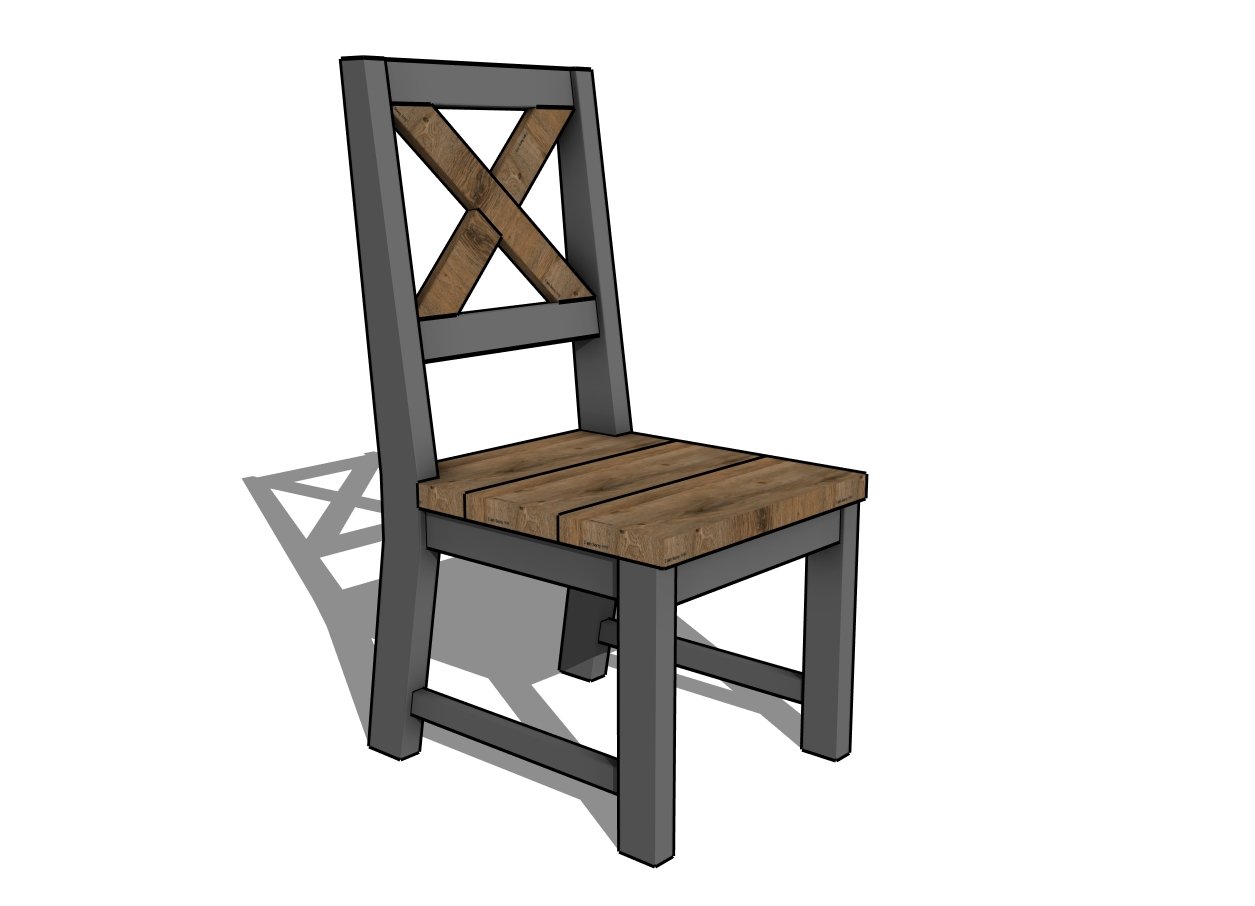
Farmhouse chair
A clear protective coat will add durability and keep your farmhouse chair looking great for years to come. With these final details, your chair is not only built to last but ready to shine in any room or outdoor space!
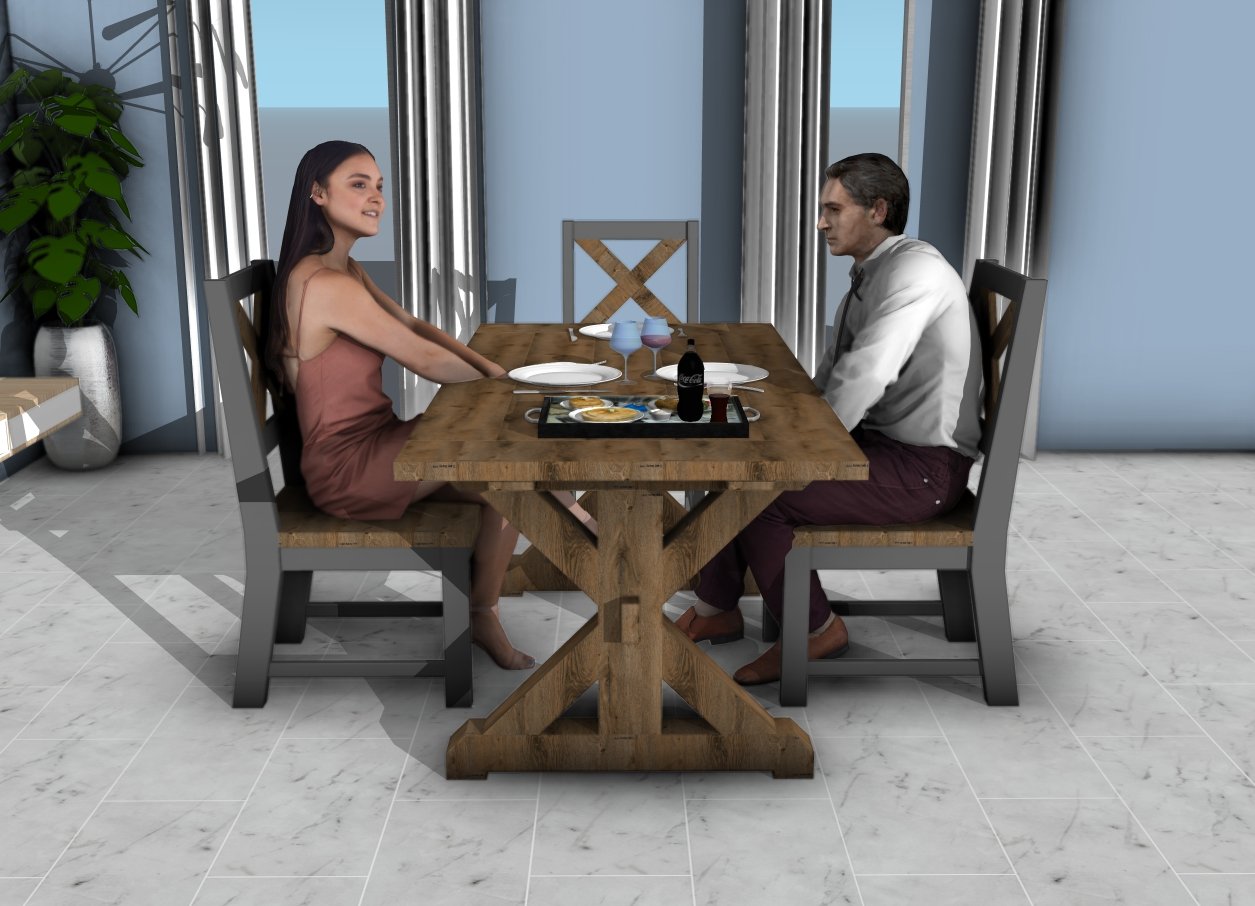
Farmhouse table – side view
This farmhouse chair isn’t just a sturdy piece of furniture; it’s a timeless addition that brings warmth, style, and functionality to any space. With its rustic charm and classic X-back design, it instantly adds character, whether in your dining room, on your porch, or around a cozy outdoor fire pit. This project doesn’t just improve your home’s look, it enhances how you experience it, giving you a handcrafted piece to enjoy and showcase for years.
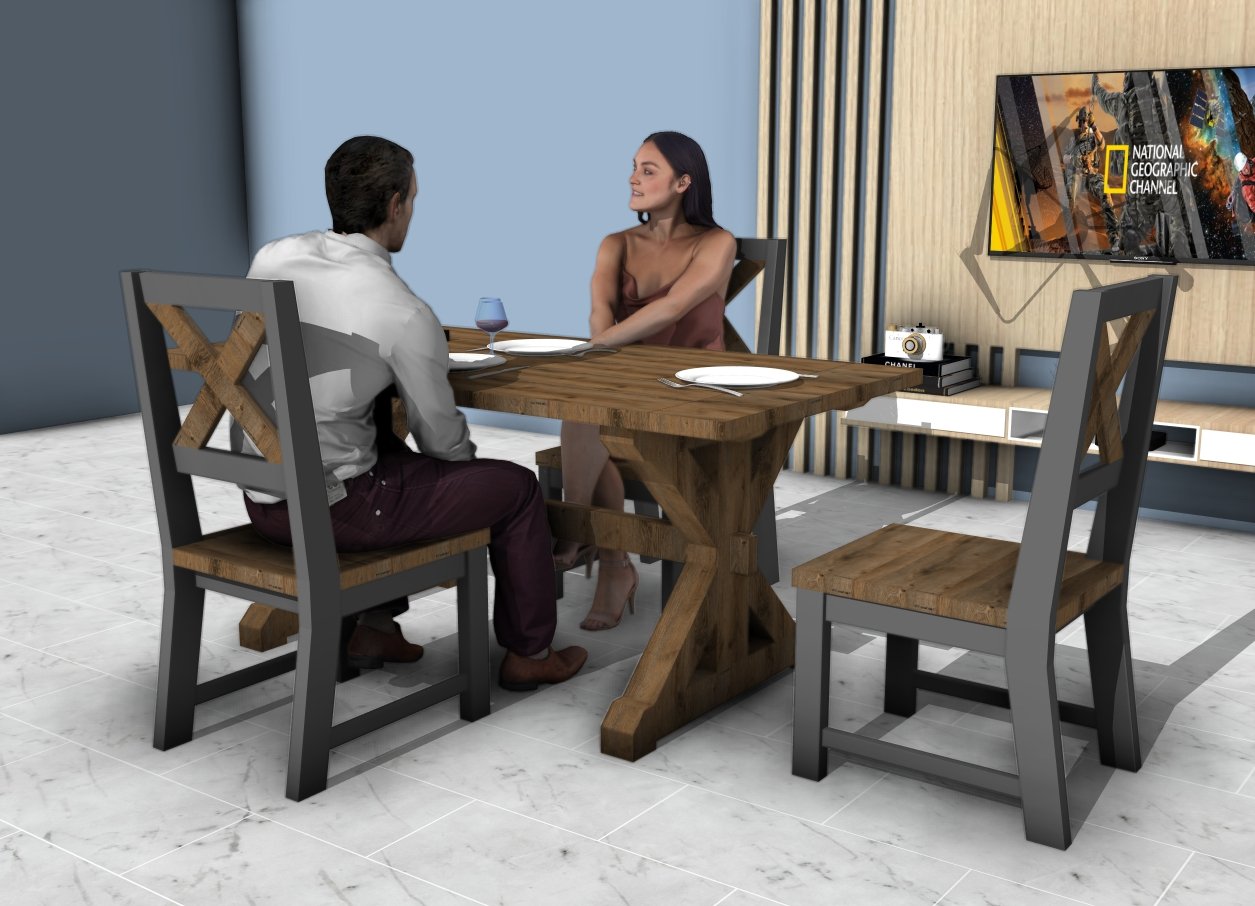
How to build a farmhouse table with chairs
Remember, DIY is all about creating pieces that reflect your unique style and needs. So go ahead—tweak the design, play with different stains or paints, and make this nightstand truly yours. Thanks for joining me on this build! Now it’s time to sit back and enjoy your beautiful new piece. And as always, if you have any questions, just drop them in the comments, I’m here to help!
Thanks for checking out my free farmhouse chair plans! Be sure to explore my other projects for more fantastic ideas. Don’t forget to hit the LIKE button and SHARE with your friends using the social media links below.
