This step by step diy woodworking project is about flat roof double carport plans. If you want to learn how to build a double car carport with a flat roof, we recommend you to pay attention to the instructions described in the article and to check out the related projects. There are many storage projects featured on our site, so don’t be afraid to browse through the rest of the woodworking plans.
Before starting the actual construction project, we recommend you to plan everything, as to save money and to keep the costs under control. Adjust the size and the design of the wooden carport to suit your needs. In addition, we recommend you to invest in high-quality materials, such as pine, redwood or cedar, as they have a nice finish and are highly durable, especially in a humid environment.
It is essential to invest in high quality materials, that are also water-resistant, such as pressure-treated lumber. Cut the components at the right size by using a circular saw and smooth the cut edges with a sand block. Don’t forget to ask a skilled friend to assist you during the project, especially if you don’t have a large expertise in the field. You need someone to hold the components into place, while you drive the screws in. See all my Premium Plans in the Shop.
Made from this plan
Flat roof double carport plans

Building a flat roof double carport
Materials
- A – 2 pieces of 4×4 lumber – 132″ long, 2 pieces – 140 1/4″ long, 2 pieces – 148 1/2″ long POSTS
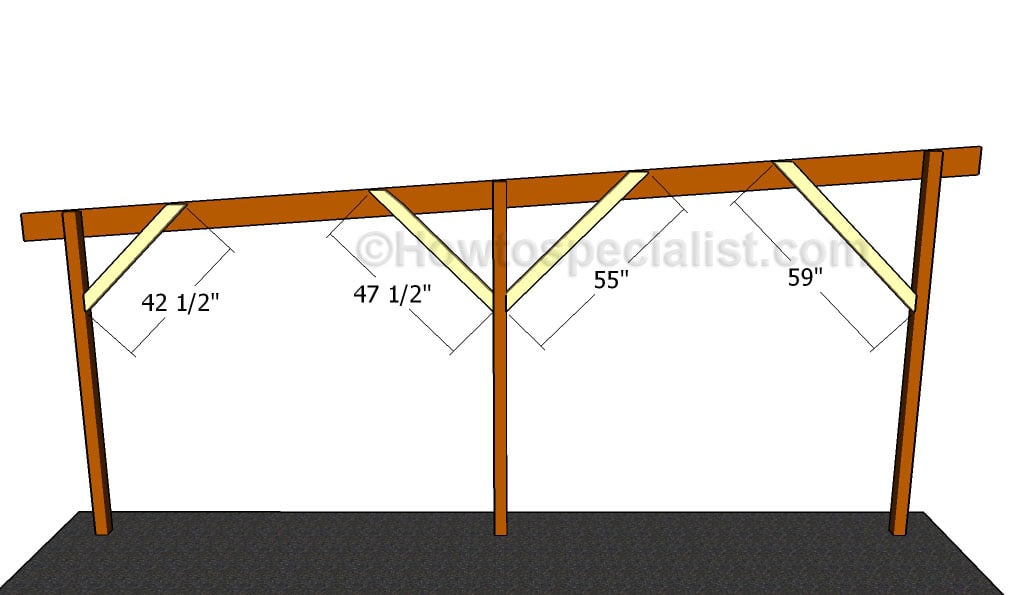
- B – 2 piece of 4×4 lumber – 42 1/2″ long, 2 pieces – 47 1/2″ long, 2 pieces – 55″ long, 2 pieces – 59″ long BRACES
- C – 4 pieces of 2×6 lumber – 265 3/4″ long SUPPORT BEAMS
- D – 12 piece of 2×6 lumber – 243″ long RAFTERS
- D – 2 piece of 2×6 lumber – 246″ long, 2 pieces – 265 3/4″ long RIM RAFTERS
- E – 10 pieces of 3/4″ plywood – 48″x96″ long, 5 pieces – 48″x73 3/4″ long, 2 pieces – 3″x96″ long, 1 piece – 3″x73 3/4″ long ROOFING SHEETS
- F – 600 sq ft tar paper, 600 sq ft asphalt shingles ROOFING
- 4 pieces of 4×4 lumber – 12 ft
- 2 pieces of 4×4 lumber – 14 ft
- 2 pieces of 4×4 lumber – 8 ft
- 2 pieces of 4×4 lumber – 10 ft
- 6 pieces of 2×6 lumber – 24 ft
- 14 pieces of 2×6 lumber – 22 ft
- 16 pieces of 3/4″ plywood – 4’x8′
- 600 sq ft tar paper, 600 sq ft asphalt shingles
- (roofing felt, asphalt shingles)
- 6 pieces of tube form
- 6 pieces of concrete bags
- 1000 pieces of 1 5/8″ screws
- 50 pieces of 5 1/2″ screws
- 2 boxes of 1 1/2″ structural screws
- 12 pieces of 7″ carriage bolt with nuts and washers
- 24 pieces of rafter ties
Tools
- Safety gloves, glasses
- Miter saw, jigsaw
- Chalk line, tape measure, spirit level, carpentry pencil
- Drill machinery and drill bits
Tips
- Use a good miter saw to make the angle cuts
- Drill pilot holes before inserting the screws
Time
- One Week
Related
Building a flat roof double carport
Laying out the carport
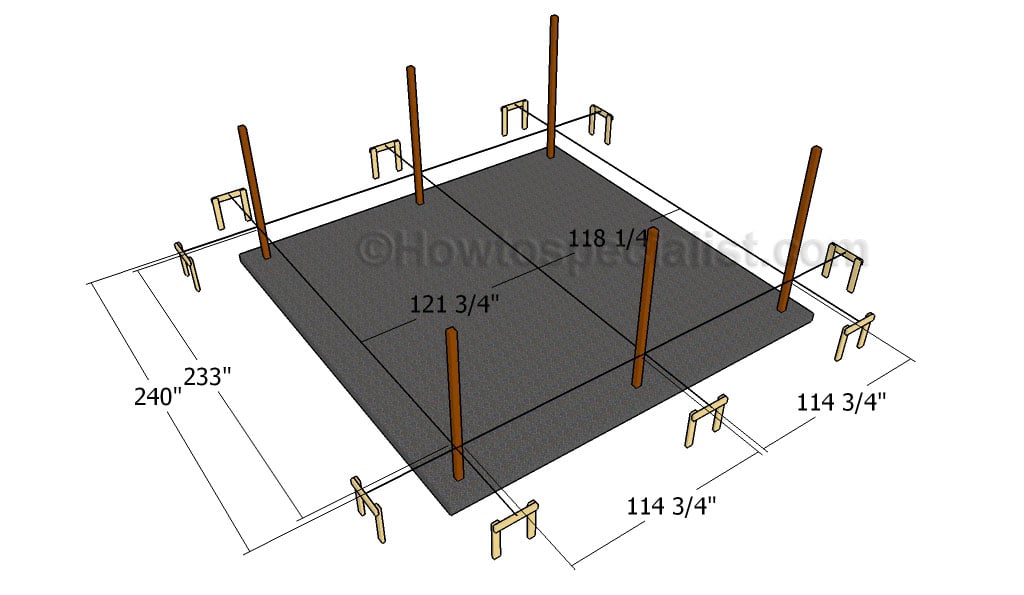
The first step of the woodworking project is to lay out the carport in a professional manner. Therefore, we recommend you to use batter boards and string to make sure the posts will be properly placed. Apply the 3-4-5 rule to each corner of the layout in order to check if they are perfectly square. In addition, make sure the diagonals are perfectly equal before setting the posts into place.
Building the posts
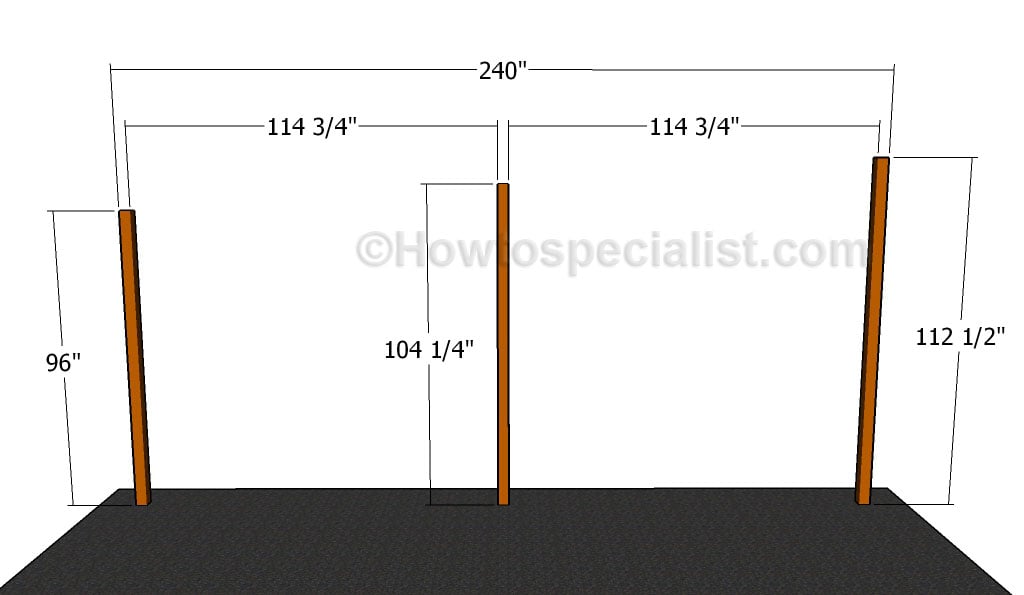
Next, you need to cut the posts at the right size, making sure you need to fit them about 3′ into the ground, before adjusting their dimensions.
Fitting the posts
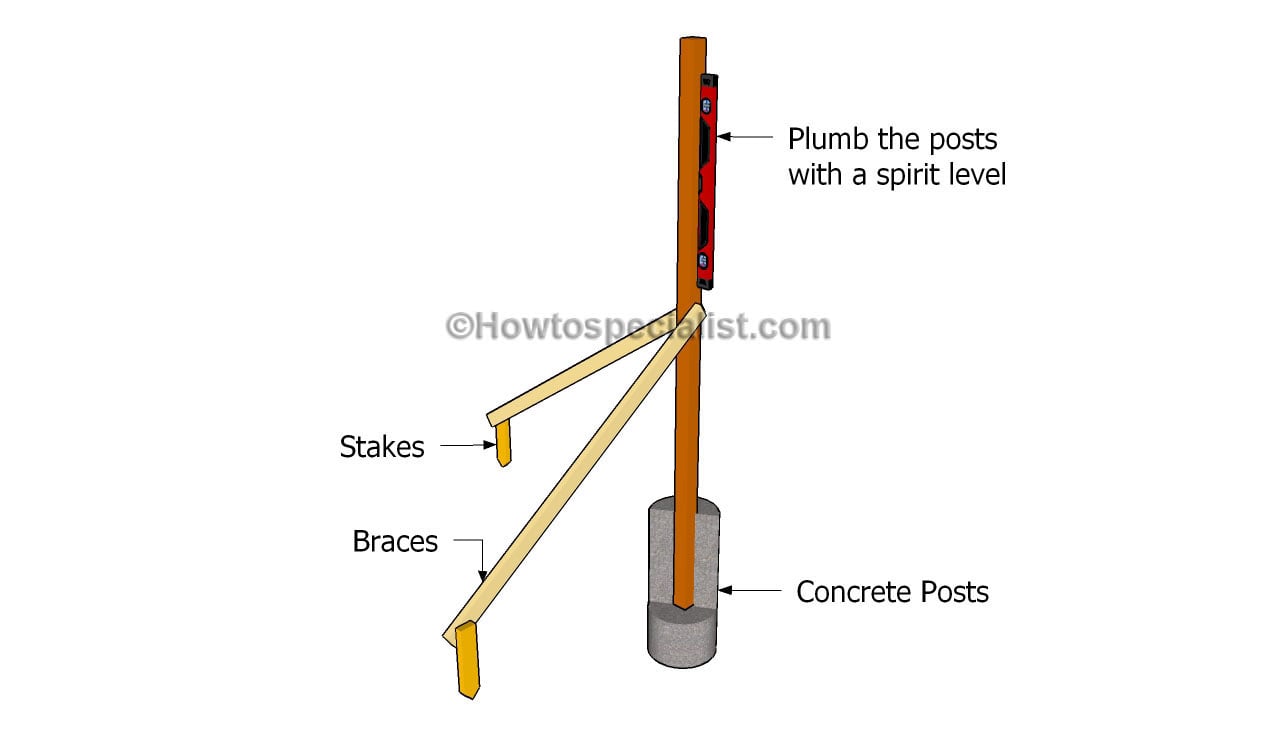
Setting the posts in concrete is essential for the rigidity of the carport. As you can easily notice in the diagram, we recommend you to dig 3′ deep holes and to pour 2″ gravel on the bottom. Install the tube forms to the holes. Secure the posts with braces before filling the forms with concrete.
Fitting the support beams
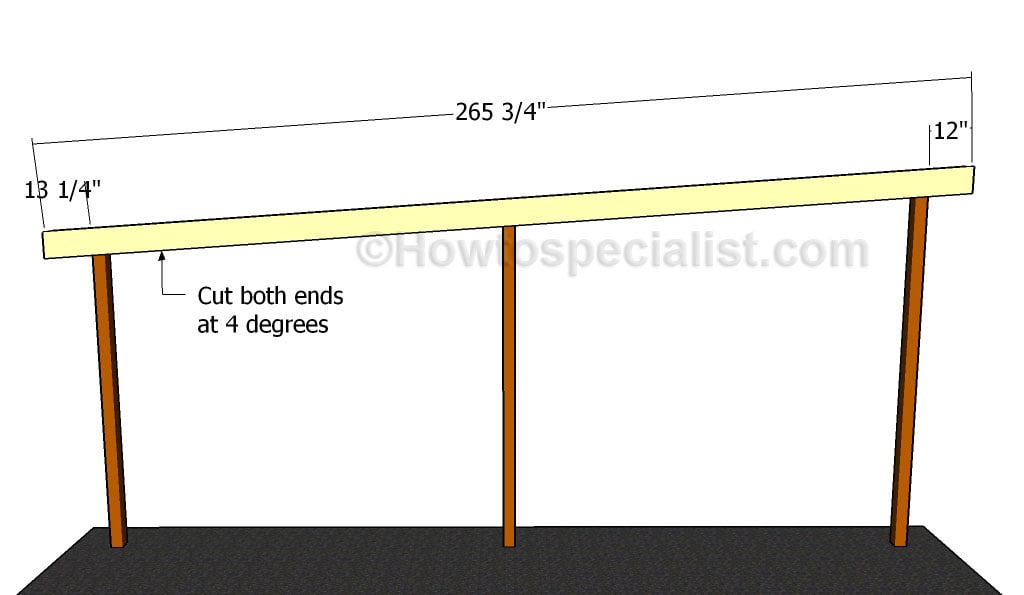
Next, install the 2×6 support beams to the top of the posts. Use clamps to secure the beams to the top of the posts. Drill pilot holes through both the support beams and through the posts before inserting the 7-8″ carriage bolts. Leave no gaps between the components and lock the components together tightly.
Make sure the carport has appropriate overhangs, in order to allow the water to drain properly. Use at least 2 bolts for each joint.
Fitting the braces
If you live in a windy area, you should install 4×4 braces to the flat roof carport. Cut both ends of the braces at 45 degrees and secure them to the structure, as described in the diagram. Drill pilot holes before inserting the screws and leave no gaps between the components, for a professional result. Insert at least two 5 1/2″ screws for each joint.
Fitting the support beams
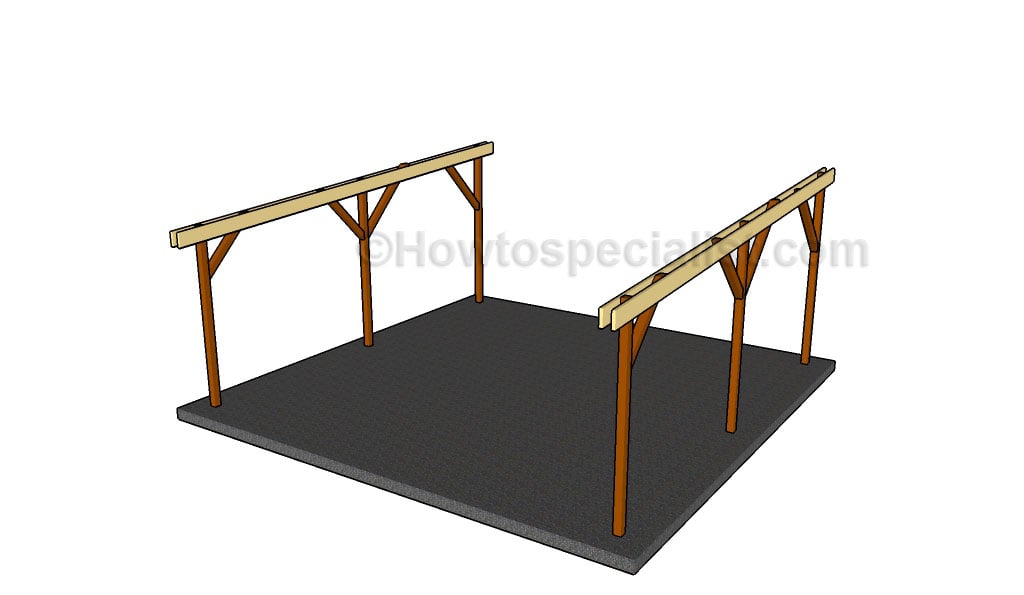
Install the support beams to the other side of the carport, using the same techniques described above. It is essential to make sure the beams are at the same level, otherwise the roof won’t be level.

Fitting the rafters
Build the rafters out of 2×6 lumber. Cut the components at the right size and smooth the edges with sandpaper.
Cutting the rafters
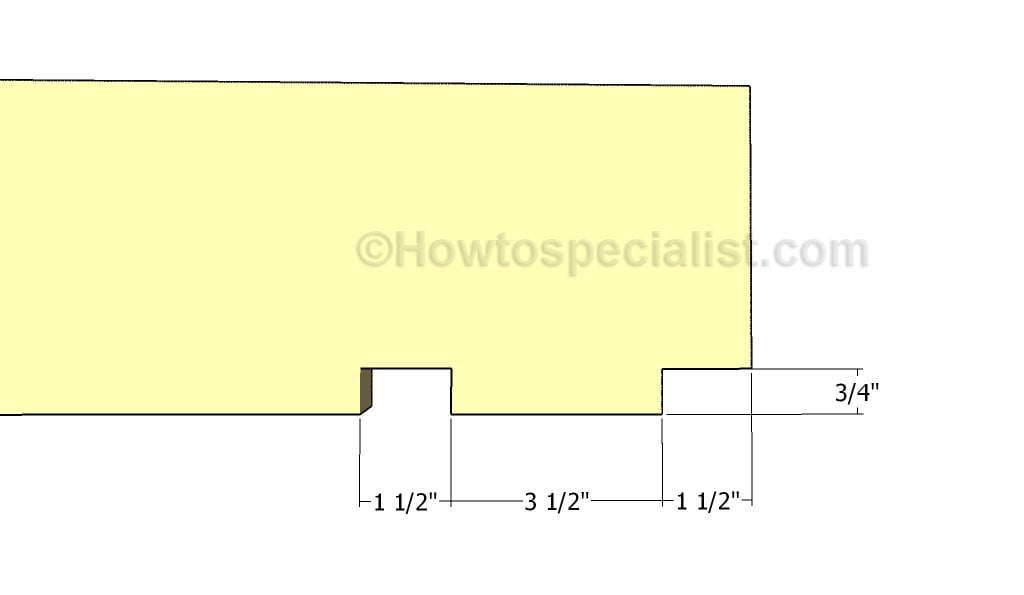
Make notches at both ends of the rafters, using the information from the diagram. Make parallel cuts inside the marked area and remove the excess material with a chisel. Smooth the cut edges with fine-grit sandpaper and remove the residues with a damp cloth.
Fitting the rafters
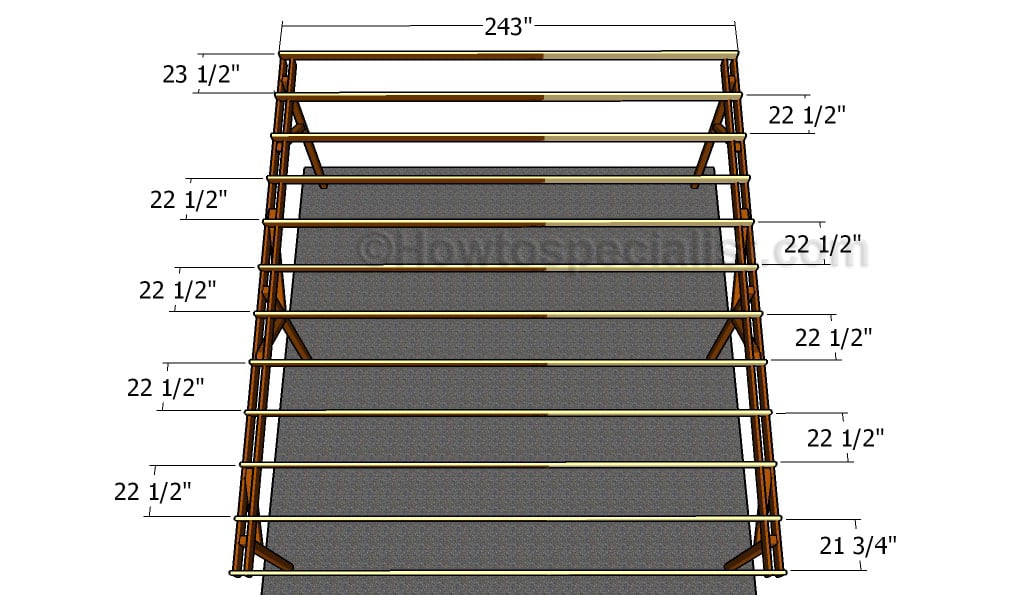
Place the rafters equally-spaced and and secure them to the support beams using rafter ties and 1 1/2″ structural screws. Align the rafters at both ends before inserting the screws, to get a professional result.
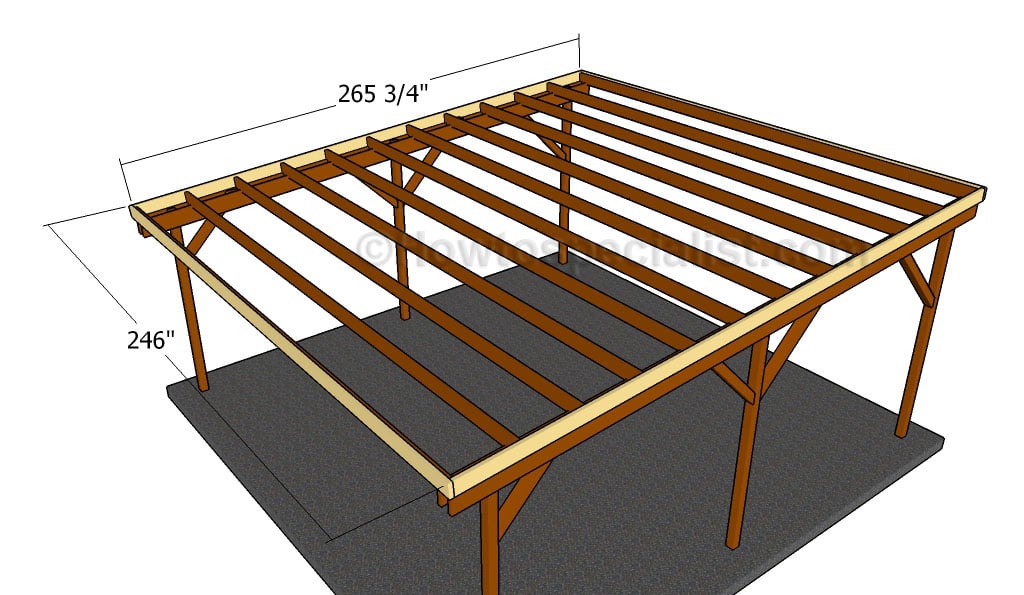
Fitting the rim rafters
One of the last steps of the project, is to fit the 2×6 trims to the exterior of the rafters. The top edge of the rim rafters should be 3/4″ over the rafters, in order to get a professional result. Secure the trims to the frame of the carport using 5 1/2″ screws, every 8″. Use a spirit level to make sure the bottom and the top trims are horizontal.
Build the roof out of 3/4″ plywood sheets and lay them to the rafters, as described in the diagram. Align the sheets at both ends and lock them to the rafters with 1 5/8″ nails or screws, every 6-8″. It is essential to close the gaps between the sheets, if you want to get the job done as a professional. Make sure the surface is even and the screws are not protruding.
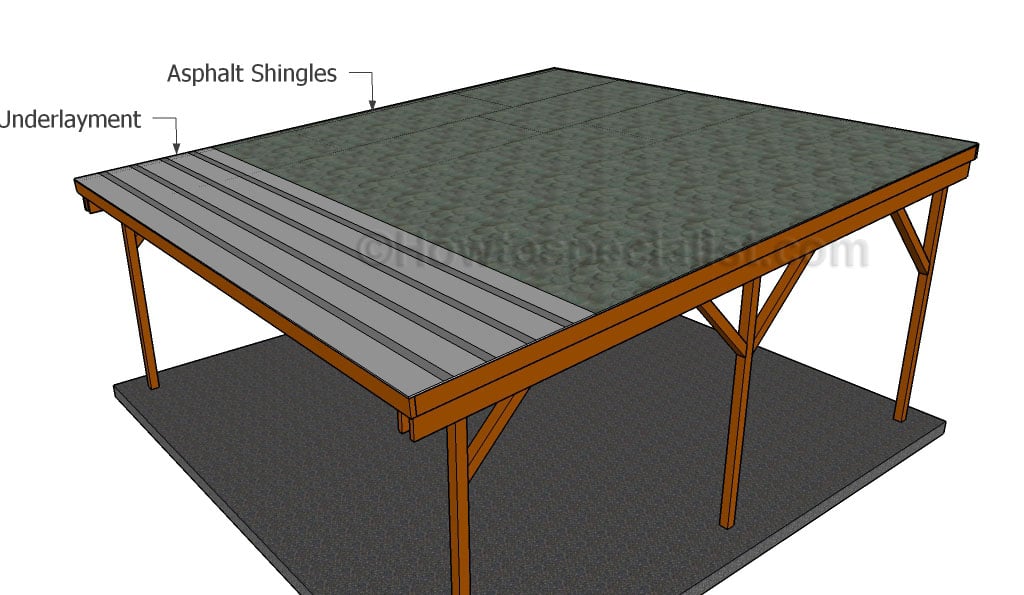
Fitting the roofing
You could fit asphalt shingles to protect the carport, as it is a straight forward solution. Therefore, install roofing felt over the roofing sheets, making sure the strips overlap at least 2″. Secure the tar paper to the plywood sheets with roofing staples. Fit the side drip edges over the roofing felt, while the bottom drip edges should be fit under. Place a starting course at the bottom of the roof, before installing the asphalt shingles. Always read the manufacturing instructions before starting the installation, as there are several aspects that differ.
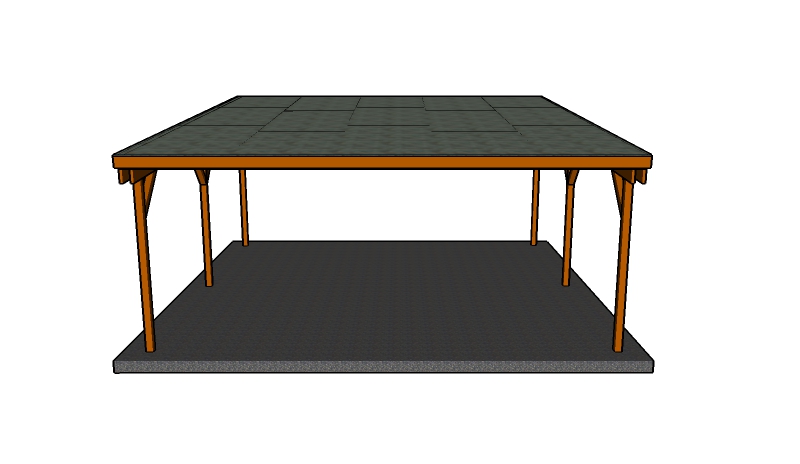
Flat roof carport plans
The flat roof carport has a neat appearance so that it can match the style of any home.
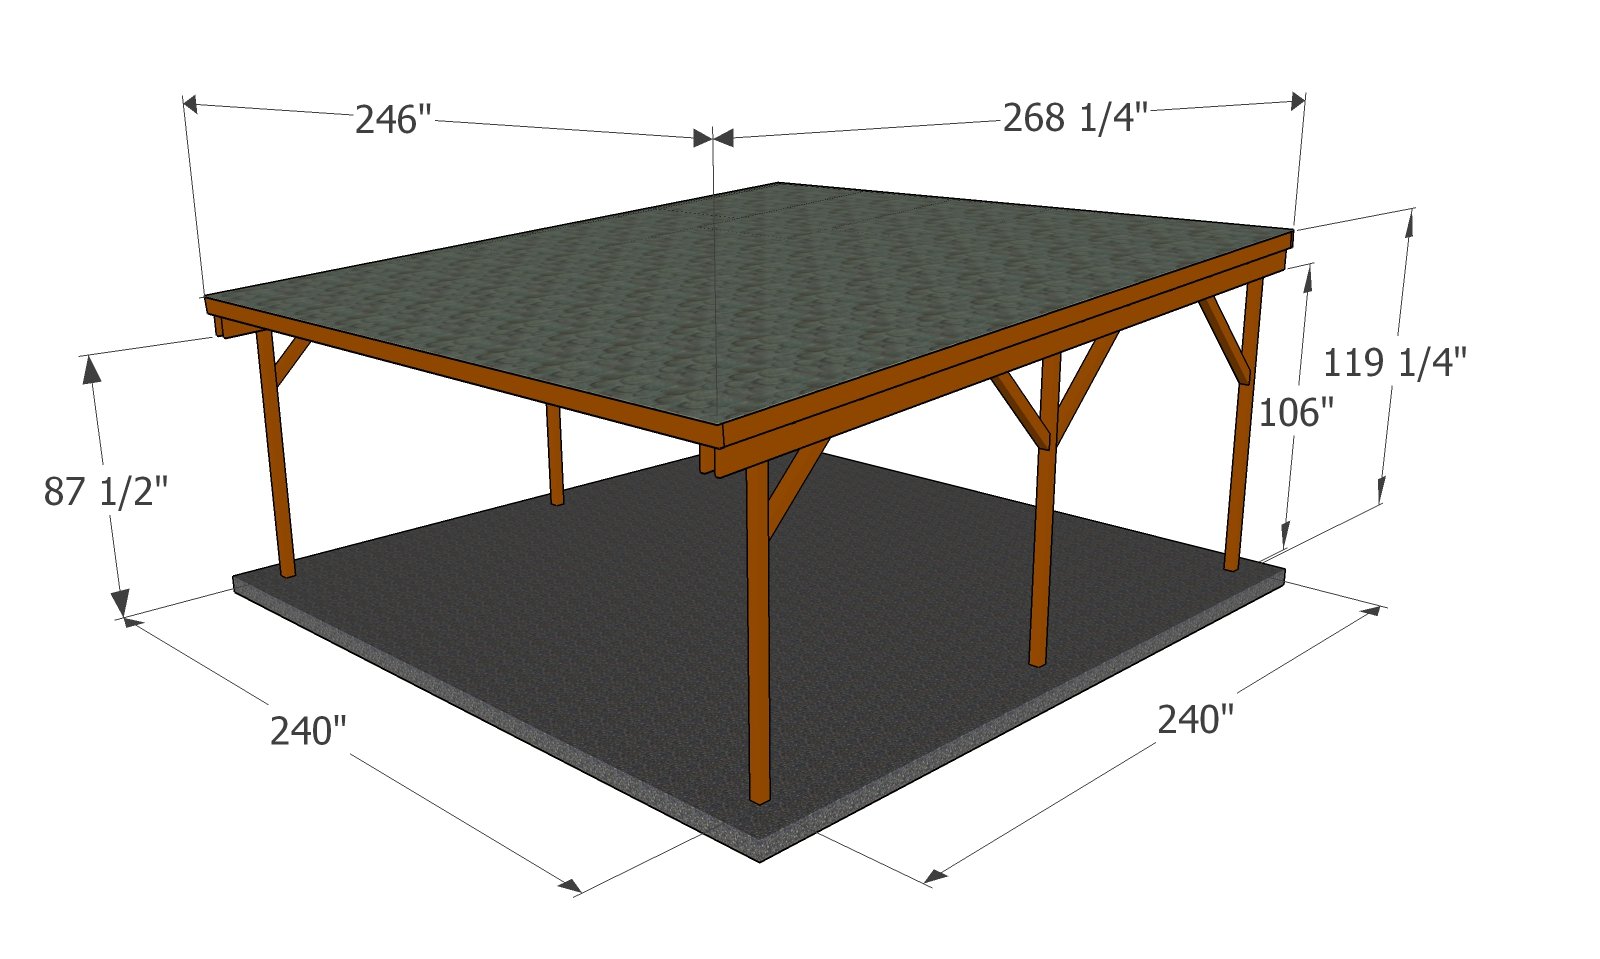
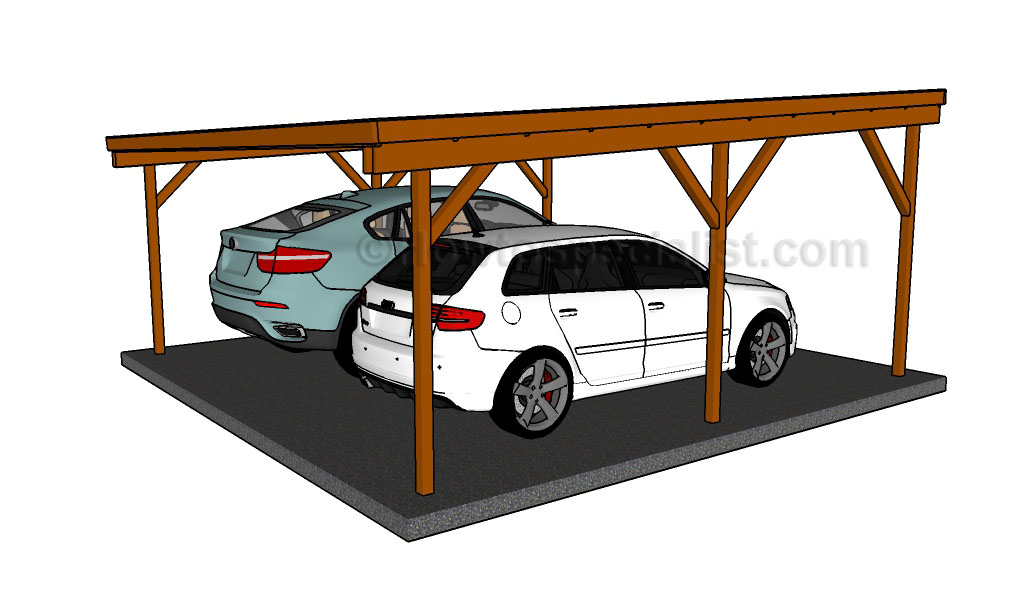
Flat roof carport plans
Last but not least, we recommend you to take care of the finishing touches. Fill the holes with wood filler and let it to dry out for several hours. Check out the rest of the outdoor projects, to see more ways to improve the look of your garden.
If you want to download the plans. just click on the GET PDF PLANS button bellow.
My best tips on building a double flat roof carport:
A double flat roof carport provides ample space for two vehicles while offering a clean, modern look. It’s a functional and stylish addition to any home, protecting your cars from sun, rain, and snow. With its simple design, a flat roof carport is easier to build than other types, making it a great DIY project. Here are my best tips for building a strong, durable double flat roof carport.
1. Plan and Design the Carport
- Determine the Carport Size: A double carport typically measures around 20-24 feet wide and 20 feet long, providing enough space for two vehicles. Adjust the size according to your needs and available space.
- Flat Roof Design Considerations: A flat roof is easy to construct and maintains a low profile, but it still needs a slight pitch for water drainage. Plan for a slope of about 1/4 inch per foot to direct water away from the roof.
- Location and Orientation: Choose a spot with level ground, ideally close to your driveway or garage for convenience. Ensure the location has proper drainage and isn’t prone to pooling water.
- Check Local Building Codes: Before starting, check your local building codes and obtain any necessary permits. Some areas may have rules about the size, height, or placement of carports, especially if they are close to property lines or utility easements.
2. Gather Materials and Tools
- Pressure-Treated Lumber or Metal Posts: Pressure-treated wood is affordable and durable for outdoor structures. For a more contemporary look, consider steel or aluminum posts and beams.
- Roofing Material: For a flat roof, corrugated metal sheets, polycarbonate panels, or rolled roofing are excellent choices for durability and weather resistance. Choose materials that are lightweight but strong enough to withstand wind and rain.
- Concrete for Post Anchors: Use concrete footings to securely anchor the posts in the ground. This ensures the carport remains stable and strong.
- Tools: You’ll need tools such as a saw, drill, hammer, post-hole digger, level, measuring tape, and ladder for the construction process.
3. Mark and Prepare the Site
- Mark the Carport’s Footprint: Use stakes and string to outline the carport’s footprint, ensuring it’s square and aligned with your home or driveway. Measure carefully to avoid alignment issues during construction.
- Clear the Area: Remove grass, plants, or debris from the marked area. Depending on your preference, you can pour a concrete slab or use gravel as the carport’s floor. A flat, solid base is important for long-term stability.
4. Set the Support Posts
- Dig Post Holes: Using a post-hole digger, dig holes for the corner and intermediate support posts. Each hole should be at least 2-3 feet deep to ensure the posts are securely anchored in the ground. The depth may vary depending on your region’s frost line.
- Set the Posts in Concrete: Place the posts into the holes and pour concrete around them. Use a level to ensure the posts are plumb (vertically straight) and brace them with temporary supports while the concrete cures. Allow the concrete to set for at least 24-48 hours.
- Spacing Between Posts: For a double carport, space the posts evenly—usually 8-10 feet apart—along the perimeter for adequate support.
5. Attach the Horizontal Beams
- Install the Main Support Beams: Once the posts are set, attach horizontal beams across the tops of the posts. These beams will support the flat roof. Use galvanized carriage bolts or lag screws to securely fasten the beams to the posts.
- Ensure Level Alignment: Check that the beams are level across the structure, as this will ensure a flat roof that drains properly. You can use shims if necessary to adjust the alignment.
6. Install Roof Joists
- Install Roof Joists Across the Beams: Measure and cut roof joists to span the width of the carport. Space them 16-24 inches apart along the beams to provide support for the roofing material.
- Slight Pitch for Drainage: Even though it’s a flat roof, create a slight pitch by attaching one side of the joists slightly higher than the other. A 1/4-inch slope per foot is typically enough for water drainage.
- Secure the Joists: Attach the joists to the beams using joist hangers or screws. Ensure the joists are evenly spaced and aligned for proper roof support.
7. Install the Roofing Material
- Lay Down the Roofing Sheets: Starting at the low end of the slope, install the roofing material (corrugated metal sheets, polycarbonate panels, or rolled roofing) across the joists. Overlap the sheets according to the manufacturer’s guidelines to prevent leaks.
- Secure the Roofing Material: Use screws with rubber washers to fasten the roofing sheets to the joists. This will ensure a watertight seal and prevent water from seeping through.
- Install Flashing (Optional): If the carport is attached to your house or garage, install flashing along the edges where the roof meets the wall. This will prevent water from getting into the seams.
8. Add Finishing Touches
- Install Gutters (Optional): To manage water runoff, consider installing gutters and downspouts along the edges of the carport roof. This will protect the area below from water pooling and help direct rainwater away from the foundation.
- Paint or Stain the Wood: If you’ve used wooden posts and beams, consider painting or staining the wood to protect it from the elements and give it a finished look. Use a weather-resistant sealant for added protection.
- Add Privacy Panels or Lattice (Optional): If you want more protection from wind or sunlight, consider adding side panels, lattice, or even trellises along one or more sides of the carport.
9. Anchor the Carport for Stability
- Anchor the Posts for Extra Stability: In windy areas, it’s essential to securely anchor the posts to the ground or concrete slab using metal brackets or additional concrete footings. This will prevent the carport from shifting or lifting in strong winds.
- Install Cross Bracing: For added strength, install diagonal cross braces between the posts and beams. This will help prevent the structure from swaying or collapsing in bad weather.
10. Maintain Your Carport
- Inspect Regularly: Check the carport periodically for any signs of wear or damage, such as loose bolts, rusted screws, or cracks in the roofing material. Tighten or replace any damaged components as needed.
- Clean the Roof: Regularly clear the roof of leaves, dirt, and debris to prevent water buildup and ensure the roof’s longevity.
Building a double flat roof carport is a practical and rewarding DIY project that offers plenty of space for protecting two vehicles. By following these tips and using quality materials, you’ll create a sturdy, functional carport that complements your home and provides reliable shelter for years to come. Whether you’re looking for a simple design or something more elaborate, the flat roof carport is a versatile and stylish addition to any property.
Thank you for reading our project about flat roof double carport plans and we recommend you to check out the rest of the projects. Don’t forget to share our projects with your friends and LIKE us, by using the social media widgets. SUBSCRIBE if you want to be the first that gets our latest articles and to help us create more free plans.

42 comments
Why are there 3 lenghts of posts in your material list? per your final picture there should only be two lenghts, the 3 posts to the left of the cars and the 3 posts to the right of the cars. The roof is dipping from right to left with no beams in between the cars.Thanks
The slope is from front to the back of the carport, not from one side to the other. That is why the three posts have different sizes.
Jack…Tim is not only right on that, but your material list is horrible!! There are 8-braces (B) that are 2×6, which are mounted to 4×4 posts (A)? These are sandwiched between the lengthwise 4×4 braces (C) that are attached on each side of the 4×4 posts (A)?? There would clearly be a GAP…OK? If the braces (B) were all 4x4s, or doubled-up 2x4s…OK. The basic design is fine, but your list and the dimensions as shown are ridiculous. I would edit this plan using 4×4 braces and include counter-bored holes (to include washers and through-bolts) through the braces and posts.
I don’t understand where the problem is. Both the cut list and the instructions call for 4×4 braces.
What are wind and snow load ratings for this design ?
This carport is not suitable for areas with snow or with heavy winds. This is a project ideal for areas with mild winds and with rain and no snow.
Some material list, where do you expect to get 20′ 2×6’s? Not readily available around my area. AND if you can find them they are horribly expensive. That would still leave them 1/4″ short on your dimensions.
First of all, you need 22′ and 24′ long rafters for this design. I don’t know how you computed the need for 20′ rafters. Secondly, I don’t expect nothing. I am a designer who happens to share free plans on a blog. If you find these materials too expensive, you don’t have to use my design or you can just not build the double carport in the first place, because any double carport requires long rafters. Cheers!
Come on guys! Jack is giving us an idea to work with. No need to beat him up over some small stuff. I would take the information he offered and tweak it to fit my needs and double check the material list with the guy at your lumber yard. Peace
Thanks, Steven! That’s the attitude I like. Take all my plans as starting points and adjust them to suit your own need and then share your experience so you can inspire other builders!
Hey Jack there are lots of people who appreciate your plans and generosity for sharing them. Me for sure. Don’t let negative unappreciative people get to you. Thanks Jack keep em coming!!!
What is the cost for the materials?
I have no cost estimate. You can print the cut list and add up the local cost of the materials.
Thanks Jack.
This is a project long overdue for me. I’ve not gone out to throw one together as plans were not available till now (or till I found yours). I needed a design to get started and you have provided many. I have a few ideas that may make this work better for me such as tying into the existing garage and an 80 yr old pecan tree that I’d rather not lose.
I’m no novice as far as diy builds, just nothing to this scale and/or importance. Not to mention something that’s viewed by all as they pass by my house.
As to the negative replies, a little common sense and planning might help. Just an opinion. You are not standing in my driveway, I am.
I appreciate all your hard work and willingness to share.
Take Care, Keep Jammin’ and Keep the Faith!
(4 maybe 5 strings for me. I’ll work on the groove!)
Thank you for the feedback, Kyle. I totally agree with your perspective. Let me know how your project comes out.
How much roughly did materials cost?
Why would you ask how much did the materials cost? Does this look like a website that sells materials. No, go to home depot or Lowes and ask them, why you ask, cause they are the ones that sale materials. This is a place to find plans not materials. Great plans by the way Jack. I didn’t realize how many idiots this world had. Don’t they know the prices are different from place to place. $1 here but $10 there so how can anyone say the right price. Thanks.
It’s ok, Adrian. Thank you for the support. I understand that some people don’t have time to add up the costs and want an estimate right away, but I would rather focus myself on what I do best: designing new plans.
This plan is exactly what I need. But I can’t figure out how to buy it or get it other than to copy and paste into Word. What am I missing?
You can save the plans as PDF. Please read the FAQs: http://howtospecialist.com/faq/
Hi Jack,
Thank you very much for your hard work and dedication. Do you have any idea where can i get 22′ and 24′ 2 x 6. I can not find those rafters and support beam anywhere at my local hardware store (homedepot or Lowes)?
Try at the local lumberyard.
84 Lumber has them. If not locally they can order them from their central supply and have them delivered to your house, for a fee of course.
Do you have any problems with water getting between shingles? I have always been told not to shingle a roof with less than a 3/12 pitch.
You are free to choose the product that suits best your local conditions and codes.
Thanks Jack. Im building a RV carport & this helps me with a good start of how to go about it with your design. Keep on with the great info
Thanks for the great idea. Do think you could put solar panels on the roof? How many? What kind of power would it light up?
Yes you can add the solar panels. I’m not an expert in the field so I can’t advise you further.
Thanks for these plans… If I go 16″ centers with 2×8″ rafters do you know if that meets/exceeds requirements for snow-load areas in Northeast like CT? I currently have a 6 post like your plan, 18 X 18 ft carport with a 2x8s at 24″ centers, but w/flat roof, that has stood for over 50 years (built by previous owner).
Can’t help you with that. I don’t know those building codes. If you get snow during the winter, I don’t recommend this design.
We get snow here as well. Would the 2×6 work with purlins or better to have the 2×8. I want to go 18 wide x 20 deep. Sloping front to back
Jack, what program are you using for making these design plans? Is it a type of builders cad software? I’m interested in getting it for my work.
Thanks for the plethora of options to work with
Please read the FAQs: https://howtospecialist.com/faq/
I read your FAQ about printing plans but I don’t see a “Print PDF Plans” button anywhere on
https://howtospecialist.com/carport/flat-roof-double-carport-plans/
Using Chrome on a Mac. Feeling a little dumb here… love your site though.
I added the button.
Which is the correct way for the sloping roof ? one drawing shows the roof sloping from the front to the rear and another drawing shows the slope from the right side to the left side !
One drawing shows that all 3 of the posts at the back are one height and all three of the posts at the front are another height, slope left to right. Then another drawing shows 3 different size posts!
thanks
All diagrams show the same lean to. It is from the front to the rear. The angle is 4 degrees.
I cant believe the whiners here.
Jack, these plans are perfect for getting you on your way. Of course they need to be tweaked to make them work for individual preferences.
Great job and quite frankly I live up in Maine and the only real tweak I did is I put a heavy duty galvanized roof so the snow slides off easily, but these plans will have no issue with the snow. I have seen people do much less in support and get through the winter with not any issues, once again the key is the galvanized roof.
BTW- If you cant get the 24′ side panels you can always join two at the center post, you will just need to make sure you have the extra support, that’s what I did when I built my first one.
Hi Jack, thank you for putting these free plans online! Some people are so entitled… but I’m sure many more people appreciate them but just don’t take the time to comment like the people who love to complain. :)
These plans are great for my project, the 3d drawing to…helps me visualise it. Thanks so much
Hey Jack,
I just found your site and absolutely love it. Thank you for all you for the average DYI person. Oh, ignore the knuckleheads who post negative stuff. If they can figure out certain things, ask an intelligent question, or ask for clarification in a nice way, it’s obvious they have issues.
As for me, I plan on using your 2 car flat roof carport plans. I’ll have to figure out how to do some mods to it. It will be approx 24′ deep, 42′ wide, 10′ tall at the front and 8′ tall at the back, able to park 4 cars. I’m going to close in the sides and back and use metal. I want to park from the Tall side to the lower side so the water will drain to the back. Can’t wait to get started on this project. I’ll post pics on the FB page when I get started for help and hints from other DYIers.
Thanks again for all you do. It’s so nice to see humans helping humans now a days!
Hi Jack. First of, thank you so much for making these plans available. This is exactly the plan I wanted, but I would like to build a 24’x24′ instead. Any chance you could adjust these plans for that size? Thank you so much!