This step by step diy project is about twin size cabin bed frame plans. You can build this cabin bed with basic tools and materials and save a ton of money. Just make sure you know the basic woodworking techniques and follow my plans, step by step. Follow the instructions and pay attention to the diagrams and build the wooden bed in just one weekend.
You should always plan everything from the very beginning, in order to prevent costly mistakes and to save time. Taking into account the basic design, this bed frame can match the style of any home. Mark the cut lines on the slats before making the cuts and use a jigsaw to get the job done. If you are looking for other designs or sizes, you should check out the rest of the bed frame plans. See all my Premium Plans HERE.
Made from this plan
Twin Cabin Bed Plans Free – PDF Download
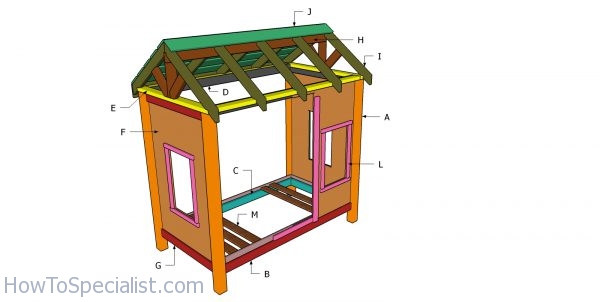
Building a twin size bed frame
Materials
- A – 4 pieces of 4×4 lumber – 70 1/2″ long LEGS
- B – 2 pieces of 1×6 lumber – 75 1/2″ long, 2 pieces – 39 1/2″ long FRAME
- C – 2 pieces of 2×4 lumber – 75 1/2″ long, 2 pieces – 36 1/2″ long FRAME
- D – 2 pieces of 1×4 lumber – 39 1/2″ long, 2 pieces – 75 1/2″ long TOP SUPPORTS
- E – 2 pieces of 2×4 lumber – 48″ long, 2 pieces – 75 1/2″ long RAFTER SUPPORTS
- F – 2 pieces of 3/4″ plywood – 63 1/2″x39 1/2″ long, 2 pieces – 37 3/4″x63 1/2″ long PANELS
- G – 4 pieces of 1×4 lumber – 39 1/2″ long, 4 pieces – 75 1/2″ long TRIMS
- H – 2 pieces of 2×4 lumber – 12 1/2″ long, 1 piece – 82 1/2″ long, 4 pieces – 13″ long RIDGE BEAM
- I – 10 pieces of 2×4 lumber – 36″ long RAFTERS
- J – 12 pieces of 1×6 lumber – 82 1/2″ long ROOF
- L – 8 pieces of 1×2 lumber – 20″ long, 8 pieces – 26″ long, 2 pieces of 1×3 lumber – 56 1/2″ long, 1 piece – 24″ long TRIMS
- M – 13 pieces of 1×4 lumber – 39 1/2″ long SLATS
- 4 pieces of 3/4″ plywood – 4’x8′
- 4 pieces of 4×4 lumber – 8 ft
- 15 pieces of 1×6 lumber – 8 ft
- 12 pieces of 2×4 lumber – 8 ft
- 13 pieces of 1×4 lumber – 8 ft
- 2 pieces of 1×3 lumber – 8 ft
- 5 pieces of 1×2 lumber – 8 ft
- 1 5/8″ screws
- 1 1/4″ screws
- 2 1/2″ screws
- 2″ nails
- 1 1/4″ nails
- mattress
- wood filler, wood glue
- stain
Tools
- Safety gloves, glasses
- Miter saw, jigsaw
- Chalk line, tape measure, spirit level, carpentry pencil
- Drill machinery and drill bits
Time
- One Weekend
Related
Building a twin cabin bed frame
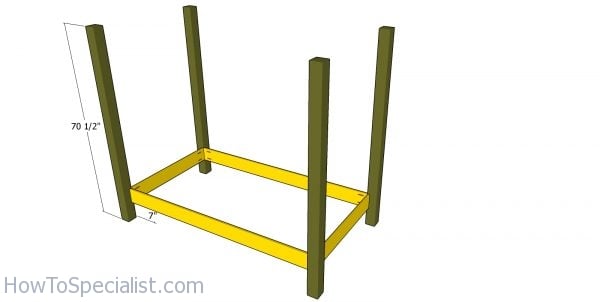
Building the frame of the cabin bed
The first step of the project is to build the frame for the cabin bed frame. Therefore, using 4×4 lumber for the posts and 1×6 lumber for the frame. Drill pocket holes at both ends of the slats and insert 1 1/4″ screws into the posts. Make sure the corners are square and align the edges flush. Plumb the posts with a spirit level.
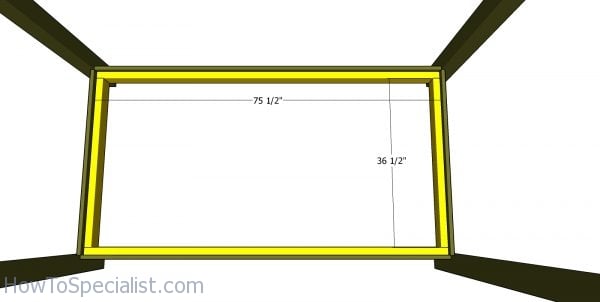
Bed frame – cabin
Use 2×4 lumber for the frame of the bed. Drill pilot holes and insert 2 1/2″ screws to assemble the frame of the bed together tightly. Fit the frame inside the cabin bed and align the edges to the bottom. Drill pilot holes through the 2x4s and insert 2″ screws to lock them into place tightly.
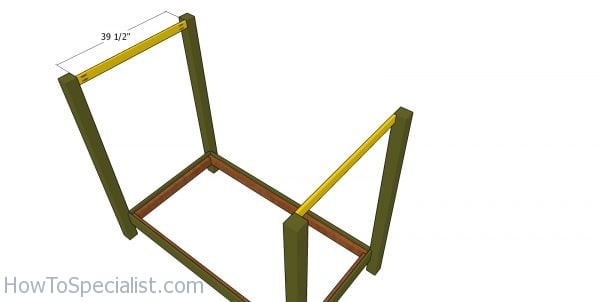
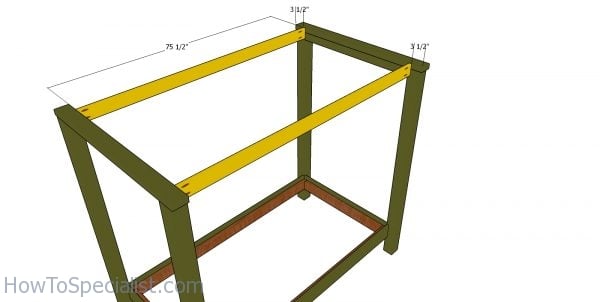
Side top supports
Fit 1x4s to the top of the bed frame, as shown in the plans. Drill pilot holes at both ends and insert 1 1/4″ screws to lock them to the posts. Make sure the corners are square. Align the edges to the inside of the cabin bed.

Top slats
Fit the 2x4s to the top of the posts. Center the slats to the sides, making sure there are 3/4″ overhangs on both sides. Drill pilot holes and insert 2 1/2″ screws to lock them to the posts.
Fitting the top supports
Fit the 1×4 slats to the front and back of the bed Drill pocket holes at both ends of the supports and insert 1 1/4″ screws to lock them to the posts. Check if the corners are square.
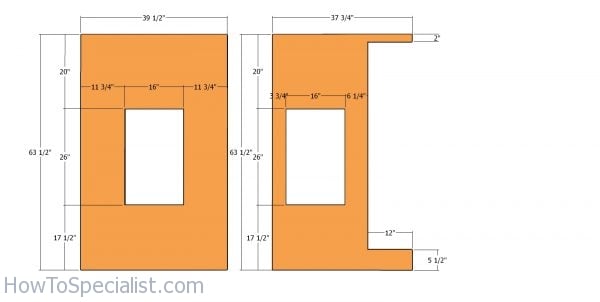
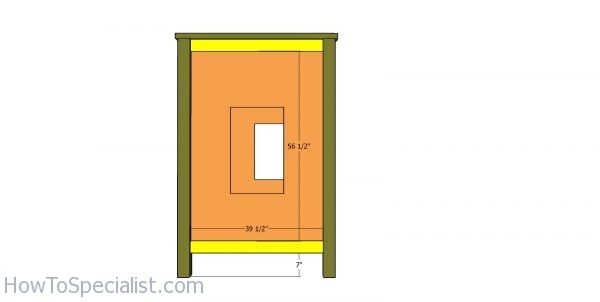
Panels – cabin bed frame
Use 3/4″ plywood for the exterior panels. Mark the cut lines on the sheets and then get the job done with a circular saw.
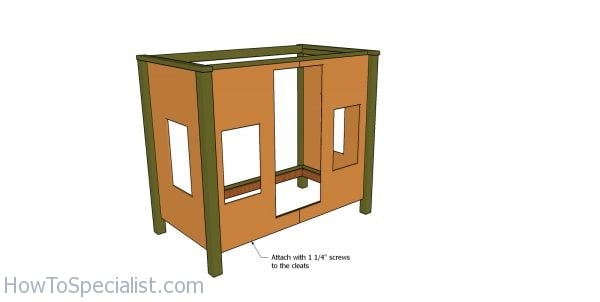
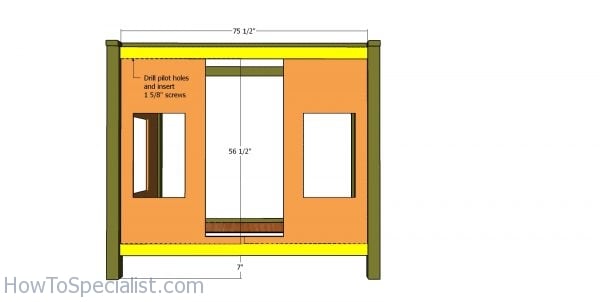
Fitting the panels to the cabin bed
Fit the panels to the exterior of the shed, as shown in the plans. Use 1 1/4″ screws to secure the panels to the supports. Leave no gaps between the components and align the edges flush.
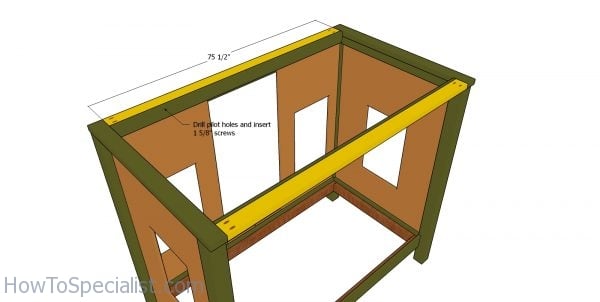
Fitting the side rafter supports
Fit the 2x4s to the top of the bed frame. Drill pocket holes at both ends of the supports and insert 2 1/2″ screws into the posts. Check if the corners are square.
Fitting the cleats to the sides of the bed
Attach 1x4s to the sides of bed frame. Add glue to the joints and insert 2″ nails to lock them to the plywood pieces.
Fitting the cleats to the front of the bed
Fit the 1×4 trims to the front of the bed frame. Use 2″ nails and glue to the secure them into place.
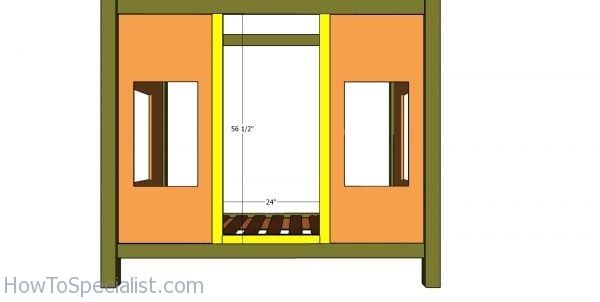
Door trims
Fit the 1×3 trims around the door opening to the cabin bed. Align the edges add glue and insert 1 1/4″ nails to lock them to the plywood panels.
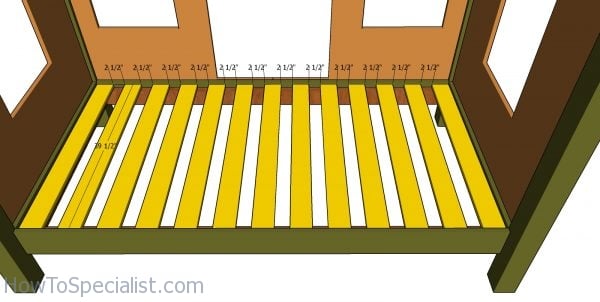
Fitting the bed frame slats
Fit 1×4 slats to the bed frame. Fit a piece of 1×3 lumber between the slats to create even gaps. Drill pilot holes and insert 1 5/8″ screws to lock the slats into place.
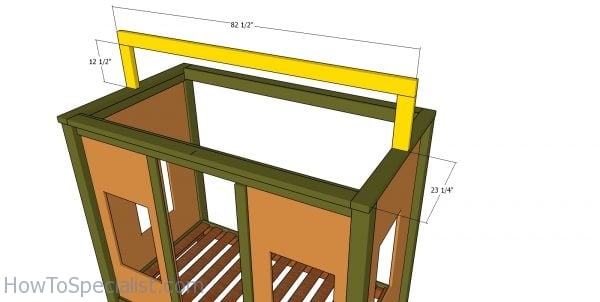
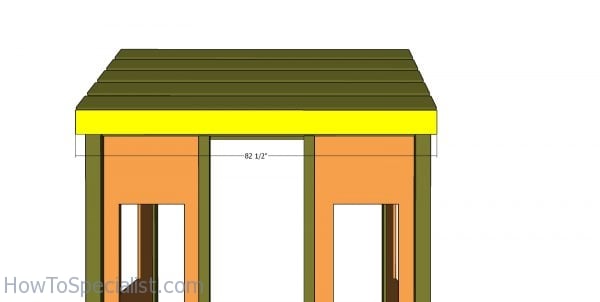
Fitting the ridge beam
Use 2×4 lumber for the ridge beam. Drill pocket holes at both ends of the supports. Center the supports to the sides of the bed frame and insert 2 1/2″ screws to lock them into place tightly. Fit the beam to the supports and insert 2 1/2″ screws to assemble the roof structure.
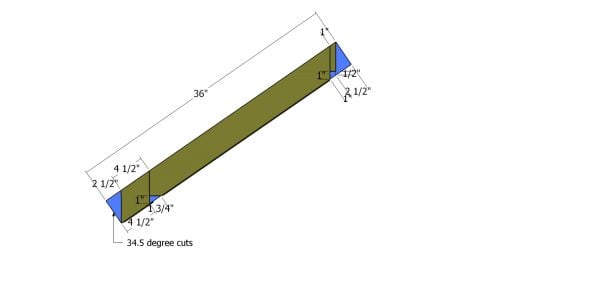
Rafters
Use 2×4 lumber for the rafters. Mark and make the cuts to the rafters with a saw.
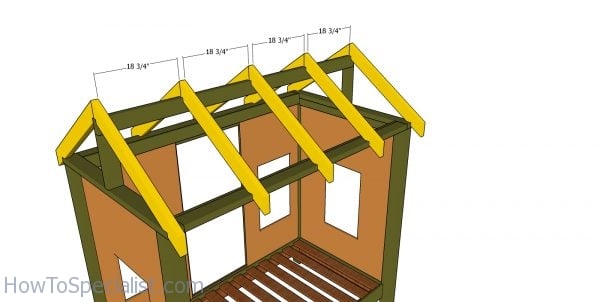
Fitting the rafters
Fit the rafters to the top of the bed frame, equally spaced. Drill pilot holes and insert 2 1/2″ screws to secure the rafters to the supports.
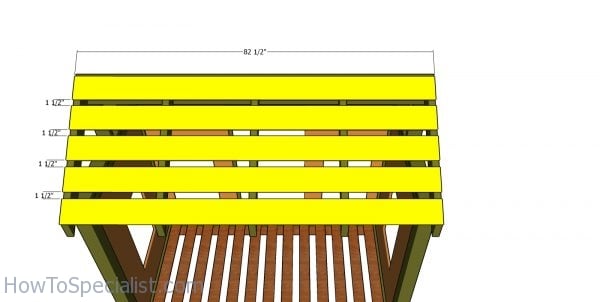
Roof slats – cabin bed
Attach the 1×6 slats to the rafters. Use 1 5/8″ screws to lock the slats to the rafters. Place a piece of 1×2 lumber to create even gaps between the slats.
Side roof trims
Fit the 1×6 trims to the sides of the cabin bed frame. Align the edges and insert 2″ nails to secure the trims into place.
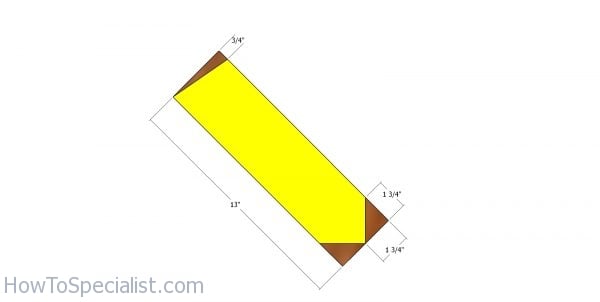
Gable end trims
Use 2×4 lumber for the gable end trims. Make the angle cuts to the trims.
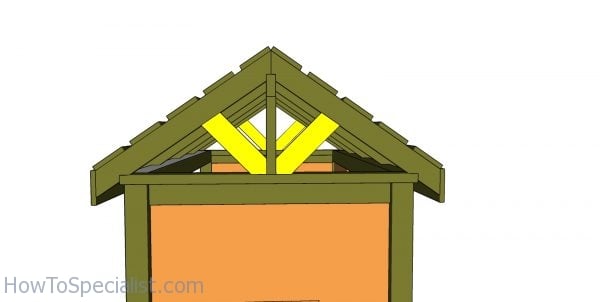
Fitting the roof trims
Fit the trims to the sides of the bed frame. Drill pilot holes and insert 2 1/2″ screws to lock them into place.

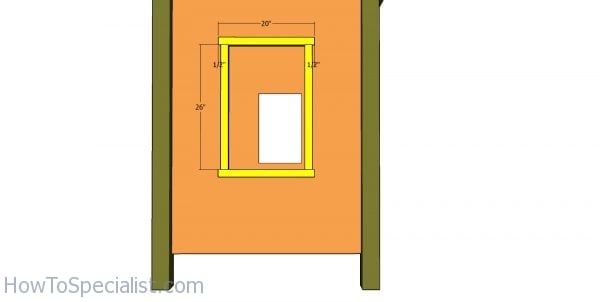
Window trims
Attach the 1×2 trims around the window opening. Insert 1 1/4″ nails to secure the trims to the plywood panels.
Side window trims
Fit the trims to the side windows, in the same manner described above.
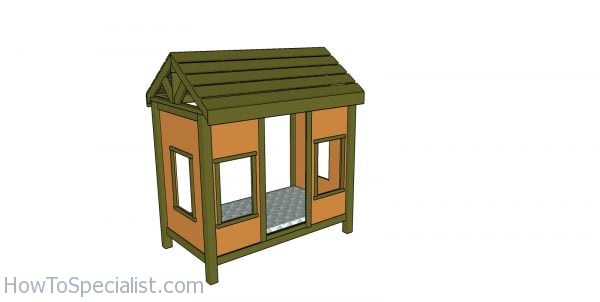
Cabin Bed Plans – Twin Size
Last but not least, you need to take care of the finishing touches. Fill the holes with wood putty and smooth the surface with 120-220 grit sandpaper. Apply a few coats of paint or stain to enhance the look of the cabin bed.
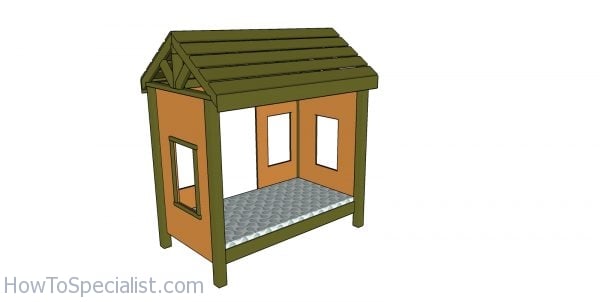
Cabin Bed Plans – Twin Size – back view
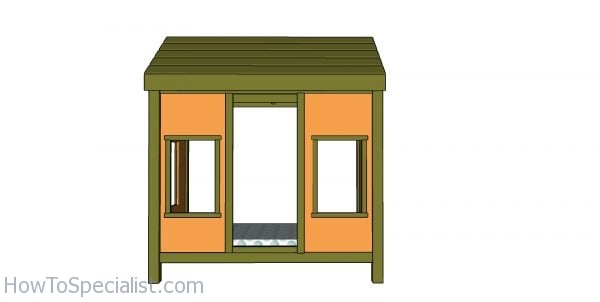
Cabin Bed Plans – Twin Size – front view
This twin size bed frame has a nice look and it would looks awesome in your kids bedroom. I have spent a lot of time designing this cabin bed, so you can make one without spending a fortune.

Thank you for reading our project about cabin bed size bed frame plans and we recommend you to check out the rest of the projects. Don’t forget to SHARE and LIKE our projects with your friends, by using the social media widgets, if you want to help us keep adding free woodworking plans.