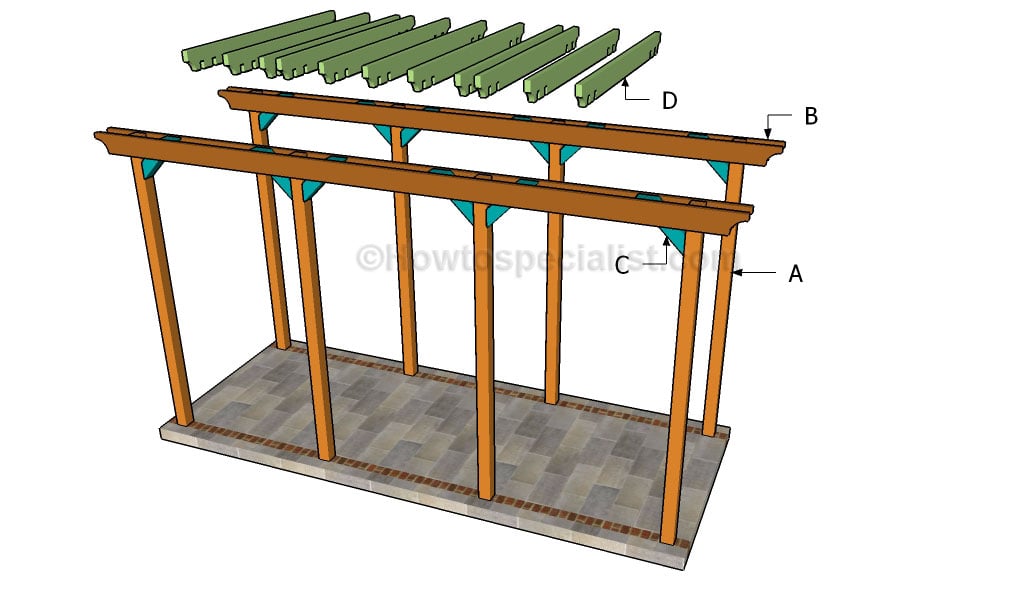
This step by step diy woodworking project is about how to build a grape arbor. If you want to learn how to build a nice wooden arbor for your backyard, we recommend you to pay attention to the instructions described in article. Work with attention and don’t forget to check out the rest of the related project, as to get an idea about what else could add value to your property.
There are many things that you should take into account before starting the actual constructions of the grape arbor. It is essential to select the right plans for your needs and to adjust their design as to match the style of the rest of your garden. In some cases this project might require a building permit, so make sure you go to the local building department to get aware of the legal requirements.
It is essential to lock the posts into place in a professional manner, otherwise they might move from position on the long run. Plumb the posts with a spirit level before pouring the concrete. Drill pilot holes through the wooden components before inserting the screws, in order to prevent the wood from splitting. Use galvanized screws as they will be exposed to moisture. See all my Premium Plans in the Shop.
Made from this plan
How to build a grape arbor

Building a grape arbor
Materials
- A – 8 pieces of 4×4 lumber – 132″ long POSTS
- B – 4 pieces of 2×8 lumber – 180″ long SUPPORT BEAMS
- C – 12 pieces of 4×4 lumber – 17 3/4″ long BRACES
- D – 17 pieces of 2×6 lumber – 72″ long RAFTERS
- 8 pieces of 4×4 lumber – 12 ft
- 4 pieces of 2×8 lumber – 16 ft
- 3 pieces of 4×4 lumber – 8 ft
- 9 pieces of 2×6 lumber – 12 ft
- tube forms
- 7″ carriage bolts
- 8″ screws
- post to beam connectors
- 1 1/2″ structural screws
- 2 1/2″ screws
- stain
- filler
Tools
- Safety gloves, glasses
- Miter saw, jigsaw
- Chalk line, tape measure, spirit level, carpentry pencil
- Drill machinery and drill bits
Tips
- Apply several coats of wood stain to the wooden components
- Fill the holes with wood filler and smooth the surface
Time
- One Day
Related
Building a grape arbor
The first step of the project is to set the posts into place, using the pattern showed in the image. Therefore, in order to get the job done in a professional manner, we recommend you to layout the posts by using batter boards and string.
The next step of the project is to attach the support beams to the top of the posts. As you can see in the image, we recommend you to use 2×8 lumber and to cut their ends in a decorative manner. Align the beams at both ends and check if they are horizontal with a spirit level before locking them into place tightly.
In addition, we recommend you to attach 4×4 braces to the grape arbor, if you want to get a professional result. Cut both ends of the braces at 45 degrees and lock them into place with 2 1/2″ galvanized screws.
Drill pilot holes through the beams and through the posts before locking them together with 7″ carriage bolts. Lock the components together with C-clamps before inserting the screws.
Building the rafters for the grape arbor is maybe one of the most complex parts of the projects, as it requires a proper planning and lots of cuts. Mark the cut lines with a pencil and cut out the notches with a circular saw. Clean the recess with a chisel and smooth the surface with sandpaper.
Fit the rafters into place making sure you place them equally spaced. Drill several pilot holes and insert 8″ screws into the support beams. Cutting the ends of the rafters in a decorative manner will enhance the overall look of the arbor. Alternatively, you can use rafter ties.
Last but not least, we recommend you to take care of the finishing touches. Fill the holes with wood filler and let it to dry out for several hours. Afterwards, smooth the wooden surface with fine-grit sandpaper and vacuum the residues.
Thank you for reading our project about how to build a grape arbor and we recommend you to check out the rest of the projects. Don’t forget to LIKE and SHARE our projects with your friends, by using the social media widgets. SUBSCRIBE if you want to be the first that gets our latest articles.


