This article is about bbq pit plans. Building a barbecue pit is easy, provided you use the right plans for your needs and testes. In addition, you have to master several masonry techniques to lay the bricks in a professional manner and choose an appropriate location for the construction. Generally speaking, a bbq gril pit can take many shapes, starting with a simple U-shaped construction made of bricks, up to larger outdoor kitchens equipped with state of the art appliances, such as gas grills, smokers, a pizza ovens or kitchen cabinets.
The location of the bbq pit is essential for your project, therefore we recommend you to consult your local building codes and make sure you comply with them. In most of the cases, you have to build the barbecue pit far away from flammable substances and from other construction in your backyard, as they could easily catch fire while you cook the food. In addition, you could place the bbq under the shade of a tree, to protect you from the sun during the hot days.
The design of the bbq pit is an essential aspect when planing its construction, as it should freshen-up the look of your backyard and not pass unnoticed by your guests. Therefore, you should study carefully the design of your house and the prominent lines and colors in your garden, to get the needed inspiration. From our point of view, we consider that a mix of surfaces covered with bricks and others with natural stone, is the perfect combination, especially if you have a tight budget. See HERE more bbq plans.
Made from this plan
In order to build a barbecue pit, you need the following:
Materials
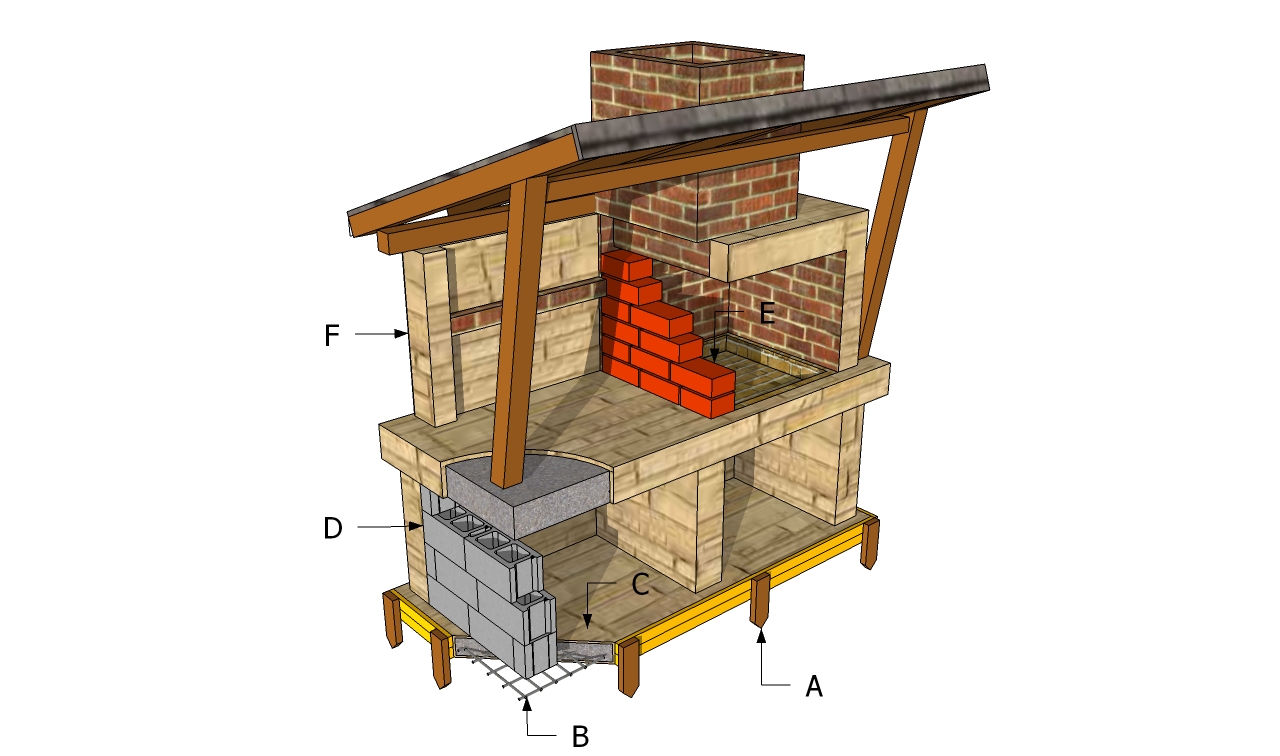
- A – 2×6 and 2×4 alsts FORMWORK
- B – rebars for the reinforcing structure of the foundation REBARS
- C – cement, sand and gravel for the foundation and countertop CONCRETE
- D – 60 concrete blocks for the base of the bbq CONCRETE BLOCKS
- E – 200-300 bricks according to its size BRICKS
- F – 100 sq ft of stone CLADDING
Tools
- Safety gloves, glasses
- Wet saw (to cut the bricks)
- Hammer, spirit level, carpentry pencil
- Concrete mixer, trowel
Tips
- Water the bricks before laying them into place, otherwise they will soak the moisture from the compound
- Buy the bbw grill grate before building the brick bbq pit
- Read carefully our other articles related to barbeque construction
Time
- Two weekends
Related
Best tips to build a bbq pit with roof:
A BBQ pit with a lean-to roof and built-in storage is a fantastic addition to any backyard, offering a functional and stylish space for grilling and entertaining. The lean-to roof provides protection from the elements, while the underneath storage keeps your grilling tools and supplies organized. Here are my best tips for building a sturdy and efficient BBQ pit with a lean-to roof and underneath storage.
1. Plan Your Design and Location
Start by planning the size, layout, and location of your BBQ pit:
- Size: Determine the size of your BBQ pit based on your available space and cooking needs. A common size is around 5-6 feet wide by 2-3 feet deep for the grilling area, with storage underneath and room for food prep.
- Roof height: A lean-to roof typically slopes down from one side to the other, providing shade and protection. Aim for a roof height of around 8-10 feet on the higher side and 7-8 feet on the lower side for adequate headroom and drainage.
- Location: Choose a location in your backyard with enough clearance for ventilation, away from trees or other flammable materials. Make sure it’s close to your dining or entertaining area but far enough from the house to prevent smoke from blowing inside.
Proper planning ensures that your BBQ pit will be functional and fit seamlessly into your outdoor space.
2. Choose the Right Materials
Choosing durable, weather-resistant materials is key to building a BBQ pit that lasts:
- Brick or stone: For the pit itself, use fire bricks or heat-resistant stone to line the grill area. These materials withstand high temperatures and provide excellent insulation.
- Steel or cast iron grates: Choose stainless steel or cast iron grates for the cooking surface. These materials are durable, easy to clean, and hold heat well.
- Wood or metal framing: Use pressure-treated wood or steel posts for the frame of the lean-to roof and storage area. Both materials are strong and weather-resistant.
- Metal roofing: For the lean-to roof, opt for corrugated metal sheets or polycarbonate panels to create a durable, water-resistant cover that allows for proper ventilation.
Choosing high-quality materials ensures the longevity of your BBQ pit and makes maintenance easier.
3. Build the Foundation
A solid foundation is crucial for a stable and long-lasting BBQ pit:
- Concrete slab: For a permanent BBQ pit, pour a concrete slab as the foundation. Dig out the area to a depth of around 4-6 inches, then fill it with compacted gravel and pour concrete on top. Make sure the slab is level and smooth.
- Paver base: Alternatively, you can use pavers for the base. Dig out the area and fill it with gravel, then lay the pavers on top, ensuring they are level and secure.
A solid foundation provides a stable surface for the BBQ pit and prevents shifting over time.
4. Build the BBQ Pit Structure
The BBQ pit itself is the centerpiece of your outdoor cooking area:
- Lay the bricks or stone: Build the BBQ pit by laying fire bricks or stone blocks in a U-shaped or rectangular pattern. The walls should be around 3-4 feet tall to provide a comfortable grilling height.
- Install the grill grates: Secure the steel or cast iron grill grates inside the pit, either by building them into the brick structure or using adjustable brackets so you can move the grates up or down.
- Add a chimney (optional): If you want better smoke control, consider adding a chimney to the back of the pit. This helps direct smoke away from the cooking area.
Make sure the pit is well-ventilated and provides enough room for airflow to keep the fire burning efficiently.
5. Construct the Lean-to Roof
The lean-to roof provides shade and protection from the elements, making your BBQ pit usable in all weather:
- Build the frame: Use 4×4 or 6×6 posts to create the frame for the lean-to roof. Install the posts at the four corners of the pit area, making sure the posts on one side are taller to create the slope for water runoff.
- Attach the roof beams: Secure horizontal beams between the posts to create the framework for the roof. Use lag screws or metal brackets to ensure the beams are sturdy and well-supported.
- Install the roofing: Attach corrugated metal sheets or polycarbonate panels to the roof frame, ensuring there’s enough slope for proper drainage. Use roofing screws with rubber washers to prevent leaks.
Ensure the roof is securely fastened to withstand wind and provide ample shade over the cooking area.
6. Add Underneath Storage
Incorporating storage underneath the BBQ pit makes it easy to keep your grilling tools and supplies organized:
- Build shelves or cabinets: Use pressure-treated wood or weather-resistant metal to build shelves or cabinets under the pit area. These can be used to store charcoal, grilling utensils, or firewood.
- Install doors or drawers: If you prefer a more polished look, add cabinet doors or pull-out drawers to keep everything neat and protected from the elements.
- Add hooks: Install hooks along the sides of the pit or underneath the counter for hanging grilling tools, aprons, or towels.
Underneath storage helps keep your BBQ area organized and ensures everything you need is within reach.
7. Add Finishing Touches
Once the structure is complete, it’s time to add the finishing touches to your BBQ pit:
- Seal the brick or stone: Apply a weatherproof sealant to the brick or stone to protect it from moisture and heat damage. This also helps maintain the appearance of the pit over time.
- Stain or paint the wood: If you’ve used wood for the frame or storage, apply a stain or paint to protect it from the elements and give it a polished look.
- Lighting: Install outdoor-rated lighting above or around the pit to illuminate the cooking area during evening use. String lights or LED spotlights are great for adding ambiance.
Finishing touches like sealing, staining, and lighting elevate the look of your BBQ pit and make it more functional for outdoor entertaining.
Bonus Tip: Add a Countertop for Prep Space If you have the space, consider adding a stone or concrete countertop next to the BBQ pit for food prep and serving. This adds convenience and makes your outdoor cooking area even more efficient.
Building a bbq pit

Building a bbq pit
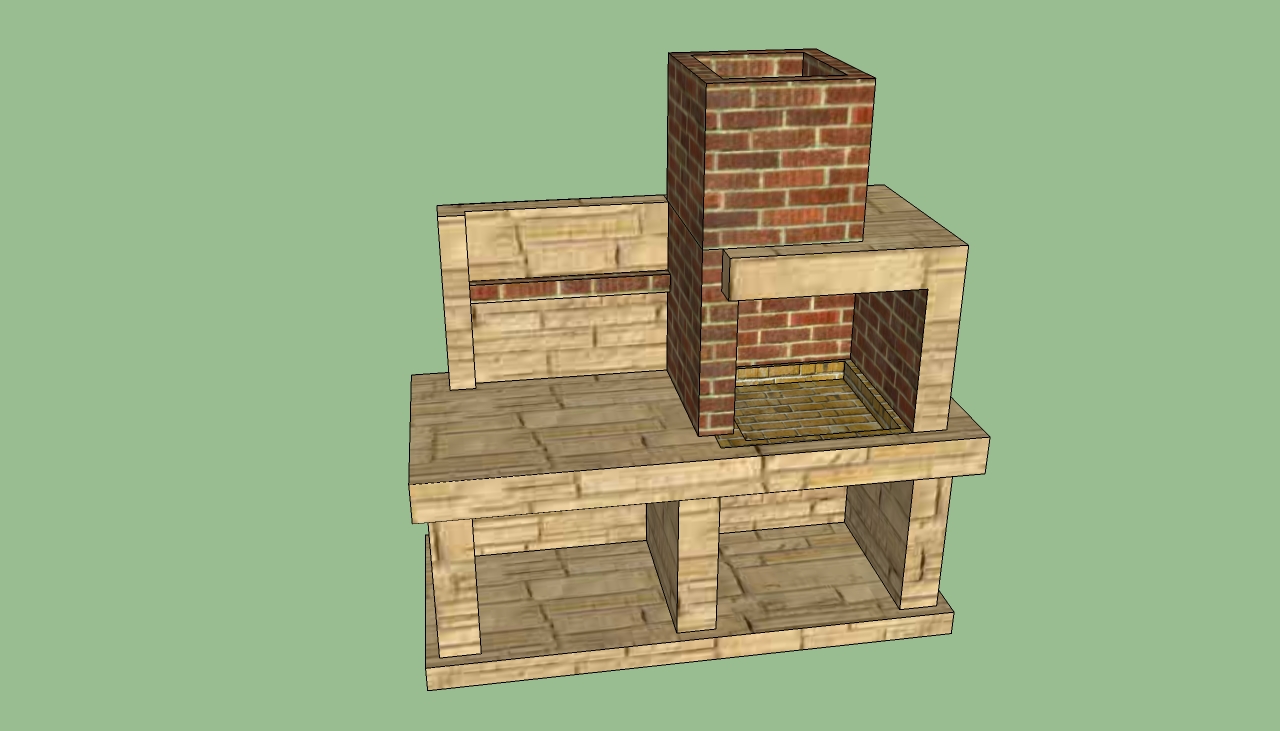
Building an unique barbeque shouldn’t be expensive nor a complex project, but an opportunity to enhance the look of your garden and to impress the loved ones. As you can see in the image, you need to use natural materials and to combine them as to build a great barbeque with a concrete table attached.
Bbq pit base plans

Bbq pit foundation plans
First, you have to lay out the foundation of the bbq pit on the construction site, by using batter boards and string. Use the 3-4-5 rule to make sure the corners are right angled. Next, excavate about 10″ (optionally, you could excavate 15” trenches for complex constructions), pour a 3” layer of gravel mixed with sand, and compact it thoroughly.
Use 2×6 boards to build the form and secure it with 2×4 stakes. Use a spirit level to make sure the form is perfectly horizontal on all sides.

Brick bbq pit foundation plans
Next, you should install a dense reinforcing structure of rebars in the form, as in the image. Lay the net in the formwork, ensuring you lay it on 2” spacers, to lift it to the middle of the concrete slab. Use a wheel barrow to mix concrete, using the following proportions: 2 parts cement, 3 parts sand, 4 parts gravel and water.

Bbq grit base plans
Next, you have to build the base of the bbq pit, by using concrete blocks and cement-based mortar. The technique is straight forward, but you have to pay attention to details, if you want to obtain a professional result.
Lay a concrete block at the beginning of the course and another one at the end. Tie a string to their exterior and lay the rest of the bricks, by pushing them firmly into the mortar.

Bbq pit countertop form
In most of the cases 4-5 course of concrete blocks are enough (about 2 – 2 1/2′), but you should adjust the size of the barbeque to your needs. Afterwards, you have to start building the countertop of the bbq pit. Therefore, use 4×4 wooden posts and place them inside the cavities, as in the image.
The posts will support the weigh of the concrete, so we recommend you to select them with great care. Place 2×4 boards on top of the posts and make sure the surface is horizontal.

Countertop reinforcing structure form
Continue building the countertop form by locking the sides (2×6 wooden boards) with screws. Use a spirit level to make sure the whole formwork is perfectly horizontal, otherwise the countertop will have an unpleasant look.
Use rebars to build another reinforcing net and place it inside the form, as in the image. However, don’t forget to lift it about 2”,by using spacers (small pieces of brick).

Barbeque pit plans
Mix a small quantity of concrete in a wheelbarrow or with a power mixer, and pour it in the form. Next, use a straight edge to level the contertop, by pushing it along the edges of the form. Vibrate the concrete with a concrete vibrator.
Barbecue pit plans

Brick pit plans
Use regular bricks to build an U-shaped bbq, as you see in the image. Use a spirit level everytime you lay a brick and check if the walls are plumb and horizontal. Lay about eight courses of bricks (adjust the height according to your needs and tastes), using our bbq pit plans.

Barbecue pit plans
Next, we have to build the top of the barbeque pit and its chimney. Taking into account the width of the bbq entrance, we have to use a precast lintel to join the two sides. Place the lintel as in the image and secure it with cement-based mortar.

Using lintels to build the top of bbq
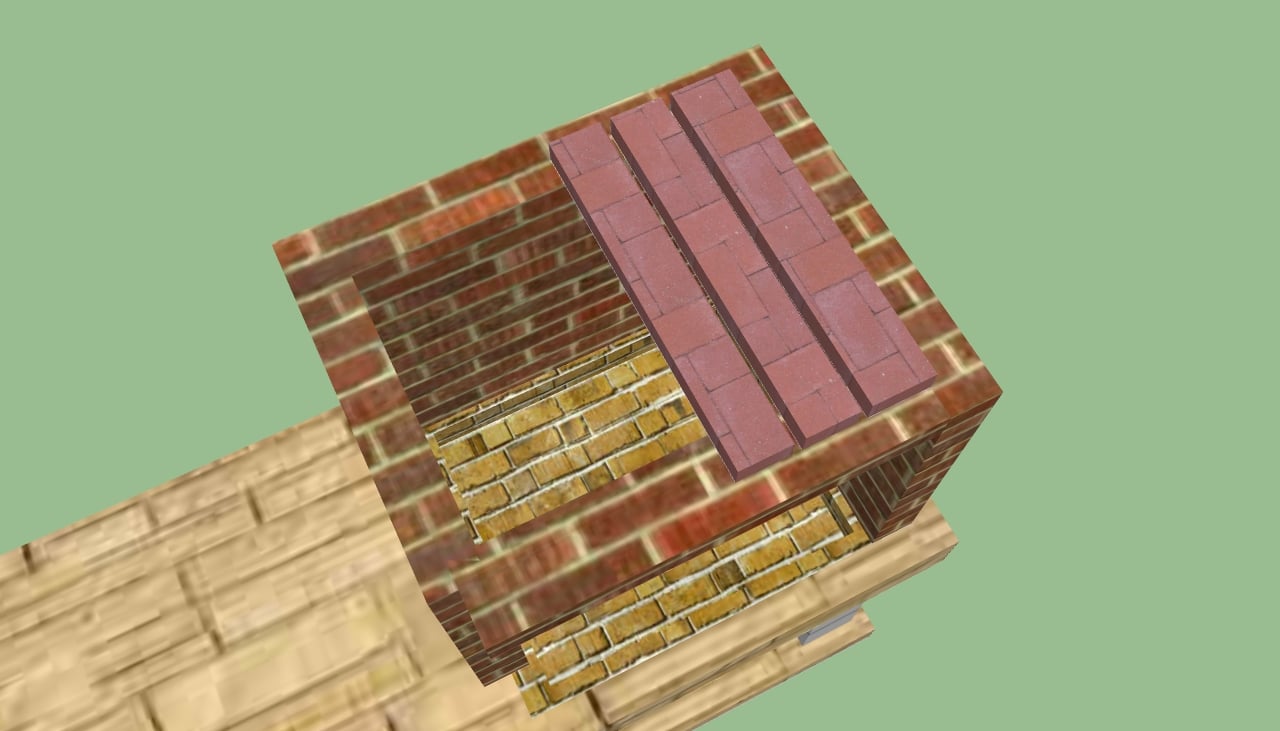
Next, place several lintels over the top of the bbq, as in the image. As you can probably imagine, in the left side of the barbecue we will build the chimney, while the lintels will be covered with regular bricks, to obtain a neat look.
Building a bbq pit might look a complex procedure, but we can assure you that it’s plain simple if you follow our step by step instructions, work with great care and buy the right materials.

Brick bbq pit plans
Mask the precast lintels with bricks, and fill the joints with cement based mortar. If you have to cut the bricks, we recommend you to use a wet saw or a grinder with a diamond blade.

Building the chimney of the bbq
Build the chimney of the bbq pit by laying 8-10 courses of bricks. In order to get the job done as a professional, you have to spread the mortar with a trowel and gently push the bricks until they get locked into place.
Don’t forget to use a spirit level every time you lay a brick, to check if the walls are plumb and aligned with the rest of the barbeque. In addition, clean the excess mortar with a sponge, before it’s too late.

Bbq pit designs
Last but not least, after you have built the chimney and the rest of the barbeque, you could give it a unique design by cladding it with natural stone. In addition, we suggest you leaving several brick surfaces exposed, while cladding others, to create a nice design.
Cladding the barbecue with stone is straight forward: spread the appropriate adhesive on the exterior face of the bbq and press the stones gently into the mortar.

Bbq fire pit plans
If you want to make your barbeque pit even more functional, we recommend you building a small wall at the back of the countertop, as you can see in the image.
In addition, you should also consider attaching several shelves to the wall, in order to create useful storage spaces, needed in any outdoor kitchen. Let the mortar dry out for several days before making the fire for the first time in the bbq pit.
By following these tips, you’ll be able to build a functional and stylish BBQ pit with a lean-to roof and underneath storage. With careful planning and attention to detail, your DIY BBQ pit will become the perfect spot for grilling, entertaining, and relaxing in your backyard.
Thank you reading our article about bbq pit plans and we recommend you to check out the rest of our projects. Don’t forget to LIKE and SHARE our articles with your friends, by using the social media widgets. SUBSCRIBE to be the first that gets our latest projects.

2 comments
Hello, I was looking at some designs from your website on building outdoors grills. I was wondering if there are any plans for a outdoor grill with a rotisserie and smoke box as well or just griil and rotisserie. I live in Tx and do a lot of outdoor cooking and wanting to try something new all the time. Can you all help with a design please?
Thank you for the idea. I am adding this to the list and I will try to come up with something.