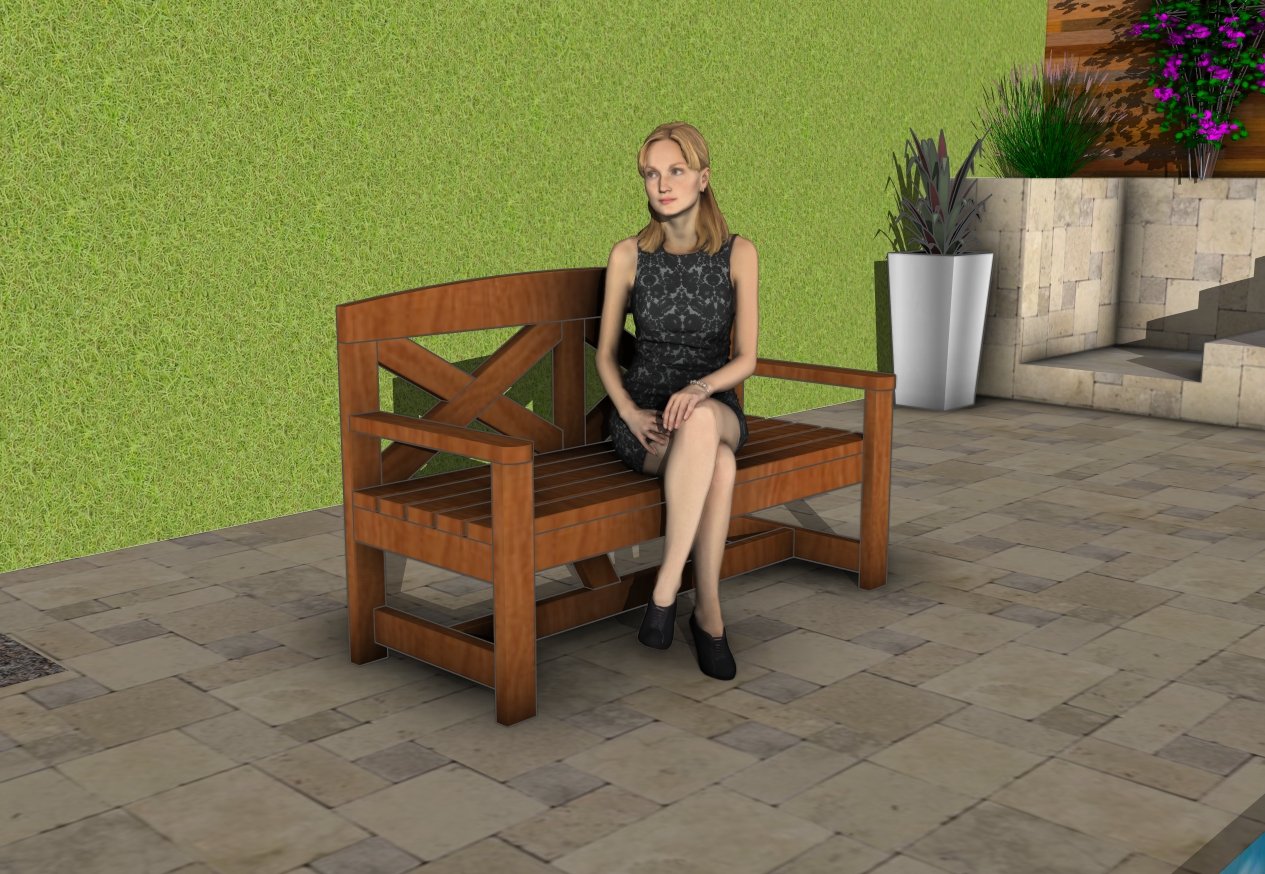
Building your own outdoor bench is a great way to add both function and style to your backyard, patio, or garden. This DIY bench features a sturdy frame, comfortable seating, and an eye-catching X-trim backrest, making it a perfect addition to any outdoor space. Designed for durability and comfort, this project is built with 2×4 and 2×6 lumber, ensuring a strong structure that will stand up to daily use and changing weather conditions.
This step-by-step plan will guide you through the entire process, from cutting and assembling the frame to installing the X trims and adding the finishing touches. Whether you’re a beginner or an experienced woodworker, these detailed instructions and diagrams will help you build a stylish and long-lasting bench with ease. Grab your tools and let’s get started on this rewarding DIY project.
We recommend you to invest in the best materials you could afford. Therefore, you should buy weather-resistant lumber, such as pine or cedar. Always take accurate measurements before adjusting the size of the components at the proper size. Drill pilot holes trough the components before inserting the wood screws, to prevent the wood from splitting. My plans come with a full cut / shopping list and they are PDF Download and Print friendly. See all my Premium Plans HERE.
Made from this plan
Pin it for Later!

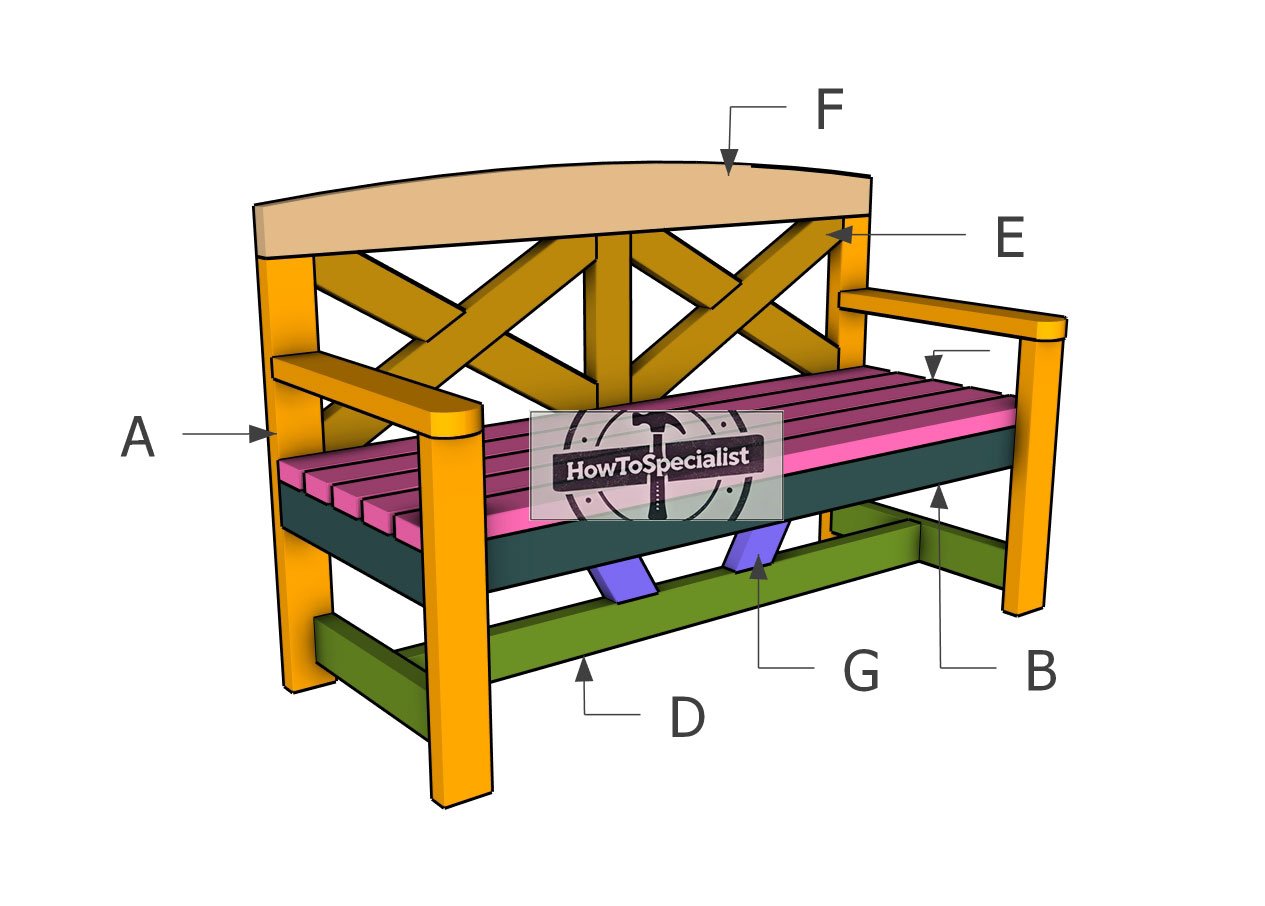
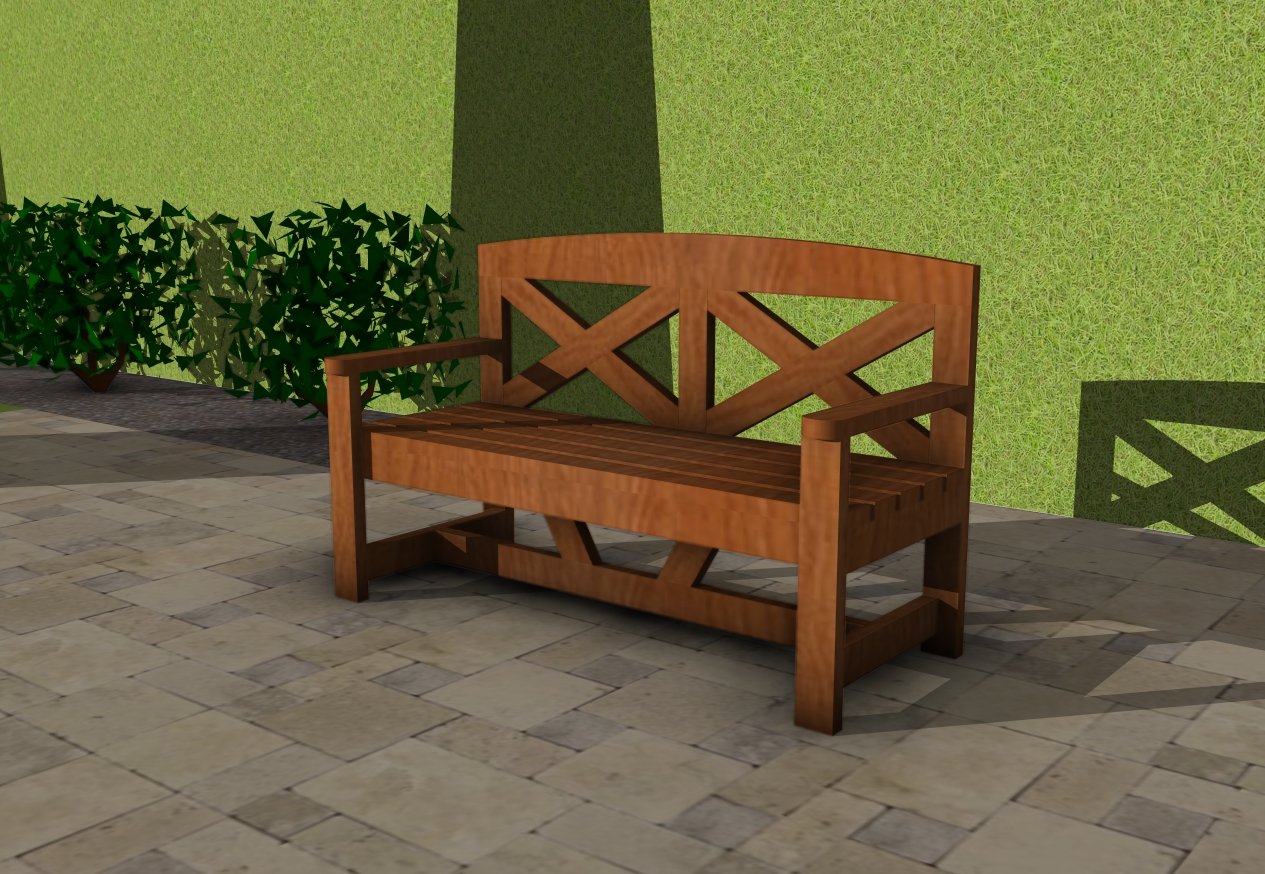
2×4 Farmhouse Garden Bench – DIY Plans
Building-a-2×4-bench-with-backrest
Materials
A – LEGS – 2×4 lumber 32 1/2″ – 2 pieces
A – LEGS – 2×4 lumber 24″ – 2 pieces
B – SEAT FRAME – 2×4 lumber 57″ – 2 pieces
B – SEAT FRAME – 2×4 lumber 21″ – 2 pieces
B – SEAT FRAME – 2×4 lumber 18″ – 1 piece
C – SEAT – 2×4 lumber 60″ – 5 pieces
D – STRETCHER – 2×4 lumber 21″ – 2 pieces
D – STRETCHER – 2×4 lumber 53″ – 1 piece
E – X-TRIMS – 2×4 lumber 19 1/2″ – 1 piece
E – X-TRIMS – 2×4 lumber 29 1/2″ – 2 pieces
E – X-TRIMS – 2×4 lumber 13 1/4″ – 2 pieces
E – X-TRIMS – 2×4 lumber 14 1/4″ – 2 pieces
F – X-TRIMS – 2×6 lumber 60″ – 1 piece
- 2×4 lumber 8 ft – 6 pieces
- 2×4 lumber 10 ft – 3 pieces
- 2×6 lumber 6 ft – 1 piece
- 3 1/2″ screws – 20 pieces
- 2 1/2″ screws – 50 pieces
- stain / paint – 1 can
- Glue – 1 piece
- Wood putty – 1 can
Tools
- Miter saw, Circular saw, Pocket hole jig
- Drill machinery, Drill bits, Jigsaw
- Safety gloves, Glasses, Speed square
- Chalk line, tape measure, spirit level, carpentry pencil
Time
- One weekend
Related
Step 1: Building the side frames
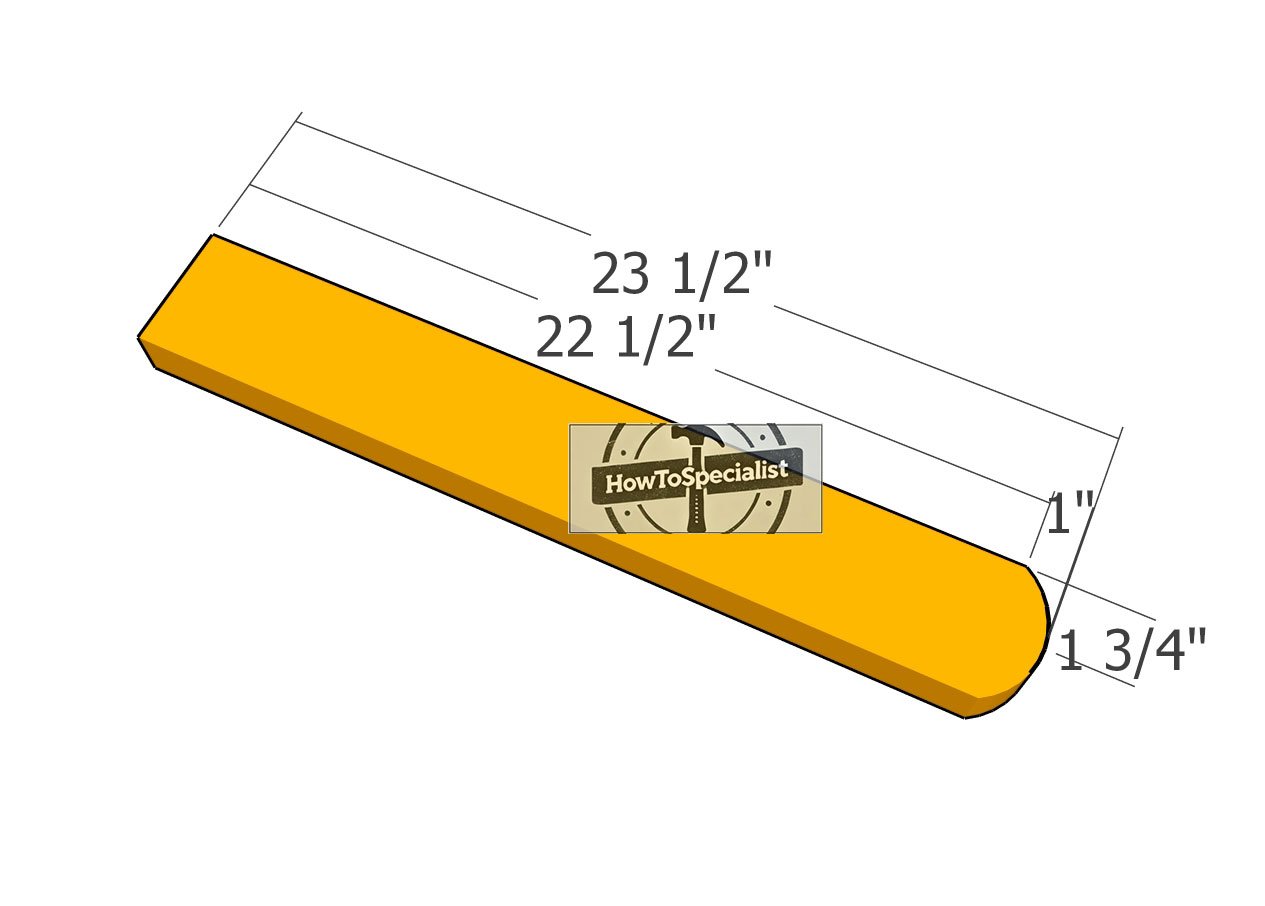
Armrests
Start by assembling the side frames for the project. Cut the armrests from 2×4 lumber, following the dimensions in the diagram. Round one end of each board to create a smooth, comfortable finish, then use sandpaper to smooth all edges for a clean and polished look. Taking the time to prep these pieces ensures a sturdy and well-crafted final result.
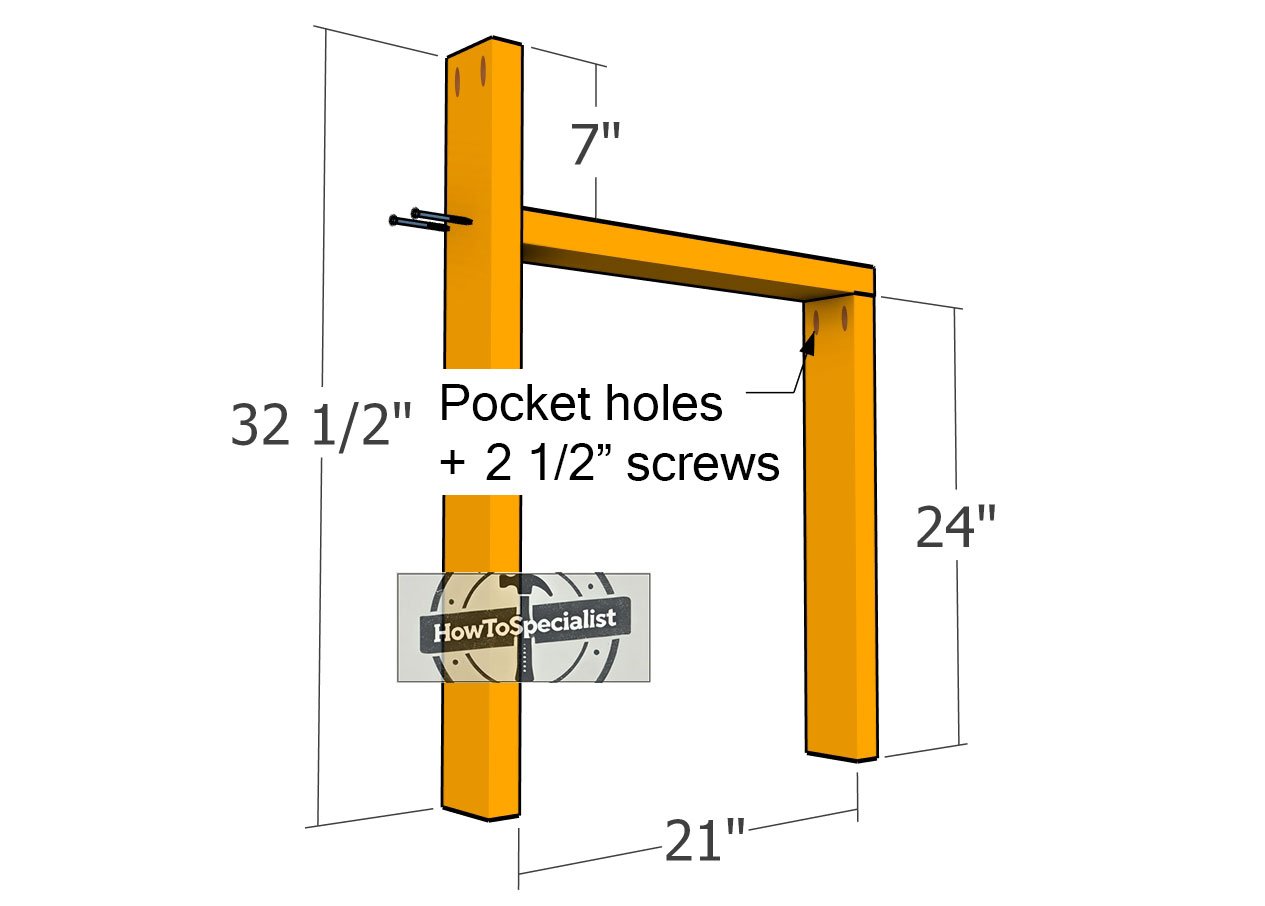
Assembling-the-side-frames
Cut the back and front legs for the garden bench from 2×4 lumber, making sure the angles and lengths match the diagram for a precise fit. Drill pilot holes through the back legs and attach them to the armrests using 2 1/2-inch screws for a strong connection. Next, drill pocket holes at the top end of the front legs and secure them to the side frames with 2 1/2-inch screws. Ensure all joints are flush and tight, as this step forms the structural backbone of your bench.
Step 2: Building the seat
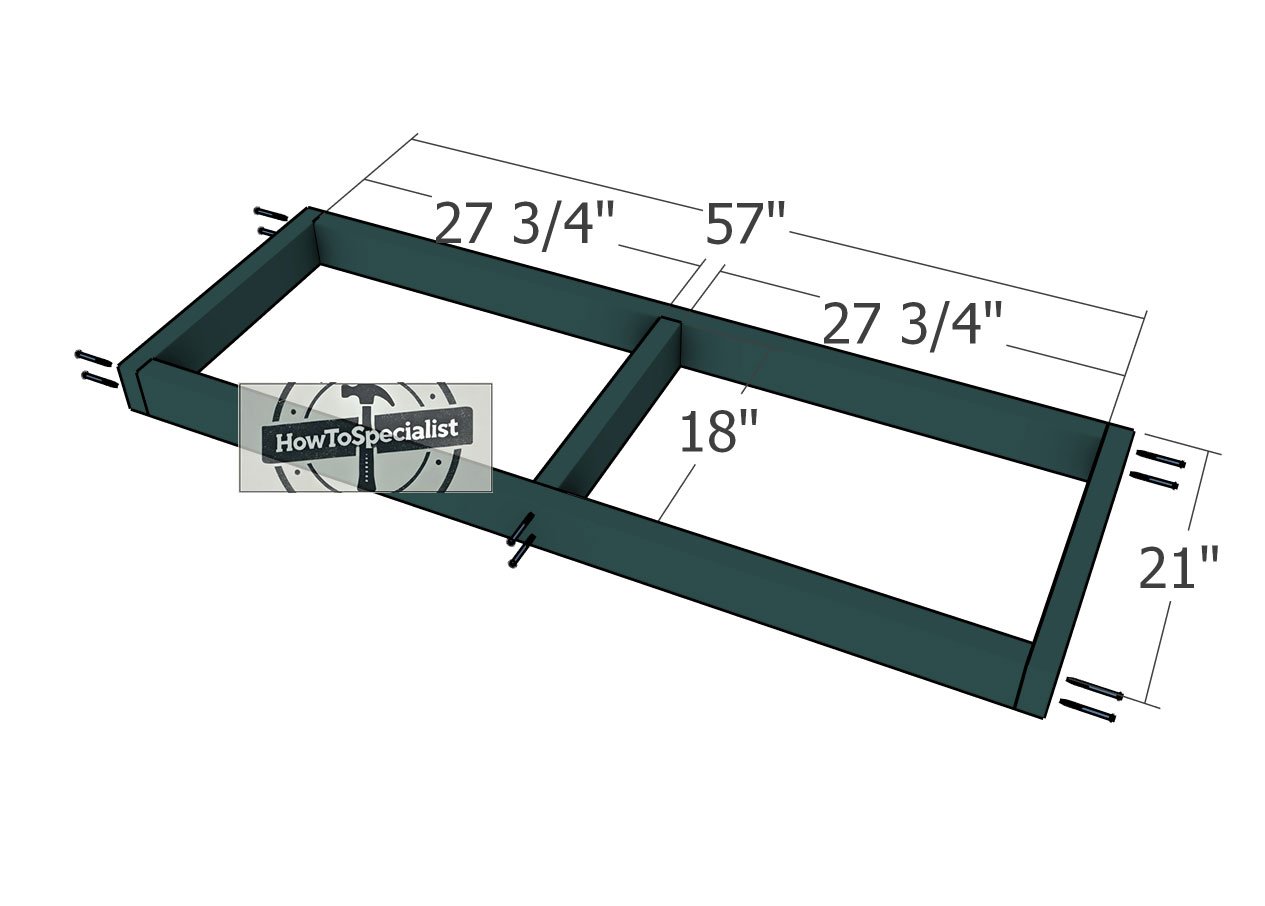
Seat-frame
Build the seat frame using 2×4 lumber, cutting each component to size as shown in the diagram. Lay the pieces on a flat, level surface for accurate assembly. Drill pilot holes through the frame components to prevent splitting, then secure them together with 3 1/2-inch screws. Make sure the corners are square and the frame is sturdy, as this will provide the support needed for the bench seat.
Fitting-the-seat-frame
Attach the side frames to the seat frame, making sure everything is properly aligned. Position the seat so it sits flush with the front and back legs. Drill pilot holes to prevent splitting, then secure the seat frame to the legs using 2 1/2-inch screws. Double-check that the seat is perfectly horizontal with a spirit level, and drive two screws into each joint for a strong and stable connection.
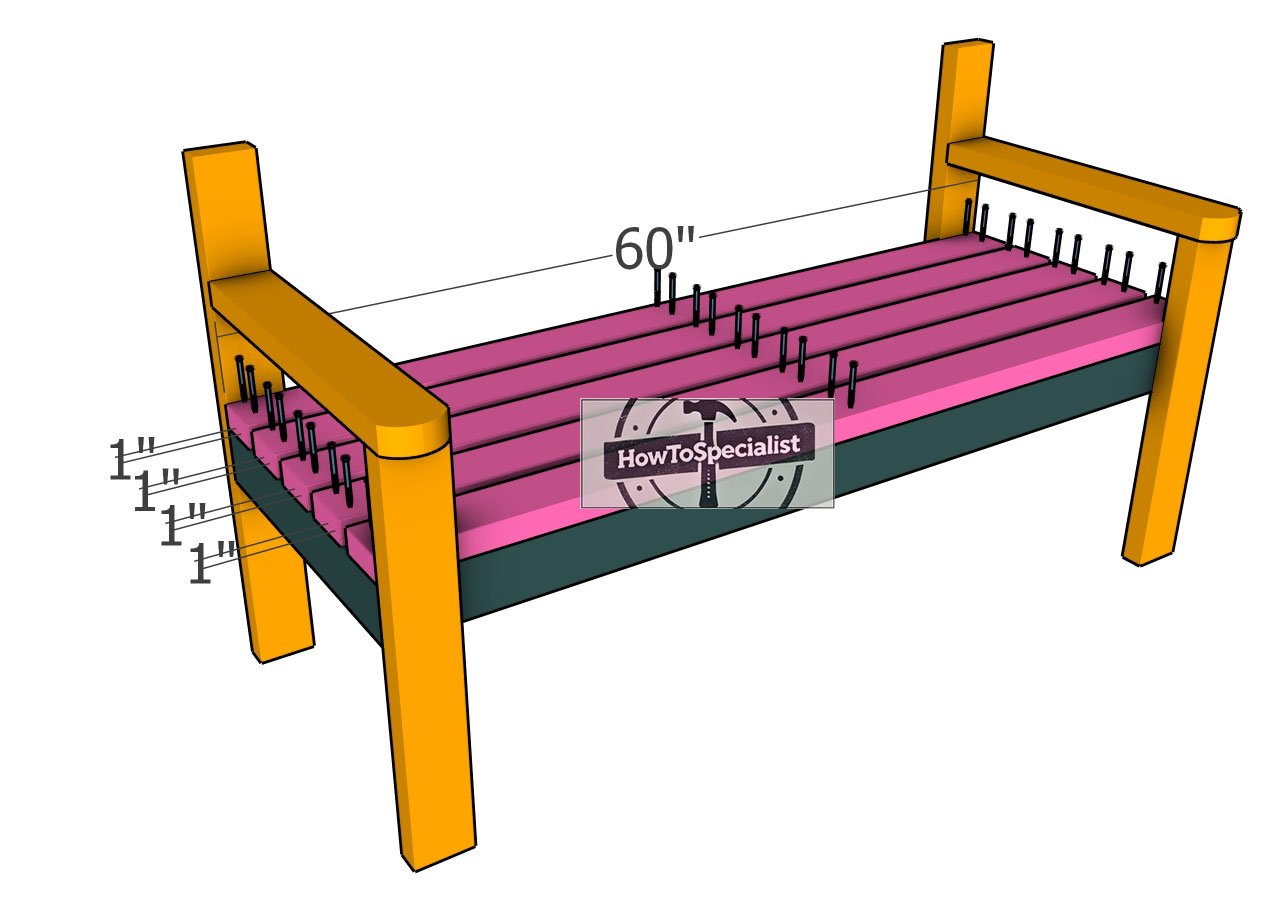
Fitting-the-seat-slats
Install the 2×4 boards onto the seat frame, aligning them evenly with the front and back edges of the bench. Use 1-inch spacers between the boards to ensure consistent gaps for a clean, uniform look. Drill pilot holes through each board to prevent splitting, then secure them to the seat frame with two screws at each joint. Take your time to ensure the boards are straight and flush for a sturdy and polished finish.
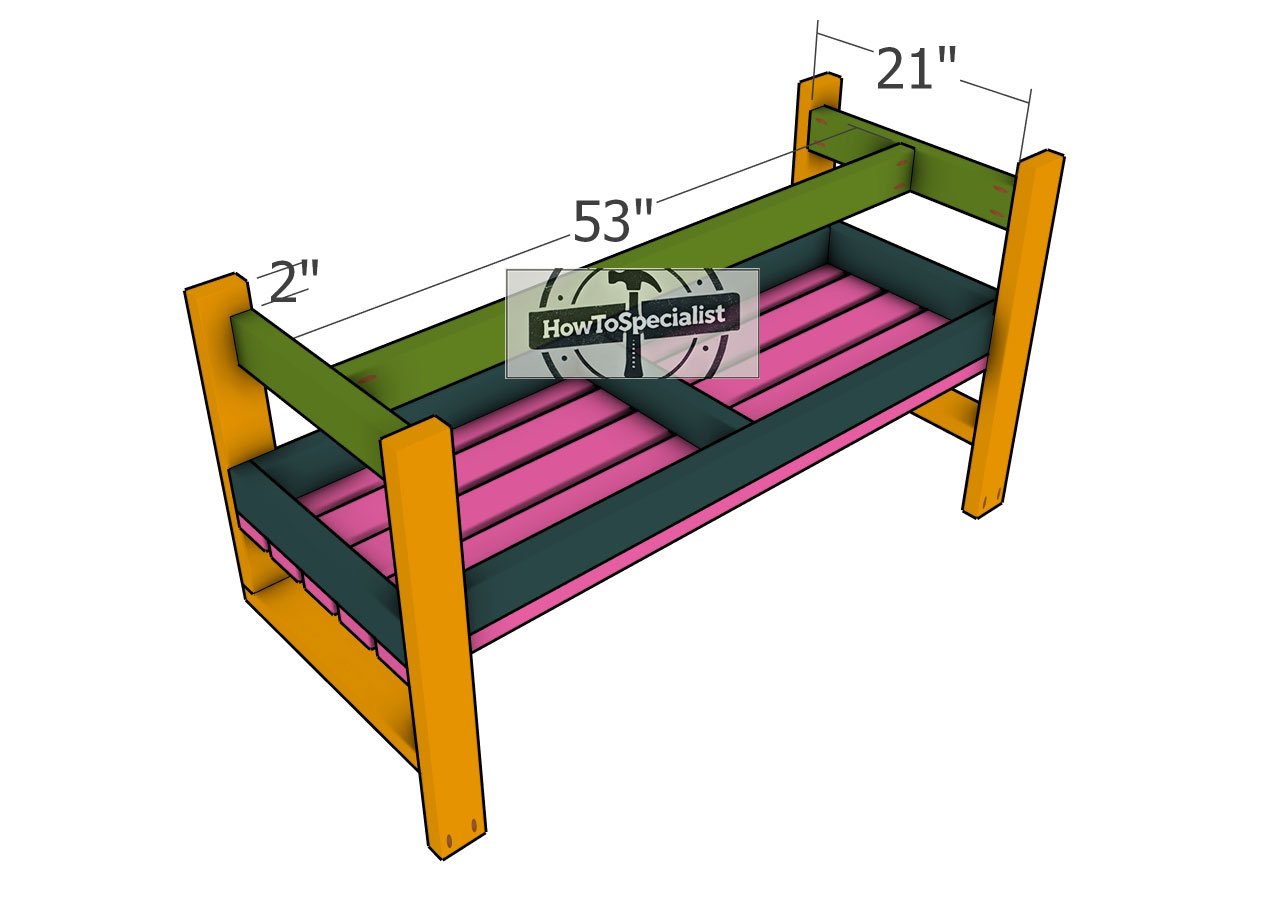
Fitting-the-bottom-stretcher
Add a center stretcher to the bottom of the garden bench to enhance its rigidity. Cut the components from 2×4 lumber according to the measurements in the diagram. Drill pocket holes at both ends of the stretcher, then position it in the center of the bench frame. Secure the stretcher in place using 2 1/2-inch screws, ensuring all joints are tight and flush. This step will provide additional support and stability to the bench, making it durable for everyday use.
Step 3: Building the backrest
Top-back-support
For the top backrest board, use a 2×6 lumber piece to give the bench a bold and sturdy look. If you prefer a simpler design, a 2×4 board can also be used. To create the curved arch on the 2×6, start by marking the center point of the board’s length. Hammer a small nail or screw at this center point on one edge, then tie a string to it. Attach a pencil to the other end of the string, ensuring the length matches the desired radius of the curve. Pull the string taut and sweep the pencil across the board to draw a smooth, even arc. Alternatively, use a flexible strip of wood or a drawing template for a precise curve.
Once the curve is drawn, cut along the line using a jigsaw for accuracy. Sand the cut edge to smooth out any rough spots. Drill pocket holes along the top of the back legs and secure the curved backrest board with 2 1/2-inch screws. Ensure the board is level and centered before fastening, giving your bench a refined and comfortable backrest with a personalized touch.

Fitting-the-middle-back-support
Attach the middle 2×4 support to the backrest of the outdoor bench for added stability. Drill pocket holes at the top end of the support and secure it to the top backrest beam with 2 1/2-inch screws. Make sure the support is perfectly centered and plumb. Then, drill pilot holes through the bottom of the support and fasten it to the seat frame with 2 1/2-inch screws. This step ensures that the backrest remains sturdy and well-supported, enhancing the overall strength of the bench.

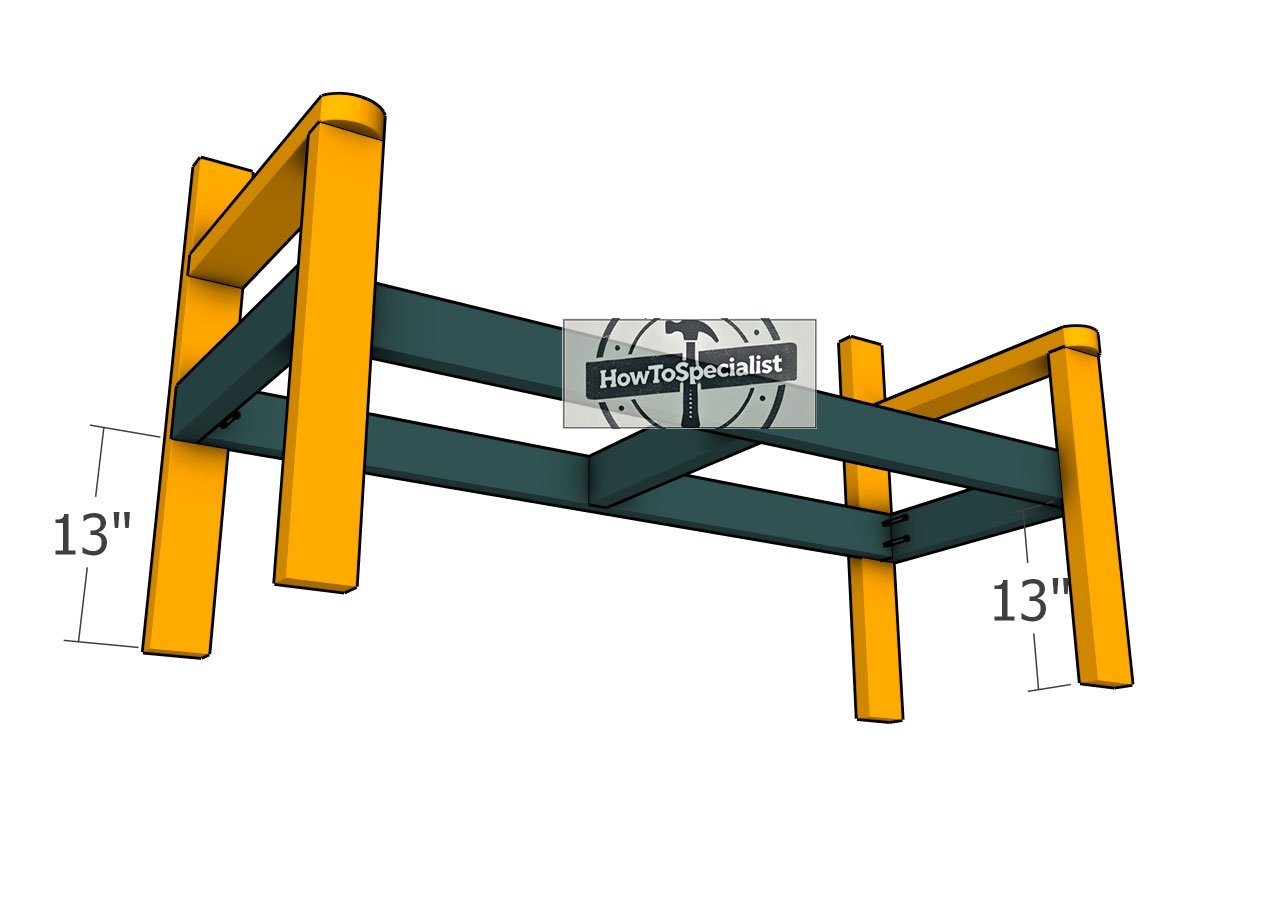
X-trims
Cut the X trim pieces from 2×4 lumber, following the measurements provided in the diagram. Use a circular saw to make precise angle cuts at both ends of each board, ensuring the pieces fit together neatly in an X pattern. Double-check the angles before cutting to ensure a tight and seamless fit when assembling the trims on the bench frame. Smooth the edges with sandpaper for a clean finish and easy installation.

Fitting-the-X-trims
Install the X trims onto the backrest of the bench, positioning them as shown in the diagram. Align the edges flush with the frame to ensure a clean, seamless look. Drill pilot holes to prevent splitting, then secure the trims tightly with 2 1/2-inch screws at each joint. Double-check the alignment as you fasten each piece to ensure the X pattern is symmetrical and sturdy.
Step 4: Finishing touches
How to build a 2×4 garden bench
For the finishing touches, sand all surfaces of the bench to remove any rough edges and ensure a smooth finish. Pay special attention to corners, joints, and the curved areas of the backrest. Apply a wood filler to cover any visible screw holes or gaps for a cleaner appearance.
2×4 bench plans – DIY
Once sanded, apply an exterior wood stain or paint that complements your outdoor space and protects the bench from weather elements. For long-lasting durability, seal the wood with a waterproof topcoat. Finally, double-check all screws and joints for tightness, and your outdoor bench is ready to add both comfort and style to your garden or patio.
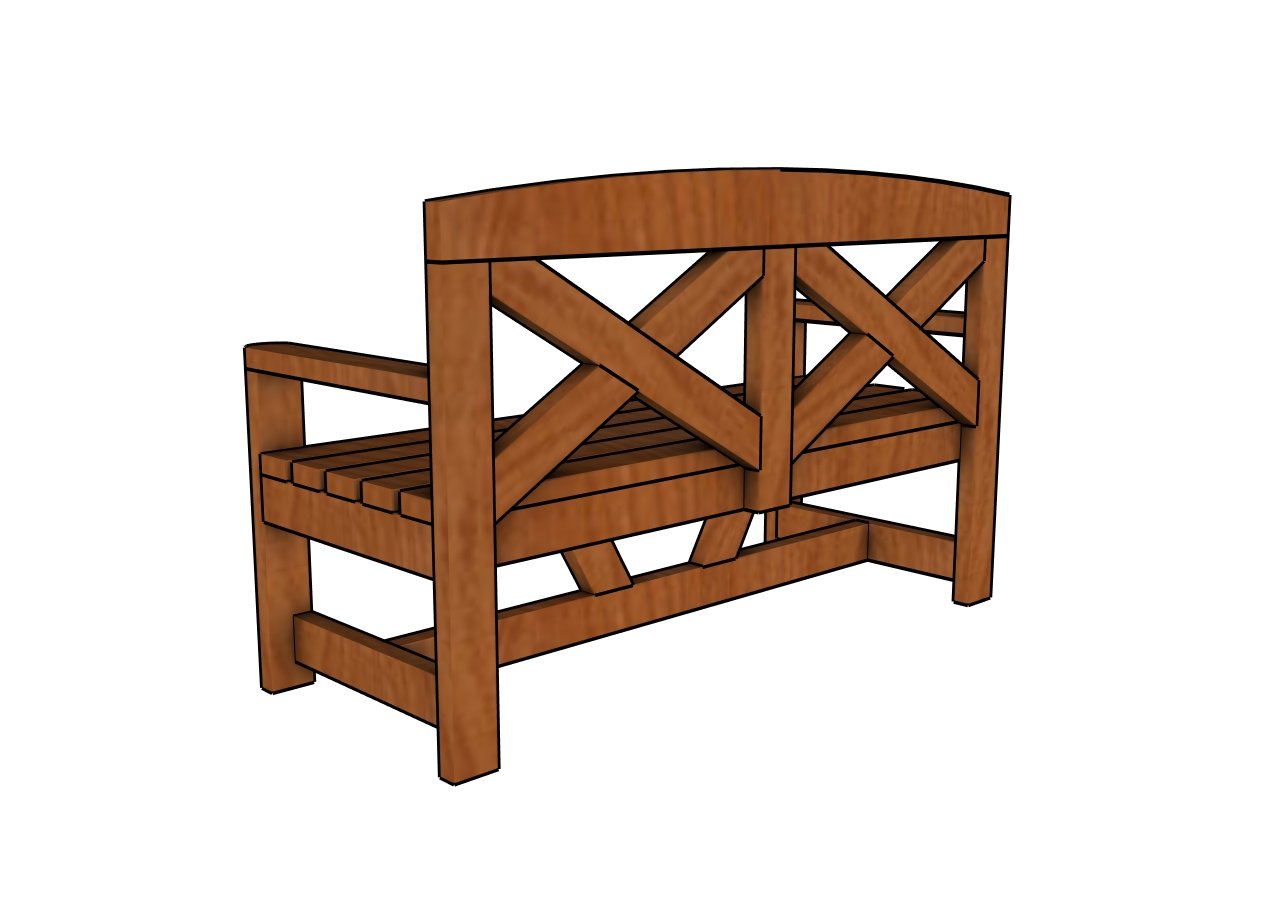
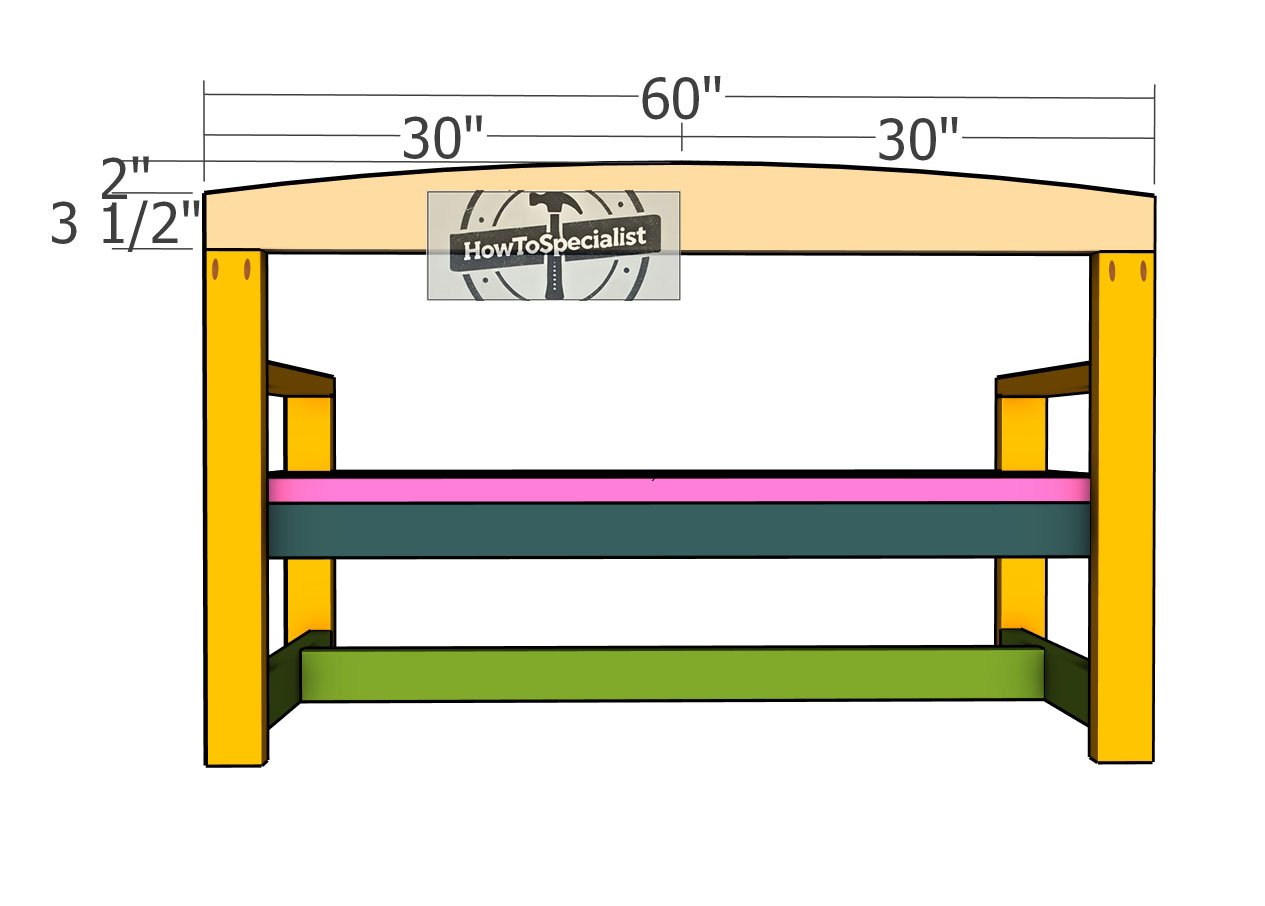
2×4 bench plans – back view
To make the most of this project, consider customizing the bench to fit your outdoor space and style. You can add cushions for extra comfort, apply a weather-resistant stain or paint to match your patio decor, or even install a small storage compartment under the seat for added functionality. If you want to enhance durability, use cedar or redwood for better resistance to moisture and decay. Placing the bench in a shaded spot or pairing it with a matching table can create a cozy outdoor seating area perfect for relaxing or entertaining guests. With a few personal touches, this bench can become a standout piece in your backyard for years to come.

Thanks for checking out my how to make a 2×4 garden bench! Be sure to explore my other projects for more fantastic ideas. Don’t forget to hit the LIKE button and SHARE with your friends using the social media links below.