If you’re looking for free dog steps plans, you’ve come to the right place! In this post, I’ll walk you through the step-by-step process of building your own sturdy and stylish dog steps that are perfect for helping your furry friend reach higher surfaces with ease. These DIY dog steps are not only functional but also a great woodworking project for any skill level. Plus, with easy-to-follow instructions and materials you can find at any home improvement store, you’ll have these custom dog steps built in no time, without spending a fortune!
These free dog steps plans come with an added bonus, a built-in small indoor dog house or storage area! Not only will these steps help your pup reach higher surfaces, but they also offer a cozy space underneath where your dog can rest, or you can use it for extra storage. It’s a practical and space-saving solution that combines functionality with style, making it perfect for any home. See my other DIY projects HERE.
We recommend you to invest in the best materials you could afford. Therefore, you should buy weather-resistant lumber, such as pine or cedar. Always take accurate measurements before adjusting the size of the components at the proper size. Drill pilot holes trough the components before inserting the wood screws, to prevent the wood from splitting. My plans come with a full cut / shopping list and they are PDF Download and Print friendly. See all my Premium Plans HERE.
Made from this plan
Pin it for Later!
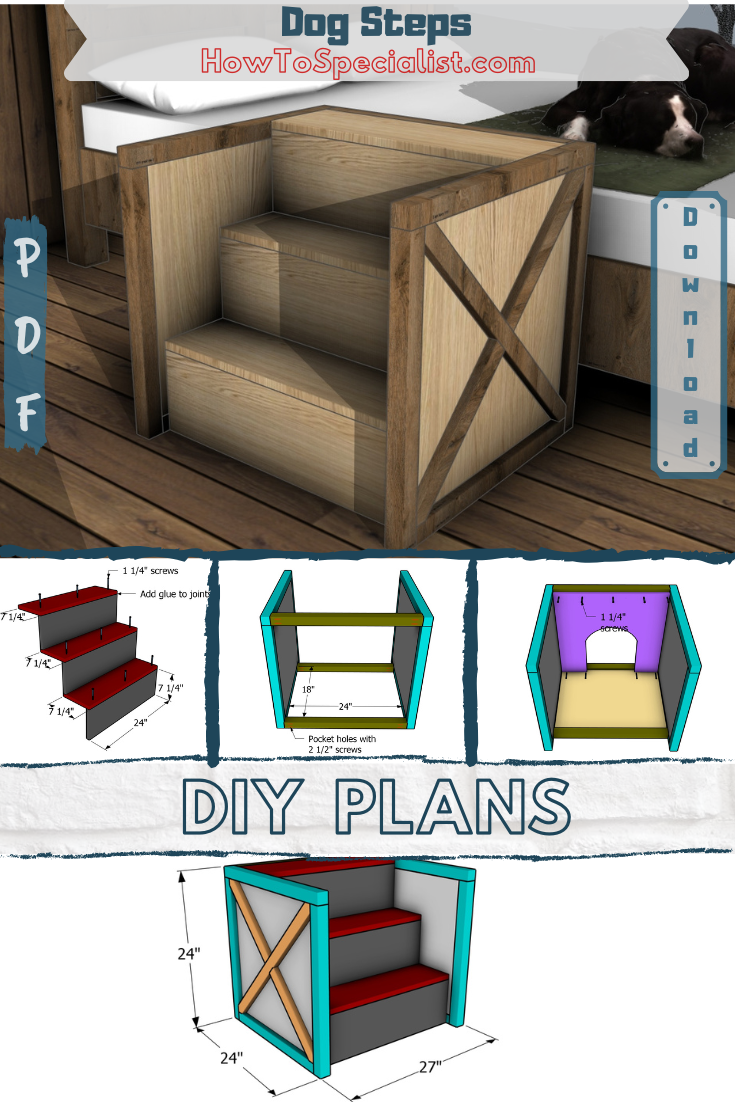
Dog Steps – Free Plans
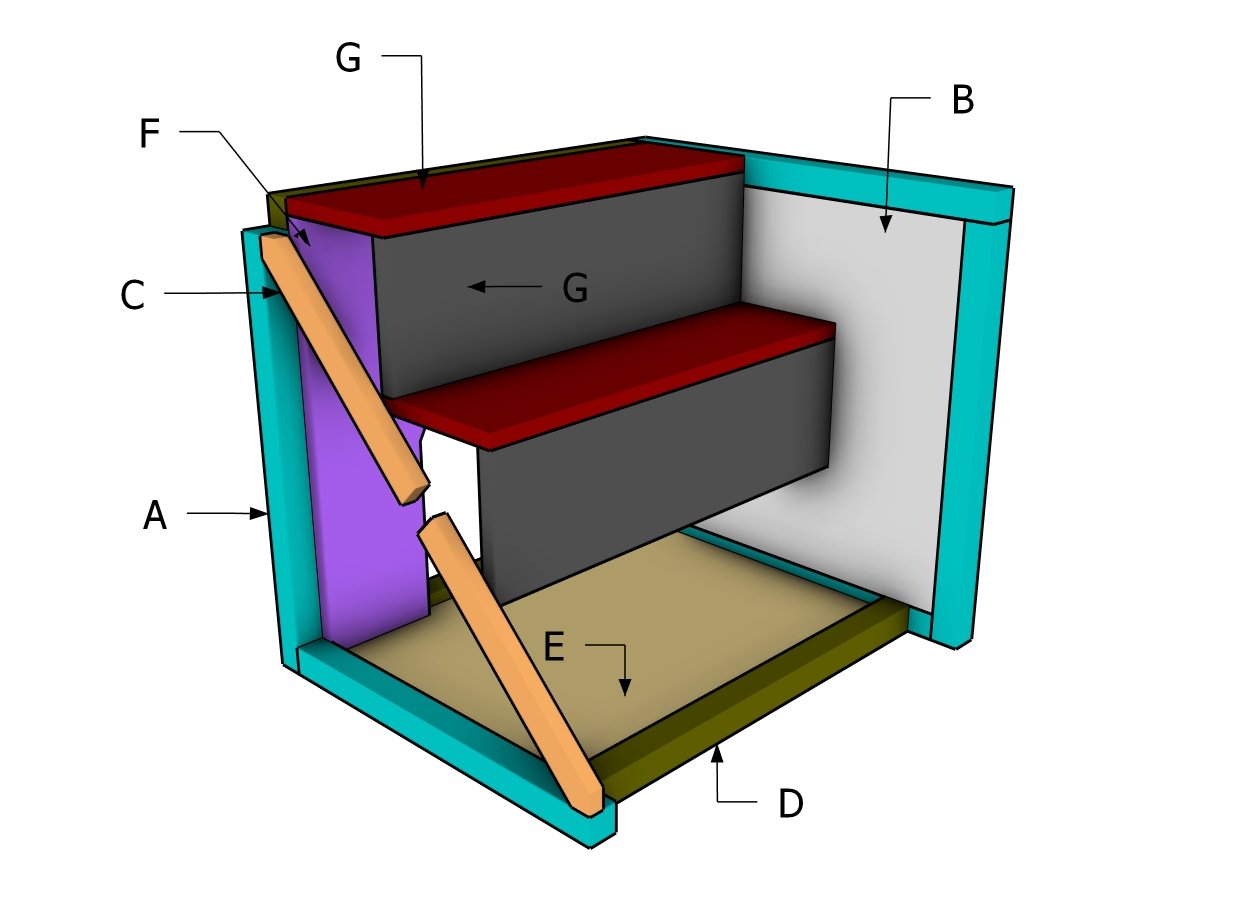
Materials
A – FRAME – 2×2 lumber 21″ – 2 pieces
A – FRAME – 2×2 lumber 24″ – 2 pieces
A – FRAME – 2×2 lumber 22 1/2″ – 4 pieces
B – SIDE PANELS – 3/4″ plywood 21″x21 – 2 pieces
C – TRIMS – 1×2 lumber 14″ – 4 pieces
C – TRIMS – 1×2 lumber 29 3/4″ – 2 pieces
D – SUPPORTS – 2×2 lumber 14″ – 24″ pieces
E – BOTTOM PANEL – 3/4″ plywood 18″x24″ – 1 piece
F – BACK PANEL – 3/4″ plywood 22 1/2″x24″ – 1 piece
G – STEPS – 1×8 lumber 24″ – 6 pieces
- 1×6 lumber 12 ft – 1 piece
- 2×2 lumber 8 ft – 3 pieces
- 1×2 lumber 10 ft – 1 piece
- 3/4″ plywood – 4’x4′ – 1 piece
- 2 1/2″ screws – 20 pieces
- 1 1/4″ screws – 50 pieces
- 1 1/4″ finish nails – 50 pieces
- Stain / paint – 1 piece
- Glue – 1 piece
Tools
- Miter saw
- Drill machinery, drill bits
- Safety gloves, glasses
- Chalk line, tape measure, spirit level, carpentry pencil
Time
- One week
Related
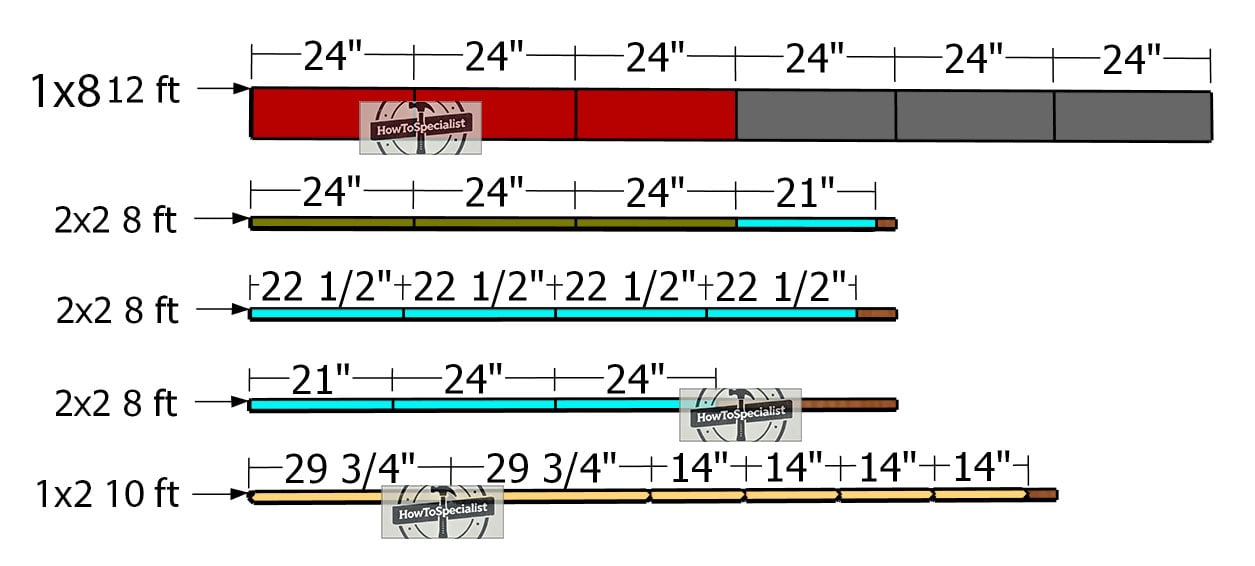
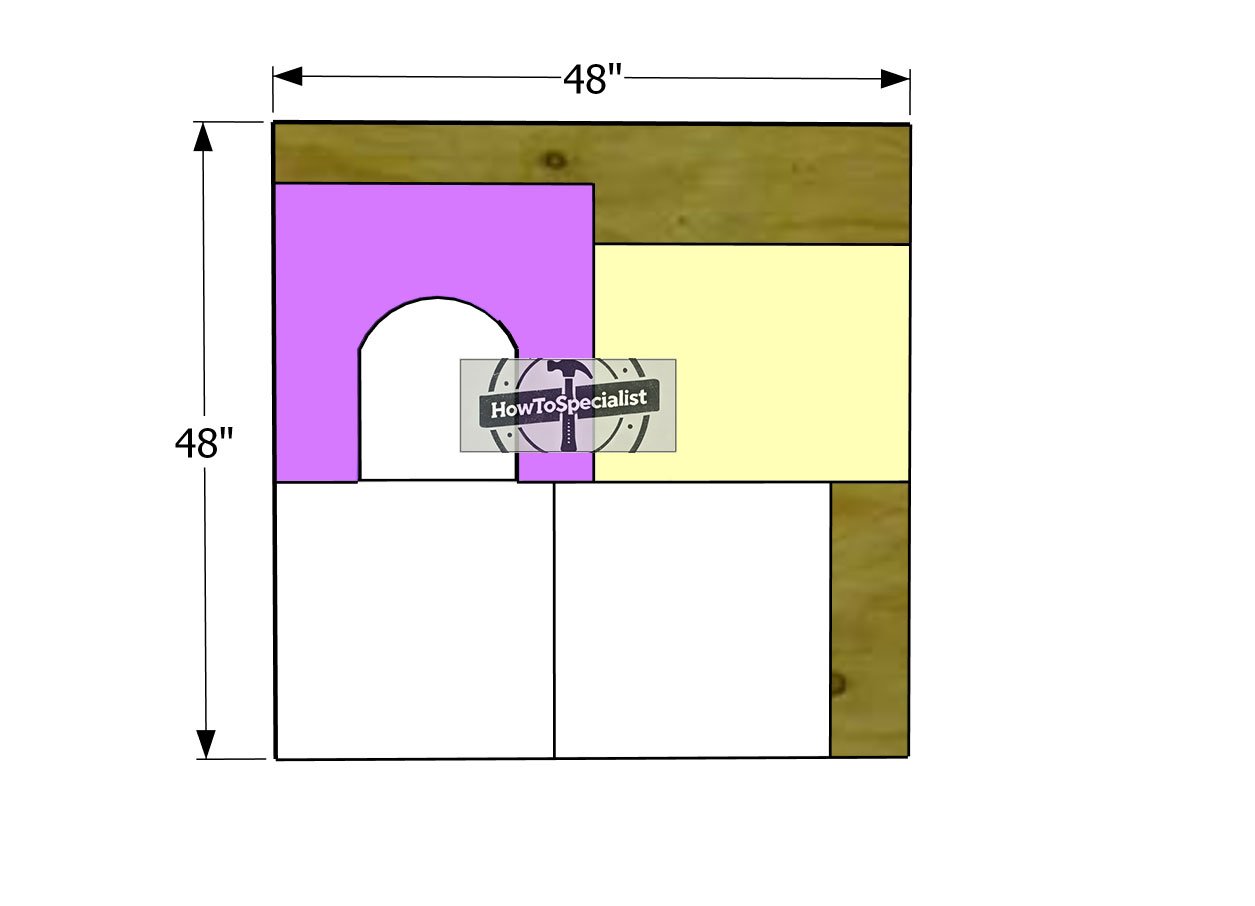
Cut layout diagram
Step 1: Building the sides
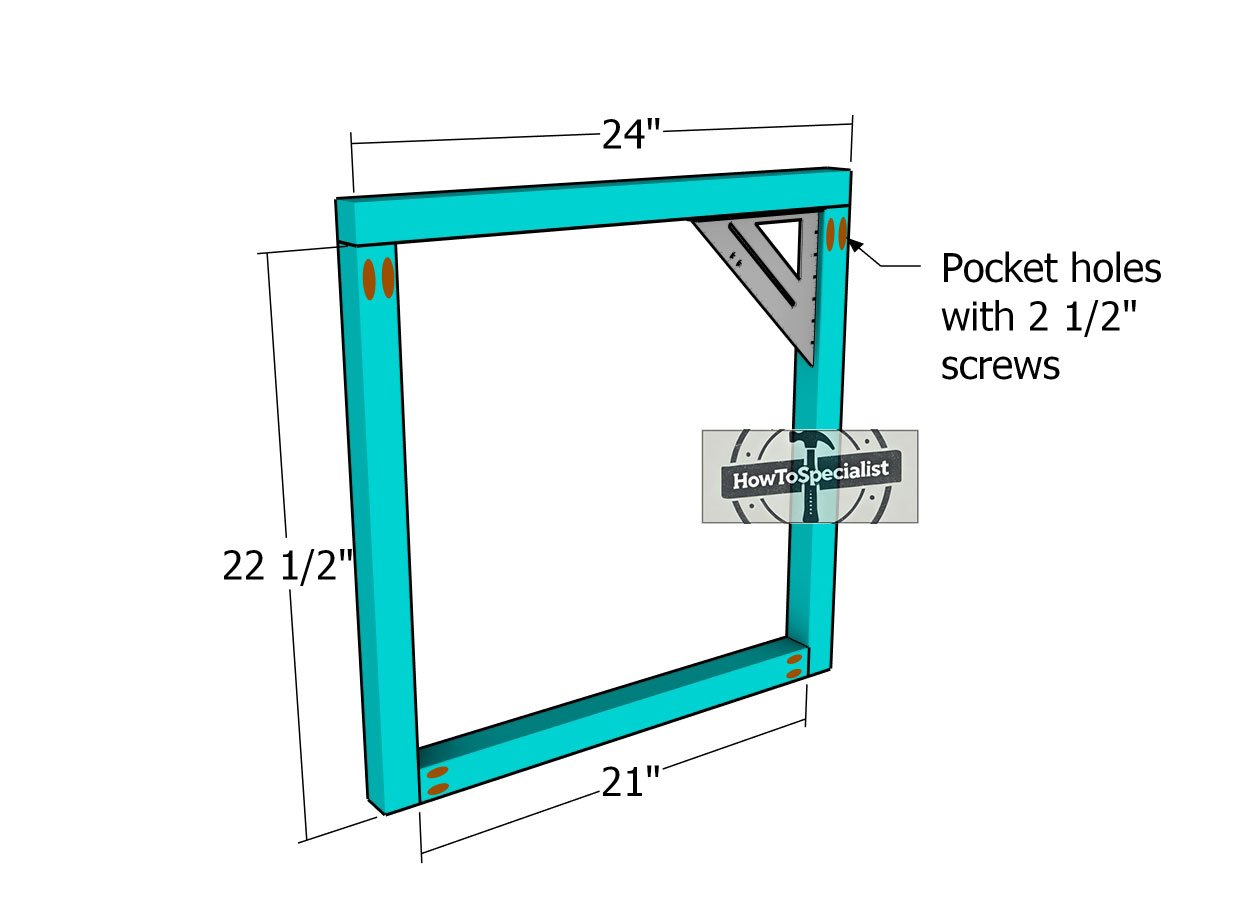
Assembling-the-side-frames
The first step in this project is to build the frames for the side panels. We’ll be using 2×2 lumber, and you’ll want to cut the pieces according to the diagram. To keep everything sturdy, drill pocket holes at both ends of the bottom pieces and at the top of the vertical boards.
Lay all the parts out on a flat surface and make sure the edges are nice and flush. Double-check that your corners are square, then go ahead and drive in those 2 1/2″ screws to put the frames together. Nice and easy—just take your time, and you’ll have solid side frames in no time!
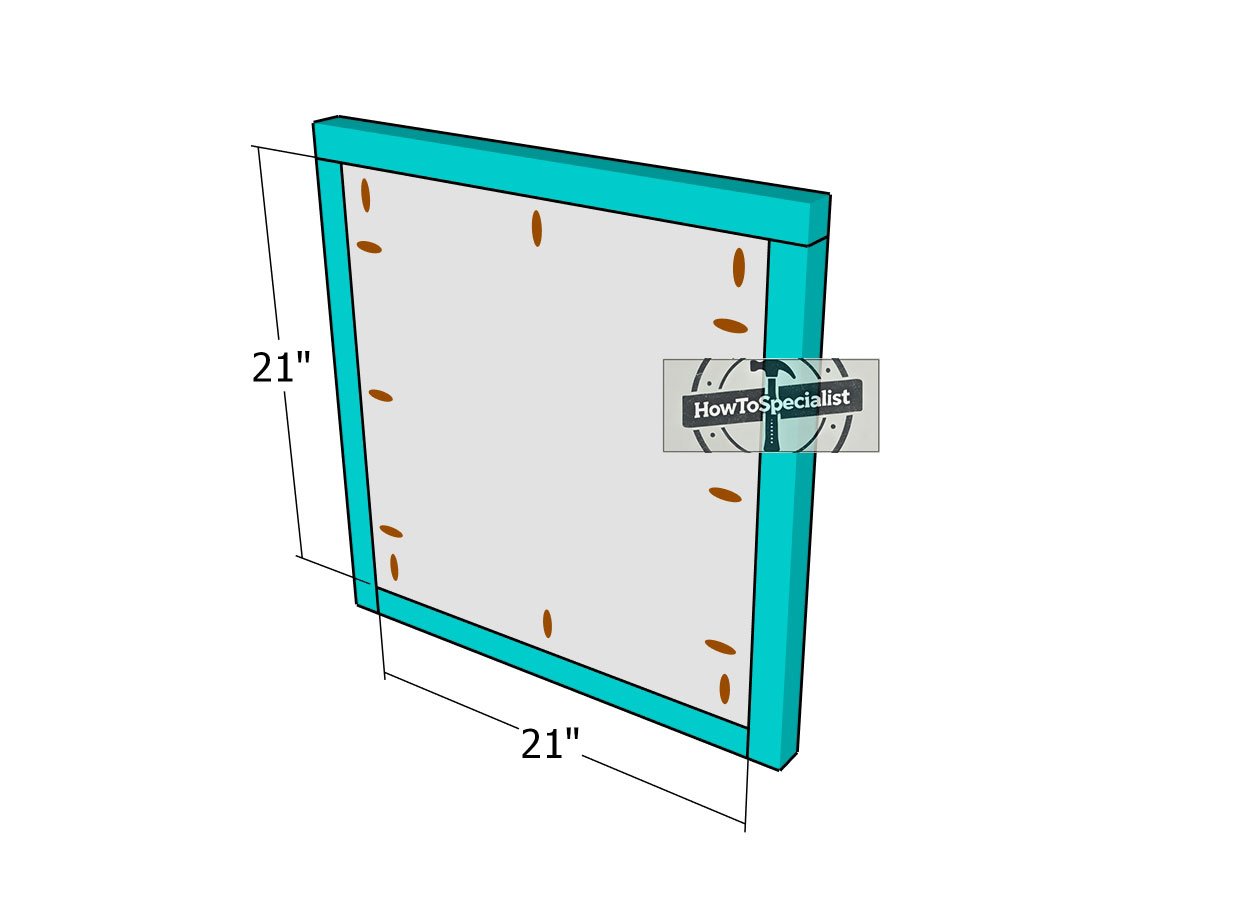
Fitting-the-side-panels
Next up, cut the side panels from 3/4″ plywood. You’ll want to drill pocket holes along all four edges, just like in the diagram. Once that’s done, fit the panel into the frame, making sure the edges are perfectly flush.
Before driving in the 1 1/4″ screws, don’t forget to add a bit of glue to those joints for extra strength. One important thing to keep in mind: make sure the pocket holes on the panel line up with the pocket holes on the frame, so everything stays nice and hidden.
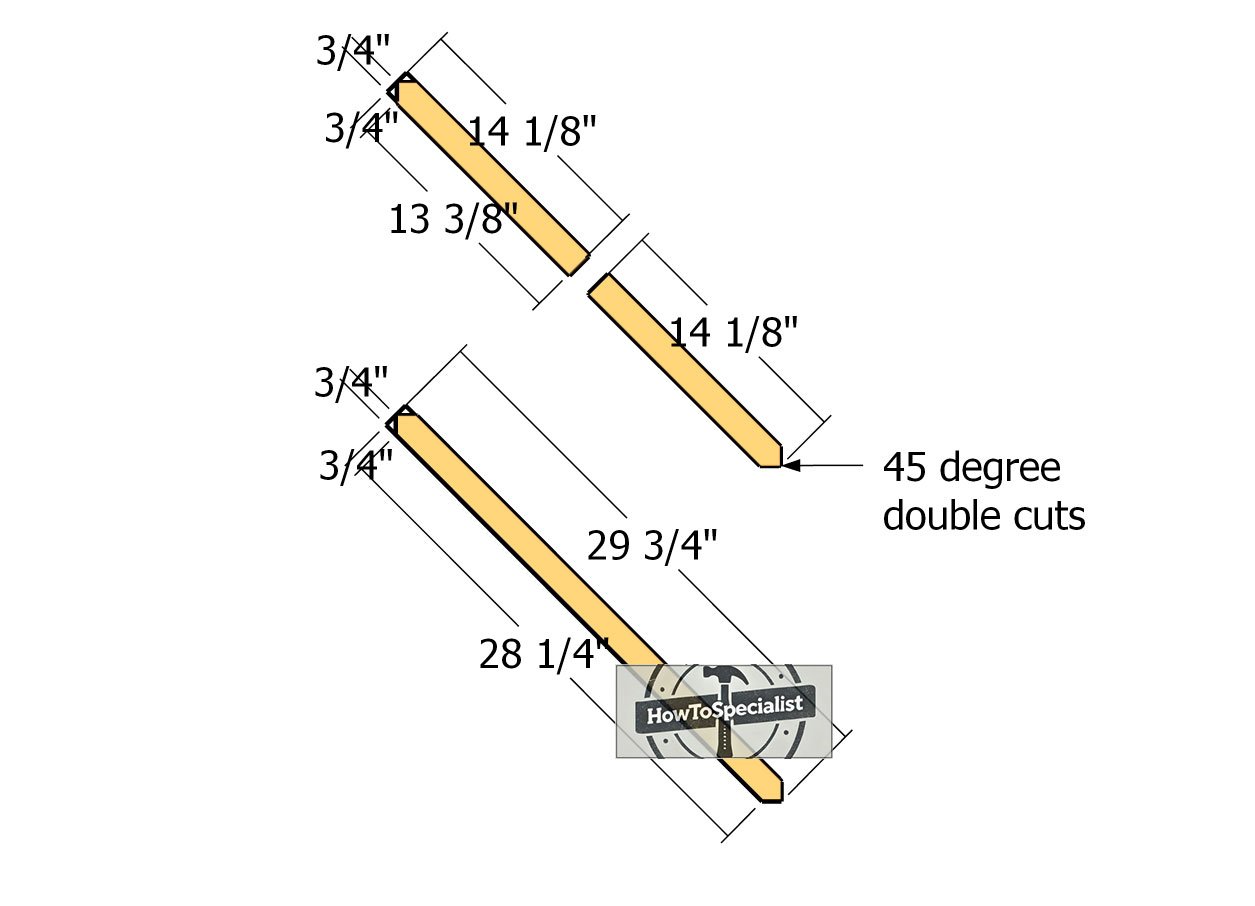
X-trims
Now it’s time to cut the X trims for the side panels. Grab your 1×2 boards and mark the cut lines carefully, just like the plans show. Once you’ve got your marks in place, use a saw to make the cuts. After that, take some sandpaper and smooth out those edges for a nice, clean finish. This will help the trims fit perfectly and give your project that polished look.
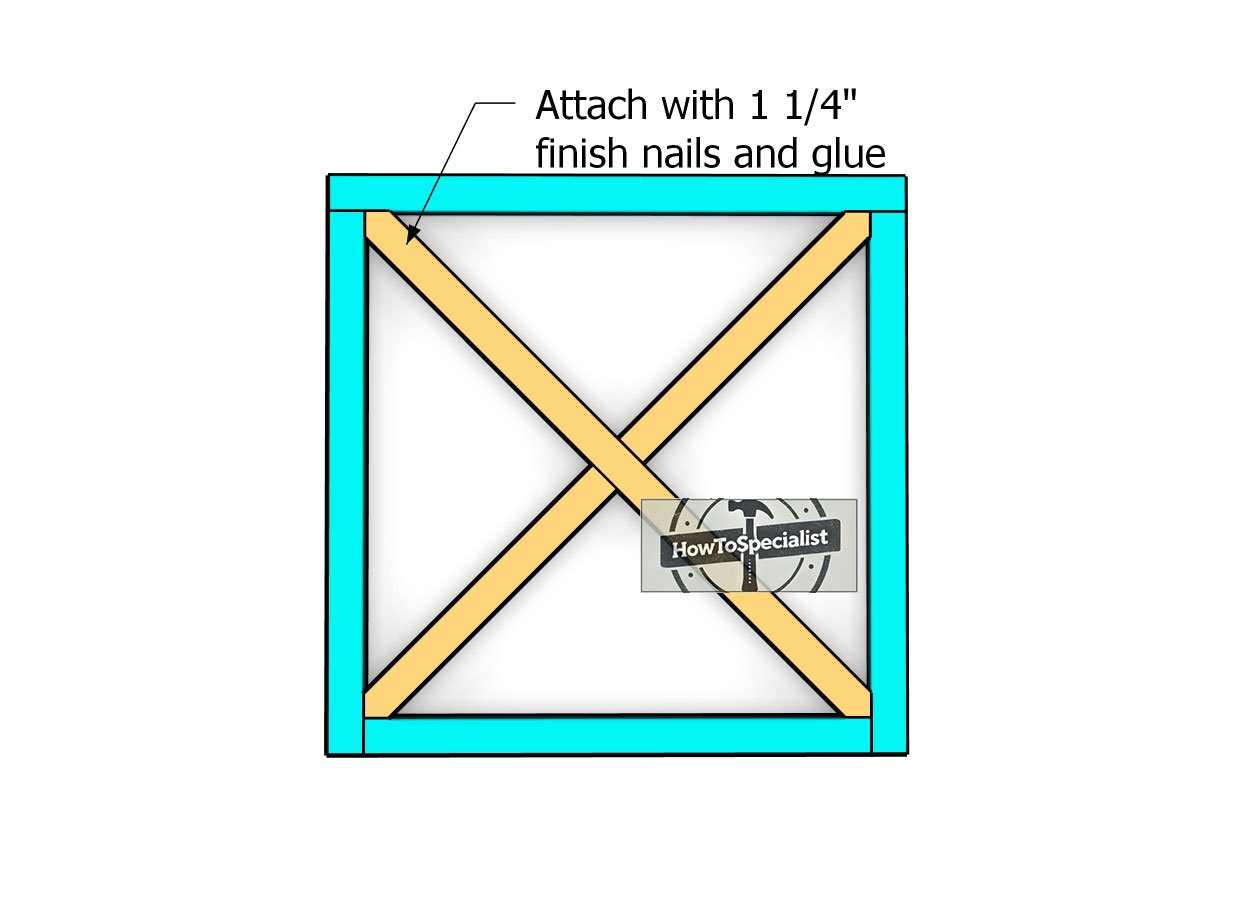
Attaching-the-X-trims
Now it’s time to attach those X trims to the side panels, following the diagram for placement. Make sure to align the edges flush for a seamless fit. Once everything’s in position, secure the trims with 1 1/4″ finish nails and a little bit of glue for extra hold. Take your time here to make sure everything is nice and snug—this is what will give the sides that classic farmhouse look!
Step 2: Assembling the frame
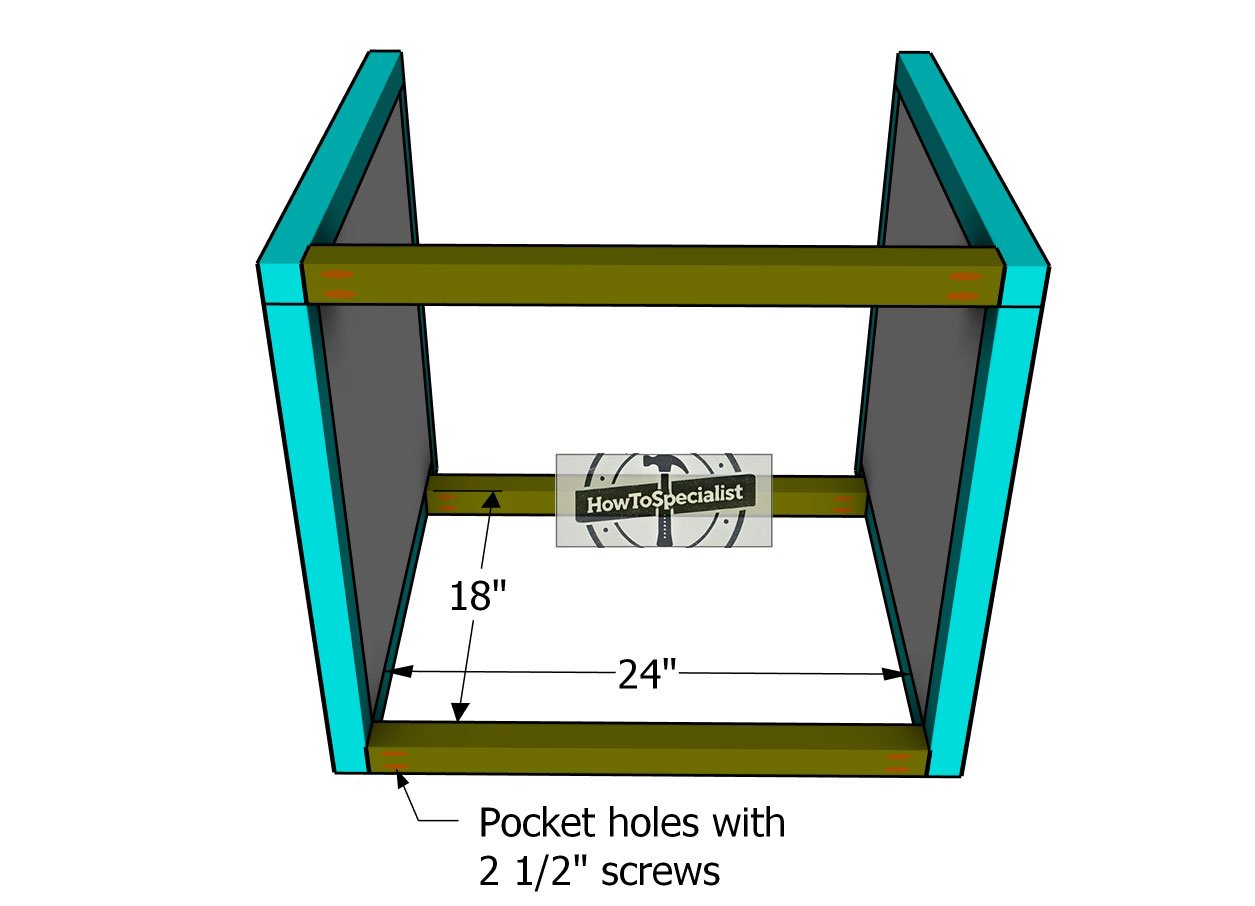
Assembling-the-frame
Once both sides are assembled, it’s time to bring them together by adding the 2×2 supports. Start by drilling pocket holes at both ends of each support. Then, fit the supports between the sides and secure them in place with 2 1/2″ screws. Don’t forget to double-check that your corners are square before tightening everything up. This step will really lock the structure together and ensure a sturdy frame.
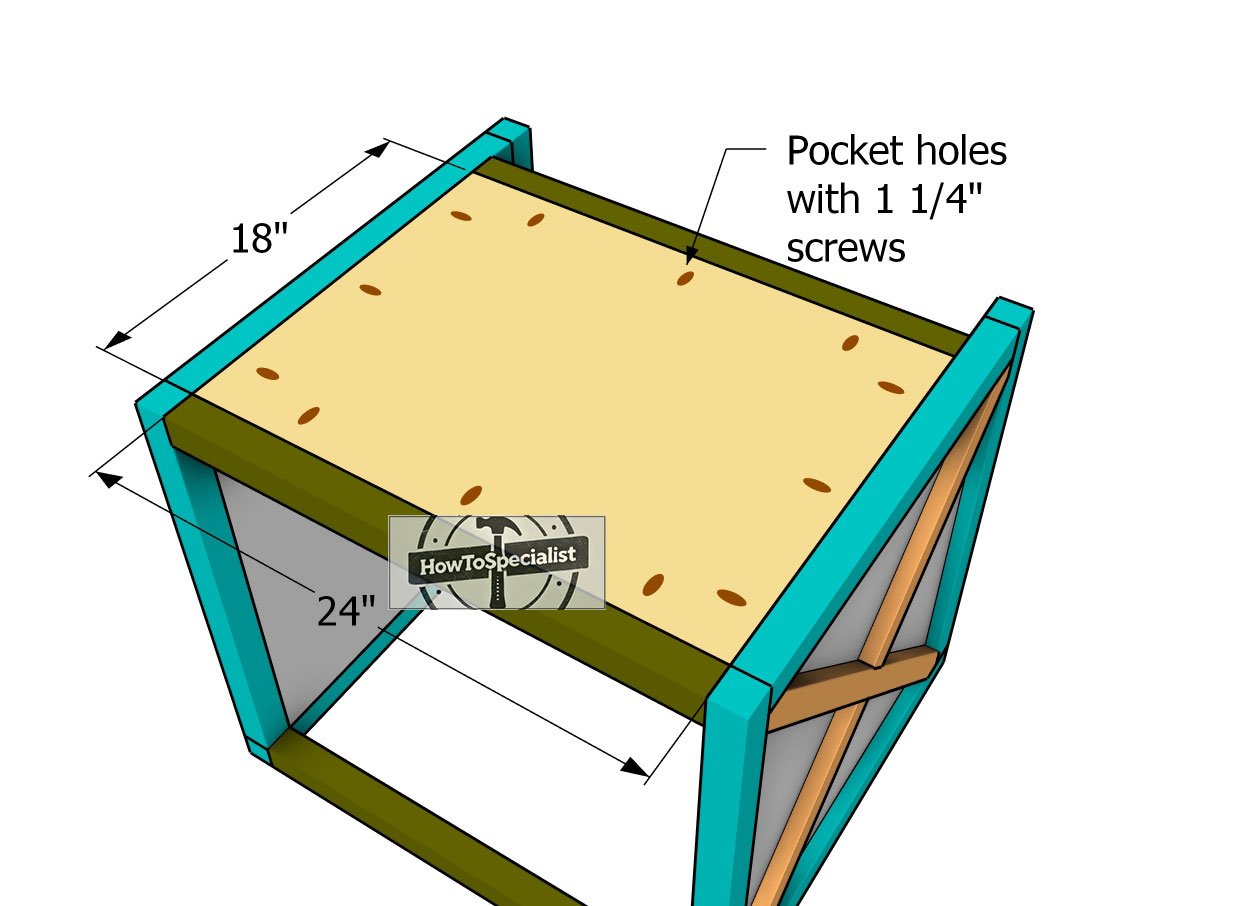
Fitting-the-bottom-panel
For the bottom of the unit, we’ll be using 3/4″ plywood as well. Cut the panel to size, drill pocket holes along the edges, and then secure it to the frame using 1 1/4″ screws and some glue for extra strength. Be sure to align the panel flush with the bottom edges of the frame to keep everything nice and level. This will give the unit a solid base and really pull the structure together.
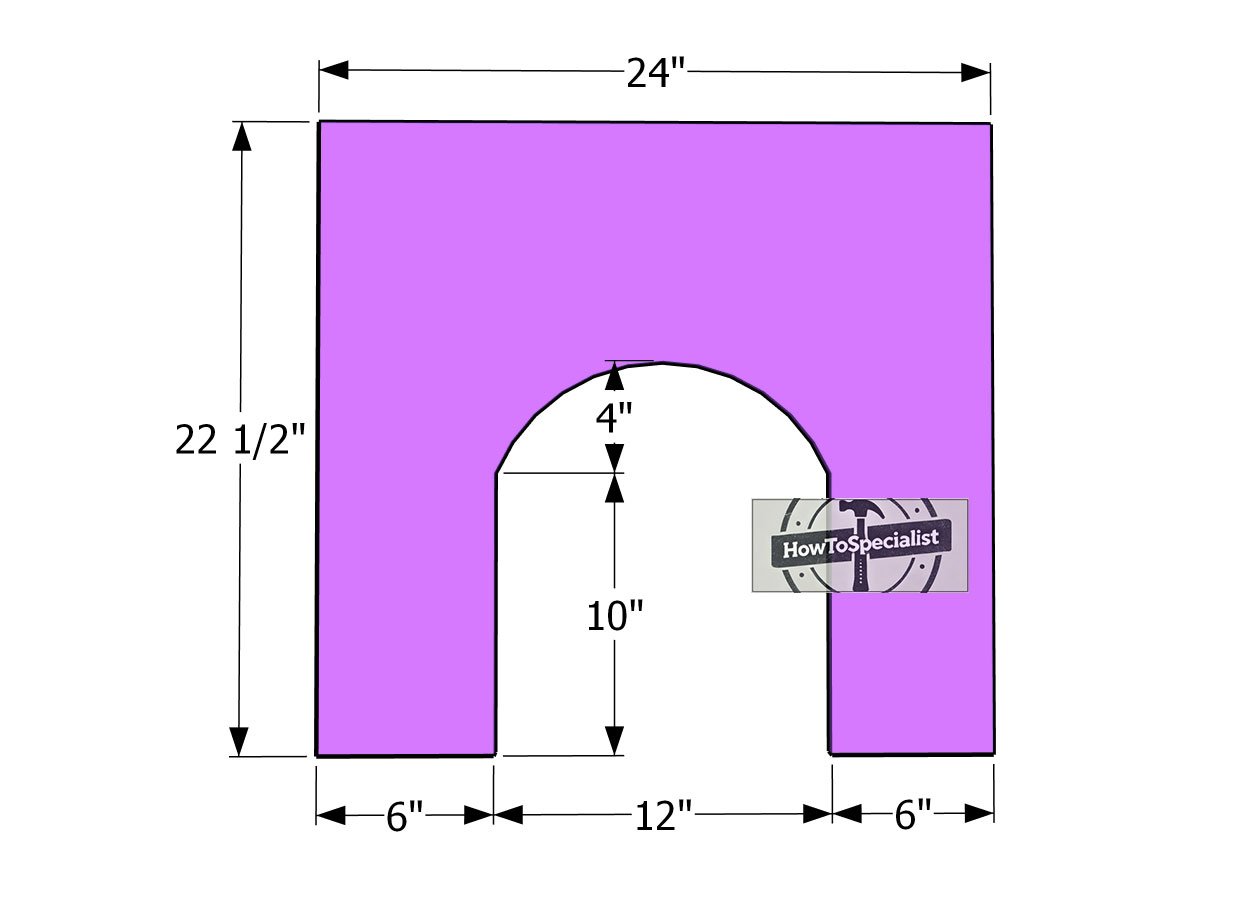
Back-panel
Now it’s time to cut the panel for the back of the dog steps. You’ll need to cut out the entrance, and for that, a jigsaw is your best friend—it allows you to easily make those curved cuts. Once you’ve finished cutting, grab some sandpaper and smooth out the edges to get rid of any rough spots and give it a nice, clean finish.
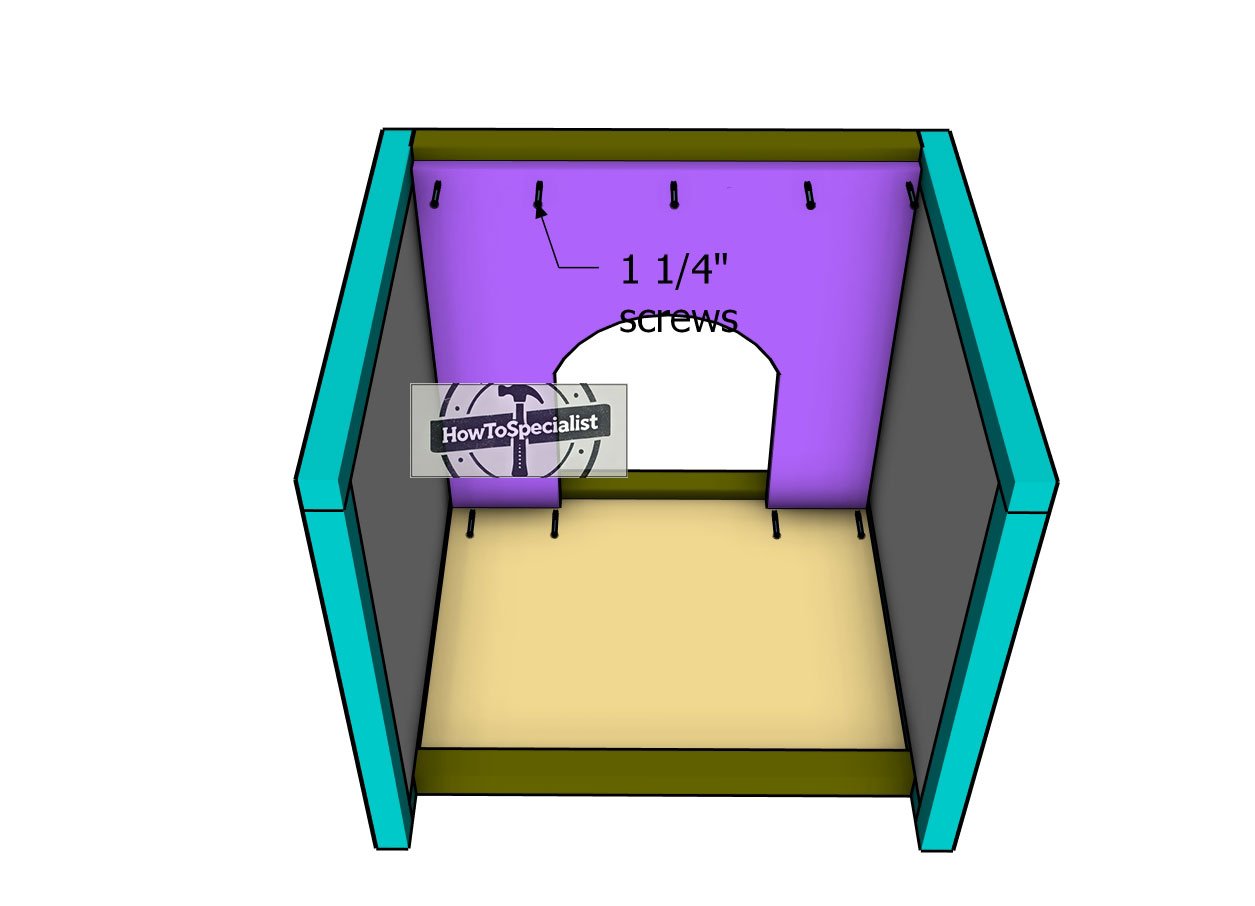
Attaching-the-back-panel
Attach the plywood panel to the back of the unit and secure it using 1 1/4″ screws. Before driving in the screws, be sure to drill pilot holes to prevent the plywood from splitting. This will keep everything in place securely and ensure a smooth finish on your dog steps.
Step 3: Making the steps
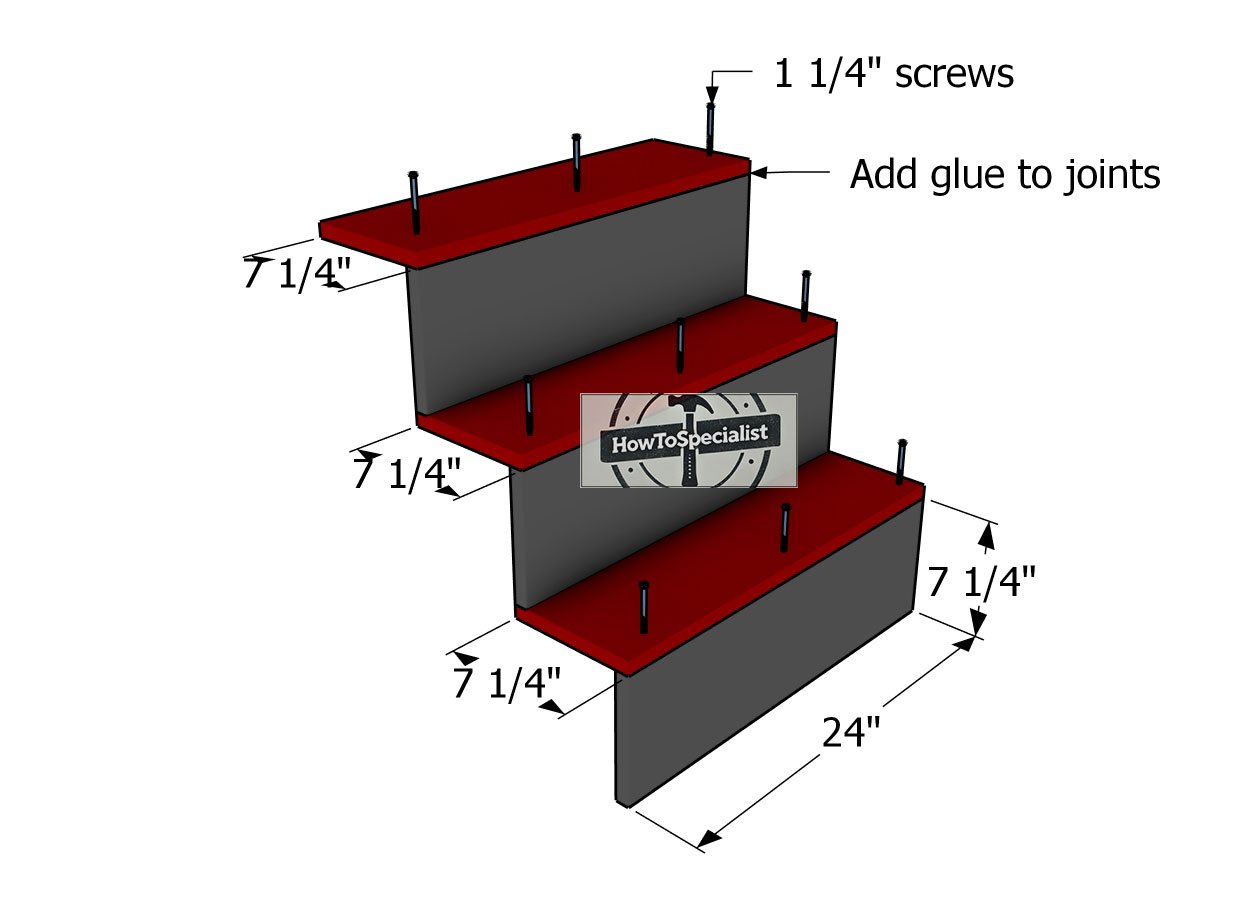
Assembling-the-steps
Assembling the steps for this project is pretty straightforward. Start by cutting the components from 1×8 lumber, then bring everything together using 1 1/4″ screws. Make sure the edges are perfectly flush and double-check that the corners are square. Don’t forget to drill pilot holes before inserting the screws—this will prevent the wood from splitting and give you a cleaner assembly.
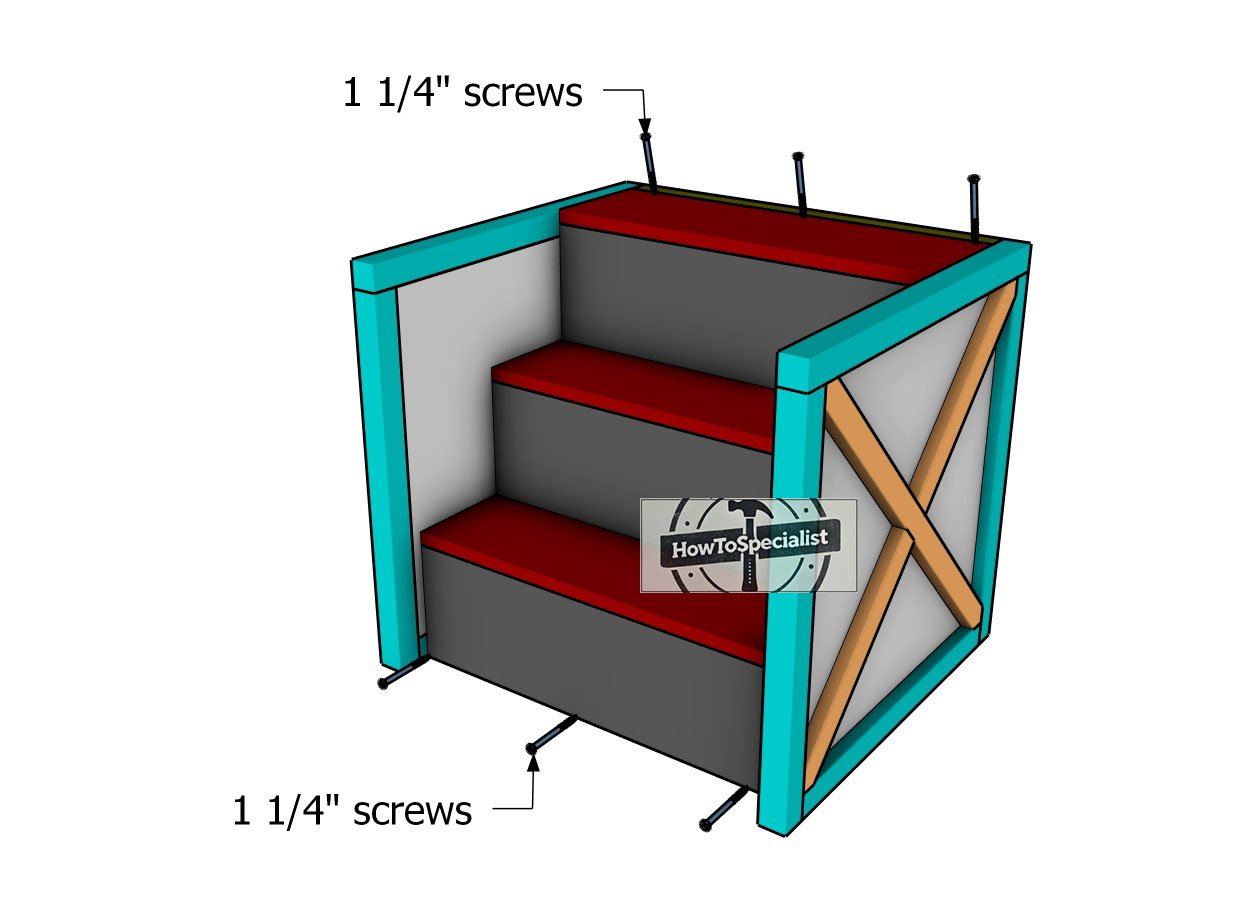
Fitting-the-steps
Now it’s time to fit the steps to the frame, following the diagram for proper placement. Align the edges flush, making sure each step fits into place perfectly. Once everything is lined up, drill pilot holes and secure the steps to the supports with 1 1/4″ screws. This will lock everything in tightly and ensure your steps are sturdy and secure.
Step 4: Finishing touches
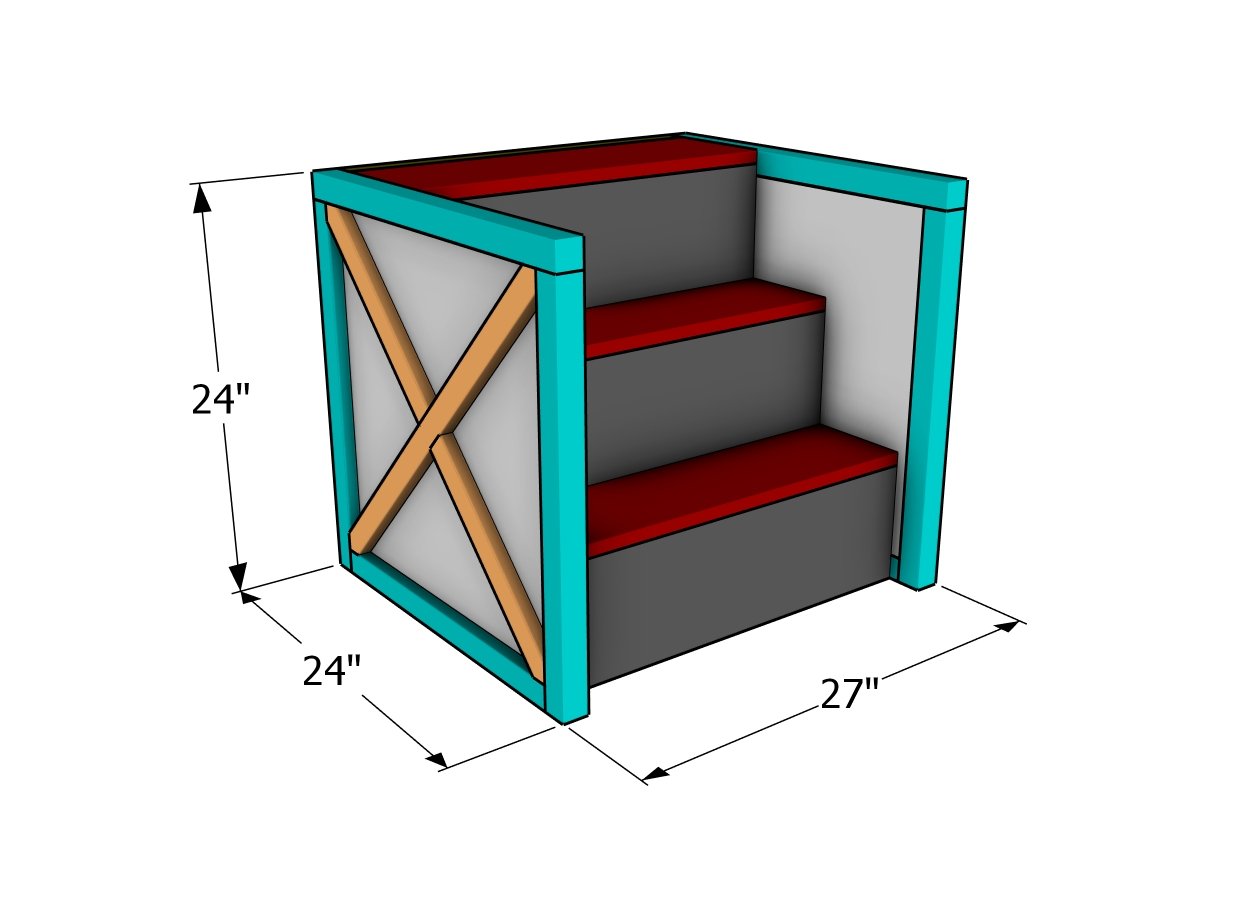
Dog steps plans – dimensions
For the finishing touches, give the entire project a good sanding to smooth out any rough edges or surfaces, making it ready for paint or stain. If you’re going for a rustic look, consider applying a wood stain to highlight the natural grain, followed by a protective clear coat for durability.
For a more modern feel, a few coats of paint in your preferred color will do the trick. Don’t forget to fill any visible screw holes with wood filler for a seamless finish. Once everything is dry, your project will be complete and ready to use, looking polished and professional!
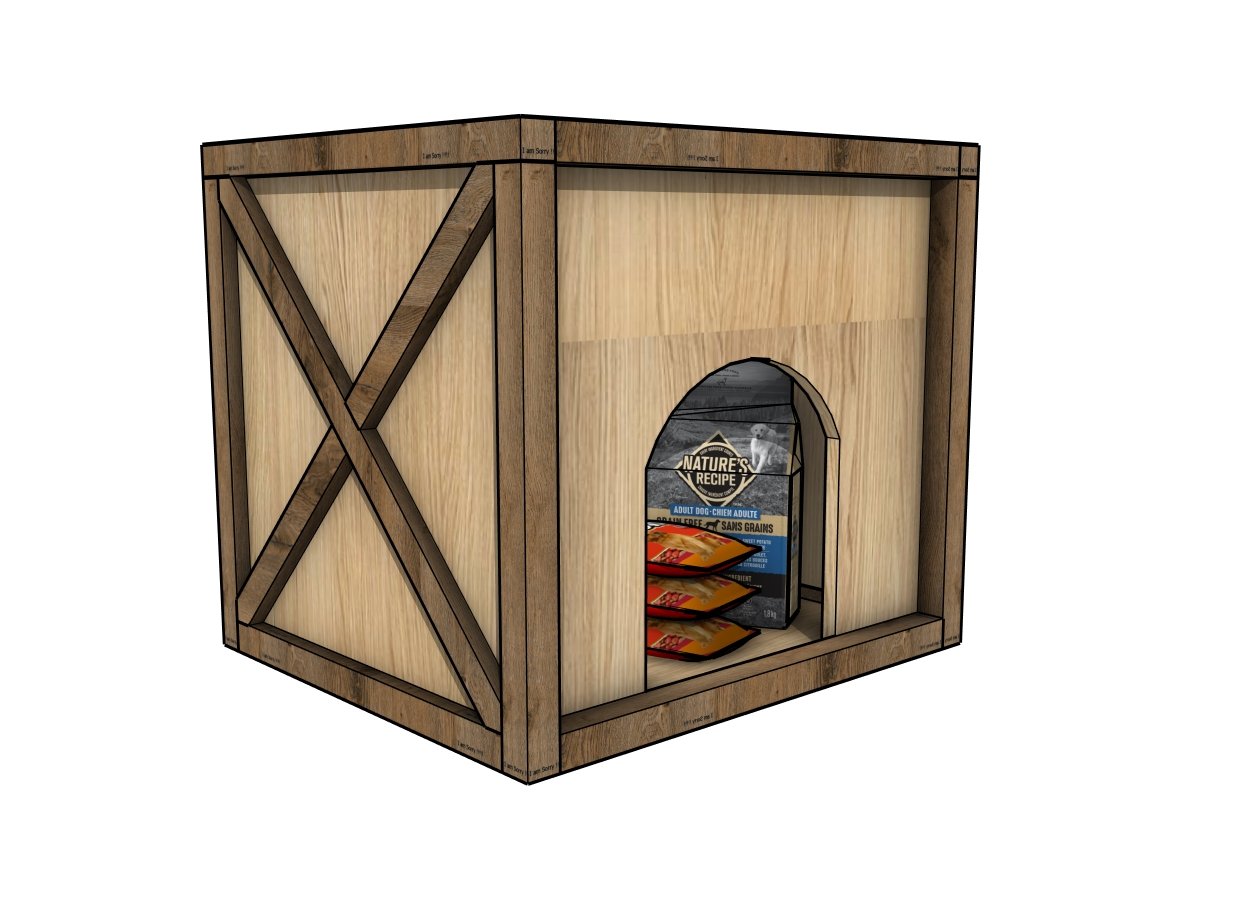
Dog steps dog house plans
And there you have it, your very own custom dog steps, complete with a built-in dog house or storage area! This project not only provides a practical solution for your dog to safely access higher surfaces but also adds a unique piece of furniture to your home.
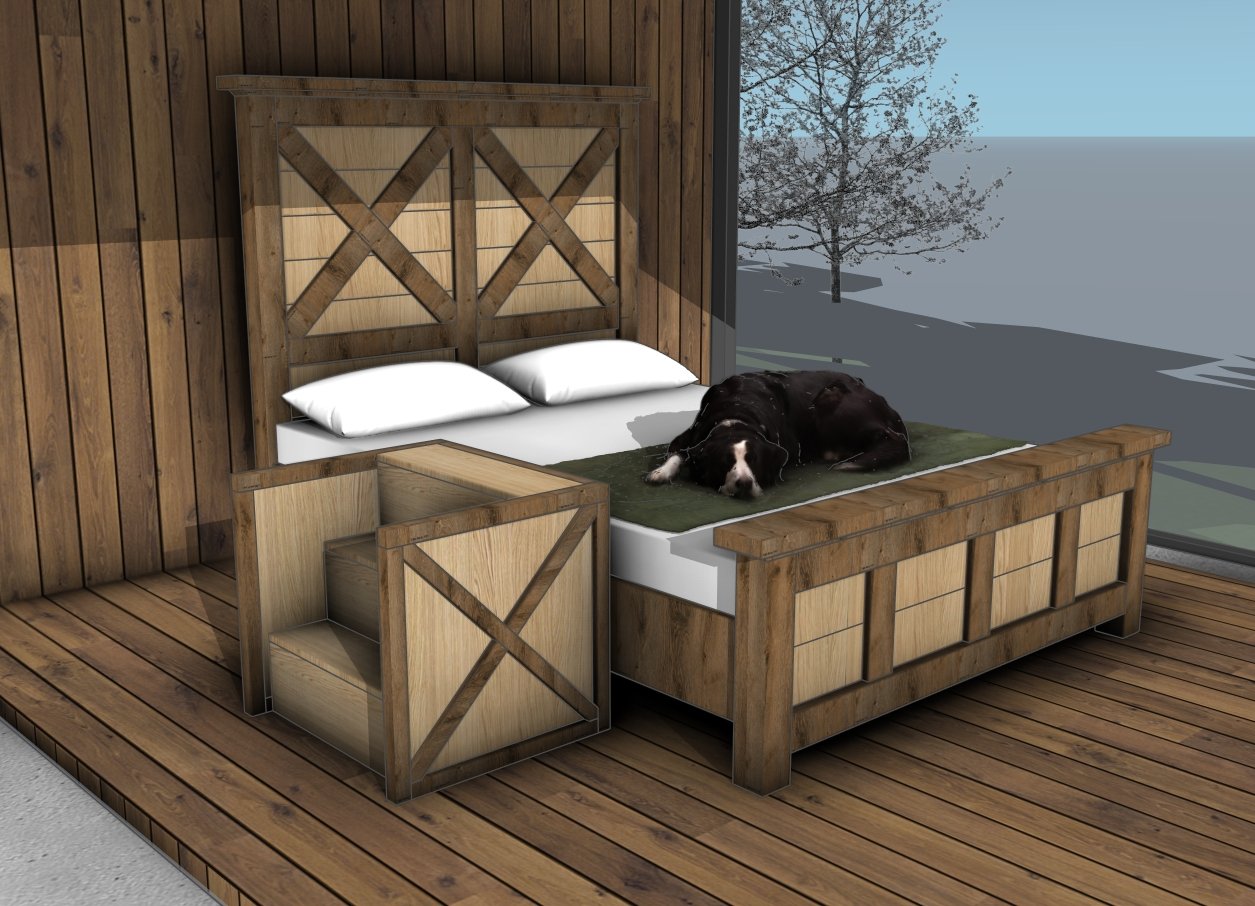
Farmhouse queen bed plans
Plus, with these free dog steps plans, you’ll save money and have the satisfaction of building something yourself. Be sure to check out more DIY projects and tutorials here on the blog, and don’t hesitate to reach out if you have any questions. Until next time, keep building and making your space work for you and your furry friends!
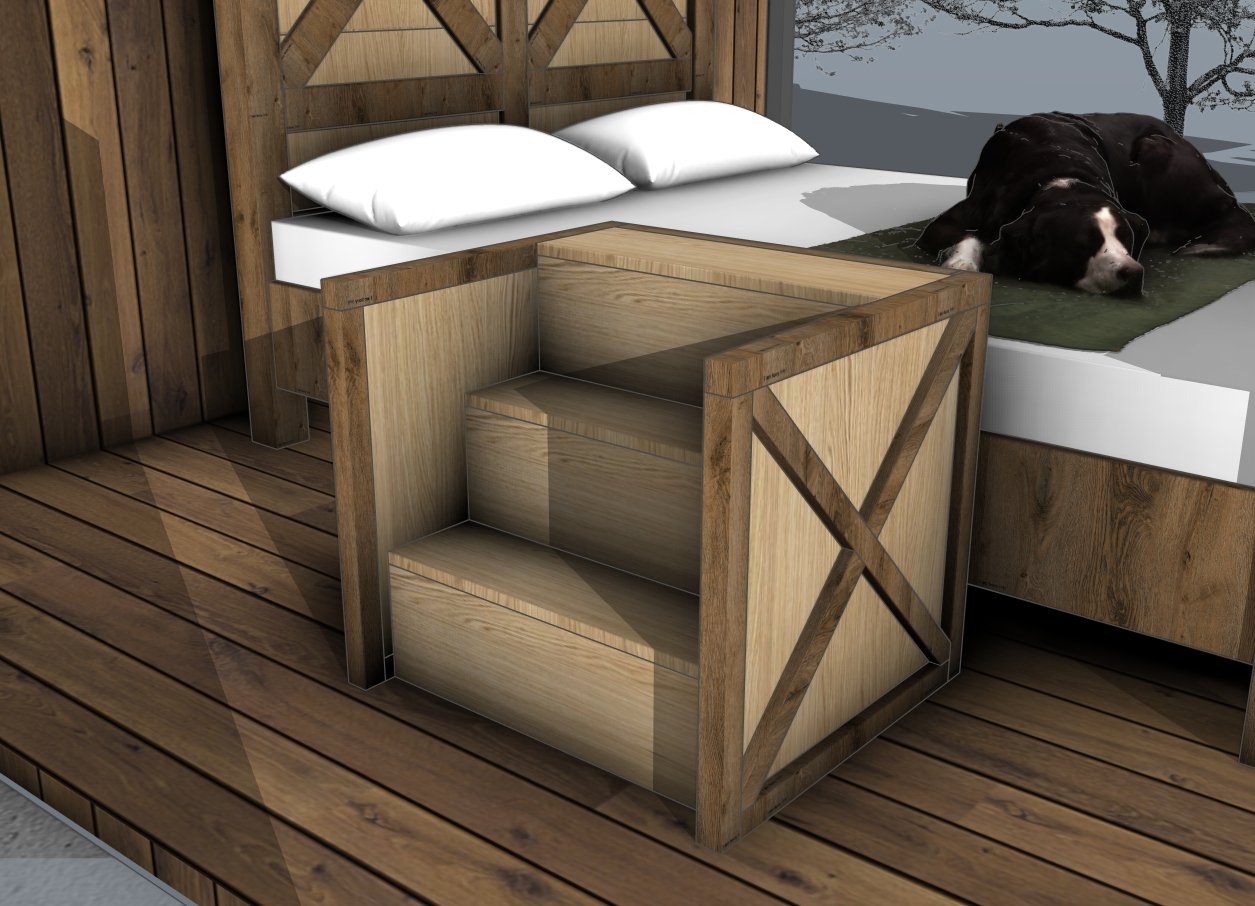
How to build dog steps
Remember, DIY is all about making pieces that fit your style and needs. So, feel free to tweak the design, experiment with different stains or paints, and truly make this nightstand your own. Thanks for following along—now it’s time to enjoy your beautiful new piece! As always, if you’ve got any questions, feel free to drop them in the comments.
Thanks for checking out my free farmhouse dog steps plans! Be sure to explore my other projects for more fantastic ideas. Don’t forget to hit the LIKE button and SHARE with your friends using the social media links below.

