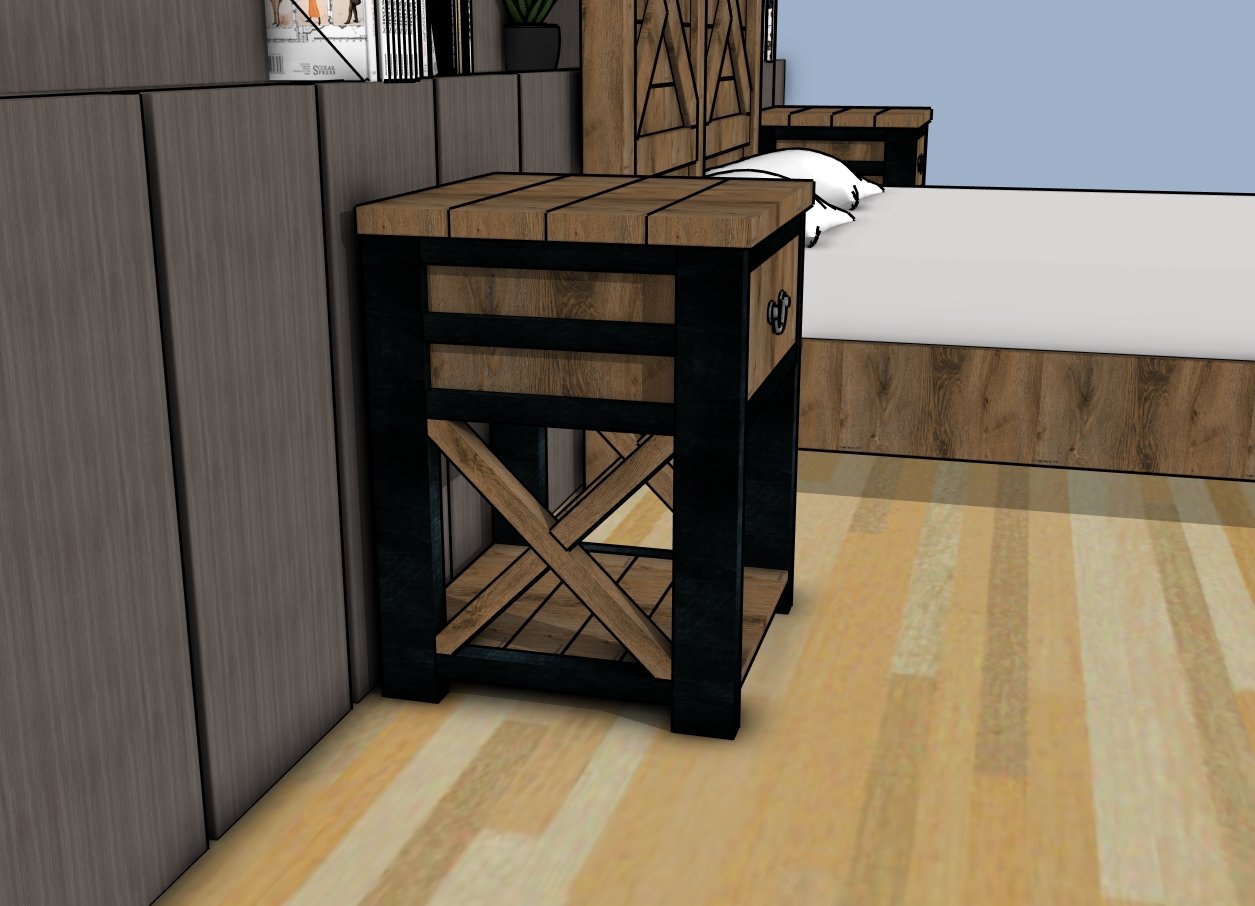
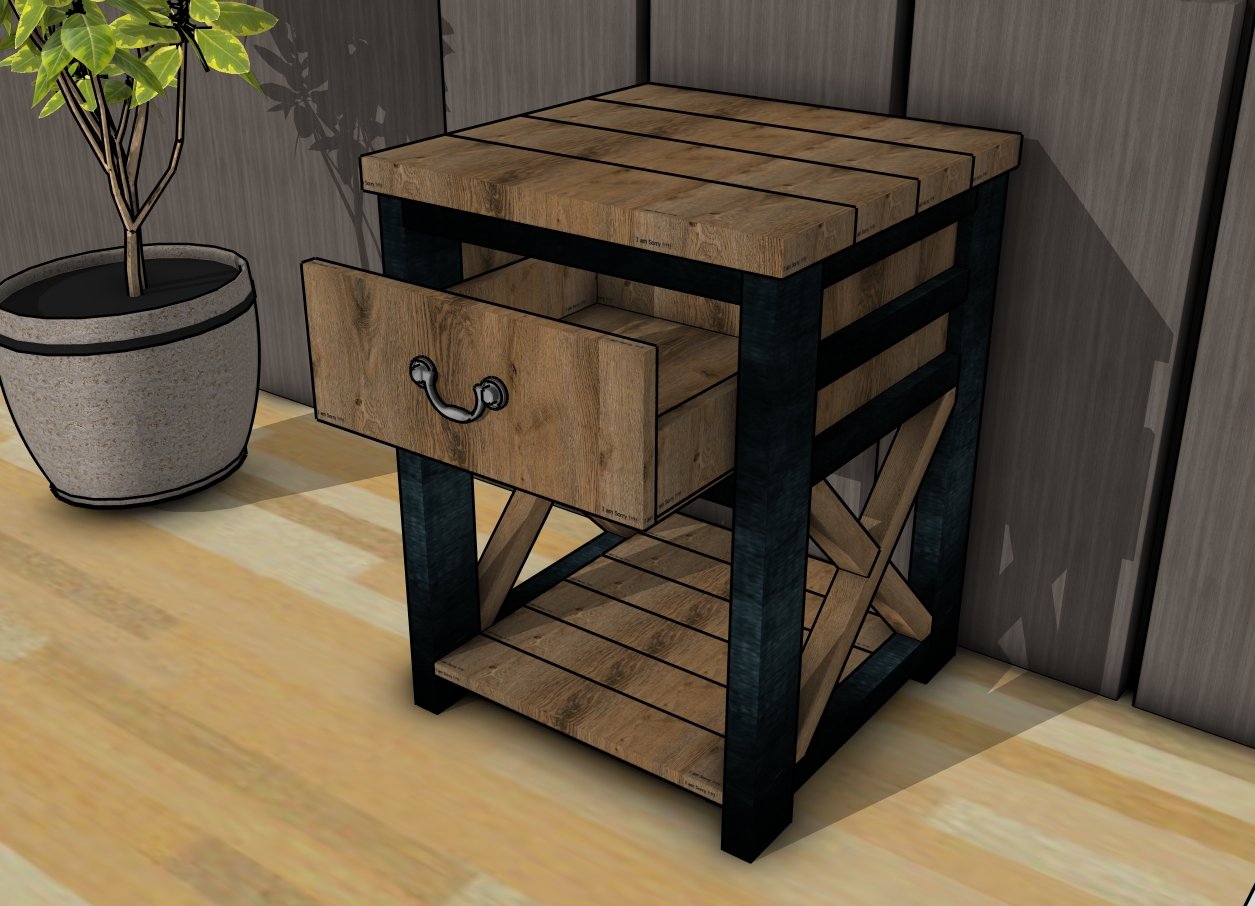
If you’re looking to add a piece of furniture that’s both practical and packed with charm, these farmhouse nightstand plans are just the project for you! With its classic X trims on the sides, a drawer for discreet storage, and a lower shelf for your favorite books or décor, this nightstand brings both beauty and functionality into any bedroom. Whether you’re new to DIY or a seasoned builder, this project is straightforward and can be completed over the weekend.
What makes this nightstand so special is how it blends rustic elements with clean lines. The X trim on the sides gives it that signature farmhouse look, while the solid frame ensures it’s built to last. Plus, who doesn’t love extra storage? The drawer is perfect for tucking away those items you want to keep handy but out of sight, and the bottom shelf is great for styling or organizing. Let’s dive into the details so you can start building your own! See my other DIY projects HERE.
We recommend you to invest in the best materials you could afford. Therefore, you should buy weather-resistant lumber, such as pine or cedar. Always take accurate measurements before adjusting the size of the components at the proper size. Drill pilot holes trough the components before inserting the wood screws, to prevent the wood from splitting. My plans come with a full cut / shopping list and they are PDF Download and Print friendly. See all my Premium Plans HERE.
Made from this plan
Pin for Later!
Farmhouse Nightstand – Free Plans
Building-a-farmhouse-nightstand
Materials
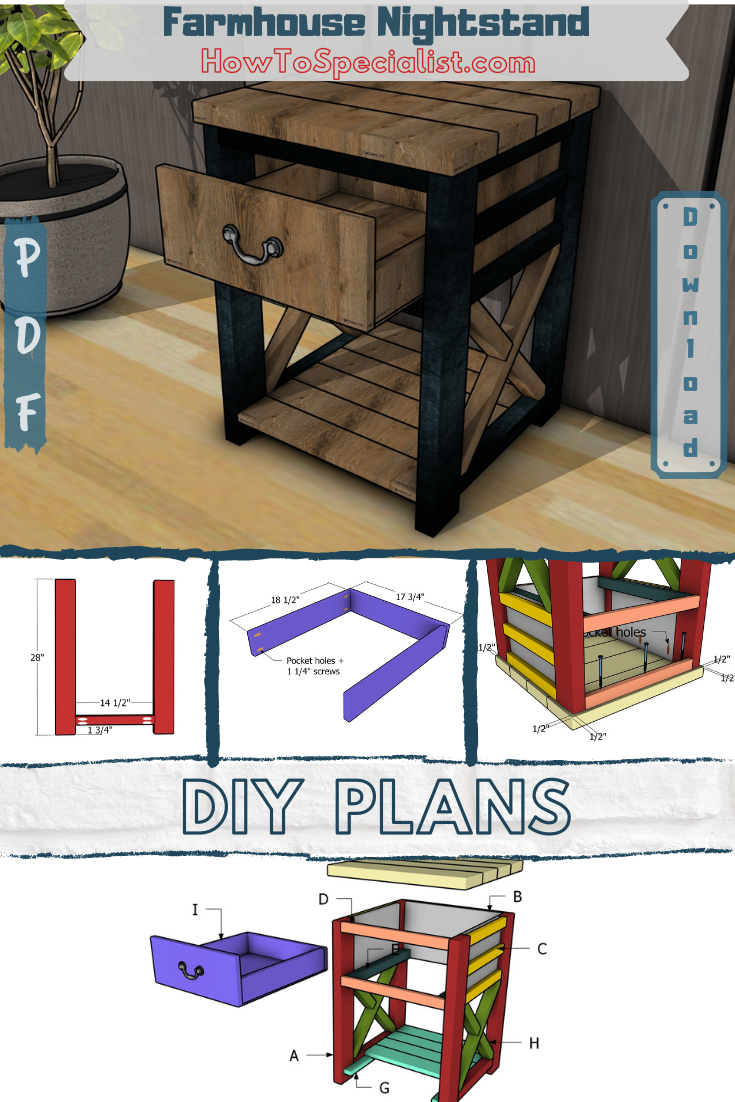
A – LEGS – 2×4 lumber 28″ – 4 pieces
A – SUPPORTS – 2×2 lumber 14 1/2″ – 2 pieces
B – PANELS – 3/4″ plywood 10 1/4″x18″ – 1 piece
B – PANELS – 3/4″ plywood 10 1/4″x14 1/2 – 2 pieces
C – TRIMS – 1×2 lumber 14 1/2″ – 3 pieces
D – TRIMS – 1×2 lumber 18″ – 4 pieces
E – CLEATS – 2×2 lumber 19 1/4″ – 2 pieces
F – TABLETOP – 2×6 lumber 22″ – 4 pieces
G – CLEATS – 1×2 lumber 20 3/4″ – 2 pieces
G – SHELF – 1×4 lumber 18″ – 6 pieces
H – X TRIMS – 2×2 lumber 20 1/2″ – 2 pieces
H – X TRIMS – 2×2 lumber 9 1/2″ – 4 pieces
I – DRAWER – 1×4 lumber 18 1/2″ – 2 pieces
I – DRAWER – 1×4 lumber 17 3/4″ – 1 piece
I – DRAWER – 1×8 lumber 17 3/4″ – 1 piece
I – DRAWER – 1/4″ plywood 17 3/4″x19 1/4″ – 1 piece
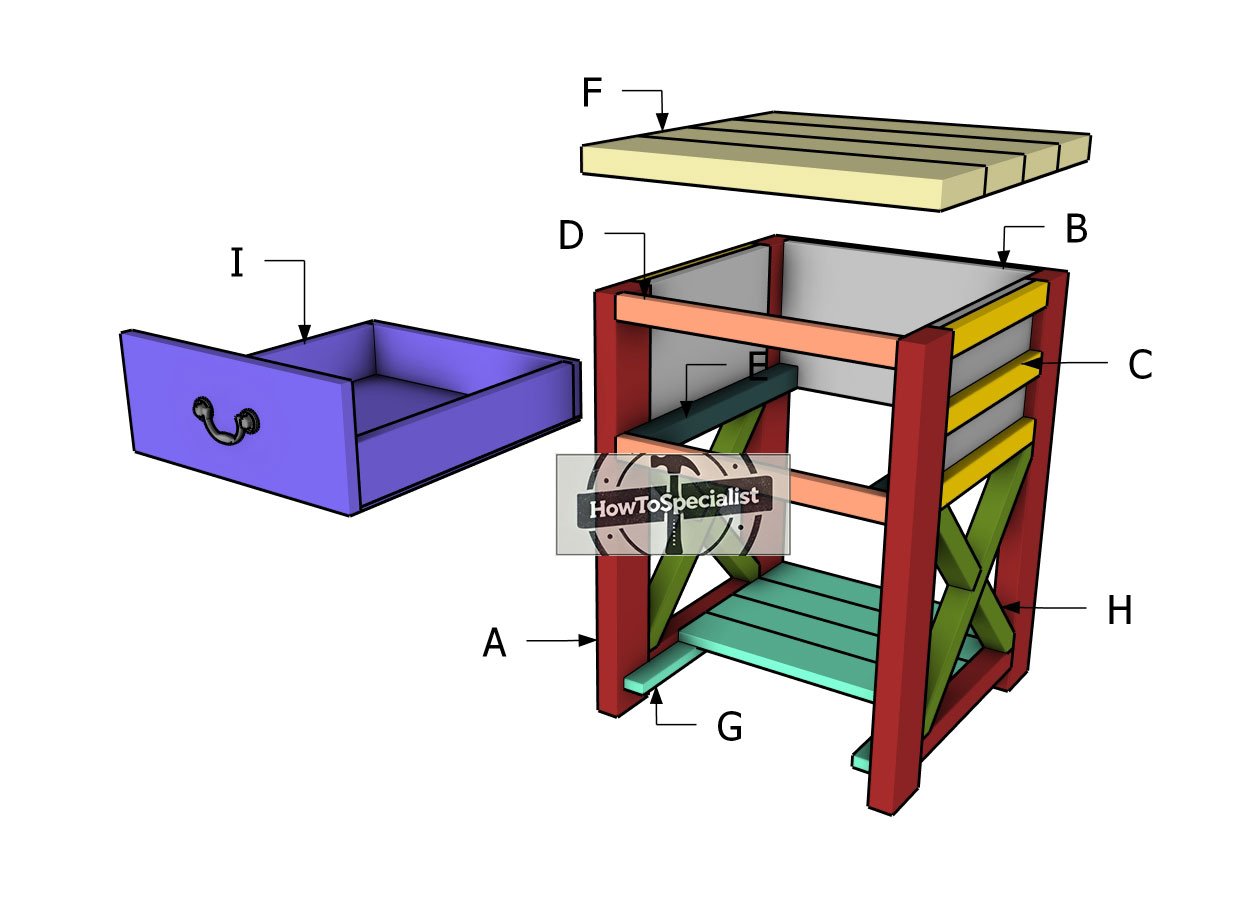
- 1×8 2 ft – 1 piece
- 1×2 8 ft – 1 piece
- 1×2 10 ft – 1 piece
- 1×4 8 ft – 1 piece
- 2×2 8 ft – 2 pieces
- 2×4 10 ft – 1 piece
- 2×6 8 ft – 1 piece
- 3/4″ plywood – 2’x4′ – 1 piece
- 1/4″ plywood – 2’x2′ – 1 piece
- 2 1/2″ screws – 20 pieces
- 1 1/4″ screws – 50 pieces
- 2″ finish nails – 50 pieces
- Drawer pull – 1 piece
- Stain / paint – 1 piece
- Glue – 1 piece
- Wax – 1 piece
Tools
- Miter saw
- Drill machinery, drill bits
- Safety gloves, glasses
- Chalk line, tape measure, spirit level, carpentry pencil
Time
- One week
Related
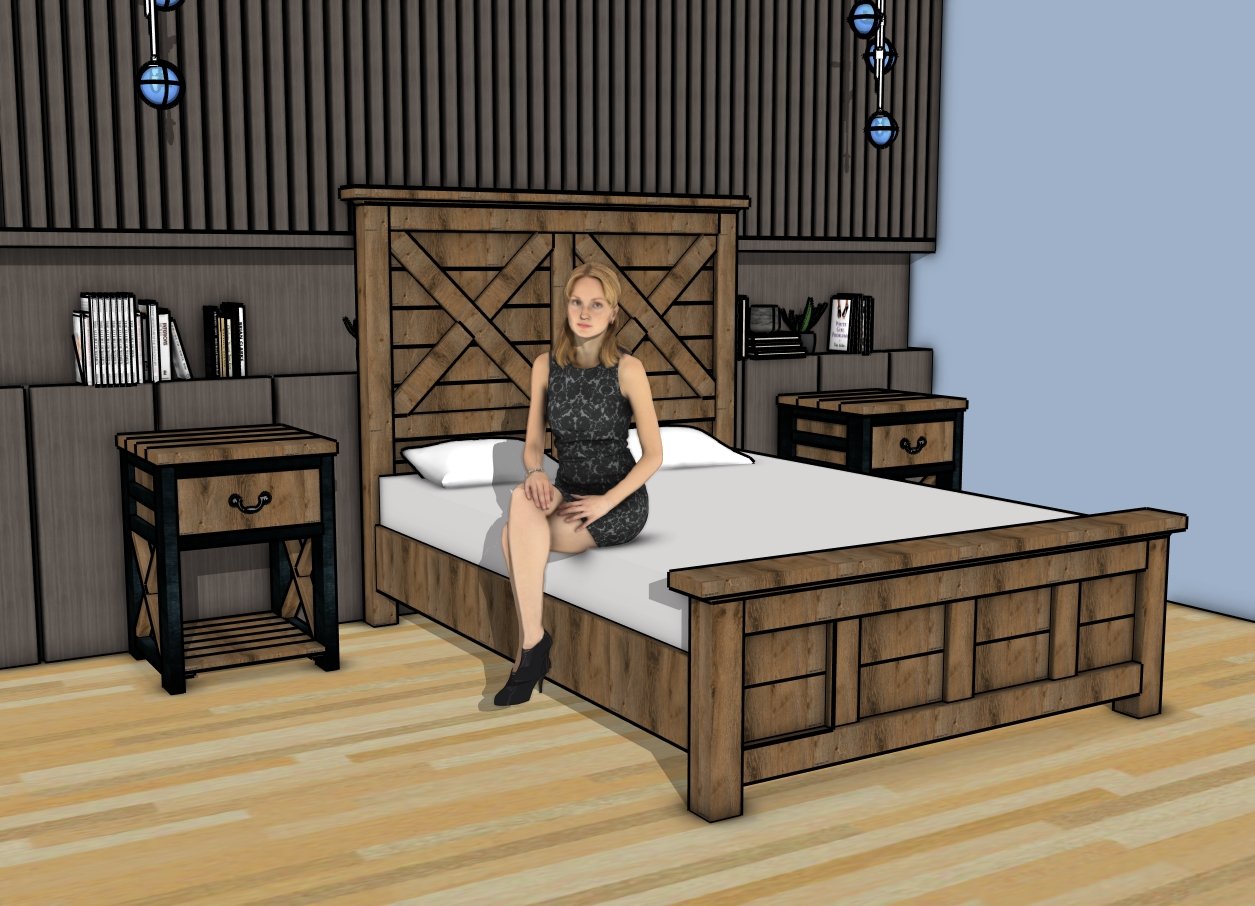
- Farmhouse queen bed plans
- Farmhouse console table plans
- Farmhouse Coffee table plans
- Farmhouse TV Stand plans
Cut layout diagram
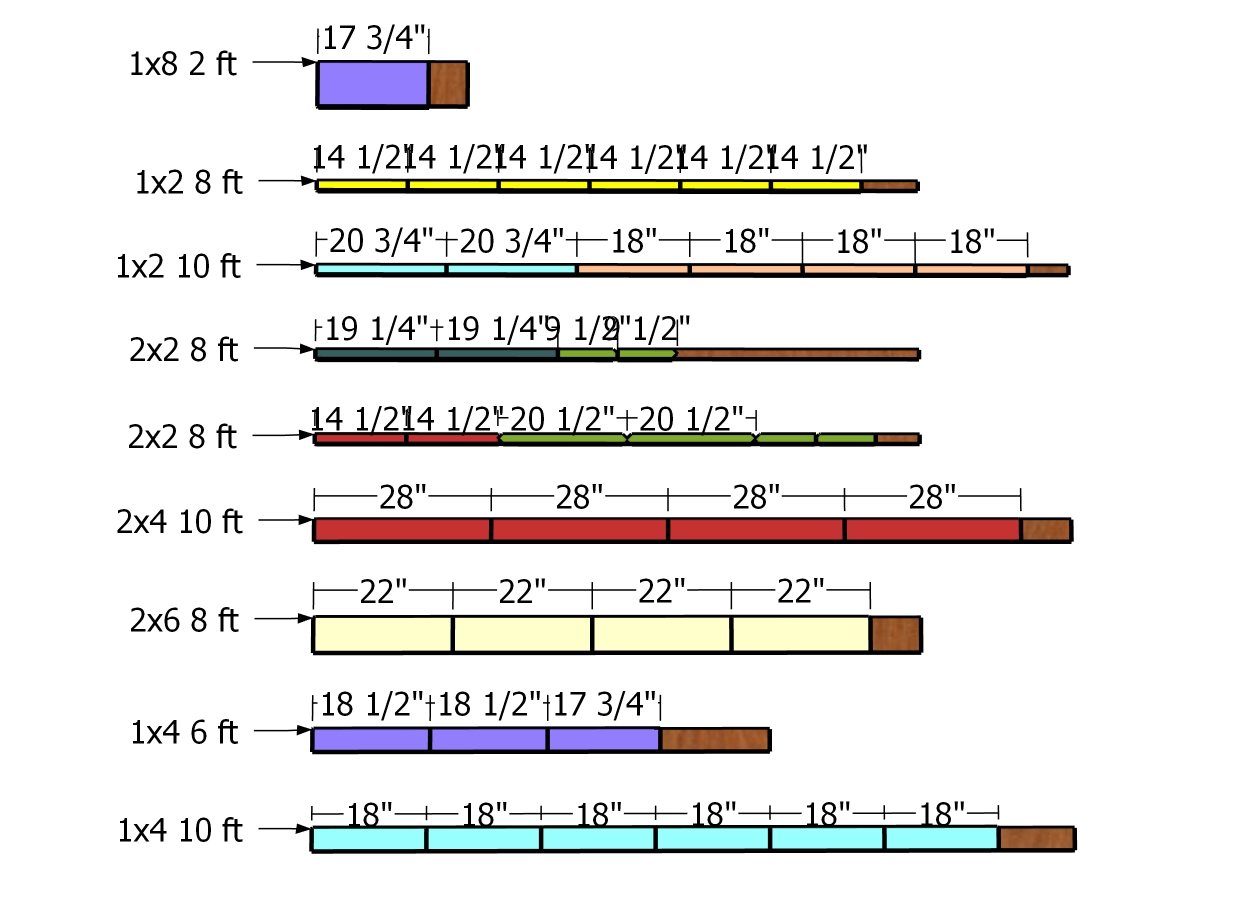
Step 1: Building the frames
Assembling-the-sides
The first step in building your farmhouse nightstand is to assemble the two side frames. For this, you’ll use 2x4s for the legs and 2x2s for the horizontal supports. To get a strong, clean joint, drill pocket holes at both ends of the supports and attach them to the legs using 2 1/2″ screws. Be sure to align everything flush and double-check that your corners are square—this will ensure your nightstand stands solid and sturdy from the start!
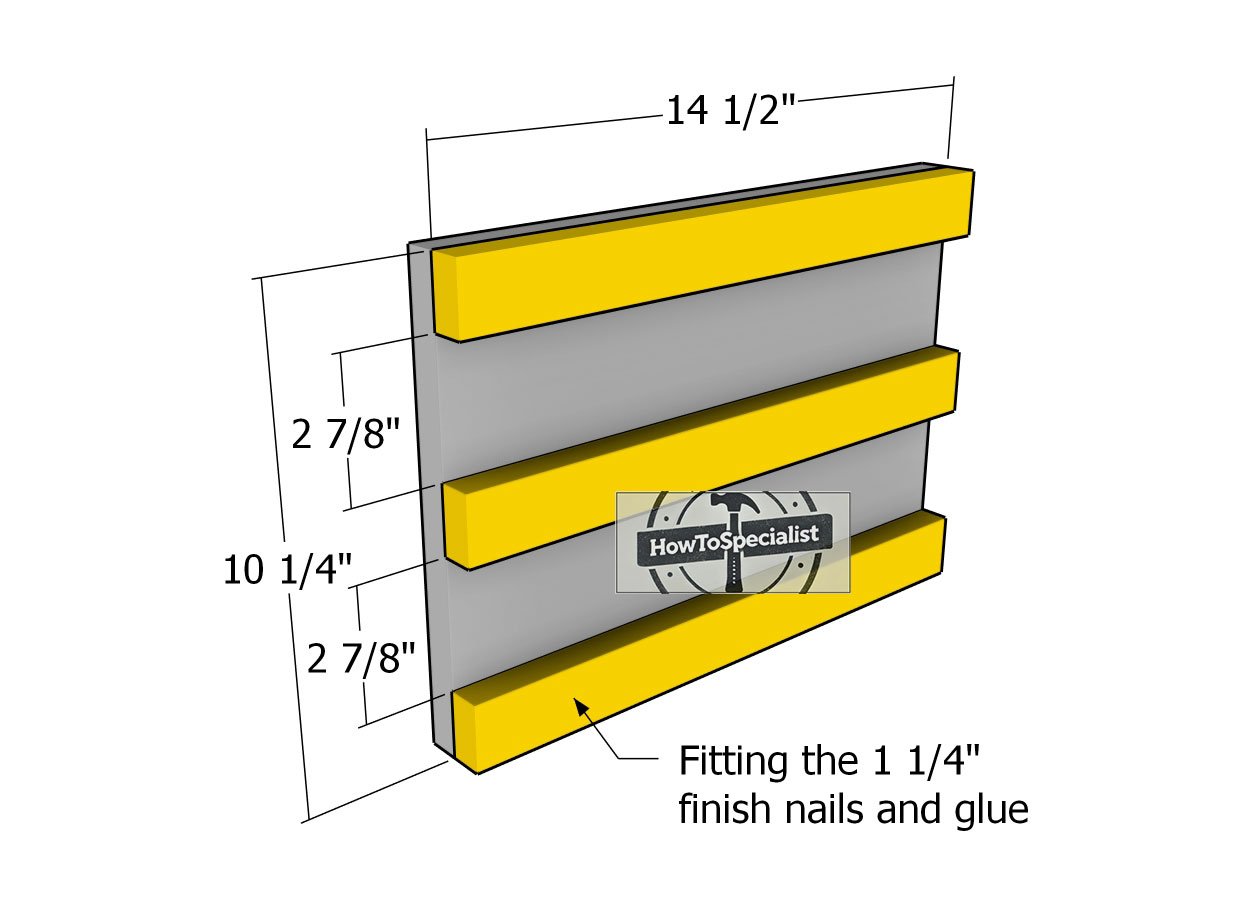
Side-panels
For the side panels, you’ll want to use 3/4″ plywood for a sturdy and durable base. To give the panels that polished, finished look, use 1×2 lumber for the trim. Secure the trim to the panel using 1 1/4″ finish nails and wood glue. This combination will create a strong bond and add a clean, detailed touch to the sides of your farmhouse nightstand.
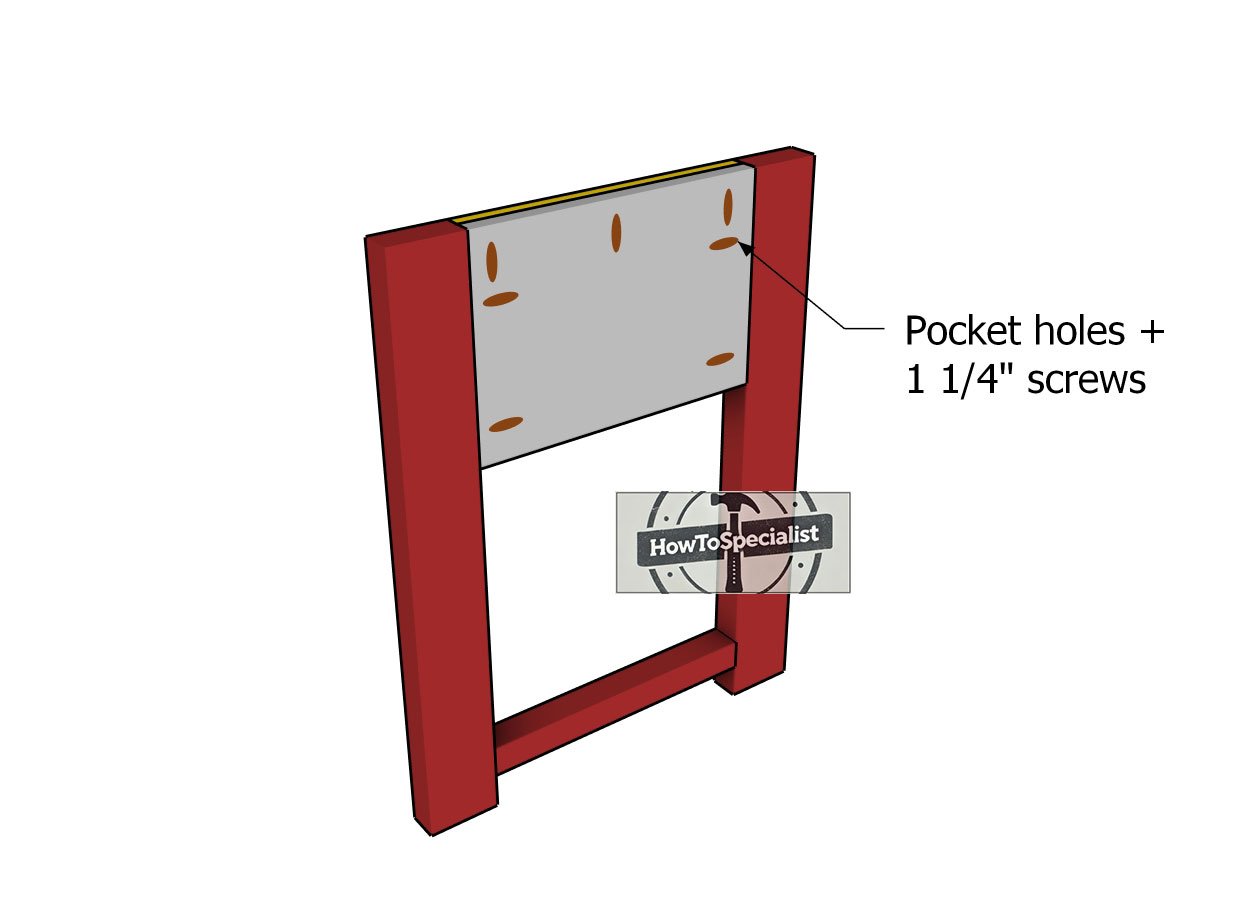
Attaching-the-side-panels
Now it’s time to fit the panels into the two side frames, making sure the trim faces outward for that farmhouse charm. Drill pocket holes along the edges of the panels—both the sides and the top—then secure them to the vertical legs using 1 1/4″ screws and wood glue.
Make sure everything is aligned perfectly with no gaps between the components, and ensure the edges are flush for a clean, seamless finish. This will give your nightstand a strong, cohesive structure that’s ready for the next steps!
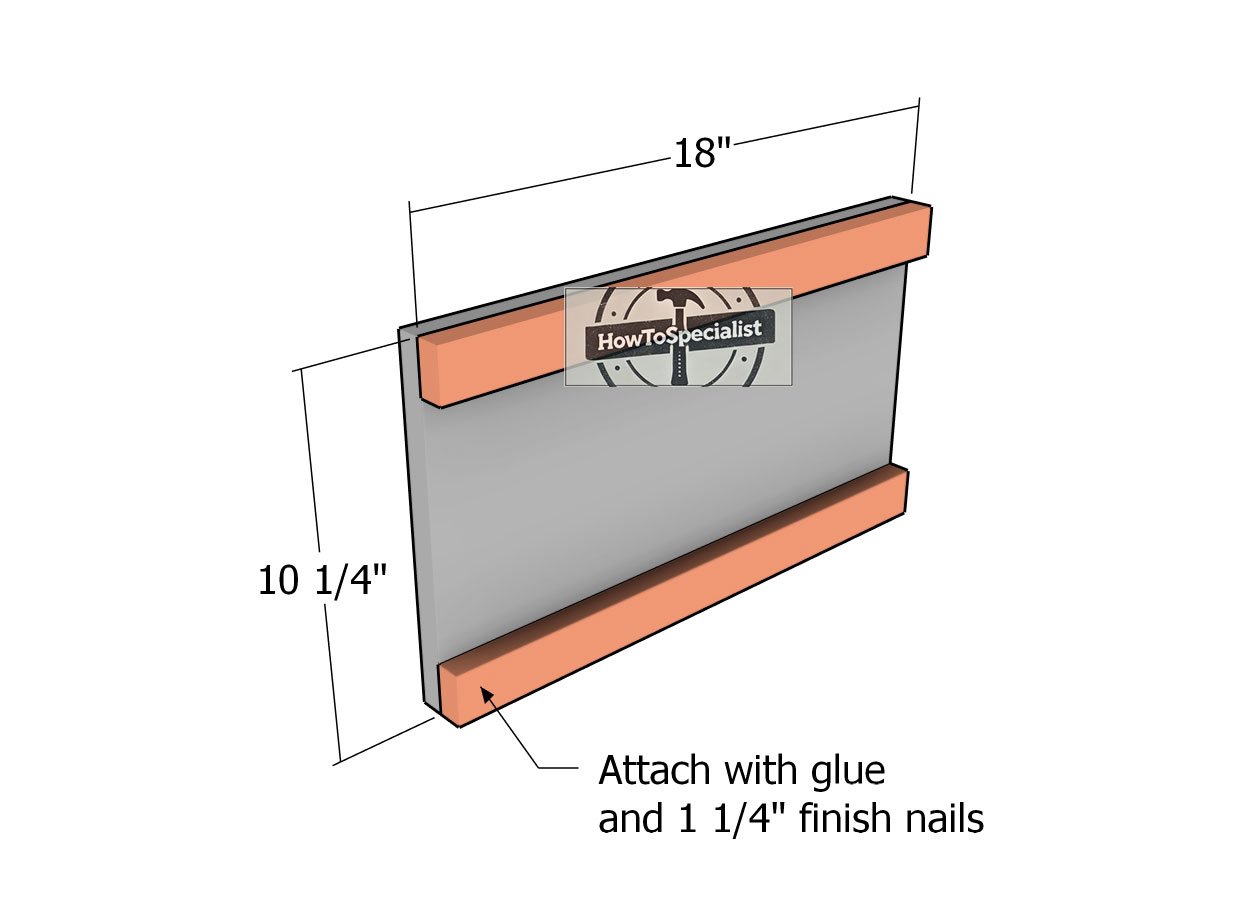
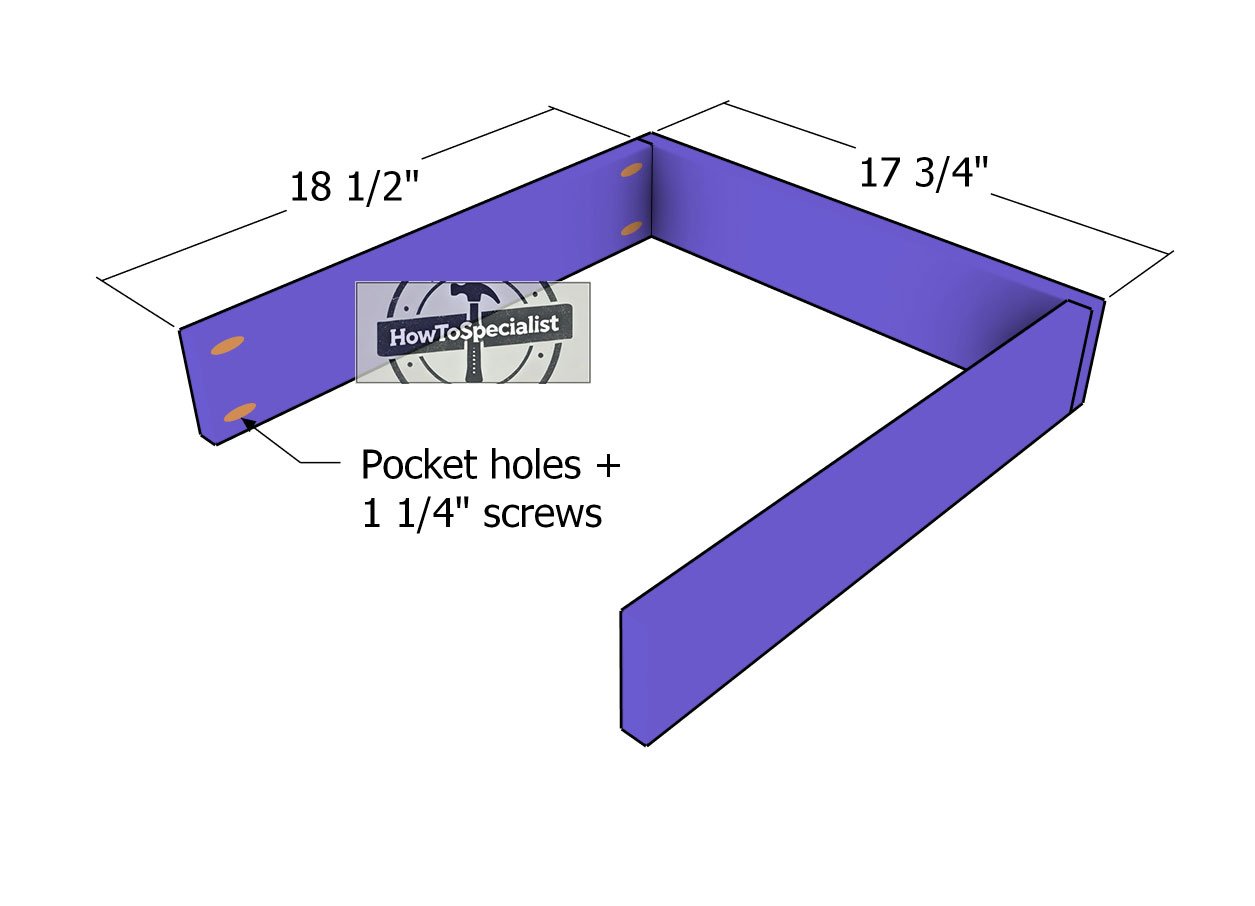
Back-trims
Next, it’s time to assemble the back panel for your nightstand. Start by attaching the 1×2 trims to the 3/4″ plywood panel, using 1 1/4″ finish nails and wood glue to secure everything in place.
Be sure to align the edges flush so that the back panel fits perfectly into the frame. This attention to detail will give the back panel a clean, polished look and ensure that your nightstand has a solid, finished appearance from all angles.
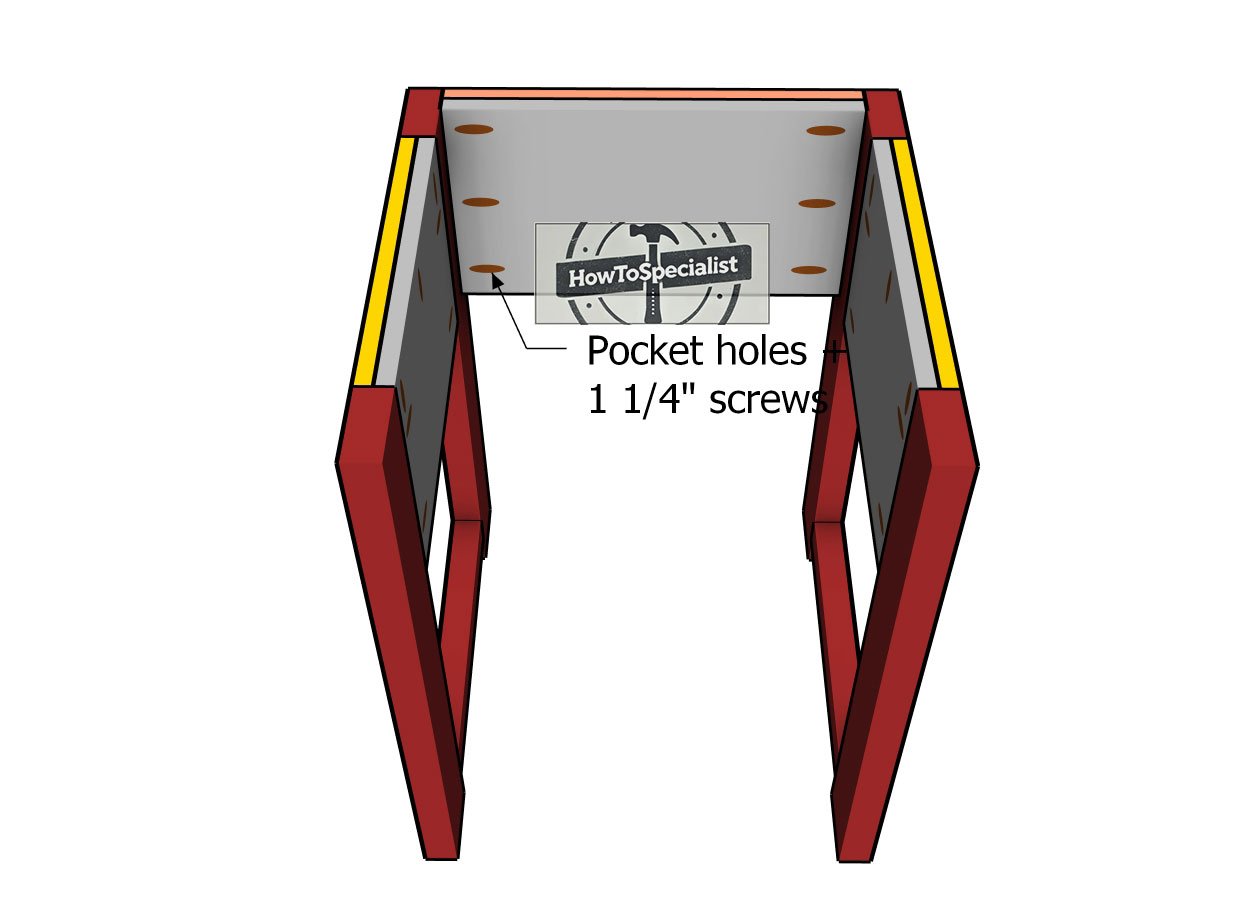
Fitting-the-back-panel
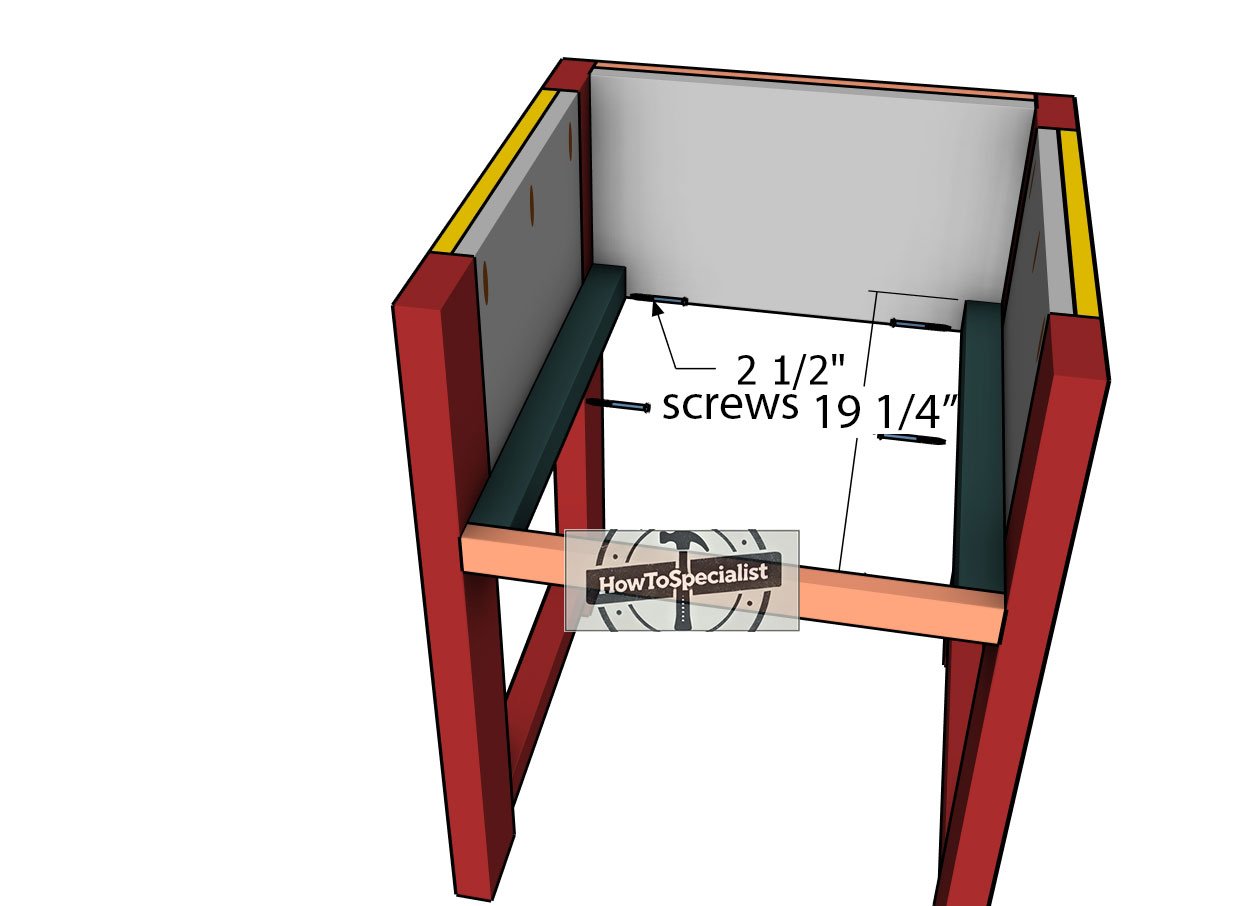
With all the panels assembled, the next step is to secure the back panel to the side frames. Drill pocket holes at both ends of the back panel, and use 1 1/4″ screws to attach it to the side frames. Make sure the edges are perfectly aligned and the corners are square. Taking the time to ensure everything is flush and square will give your nightstand a clean, professional look and ensure the structure is sturdy and well-built.
Drawer-frame
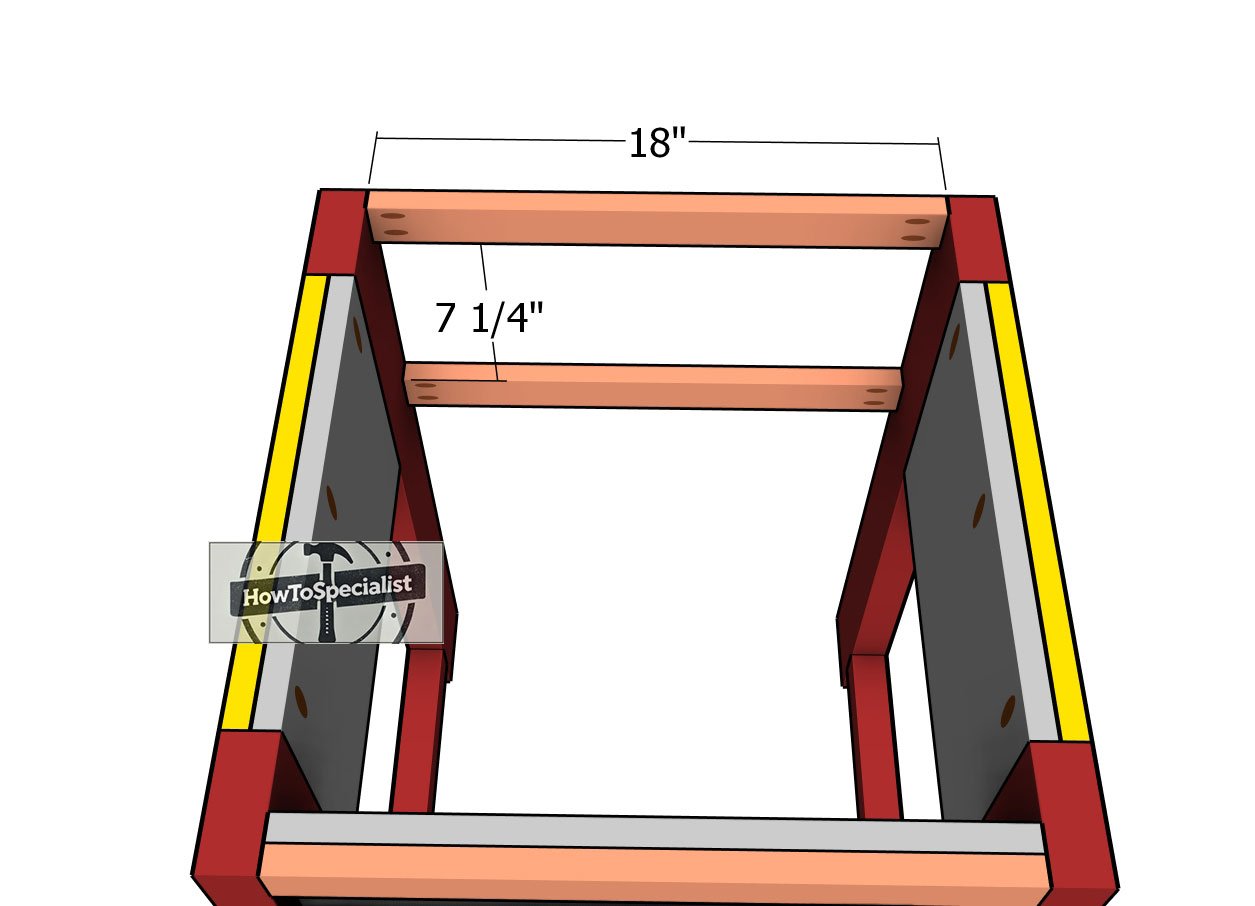
To frame the front face of the nightstand, use 1×2 slats for a clean, refined look. Drill pocket holes at both ends of the 1×2 boards, and attach them to the side frames using 1 1/4″ screws.
Ensure the corners are square, and align the edges flush for a smooth, seamless finish. This step will give the front of your nightstand a sturdy frame, setting the stage for the drawer and other final touches.
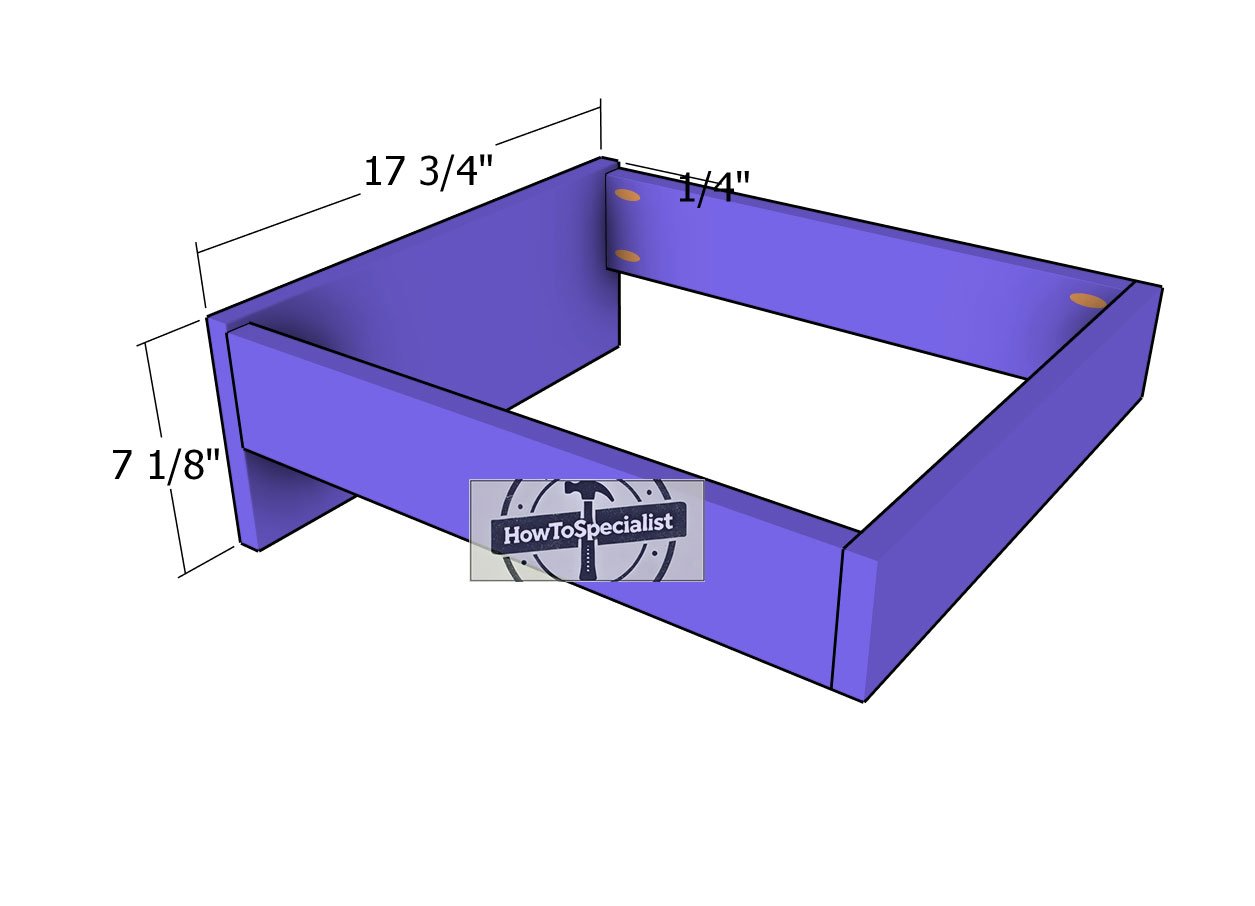
Drawer-cleats
Now, it’s time to install the 1×2 cleats that will support the drawer. Following the diagram, position the cleats on the inside of the side frames. Drill pilot holes to prevent splitting, then secure each cleat tightly with 2 1/2″ screws. Use three screws on each side to ensure a strong hold, which will keep the drawer functioning smoothly and securely for everyday use.
Step 2: X-trims
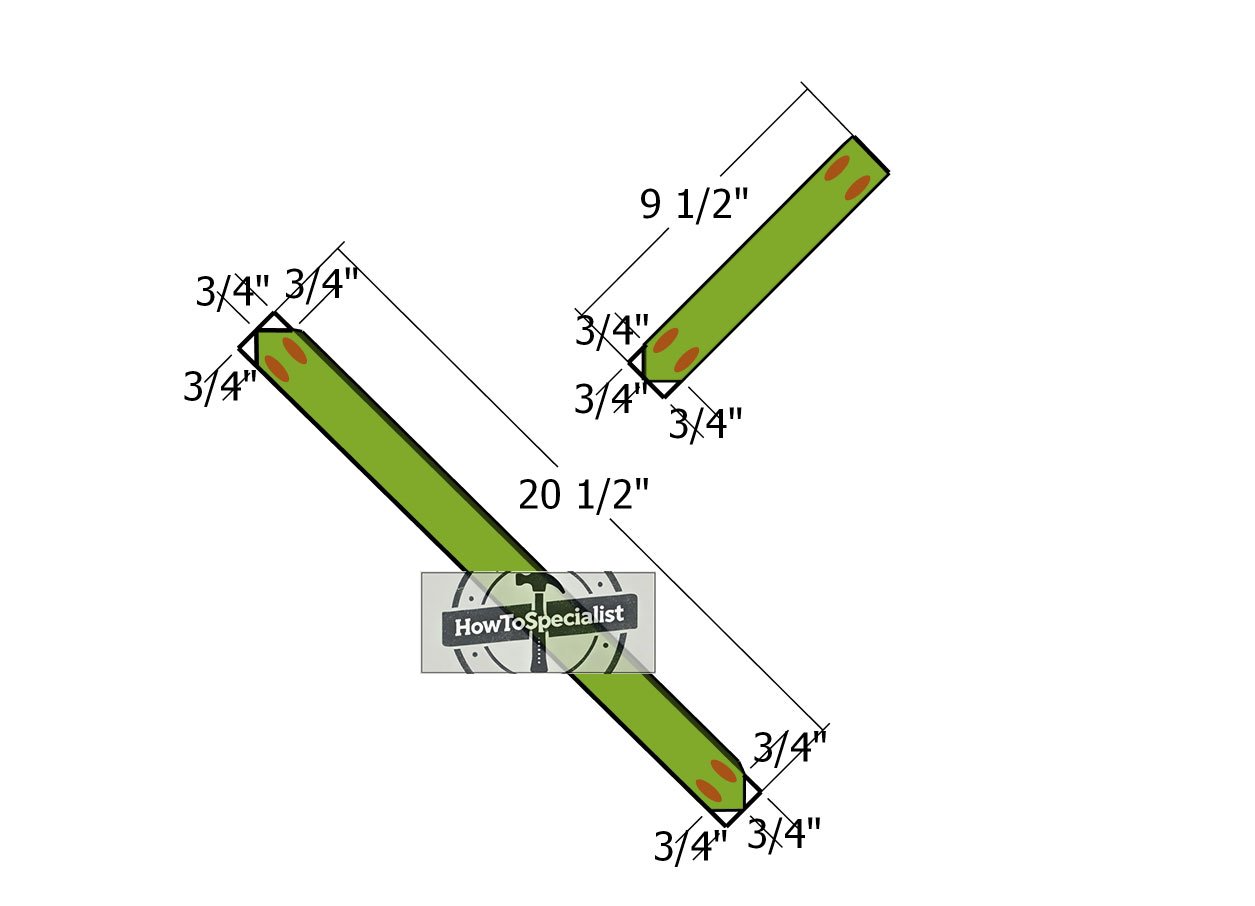
X-trims
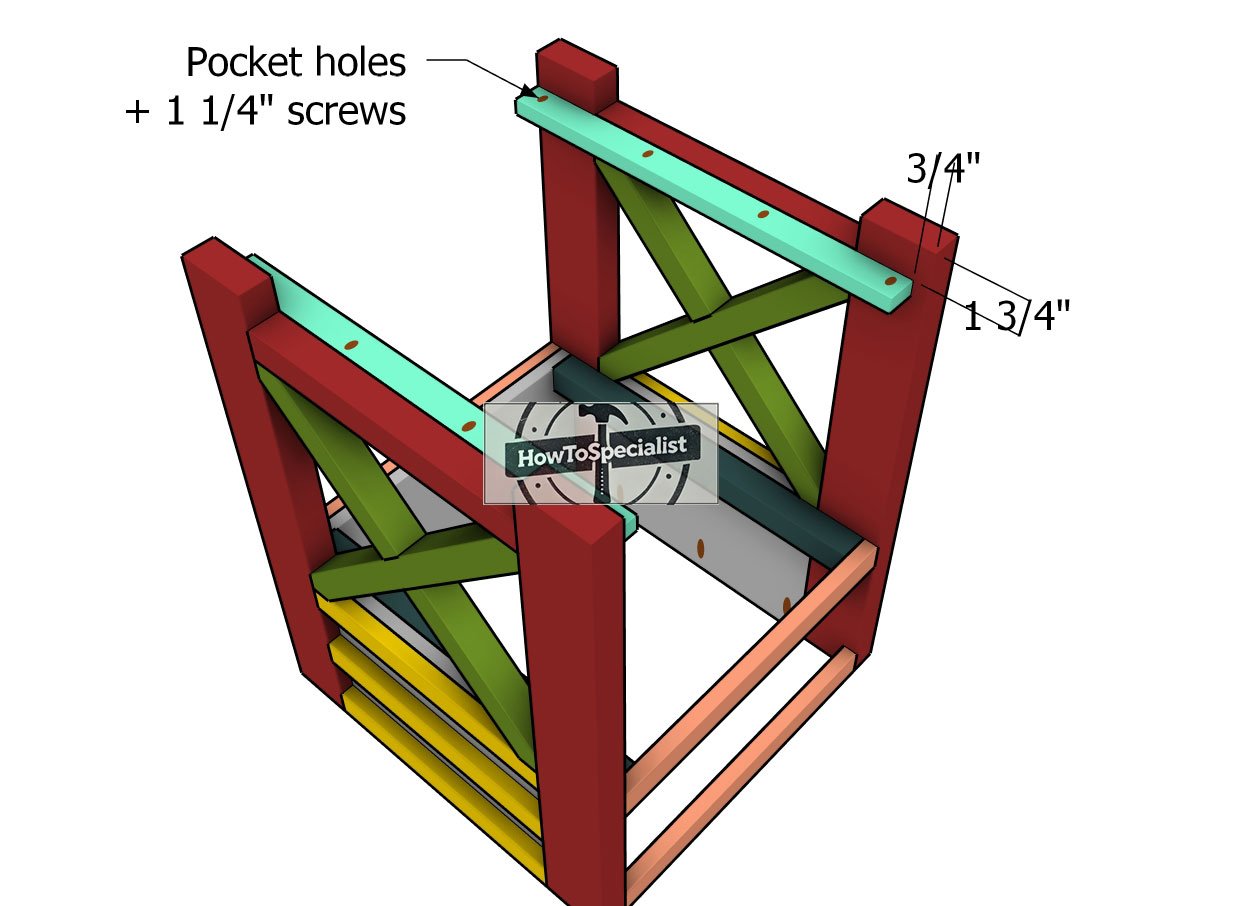
To give your nightstand that iconic farmhouse charm, we’ll be adding X trims to the sides. Using a miter saw, carefully cut the 2×2 components at a 45-degree angle, following the measurements shown in the diagram.
Once your pieces are cut, drill pocket holes at the ends of the trims so you can easily assemble and attach them to the frame. These X trims will not only enhance the overall look but also add extra structure to the sides of your nightstand.
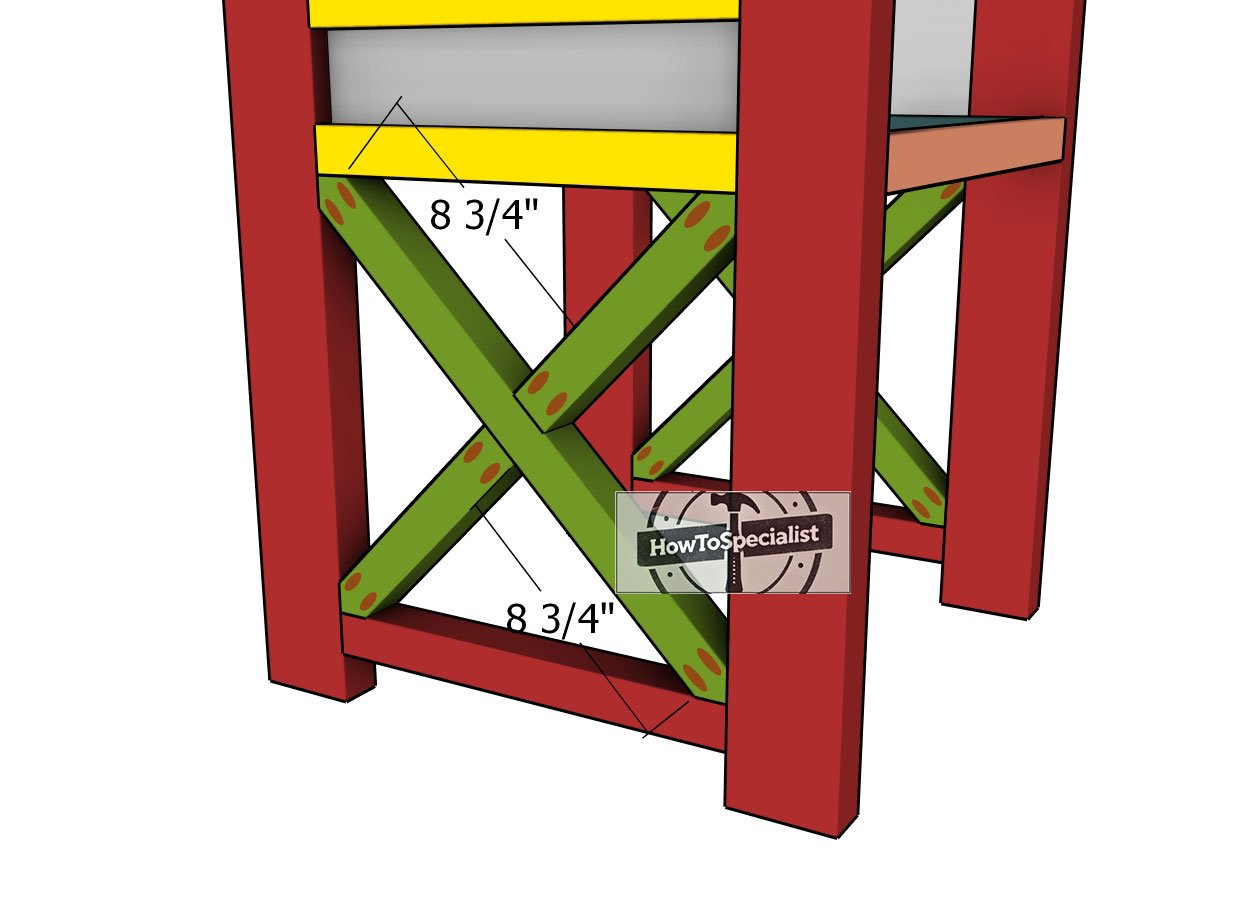
Fitting-the-X-trims
To finish off the sides, attach the X-trims to the nightstand. Align the edges flush with the frame, and secure them in place with 2 1/2″ screws.
Be sure to position the pocket holes so they are oriented toward the interior, ensuring that the exterior remains neat and clean. This will give your farmhouse nightstand that classic, polished look while keeping the structure strong and visually appealing from all angles.
Step 3: Bottom Shelf
Shelf-cleats
For the shelf cleats, use 1×2 lumber to create a solid support for the bottom shelf. Drill pocket holes along the sides of the cleats, then secure them to the side frames using 1 1/4″ screws. Make sure everything is aligned and level to ensure the shelf sits properly and has strong support. This step will provide a sturdy base for the lower shelf, adding both functionality and style to your farmhouse nightstand.
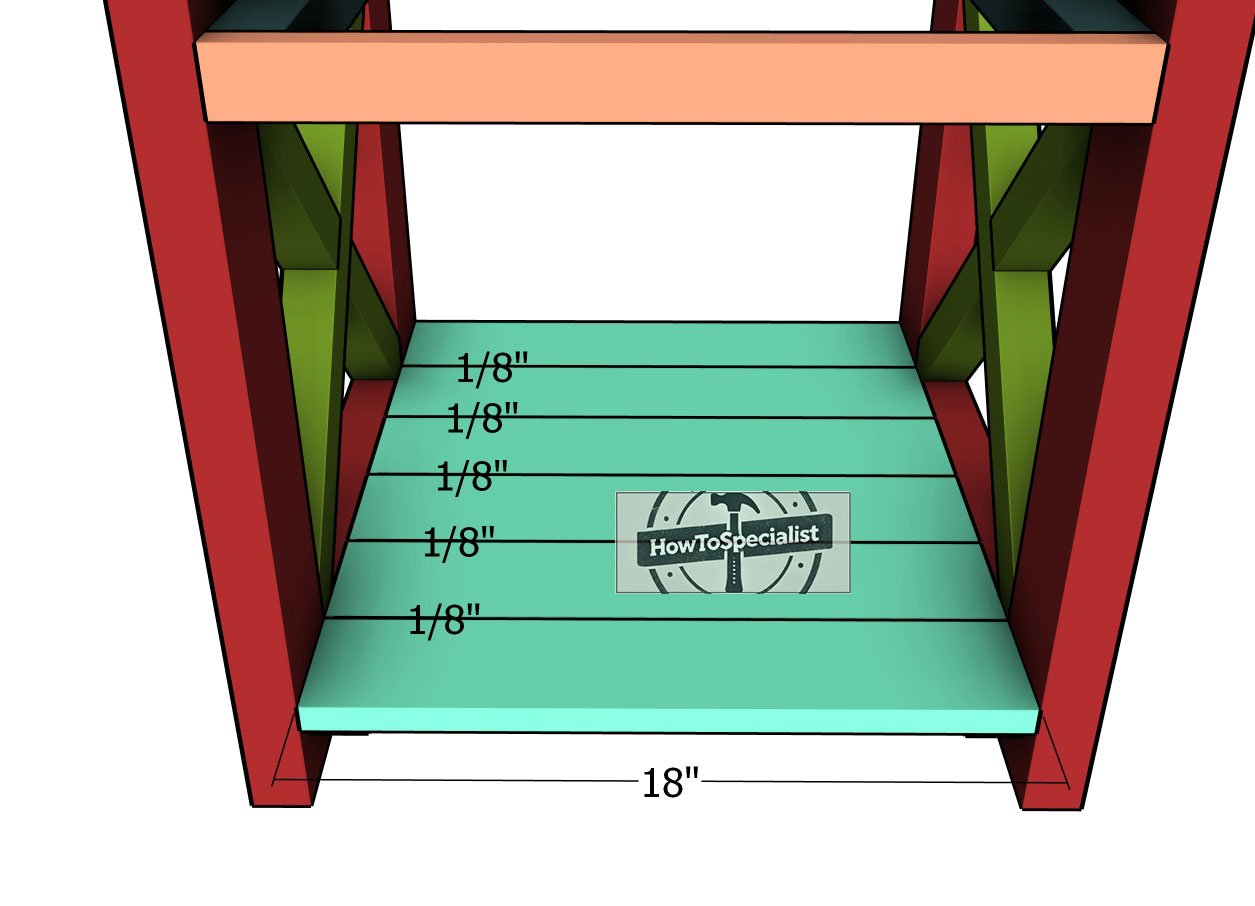
Fitting-the-shelf-slats
Now, attach the 1×4 boards to the cleats to form the lower shelf. Use 1/8″ spacers between the boards to ensure even gaps and a professional finish. Drill pilot holes at both ends of each board, then secure them into place with 1 1/4″ screws.
Be sure to use two screws at each end of the boards for added strength and stability. This will give your nightstand a durable and functional lower shelf while maintaining that clean, even look.
Step 4: Tabletop
Assembling-the-tabletop
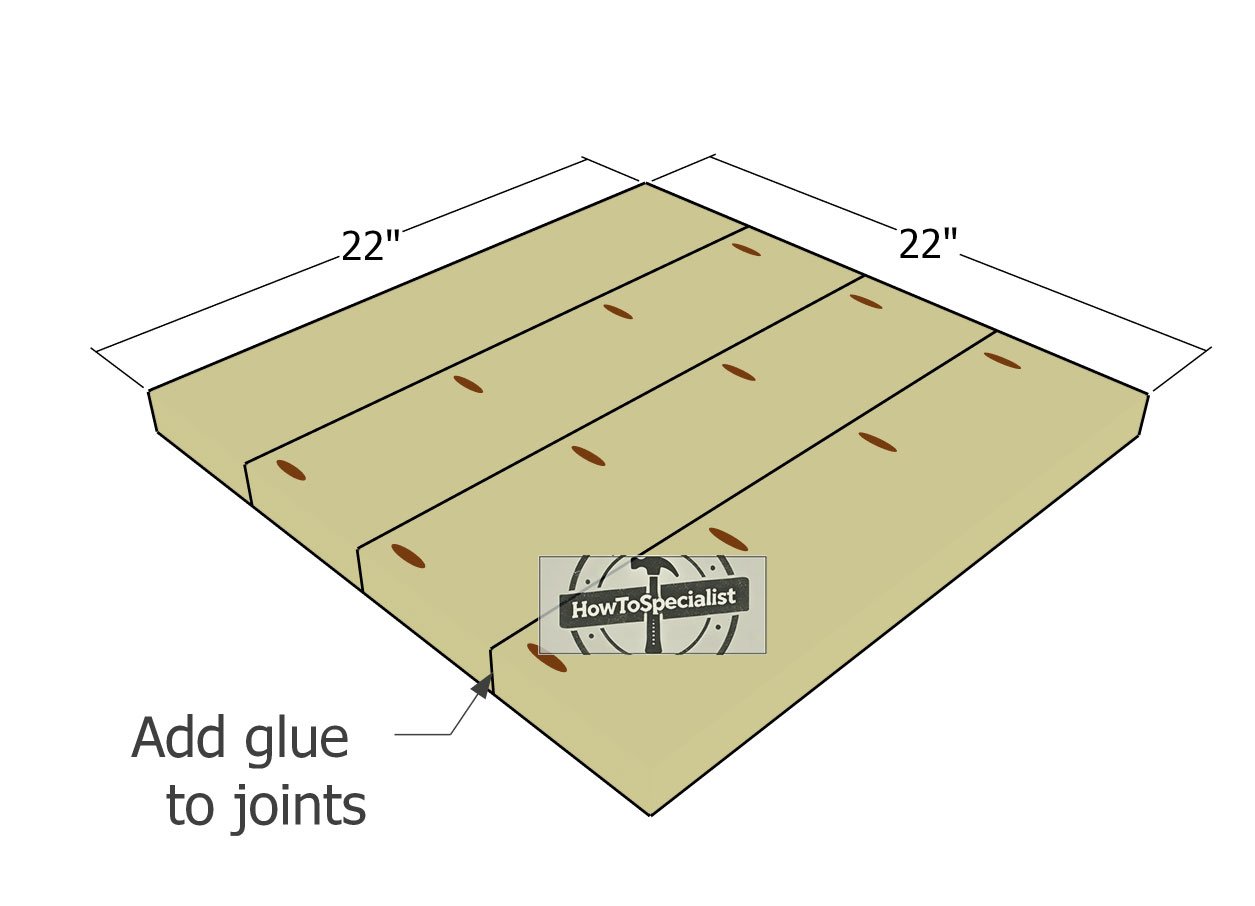
For the tabletop of your farmhouse nightstand, use 2×6 lumber. Cut the boards to size and drill pocket holes as shown in the diagram for a strong, seamless assembly. Lay the boards flat on a level surface, making sure the edges are aligned flush for a smooth finish.
Once everything is in place, insert 2 1/2″ screws into the pocket holes and apply wood glue to the joints for added stability. This will create a solid, sturdy tabletop that perfectly complements the farmhouse design.
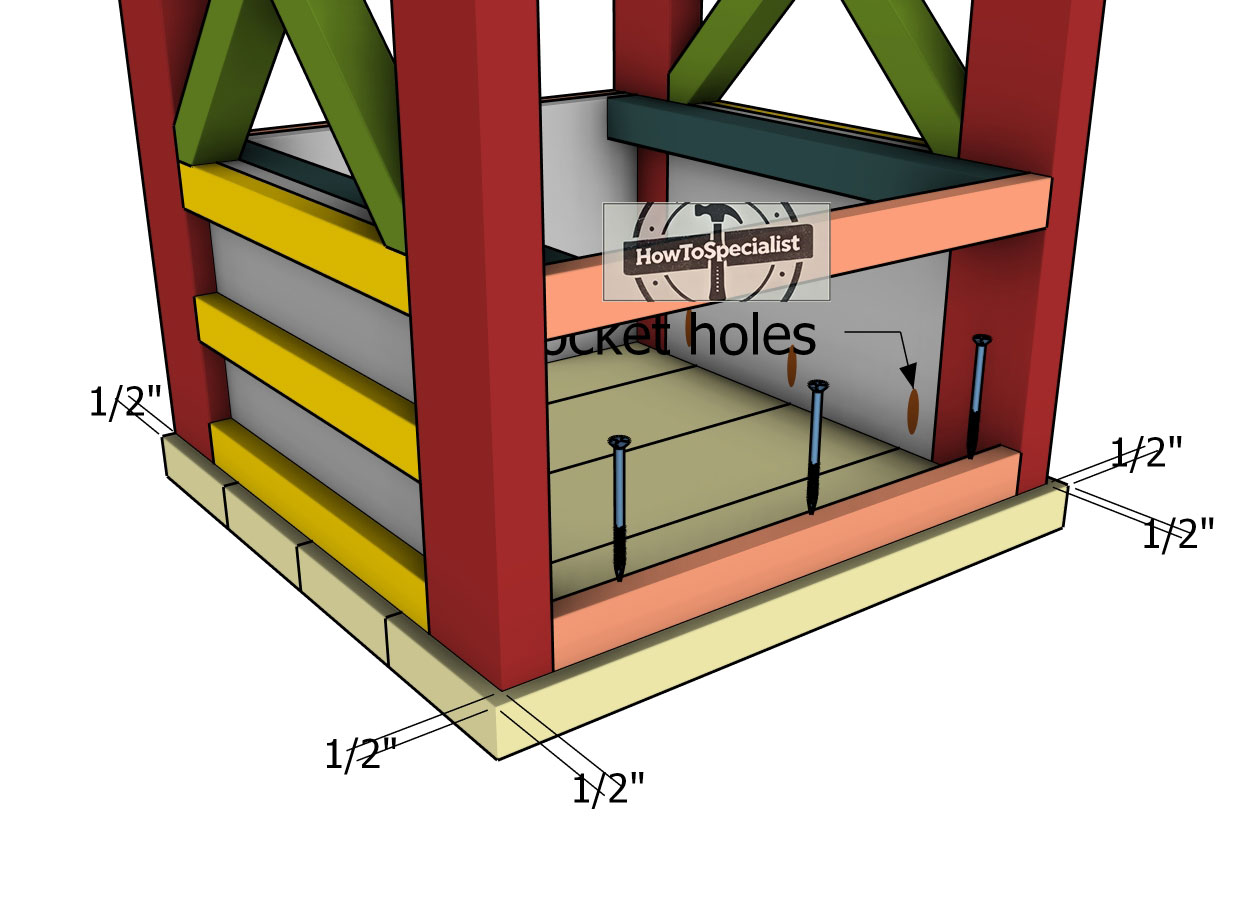
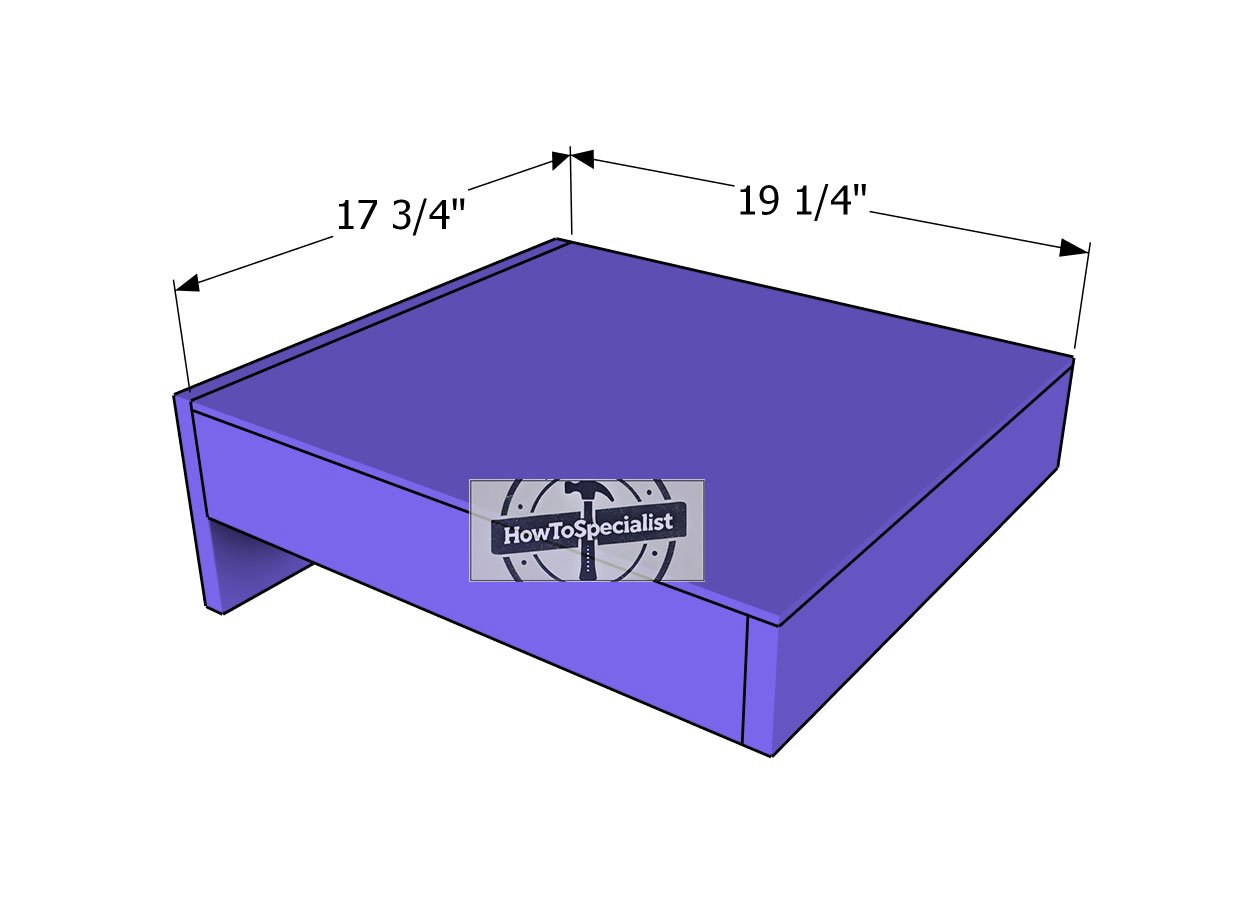
Attaching-the-tabletop
To attach the frame to the tabletop, carefully center the table frame on the tabletop, leaving 1/2″ overhangs on all sides for a balanced look. Drill pilot holes through the 1×2 boards of the frame, then secure the tabletop with 2 1/2″ screws.
Additionally, insert 2 1/2″ screws through the side panels, using the pocket holes for a clean, hidden connection. This will ensure the tabletop is securely attached and gives your nightstand a professional, finished appearance.
Step 5: Drawer
Drawer-main-frame
With the nightstand assembled, it’s time to move on to the drawer. For the drawer frame, use 1×4 boards. Drill pocket holes at both ends of the side boards to prepare for assembly.
Align the pieces and secure them together with 1 1/4″ screws, making sure to add wood glue to the joints for extra strength. This will create a solid and durable drawer that fits perfectly into your farmhouse nightstand.
Fitting-the-drawer-front
Next, attach the 1×8 board to the front of the drawer. Secure it using 1 1/4″ screws and wood glue, making sure to offset the front board by 1/4″ to allow space for attaching the plywood bottom later.
As shown in the diagram, be sure to adjust the width of the drawer front to 7 1/8″ to ensure a proper fit within the nightstand. This step will give your drawer a neat, finished look while keeping everything aligned for smooth operation.
Fitting-the-drawer-bottom
Now, it’s time to attach the 1/4″ plywood bottom to the drawer. Align the edges flush with the frame to ensure a clean fit. Apply wood glue along the joints for added stability, then secure the plywood in place using 1 1/4″ finish nails. This will lock the drawer bottom tightly, giving it the strength and durability needed for everyday use.
Fitting-the-drawer-to-the-nightstand
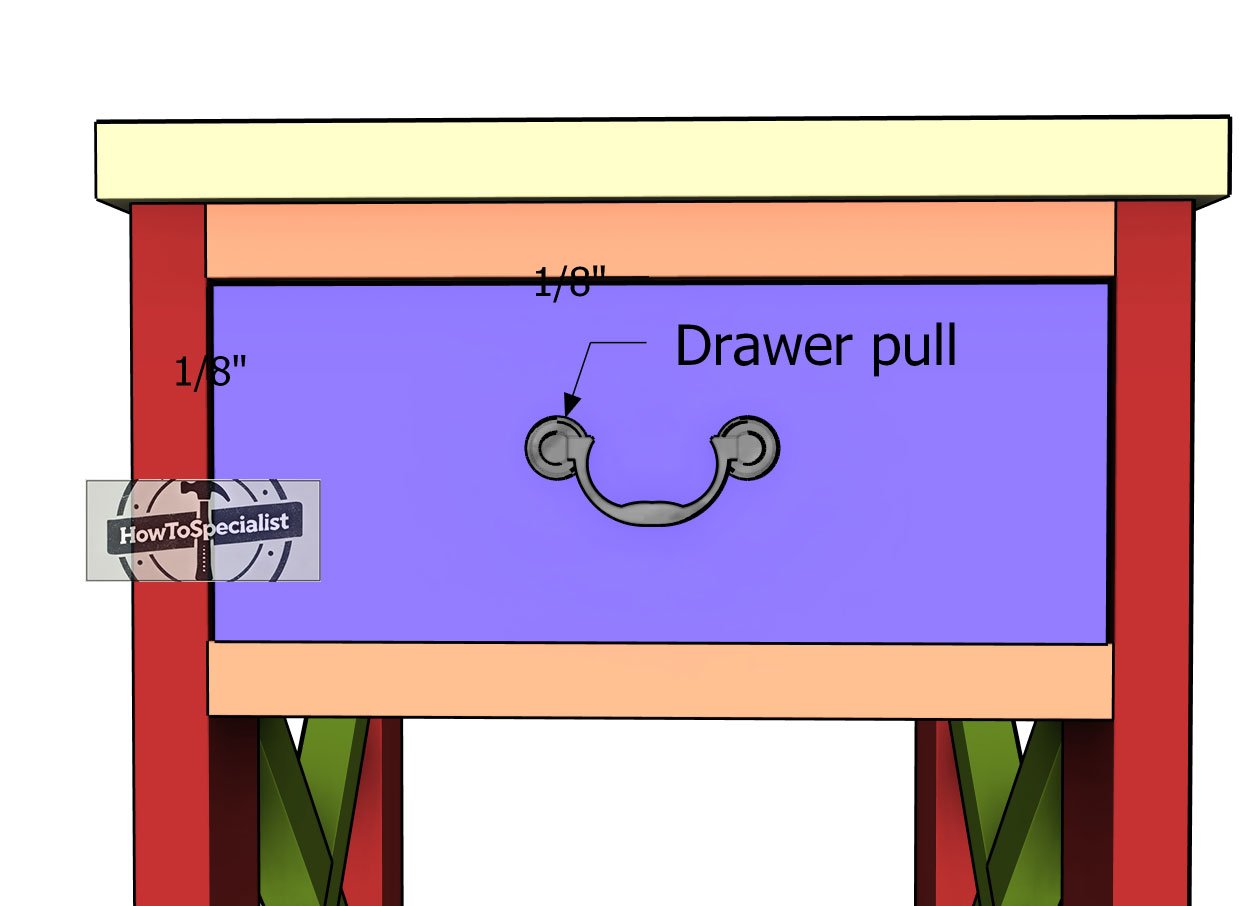
Finally, insert the drawer into the nightstand and attach the drawer pull. You can choose a pull that complements your style and matches the other furniture pieces in your bedroom. To ensure smooth operation, apply wax to the cleats, allowing the drawer to slide effortlessly. As shown in the diagram, there will be a small gap on all sides of the drawer, providing enough space for easy movement. With this final step, your farmhouse nightstand is complete and ready to use!
Step 6: Finishing touches
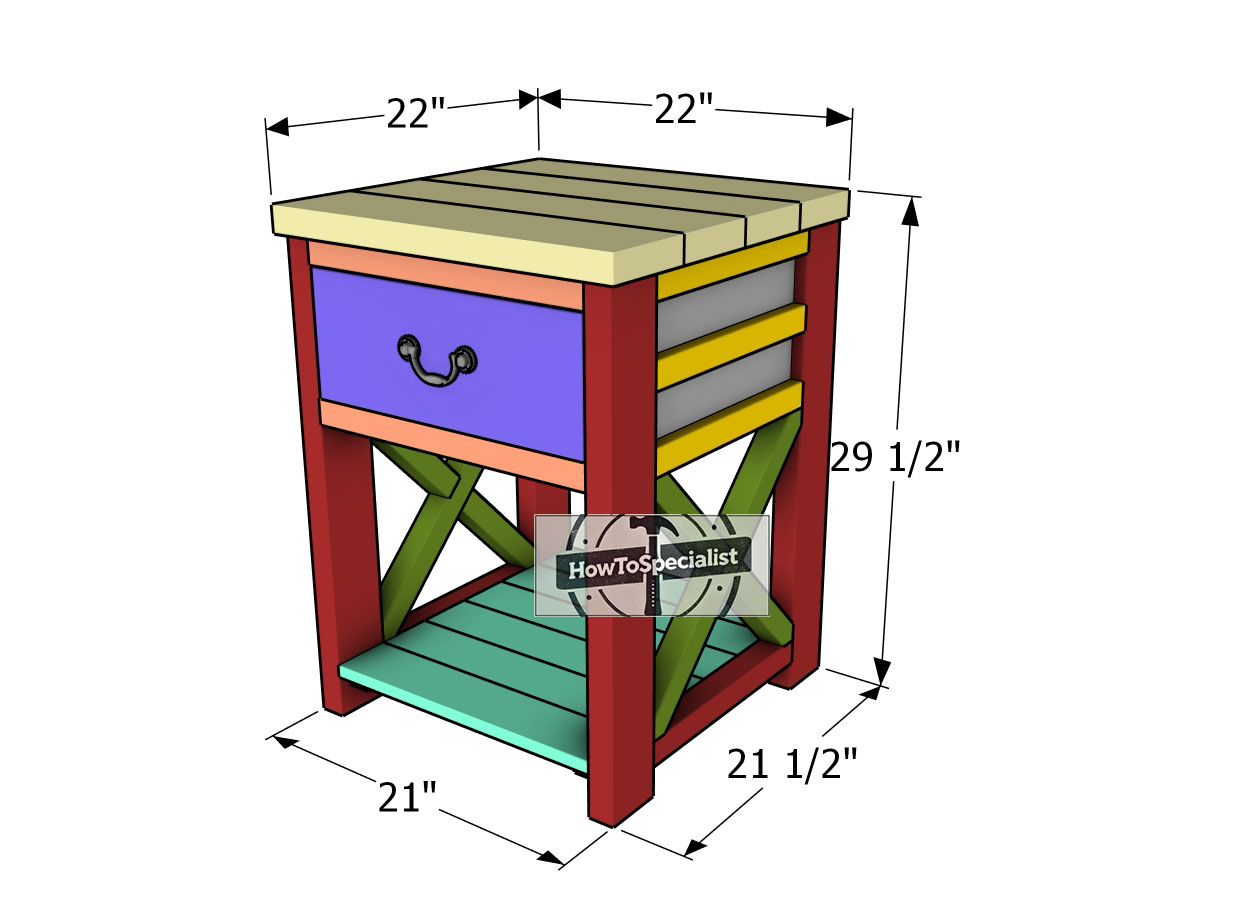
Farmhouse-bedside-table—dimensions
Now that the building is complete, it’s time to focus on the finishing touches that will truly bring your farmhouse nightstand to life. Start by giving the entire piece a good sanding. You want to smooth out any rough edges, paying close attention to the corners and the X trim. A 120-grit sandpaper works great for this, but feel free to go finer for an ultra-smooth finish. This step is crucial to ensure the stain or paint goes on evenly and highlights the natural beauty of the wood.
Bedside table plans
When it comes to finishing, you have a lot of options depending on the look you’re going for. If you love that rustic farmhouse vibe, a stain in a warm, natural wood tone will accentuate the grain and give the nightstand a weathered, lived-in feel. Simply apply the stain with a brush or rag, let it sit for a few minutes, then wipe off the excess. If you prefer a more modern farmhouse look, you can opt for a solid color paint in classic shades like white, black, or even a soft gray. Don’t forget to add a protective clear coat—this will help your nightstand stand up to everyday use.
For the final details, consider upgrading your hardware. A drawer pull in antique brass or black matte finish will really tie the whole piece together and give it that professional, polished look. The little things, like hardware, make a big difference in elevating the overall design. Now that the finishing touches are in place, you’ve got a farmhouse nightstand that not only serves a purpose but also brings warmth and character to your space.
How to build a queen bed
And that’s it! With your farmhouse nightstand complete, you’ve added not only a functional piece to your space but also one that captures the timeless charm of farmhouse design. From the sturdy frame to the beautiful X trims, this nightstand is sure to stand out in any room. Whether you’re using it to store your nighttime essentials or styling the lower shelf with your favorite décor, it’s a project you’ll be proud of every time you see it.
DIY nightstand plans
Remember, DIY is all about making pieces that fit your style and needs. So, feel free to tweak the design, experiment with different stains or paints, and truly make this nightstand your own. Thanks for following along—now it’s time to enjoy your beautiful new piece! As always, if you’ve got any questions, feel free to drop them in the comments.

Thanks for checking out my farmhouse nightstand plans! Be sure to explore my other projects for more fantastic ideas. Don’t forget to hit the LIKE button and SHARE with your friends using the social media links below.