This step by step diy project is about how to build an L-shaped roof. Building a gable roof for an L-shaped shed is easy, if professional plans and tools are used. Any person with basic woodworking skills can get the job done, but you need to ask a friend to assist you, as one has to hold the components into place, while the other one drive the screws in. A gable roof will most certainly add character to your project, although it requires significant work and craftsmanship.
Building the valley of the roof is a complex project, but any person can get the job done if the right plans are used. As you will easily see in this article, you need to make several miter cuts, otherwise the components won’t fit into place properly. After aligning the components into place, you should drill pilot holes and insert 4″ galvanized screws into the top plates and into the ridge boards.
Use a spirit level to align the components and to check if the ridge boards are perfectly horizontal. Continue the woodworking project by checking if the rafters are plumb. Another aspect you have to take into account is to check if the ends of the rafters are level. This aspects might seem minor, but they account on the final look of your L-shaped shed. If you want to create a small loft, you should take into account using a 45º slope. See all my Premium Plans in the Shop.
Made from this plan
In order to build an L-shaped shed roof, you need to use the following:
Materials
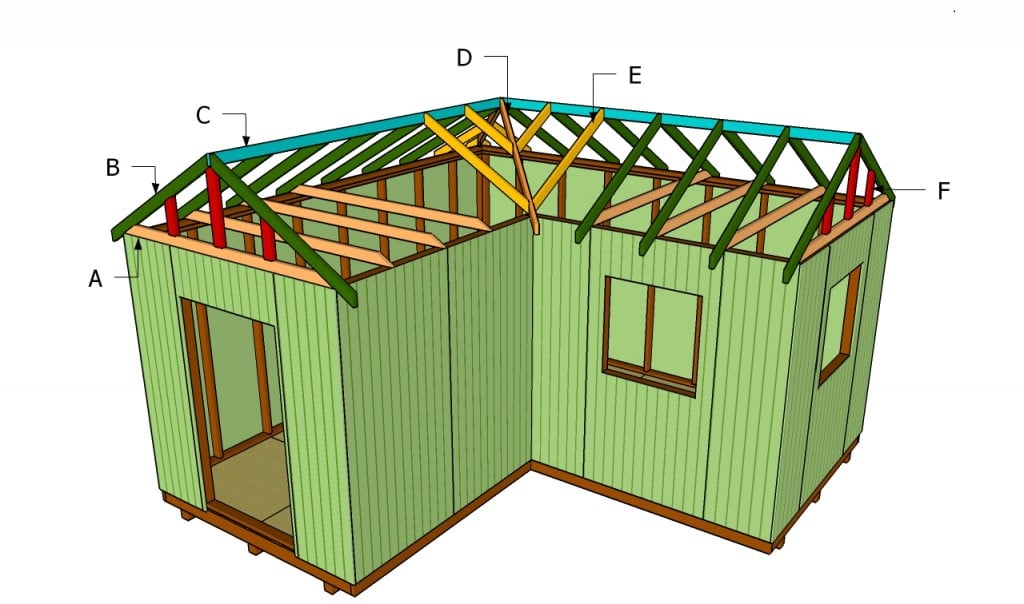
- A – 8 pieces of 2×4 lumber – 97 1/4″ long BOTOM RAFTER
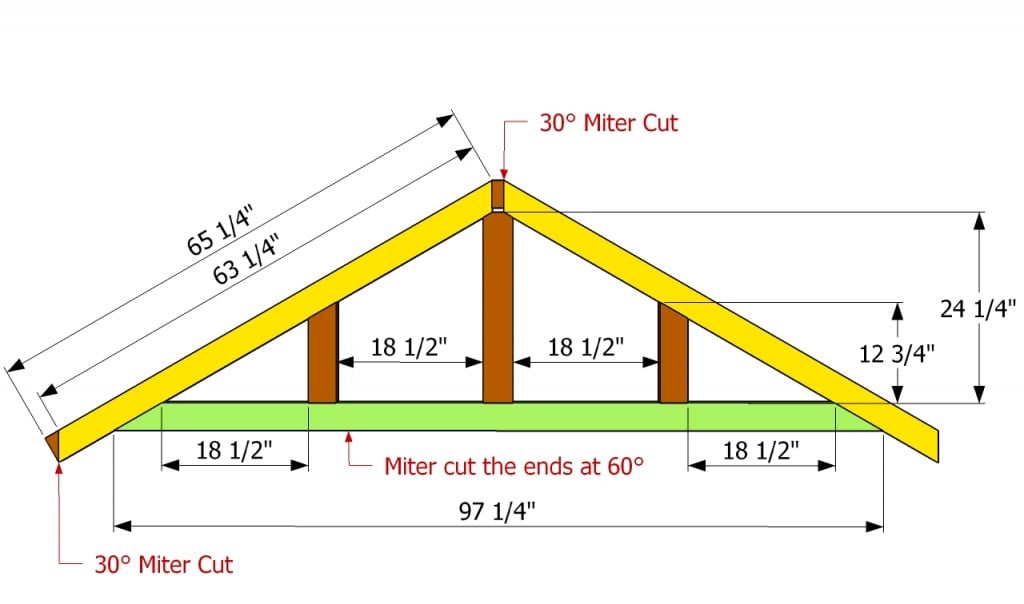
- B – 22 pieces of 2×4 lumber – 65 1/4″ long RAFTERS
- C – 2 pieces of 2×4 lumber – 144 3/4″ and 144 1/2″ RIDGE BOARD
- D – 2 pieces of 2×4 lumber – 85″ long VALLEY RAFTERS
- E – 2 pieces of 2×4 – 36″, 2 pieces – 8 1/4″, 2 pieces – 26 1/4″, 2 pieces – 54 1/4″ RAFTERS
- F – 4 piece of 2×4 lumber – 12 3/4″, 2 piece – 24 1/4″ INTERMEDIATE RAFTERS
Tools
- Safety gloves, glasses
- Miter saw, jigsaw
- Chalk line, tape measure, spirit level, carpentry pencil
- Drill machinery and drill bits
Tips
- Apply several coats of wood stain to the wooden components
- Plumb the rafters, before securing them into place
Time
- One Day
Related
- Part 1: How to build a workshop
- Part 2: How to install siding on a shed
- Part 3: How to build an L-shaped roof
- Part 4: How to install roof decking
- Part 5: How to build a shed door
Building an L-shaped roof

Building an L-shaped roof
How to build an l-shaped roof
The first step of the project is install the ridge boards. In order to fit the components into place, you should secure them to the shed framing, at both ends. Place a spirit level on top of the ridge board to see if it is perfectly level.
Fitting the valley rafters to the ridge boards is a straight-forward job, if the right tools and techniques are used. You need to cut the ends of the rafters at angle, in order to fit into place properly. Drill pilot holes trough the rafters and secure them into place with galvanized screws.
Installing the rest of the rafters is not difficult, if you have all the components and place them equally spaced. Align the components at both ends, if you want to get a professional result.
Place the rafters every 24″ on center, if you want to get a professional result. As you can see in the image, you also need to fit the bottom rafters, as to give enough support to the structure.
Building the roof components is easy, if you use proper plans, quality materials and the right tools. After marking the cut lines of the 2×4 lumber, you should adjust the components at the right size, by using a circular saw with a sharp blade. Fit intermediate rafters to gable ends of the roof, in order to support the siding properly.
Cut the valley rafters as in the image, if you want to get a professional result. Use a good saw to miter cut the ends of the rafters, otherwise they won’t fit into place properly. Fit a bottom rafter at the bottom of the valley components, in order to hold them together tightly.
Work with great attention if you want to get an accurate result. Fit the rafters into place after aligning them at both ends. Use a spirit level to check if the rafters are plumb, before drilling pilot holes and inserting the galvanized screws into place.
Last but not least, we recommend you to take care of the finishing touches. In order to get a professional result, fill the holes and the gaps with wood filler and let it dry out for a few hours. Next, smooth the surface along the wood grain, using medium-grit sandpaper.
Thank you for reading our project about how to build an L-shaped roof and we recommend you to check out the rest of the projects. Don’t forget to share our projects with your friends, by using the social media widgets.
EXPLORE MORE IDEAS:


1 comment
Thank you Jack Sanders..
This “L” shape roof tutorial is great for a guy with a saw and hammer