This diy step by step article is about how to build a pergola attached to the house. Building an attached pergola is a complex woodworking project, but you can get the job done by yourself if you follow our step by step tutorial. A pergola attached to your house is very functional, as it creates a beautiful space where you can take your breakfast or read a book, while watching your kids playing in the backyard. Although there are many designs you can choose from, we will show you several techniques that can be applied in any project.
Setting out the attached pergola is one of the most important steps of the whole project, therefore we recommend you to use our free tips and work with attention and take accurate measurements. If you don’t have any previous experience in this field, you should ask a handy friend to assist you and hold the elements into place while you drive in the screws. In most of the cases, you will need to use a ladder, therefore make sure you place it on a sturdy surface.
Building an attached pergola is one of those projects that should add value to any property, while being affordable and durable. Consequently, we recommend you to use timber designed for outdoor use (cedar, redwood, pressure treated) and to apply several coats of varnish, as to protect it against water damage or decay. In addition, select the wood with great care, making sure it is perfectly straight and in a good condition (without any visible flaws). See all my Premium Plans in the Shop.
Made from this plan
In order to build a pergola attached to the house, you need the following:
Materials
- 8-9′ long 4×4 or 6×6 wooden posts
- 3”, 4” and 6” nails / screws
- Tube forms
- Adjustable post anchors
- 2×10 support beams
- 2×8 ledger
- 2×2 splats to support the crossbeams
- 2×4 or 2×6 shade elements
- Cement, sand, gravel
Tools
- Safety gloves, glasses
- Circular saw, Hammer, spirit level, carpentry pencil
- Ladder, Posthole digger, Power mixer
Tips
- Lay out the pergola accurately, using batter boards and string
- Plumb the posts using post level clips and braces
- Use adjustable post anchors to secure the 4×4 wooden posts
Time
- One weekends, two workers
How to build a pergola attached to the house

Setting out the attached pergola
First of all, you have to set out the perimeter of the attached pergola. Therefore, in order to get the job done like a pro, we recommend you to build several batter boards from 2×4 wooden slats, and to install them as in the image.
In addition, you have to use string to adjust the layout of the pergola, until the corners are right angled. Work with patience, making sure the diagonals of the pergola are equal.

Installing a pergola post
Installing the 4×4 wooden posts into position is not difficult, if you follow our step by step tips. First, you have to dig 3′ deep holes at least 15” in diameter and pour a 4” layer of gravel mixed with sand. Continue the process by installing the tube forms into place (use a spirit level to make sure they are perfectly horizontal).
Fill the forms with concrete and fit the adjustable post anchors. After 48 hours, plumb the posts, lock them into position with braces and drive in 3” screws.

Building attached pergola ledger
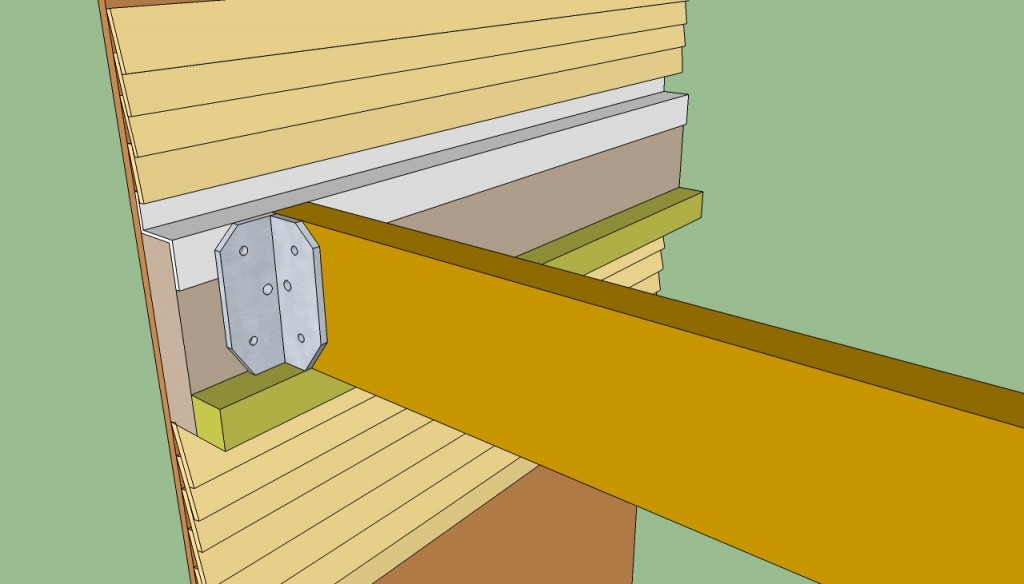
After you have set the posts into position, you have to secure a 2×8 ledger to the house, as in the image. Therefore, you have to plumb the 2×8 ledger and attach it to the frame of your house with several bolts.
On the other hand, you also have to install a vinyl flushing over the ledger to drain the water properly. As you notice in the image, you have to anchor the support beams with corner brackets.

Building an attached pergola
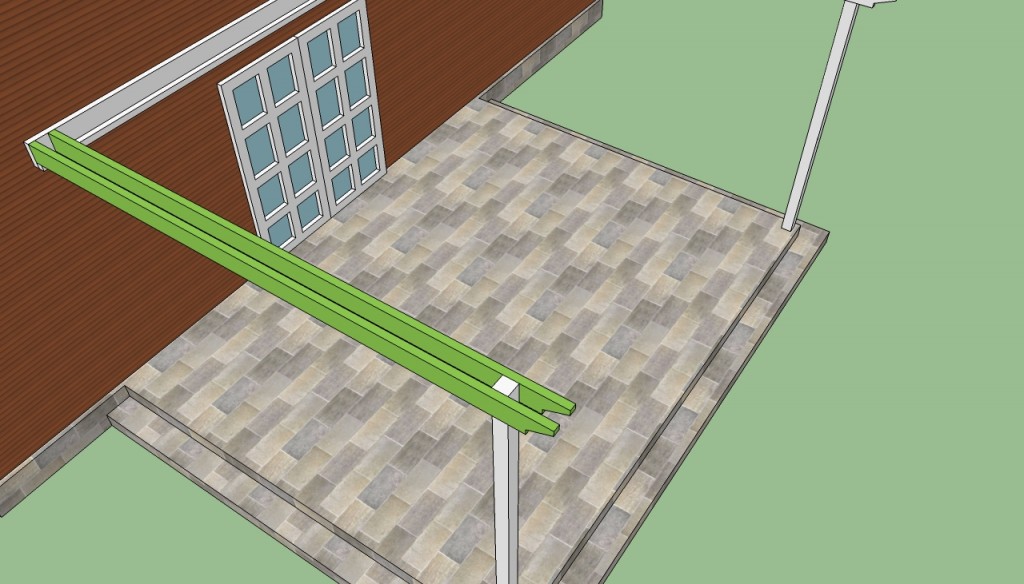
Securing the support beams properly is maybe the most important step of the whole process, therefore we recommend you to tackle it with great care. Level the beams, lock them into place with C-clamps and drive in the screws.

Installing support beams
In order to obtain a neat look, you can cut out the ends of the beams in a decorative manner, like you can see in the image. First of all, you have to trace the marks on the 2×6 beams and then cut them with a jigsaw.
You can cut the ends in many ways, but you should chose the design according to your tastes. Don’t forget to smooth the edges of the beams with a sand block, after you have made the cuts.
Building a pergola attached to the house

Installing pergola crossbeams
After these preliminary steps, you have to build the shade elements from 2×6 slats and install them into position. Place the shade elements every 15” or more, according to how much light you want to get through the pergola.

Building a pergolla attached to house
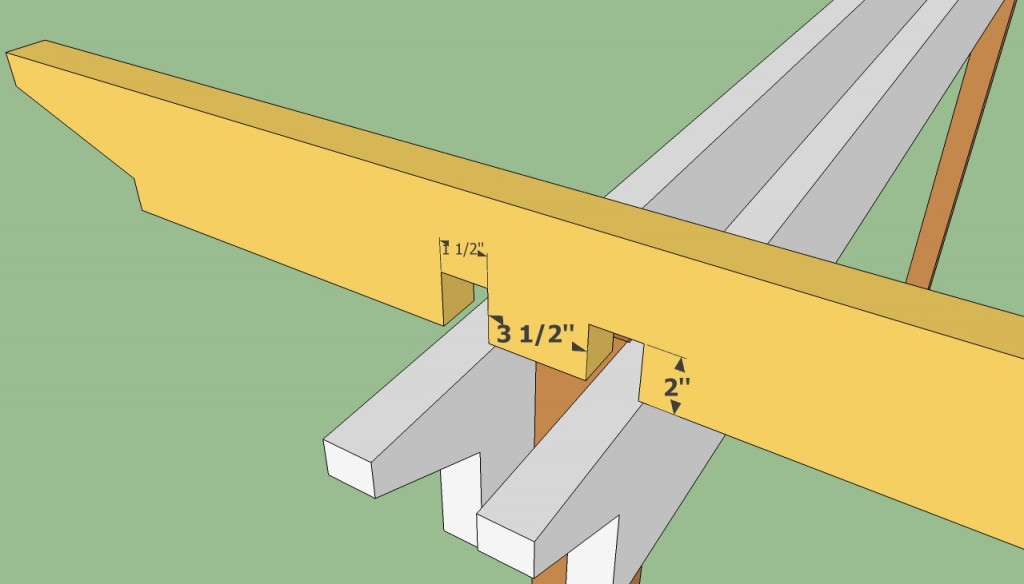
Another way of setting the shade elements into position is to cut several notches, as in the image. Use a jig saw to make the notches, or perform several cuts with a circular saw and remove the excess material.
Afterwards, you should drive pilot holes through the top of the shade elements into the support beams, and insert the appropriate screws. Place the shade elements equally spaced for a neat look.

Attached to house pergola
If you want to add a personal touch to your attached pergola, you could install several 2×2 or 2×4 slats, perpendicularly on the cross breams. On one hand, they will add character to your pergola, but on the other hand, they would also keep the shade elements equally spaced.
Don’t forget to use a spirit level every time you install a new element, otherwise the final result might not raise to your expectations.

How to build a pergola attached to house
After you have built the pergola attached to your house, you have to fill the gaps with wood putty and sand the surface with medium grit sandpaper. Work with good judgement, if you want to obtain a professional result.
Thank you for reading our article about how to build a pergola attached to the house and we recommend you to check out the rest of our projects. Don’t forget to share our articles with your friends, by using the social media widgets.
EXPLORE MORE IDEAS:


