This step by step article is about diy pergola plans. We show you how to make a pergola in your backyard, as to increase the value of your property and to create a nice area for leisure. If you like to spend your time in your backyard, or you just want to improve the look of your backyard, this simple project is the perfect choice. Just follow our instructions, choose the material with great care and measure twice before making the cuts, if you want to obtain a professional result.
There are cases in which the constructions requires several building permits, therefore we recommend you to visit your local building department, to get all the needed information about your project. Afterwards, keeping in mind the most important legal considerations, you should choose the right plans for your needs, tastes and budget. Next, buy the lumber from your diy store, making sure it’s designed for outdoor use (cedar, redwood or pressure-treated) and in perfect condition. See all my Premium Plans in the Shop.
Made from this plan
In order to build a patio pergola, you need the following:
Materials
- 4×4 or 6x6ong wooden posts – 8-9′ long (4 pieces)
- Tube forms
- Cement, sand, gravel
- Adjustable post anchors (4 pieces)
- 2×6 support beams (12 – 12 1/2′ long)
- 2×6 shade elements (12 – 12 1/2′ long)
- 2×4 slats (130” long)
- 7” carriage screws – to secure the support beams
- 6” wood screws – to fasten the crossbeams
- 3” wood screws – to fasten the slats
- rafter ties
- wood filler , wood glue, stain/paint
- post to beam connectors
Tools
- Posthole digger, Power mixer
- Circular saw, jigsaw, Drill machinery, wood drill bits
- Hammer, spirit level, carpentry pencil, tape measure
- Ladder, Safety gloves, glasses
Tips
- Lay out the pergola with batter boards and string
- Plumb the posts with braces, before setting them into the anchors
- Drill pilot holes in the wooden elements, before inserting the screws
Time
- One weekends, two workers
My best tips for building a 10×10 pergola:
A 10×10 pergola is a perfect addition to any backyard, creating an open-air space for relaxing or entertaining. The design is simple yet elegant, providing shade and style. Here are my best tips for building a sturdy and beautiful 10×10 pergola.
1. Plan the Design and Layout
Before you start, carefully plan the layout:
- Size: A 10×10-foot pergola provides enough space for a small seating area or outdoor dining setup. Make sure you have enough room in your yard and consider how you want to use the space.
- Material: Use pressure-treated lumber, cedar, or redwood for durability and a natural look. Vinyl or aluminum are great low-maintenance options.
- Post spacing: Position the 4 posts evenly spaced at the corners, ensuring they are exactly 10 feet apart to create a square shape.
Planning the size and material ensures your pergola will fit perfectly and be built to last.
2. Prepare the Foundation
A stable foundation is key to a sturdy pergola:
- Concrete footings: For stability, dig holes at least 24 inches deep for each post and fill them with concrete footings. This prevents the pergola from shifting.
- Gravel or pavers: Alternatively, you can create a level base using gravel or pavers to build the pergola on top. This method works well if you prefer not to use concrete.
A strong foundation keeps the pergola level and secure.
3. Install the Posts
The corner posts are the backbone of your pergola:
- 4×4 or 6×6 posts: Use pressure-treated 4×4 or 6×6 posts for strength. Make sure they are level and plumb when installed in the footings.
- Braces: While the concrete is setting, brace the posts with temporary supports to ensure they remain straight and stable.
Setting the posts correctly ensures the structure will be solid and straight.
4. Add the Beams and Rafters
The beams and rafters form the top of the pergola:
- Beams: Attach 2×6 or 2×8 beams to the top of the posts, securing them with lag bolts or metal brackets. These beams run parallel to each other and form the frame for the rafters.
- Rafters: Cut 2×4 rafters and install them across the beams, spacing them about 12-16 inches apart for optimal shade. You can add decorative cuts to the ends of the rafters for extra style.
- Cross rafters (optional): For extra shade, consider adding smaller cross rafters perpendicular to the main rafters.
Properly spaced rafters provide shade and support while adding to the aesthetic of the pergola.
5. Secure the Pergola
Ensure the structure is sturdy by reinforcing key areas:
- Corner brackets: Use metal corner brackets or wooden braces to secure the joints between the beams and posts.
- Post anchors: If the posts are installed on a deck or paver surface, use post anchors to secure them to the base.
Reinforcing the joints and connections adds strength to the pergola, especially in windy areas.
6. Finish and Customize
Once the pergola is built, focus on the finishing touches:
- Stain or paint: Apply a wood stain or exterior-grade paint to protect the wood from weather damage and enhance the appearance.
- Lighting: Add string lights or outdoor lanterns to create a cozy ambiance for evening gatherings.
- Climbing plants: Consider growing vines or climbing plants like wisteria or jasmine along the posts to add greenery and extra shade.
Finishing touches make your pergola more inviting and customized to your taste.
Bonus Tip: Add Curtains or Screens for Privacy To create a more private outdoor space, consider adding outdoor curtains or retractable screens to the sides of the pergola.
Diy Pergola plans

Laying out the attached pergola
The first step of this project is about laying out the pergola on the selected location. Therefore, we recommend you to place eight batter boards (made from 2x4s), as in the image and use string to outline the contour of your pergola.

Leveling the concrete footings
After you have set out the diy pergola, you should build the concrete footings. That is why, you should dig four holes 15” in diameter (3′ deep – at least 6” under the frost line). Next, you have pour a 4” layer of gravel and compact it thoroughly.
Install tube forms in the holes, making sure they are perfectly level one with another (use a straight edge and a spirit level). Mix a small quantity of concrete and fill the forms.

Installing a pergola post
Don’ forget to install the adjustable post anchors in concrete, before it dries out. Leave the concrete to dry out at least 48 hours, before installing the wooden posts.
Build the posts from 4×4 or 6×6 lumber, plumb them with a spirit level and lock them into place with two braces. Afterwards, insert several lag bolts through the anchors into the posts. Last but not least, remove the braces and install the beams.

Installing the wooden posts
On the other hand, if you don’t want to use metal anchors, you could secure them directly in the concrete. In this manner, the posts would be rigid, but they could rot due to the increased moisture in the ground.

How to make a pergola
After you have installed the four posts into position, you should build the support beams and secure them into place. Therefore, we recommend you to use 2×6 or 2×8 lumber to build the support beams, according to your needs and tastes.
As you can see in the image, these components should overhang about 10-15” on both sides of the pergola. Use a spirit level to align them properly, before inserting the carriage bolts.

Installing the support beams
In order to secure the support beams into place, you have to align and lock them into position with several C-clamps. Next, drill several pilot holes through the beams and trough the post. Next, drive in the carriage bolts and tighten the nuts.
How to make a pergola
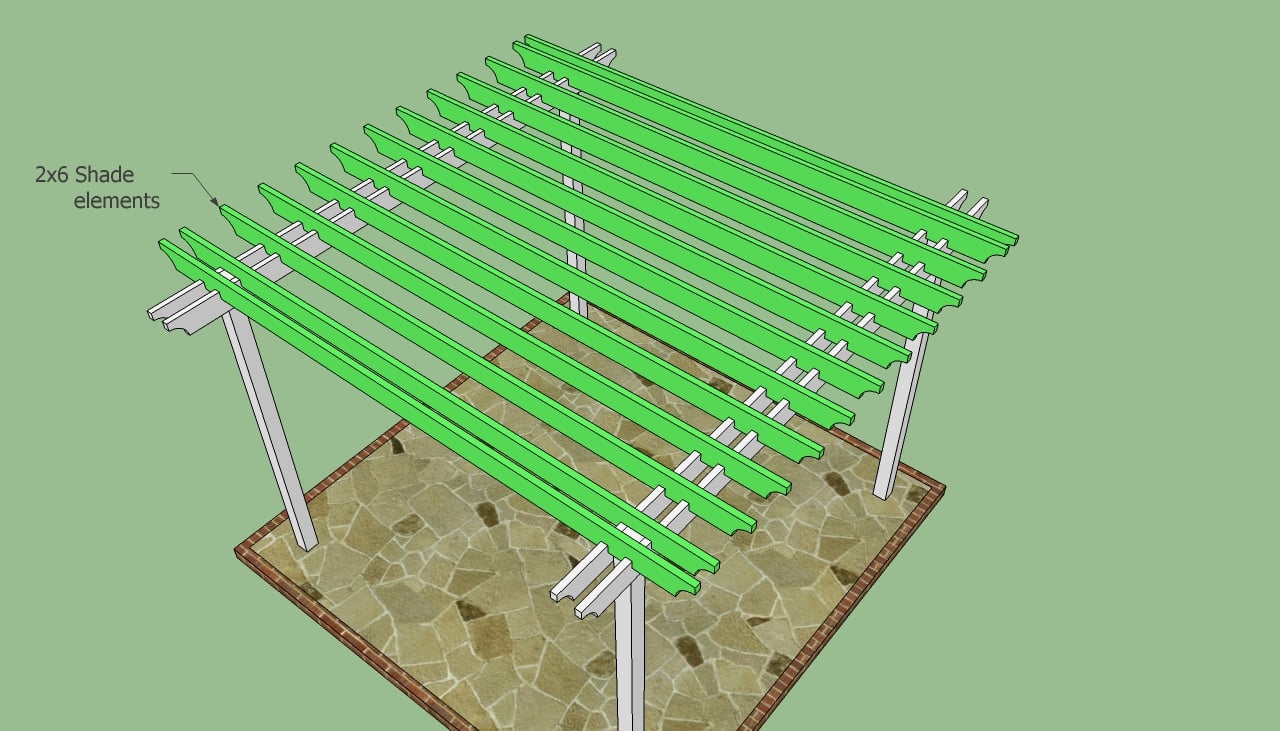
Installing the shade elements
Continue your project by installing the crossbeams. Therefore, build them from 2×6 lumber, in the same manner described above. Select the wood carefully, making sure the beams are perfectly straight and in perfect condition.
The distance between the crossbeams influences the amount of light that gets trough your pergola. In our case, the shade elements are placed every 12”, but you should adjust them.
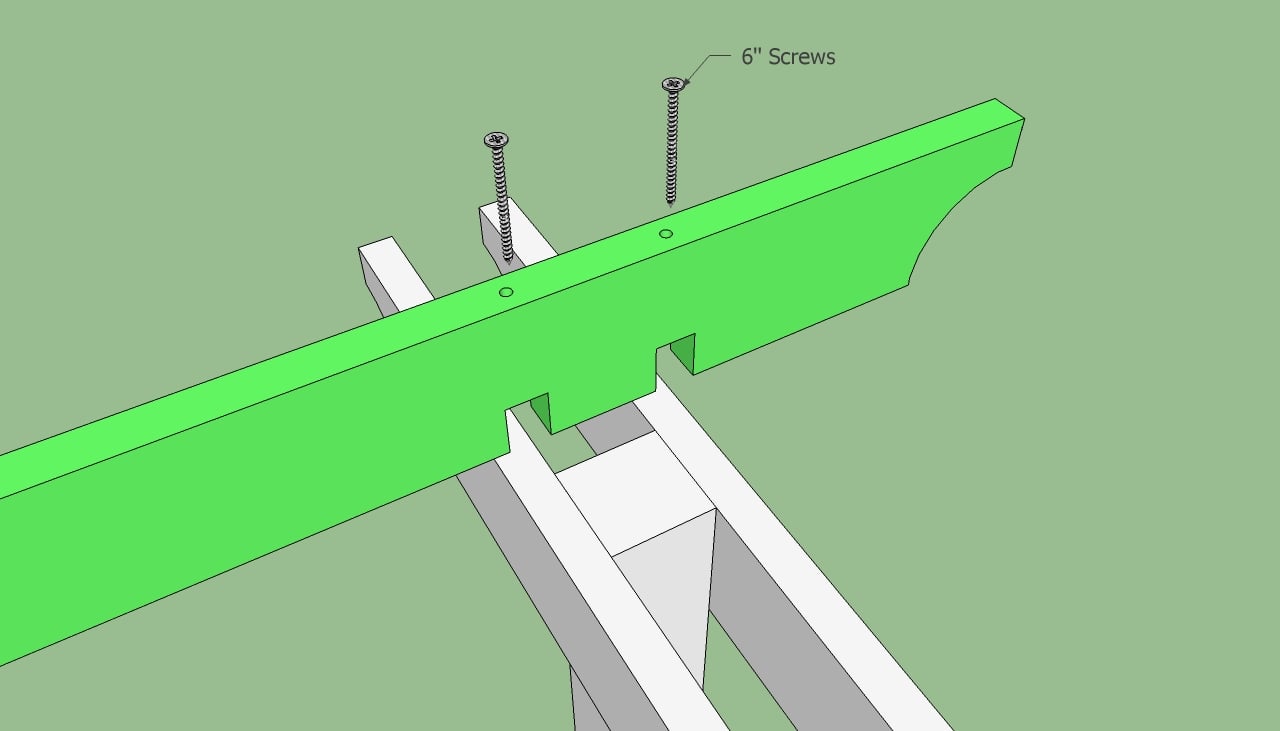
Fastening the crossbeams
In order to secure the shade elements into position, you should cut 2 notches at both ends, as in the image. After you have built the crossbeams, you should drill two pilot holes, just trough the notches.
Next, you have to insert several 6” screws trough the pilot holes in the support beams, at both ends. Make sure you align the shade elements perfectly, before inserting the screws, otherwise your pergola won’t have a neat look.
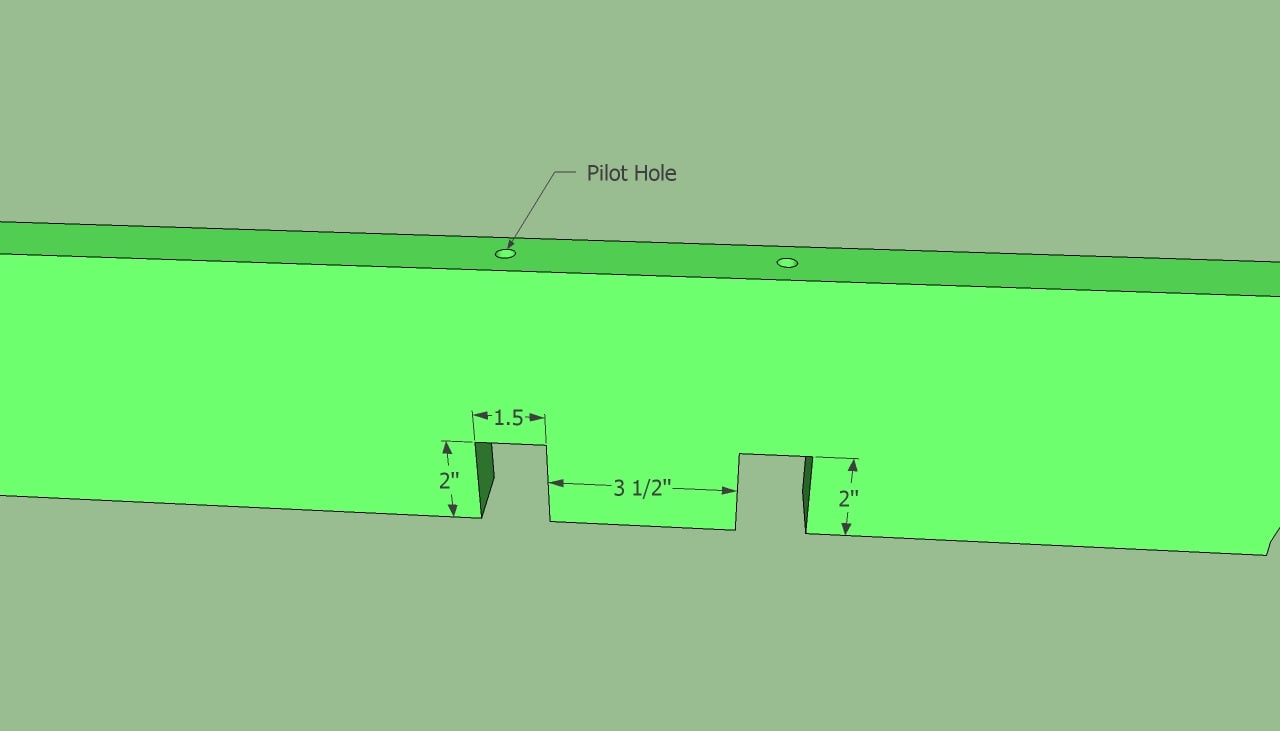
Pergola crossbeams plans
Building the shade elements is a straight-forward process, if you use the right diy plans for the job. Just select the lumber with great care, measure the beams with great attention and good judgement, if you want to obtain a professional result at a reasonable price.
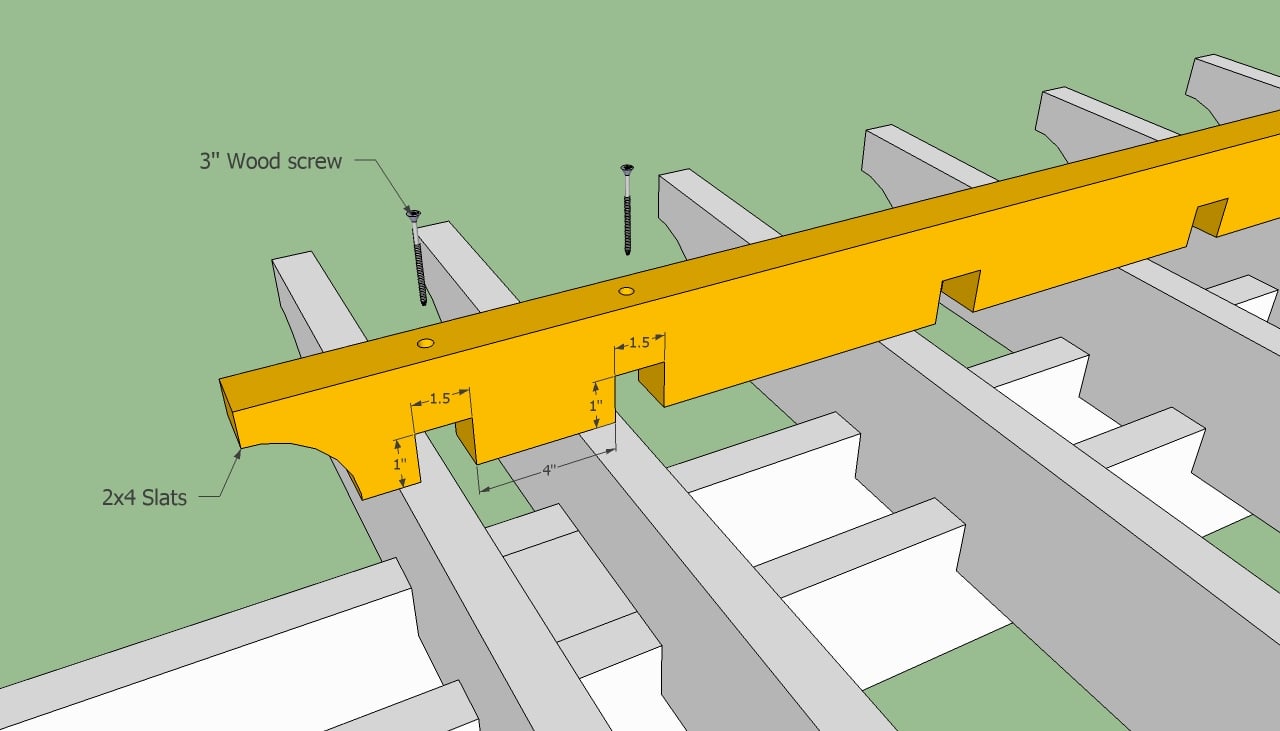
Building the pergola slats
After you have placed the crossbeams in a professional manner, you should get the job done by installing the 2×4 slats. The slats have a dual purpose; on one hand they add a dramatic look to your pergola, while on the other hand they keep the crossbeams equally spaced and increase the rigidity of the structure.
Drill pilot holes through the 2×4 slats and lock them into position with 3” screws. Place the slats every 2-3′, or adjust the distance according to your needs.

Diy pergola plans
As you can see in the image, installing the 2×4 slats is an easy procedure, if you follow our step by step instructions. Just cut out the notches in the slats and install them into position with several screws, at both ends.
Use a tape measure to place the wooden slats equally spaced. This aspect is essential, otherwise the patio pergola won’t have a neat and symmetrical look.
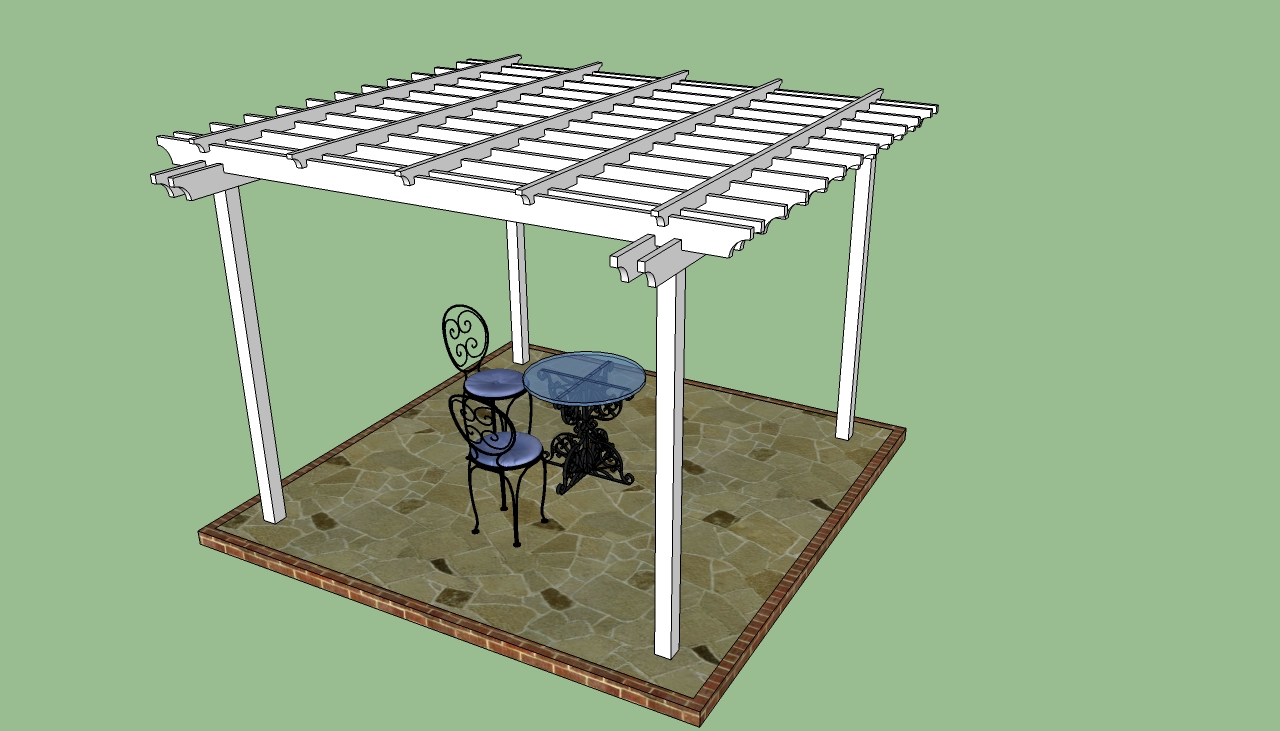
How to build a pergola
After you have assembled all the components together, you should sand them with medium grit sandpaper and apply several coats of varnish, to protect the pergola against wood decay and water damage.
By following these tips, you’ll be able to build a beautiful and durable 10×10 pergola that enhances your outdoor space. Whether you use it for shade, dining, or relaxation, your pergola will provide a perfect retreat in your backyard.
Thank you for reading our article about how to make a pergola diy plans and we recommend you to check out the rest of our projects. Don’t forget to LIKE and SHARE our projects with your friends, by using the social media widget.

2 comments
Im looking to built 16’x16′ pergola I want to attached to the house need prints and material list
THANK YOU
I have plans for a free standing pergola: https://howtospecialist.com/outdoor/pergola/16×16-pergola-plans-step-by-step/ You can use the plans as a starting point.