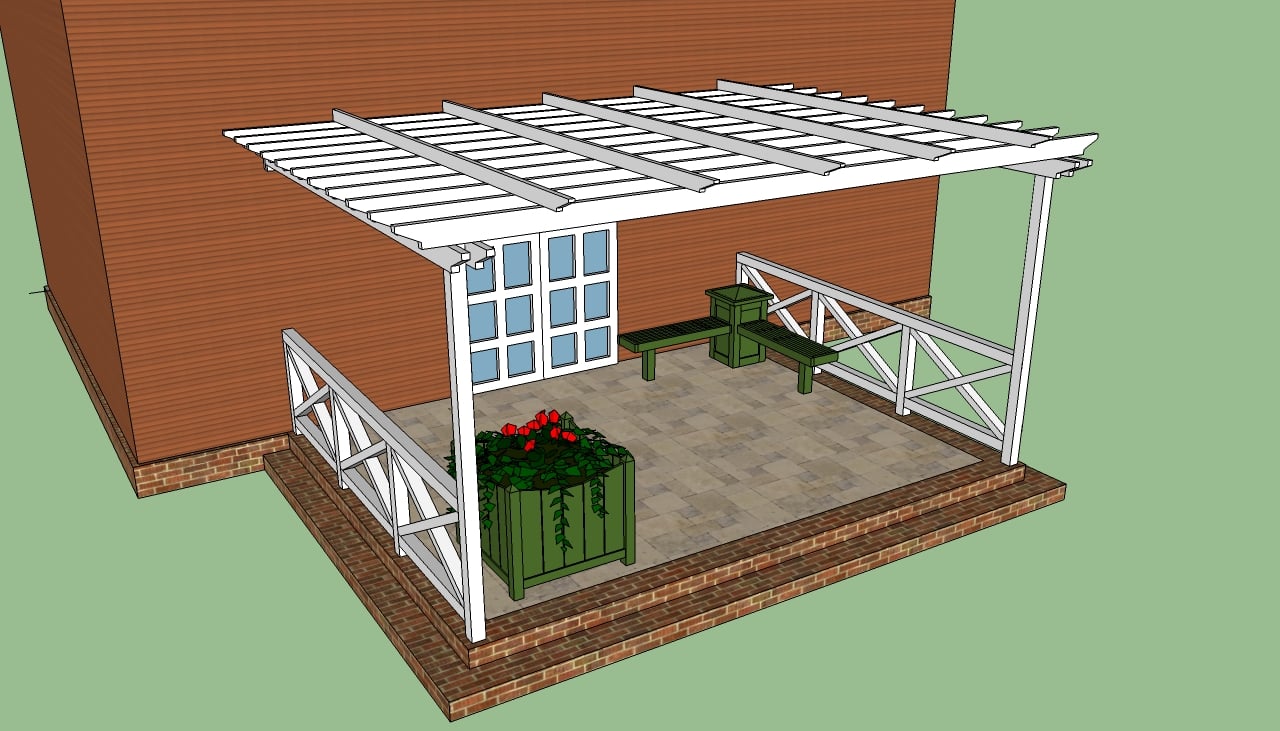
This step by step diy article is about attached pergola plans. Building a pergola attached to your house is a complex project, but you can get the job done by yourself, if you follow our plans free and use the right tips, techniques and materials. Generally speaking, pergolas are built to create a nice shaded area, where you could take your dinner or read a book, while enjoying the fresh air in your garden. If you don’t want to build a patio pergola in the middle of your garden, you can still have a cozy place with a nice design, if you attach it to your house, next to a simple deck.
An attached pergola requires a ledger anchored to your house, several outer posts (according to the size of your pergola) and wooden shading elements. As you can see, there is nothing complicated involved in the building process, provided you work with great care and make sure everything is well aligned and leveled. Don’t forget to study the building codes before planing the attached pergola, as there are certain aspects where you have to comply with the local regulations (the depth of the holes that support the posts, the type of materials used, etc.). Despite the construction techniques required in the building process, we will show you the main methods, to help you get the job done quickly and in a professional manner.
There are many designs you can choose from when building your attached pergola, but you have to remember that the more complex the shape, the greater the costs. Therefore, you should make a blueprint of the pergola before starting the actual project, in which we recommend you to wrote down the dimensions of the components and their costs. In this manner, it is easier to make a cost estimation and to keep the expenditures under control. If you afford and like the idea, you could even cover the attached pergola with polycarbonate sheets, to protect the deck or patio from rain and snow.
Made from this plan
In order to build an attached pergola, you need the following:
Materials
- A – 4 pieces of 8-9′ long 4×4 or 6×6 lumber WOODEN POSTS
- B – 2 pieces of 2×8 or 2×10 lumber SUPPORT BEAMS
- C – 2×6 lumber CROSSBEAMS
- D – 2×2 slats SLATS
- E – 4 carriage bolts 7” long BOLTS
- F – 6” galvanized screws, to secure the crossbeams SCREWS
- Tube forms, post anchors
- Cement, sand, gravel
Tools
- Safety gloves, glasses
- Circular saw, Hammer, spirit level, carpentry pencil
- Ladder, posthole digger, Power mixer
Tips
- Lay out the pergola accurately, using batter boards and string
- Plumb the posts using post level clips and braces
- Use adjustable post anchors to secure the 4×4 wooden posts
Time
- One weekends, two workers
Attached pergola plans
Building an attached pergola is a straight forward job, if you evaluate the situation properly and select the building plans with good judgement. As you can see in the image, the construction involves the installation of several elements, therefore you have to plan everything from the very beginning.
Pergola attached to the house plans

Building a nice attached pergola
Decide the size, place and design of the pergola. While the building techniques are similar, a beam positioned differently, or the materials used have a significant impact on the look of your pergola. For example, placing the shading elements perpendicular to the house will create a different design as compared to placing them parallel.

Installing pergola posts
Use batter boards and string to lay out the pergola like a professional. Measure the diagonals and use the 3-4-5 rule to make sure the corners are right angled. This aspect is essential for the success of your project, therefore pay attention during this step.

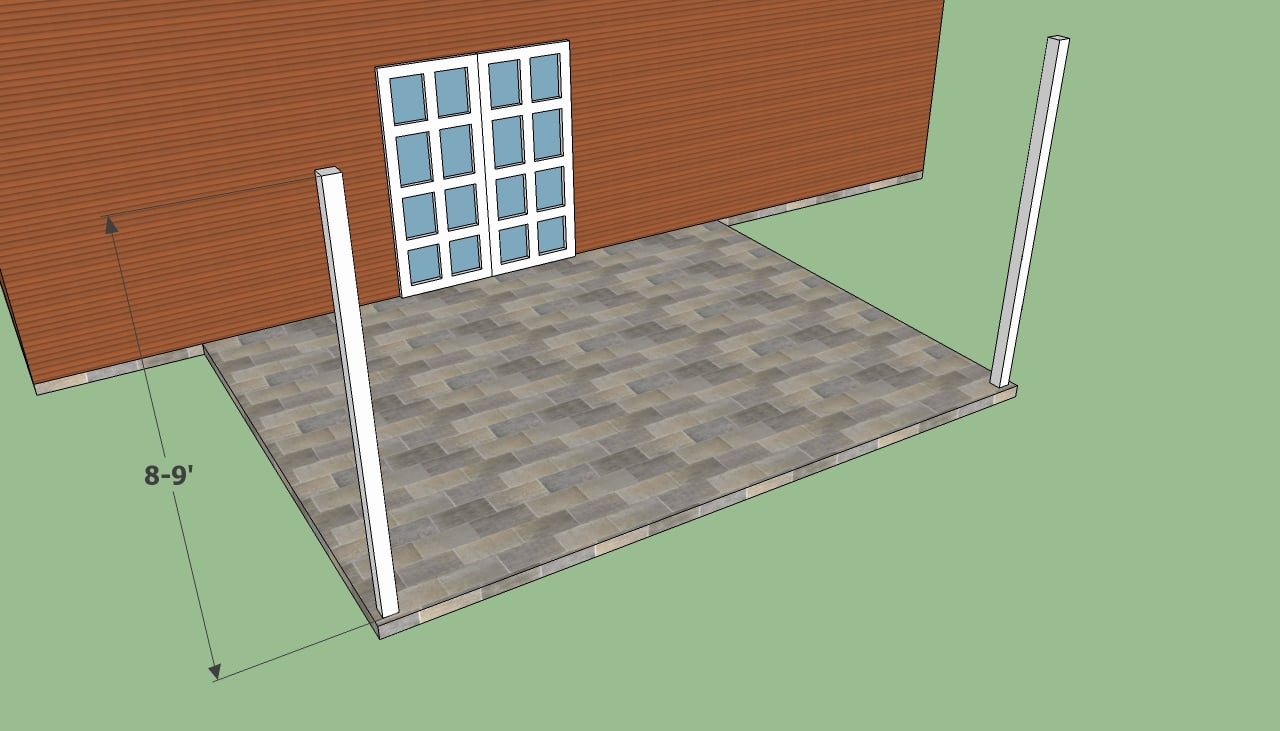
Installing the wooden posts
The height of the posts should vary according to your needs and tastes, but in general it should be between 8-9′. In order to anchor the posts properly, we recommend you to plumb them by using a spirit level, brace them in two perpendicular directions and afterwards drive in the screws.

Attached pergola ledger
Attaching the cross beams to the house can be done in several ways, including setting posts along the house, but the easiest way is to anchor a 2×8 ledger with several bolts. As you can see in the image, you need to install a vinyl flushing over the ledger to prevent the water from damaging the house timber frame.
Building a pergola attached to a house

Building attached pergola plans
The next step is about securing the 2×8 or 2×10 support beams to the posts. The procedure is straight forward, if the wooden posts are plumb and perfectly aligned. In addition, we recommend you to use several C-clamps to lock the beams into position, before driving in the 7” bolts.

Pergola support beam plans
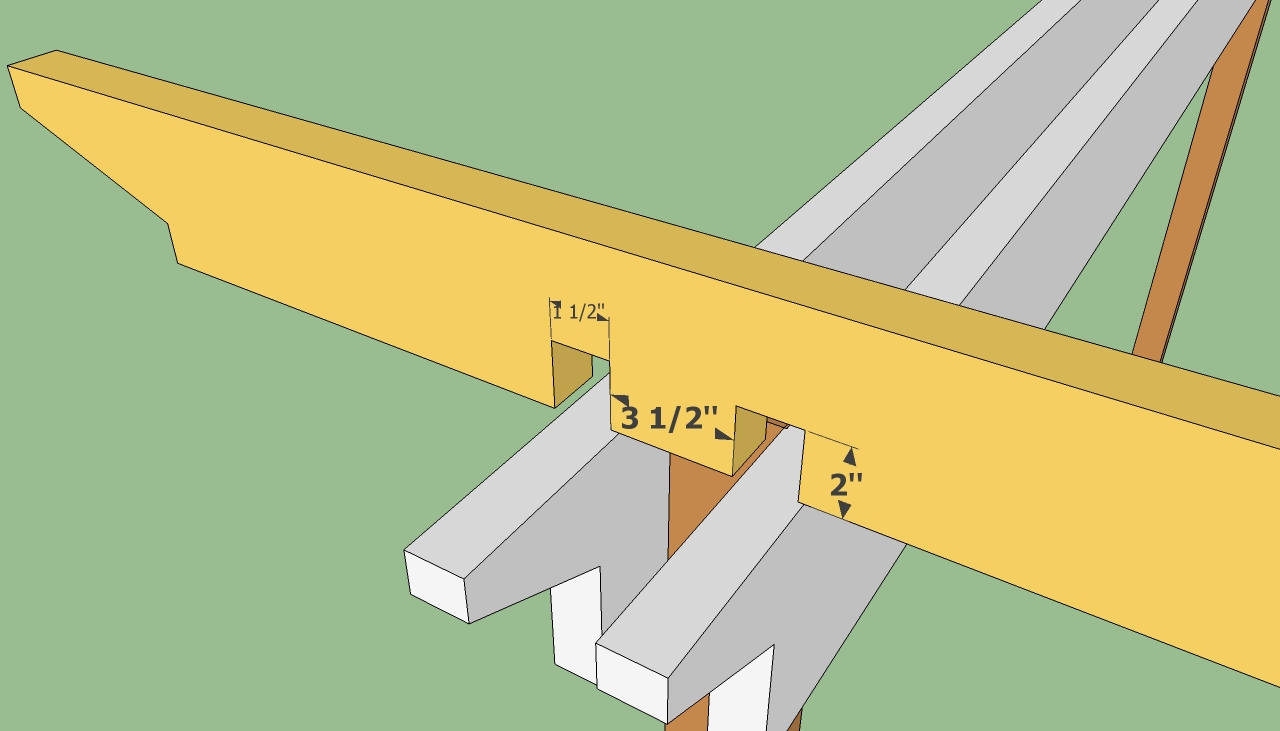
In our attached pergola plans you can also see how to cut the ends of the beams, as to obtain a nice design. Nevertheless, you have to remember that you can adjust the size of the cut ends, according to the materials you use, to fit your needs and tastes perfectly.

Free attached pergola plans
Installing the 2×6 shade elements perpendicularly on the support beams can be done in several ways. First, you can notch the shade elements and fit them between the support beams, or place them over the beams without cutting them out.
Irrespective of the case, use a tape measure to make the cuts accurately. Lock the cross-beams into place, by toenailing them with appropriate screws, after drilling pilot holes.

Attached pergola plans
Placing the shade elements is not difficult, especially if you ask a friend to assist you and hold them into position while you drive in the screws. Work with great care, making sure you use a spirit level to plumb them.

Attached pergola crossbeams cut ends
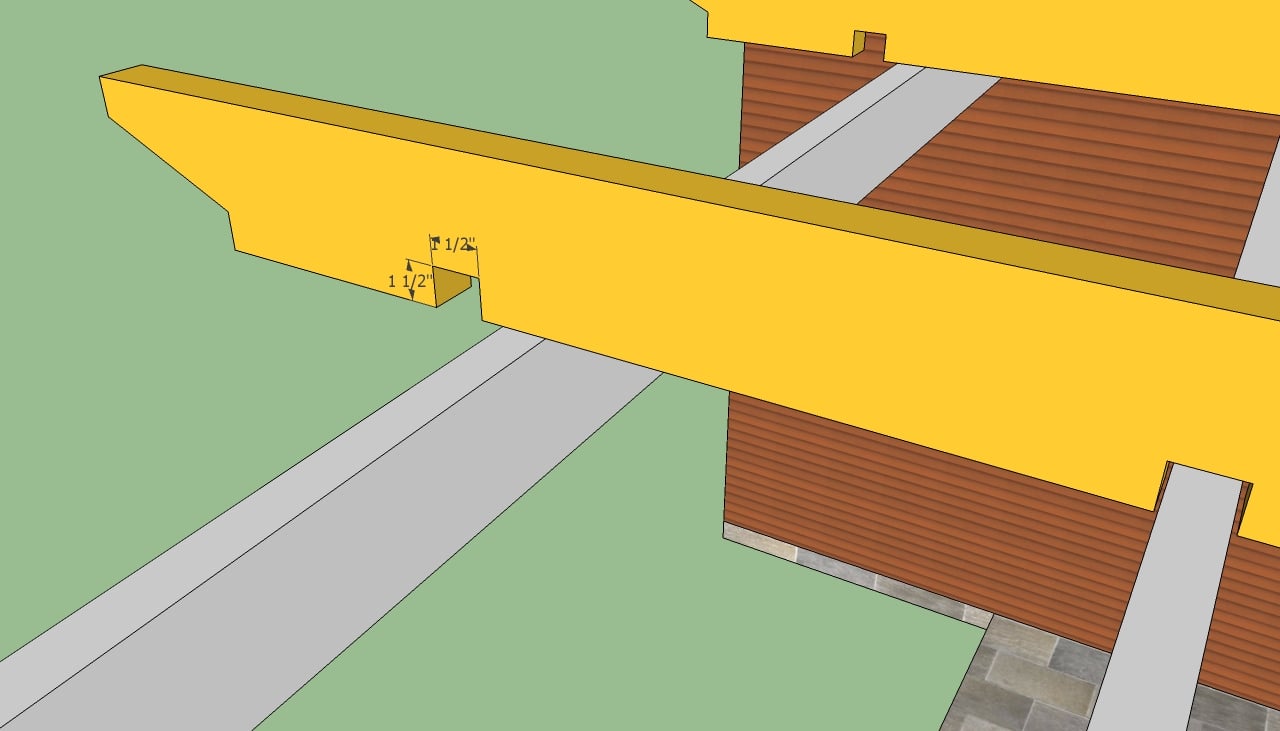
If you want to add personality to your attached pergola, we recommend you to follow our plans and cut the ends of the shade elements in an unique manner. As we have already mentioned, we use usually 2×6 beams to build these elements, but you can get the job done also with 2x4s.
Use a jigsaw to cut their ends and place them on the support beams. Next, connect them to the ledger by using joist hangers or corner brackets.

Installing the shading elements
After you have set the crossbeams into place, you could make the whole structure more rigid by installing several 2×4 or 2×6 slats, perpendicularly on the crossbeams. As you can see in the plans, the best way to lock them into place is by cutting notches at their joints with the shade elements.

Attached pergola designs
After you have installed all the parts into place in a professional manner, you have to fill the holes and other gaps with wood putty, let it dry for several days and then sand the surface with medium grit.

Pergola attached to house plans
After you have built the main structure, you should customize the attached pergola, according to your needs and tastes. Therefore, you could, for example, install x-shaped railings and balusters, in order to enhance the look of your house.
My best tips for building an attached pergola:
An attached pergola is a fantastic way to extend your outdoor living space, offering shade and style while seamlessly connecting to your home. Building an attached pergola is a manageable project with the right tools and planning. Here are my best tips for building a sturdy and stylish attached pergola.
1. Plan the Design
Before you begin, plan your pergola’s design carefully:
- Size: Determine how large you want your pergola to be based on the size of your patio or deck. Standard sizes range from 10×12 feet to 12×16 feet, but you can adjust the dimensions based on your space.
- Roof style: Consider whether you want an open lattice, slatted roof, or solid roof depending on how much shade you prefer.
- Height: Keep the pergola height at about 8-10 feet for comfortable headroom.
- Wood type: Pressure-treated lumber or cedar are great choices for outdoor structures due to their durability and resistance to rot.
Make sure your design complements the style of your home for a cohesive look.
2. Choose the Right Location
Choosing the best spot for your pergola is crucial for both aesthetics and functionality:
- Sun exposure: Place the pergola where it can provide shade during the hottest parts of the day, usually on the south or west side of your home.
- Access: Position the pergola near your outdoor seating or dining area for easy access and to enhance your outdoor space’s usability.
- Foundation: Ensure the area where you build the pergola has a solid foundation, such as a patio, deck, or concrete slab. If building on soil, you may need to add footings for extra stability.
3. Gather Your Materials
Here are the essential materials you’ll need to build an attached pergola:
- Pressure-treated lumber or cedar for posts, beams, and rafters
- Ledger board (a sturdy board attached to the house)
- Post brackets for securing the posts to the ground or concrete
- Lag bolts, screws, and joist hangers
- Concrete (if setting posts in the ground)
- L-brackets or other metal hardware for added support
- Level, measuring tape, and trowel
Make sure the materials are rated for outdoor use to withstand weathering.
4. Secure the Ledger Board
The ledger board attaches the pergola to your home and provides a solid anchor point:
- Locate the studs in your home’s exterior wall where the ledger board will be attached. Use a stud finder to mark the positions.
- Attach the ledger board to the wall using lag bolts, ensuring it’s level. The ledger board should be made from a sturdy 2×6 or 2×8 piece of lumber.
- Use flashing above the ledger board to protect the wood from water damage.
Ensure the ledger board is securely fastened, as it will support one side of the pergola.
5. Set the Posts
The vertical posts provide the main support for your pergola:
- Measure and mark where the posts will be placed. They should be evenly spaced, typically 6-8 feet apart.
- If mounting posts on a deck or patio, use post brackets to secure the posts to the surface.
- For posts set in the ground, dig holes about 2 feet deep and 12-16 inches wide. Pour concrete into the holes and set the posts, ensuring they are level and plumb.
Allow the concrete to cure for at least 24 hours if you’re setting posts into the ground.
6. Install the Support Beams
Once the posts are secure, install the horizontal support beams:
- Attach the beams to the top of the posts using galvanized screws or lag bolts. The beams will run parallel to the house, providing the main support for the rafters.
- For added stability, you can use metal brackets or L-brackets to reinforce the connections between the beams and the posts.
Make sure the support beams are level before moving on to the rafters.
7. Add the Rafters
The rafters create the shade structure and complete the look of your pergola:
- Cut 2×6 or 2×8 lumber to your desired rafter length. The rafters should extend past the support beams for a more dramatic look.
- Space the rafters 16-24 inches apart, depending on how much shade you want. Closer spacing will provide more shade, while wider spacing lets in more light.
- Secure the rafters to the ledger board and support beams using joist hangers or hurricane ties for extra stability.
Ensure the rafters are evenly spaced and securely attached for a balanced, sturdy structure.
8. Install Crossbeams (Optional)
For added shade and a decorative touch, you can install crossbeams on top of the rafters:
- These can be smaller 2×2 or 2×4 pieces of lumber, spaced perpendicular to the rafters.
- Attach them with screws or nails to the top of the rafters, providing extra visual interest and more shade.
Crossbeams also add strength to the pergola structure.
9. Secure and Stain the Pergola
Once the structure is complete, check all connections and fasteners to ensure everything is tight and secure:
- Apply a wood sealant or stain to protect the pergola from the elements. Choose a stain that complements the style of your home or outdoor space.
- Reapply sealant or stain every 1-2 years to keep the wood looking great and protected from moisture, UV rays, and pests.
Bonus Tip: Add Climbing Plants or Curtains for Extra Shade For added charm and more shade, plant climbing vines like wisteria or grapevines around the pergola posts. You can also install outdoor curtains to create a cozy, private outdoor space.
By following these steps, you’ll be able to build a sturdy and stylish attached pergola that enhances your outdoor living space. With careful planning and attention to detail, your DIY pergola will provide years of shade, comfort, and beauty.
Thank you for reading our article about attached pergola plans and we recommend you to check out the rest of our projects. Don’t forget to share our projects with your friend, by using the social media widgets.

