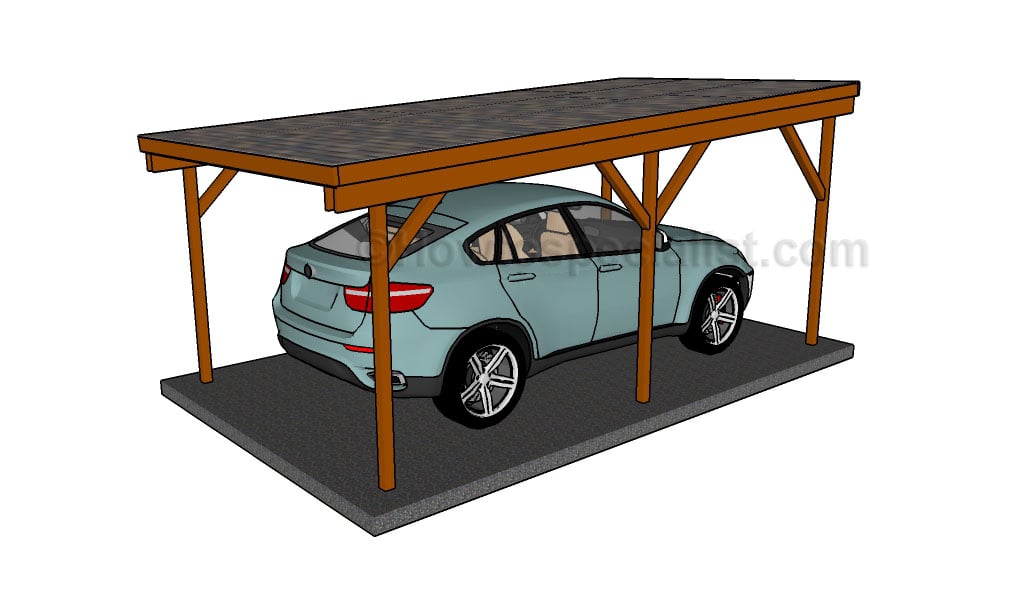
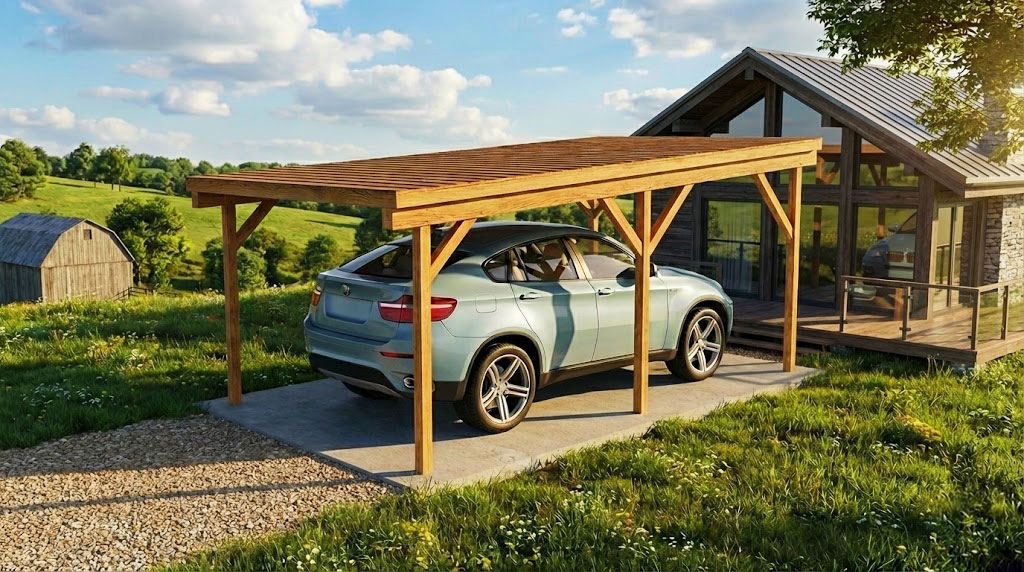
This step by step diy woodworking project is about how to build a flat roof carport. If you want to learn how to make a carport with a flat roof, we recommend you to pay attention to the instructions described in the article and to check out the related projects. A simple carport made out of wood is ideal for any property, as it will protect your car from bad weather but it also provides the convenience of proximity to the house.
In most of the cases, a building permit is required so make sure you go to the town hall and ask information about the legal requirements you have to comply with. In this manner, you will also find out useful details about your carport construction. When building the carport, you should make sure the plans are detailed and come with step by step instructions, as well as with a complete list of the materials.
It is essential to invest in high quality materials, that are also water-resistant, such as pressure-treated lumber. Cut the components at the right size by using a circular saw and smooth the cut edges with a sand block. Don’t forget to ask a skilled friend to assist you during the project, especially if you don’t have a large expertise in the field. You need someone to hold the components into place, while you drive the screws in. See all my Premium Plans in the Shop.
Made from this plan
Flat roof carport plans

Building a flat roof carport
Materials
- A – 2 pieces of 4×4 lumber – 132″ long, 2 pieces – 140 1/4″ long, 2 pieces – 148 1/2″ long POSTS
- B – 4 pieces of 2×6 lumber – 265 3/4″ long SUPPORT BEAMS
- C – 2 piece of 4×4 lumber – 42 1/2″ long, 2 pieces – 47 1/2″ long, 2 pieces – 55″ long, 2 pieces – 59″ long BRACES
- D – 12 piece of 2×6 lumber – 140″ long RAFTERS
- D – 2 piece of 2×6 lumber – 143″ long, 2 pieces – 265 3/4″ long RIM RAFTERS
- E – 4 pieces of 3/4″ plywood – 48″x96″ long, 2 pieces – 48″x73 3/4″ long, 2 pieces – 44″x96″ long, 1 piece – 44″x73 3/4″ long ROOFING SHEETS
- F – 350 sq ft tar paper, 350 sq ft asphalt shingles ROOFING
- 4 pieces of 4×4 lumber – 12 ft
- 2 pieces of 4×4 lumber – 14 ft
- 6 pieces of 2×6 lumber – 24 ft
- 2 pieces of 4×4 lumber – 8 ft
- 2 pieces of 4×4 lumber – 10 ft
- 14 piece of 2×6 lumber – 12 ft
- 9 pieces of 3/4″ plywood – 4’x8′
- 350 sq ft tar paper, 350 sq ft asphalt shingles
- 2 1/2″ screws
- 5 1/2″ screws
- 1 5/8″ screws
- rafter ties
- stain
Tools
- Safety gloves, glasses
- Miter saw, jigsaw
- Chalk line, tape measure, spirit level, carpentry pencil
- Drill machinery and drill bits
Tips
- Use a good miter saw to make the angle cuts
- Drill pilot holes before inserting the screws
Time
- One Week
Related
How to make a carport
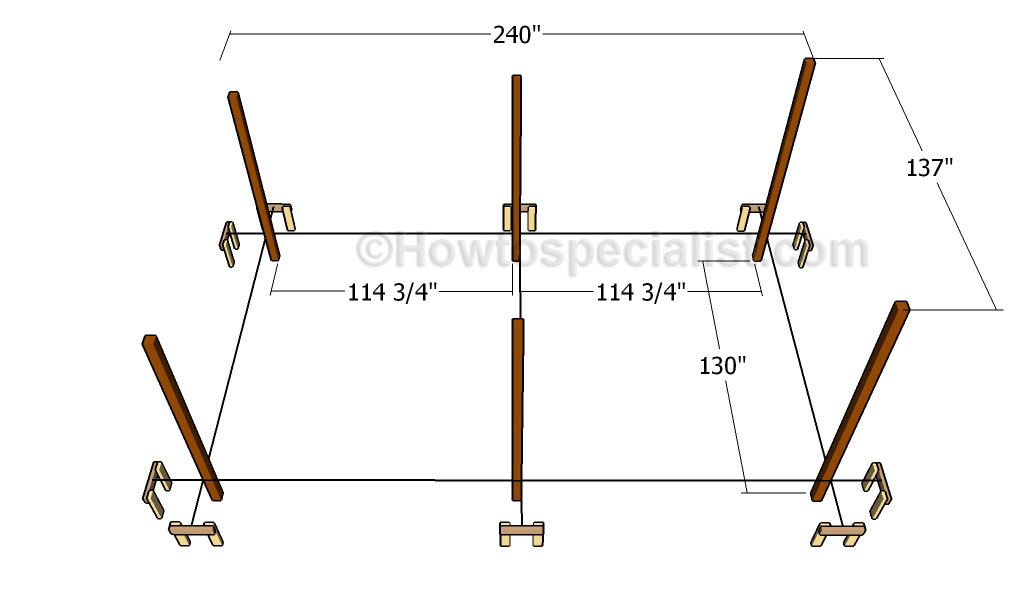
Laying out the carport
The first step of the woodworking project is to lay out the carport in a professional manner. Therefore, we recommend you to use batter boards and string to make sure the posts will be properly placed. Apply the 3-4-5 rule to each corner of the layout in order to check if they are perfectly square.
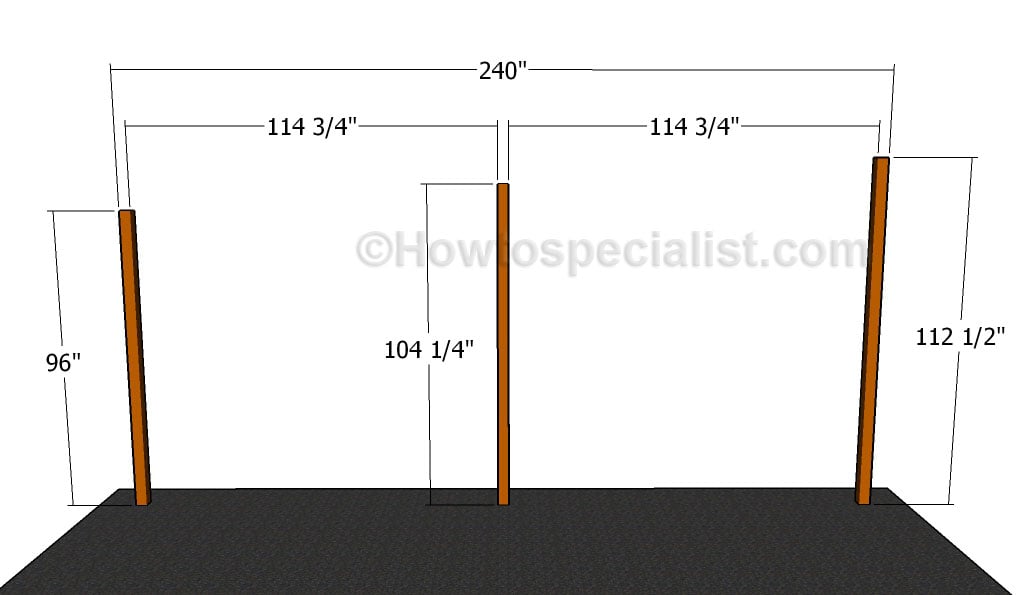
Fitting the posts
Next, you need to cut the posts at the right size, making sure you need to fit them about 3′ into the ground, before adjusting their dimensions.
Fitting the posts
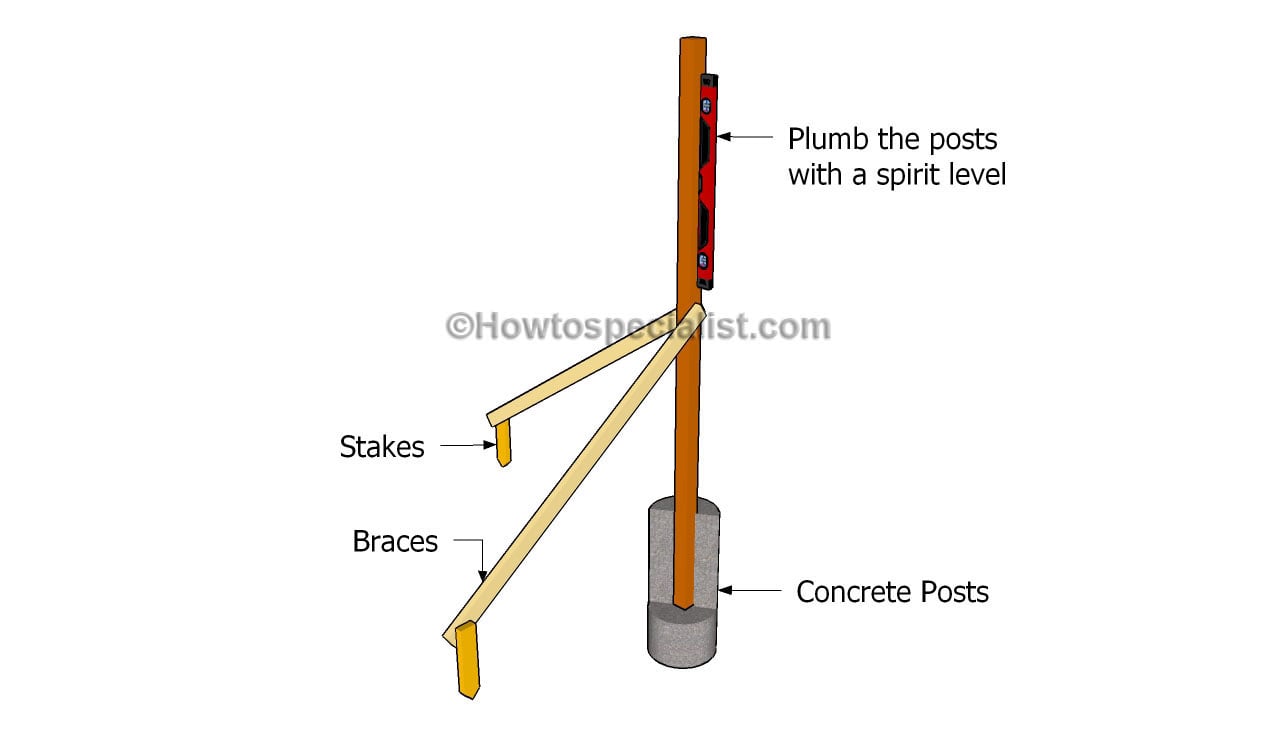
The next step of the project is to fit the posts into place. First of all, you need to dig 2-3′ deep holes (at least 6″ under the frost line) and pour a 2″ layer of gravel. Install tube forms and fit the posts into place, making sure they are perfectly plumb. Secure the posts with braces before filling the forms with concrete.
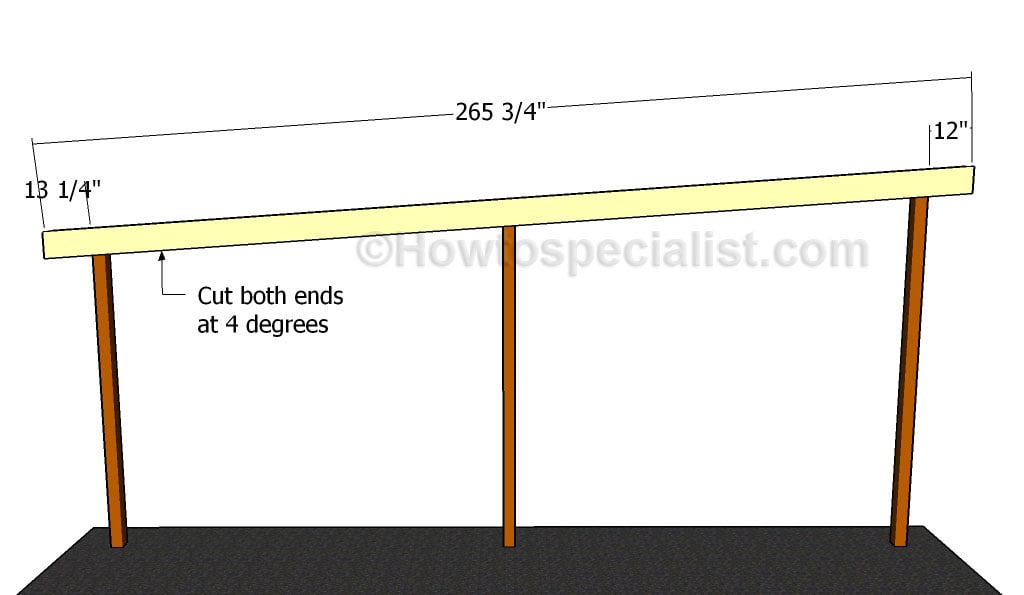
Fitting the support beams
After a few days, allowing the concrete to dry out, you need to install the 2×6 support beams to the top of the posts. Use clamps to secure the beams to the top of the posts. Drill pilot holes through both the support beams and through the posts before inserting the 8″ carriage bolts. Leave no gaps between the components and lock the components together tightly. Repeat the process for the other posts until you get a rigid structure.
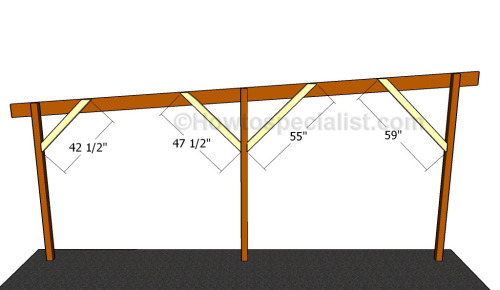
Fitting the braces
You also need to fit 4×4 braces to the flat roof carport, in order to enhance the rigidity of the structure. Cut both ends of the braces at 45 degrees and secure them to the structure, as described in the diagram. Drill pilot holes before inserting the screws and leave no gaps between the components, for a professional result. After fitting the braces, install the other support beams.
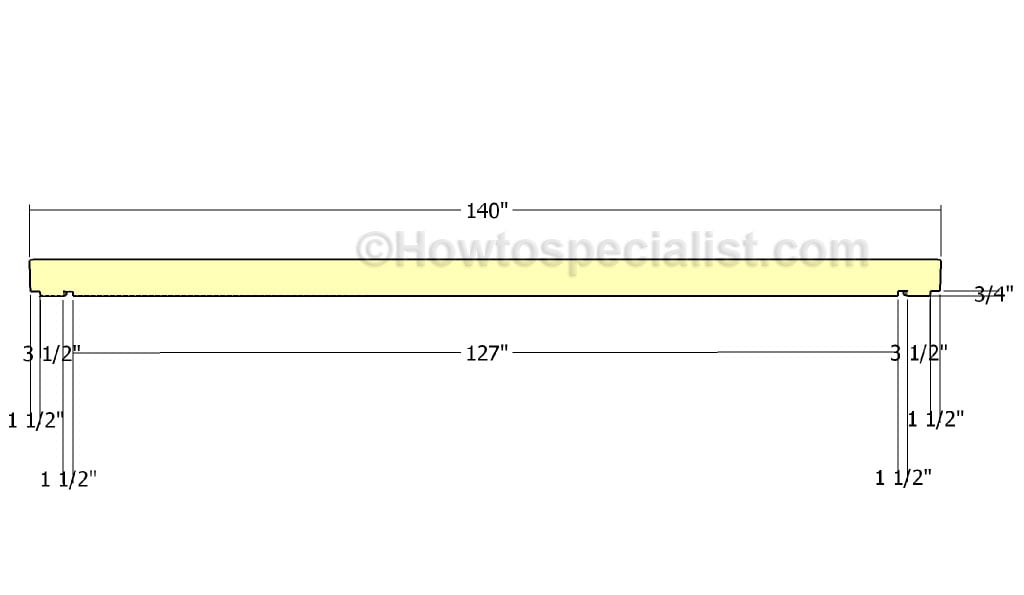
Building the rafters
Build the rafters out of 2×6 lumber. After cutting the beams to the right size, we recommend you to make a few notches to the components, as to lock them to the support beams easier. Smooth the notches with sandpaper and remove the residues with a damp cloth.
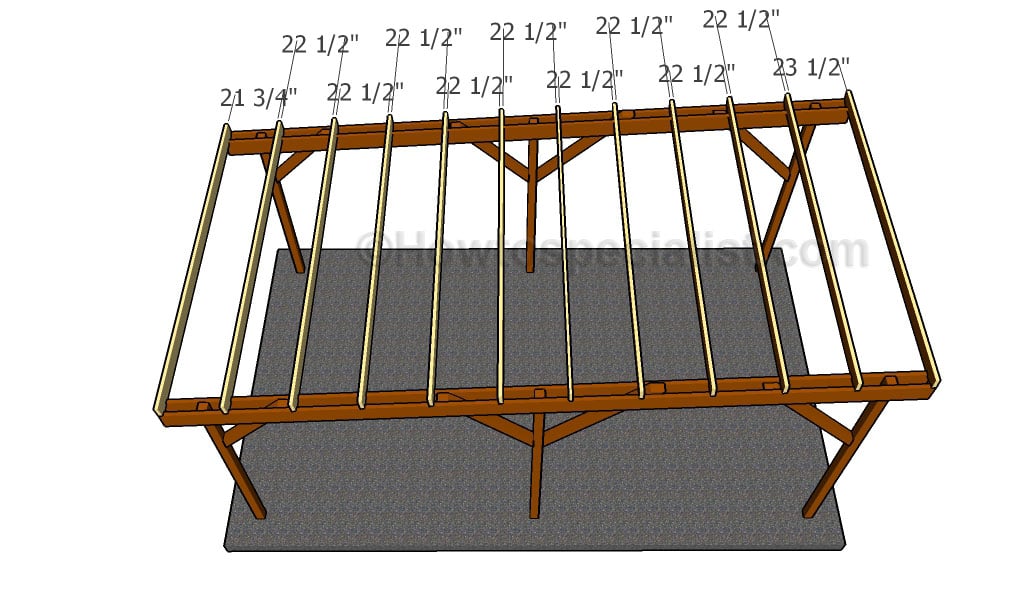
Fitting the rafters
Lay the rafters to the support beams, making sure you place them equally-spaced. Drill pilot holes through the rafter and secure them to the support beams using 5 1/2″ screws. It is essential to pay attention to details, otherwise the roof won’t be plane.
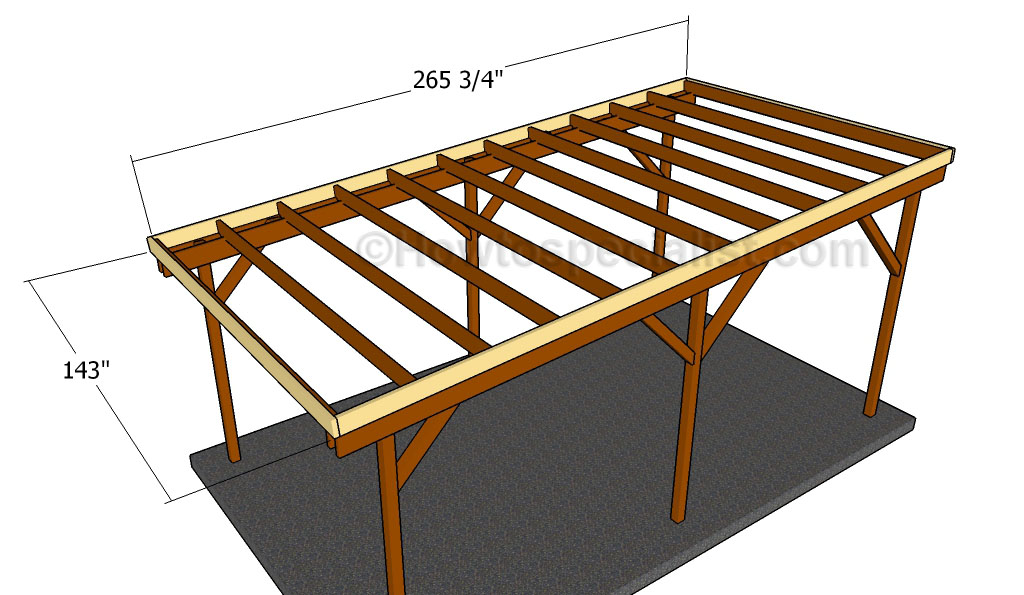
Fitting the exterior rafters
Next, attach the 2×6 trims to the exterior of the roof, as described in the diagram. Drill pilot holes through the trims and secure them into place using 2 1/2″ screws. Add glue to the joints and remove the excess with a damp cloth.

Fitting the roofing sheets
Attach 3/4″ tongue and groove plywood sheets to the roof, as in the image. It is essential to follow a certain pattern, otherwise the roof won’t be rigid enough. Use a good circular saw to adjust the size of the sheets, when needed. Align the sheets at both ends and lock them to the rafters with 1 1/2″ nails or screws, every 6-8″. It is essential to close the gaps between the sheets, if you want to get the job done as a professional.
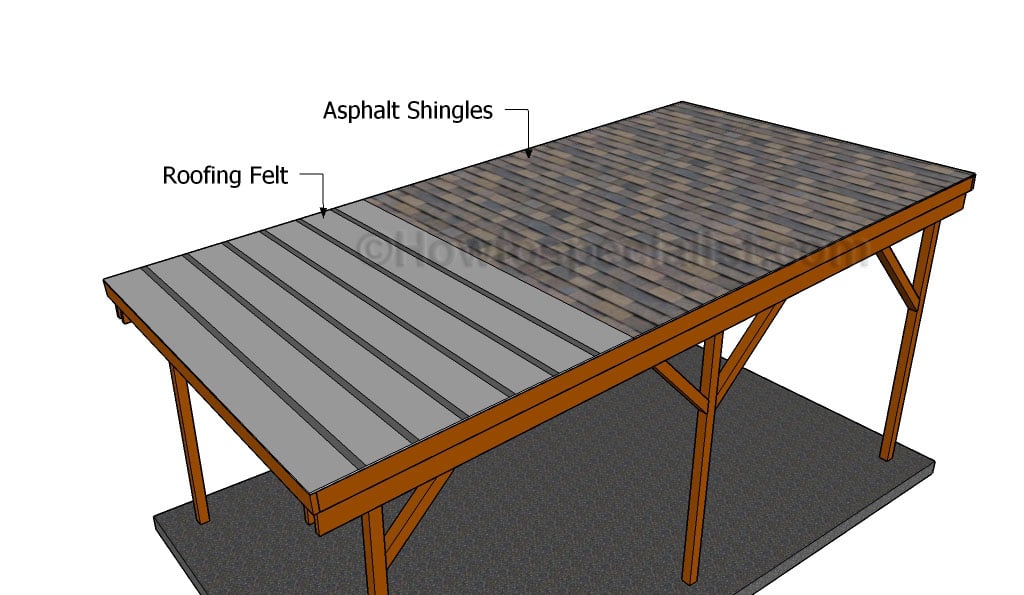
Fitting the roof
You could fit asphalt shingles to protect the carport, as it is a straight forward solution. Therefore, install roofing felt over the roofing sheets, making sure the strips overlap at least 2″. Secure the tar paper to the plywood sheets with roofing staples. Fit the side drip edges over the roofing felt, while the bottom drip edges should be fit under. Place a starting course at the bottom of the roof, before installing the asphalt shingles. Always read the manufacturing instructions before starting the installation, as there are several aspects that differ.
How to make a carport
Last but not least, we recommend you to take care of the finishing touches. Fill the holes with wood filler and let it to dry out for several hours. Don’t forget to check out the rest of the carport plans, as there are several alternatives to choose from.
My best tips for building a single car flat roof carport:
A single car flat roof carport is an excellent addition to your home, offering protection from the elements without the expense of a full garage. Whether you’re looking to shield your car from rain, sun, or snow, a flat roof carport is simple to build, sleek in design, and can be completed as a DIY project. Here are my best tips for building a single car flat roof carport.
1. Plan and Design Your Carport
- Determine the Carport Size: A standard single car carport typically measures around 10-12 feet wide and 20 feet long, providing enough space for one vehicle. Adjust the size based on your needs and available space.
- Flat Roof Design: A flat roof is easy to build and has a low-profile design. However, it still needs a slight slope for water drainage. Plan for a slope of about 1/4 inch per foot to prevent water pooling on the roof.
- Choose the Location: Select a level area close to your driveway or house, making sure there’s adequate drainage. The carport can either be free-standing or attached to your home, depending on your preference and available space.
- Check Local Building Codes: Before starting, check your local building regulations and obtain any necessary permits. These codes may dictate carport size, height, and setback distances from property lines or structures.
2. Gather Materials and Tools
- Pressure-Treated Lumber or Steel Posts: Pressure-treated wood is a cost-effective and durable material for the posts and beams. Steel or aluminum posts can also be used for a more modern look.
- Roofing Material: Corrugated metal sheets or polycarbonate panels are common for flat roof carports due to their durability and ease of installation. You can also use rolled roofing or asphalt shingles for a more traditional look.
- Concrete for Footings: Use concrete to set the posts securely in the ground, ensuring the structure is stable and long-lasting.
- Tools: Basic tools include a saw, drill, post-hole digger, hammer, measuring tape, level, and ladder. You may also need a wheelbarrow for mixing concrete.
3. Mark and Prepare the Site
- Mark the Carport’s Layout: Use stakes and string to mark out the carport’s footprint. Make sure it is square by measuring diagonally between opposite corners.
- Clear the Area: Remove any grass, plants, or debris. If desired, pour a concrete slab or spread gravel over the area where the carport will be located. This provides a solid, level surface for parking and protects the base from mud and water.
4. Dig Post Holes and Set the Support Posts
- Dig Post Holes: Use a post-hole digger to dig holes for the support posts at each corner of the carport. The holes should be at least 2-3 feet deep for proper stability. Adjust the depth based on your region’s frost line or local building codes.
- Set the Posts in Concrete: Place the posts in the holes and pour concrete around them. Use a level to ensure the posts are perfectly vertical and brace them with temporary supports while the concrete cures. Allow the concrete to set for at least 24-48 hours.
- Check Post Spacing: For a single car carport, space the posts 8-10 feet apart along the sides and across the front to ensure adequate support for the roof.
5. Attach the Ledger Board (If Attached to the House)
- Secure the Ledger Board: If attaching the carport to your house, install a ledger board to support the roof on the house side. The ledger board should be securely fastened to the wall studs with lag bolts.
- Install Flashing Above the Ledger Board: To prevent water from seeping behind the ledger, install flashing along the top edge. This protects both your house and the carport from water damage.
6. Install Horizontal Beams
- Attach Beams to the Posts: Once the posts are set, attach horizontal beams (usually 2×6 or 2×8) across the top of the posts. These beams will support the flat roof structure. Use galvanized carriage bolts or lag screws to ensure a secure connection.
- Ensure Beams Are Level: Use a level to make sure the beams are perfectly horizontal, as this will provide the foundation for a properly pitched roof.
7. Install Roof Joists
- Cut and Install the Roof Joists: Measure and cut roof joists (usually 2×4 or 2×6) to span between the ledger board and the horizontal beams. Space them 16-24 inches apart, depending on your roofing material and local load requirements.
- Create a Slight Slope: Even though the carport is classified as a flat roof, create a slight slope by attaching one side of the joists slightly higher than the other. A 1/4-inch slope per foot will allow proper water drainage.
- Secure the Joists: Use joist hangers or screws to attach the joists to both the ledger board (if applicable) and the beams. Ensure they are evenly spaced and level.
8. Install the Roofing Material
- Lay Down Roofing Sheets or Panels: Starting from the lower end of the slope, install corrugated metal sheets, polycarbonate panels, or rolled roofing across the joists. Overlap the panels to prevent leaks.
- Fasten the Roofing Material: Secure the roofing material with screws or nails, ensuring that all edges are tightly fastened to prevent wind damage.
- Optional: Install Gutters: To help manage rainwater, consider installing gutters and downspouts along the edges of the carport roof. This will direct water away from the structure and protect the ground below from erosion.
9. Add Finishing Touches
- Paint or Stain the Structure: If you’ve used wooden posts and beams, consider painting or staining the wood to protect it from the elements. Use a weather-resistant finish to prevent rot and extend the lifespan of the carport.
- Add Trim or Lattice (Optional): To enhance the carport’s appearance, you can add decorative trim or lattice panels along the sides. This also adds some privacy or shade to the carport area.
10. Anchor the Carport for Stability
- Anchor the Posts for Wind Resistance: If you live in an area prone to high winds, ensure that the posts are securely anchored with concrete footings or metal brackets. This will prevent the carport from shifting or lifting during storms.
- Install Cross Bracing: For additional strength, install diagonal cross braces between the posts and beams. This will prevent swaying and reinforce the structure.
11. Maintain Your Carport
- Inspect Regularly: Periodically check the carport for signs of wear or damage, such as loose screws, rust, or leaks. Tighten any loose hardware and repair damaged roofing material as needed.
- Clean the Roof: Keep the roof clean by removing debris such as leaves, dirt, or branches. This will help prevent water buildup and extend the lifespan of your roofing materials.
Building a single car flat roof carport is a straightforward and rewarding project that offers protection for your vehicle and adds value to your property. By following these steps—planning carefully, using the right materials, and ensuring proper drainage—you’ll create a functional and attractive carport that lasts for years. Whether you’re looking for a simple shelter or a stylish addition to your home, a well-built flat roof carport is a great investment.
Thank you for reading our project about how to make a flat roof carport and we recommend you to check out the rest of the projects. Don’t forget to share our projects with your friends and LIKE us, by using the social media widgets. SUBSCRIBE if you want to be the first that gets our latest articles.
6 comments
cool set of plans, why not use tin roofing instead?
Would love to see an example using anchors instead of cement too
You can use tin roofing very easily, as well as post anchors, if you life in an area with moderate wind.
Hello, Jack
I understand that this flat roof that has a pitch of .8/12 created by cutting each 4 x 4 at length 112.5, 104.25, and 96 on each side. You also mentioned to cut both ends of 2 x 6 support beams at 4 degree. I don’t understand how to cut the 2 x 6 length at 4 degree due to my lack of experience. Could you show a picture of this 4 degree cut or point me to some examples of 4 degree? Also if we decide to do gutters, would the gutters need to mounted on all 4 sides or just the short wall at the lower end. Thanks
The pitch is not 8/12, the roof angle is 4 degrees. To make a 4 degree cut, set the miter at 4 degrees and make the cut.
Material B, support beams. you have boards measured at 265 inches. I can only find boards 2x 6 192 inches. What do you suggest when B is shorter or if you wanted to extend the carport length further out, when the 2 X 6 in not long enough? Thank you
You have excellent plans. I have mobile home that need to cover my front porch. How hard is it to adapt the size of car port or lean to. I need it attached to home and slanted. I worry about the height of home with slant plus I can only attach posts to existing concrete with anchors. My porch is 10x 6. With four feet steps so I was thinking 12 x 6
Any insight I appreciate