This article is about how to build a barbeque pit. Building a brick bbq pit is easy if you use the right plans for your needs and the most appropriate building techniques. On the other hand, you have to place the barbeque pit in the right location, therefore we recommend you to let a significant distance from the other structures in your backyard, as they could easily catch fire when cooking meat. Once you are aware of the danger of fire, you could plan the other aspects of your bbq pit, suck as its design, dimensions or features. For example, you could make it highly functional by building an adjacent table, to store the utensils and the wood while cooking.
Read with great care the local building codes, as to place the brick barbeque away from flammable substances, from fences and from your neighbors’ houses. Nevertheless, you shouldn’t build it too far from your home, as most likely you will have to make several trips to your kitchen, to get the meat and beverages. In addition, when planning the outdoor bbq, you should make sure you add a large patio next to it, to have enough space to set a table and several chairs. If you live in an area with hot summer days, it would be a great idea to build the barbeque pit under the shade of a big tree.
When building the bbq pit, you have many options in terms of design, features and cost. Therefore, on one hand, you could build a simple bbq by using bricks, mortar and a set of bbq grill accessories, or you can invest more money to equip it with state of the art appliances, such as a smoker, a small refrigerator, outdoor cabinets or a gas pizza oven. If you afford and are you willing to invest a small fortune in these features, you can turn the brick barbeque pit into a real outdoor kitchen and make it an attraction point of your backyard. The possibilities are endless, just use your imagination and customize our plans to fit your needs and tastes perfectly. See all my Premium Plans in the Shop.
Made from this plan
Materials
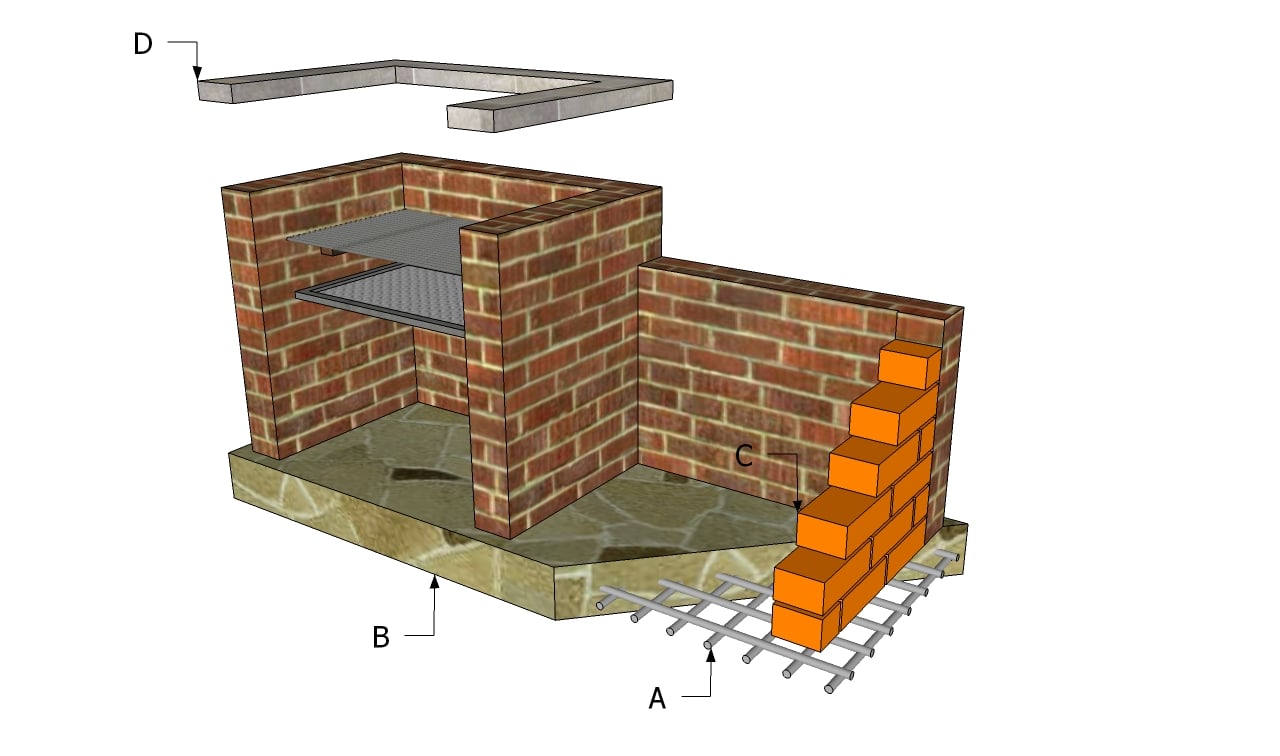
- A – rebars for the reinforcing structure of the foundation REBARS
- B – concrete (foundation and countertop) CONCRETE
- C – bricks (100-200 bricks according to its size) BRICKS
- D – 10 sq of flagstone FLAGSTONE
- concrete
- built in charcoal barbecue
Tools
- Safety gloves, glasses
- Wet saw (to cut the bricks)
- Hammer, spirit level, carpentry pencil
- Concrete mixer
Tips
- Read carefully our other articles related to barbeque construction
- Water the bricks before laying them into place, otherwise they will soak the moisture from the compound
- Place the brick bbq far away from inflammable substances or constructions
- Buy the bbw grill grate before building the brick barbeque
Time
- One weekend
Related
Building a barbeque pit

Building a bbq pit
Smart Tip: If you like to spend time with your friends and family in your backyard, you should consider building a brick barbeque. As you can see in the image, you need to build a sturdy foundation and to build brick walls. Clad the contertop with flagstone, if you want to enhance the look of the bbq pit.
How to build the foundation for the barbeque pit

Barbeque pit foundation form
The foundation will support the weight of the brick bbq pit. Therefore, you have to lay it out on the construction site, using several batter boards and string, dig about 10″” (optionally, you could excavate 15” trenches for heavier constructions), pour a 2-3” layer of gravel mixed with sand, and afterwards compact it thoroughly.
Build the form using 2×6 boards and secure them with 2×4 stakes. Use a spirit level to make sure the form is perfectly horizontal on all sides.

Barbeque brick pit plans
Next, use rebars to make a dense reinforcing structure, as in the image. Place the net in the form, making sure you lay it on several 2” spacers, to reinforce the concrete properly. Use a power mixer or a wheel barrow to mix concrete, using the following proportions: 2 parts cement, 3 parts sand, 4 parts gravel and enough water to obtain concrete with cream consistency.

Bbq pit foundation plans
After you have poured the concrete in the form you have to vibrate it, as to remove the pockets of air. Therefore, you could either use a concrete vibrator or hit the form with a hammer several times. If the form is not secured properly, the concrete might move it from position.
Last but not least, use a straight edge to level the foundation, by pushing it along the sides of the form. Let the concrete dry out for at least 48 hours.
How to build a barbeque pit

Barbeque brick pit base
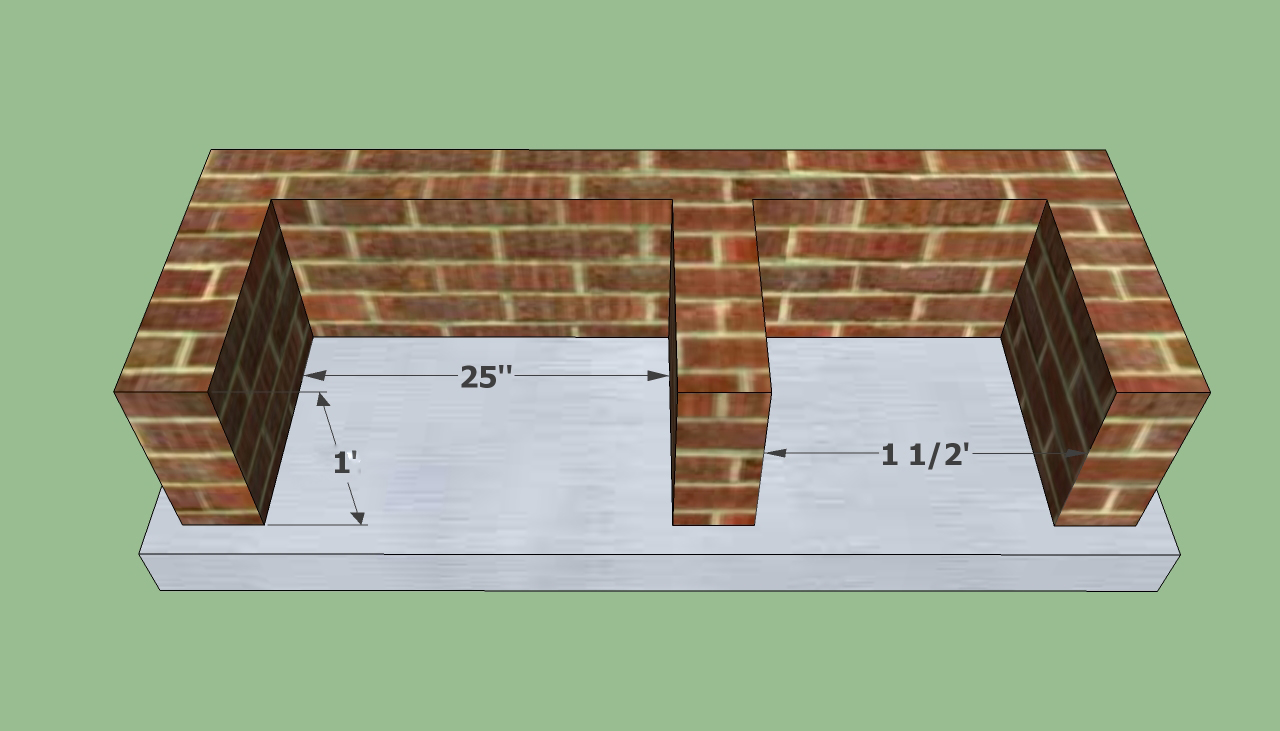
Use the grill grates to help you when deciding the size of the barbeque pit. Therefore, place the grate on the foundation and use a pencil to outline its contour. Before drawing the guidance lines, make sure the grate is located properly and perfectly aligned with the foundation. Next, spread mortar with a trowel and lay a brick at the beginning and another at the end of the course. Tie a string to their exterior and place the rest of them til you complete the course. Don’t forget to firmly push the bricks into the mortar.

Build barbeque pit
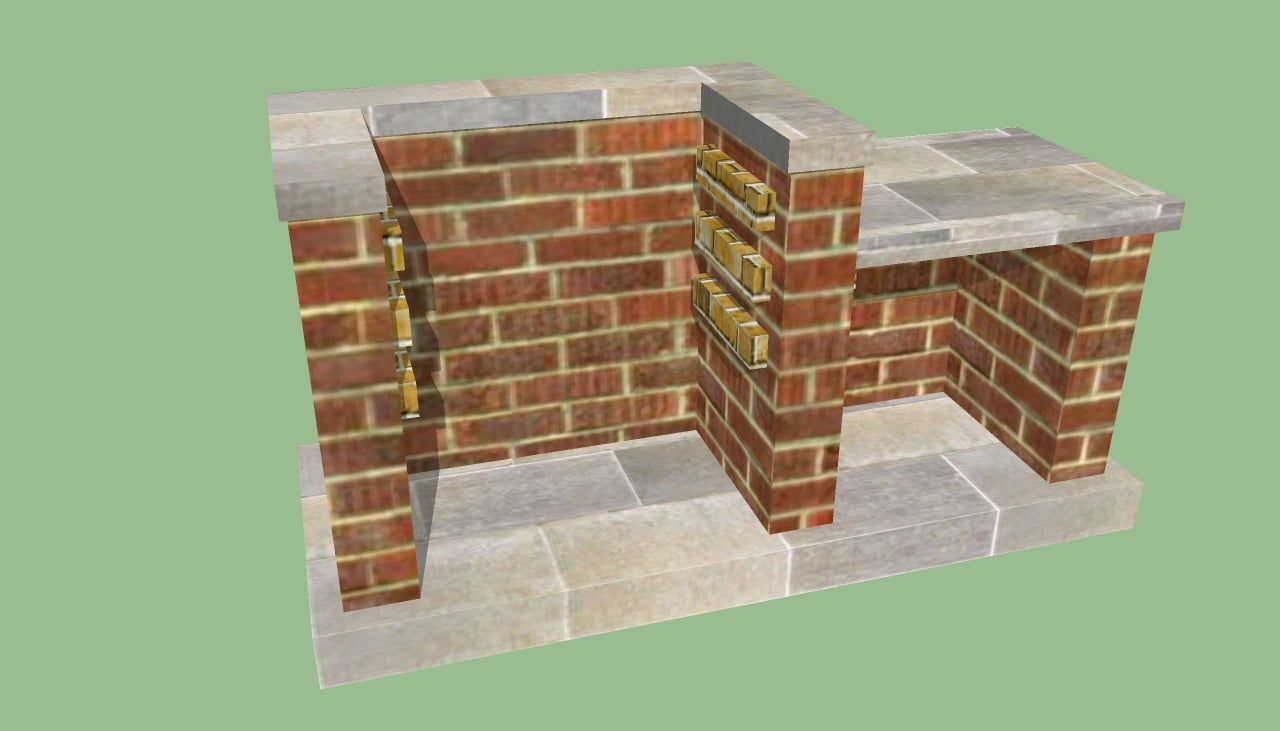
Apply mortar on the bricks and lay the next courses, in the same manner described above. If you need to adjust the size of the bricks, we recommend you to rent a wet saw. Starting with the forth course, place the side bricks perpendicularly, to support the grill grate.

Building the grill supports
Next, we recommend you to proceed in the same manner every other course. In this way, you can move the grill up and down according to the fire intensity or according to the food you are cooking. Use a spirit level to make sure the walls are perfectly plumb and the grill grate supports are aligned one with another.

How to build barbeque pit
Work with great care and attention if you want to get the job done as a professional. As you can see, building a barbeque pit isn’t that difficult, provided you use the right masonry techniques and appropriate plans.

Building bbq pit
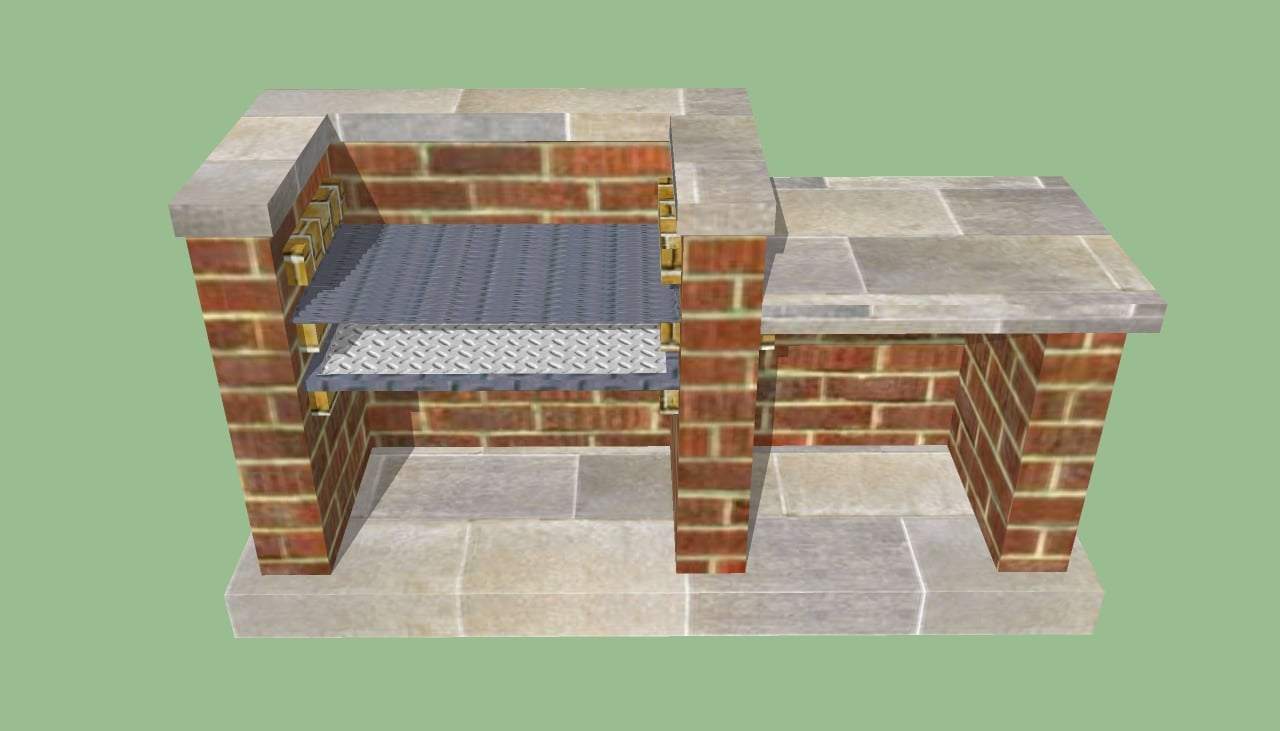
Lay another course of bricks, in the same manner described above. In addition, we also suggest you build a table adjacent to the barbeque pit, as in the image. In this manner, it will be easier to place the plates and utensils, while cooking the meat.
Use the technique described above and place the bricks so they jot out towards the table (they will support the concrete slab).
Bbq pit plans

How to build barbeque pit
After you have completed the most important steps of the brick barbeque pit construction, you still have to do the finishing touches. Therefore, place a concrete slab on of the table. To set it into place, use an adhesive designed to bond stone. You can also lay flag stone on top of the last course of bricks, to make your bbq pit unique.

Bbq pit grill grate
After you have installed the stone countertop and secured it with adhesive you have to clean the brick barbeque pit with a damp sponge and a bowl of water.
Clean each brick with the sponge, making sure you remove the excess mortar and soak the sponge in water regularly. If you follow our tips, your barbeque will have a beautiful design, be highly functional and durable, and add value to your property.

Bbq pit designs
Leave the mortar dry out for several days and then install the grill grate and the other accessories into place. Building this bbq pit is easy, if you follow our step by step instructions and use quality materials.
Work with great care and with good judgement to build a wood fired barbeque in under a week. After you have completed the project, you should enjoy it together with your family for many years in a row.
My best tips for building a brick barbeque pit:
A brick barbecue pit is a fantastic addition to your backyard, perfect for slow-cooking meats, grilling, or hosting a casual outdoor gathering. Building a sturdy and functional brick pit can be a rewarding project with lasting results. Here are my best tips for building a brick barbecue pit.
1. Choose the Right Location
Selecting the right spot is key to making sure your barbecue pit is safe and convenient:
- Flat, stable ground: Choose a level area to build your pit, free from tree roots or uneven ground.
- Distance from structures: Keep the pit away from your house, fences, or flammable materials to prevent fire hazards.
- Good ventilation: Make sure the location has enough airflow for smoke to escape, especially if you plan to use it for slow cooking or smoking meats.
Check local regulations or building codes to ensure you comply with any outdoor fire rules in your area.
2. Gather the Right Materials
You’ll need a few basic materials to build a brick barbecue pit:
- Fire bricks for the inner walls (heat-resistant and durable)
- Regular bricks for the outer structure (decorative and sturdy)
- Mortar mix (heat-resistant mortar is ideal for fire bricks)
- Grill grate or cooking grate (customize to your size needs)
- Rebar or metal rods (for grill support)
- Trowel
- Level
- Shovel
- Tape measure
- Concrete mix (for the foundation)
3. Plan the Size and Shape of the Pit
Determine the size of your barbecue pit based on how much space you have and how you plan to use it:
- A typical pit is 3 to 4 feet wide, 2 feet deep, and 2.5 to 3 feet tall.
- Decide if you want a square or rectangular shape, which works well for most grilling and smoking setups.
You can customize the design with larger dimensions if you plan on cooking for bigger groups or hosting outdoor parties.
4. Build a Solid Foundation
A solid foundation is essential for stability and durability:
- Mark the area where you’ll build the pit and dig down about 4-6 inches.
- Pour a layer of concrete mix into the hole and smooth it out to create a level base. Ensure the foundation is slightly larger than the pit’s footprint to provide extra stability.
- Allow the foundation to cure for at least 24-48 hours before moving forward.
This strong base ensures the brick pit won’t shift or crack over time.
5. Lay the First Row of Bricks
Once the foundation has cured, you can start building the structure:
- Apply a layer of mortar onto the foundation using a trowel.
- Lay the first row of regular bricks around the perimeter of your barbecue pit, leaving an opening at the front for airflow and access to the fire.
- Use a level to check that the bricks are straight and even. Adjust as necessary by adding or removing mortar.
This first row is the foundation for the rest of the pit, so take your time to ensure it’s perfectly level and square.
6. Build Up the Walls
Continue laying bricks to build up the walls of the barbecue pit:
- Apply mortar between each row of bricks, using your trowel to spread it evenly and remove any excess.
- Stagger the joints between the bricks as you build for added strength.
- As you reach about halfway up, begin planning for the grill grate supports.
Use a spirit level after every few rows to ensure the walls remain straight and level.
7. Install the Grill Grate Supports
To hold the grill grate, you’ll need to install metal supports:
- Insert rebar or metal rods horizontally into the mortar joints where the grill grate will sit. This is usually about halfway up the walls, but you can adjust based on the height you prefer for cooking.
- Make sure the supports are level and strong enough to hold the weight of the grate and the food you’ll be cooking.
If you want multiple grilling levels, add more supports higher up the structure.
8. Line the Interior with Fire Bricks
For the inner walls, line the barbecue pit with fire bricks:
- Fire bricks can withstand higher temperatures than regular bricks and provide a long-lasting surface for the inside of the pit.
- Use heat-resistant mortar to attach the fire bricks to the inner walls. These bricks will protect the structure and create the perfect environment for cooking with charcoal or wood.
Ensure the fire bricks are laid evenly and firmly in place.
9. Finish the Top Layer
Once the walls are built and the fire bricks are installed, you can finish the top of your barbecue pit:
- Cap the walls with a row of regular bricks or flat concrete slabs to give the structure a clean, finished look.
- Make sure the top row is level and smooth, as it will be the visible part of the pit.
This step also helps prevent any loose bricks from shifting when you’re grilling.
10. Add the Grill Grate
Once the pit is fully built and the mortar has dried, place your grill grate onto the metal supports:
- The grill grate should fit securely and be easy to remove for cleaning or adjusting the fire.
- If you want more versatility, consider using an adjustable grate that can be raised or lowered depending on your cooking needs.
A heavy-duty, stainless steel grill grate is ideal for durability and heat resistance.
11. Let the Pit Cure
Allow the barbecue pit to cure for at least 48 hours before using it:
- Keep the structure covered with a plastic sheet or tarp to protect it from rain or extreme temperatures while the mortar sets.
- Once fully cured, your brick barbecue pit will be ready for its first fire.
Bonus Tip: Add an Ash Clean-Out Slot For easier maintenance, consider leaving a small clean-out slot at the bottom of the pit. This allows you to easily sweep out ash and embers after each use.
By following these steps, you’ll be able to build a sturdy and stylish brick barbecue pit that’s perfect for grilling, smoking, or slow-cooking. Whether you’re hosting a backyard party or simply enjoying an outdoor meal, your DIY barbecue pit will be a great addition to your outdoor space.
Thank you reading our article about how to build a barbeque pit and we recommend you to check out the rest of our projects. Don’t forget to share our articles with your friends, by using the social media widgets.

8 comments
How much space is there in between the bricks were the rack is mounted? where can I get the racks or grates?
I recommend you buying the grate and rack before starting the project. In this manner, you can adjust the dimensions accordingly. You should search for “brick bbq grill set” on the internet. Usually the large DIY stores have these for sale.
need to find someone to do the job for me. anybody you know in southern california orange county?
Unfortunately I don’t. But you can always try to get the job done by yourself. It is not as difficult as you might think.
I built a brick grill and lined the inside with fire brick. The problem that I have is trying to keep the heat trapped to cook chicken. The heat seems to escape. Do I need a cover for the top and front. Help PLEASE. I have spent a lot of time and money to have my grill to only be a conversation piece. I have a catch pan to catch charcoal ashes. Should I discard the pan and just use wood in the bottom?
You can cook chicken even without the brick enclosure. The secret is to create enough charcoal so that the chicken will cook evenly. It is a learning curve, so you don’t have to be pessimistic. The backup idea is a good one and it will work, but the bbq as it is now will work after some fine tuning.
Where did you get the bbq grate ?
My father built a grill back in 1960 when I was a small kid. It had places for 2 separate grills and a wood storage built in and a chimney. Walking through the woods where the old house used to stand I found that grill still standing in 2012. The grills had rusted away but the rocks and mortar were just like the day he built it.