This step by step diy woodworking project is about diy pergola plans. If you want to learn more about building an exquisite pergola for your backyard, we recommend you to check out this step by step article. In most of the cases, building a pergola requires a permit so its is advisable to go to your town hall and ask for the legal requirements you have to comply to.
Before starting the actual construction project, we recommend you to plan everything, as to save money and to keep the costs under control. Adjust the size and the design of the pergola to suit your needs. In addition, we recommend you to invest in high-quality materials, such as pine, redwood or cedar, as they have a nice finish and are highly durable, especially in a humid environment.
If you don’t have a rich expertise in woodworking field, you should ask a friend to give you a hand with the project. There are many things that you could go wrong, so make sure you plan everything and invest in quality materials. Select the lumber with attention, making sure the components are perfectly straight and in a very good condition. Use a carpentry square to check if the corners are right-angled. See all my Premium Plans in the Shop.
Made from this plan
DIY Pergola Plans

Building a free standing pergola
Materials
- A – 4 pieces of 6×6 lumber – 96″ long LEGS
- B – 4 piece of 2×10 lumber – 168″ long SUPPORT BEAMS
- C – 8 pieces of 2×8 lumber – 144″ long SHADE ELEMENTS
- D – 11 pieces of 1×1 lumber – 135″ long SLATS
- E – 16 pieces of 1×3 lumber – 8 1/2″ long TRIMS
- 4 pieces of 6×6 lumber – 8 ft
- 4 pieces of 2×10 lumber – 14 ft
- 8 pieces of 2×8 lumber – 12 ft
- 11 pieces of 1×1 lumber – 12 ft
- 2 pieces of 1×3 lumber – 8 ft
- 1 5/8″ screws, tube form
- rafter ties
- 8 pieces of 9″ carriage bolt
- wood filler , wood glue, stain/paint
- post to beam connectors
- 4 post anchors
- 1 1/2″ structural nails
Tools
- Safety gloves, glasses, Miter saw, jigsaw
- Chalk line, tape measure, spirit level, carpentry pencil
- Drill machinery and drill bits
Tips
- Apply several coats of wood stain to the wooden components
- Fill the holes with wood filler and smooth the surface
Time
- One Day
Related
Building a patio pergola
Laying out the pergola
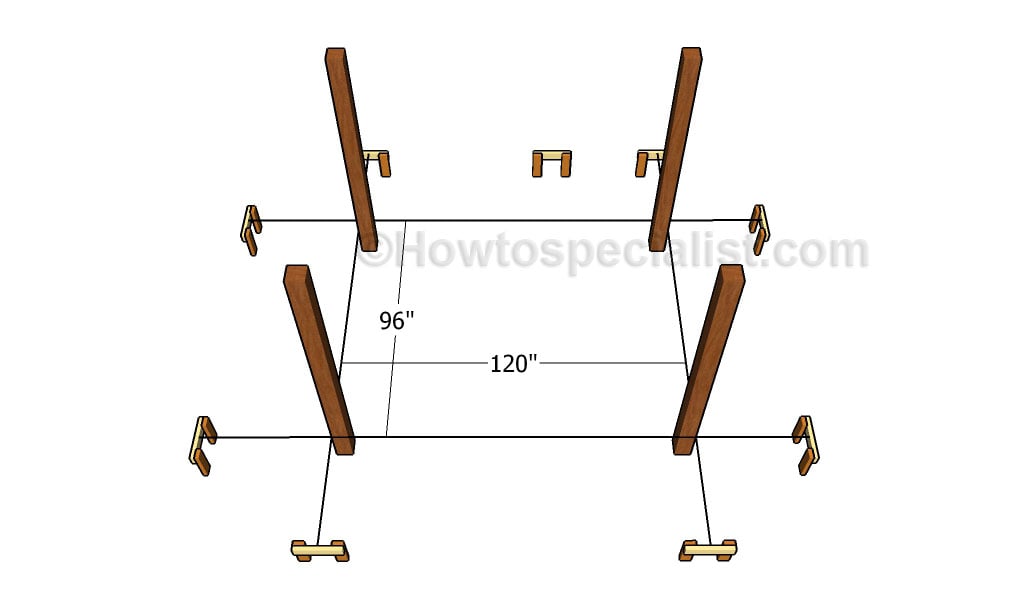
The first step of the woodworking project is to lay out the pergola in a professional manner. Therefore, use batter boards to lay out the posts as showed in the diagram. Make sure the corners are square by checking if the diagonals are square. In addition, apply the 3-4-5 rule to every corner in order to double check the accuracy of the layout.
Building the posts
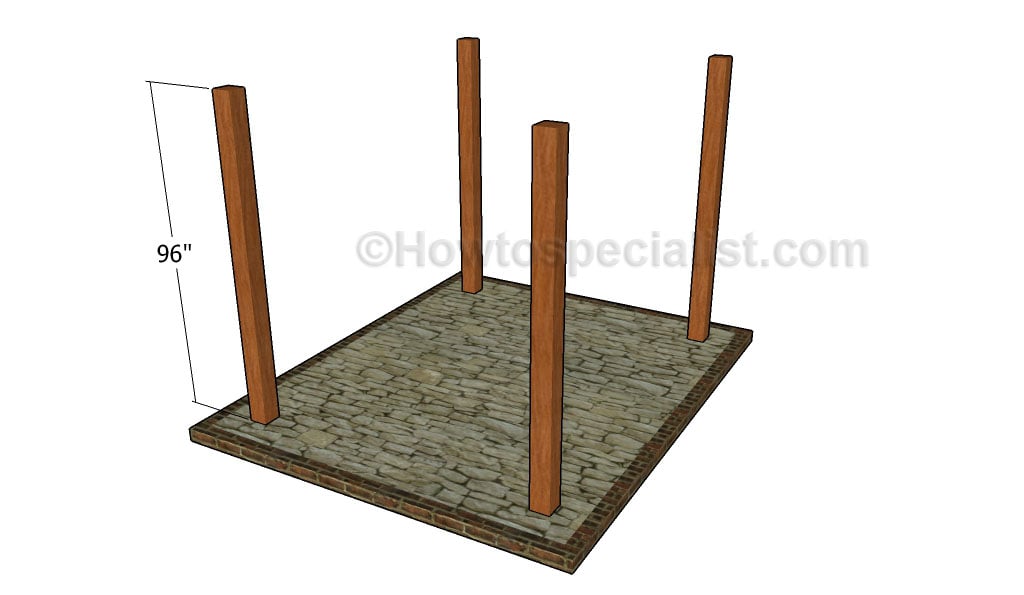
Drill 3′ deep holes and set the posts in concrete, if you want to create a rigid structure. Alternatively, you could set post anchors to the concrete footings and fit the 6×6 posts into place using lag screws.
Fitting the posts
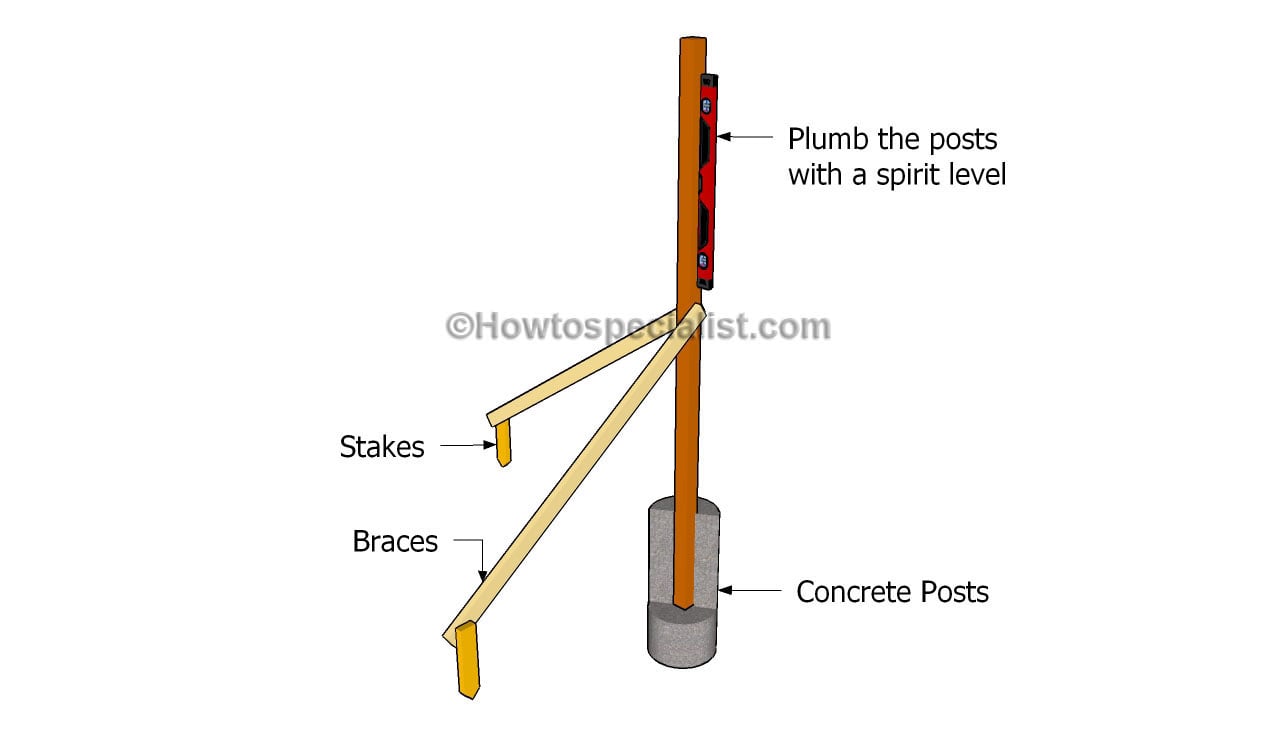
Irrespective of your choice, make sure you plumb the posts with a spirit level and you use temporarily braces to hold them into place until the concrete has dried out.
Building the support beams
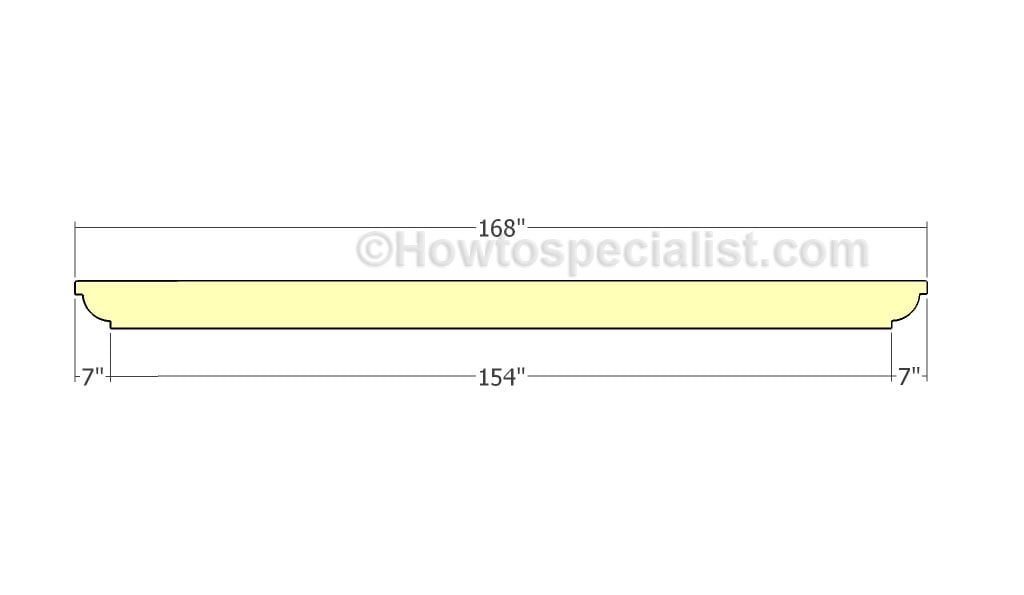
Build the support beams out of 2×10 lumber. Make sure you select the straightest beams you can find, otherwise the end result won’t have a neat aspect. Smooth the cut edges with fine-grit sandpaper in order to get a professional result.
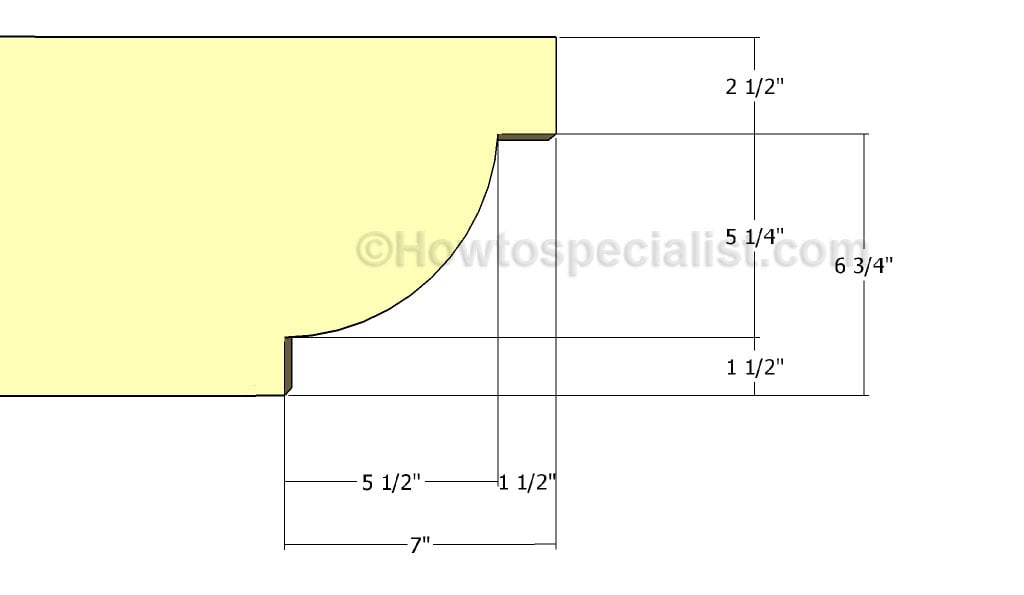
Cutting the decorative ends of the support beams
In order to add character to your project, we recommend you to cut the ends in a decorative manner. Use the instructions in the diagram to mark the cut lines and use a jigsaw to make the cuts. Smooth the edges with fine-grit sandpaper and remove the excess with a damp cloth.
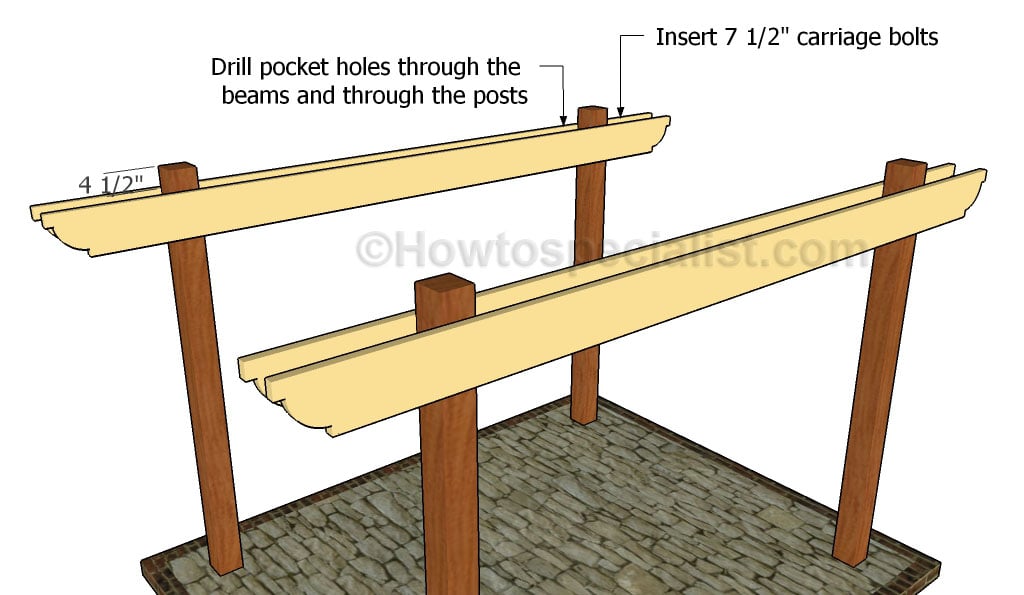
Fitting the support beams
Clamp the support beams to the posts and make sure they are perfectly horizontal, by using a nice spirit level. In addition, align both ends of the beams for a professional result. Leave about 4 1/2″ from the top of the posts to the support beams. Afterwards, drill pilot holes through both the beams and the posts. Insert 7 1/2″ carriage bolts to secure the components together tightly. Two or three bolts on each joint will add enough support to the structure.
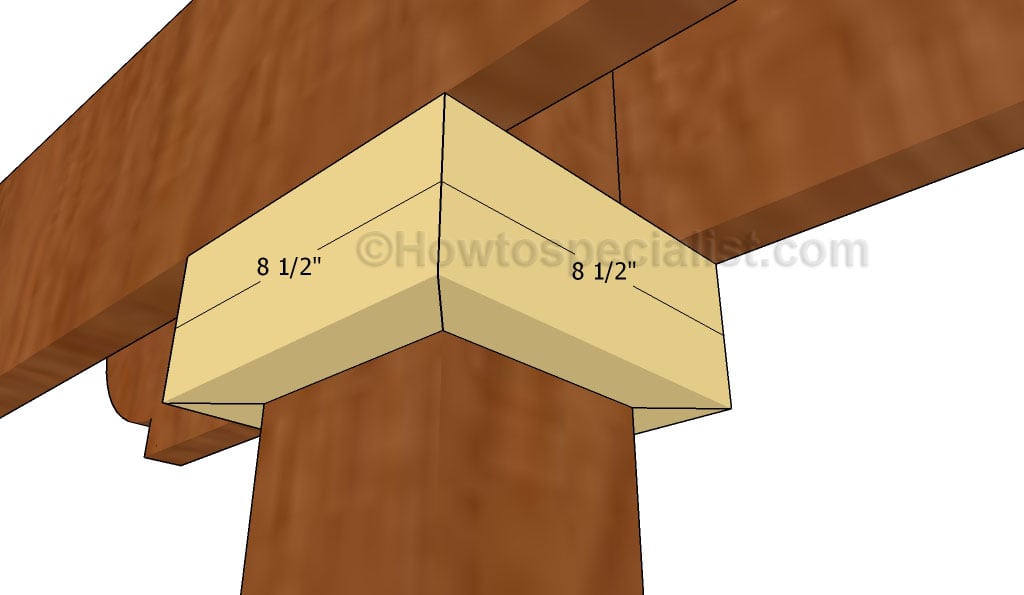
Fitting the trims to the posts
If you want to enhance the look of the backyard pergola, we recommend you to fit 2×4 trims to the top of the posts, just under the support beams. Cut both ends of the trims at 45 degrees and secure them to the posts using glue and finishing nails. Leave no gaps between the components for a professional result.
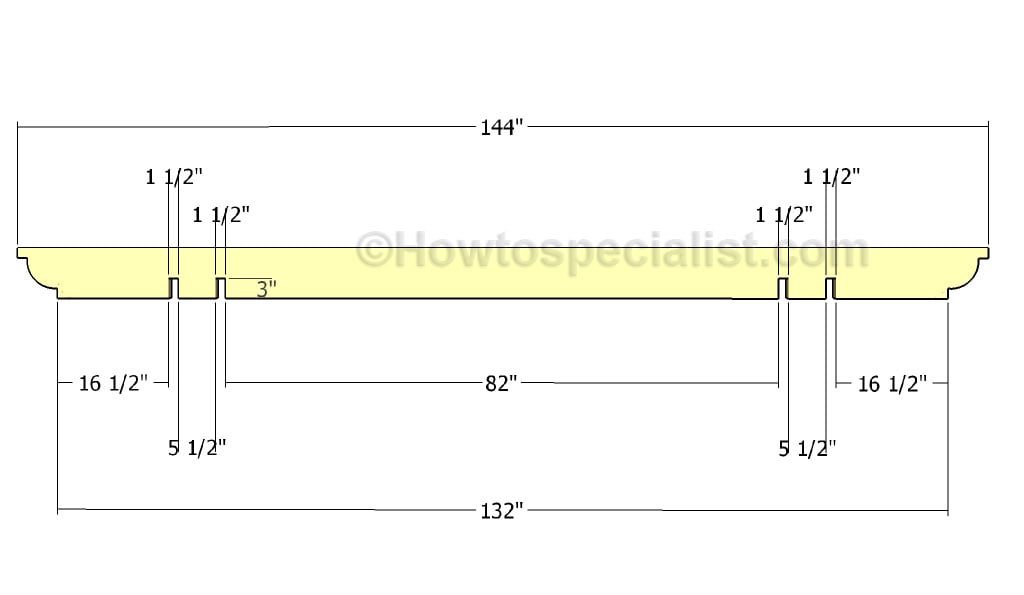
Building the shade elements
Next, you have to build the shade elements for the pergola out of 2×8 lumber. Therefore, mark the cut elements to the slats and get the job done with a jigsaw. Smooth the cut edges with sandpaper and remove the residues properly. It is essential to make 1 1/2″ x 3″ notches to the component, otherwise it won’t fit properly to the support beams.
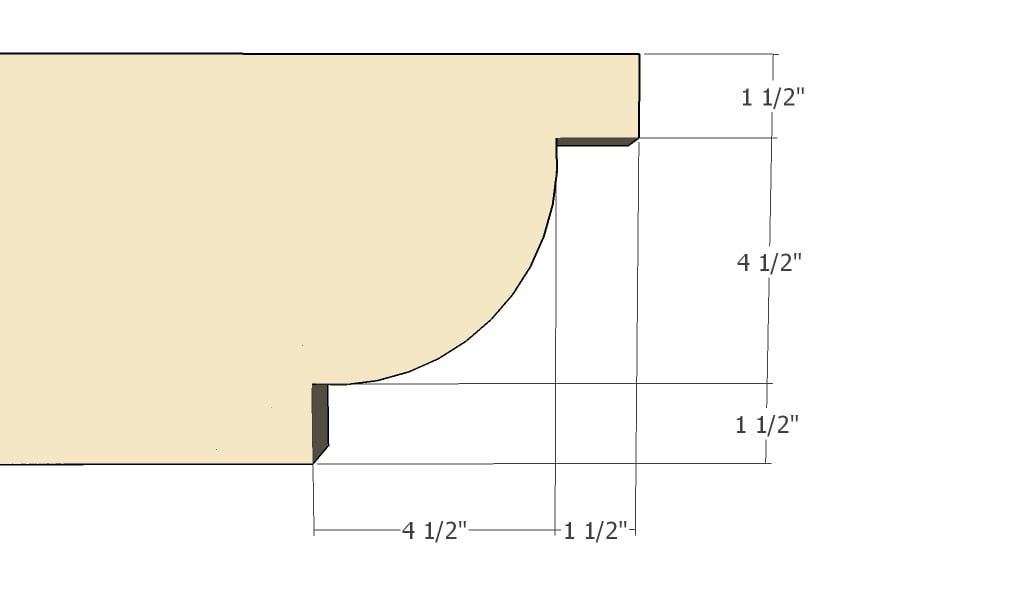
Building the ends of the shade elements
Mark the cut lines on the beams and get the job done with a circular saw and with a jigsaw. Smooth the cut lines with sandpaper.
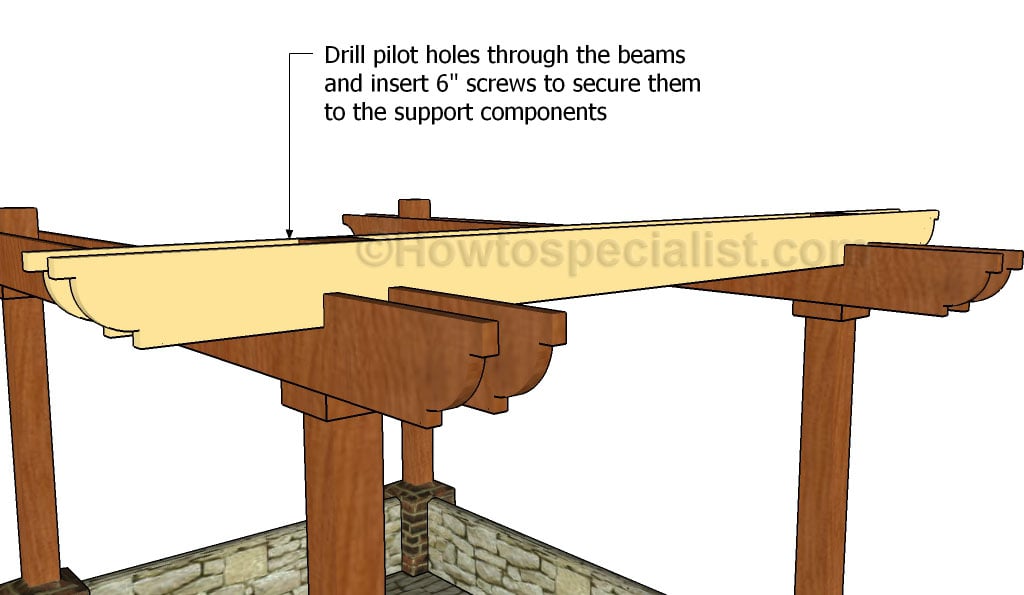
Fitting the shade elements
Fit the shade elements to the support beams, as described in the diagram. Drill pilot holes through the components and insert 6″ into the support beams. Leave no gaps between the components and use a spirit level to make sure the shade elements are perfectly horizontal.
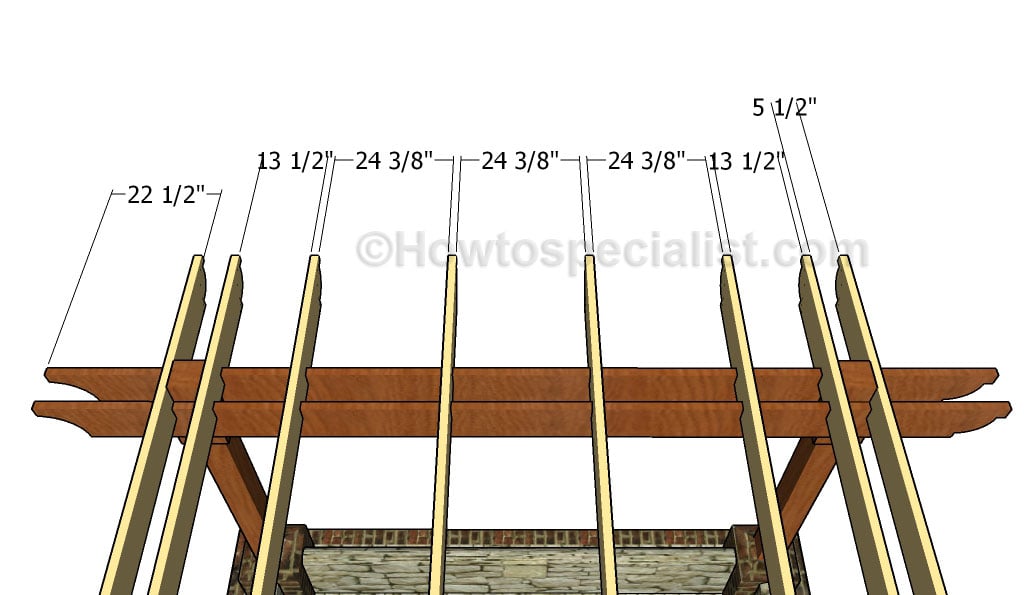
Fitting the shade beams
Use the information in the diagram to space the shade elements properly. You can increase or decrease the distance between the components according to how much light you want to get through the roof.
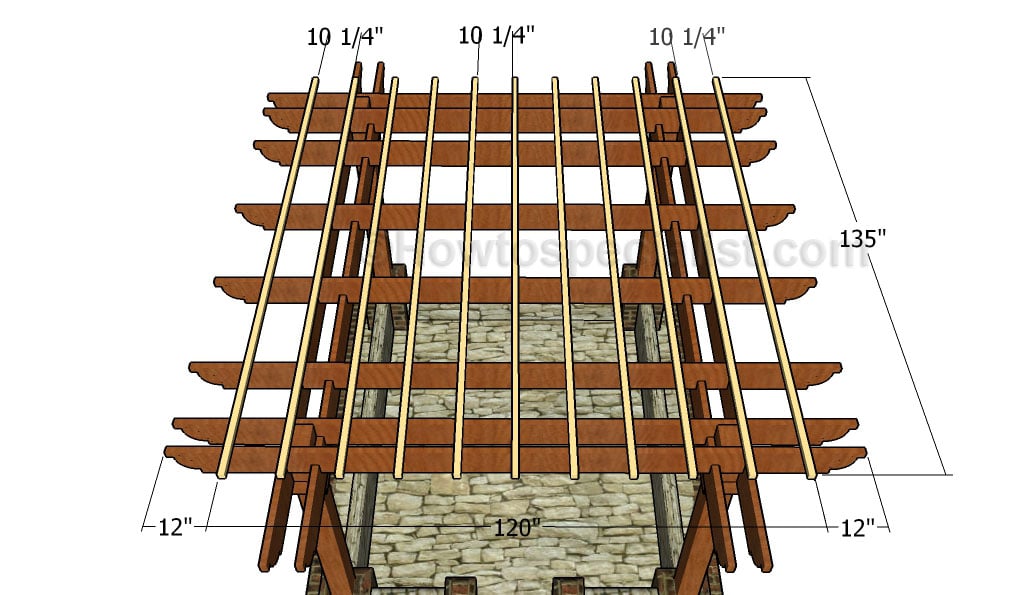
Fitting the top slats
One of the last steps of the project is to attach the 1×1 slats to the top of the pergola. They will keep the shade elements properly and prevent them from moving off the position. Cut the ends at 45 degrees for a personal touch. Make sure you place the slats equally-spaced for a symmetrical effect.
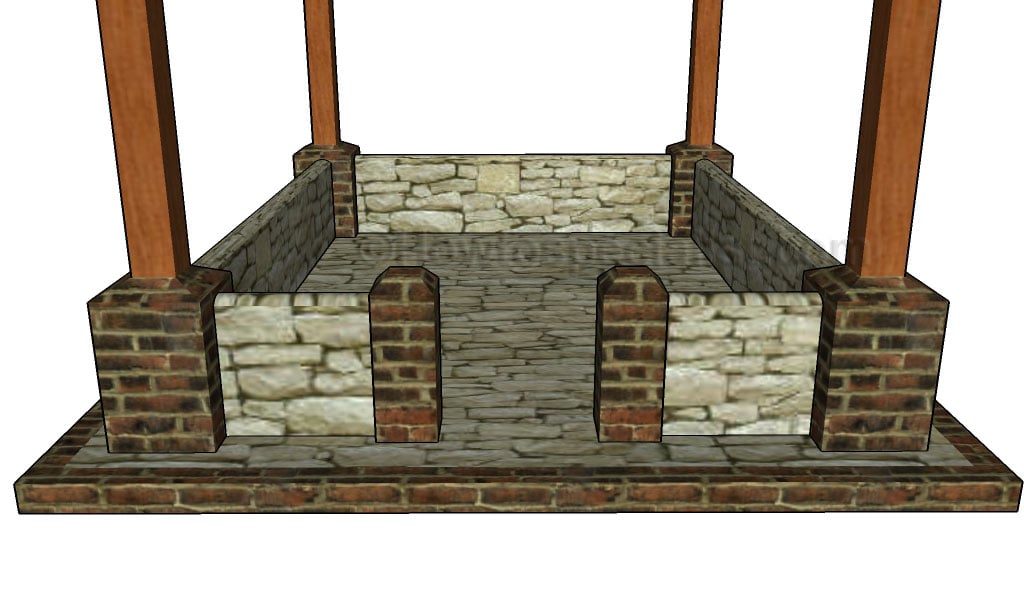
Building the stone base
If you want to enhance the look of the pergola, you could build brick and stone walls around the perimeter of the pergola. Adjust the design of the walls to suit your needs. Invest in quality materials for a durable and professional result.

DIY Pergola Plans
Last but not least, we recommend you to take care of the finishing touches. Fill the holes with wood filler and let it to dry out for several hours. Afterwards, smooth the wooden surface with fine-grit sandpaper and vacuum the residues. Drill pilot holes through the back of the desk and insert long screws into the wall studs.
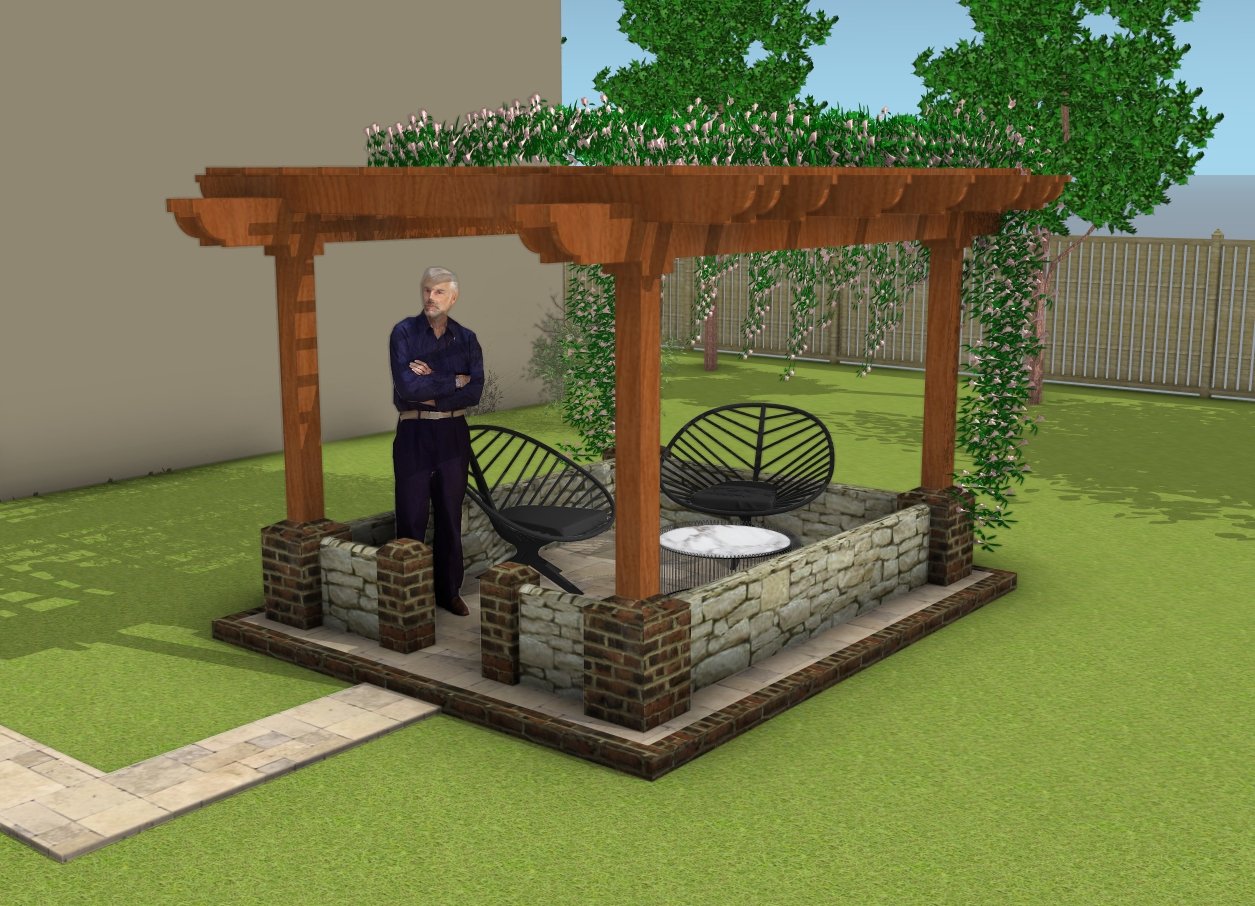
DIY Pergola Plans
An 8×10 freestanding pergola is an ideal addition to any outdoor space, offering a cozy, versatile area that can transform your backyard into an inviting retreat. This size provides just the right amount of shade and coverage for a dining table, lounge area, or even a small garden nook, without overwhelming the yard.
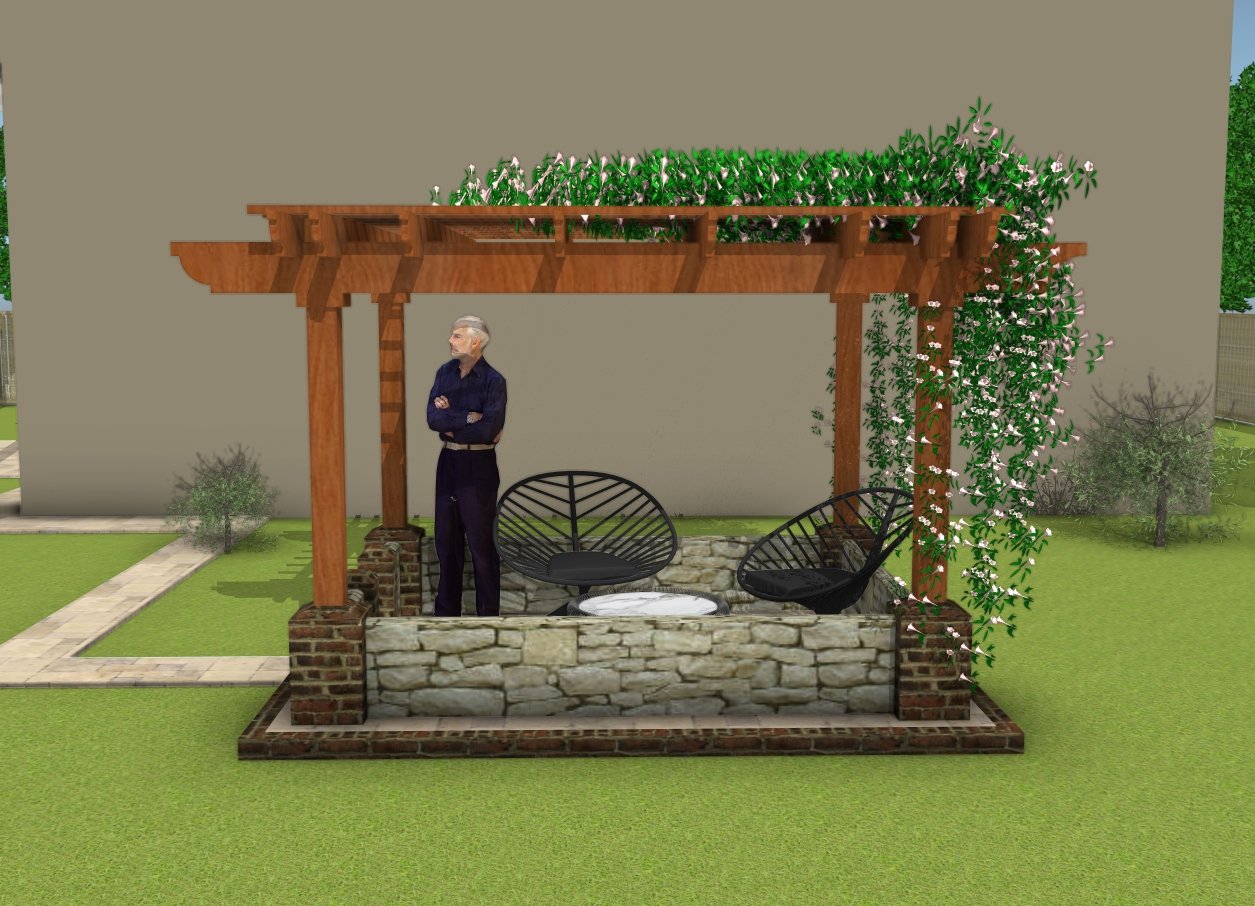
Simple pergola plans
Because it’s freestanding, you can place it anywhere—from over a patio to a tucked-away corner—giving you complete freedom to design your layout. It’s also a fantastic way to define outdoor “rooms” and can be personalized with hanging plants, lights, or curtains. Building a freestanding pergola is the perfect way to bring comfort, style, and functionality to your yard!
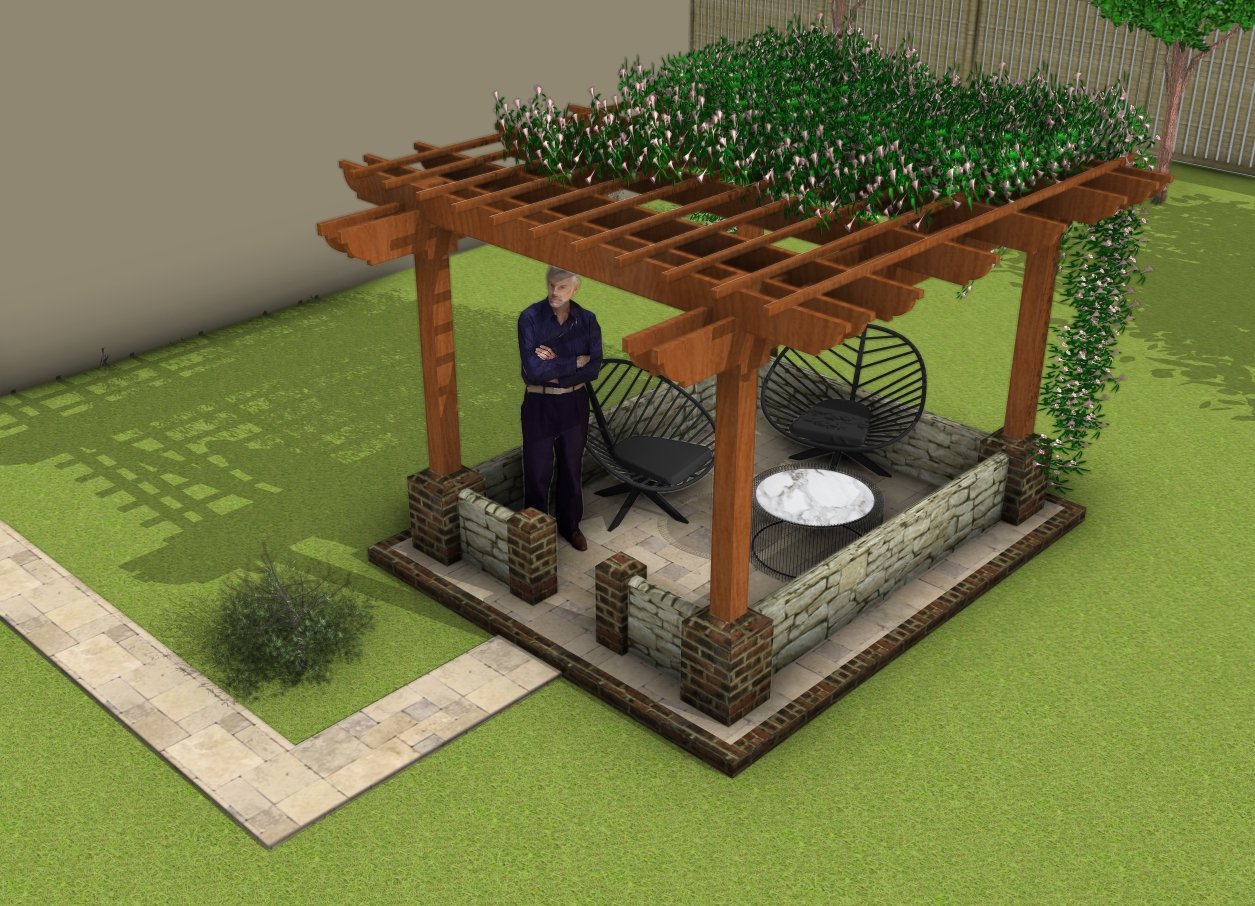
Free standing pergola plans
If you want to download the plans, just click on the GET PDF PLANS button bellow.
Thank you for reading our project about DIY pergola plans and we recommend you to check out the rest of the projects. Don’t forget to share our projects with your friends and LIKE us, by using the social media widgets. SUBSCRIBE if you want to be the first that gets our latest articles and to help us keep adding free plans.

15 comments
Je veux construire une pergola de12′ x 16′ q’elle bois me conseiller vous le plancher est fait j’aimerais bien avoir un plan felicitation pour votre site
I don’t speak french. I would appreciate it if you try it with english.
Jack sander.. he said he would like to know what type of wood would you suggest for a 12×16 pergola. The floor is already made. He would like to see a plan and he said congratulations for a great site.
First of all, who is “he”? Secondly, as I also point out in the project, I recommend weather resistant lumber : pressure treated, cedar or redwood. Check out these plans for a 12×16 pergola: http://myoutdoorplans.com/pergola/12×16-pergola-plans/
Dear Jack, how could it happened, that you don’t know who is “he”? I spend 20 seconds on this page and I realized that Amanda’s “he” equal Denis Deslandes. Pls spend more time with your site, more than me at least. Btw the contenc is useful, thx.
Regards,
My bad, but I think I managed to help him with the essence of his request. I assure you I spend a lot of time on the site, producing free tutorials, so diy-ers can build things and save money, and people like you leave very useful comments. I also inform you I am involved in other projects as well, and I also have a personal life outside this site, if you are that concerned with how I use my 24 hours of a day.
Regards,
I can’t wait to try it. Your step by step tutorial was very clear. Thank you.
Good luck with the project. Let me know how it comes out!
Hello Jack, first of all, thanks for the wonderful info and the time you took to make this documentation so clear and useful. I’m going to build this pergola in my garden at home. I have a question about the shade elements. The specification of the shade elements describes cuts of 1 1/2″x3″ to fit in the support beams, although the support beams are 2″ in width. Why is this? Thanks a lot!
That is the nominal size, the actual size of 2x”” lumber is 1 1/2″
Hello, Jack! I just finished building it! It looks awesome. A beautiful design. Thanks again for sharing. Best.
Diego
Congrats! I would love to see your pergola. You can send a few pics here: http://howtospecialist.com/give-back/
Hello, Jack, I’m planning to build this with PT lumber. I read elsewhere that it can be harder to handle than cedar. Is it realistic to think I can use my ordinary black and decker jigsaw to cut the detail into beams’ ends? Also, if I anchor this structure into my concrete slab, will it be rigid enough to hold a 5-foot long cypress swing? Thanks for your help!
I’m not sure how well your jigsaw cuts, but making an educated guess I say it should work, not as fast as a pro saw, but you’ll get the job done. It will work, but I recommend you to set the posts in concrete. It will hold the weight and handle the forces a lot better than using brackets.
Looking to do a 10’x 30’ pergola. Do you think I could use a 30’ – 2”x 10” with no middle post for support? Doing by pool and really don’t want more support poles then the 4 on the corners