This step by step diy woodworking project is about how to build an attached carport. If you want to learn how to build a carport attached to an already existing building, we recommend you to pay attention to the instructions described in the article and to check out the related projects. An attached construction is ideal for any property, as it will protect your car from bad weather but it also provides the convenience of proximity to the house. There are many carport projects featured on our site, so don’t be afraid to browse through the rest of the woodworking plans.
In most of the cases, a building permit is required so make sure you go to the town hall and ask information about the legal requirements you have to comply with. In this manner, you will also find out useful details about your carport construction. When building the carport, you should make sure the plans are detailed and come with step by step instructions, as well as with a complete list of the materials.
It is essential to invest in high quality materials, that are also water-resistant, such as pressure-treated lumber. Cut the components at the right size by using a circular saw and smooth the cut edges with a sand block. Don’t forget to ask a skilled friend to assist you during the project, especially if you don’t have a large expertise in the field. You need someone to hold the components into place, while you drive the screws in. See all my Premium Plans in the Shop.
Made from this plan
How to build an attached carport

Building an attached carport
Materials
- A – 3 pieces of 4×4 lumber – 84″ long POSTS
- B – 2 pieces of 2×6 lumber – 216″ long SUPPORT BEAMS
- C – 1 piece of 2×8 lumber – 216″ long SUPPORT BEAM
- D – 30 piece of 1×4 lumber – 131 1/4″ long RAFTERS
- E – 1 pieces of 1×6 lumber – 216″ long TRIM
- F – 25 pieces of 1×6 lumber – 216″ long ROOFING
- G – 4 pieces of 4×4 lumber – 34″ long BRACES
- post anchor, tube form, concrete
- 2 1/2″ screws, rafter ties
- roofing felt, asphalt shingles
Tools
- Safety gloves, glasses
- Miter saw, jigsaw
- Chalk line, tape measure, spirit level, carpentry pencil
- Drill machinery and drill bits
Tips
- Use a good miter saw to make the angle cuts
- Drill pilot holes before inserting the screws
Time
- One Week
Related
Building an attached carport

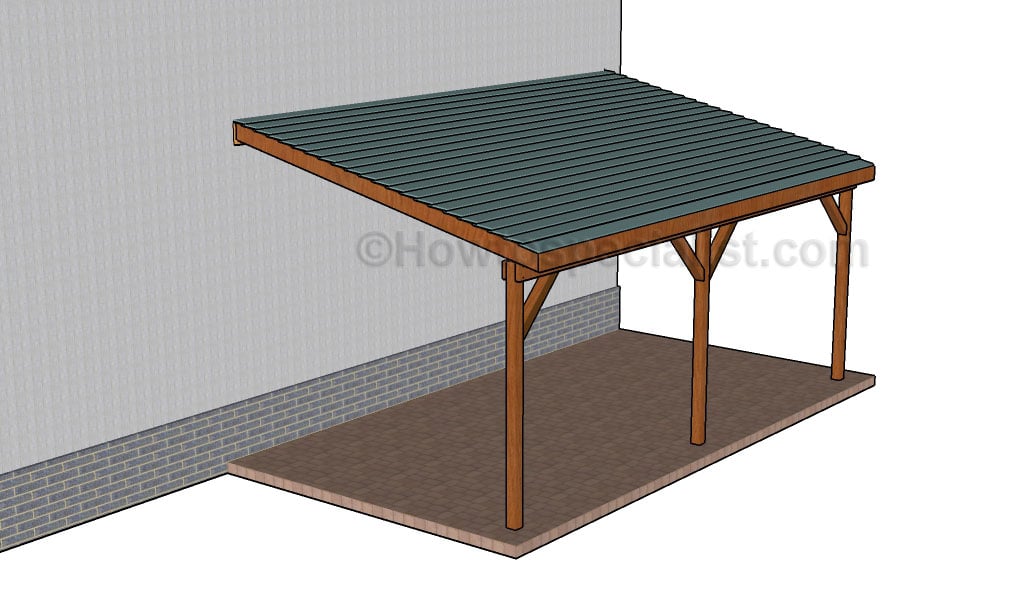
Laying out the posts
The first step of the project is to layout the attached carport in a professional manner. Therefore, we recommend you to use batter boards and string to mark the outline of the posts. Adjust the size of the carport to suit you needs.
Fitting the posts
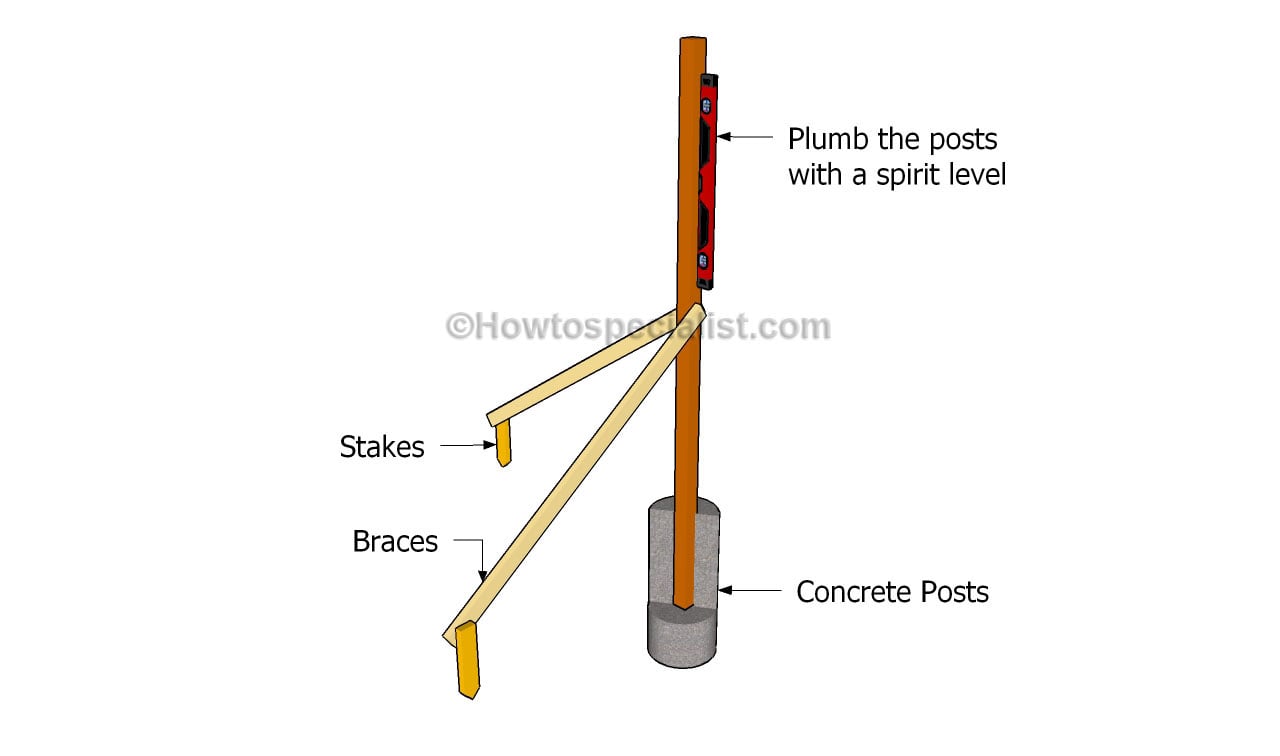
Dig 3′ deep holes and fit tube forms, after compacting a 2″ gravel layer on the bottom of the holes. Use temporary braces to lock the posts into place. Make sure the 4×4 posts are perfectly plumb before filling the tube forms with concrete. Level the surface and let the concrete dry out for a few days.
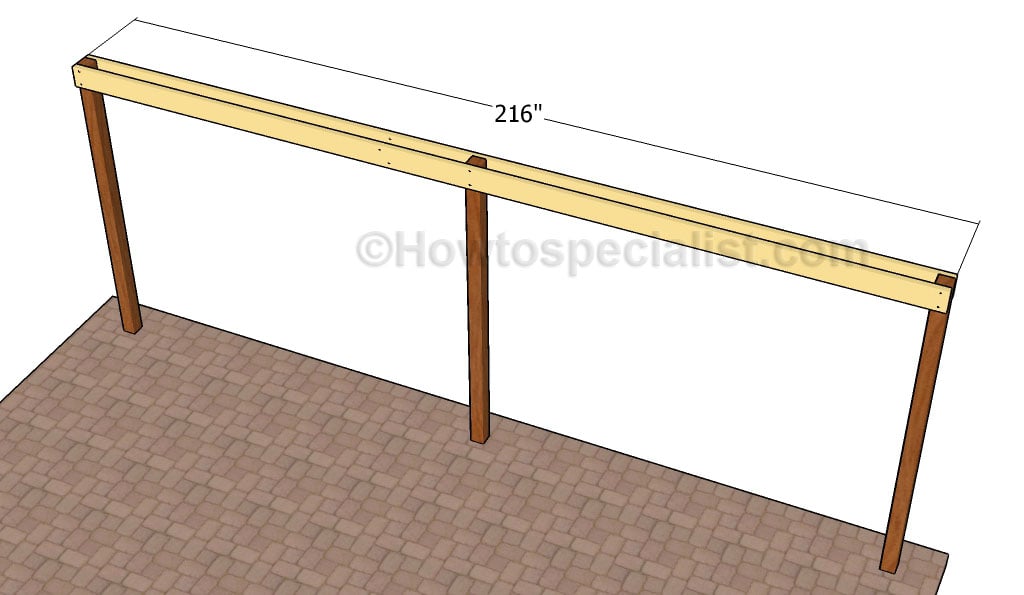
Fitting the support beams
Build the support beams out of 2×6 lumber. Cut them at the right size and clamp them to the top of the posts. Use a spirit level to make sure the beams are horizontal. Drill pilot holes through the beams and through the posts before inserting 7″ carriage bolts.
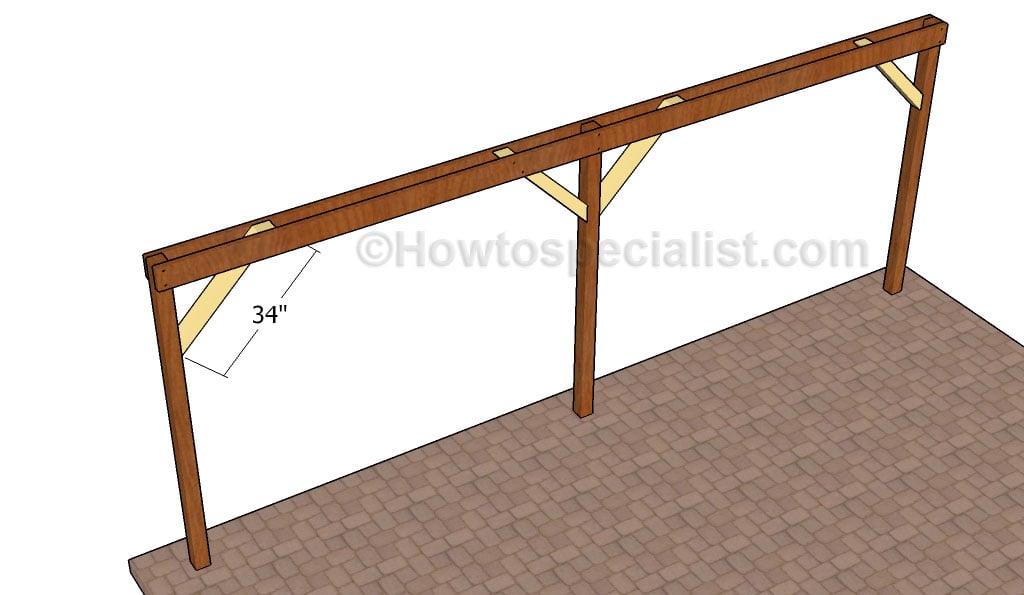
Fitting the braces
If you live in an area with strong wings, we recommend you to attach 4×4 braces to the structure, as described in the diagram. Cut both ends of the braces at 45 degrees and secure them to the structure by using 2 1/2″ screws. Check if the posts are vertical before inserting the screws.
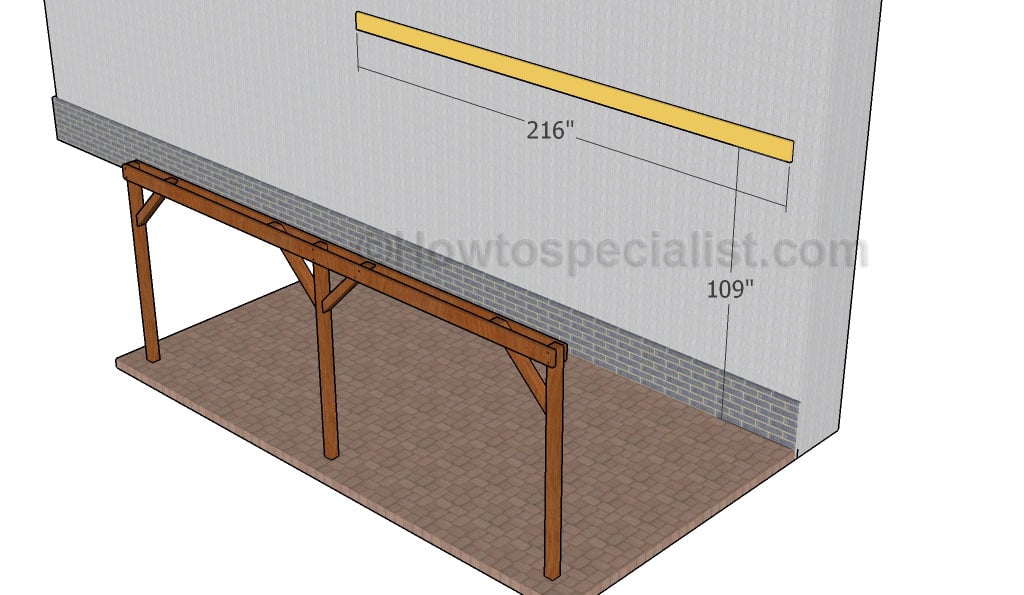
Fitting the support beam
Next, you need to attach the 2×8 support beam to the building. Take accurate measurements, as the height at which you place the beam will influence directly the slope of the roof. Level the beam with a spirit level, drill pilot holes and insert lag bolts into the building to create a rigid bond.
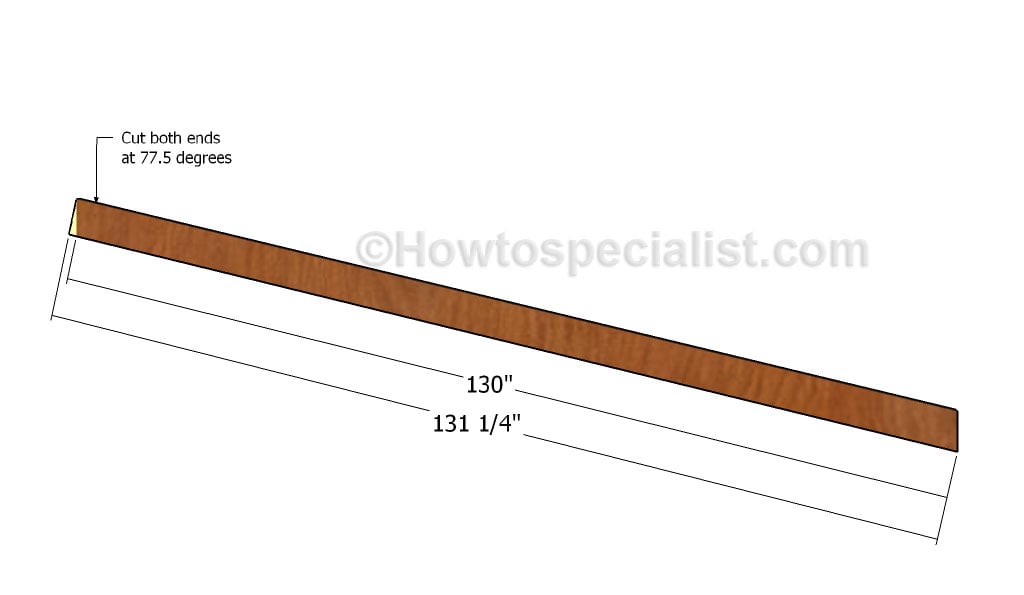
Building the rafters
Cut both ends of the 2×6 rafters at 77.5 degrees and smooth the edges with fine-grit sandpaper. Make sure the rafters are perfectly straight and the lumber is in a very good condition.
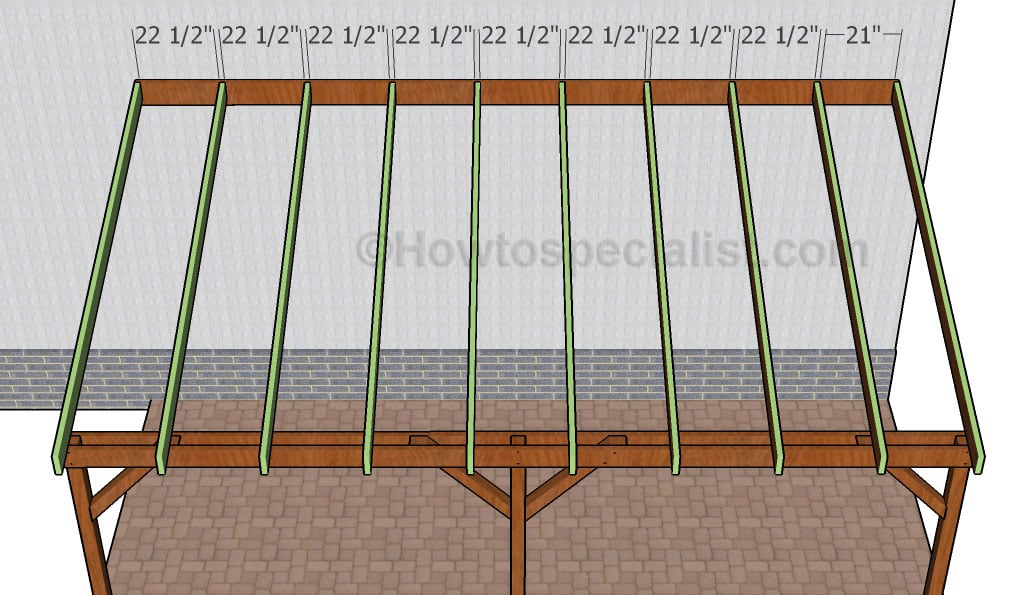
Fitting the rafters
Next, you have to secure the rafters to the support beams, at both ends. In order to create rigid bonds, we recommend you to use appropriate hardware on both joints. Leave no gaps between the components and make sure they are locked together tightly.
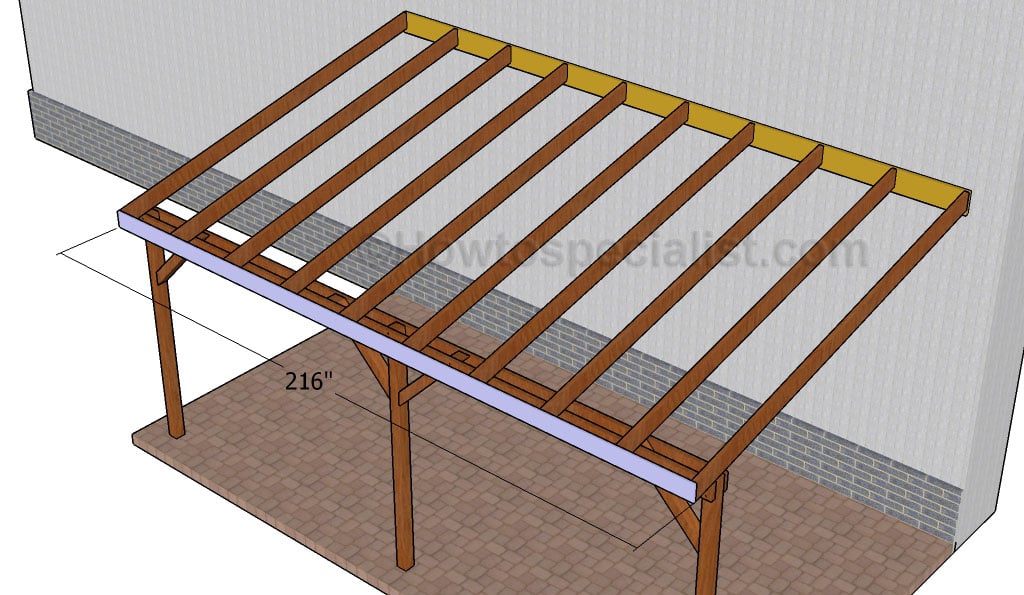
Fitting the trim
Attach the 1×6 trim to the ends of the rafters in order to build a carport with a neat appearance. Align the edges with great care and secure the trim to the rafters by using 1 1/2″ finishing nails.
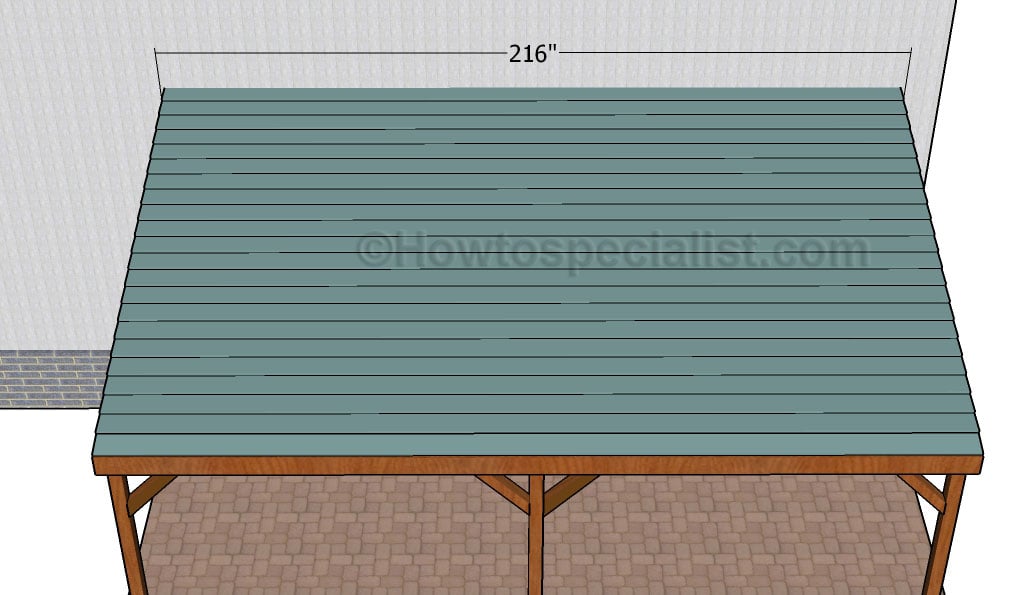
Fitting the roofing
Building the roof for the carport is the next step of the outdoor project. In order to get a professional result, we recommend you to use 1×6 slats and to install them to the rafters starting with the bottom up to the top. Use galvanized screws and make sure the slats overlap at least 1 1/2″ before driving in the nails. In this manner, the head of the screws will be protected from moisture by the upper slat.
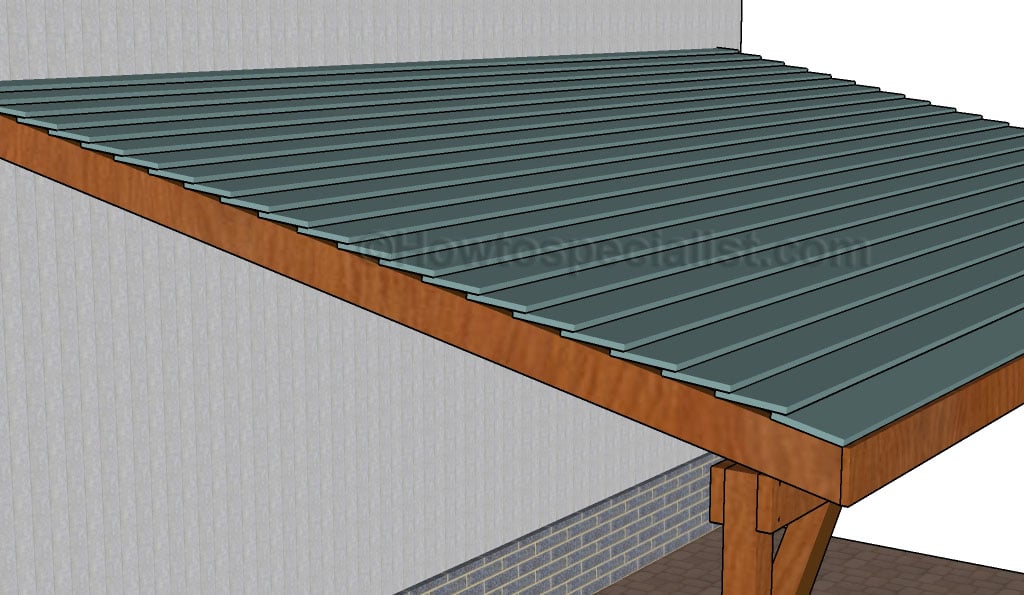
Roofing detail
The diagram shows more information regarding the installation of the roofing slats. Make sure the edges are aligned before inserting the finishing nails.
How to build an attached carport
Last but not least, we recommend you to take care of the finishing touches. Fill the holes with wood filler and let it to dry out for several hours. Don’t forget to check out the rest of the carport plans, as there are several alternatives to choose from.
Thank you for reading our project about how to build an attached carport and we recommend you to check out the rest of the projects. Don’t forget to LIKE and SHARE our projects with your friends, by using the social media widgets. SUBSCRIBE if you want to be the first that gets our latest articles.

EXPLORE MORE IDEAS:
 |
 |
 |
 |
 |
9 comments
I think for most building codes, you will need to add flashing to your ledger board bolted to the side of the house.
Thanks for the valuable comment, Vic. Reading the building codes before staring a project is always a must.
Am in process of having a carport built. Need to know if a cement flooring is required if the carport is attached to house. Can one use asphalt or gravel for the area the car sits. I was told the carport flooring must be cement with 42″ frost footings around the perimeter. And each post supporting the roof of the carport must also be in ground below frost line 42″. One person who lays cement says to avoid having both, the frost footings and posts being installed 42″ each, he could a type of monolithic slab process in areas where postings are installed instead. I am a senior (almost 76 years old) and do not want to be taken advantage of financially. Any advice you give will be greatly appreciated.
The safest bet would be to read the local building codes. Each area has its own characteristics, so I cannot give you a holistic advice. However, as a general rule, the depth of the footings has to be dug below the frost line. If you set the posts into concrete or use post anchors is up to you. The footings are the most important part, because they will support the whole weight of the carport. The surface is up to your decision, you can pour a slab, but gravel works as well.
If you use gravel of any type make sure you put down a weed control fabric to help stop weeds taking root. Best not to use pea gravel as it is terrible to push wheelbarrow , pram or wheelchairs on.
My driveway is asphalted, and has 4X4 beams lining the edge of it (which is also the limit between my lot and my neighbour’s). Could I anchor the 4X4 posts onto the beams that line up the driveway (they themselves are anchored into the ground, via metal pipes set into drilled holes), or do I really need to have the posts anchored into cement?
Furthermore, the house has vinyl siding, at the height where I would need to attach the 2X8 support beam to the house. Are there any particular concerns reguarding that? How do I attach the beam to the house wall? Do I need to remove some of the siding? How do I know what’s behind the siding, to know where to drill to put in anchoring bolts?
If the beam is only secured to the slab and not deeper to the ground, I would set the posts in concrete or at least pour footings. Yes, you need to remove the siding, so you can lock the bream to the house framing.
How do you actually fix the rafters to the beam which is attached to the building?
what would the max height be inside the carport? looking to get about 10 ft , if so how would I adjust the measurements?