Let’s face it—kitchen countertops take a beating. Between hot pans, sharp knives, spilled sauces, and more cups of coffee than we’d like to admit, they go through a lot. Over the years, even the most durable surfaces start to wear down, lose their shine, or just look downright dated. And while the thought of brand-new quartz or granite sounds dreamy, the price tag and mess? Not so much. The good news is you don’t need to rip everything out and start from scratch to breathe new life into your space. With a little creativity, a solid plan, and a weekend or two, you can give your old countertops a refresh that looks incredible—without going anywhere near a demolition crew.
This guide is all about the doable. Whether you’re working with a tired laminate top, builder-grade tile, or a surface that’s just lost its spark, there’s a way to transform it that’s friendly on your budget, your schedule, and your skill level. We’re talking practical, beginner-friendly projects that anyone can take on—and that actually hold up to daily life in a busy kitchen. From concrete overlays to peel-and-stick films to epoxy finishes that look like real stone, we’ll walk through the pros, cons, and how-tos so you can pick the method that fits your style, your kitchen, and your comfort zone. So grab a cup of coffee (just don’t spill it on the counter), and let’s dig in.
One thing worth diving into is how to test your countertop surface before committing to a method. Not all surfaces react the same to paint, epoxy, or adhesive vinyl. For example, some older laminate counters have glossy finishes or coatings that repel paint or make adhesion tricky. Before you go all-in, it’s smart to do a small patch test in an inconspicuous area. Clean it, apply a bit of your product—whether paint, primer, or film—and wait 24 hours to see how it holds. That little test can save you hours of sanding or troubleshooting later.
Another great tip—especially for folks planning to stay in their home long-term—is to think about how your countertop upgrade ties into your future kitchen plans. If you’re planning to replace appliances, cabinets, or flooring down the line, it’s smart to choose materials and finishes that complement those changes. For instance, a painted countertop might be a perfect interim fix while you budget for a full kitchen remodel, but epoxy or tile might be better if you want the upgrade to last for years. This kind of planning helps you get the most value out of your effort—and prevents having to redo the work later.

Painted Countertops: A Fresh Start Without the Price Tag
If your laminate countertops are still solid but stuck in a past decade style-wise, paint might just be your easiest ticket to a fresh, modern look. And no—we’re not talking about slapping on any old wall paint and calling it a day. With the right materials, painted countertops can look shockingly good, mimicking everything from stone to sleek concrete. You can go the kit route with options like Giani or Rust-Oleum’s Countertop Transformations, or piece it together yourself using a bonding primer, durable latex or acrylic paint, and a clear topcoat like polycrylic or even epoxy resin for extra shine and protection.
Prep is everything here. You’ll want to clean the surface thoroughly, sand it lightly to dull the shine and give the paint something to grip, then take your time applying even coats. Once the final sealant is on, be patient and let it cure fully—usually a couple of days. This isn’t a slap-it-on-and-walk-away project, but it’s absolutely beginner-friendly and very budget-friendly. With good prep and proper sealing, many DIYers get anywhere from 3 to 5 years of wear before needing a refresh. Just be gentle: don’t cut directly on it, skip setting hot pans straight down, and you’ll be amazed at how fresh and high-end your kitchen feels.
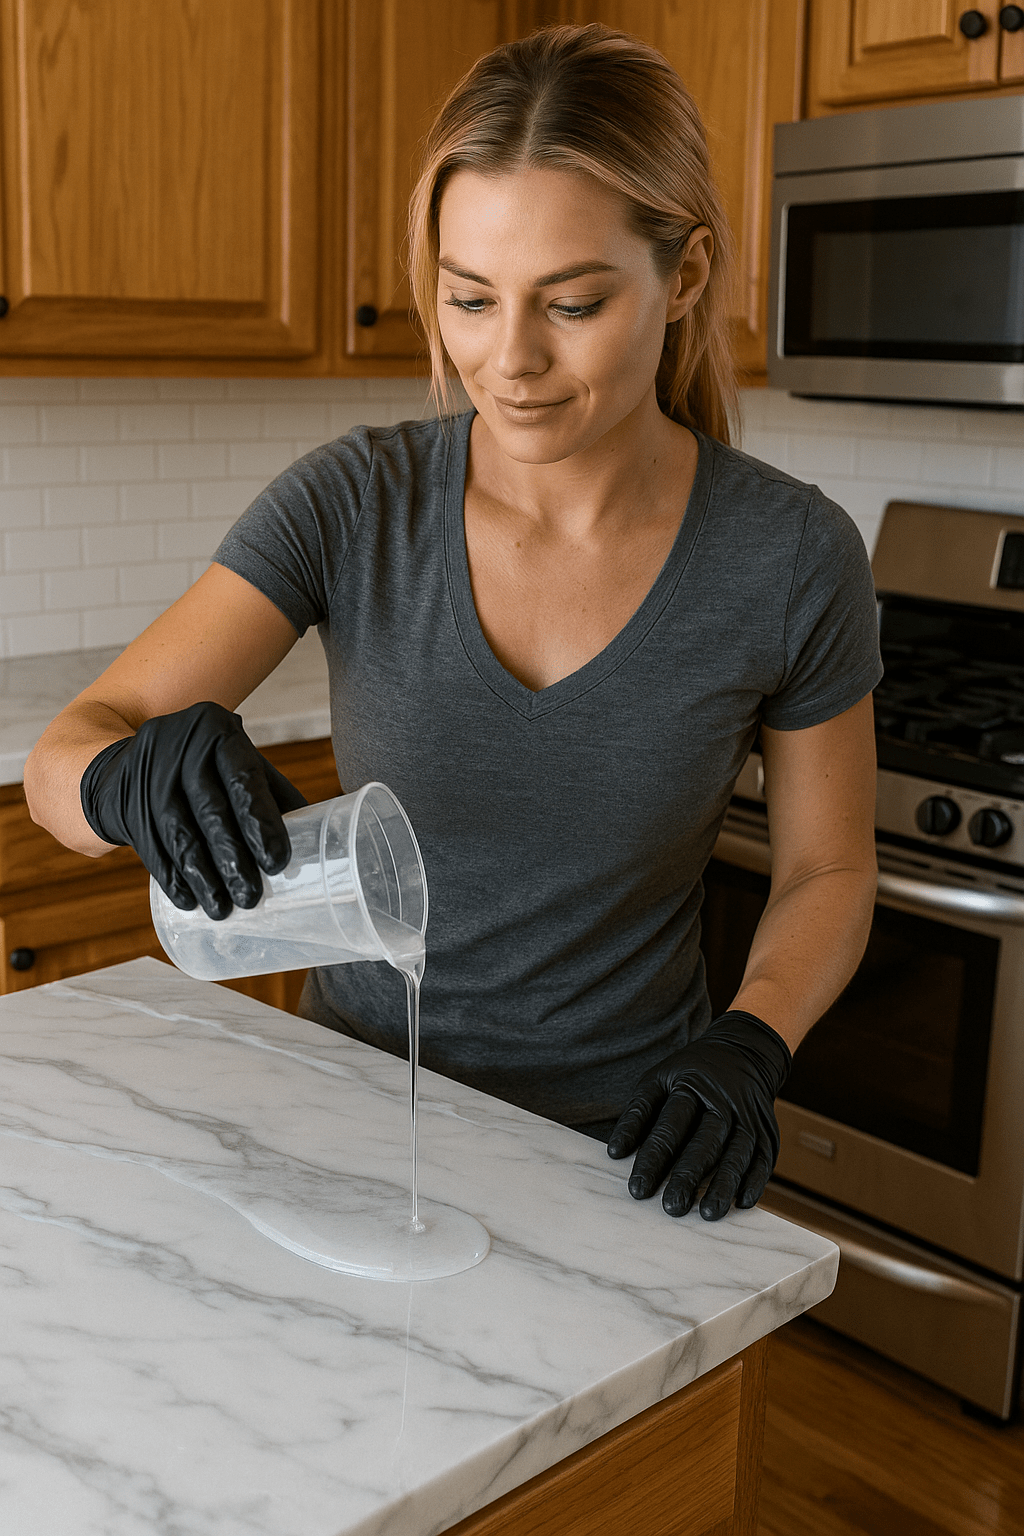
Concrete Overlays: Modern, Minimal, and Durable
If you’re after a countertop upgrade that feels high-end, custom, and solid as a rock—literally—a concrete skim coat might be exactly what you need. This method involves layering a thin, troweled-on coating of concrete over your existing surface, whether it’s laminate, tile, or even plywood. Products like Ardex Feather Finish or Henry’s Floor Patch work beautifully for this, giving you that raw, matte, industrial-chic vibe that pairs perfectly with modern, farmhouse, or minimalist kitchens. Once sealed, the surface becomes smooth, durable, and surprisingly resistant to stains and wear.
This project does take a bit more patience and precision than painting, but it’s still very DIY-friendly. You’ll want to start by sanding and cleaning the surface thoroughly to make sure the concrete bonds well. Then, it’s all about mixing, applying in thin coats, and smoothing with a trowel or putty knife—usually two or three layers depending on your desired texture. After the final coat cures, sealing is essential. A food-safe, matte sealer like Cheng’s Concrete Countertop Sealer or a high-quality water-based polyurethane will protect the finish while preserving that beautiful natural texture. The result? A sleek, stone-like countertop that feels completely custom—without the cost or the demo.
Peel-and-Stick Countertop Film: Instant Gratification
If you’re renting, on a tight timeline, or just not quite ready to go all-in with paint or concrete, peel-and-stick countertop film is a surprisingly good option. It’s basically a high-quality adhesive vinyl sheet that you apply directly over your existing counters—no sanding, no sealing, no mess. These films come in a wide variety of styles, from realistic marble and granite patterns to warm butcher block or sleek stainless steel. Brands like Instant Granite and DC Fix make durable options that not only look convincing but also hold up well to daily kitchen use, including light moisture and occasional spills.
Installation is refreshingly straightforward. Start with a clean, smooth surface, then measure and cut the film to size, leaving a bit of overhang for trimming. Slowly apply it while smoothing out air bubbles as you go—use a credit card, plastic squeegee, or your fingers for small areas. A sharp utility knife and a straightedge will help you get crisp, clean cuts around edges and corners. While it’s not a permanent solution, a well-installed peel-and-stick film can easily last one to three years and completely transform the look of your kitchen. It’s the kind of weekend project that delivers immediate satisfaction—and doesn’t leave your landlord sweating.
Tile It Up: Classic with a Twist
If you’re up for a little more hands-on work and want a classic, long-lasting upgrade, tiling over your old countertops is a tried-and-true option that never really goes out of style. Whether you go with traditional ceramic, durable porcelain, or even user-friendly peel-and-stick tile sheets, there’s a look to suit every kitchen and every skill level. Subway tile is a popular go-to for a clean, modern finish, while natural stone or glass mosaics bring in texture, color, and a warm, custom feel.
The key to a successful tile job is in the prep. Your surface needs to be flat, clean, and sturdy—no flexing or shifting. If your existing counter doesn’t meet those criteria, adding a backer board layer can help create a stable base. From there, it’s all about layout and patience. Apply a good-quality thin-set mortar or tile adhesive, take your time getting those grout lines even, and don’t rush the curing process. Once everything’s set, finish with grout and a waterproof sealer to lock out moisture and stains. This method might take a weekend or two, but when done right, it creates a countertop that not only looks brand new—it stays that way for years to come.
Epoxy Resin Countertops: The High-Gloss Showstopper
Epoxy has become a favorite among DIYers who crave the luxurious look of marble or quartz but don’t want to pay thousands for new stone slabs. These high-gloss resin kits—like Stone Coat Countertops or Leggari—are designed to pour directly over your existing surface, transforming laminate, tile, or even plywood into something that looks straight out of a high-end kitchen magazine. With the right color pigments and a bit of technique, you can swirl in veining, create depth, and replicate the appearance of natural stone in stunning detail. Once cured, the surface is durable, heat-resistant, food-safe, and smooth as glass.
That said, epoxy isn’t a slap-it-on kind of project. You’ll need to prep thoroughly: protect your cabinets and floors with plastic sheeting, clean the surface meticulously, and work in a dust-free environment to avoid flaws in the finish. Timing and technique matter too, so watching a few how-to videos from the kit manufacturer is a smart move. But when you nail it, the result is a jaw-dropping, one-of-a-kind countertop that looks like a complete renovation—and costs just a fraction of what real stone would. If you’ve got a steady hand and a weekend to spare, epoxy might just be your dream upgrade.
Don’t Forget the Details
No matter which method you go with—paint, concrete, epoxy, or tile—the real magic is in the details. Upgrading your countertops isn’t just about the flat surface you prep and finish. The edges, backsplash, and surrounding elements all play a role in the final look. If your counters have wood or laminate trim pieces, give them a fresh coat of paint or a light sanding to match the new finish. Old caulk lines? Scrape them out and lay down a crisp, clean bead of paintable or waterproof caulk. While you’re at it, consider swapping out outdated outlet covers or even adding LED under-cabinet lighting to give the whole kitchen a polished, well-thought-out vibe.
And here’s a step people often skip—seal your work. Especially in a kitchen, where steam, spills, and sharp tools are part of daily life, sealing the final surface isn’t optional. Whether it’s concrete, painted laminate, or tile grout, a good quality sealer adds that final layer of durability and protection that keeps your upgrade looking sharp over time. It’s the difference between a quick weekend facelift and a lasting renovation that holds up for years.
A Whole New Kitchen—No Demo Required
Upgrading old countertops doesn’t have to mean living in a construction zone or draining your bank account. With just a handful of tools, a little patience, and the right approach, you can breathe new life into your kitchen without even pulling out the sink. Most of these projects can be tackled for a few hundred dollars—or less—and the results speak for themselves. Whether you’re looking for a short-term refresh or a longer-lasting solution, there’s a method that fits your skill level, style, and budget.
So if your countertops are shouting 1995 and your style says otherwise, don’t wait for the perfect moment or a massive remodel. Choose the method that gets you excited, gather your supplies, and dive in. With a bit of DIY determination and a weekend’s worth of effort, you can transform your kitchen into a space that feels brand new—without ever swinging a sledgehammer. This is your space—own it, improve it, and make it truly yours.