Looking for a fun outdoor project plan that your kids will love? Building a mud kitchen is a great way to engage their imagination while keeping them active and entertained. A kids’ mud kitchen offers a space for sensory play, mixing mud pies, and pretending to cook up nature-inspired dishes. In this post, I’ll walk you through simple plans for creating a sturdy, kid-friendly mud kitchen using basic materials. With a few hours of work, you can create the ultimate outdoor play station for your little ones!
Building a kids’ mud kitchen should take about 4-6 hours, depending on the design complexity. The estimated cost for materials, such as wood, hardware, and optional paint or stain, ranges between $75 and $170. This affordable project is quick to complete and will provide endless outdoor fun for your little ones.
We recommend you to invest in the best materials you could afford. Therefore, you should buy weather-resistant lumber, such as pine or cedar. Always take accurate measurements before adjusting the size of the components at the proper size. Drill pilot holes trough the components before inserting the wood screws, to prevent the wood from splitting. My plans come with a full cut / shopping list and they are PDF Download and Print friendly. See all my Premium Plans HERE.
Made from this plan
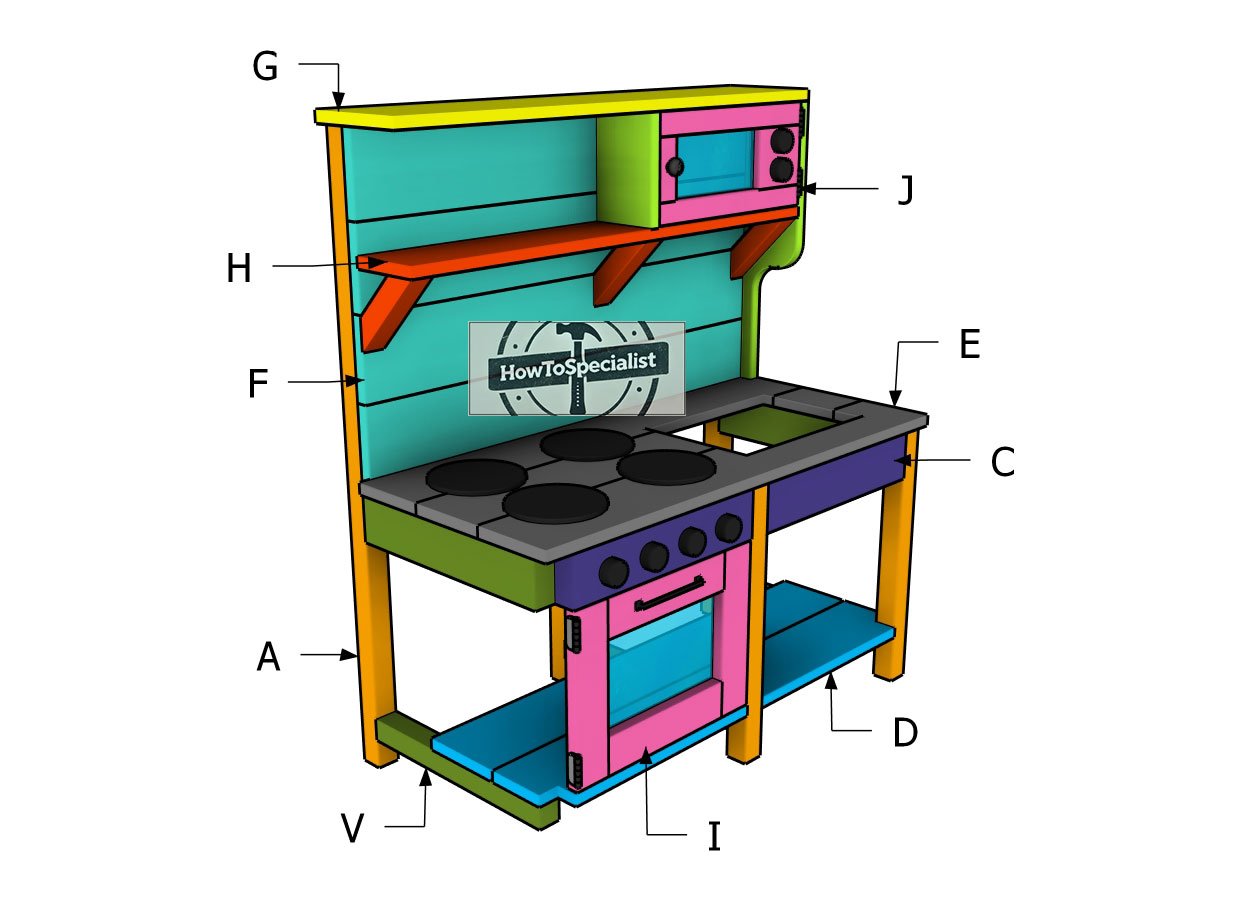
Kids Mud Kitchen – Free plans
Building-a-mud-kitchen
Materials
A – LEGS – 2×2 lumber 19 1/4″ – 3 pieces
A – LEGS – 2×2 lumber 41 1/4″ – 3 pieces
V – FRAME – 2×2 lumber 15 1/2″ – 3 pieces
V – FRAME – 2×4 lumber 15 1/2″ – 3 pieces
C – FRAME – 2×4 lumber 15 1/2″ – 4 pieces
D – SHELF – 1×6 lumber 35 1/2″ – 3 pieces
E – TABLETOP – 1×6 lumber 37″ – 3 pieces
F – BACKSPLASH – 1×6 lumber 35 1/2″ – 4 pieces
G – TOP – 1×8 lumber 37″ – 1 piece
H – SHELF – 2×2 lumber 7 1/8″ – 3 pieces
H – SHELF – 1×6 lumber 35 1/2″ – 1 piece
I – DOOR – 1×3 lumber 10 1/4″ – 2 pieces
I – DOOR – 1×3 lumber 11 1/4″ – 2 pieces
J – DOOR – 1×2 lumber 14 3/4″ – 2 pieces
J – DOOR – 1×2 lumber 4 1/4″ – 1 piece
J – DOOR – 1×5 lumber 4 1/4″ – 1 piece
- 1×2 lumber 4 ft – 1 piece
- 1×3 lumber 4 ft – 1 piece
- 2×4 lumber 10 ft – 1 piece
- 2×2 lumber 8 ft – 3 pieces
- 1×6 lumber 8 ft – 1 piece
- 1×6 lumber 10 ft – 3 pieces
- 1×8 lumber 8 ft – 1 piece
- 3/4″ plywood – 4’x4′
- 2 1/2″ screws – 100 pieces
- 1 5/8″ screws – 100 pieces
- 1 1/4″ screws – 100 pieces
- 3/4″ screws – 30 pieces
- 1 1/4″ finish nails – 50 pieces
- 1 1/2″x1 1/2″ hinges – 4 pieces
- 1/8″ plexiglass – 2’x2′
- knob – 1 piece
- handle – 1 piece
- hooks – 2 pieces
- magnetic door stop – 2 pieces
- sink – 1 piece
- glue, stain / paint
Tools
- Circular saw
- Drill machinery, drill bits
- Safety gloves, glasses
- Chalk line, tape measure, spirit level, carpentry pencil
Time
- One weekend
Related
Pin for later!

Building the frame
Building-the-frames
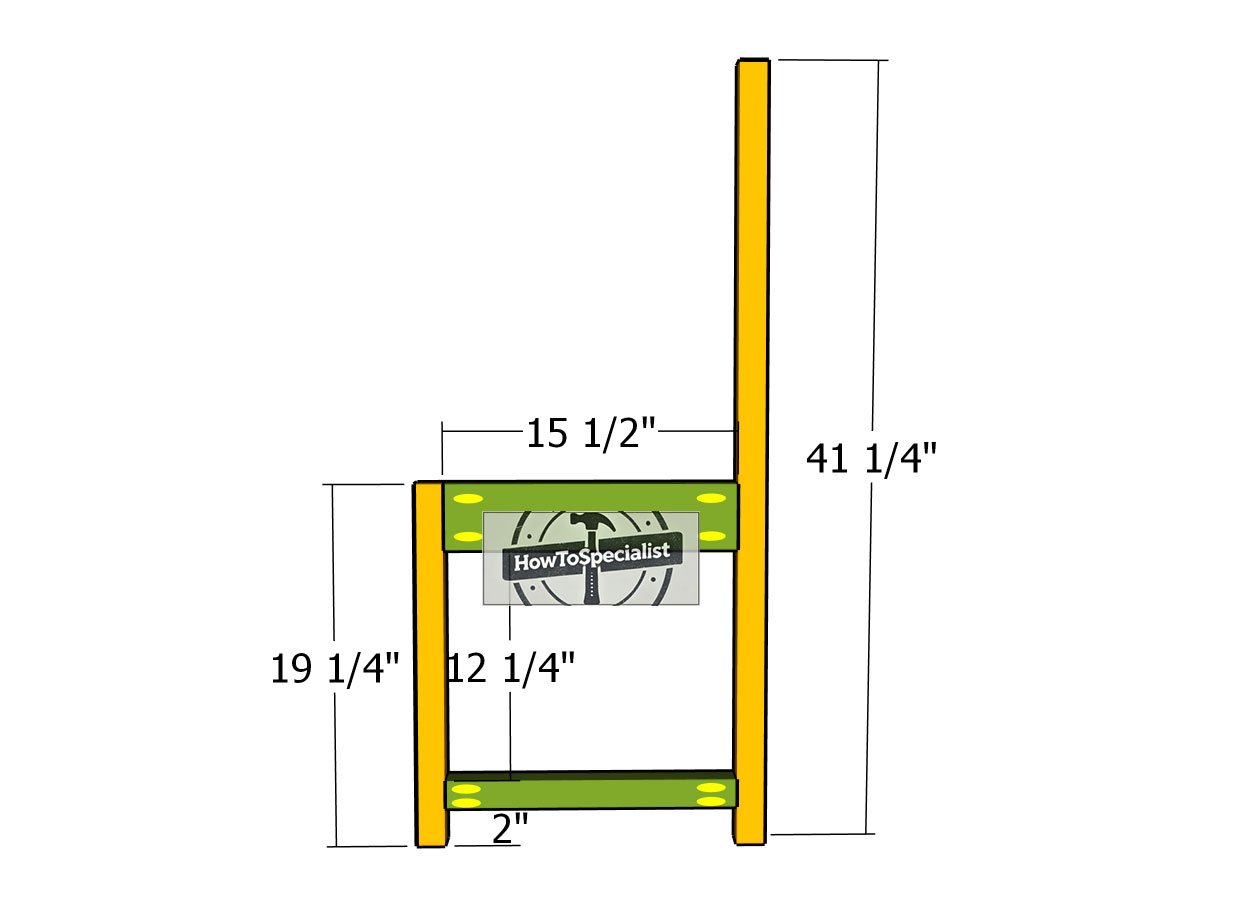
The first step is to build the three main frames for the kids’ kitchen. Use 2×2 lumber for the legs and base support, and 2×4 lumber for the top support. Create pocket holes at both ends of the horizontal supports, securing them to the legs with 2 1/2″ screws. Ensure everything is aligned and that the corners are perfectly square before moving on.
Fitting-the-front-supports
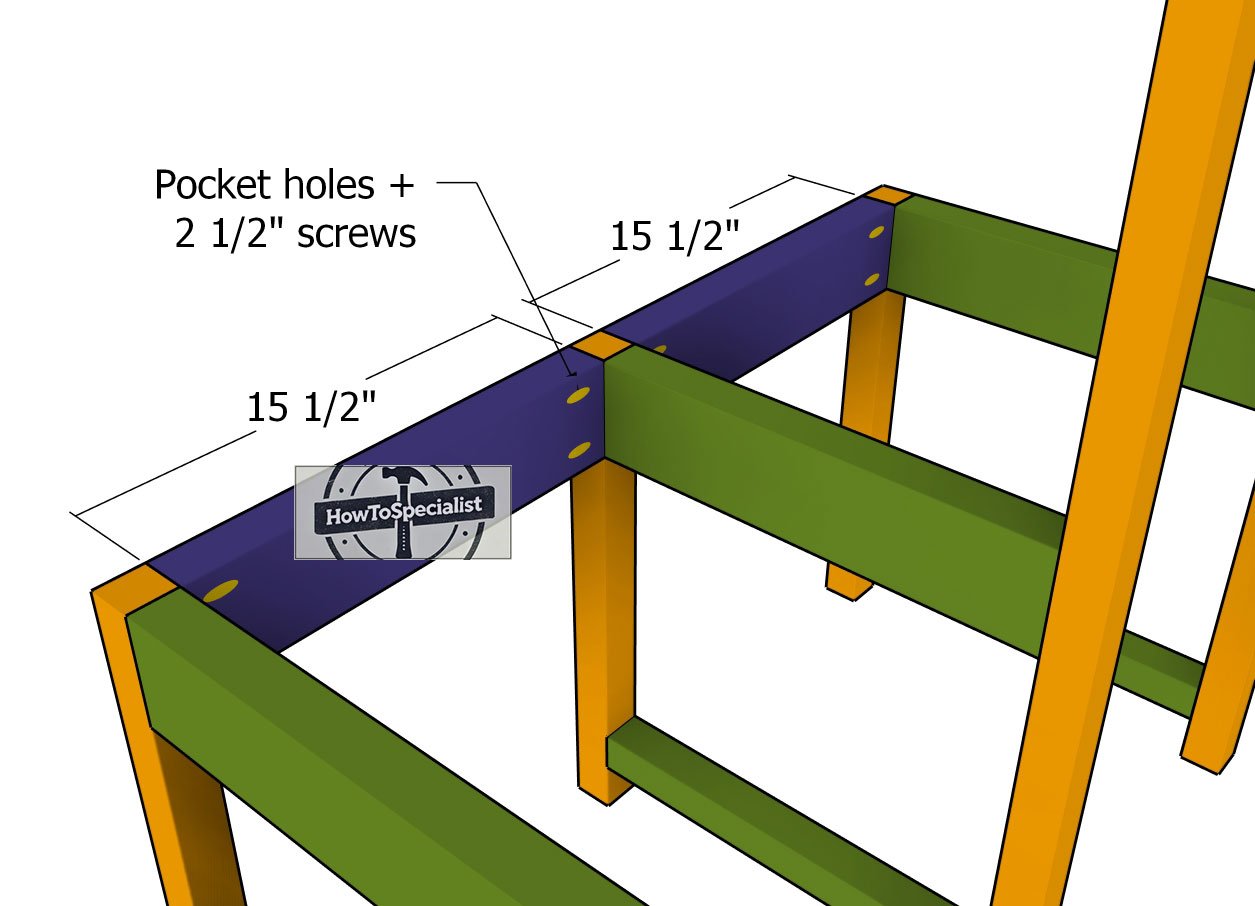
Tightly secure the frames by attaching 2×4 boards to the front of the kitchen. Drill pocket holes and insert 2 1/2″ screws to assemble the structure, using 2 screws at each end and adding wood glue to strengthen the joints. For a cleaner look, make sure to position the screws on the inside of the frame.
Shelf-boards
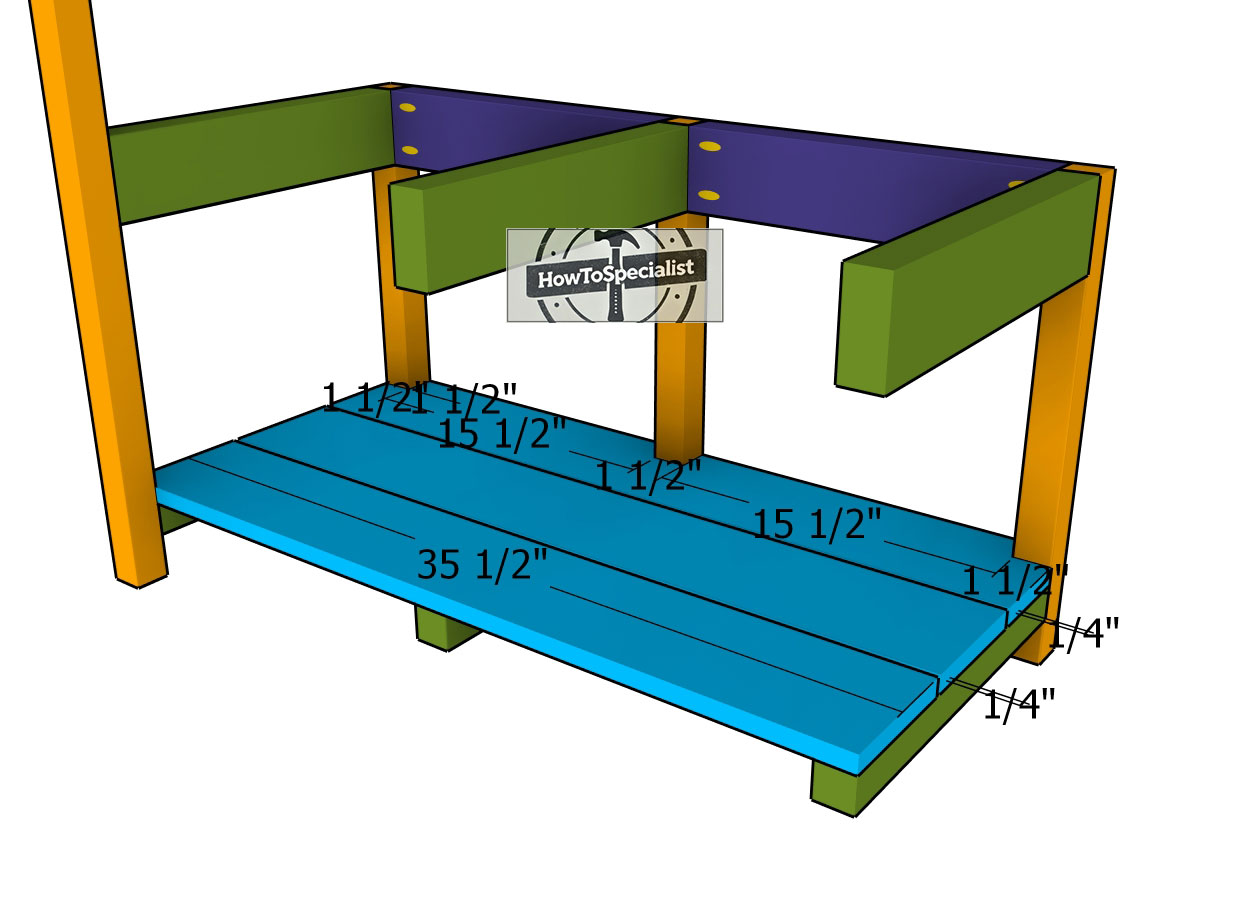
Now, it’s time to attach the 1×6 boards to form the bottom shelf. Make notches on the board at the front of the kitchen using a jigsaw. Leave a 1/4″ gap between each board for proper spacing. Align the boards flush with both ends, and secure them tightly in place with 1 5/8″ screws. This will give the shelf a neat and sturdy finish.
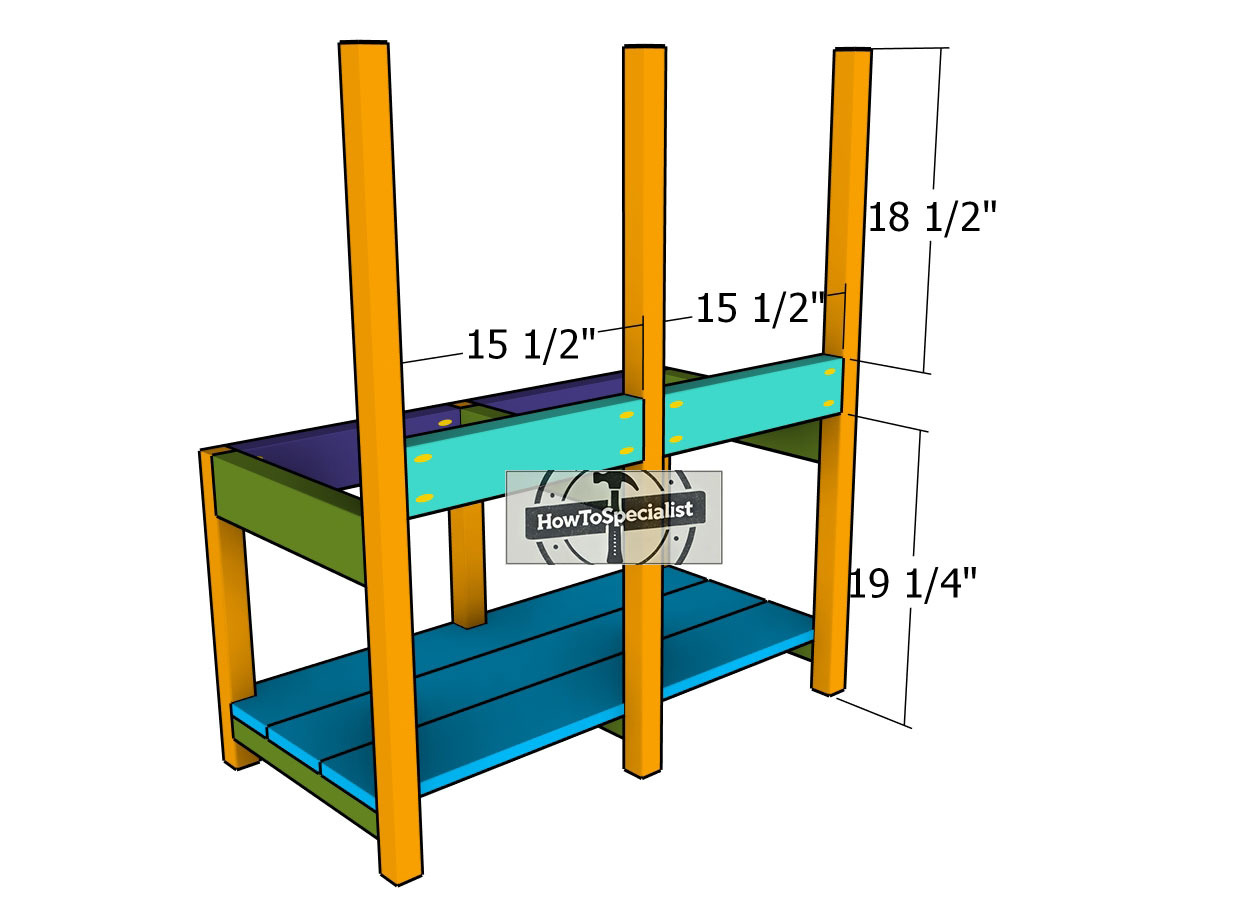
Back-supports
Attach the 2×4 boards to the back of the kitchen by drilling pocket holes at both ends of each board. Secure them to the back legs using 2 1/2″ screws, making sure to add glue to strengthen the joints. Ensure the corners are square to keep the structure aligned and sturdy as you tighten the screws.
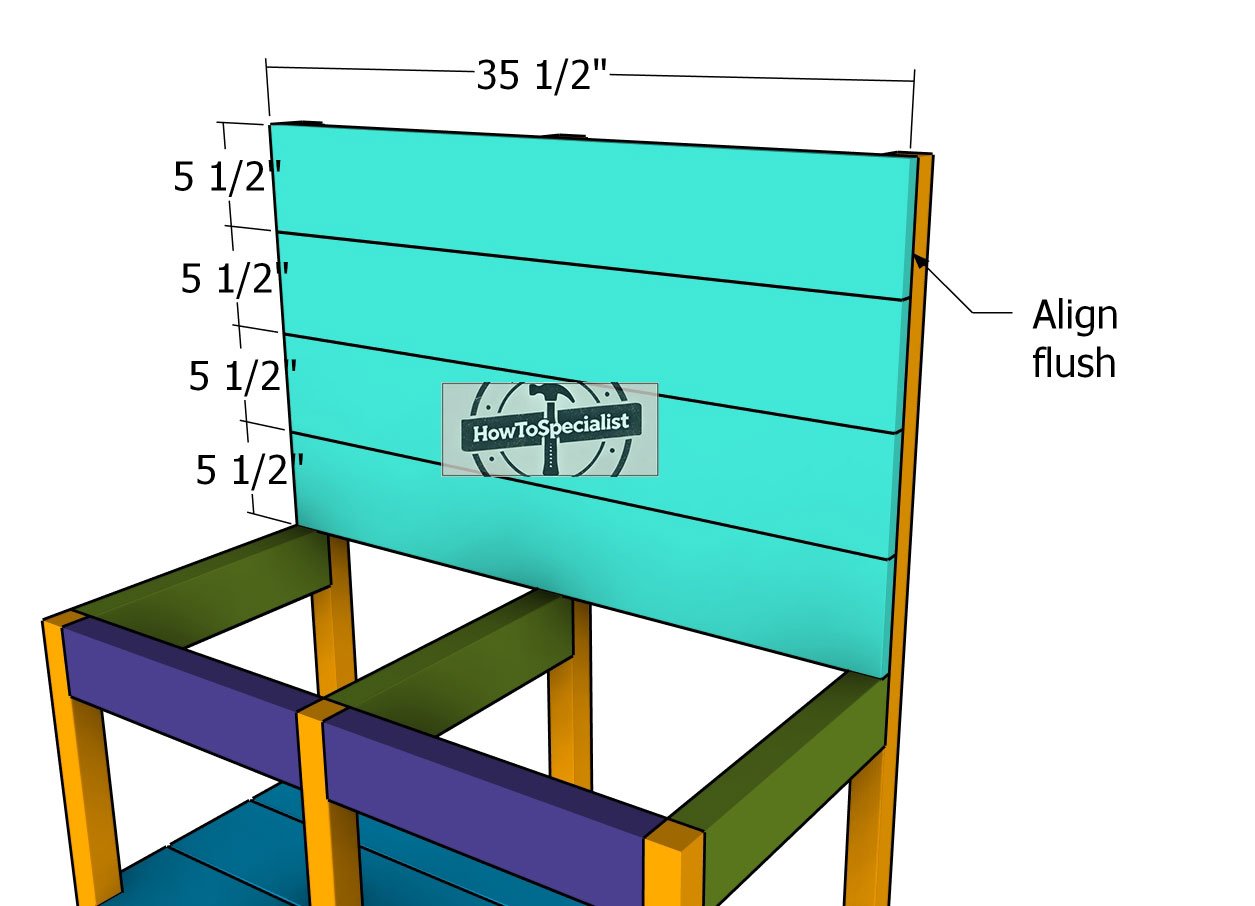
Backsplash-boards
Attach the 1×6 boards to the backsplash, ensuring the edges are flush and leaving no gaps between the boards. Drill pilot holes and insert 1 5/8″ screws to secure them, using two screws for each joint—six screws per board. This will ensure a sturdy and aligned backsplash for the kitchen setup.
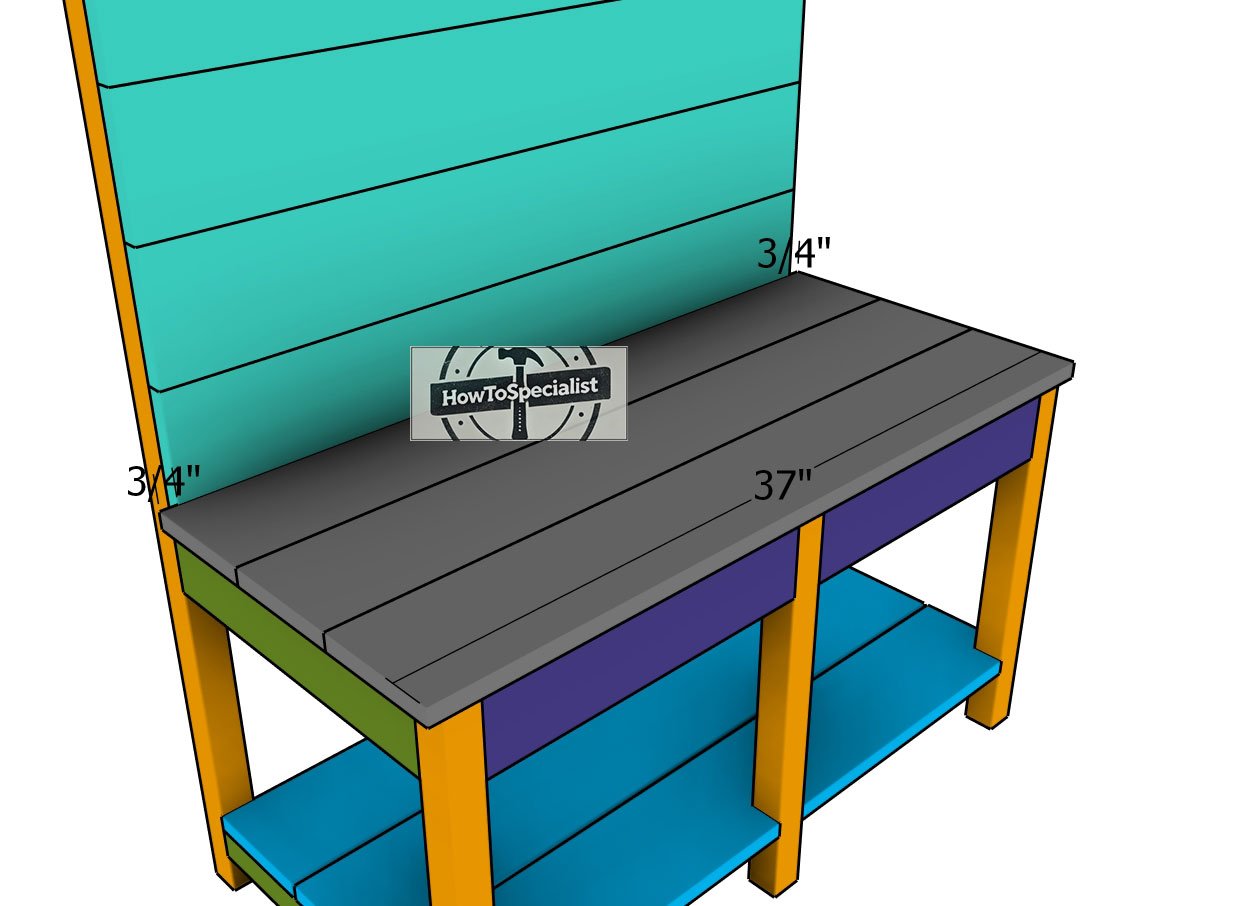
Attaching-the-tabletop-boards
Now it’s time to attach the 1×6 boards to the tabletop. Lay the boards on the structure, ensuring there’s a 3/4″ overhang on both sides. Make sure the boards are tightly aligned with no gaps, then secure them in place with 1 5/8″ screws. This will create a smooth and solid tabletop for the kids’ kitchen.
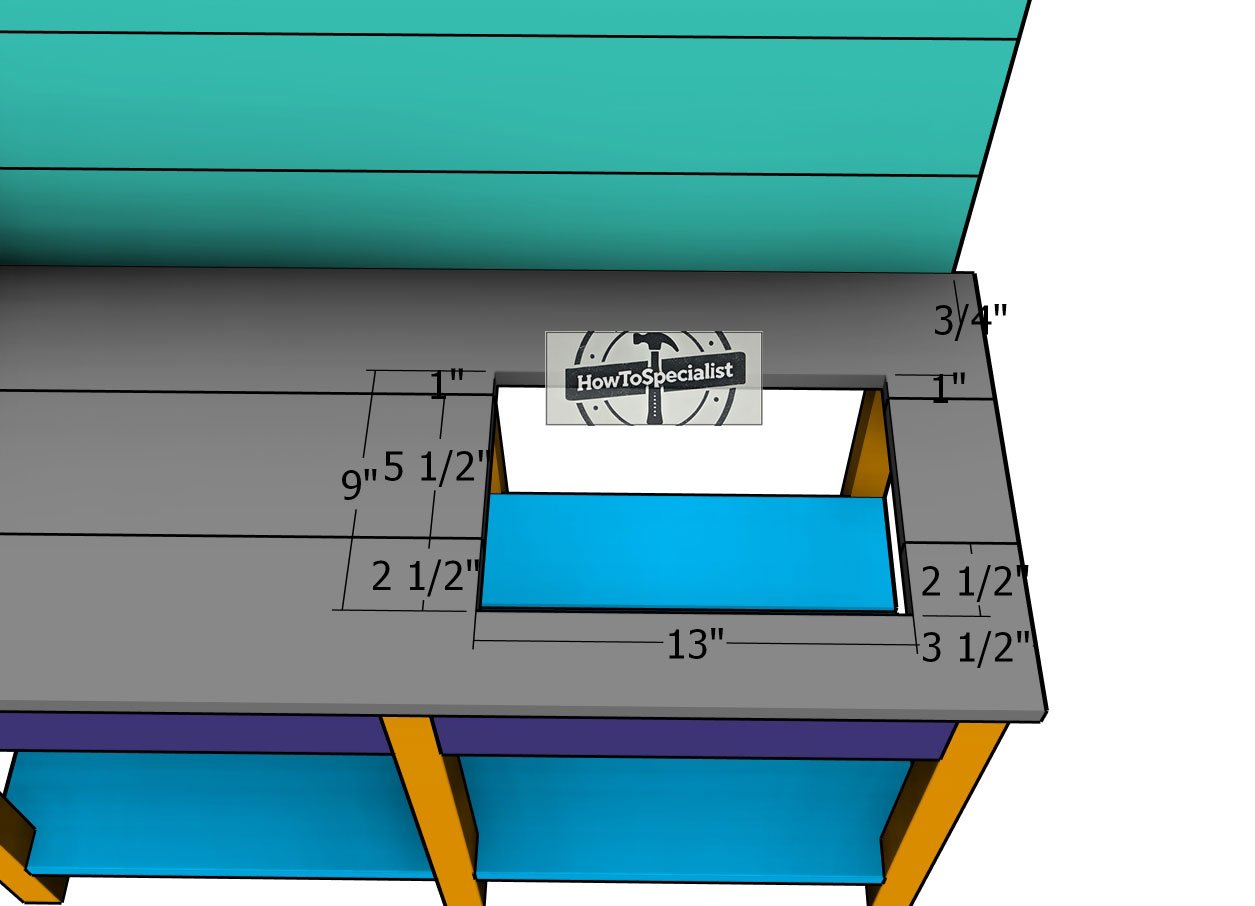
Cutting-out-the-sink-hole
Now it’s time to cut out the hole for the sink. In my case, the hole measures 9″x13″, but be sure to adjust the size according to your sink dimensions. Center the sink on the tabletop and trace the perimeter. Once marked, use a jigsaw to carefully cut along the traced line to create the opening. I have a full tutorial on how to cut a hole in a countertop HERE.
Building the hutch
Cutting-the-side-boards
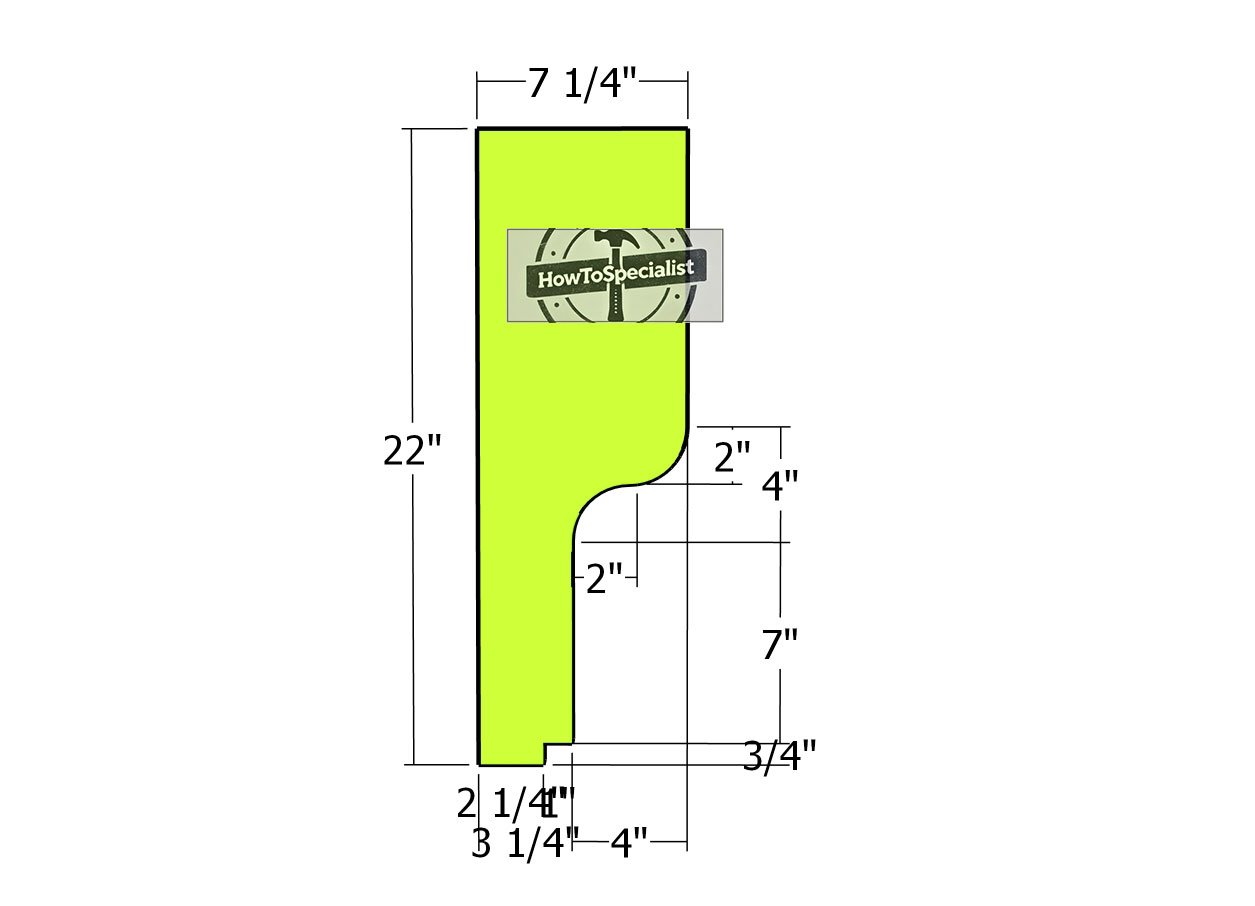
Now it’s time to frame the hutch for the kids’ kitchen. As shown in the diagram, use 1×8 boards for the side components. Mark the cut lines carefully, and use a jigsaw to make the cuts. For rounded shapes, trace the curves using a circular object as a guide to ensure smooth and even edges. This will create the perfect hutch frame to finish off the kitchen setup.
Attaching-the-side-boards
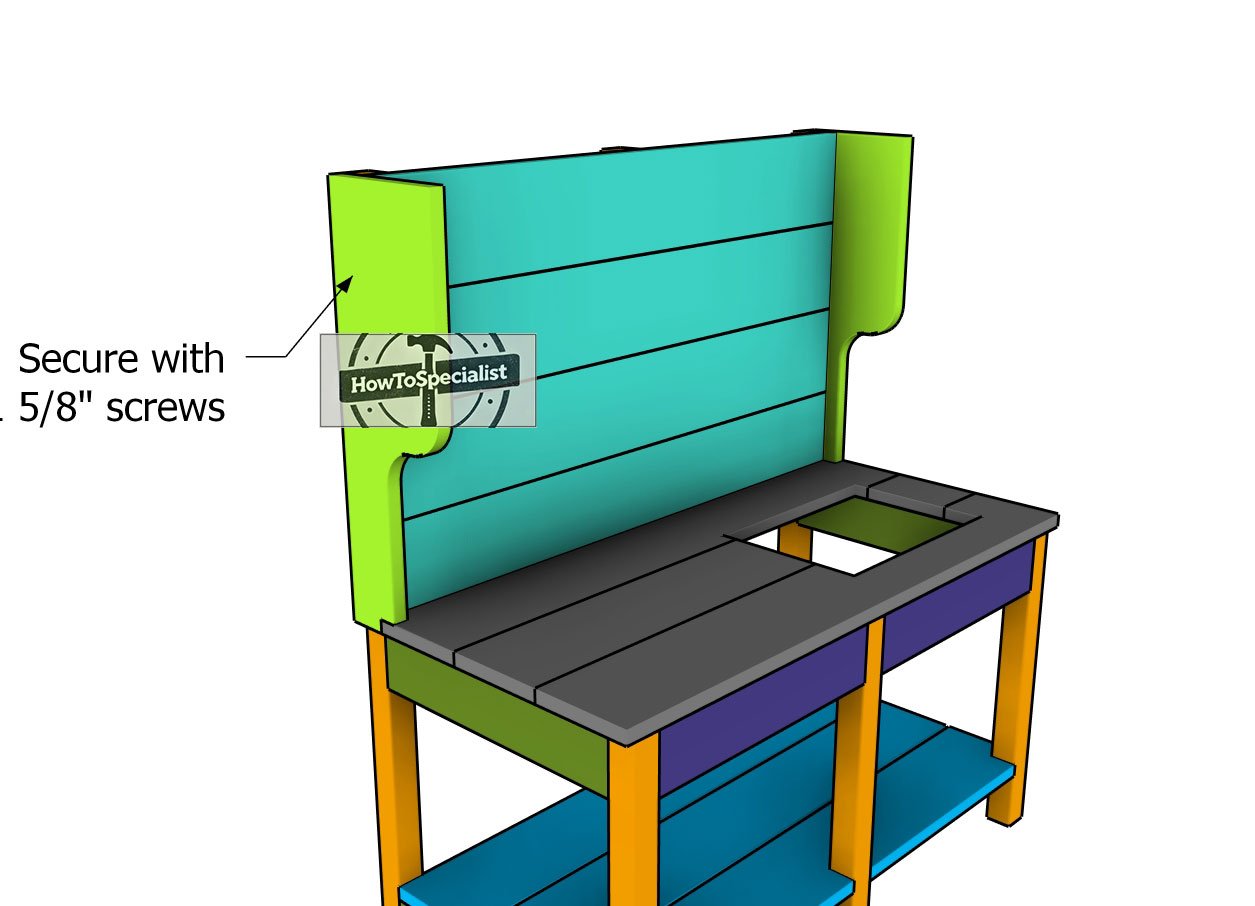
Fit the two boards to the sides of the hutch and secure them with 1 5/8″ screws. Before inserting the screws, drill pilot holes to prevent splitting. Apply wood glue to the joints for added strength and a more durable connection. This will ensure the sides of the hutch are firmly attached and stable.

Fitting-the-shelf
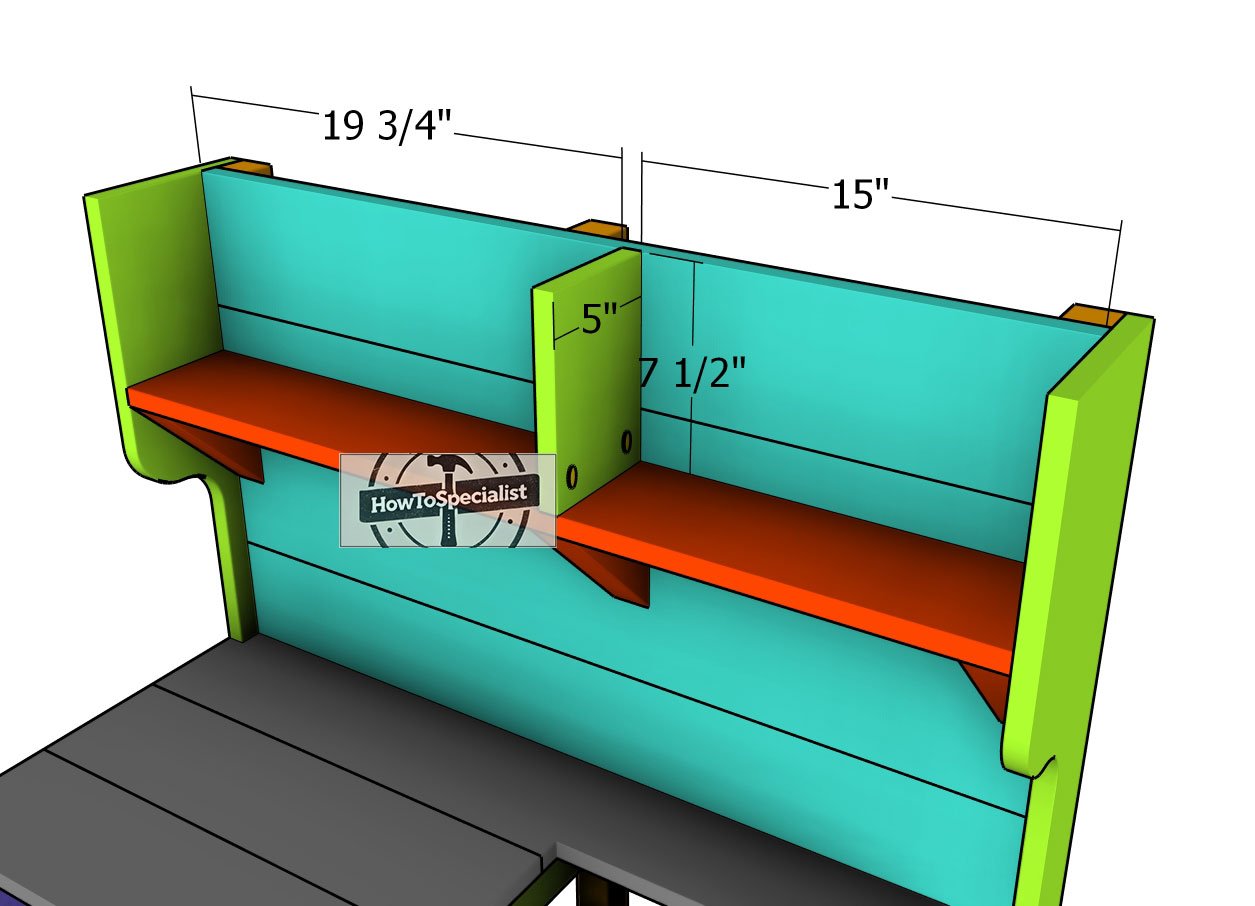
Building the shelf is straightforward, using 2×2 lumber for the supports and 1×6 lumber for the shelf itself. Cut the ends of the supports at 45-degree angles, then secure them in place with 1 5/8″ screws. Make sure to use a spirit level to ensure the shelf is perfectly horizontal and stable. As shown in the diagram, you’ll need to narrow the 1×6 board down to 5″ in width for a proper fit.
Middle-shelf-part
Fit the partition to the shelf to create the frame for the microwave area. Secure the partition using pocket holes and 1 1/4″ screws to lock it firmly to the shelf. This will section off the space, giving the kitchen an organized and functional look.
Fitting-the-top-piece
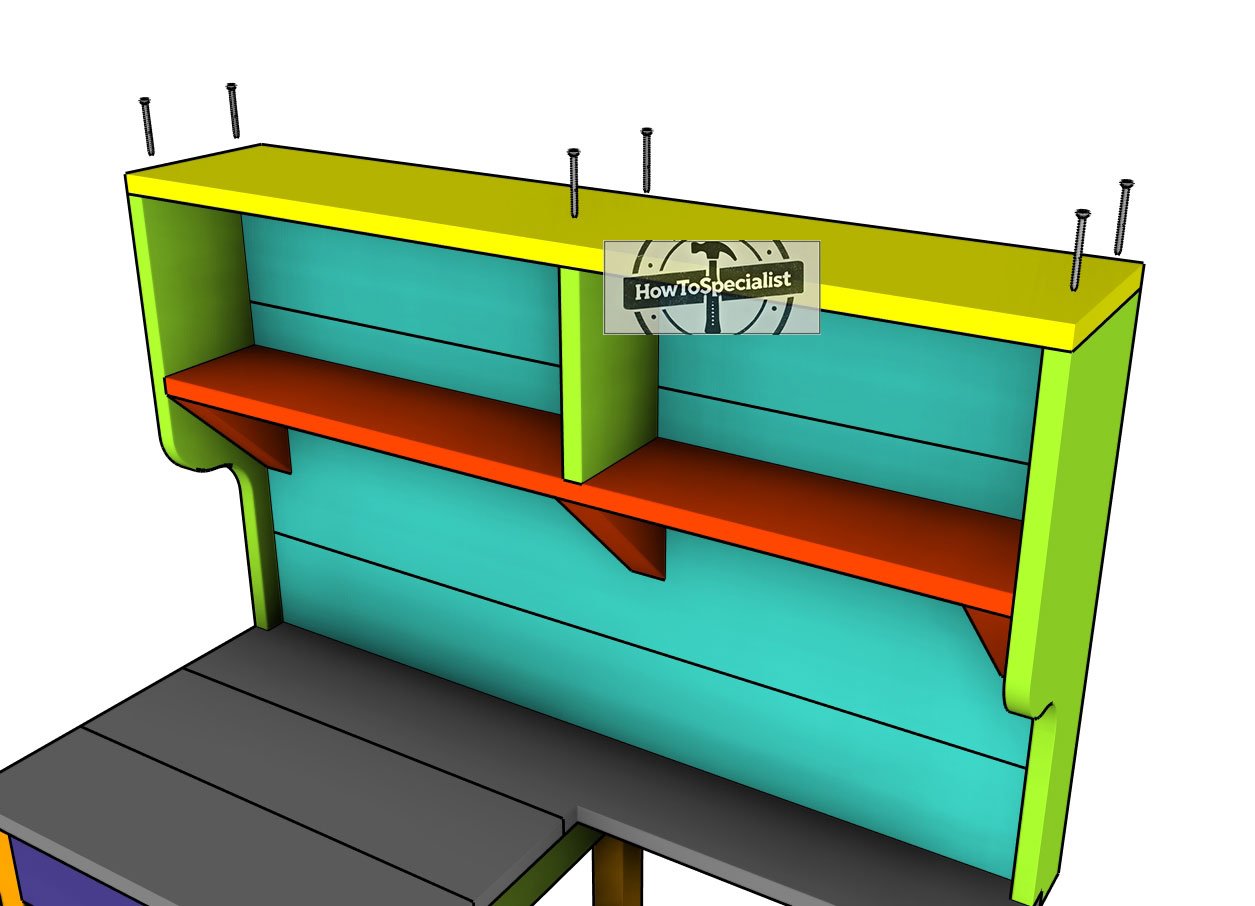
Attach the 1×8 board to the top of the mud kitchen using 1 5/8″ screws. Make sure the edges are flush, and then drill pilot holes to avoid splitting the wood. Once aligned, insert the screws to securely assemble the hutch and give it a stable, finished structure. This step completes the top section, adding extra storage or display space to the mud kitchen.
Building the doors

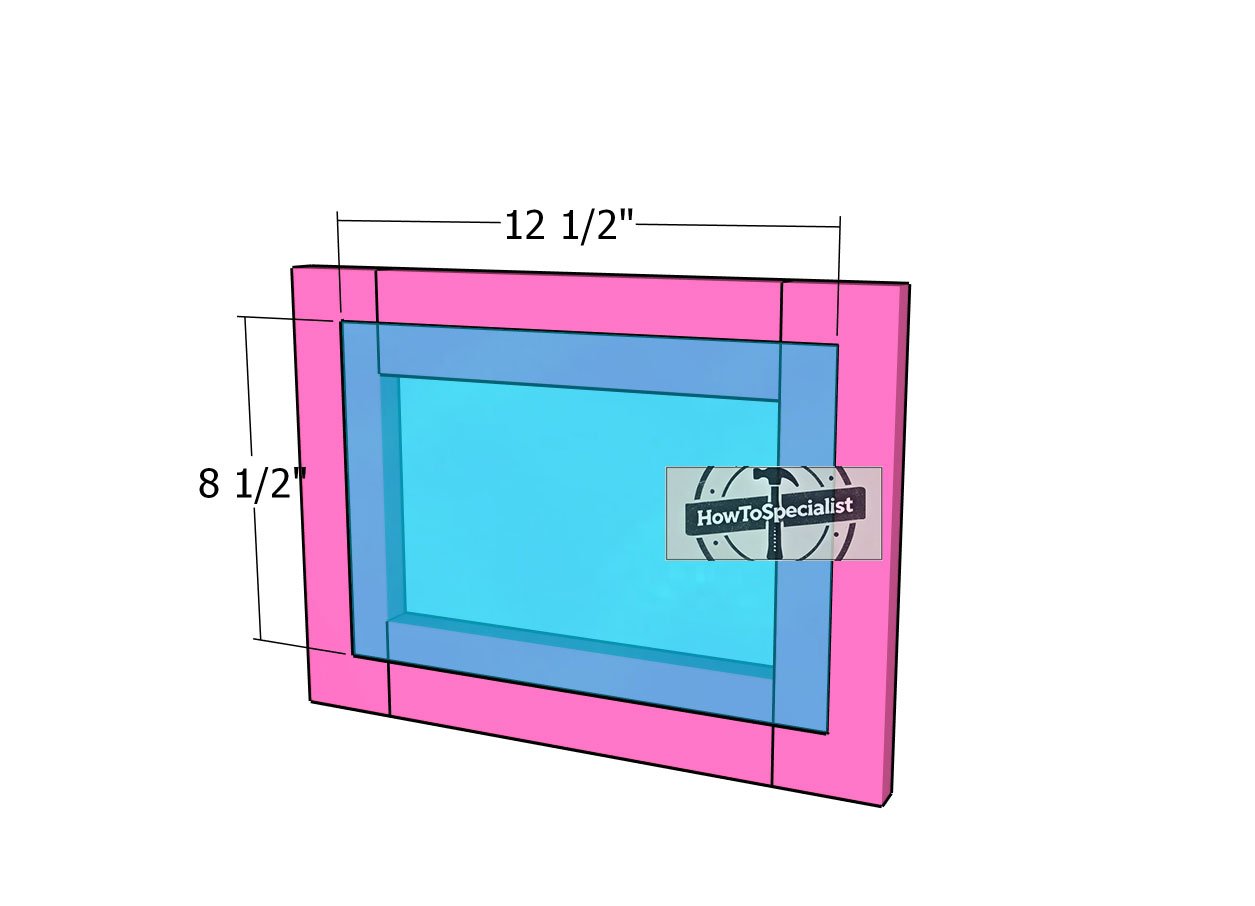
Oven-door-frame
Now we’ll begin framing the doors for the kitchen, starting with the oven door. Use 1×3 boards for this part. Drill pocket holes at both ends of the horizontal components, and assemble the door using 1 1/4″ screws. Ensure that the edges are aligned flush and double-check that the corners are square before securing the door tightly. This will give the oven door a clean, precise look and ensure a sturdy fit.
Glass-panel-oven-door
Attach the 1/8″ plexiglass to the back of the frame to complete the oven door. Use 3/4″ screws and glue to securely lock the panel into place. Make sure the plexiglass is aligned properly and sits firmly within the frame, giving the door a polished, functional look. This will create a durable window effect for the oven, adding to the kitchen’s realistic features.
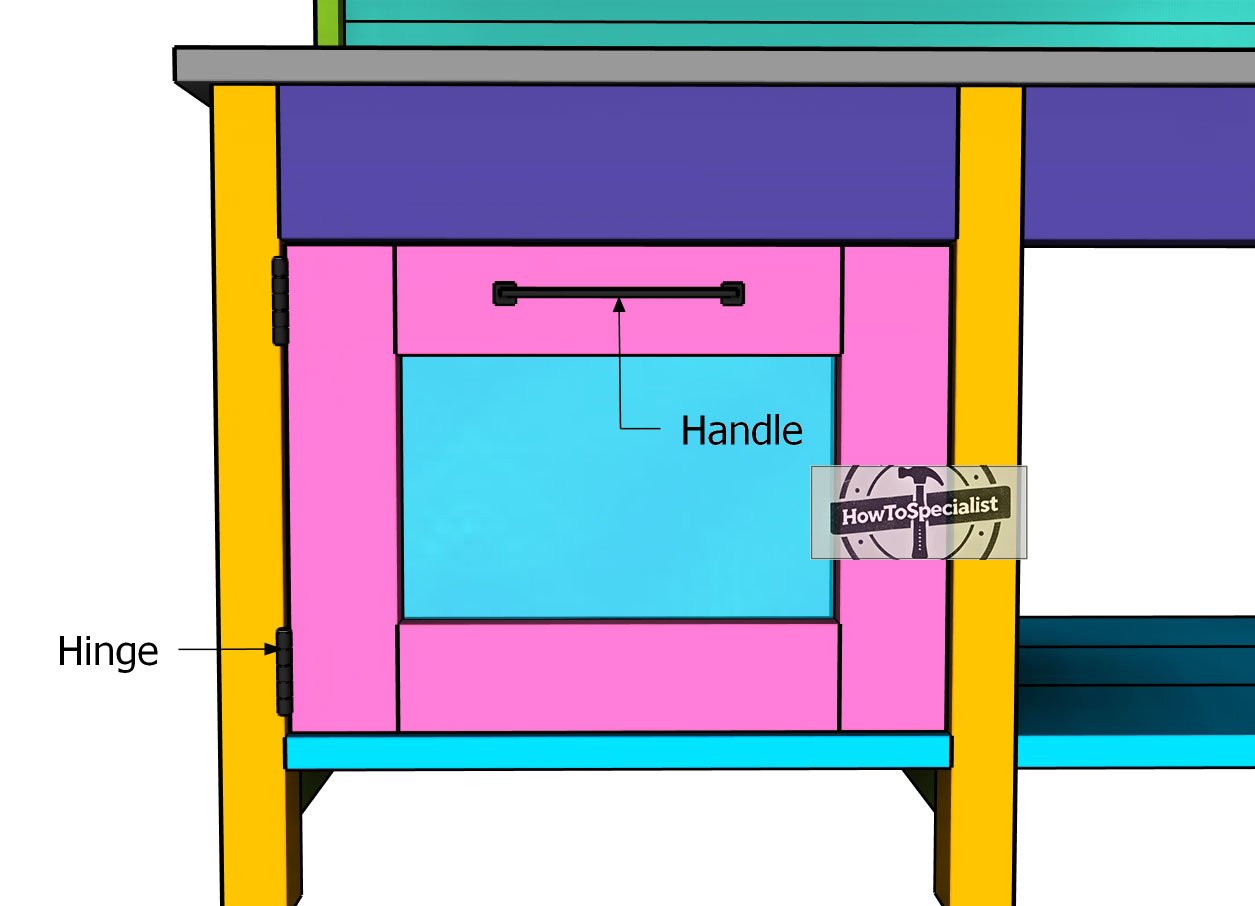
Fitting-the-oven-door
Fit the door into the opening, ensuring it is centered so that the gaps are even on all sides. Attach it to the left side of the kitchen using two small 1 1/2″x1 1/2″ hinges for a smooth operation. Install a handle to easily open and close the door, and consider adding a magnet door stop to help lock the door securely in place when closed. This will give the kitchen a functional and realistic touch.
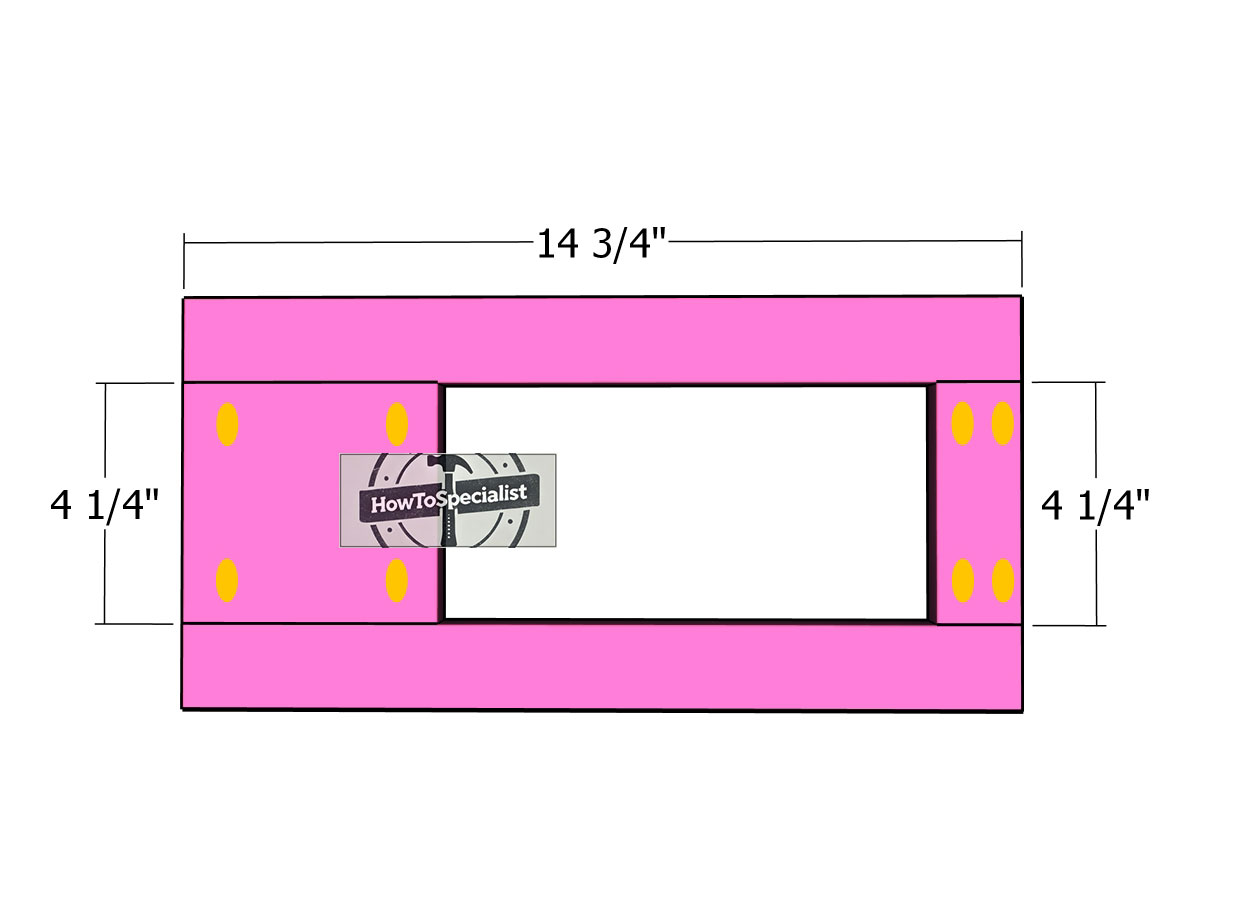
Microwave-door-frame
Use 1×2 boards to create the frame for the microwave door. Drill pocket holes into the boards and assemble the frame using wood glue and 1 1/4″ screws. Ensure the edges are aligned and the joints are secure, resulting in a strong and stable frame for the microwave door. This will complete the functional and decorative elements of the kitchen setup.
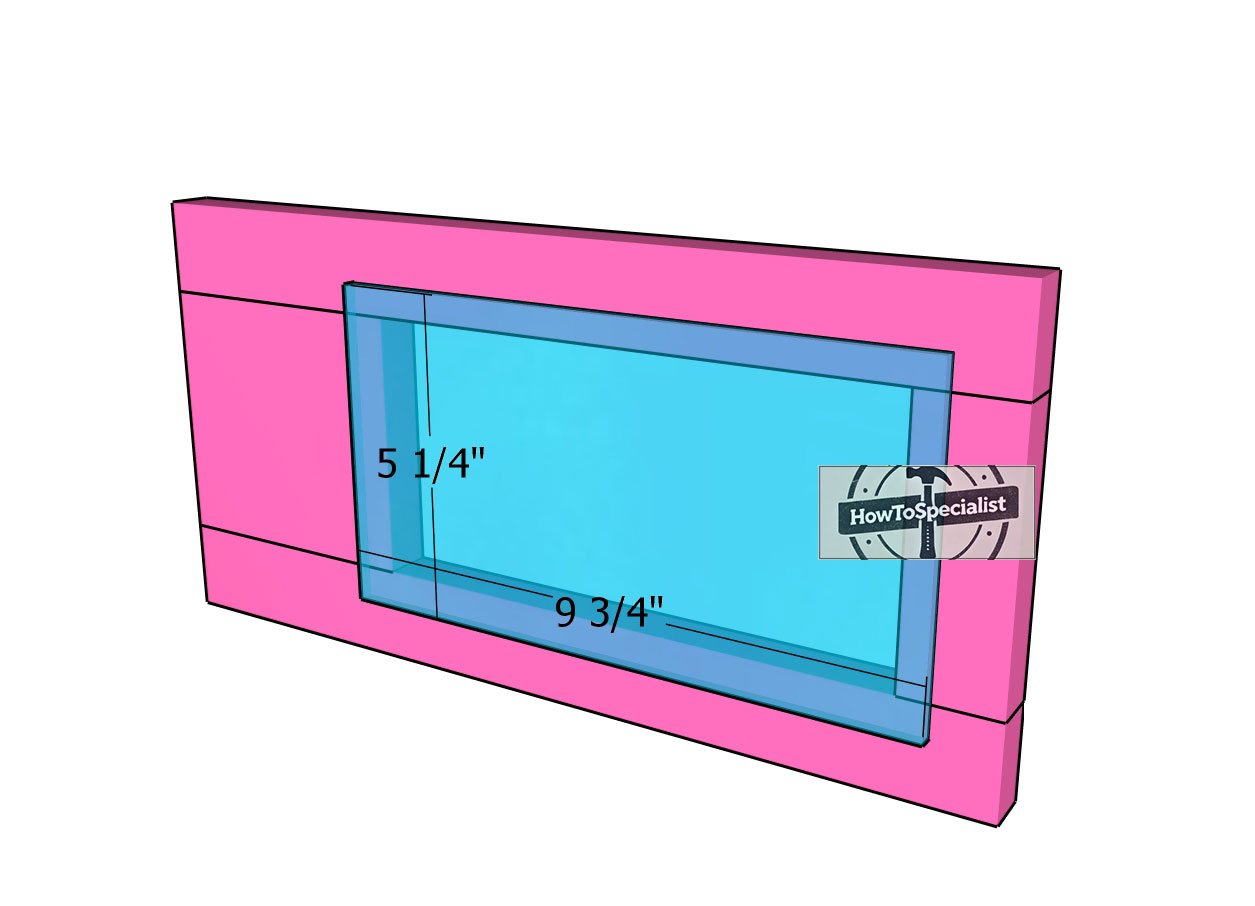
Oven-door-glass-panel
Attach the 1/8″ plexiglass panel to the microwave door frame using 3/4″ screws and glue. Make sure the plexiglass is aligned properly and securely fastened to provide a clean and sturdy finish. This step will give the door a functional window, adding to the overall aesthetic and usability of the kids’ kitchen.
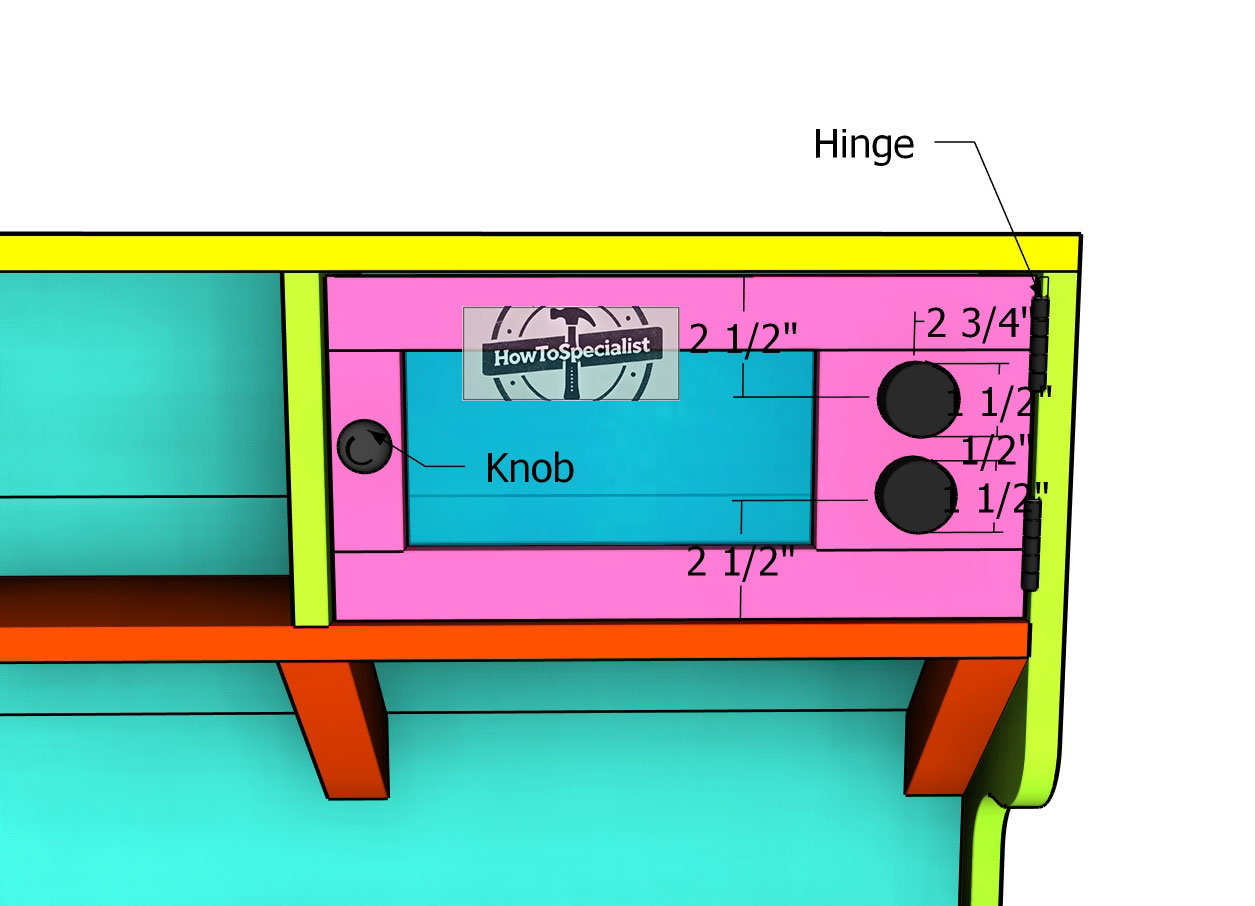
Fitting-the-microwave-door
Attach the knob to the microwave door, followed by the hinges and a magnetic door stop to keep it securely closed. For the faux buttons, cut small pieces from 3/4″ plywood and use glue and 1 1/4″ finish nails to fix them in place, giving the microwave a realistic touch. Now, the microwave area is complete, and your kids are ready to enjoy hours of creative play, cooking up their fantastic recipes in their new kitchen setup.
Finishing touches
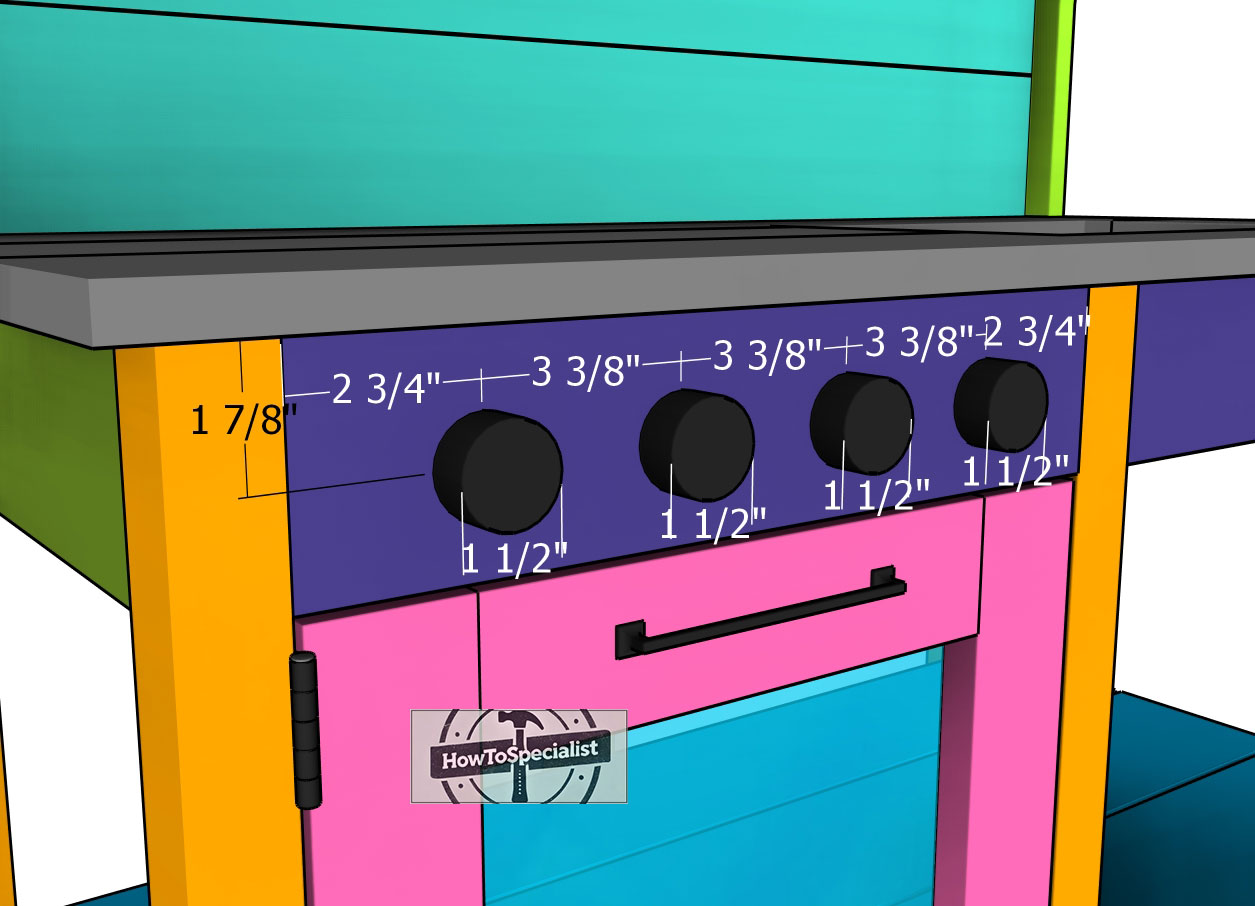
Oven-buttons
For the oven buttons, use 3/4″ plywood just like with the microwave. Secure the buttons using glue and 1 1/4″ screws to ensure they stay firmly in place. This final touch adds a realistic element to the oven, giving your kids a more interactive play experience as they cook up their imaginative dishes.
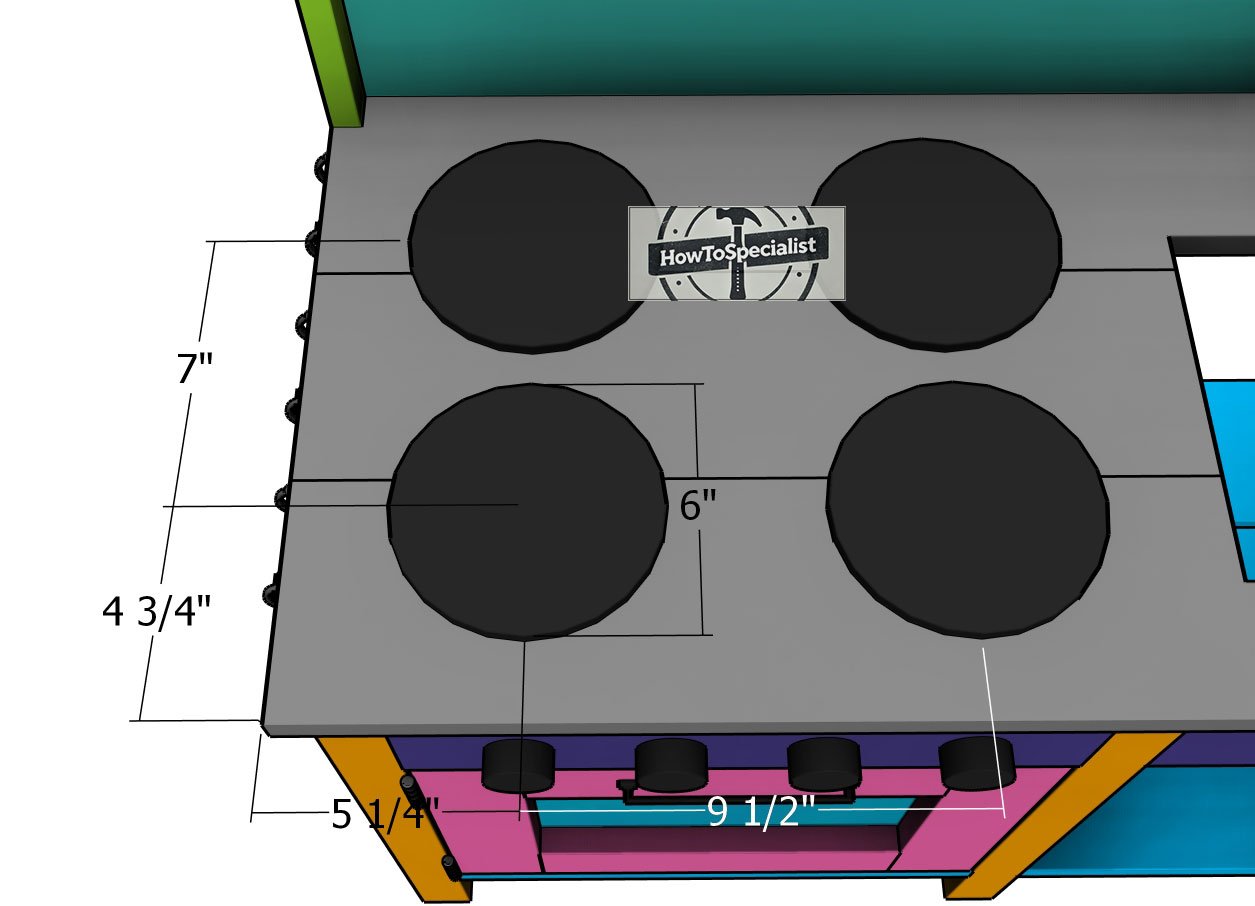
Fitting-the-stovetop-pieces
Make the stovetop pieces from 3/4″ plywood as well. Cut out circular shapes to mimic the burners, and secure them to the stovetop with glue and 1 1/4″ screws. This will add a fun and realistic feature to the kitchen, allowing your kids to pretend they’re cooking up a storm. The durable plywood ensures that the stovetop can handle plenty of playtime action.
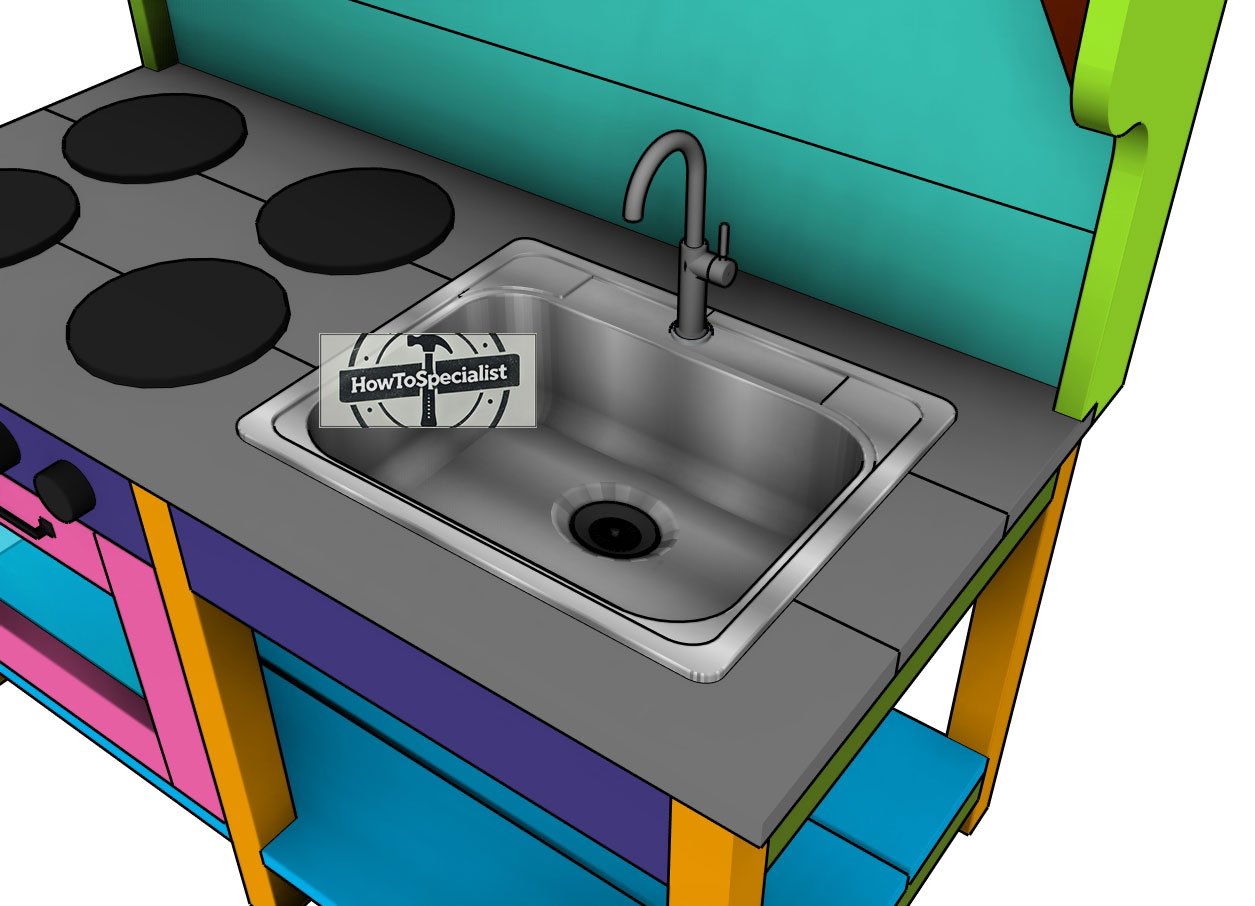
Fitting-the-sink
Now you can install the sink into place. Position it in the cutout hole on the countertop, ensuring it’s centered and fits snugly. Secure the sink by applying glue around the edges or using small screws if necessary to hold it firmly in place. Once installed, your kids’ kitchen will have a functional sink area, making their playtime experience even more interactive and enjoyable!
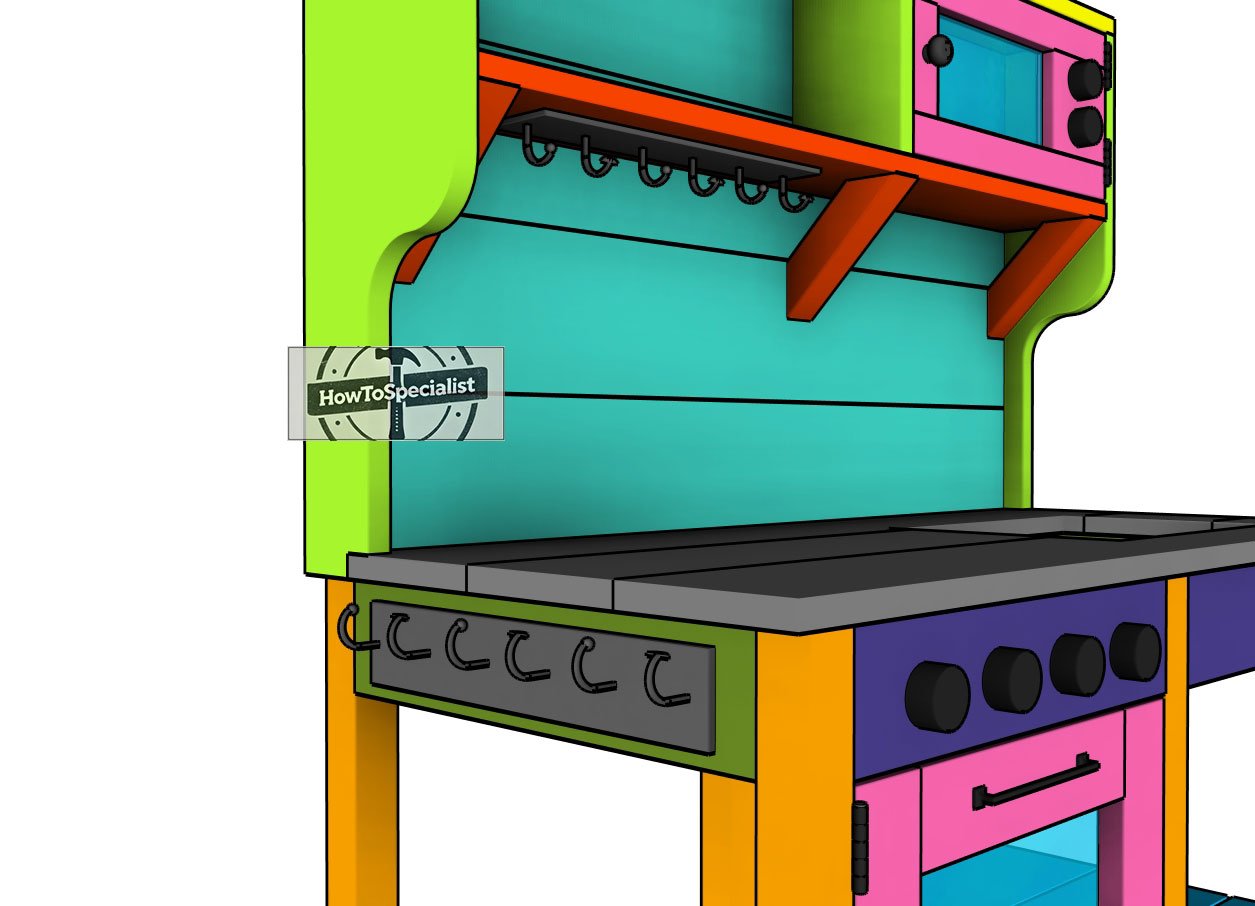
Fitting-the-hooks
Attach hooks to the sides of the kitchen to create convenient storage areas for pans, utensils, and other cooking accessories. Position the hooks at an easily reachable height for kids, ensuring they’re securely fastened with screws to handle the weight of the items. This will not only add a functional storage solution but also help keep the play area organized, enhancing the overall experience for your little chefs.
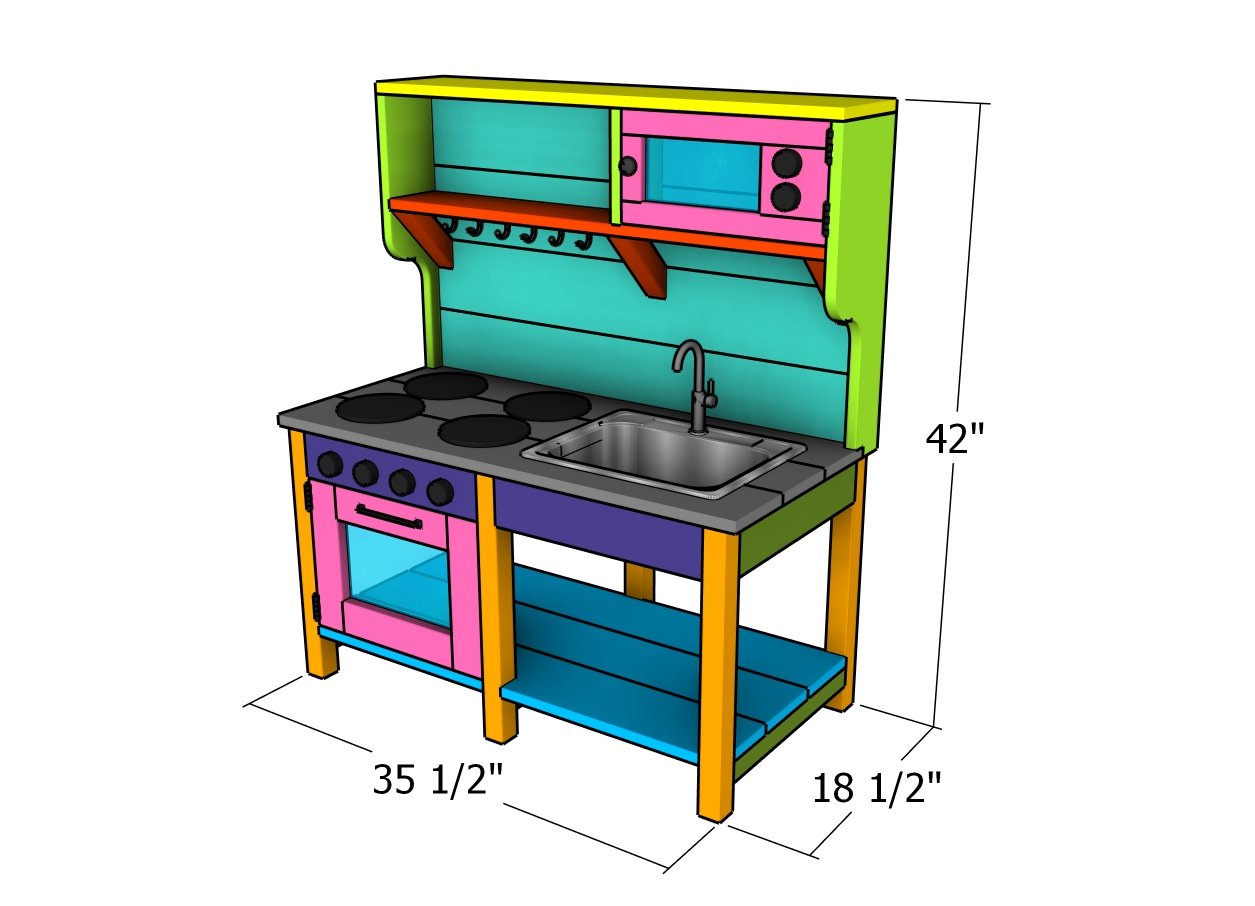
kids kitchen – dimensions
To give your kids’ mud kitchen a polished and durable finish, start by sanding down any rough edges on the wood to prevent splinters. Applying a weather-resistant paint or wood stain will protect the structure from the elements and extend its life, especially since it will be used outdoors. Choose bright, fun colors to make it more appealing for children.
This mud kitchen project aligns with Montessori philosophy by encouraging hands-on learning and creative, open-ended play. Children can engage their senses while exploring nature, enhancing their problem-solving skills and independence. The outdoor setting fosters a connection with the environment, supporting Montessori’s emphasis on experiential learning through natural materials and self-directed activity.
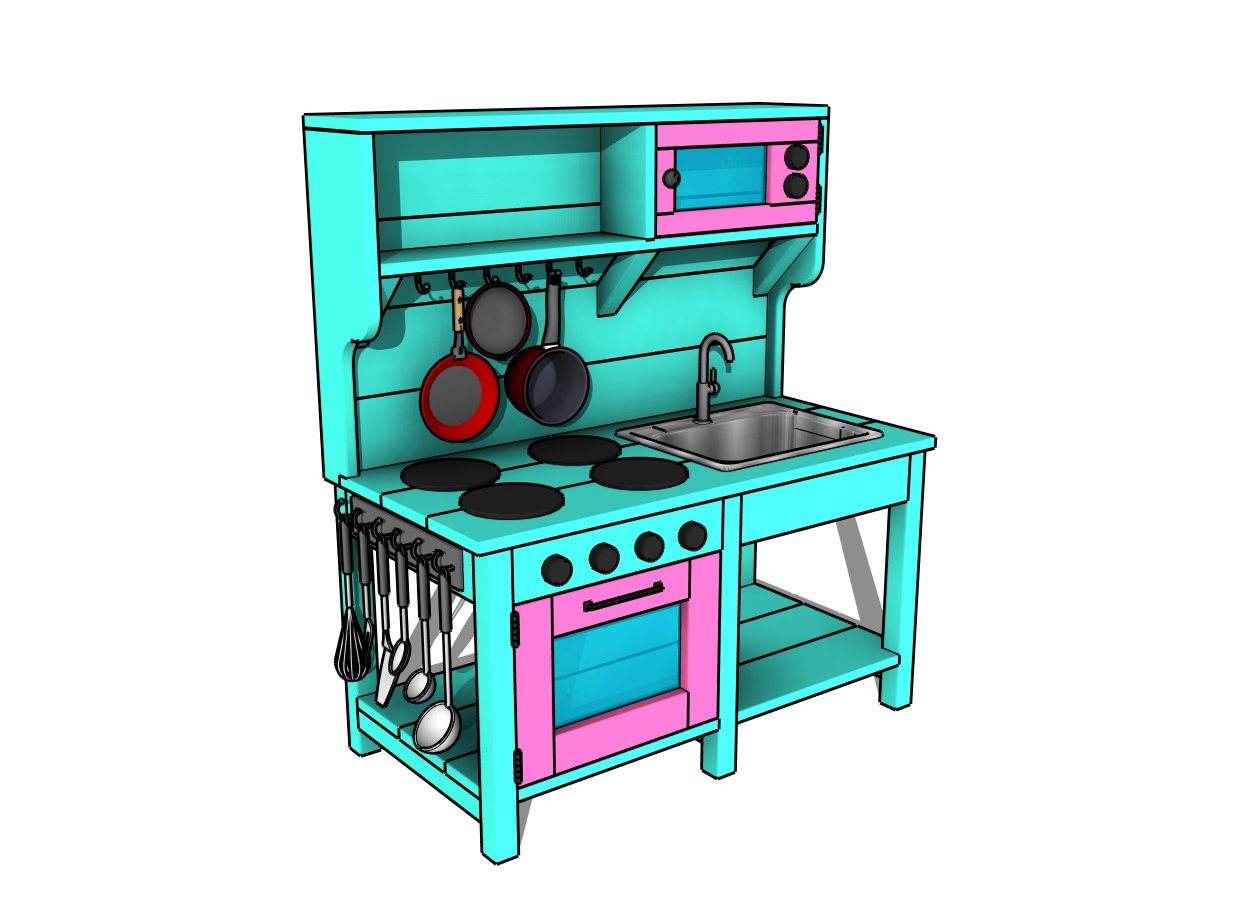
kids kitchen plans
Next, consider adding extra features like hooks for hanging utensils, shelves for storing pots and pans, or a chalkboard for creative play. You can even incorporate an old sink or plastic bins to create a space for water play. Personalize the kitchen by painting the kids’ names or fun kitchen-themed labels on drawers or storage areas.
Finally, make sure the mud kitchen is placed in a spot that allows for easy cleanup, such as near a hose or in a shaded area to protect it from too much direct sun exposure. These finishing touches will turn your simple mud kitchen into a long-lasting, engaging play area for your children to enjoy.
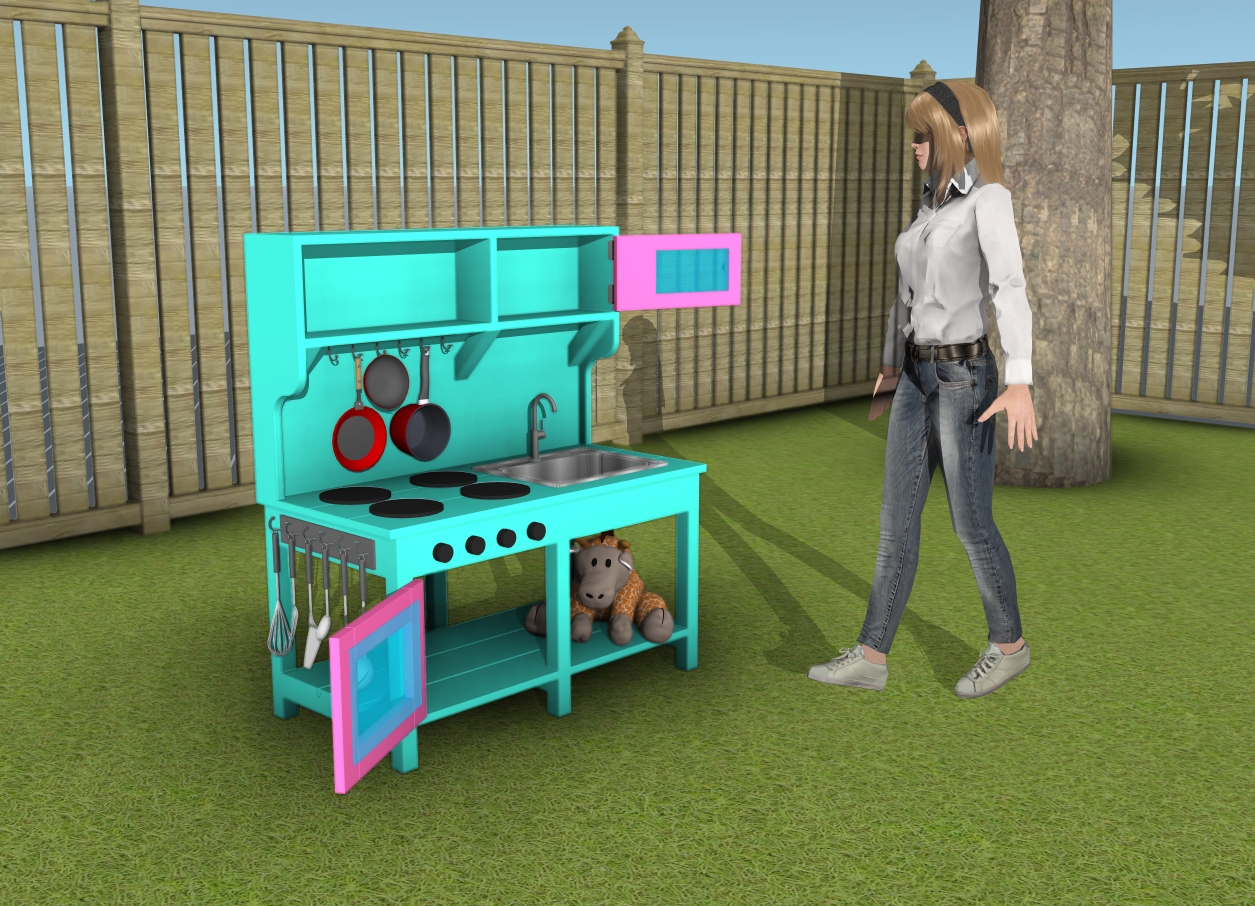
How to build a mud kitchen
Smart Tip: I can’t wait to see how you make it your own – don’t forget to share your finished projects with me! In addition, take a look over the rest of my shed plans HERE. Free plans for the corresponding Montessori chair HERE.

Thanks for checking out my mud kitchen table plans! Be sure to explore my other projects for more fantastic ideas. Don’t forget to hit the LIKE button and SHARE with your friends using the social media links below.