This step by step diy project is about free saddle stand stand. If you want to learn more about building a wooden saddle stand, pay attention to this project. This saddle stand can be used as a decorative piece, especially if you are into the farmhouse style. Make sure you smooth all the edges and apply a few coats of paint or stain to protect the components.
You should always plan everything from the very beginning, in order to prevent costly mistakes and to save time. In most of the cases, you need a friend to give you a hand when assembling the wood saddle stand. Invest in high quality lumber and plywood, as the components will be exposed to bad weather. Protect the components with appropriate paint or stain.
There are a few tips that you should take into account, if you want to get a professional result. Therefore, take accurate measurements and use professional tools when making the cuts or when drilling pilot holes. Align the components at both ends and add waterproof glue to the joints, if you want to create a rigid structure. See all my Premium Plans in the Shop.
Made from this plan
Free saddle stand plans
Building a saddle stand
Materials
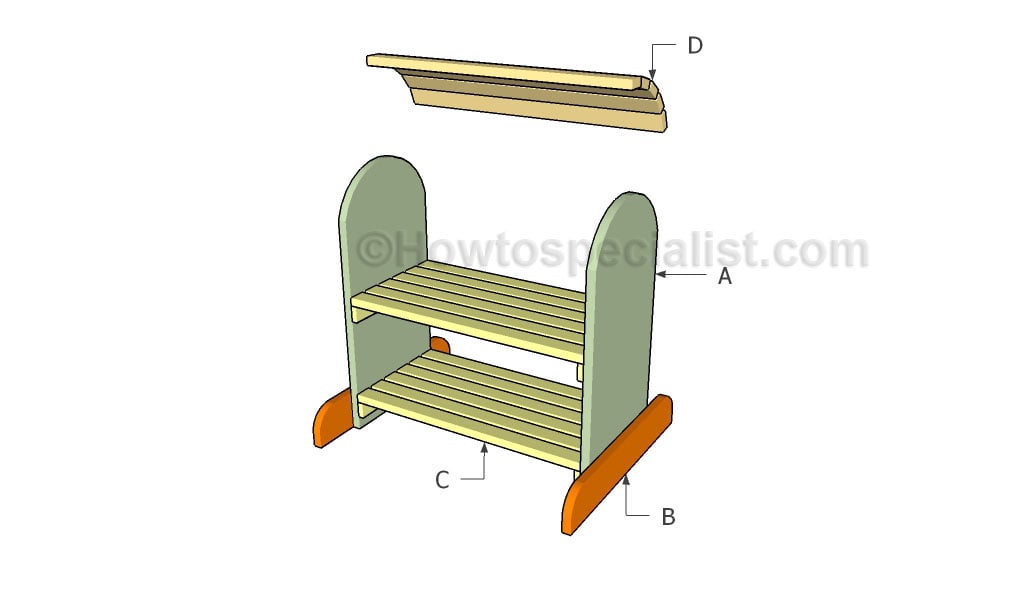
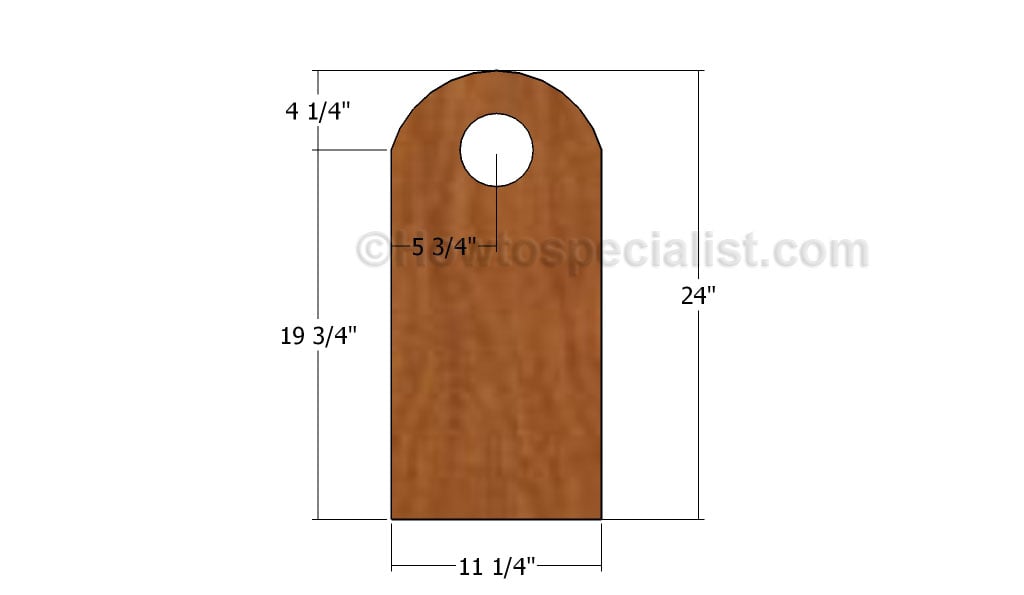
- A – 2 pieces of 1×12 lumber – 24″ long SIDES
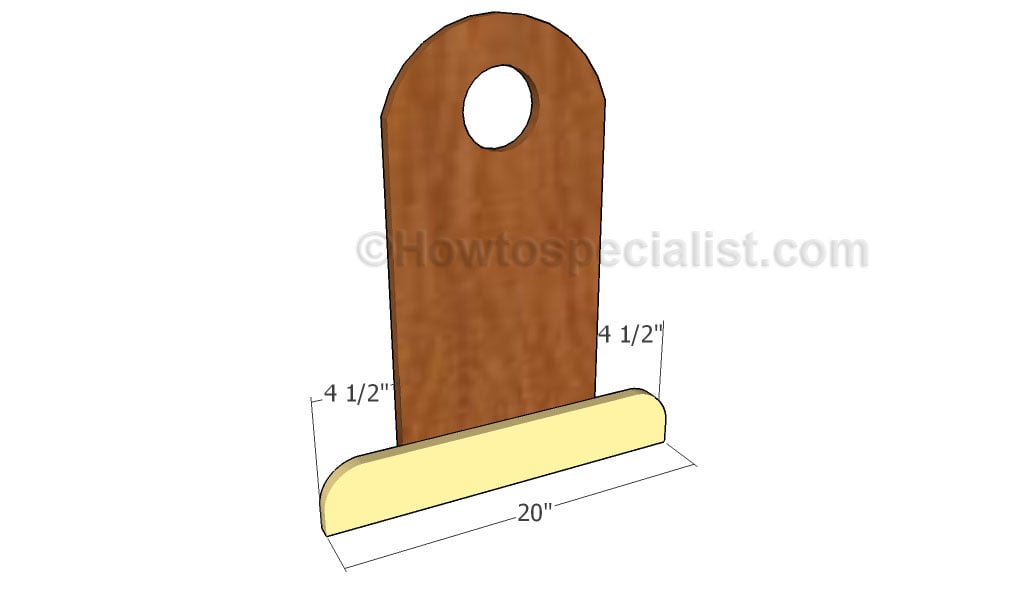
- B – 2 pieces of 1×4 lumber – 20″ long BASE
- C – 2 pieces of 1×2 lumber – 11 1/4″ long, 6 pieces – 22 1/2″ long 2xSHELF
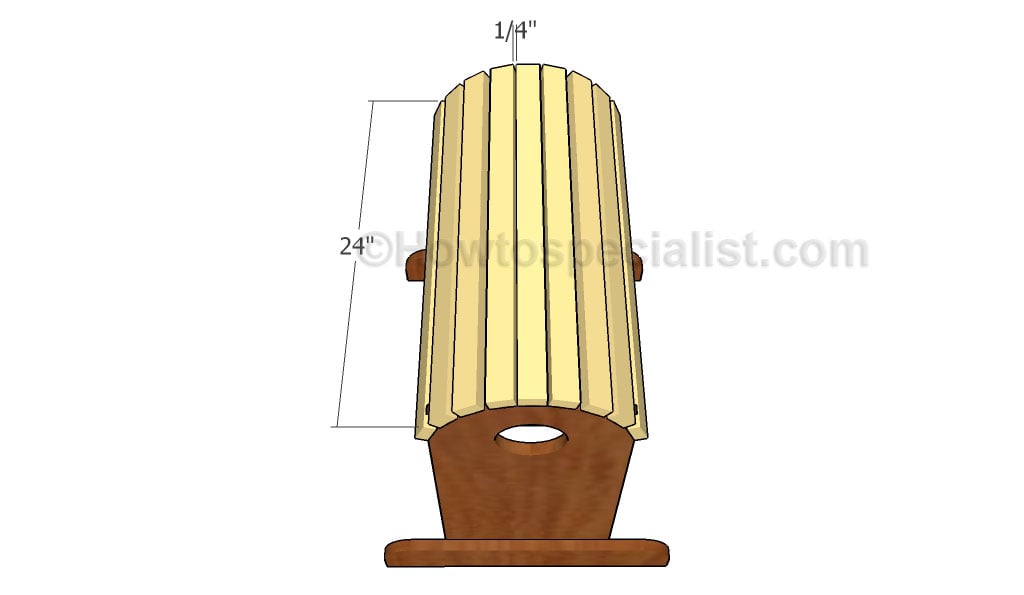
- D – 9 pieces of 1×2 lumber – 24″ long TOP
- 1 piece of 1×12 lumber – 4 ft
- 1 piece of 1×4 lumber – 4 ft
- 5 pieces of 1×2 lumber – 8 ft
- 2 1/2″ brad nails, 2 1/2″ screws, 1 5/8″ screws
- stain, glue, putty
Tools
- Safety gloves, glasses
- Miter saw, jigsaw
- Chalk line, tape measure, spirit level, carpentry pencil
- Drill machinery and drill bits
Tips
- Use a good miter saw to make the angle cuts
- Drill pilot holes before inserting the screws
Time
- One Day
Related
Building a wooden saddle stand
Building the sides
The first step of the project is to build the sides of the saddle stand. Use 1×12 lumber for the components. Mark the cut lines on the slats and get the job done with a jigsaw. Drill a starting holes and use a jigsaw to make a 3″ hole. Use sandpaper to smooth the edges or a router with a round bit.
Attaching the base supports
Continue the woodworking project by attaching the base components to the sides. Round the exposed edges of the supports. Attach the base to the sides and insert 1 1/4″ screws from the inside to mask the head of the screws. Drill pilot holes to prevent the wood from splitting. Add glue to the joints to enhance the rigidity of the structure.
Attaching the to slats
Continue the project by attaching the 1×2 slats to the top of the saddle stand. Use 1 1/4″ brad nails to lock the slats to the sides. Place the slats equally-spaced for a symmetrical result. Smooth the edges and remove the residues with a damp cloth.
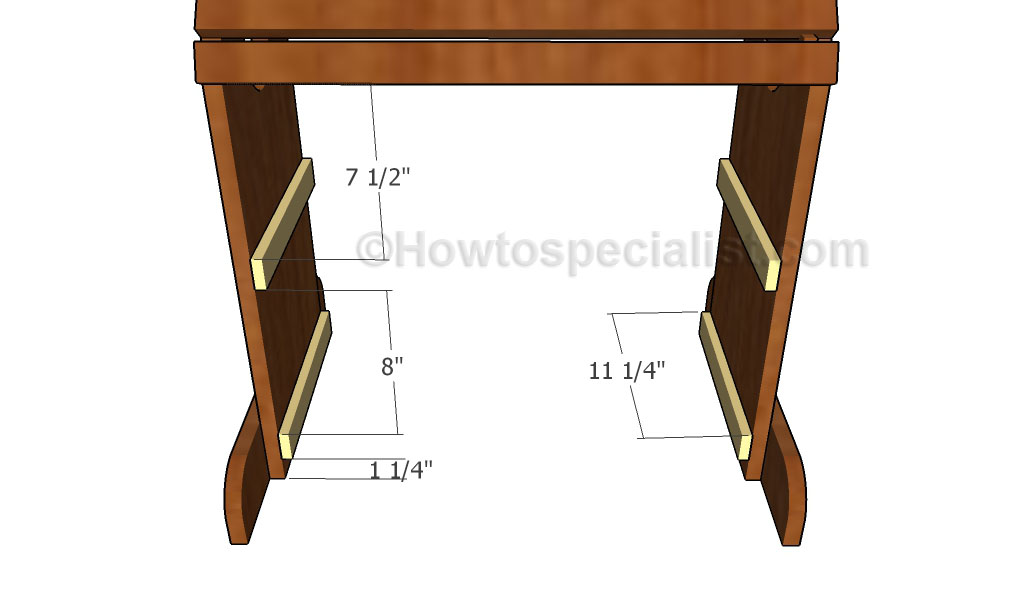
Attaching the cleats
Attach 1×2 cleats to the interior of the stand, in order to create some storage shelves. Use 1 1/4″ screws or brad nails to lock the cleats to the stand. Make sure the edges are aligned and horizontal. Add glue to the joints and remove the excess.
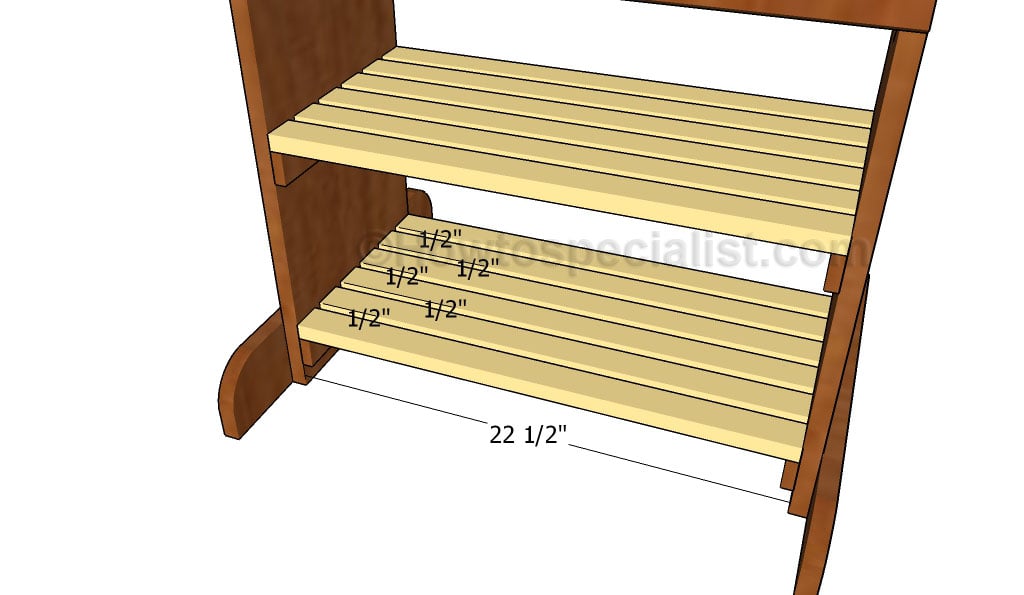
Fitting the shelf slats
One of the last steps of the project is to attach the 1×2 slats to the cleats, in order to create the storage shelves. Use 1 1/4″ brad nails to lock the slats to the cleats. Place the slats equally-spaced, leaving 1/2″ between them.

Last but not least, we recommend you to take care of the finishing touches. In order to get a professional result, fill the holes and the gaps with wood filler and let it dry out for a few hours. Check if there are protruding screws and fix this issue, if necessary.
Thank you for reading our project about saddle stand plans and we recommend you to check out the rest of the projects. Don’t forget to SHARE and LIKE our projects with your friends, by using the social media widgets, if you want to help us keep adding free woodworking plans.
7 comments
Hi, nice saddle stand plans. I did, however, find it a bit long w at 24 3/4″, (my stirrups were laying out flat on the floor)so made mine a bit taller. Overall, very nice.
Thanks!
Reo
Fiddlestix! Meant it to say “a bit short” not “a bit long”…fat fingers, small keyboard…..
Reo
Congrats for the project! I would love to see how it came out. If you want to have the projects featured, please sent the images at: http://howtospecialist.com/give-back/
Hi – great plans sent them to a guy to build me a stand that will display my grandfathers saddle. However 24″ is way way way too short for any western saddle. He built it exactly as your plan states and charged me quite a bit and it doesn’t work for me. Please change your plans as 24″ would maybe be OK for a child’s saddle – but definitely not an adult western saddle.
it does state, this is a DECORATIVE DIY Saddle Stand… That being said, there is no reason, it can/t be made taller, without much more effort, just a little more plywood is all.
Made mine with and it turned out great 👍 Thanks for the plans.
Good morning.
Could you supply the measurements when the stand is made taller at 36 inches?
I am a novice and want to make it right the first time and need help.
Thank you.
Will send you pics when I finish.
Thank you in advance